The Pioneer Woman Tasty Kitchen
Profile photo of callimakesdo

Candied Jalapeños (Cowboy Candy)

Posted by in Step-by-Step Recipes

Tasty Kitchen Blog: Candied Jalapenos Cowboy Candy. Guest post by Calli Taylor of Make It Do, recipe submitted by TK member Rebecca of Foodie with Family.

 
Every year my spice-lovin’ husband plants WAY too many hot peppers in our vegetable garden. He can’t help himself, I suppose, but our family can only eat so much salsa and Chile Verde.

This year, rather than letting our delicious crop of jalapeños go to waste, I searched Tasty Kitchen for new recipes and could hardly believe my luck when I came across a recipe for Candied Jalapeños (Cowboy Candy) from TK member Rebecca.

Canned jalapeños? Yes please! What could be better than enjoying the fruit of our summer labor on a cold day in February?

After making a batch of Rebecca’s Candied Jalapeños, I know one thing for sure: there is no way I’ve canned enough jars to make it till February.

You may be wondering what Candied Jalapeños taste like. It’s a wonderful mix of sweet and heat. I made my first batch with the seeds and membranes included and it was SPICY! The tangy, savory sweet flavor of the syrup knocked my socks off. In short, Cowboy Candy is delicious and totally addicting.

I’ll be making another batch for my family this week, and one to give as gifts for the holidays. This time around I’ll remove the seeds and membranes (which is where most of the spicy heat is found), so the rest of my family can enjoy their treat without watery eyes and runny noses.

Here’s how to make Cowboy Candy.


Tasty Kitchen Blog: Candied Jalapenos Cowboy Candy. Guest post by Calli Taylor of Make It Do, recipe submitted by TK member Rebecca of Foodie with Family.

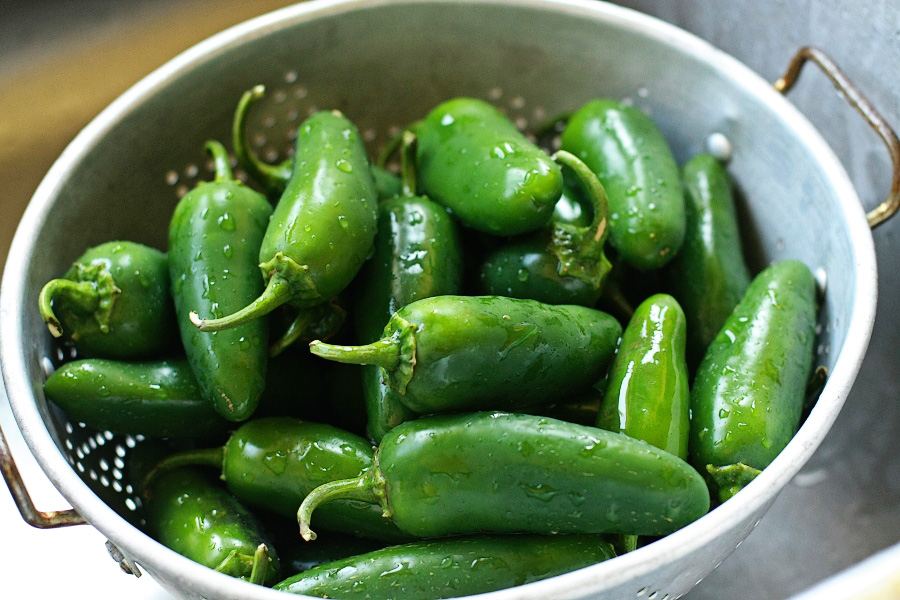
Start with fresh, firm jalapeños. As with any canning recipe, the quality of your vegetable (or fruit) is very important.


Tasty Kitchen Blog: Candied Jalapenos Cowboy Candy. Guest post by Calli Taylor of Make It Do, recipe submitted by TK member Rebecca of Foodie with Family.

Remove the stems from your peppers. Yes, I’m wearing gloves, which might seem a bit cautious. But try inadvertently rubbing your eye after chopping a quantity of spicy peppers, and you’ll opt for gloves too.

This would be a good time to core out the seeds and membrane if you like a milder flavor.


Tasty Kitchen Blog: Candied Jalapenos Cowboy Candy. Guest post by Calli Taylor of Make It Do, recipe submitted by TK member Rebecca of Foodie with Family.

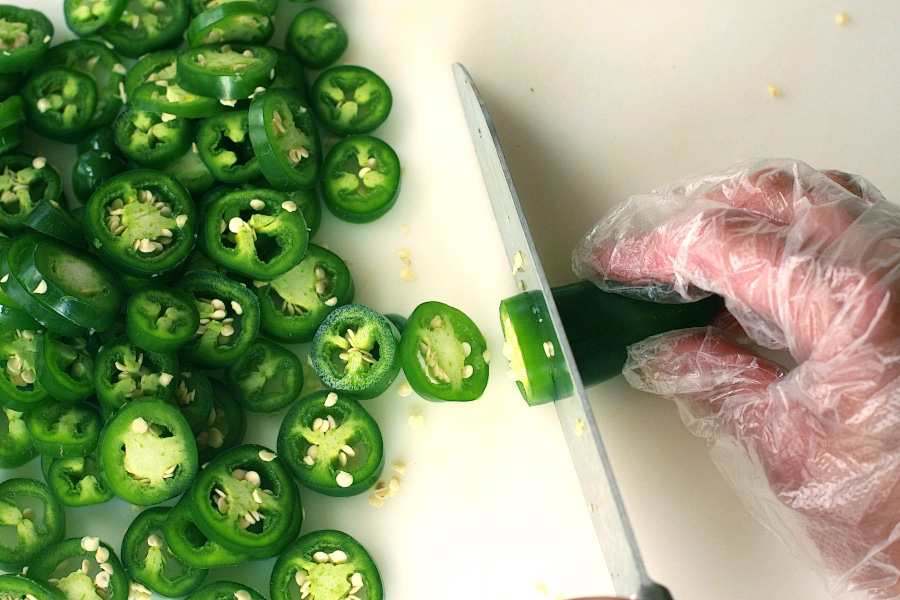
Slice the peppers into 1/8 to 1/4 inch slices.


Tasty Kitchen Blog: Candied Jalapenos Cowboy Candy. Guest post by Calli Taylor of Make It Do, recipe submitted by TK member Rebecca of Foodie with Family.

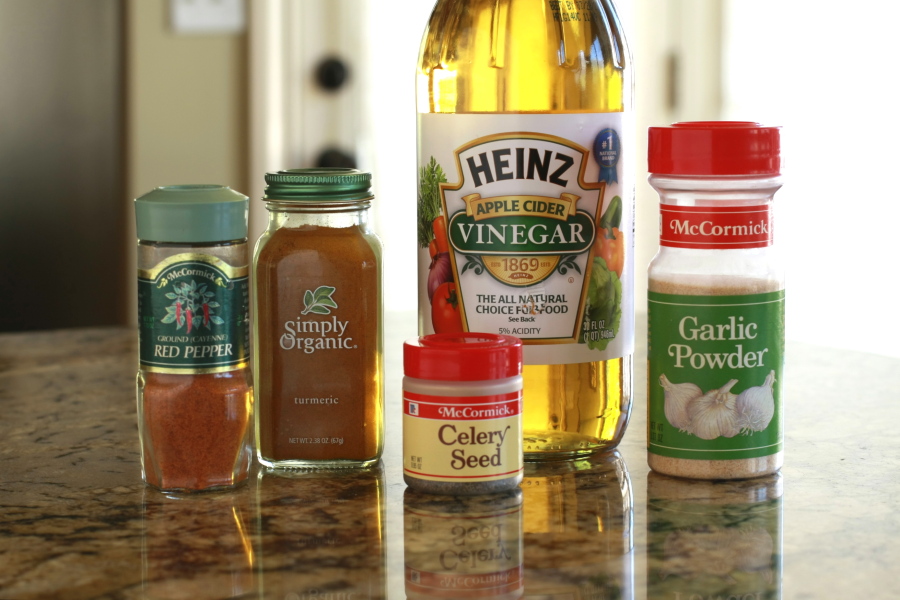
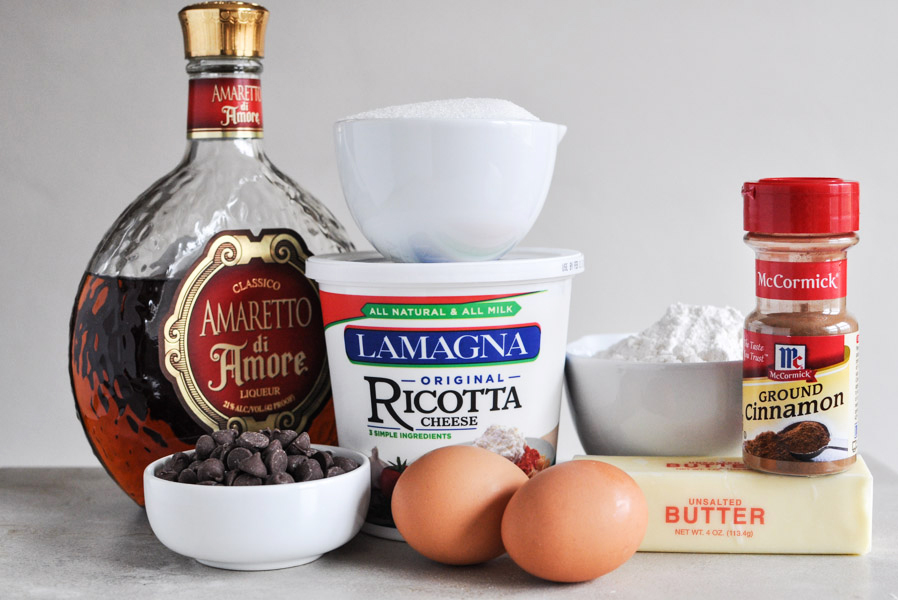
Beyond the obvious jalapeños, the ingredients are sugar, cider vinegar, turmeric, celery seed, ground cayenne pepper and granulated garlic. I live in a smaller community and couldn’t find granulated garlic. I chose powdered garlic at half the measurement (1-1/2 teaspoons) as a substitute, since powered is much finer than granulated. Powdered garlic was easy and worked great for me. After reading the comments on Rebecca’s blog, I discovered that she recommends one clove of garlic per 1/4 teaspoon of granulated, if you have trouble finding granulated like I did.


Tasty Kitchen Blog: Candied Jalapenos Cowboy Candy. Guest post by Calli Taylor of Make It Do, recipe submitted by TK member Rebecca of Foodie with Family.

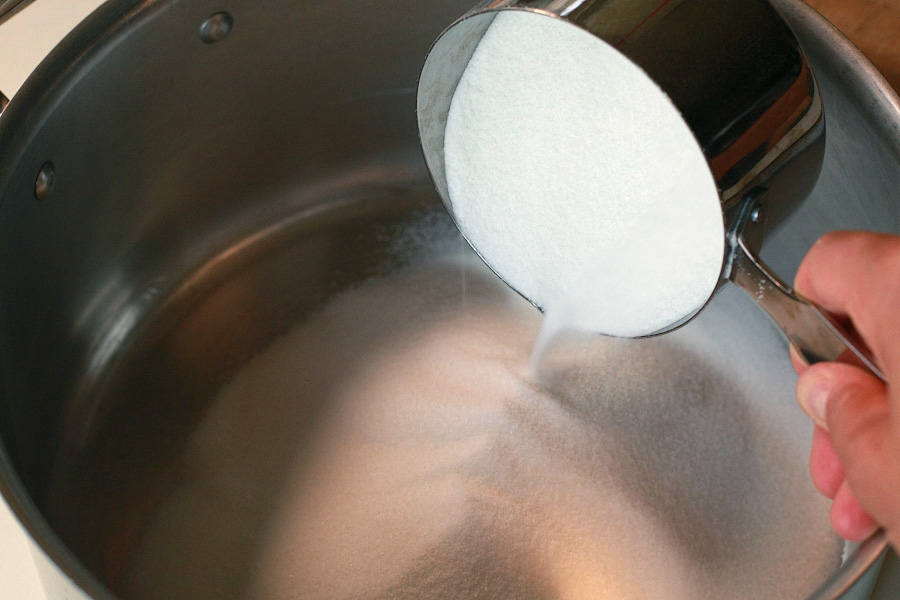
Pour 6 cups of white granulated sugar into a large pot.


Tasty Kitchen Blog: Candied Jalapenos Cowboy Candy. Guest post by Calli Taylor of Make It Do, recipe submitted by TK member Rebecca of Foodie with Family.

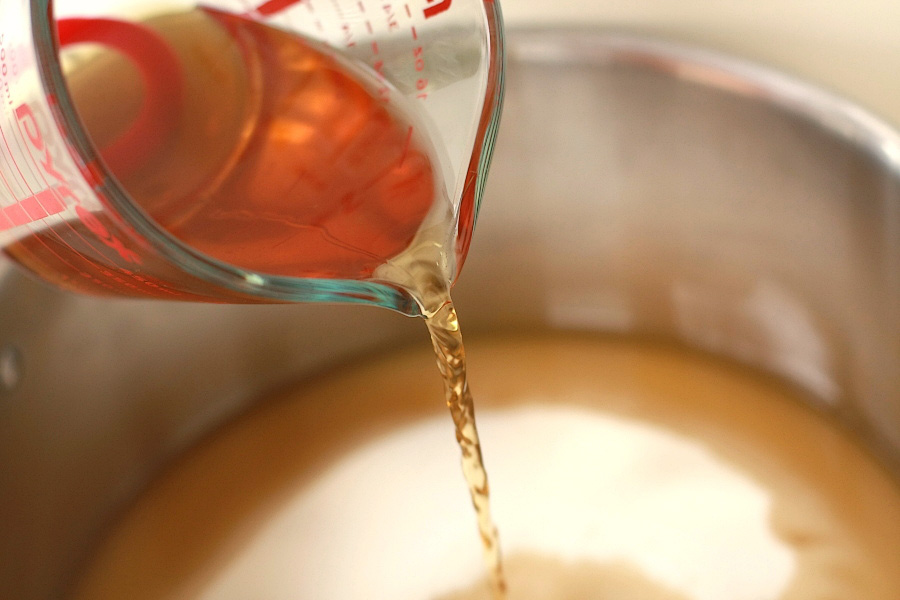
Add the vinegar and spices.


Tasty Kitchen Blog: Candied Jalapenos Cowboy Candy. Guest post by Calli Taylor of Make It Do, recipe submitted by TK member Rebecca of Foodie with Family.

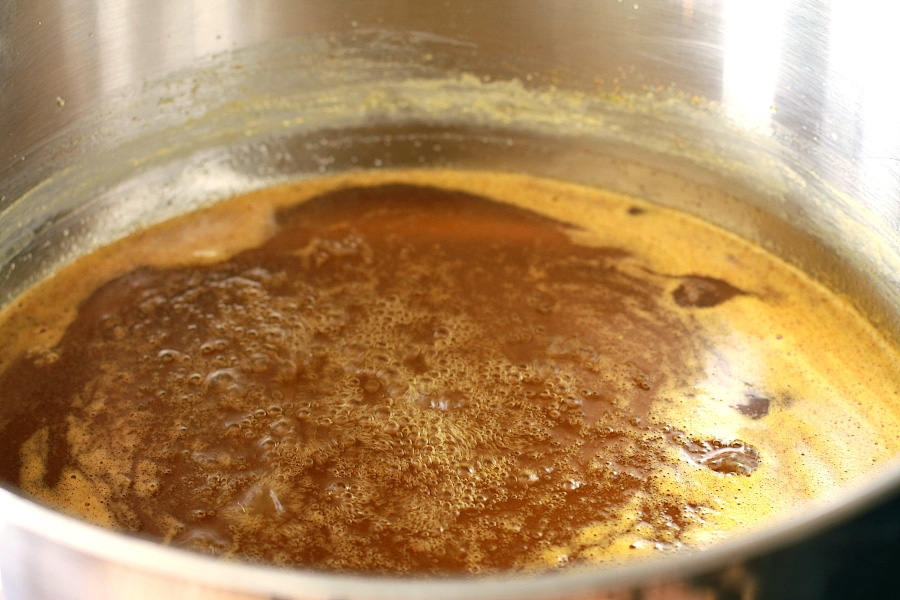
Bring to a boil. Reduce the heat and simmer for 5 minutes.


Tasty Kitchen Blog: Candied Jalapenos Cowboy Candy. Guest post by Calli Taylor of Make It Do, recipe submitted by TK member Rebecca of Foodie with Family.

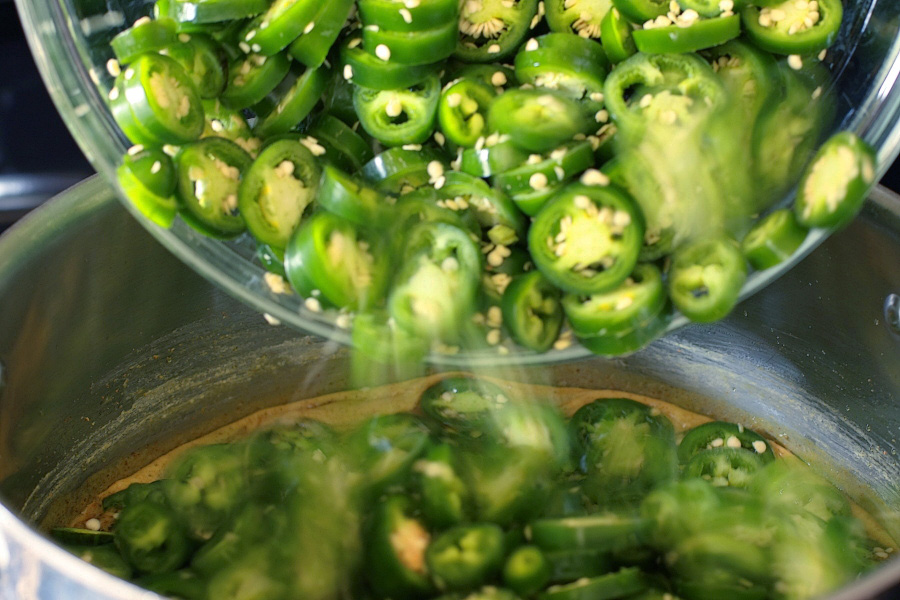
Add the peppers and simmer for exactly 4 minutes. Remove from the heat. Some of the slices looked more cooked than others, but that’s okay.


Tasty Kitchen Blog: Candied Jalapenos Cowboy Candy. Guest post by Calli Taylor of Make It Do, recipe submitted by TK member Rebecca of Foodie with Family.

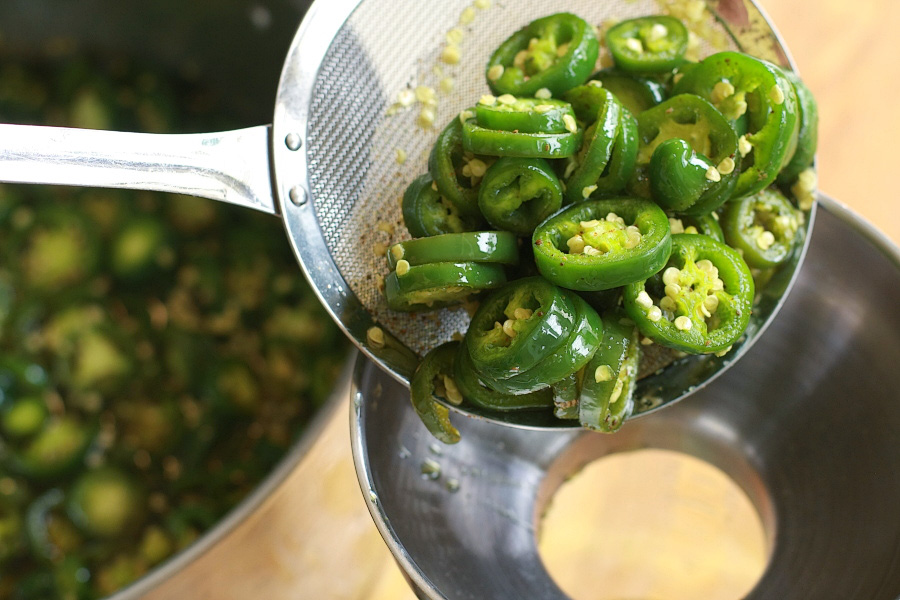
Using a slotted spoon or mesh skimmer, transfer the peppers into clean, sterile, hot canning jars. Fill to within 1/4 inch from the rim of the jar. You can use half pint or if you have big eaters, go for pint jars. Knowing my husband, I opted for pints and yielded 4 jars.


Tasty Kitchen Blog: Candied Jalapenos Cowboy Candy. Guest post by Calli Taylor of Make It Do, recipe submitted by TK member Rebecca of Foodie with Family.

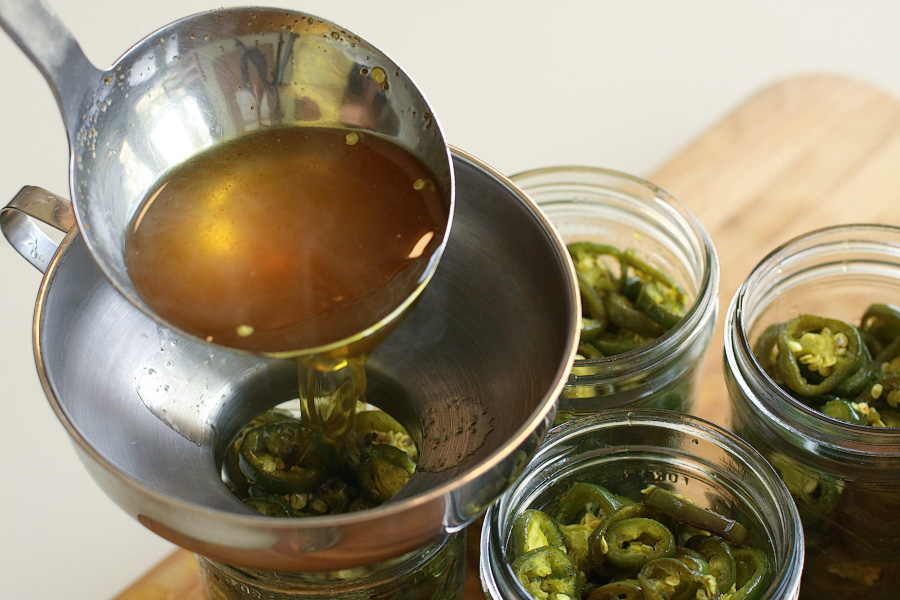
Return the syrup to the stove, turn up the heat and bring back to a full rolling boil. Boil hard for 6 minutes.

Use a ladle to pour the boiling syrup over the jalapeños.


Tasty Kitchen Blog: Candied Jalapenos Cowboy Candy. Guest post by Calli Taylor of Make It Do, recipe submitted by TK member Rebecca of Foodie with Family.

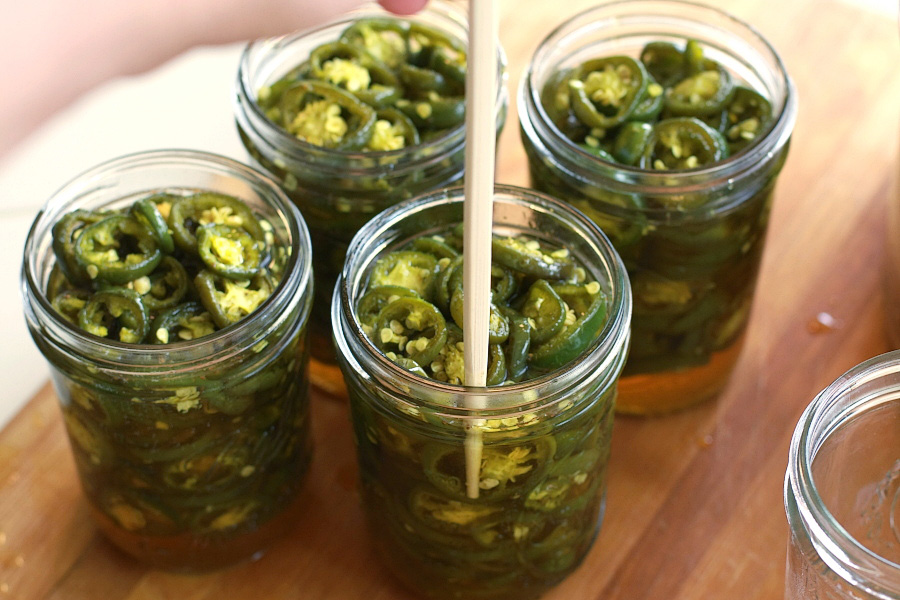
Insert a clean, sterile chopstick to the bottom of the jar several times to release any trapped air. Add or remove syrup if necessary to leave 1/4 inch head space.


Tasty Kitchen Blog: Candied Jalapenos Cowboy Candy. Guest post by Calli Taylor of Make It Do, recipe submitted by TK member Rebecca of Foodie with Family.

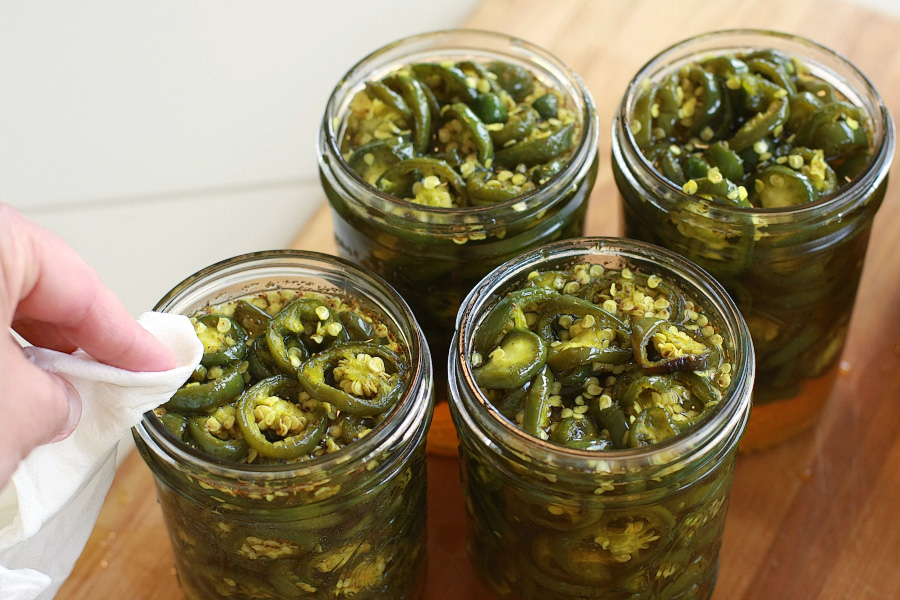
Wipe the rims of the jars using a clean, damp paper towel to remove any stickiness. A clean rim is important for a good seal.


Tasty Kitchen Blog: Candied Jalapenos Cowboy Candy. Guest post by Calli Taylor of Make It Do, recipe submitted by TK member Rebecca of Foodie with Family.

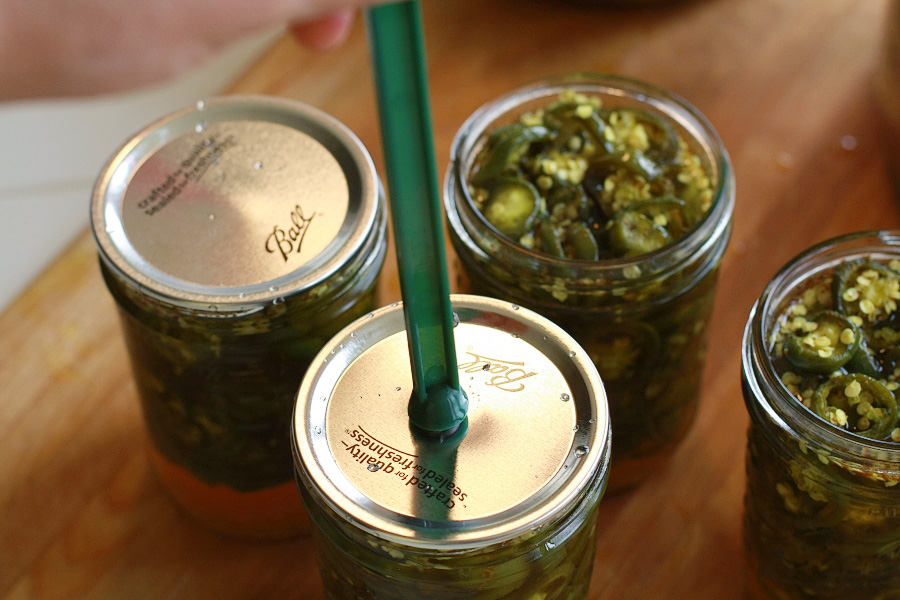
Fix on new two-piece lids to fingertip tightness.

Rebecca included recommended canning times on the recipe: 10 minutes for 1/2 pint and 15 minutes for pint jars. However, I live in the Rocky Mountains at almost 5000 feet, so I made a quick call to my local State Extension service for canning times at my altitude. The canning times vary depending on where you live, so I highly recommend making the same phone call to find the right time for you. I processed my pint jars for 25 minutes.

Add your cans to your canner with two inches of water over the tops of the lid. Start timing only after your water has come to a full boil.


Tasty Kitchen Blog: Candied Jalapenos Cowboy Candy. Guest post by Calli Taylor of Make It Do, recipe submitted by TK member Rebecca of Foodie with Family.

Rebecca recommends waiting about 2 weeks before eating your jalapenos, for best flavor. This turned out to be a tall order for our house and my husband broke into a jar in less than a week.

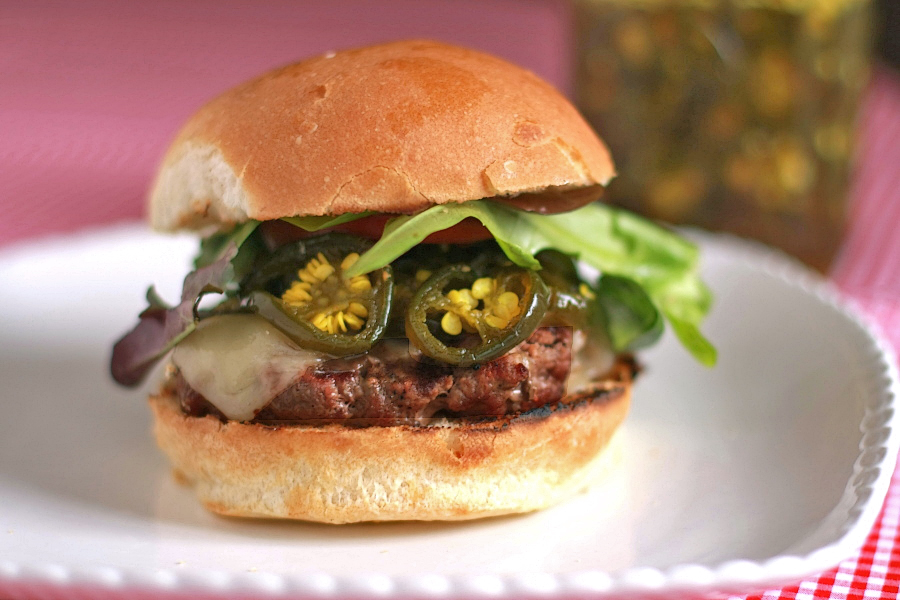
Already we’ve enjoyed them on burgers with jack cheese and on turkey sandwiches.


Tasty Kitchen Blog: Candied Jalapenos Cowboy Candy. Guest post by Calli Taylor of Make It Do, recipe submitted by TK member Rebecca of Foodie with Family.

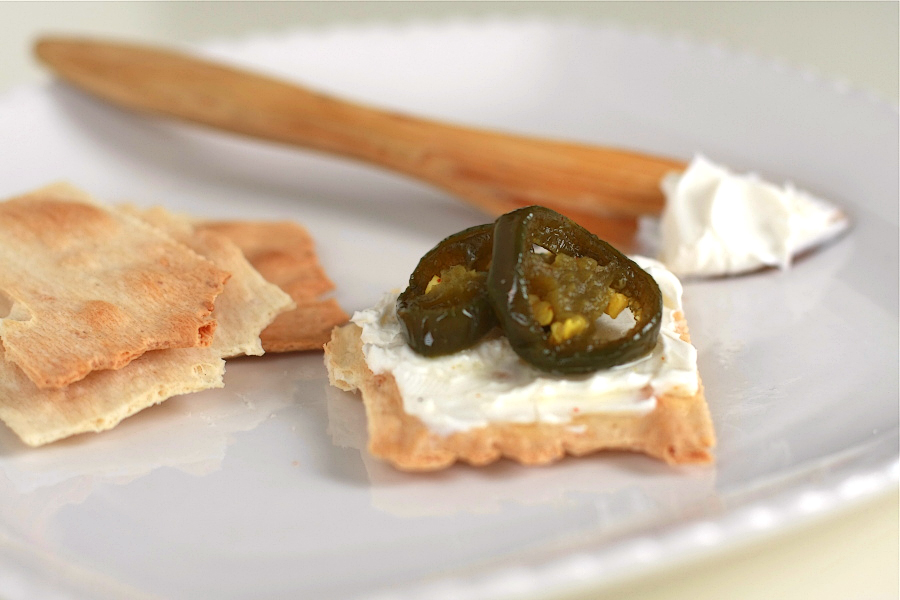
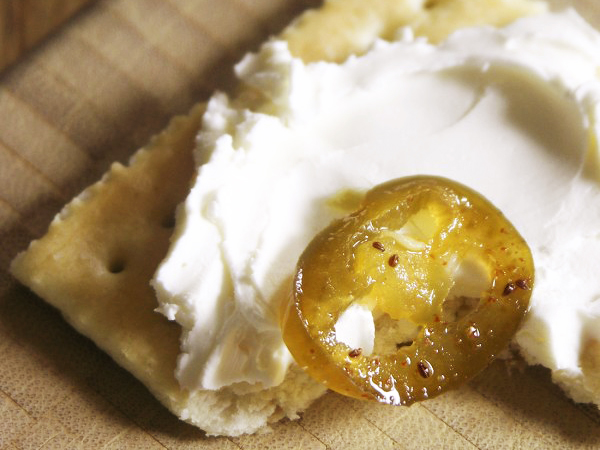
We’ve also loved them as an appetizer on crackers with cream cheese. I get the feeling we’ve just begun finding ways to enjoy this spicy treat.

Just be sure to spoon some of the syrup onto whatever you are eating! It is the star of the show.

Thank you Rebecca for sharing Cowboy Candy with us. You are truly a genius in the kitchen.

Be sure to check out Rebecca’s Tasty Kitchen recipe box for more of her delicious recipes. You’ll also love her blog Foodie with Family.


Printable Recipe

Candied Jalapenos (Cowboy Candy)

See post on Rebecca’s site!
4.97 Mitt(s) 34 Rating(s)34 votes, average: 4.97 out of 534 votes, average: 4.97 out of 534 votes, average: 4.97 out of 534 votes, average: 4.97 out of 534 votes, average: 4.97 out of 5

Prep Time:

Cook Time:

Difficulty: Intermediate

Servings: 36

36
x

Print Options

Page size Letter 3x5 4x6
Text Size Small Medium Large
Content Include description
Include prep time, etc.
Show image

Description

These little beauties are so addictive: sweet, spicy, and tangy. Once you start eating these, you’ll find all sorts of places to stash them—sandwiches, potato salad, grilled meat, and pasta, just to name a few.

Ingredients

  • 3 pounds Firm, Fresh Jalapeno Peppers, Washed
  • 2 cups Cider Vinegar
  • 6 cups White Granulated Sugar
  • ½ teaspoons Turmeric
  • ½ teaspoons Celery Seed
  • 3 teaspoons Granulated Garlic
  • 1 teaspoon Ground Cayenne Pepper

Preparation Instructions

Wearing gloves, remove the stems from all of the jalapeno peppers. The easiest way to do this is to slice a small disc off of the stem-end along with the stem. Discard the stems.

Slice the peppers into uniform 1/8-1/4 inch rounds. Set aside.

In a large pot, bring cider vinegar, white sugar, turmeric, celery seed, granulated garlic and cayenne pepper to a boil. Reduce heat and simmer for 5 minutes. Add the pepper slices and simmer for exactly 4 minutes. Use a slotted spoon to transfer the peppers, loading into clean, sterile canning jars to within 1/4 inch of the upper rim of the jar. Turn heat up under the pot with the syrup and bring to a full rolling boil. Boil hard for 6 minutes.

Use a ladle to pour the boiling syrup into the jars over the jalapeno slices. Insert a cooking chopstick to the bottom of the jar two or three times to release any trapped pockets of air. Adjust the level of the syrup if necessary. Wipe the rims of the jars with a clean, damp paper towel and fix on new, two-piece lids to finger-tip tightness.

If you do not want to can these to the point of shelf stable, you can simply put the jars in your refrigerator and store them there. I prefer to keep the fridge space free so I can them. If you wish to can them, follow the instructions below.

Note: If you have leftover syrup, and it is likely that you will, you may can it in half-pint or pint jars, too. It’s wonderful brushed on meat on the grill or added to potato salad or, or, or … in short, don’t toss it out!

To can, place jars in a canner and cover with water by 2-inches. Bring the water to a full rolling boil. When it reaches a full rolling boil, set the timer for 10 minutes for half-pints or 15 minutes for pints. When timer goes off, use canning tongs to transfer the jars to a cooling rack. Leave them to cool, undisturbed, for 24 hours. When fully cooled, wipe them with a clean, damp washcloth, then label.

Allow to mellow for at least two weeks, but preferably a month before eating. Or don’t. I won’t tell!


_______________________________________

Calli is truly a woman of many talents, from cooking, sewing, crafts, beautiful photography and gardening. Her blog, Make it Do is a treasure trove of recipes, household tips, crafts projects, sewing patterns … you name it. It’s also peppered with photos of her beautiful kids. Go visit her site, and visit it often. There’s always something new to learn there!


Profile photo of HowSweetEats

Cannoli Tart

Posted by in Baking, Step-by-Step Recipes

Tasty Kitchen Blog: Cannoli Tart. Guest post by Jessica Merchant of How Sweet It Is, recipe submitted by TK member The Seaside Baker.

 
Oh my goodness. You know when you have one of those desserts that completely knocks your socks off? This is it. And it’s simple, too. It’s like the new Holy Grail of treats!

It’s not very often that I get to bake with ricotta because my husband swears that he dislikes it. Even though—of course—he’s eaten it in multiple dishes and I’ve watched him enjoy a full meal where ricotta is involved, but whatever. I can occasionally slip in a tablespoon or so here and there without him noticing, but an entire dessert made from the stuff? This would be tricky.

However, tricky as it was, it actually worked. After seeing this Cannoli Tart from The Seaside Baker, I knew I had to make it immediately. And immediately I did—like nearly one day later. Not only did it pass my sweet tooth test with flying colors, the ricotta-hater loved it too. You know what that means. You must must must try it!


Tasty Kitchen Blog: Cannoli Tart. Guest post by Jessica Merchant of How Sweet It Is, recipe submitted by TK member The Seaside Baker.

For the crust and the tart filling, all you need is some amaretto, ricotta cheese, eggs, cold butter, flour, sugar, cinnamon, salt and chocolate chips. Oh, you also need a little milk. About one tablespoon. This is, like, the easiest dessert ever!


Tasty Kitchen Blog: Cannoli Tart. Guest post by Jessica Merchant of How Sweet It Is, recipe submitted by TK member The Seaside Baker.

Begin by making the crust. First, give the flour, sugar, salt and cinnamon a good whirl in your food processor.


Tasty Kitchen Blog: Cannoli Tart. Guest post by Jessica Merchant of How Sweet It Is, recipe submitted by TK member The Seaside Baker.

Then add the cold butter and pulse until it forms little crumbs. Can you see the slight difference here from the picture above? There are some pea-sized, flour-coated butter chunks! Yum.


Tasty Kitchen Blog: Cannoli Tart. Guest post by Jessica Merchant of How Sweet It Is, recipe submitted by TK member The Seaside Baker.

Add the egg and milk, then process until the dough comes together …


Tasty Kitchen Blog: Cannoli Tart. Guest post by Jessica Merchant of How Sweet It Is, recipe submitted by TK member The Seaside Baker.

… and forms a ball like so. Pretty cool, huh? If there are a few crumbs left, just press them into the dough ball with your hands.


Tasty Kitchen Blog: Cannoli Tart. Guest post by Jessica Merchant of How Sweet It Is, recipe submitted by TK member The Seaside Baker.

Next, place the dough ball between two sheets of parchment paper. I actually used wax paper because I never seem to have parchment when I need it. Also, stop laughing at my mess of a rolling pin. It lost its arms. I keep meaning to buy a new one but then … I forget.


Tasty Kitchen Blog: Cannoli Tart. Guest post by Jessica Merchant of How Sweet It Is, recipe submitted by TK member The Seaside Baker.

Use the rolling pin (or something similar, like say, a bottle of wine?) to roll the dough out to fit your tart pan or pie plate. Gently lift it up and place it over the pan.


Tasty Kitchen Blog: Cannoli Tart. Guest post by Jessica Merchant of How Sweet It Is, recipe submitted by TK member The Seaside Baker.

Press the dough into the pan or plate with your fingers. Clearly, pie-like dough is not one of my strengths. I have many pie crust issues. But this just proves that it doesn’t have to be perfect. Just get it in there, then refrigerate while you make the filling.


Tasty Kitchen Blog: Cannoli Tart. Guest post by Jessica Merchant of How Sweet It Is, recipe submitted by TK member The Seaside Baker.

For the filling, I simply gave my food processor a quick wipe down since it was already out. All you have to do is add the ricotta, sugar, egg and amaretto and blend until just combined. So creamy.


Tasty Kitchen Blog: Cannoli Tart. Guest post by Jessica Merchant of How Sweet It Is, recipe submitted by TK member The Seaside Baker.

Then fold in the chocolate chips.


Tasty Kitchen Blog: Cannoli Tart. Guest post by Jessica Merchant of How Sweet It Is, recipe submitted by TK member The Seaside Baker.

Pour the filling in the tart pan …


Tasty Kitchen Blog: Cannoli Tart. Guest post by Jessica Merchant of How Sweet It Is, recipe submitted by TK member The Seaside Baker.

… then spread it out evenly and bake for about 35 minutes.

Once you remove the tart, you want it to cool completely. You can place it in the fridge. Trust me, I was skeptical too, but it is totally worth it. I served the tart chilled and holy cow, it was incredible.


Tasty Kitchen Blog: Cannoli Tart. Guest post by Jessica Merchant of How Sweet It Is, recipe submitted by TK member The Seaside Baker.

After chilling and right before serving, add a drizzle of chocolate and a shake of powdered sugar.


Tasty Kitchen Blog: Cannoli Tart. Guest post by Jessica Merchant of How Sweet It Is, recipe submitted by TK member The Seaside Baker.

Can you even handle this?

To say this tart far exceeded my expectations would be an understatement. It was out of this world. It isn’t super sweet either, which makes me think it is highly versatile for even those (crazy folks?) who don’t love sweet dishes. You gotta try it.

Thanks so much to The Seaside Baker for the recipe. Be sure to check out her blog for even more tempting and delicious dishes.


Printable Recipe

Cannoli Tart

See post on theseasidebaker’s site!
5.00 Mitt(s) 1 Rating(s)1 vote, average: 5.00 out of 51 vote, average: 5.00 out of 51 vote, average: 5.00 out of 51 vote, average: 5.00 out of 51 vote, average: 5.00 out of 5

Prep Time:

Cook Time:

Difficulty: Easy

Servings: 6

6
x

Print Options

Page size Letter 3x5 4x6
Text Size Small Medium Large
Content Include description
Include prep time, etc.
Show image

Description

A delicious creamy cannoli in tart form.

Ingredients

  • FOR THE CRUST:
  • 2 cups Sifted Flour
  • ½ cups Plus 1 Tablespoon Sugar
  • ½ teaspoons Salt
  • 1 teaspoon Cinnamon
  • ⅓ cups Cold Butter
  • 1 whole Egg
  • 1 Tablespoon Milk
  • FOR THE FILLING:
  • 2-¼ cups Ricotta
  • 1 whole Egg
  • 2 teaspoons Sugar
  • 2 teaspoons Amaretto
  • ½ cups Chocolate Chips Or Chunks

Preparation Instructions

For the crust:
If using a food processor, add flour, sugar, salt and cinnamon and pulse a few times. Add butter, and pulse until butter and flour have formed pea-sized crumbles. Add egg and milk and pulse until a large ball is formed.

If mixing by hand, in a bowl combine flour, sugar, salt and cinnamon. Whisk a few times to mix up. Cut in butter until the mixture forms pea-sized crumbles. With your hands, mix in egg and milk and knead into a ball.

Place the dough ball in between 2 pieces of parchment paper. Roll dough out large enough to fit a deep dish pie pan or deep dish tart pan. Grease pan with butter or nonstick cooking spray. Gently place the dough into pan. Refrigerate while you make your filling and your oven is preheating.

For the filling:
In a food processor or mixer, blend ricotta, egg, sugar, and amaretto until just combined. Stir in chocolate chips. Pour into crust.

Bake at 350ºF for around 25-35 minutes, or until your crust has slightly browned and the filling has puffed a bit. Serve cold or at room temp sprinkled with powdered sugar or drizzled with chocolate.


_______________________________________

Jessica Merchant is a personal trainer turned food writer and blogger. Her blog, How Sweet Eats, is where she proclaims her love for all things sweet, all things bacon, and everything else in between. She works her magic in her Pittsburgh kitchen, which she shares with her husband of 2 years.


Profile photo of Faith (An Edible Mosaic)

Cauliflower Buffalo Wings

Posted by in Step-by-Step Recipes

Tasty Kitchen Blog: Cauliflower Buffalo Wings. Guest post by Faith Gorsky of An Edible Mosaic, recipe submitted by TK member Shelbi Keith of Look Who's Cookin' Now.

Please join us in welcoming our newest Tasty Kitchen Blog contributor, Faith Gorsky of An Edible Mosaic. She’s been sharing her wonderful and often exotic recipes with us for some time now (almost 100 recipes and counting!), and we’re so proud to have her here. As you can see from her pick for her first guest post, she just fits right in perfectly. Glad to have you, Faith!

_______________________________________


Growing up in a suburb of Buffalo and working in a pizzeria during high school means I’m a wing-lover from way back. This is why when I saw Tasty Kitchen member Shelbi Keith’s recipe for Cauliflower Buffalo Wings, I knew they were happening in my kitchen ASAP.

Now, if you’re skeptical about whether a vegetable can really have Buffalo wing flavor, have no fear. I’m going to let you in on a little secret: it’s all in the sauce! Frank’s Hot Sauce is the sauce of choice for balanced heat and flavor, and a little bit of butter rounds it out. That’s it, straight-up. Shelbi nailed it. (Of course, for a milder sauce, you can increase the amount of butter and decrease the amount of hot sauce to taste.) I won’t be surprised if this recipe makes another appearance in my kitchen very soon.


Tasty Kitchen Blog: Cauliflower Buffalo Wings. Guest post by Faith Gorsky of An Edible Mosaic, recipe submitted by TK member Shelbi Keith of Look Who's Cookin' Now.

Here’s what you’ll need to make this: cauliflower, butter, hot sauce, flour, garlic powder, milk, and blue cheese dressing (for serving).


Tasty Kitchen Blog: Cauliflower Buffalo Wings. Guest post by Faith Gorsky of An Edible Mosaic, recipe submitted by TK member Shelbi Keith of Look Who's Cookin' Now.

Take note, I only used half of a cauliflower because I picked up what had to be the largest head of cauliflower I’ve ever seen in my life at the farmers market. I got it home and it weighed in at five pounds! If your cauliflower is a more normal size, use the whole head.


Tasty Kitchen Blog: Cauliflower Buffalo Wings. Guest post by Faith Gorsky of An Edible Mosaic, recipe submitted by TK member Shelbi Keith of Look Who's Cookin' Now.

Chop it up into pretty florets.


Tasty Kitchen Blog: Cauliflower Buffalo Wings. Guest post by Faith Gorsky of An Edible Mosaic, recipe submitted by TK member Shelbi Keith of Look Who's Cookin' Now.

Mix up the batter (just milk, flour, and garlic powder).


Tasty Kitchen Blog: Cauliflower Buffalo Wings. Guest post by Faith Gorsky of An Edible Mosaic, recipe submitted by TK member Shelbi Keith of Look Who's Cookin' Now.

Dip each cauli floret into the batter, letting the excess drip off. Arrange them up all nice and purty on a baking sheet that you sprayed with cooking spray (or lined with a Silpat liner and sprayed lightly with cooking spray).


Tasty Kitchen Blog: Cauliflower Buffalo Wings. Guest post by Faith Gorsky of An Edible Mosaic, recipe submitted by TK member Shelbi Keith of Look Who's Cookin' Now.

Give the tops a little spritz with cooking spray, and into the oven they go. Shelbi cooked hers at 450ºF for 18 minutes, but noted that, before the 18-minute mark, they burned a little on the bottom before they had a chance to cook through. So I cooked mine at 425ºF until tender, about 20 to 25 minutes. That worked pretty well and the cauli didn’t burn!


Tasty Kitchen Blog: Cauliflower Buffalo Wings. Guest post by Faith Gorsky of An Edible Mosaic, recipe submitted by TK member Shelbi Keith of Look Who's Cookin' Now.

While the cauliflower cooks, you can whip up the sauce. Melt the butter …


Tasty Kitchen Blog: Cauliflower Buffalo Wings. Guest post by Faith Gorsky of An Edible Mosaic, recipe submitted by TK member Shelbi Keith of Look Who's Cookin' Now.

And mix the melted butter with the hot sauce. Done and done.


Tasty Kitchen Blog: Cauliflower Buffalo Wings. Guest post by Faith Gorsky of An Edible Mosaic, recipe submitted by TK member Shelbi Keith of Look Who's Cookin' Now.

When your cauliflower is out of the oven, toss it gently with the sauce. Mmm … love that spicy smell!


Tasty Kitchen Blog: Cauliflower Buffalo Wings. Guest post by Faith Gorsky of An Edible Mosaic, recipe submitted by TK member Shelbi Keith of Look Who's Cookin' Now.

Plate it up! I like to pile my Cauliflower Buffalo Wings high and deep, like how an order of normal Buffalo Wings would be served at a restaurant, but they are also so pretty plated elegantly the way Shelbi did. Don’t forget to serve them with blue cheese dressing and carrot and celery sticks if you want. Try not to dive face-first into that beautiful plate.


Tasty Kitchen Blog: Cauliflower Buffalo Wings. Guest post by Faith Gorsky of An Edible Mosaic, recipe submitted by TK member Shelbi Keith of Look Who's Cookin' Now.

Thanks to Shelbi for sharing this delicious take on Buffalo wings! For more good eats, you can check out her site Look Who’s Cookin’ Now.


Printable Recipe

Cauliflower Buffalo Wings

See post on Shelbi Keith’s site!
4.14 Mitt(s) 7 Rating(s)7 votes, average: 4.14 out of 57 votes, average: 4.14 out of 57 votes, average: 4.14 out of 57 votes, average: 4.14 out of 57 votes, average: 4.14 out of 5

Prep Time:

Cook Time:

Difficulty: Easy

Servings: 4

4
x

Print Options

Page size Letter 3x5 4x6
Text Size Small Medium Large
Content Include description
Include prep time, etc.
Show image

Description

Vegetarian buffalo wings! A perfect appetizer or side dish for your football party.

Ingredients

  • 1 head Cauliflower
  • 1 cup Milk
  • ¾ cups Flour
  • 2 teaspoons Garlic Powder
  • 1 Tablespoon Butter
  • 1 cup Frank's Red Hot Sauce
  • ½ cups Blue Cheese Dressing

Preparation Instructions

Preheat oven to 450 F.

Trim the heat of cauliflower into appetizer-sized pieces. (I bought the pre-chopped kind.) Set it aside.

In a shallow bowl stir together milk, flour and garlic powder.

Dip each piece of cauliflower into the batter and allow the extra batter to dip off. Place on a greased baking sheet. Spray the tops of the florets with cooking oil. Bake for 18 minutes.

Melt the butter in a saucepan over low heat. Mix together melted butter and Frank’s hot sauce.

Toss cooked cauliflower pieces with sauce. Serve with a side of blue cheese dressing.

Note: The bottom of my cauliflower pieces burned a little. The burned crust easily pulled off. I tried cooking it for less time and it didn’t cook through.


_______________________________________

Faith Gorsky is the writer, recipe developer, photographer, and food stylist behind the blog An Edible Mosaic. She lives in Upstate New York and loves to travel, especially to places steeped in rich culture and history. She also enjoys reading, vintage shopping, watching movies, and is enamored with ancient cultures. She just released her first cookbook, “An Edible Mosaic: Middle Eastern Fare with Extraordinary Flair” (Tuttle Publishing), a collection of authentic Middle Eastern recipes handed down to her from her husband’s family.


Profile photo of HowSweetEats

Cauliflower Crust Pizza

Posted by in Step-by-Step Recipes

Tasty Kitchen Blog: Cauliflower Crust Pizza. Guest post by Jessica Merchant of How Sweet It Is, recipe submitted by TK member Michelle of The Lucky Penny.

 
Oh cauliflower pizza crust, I have been skeptical of you for so long. So, so long. The first time I attempted a cauliflower crust was back in the day, long before Pinterest existed or I knew what a blog was, after getting a recipe from someone in my local gym. I didn’t love cauliflower at the time but I didn’t loathe it either. Plus, it came loaded with lots of cheese, so it had to be a win. Right?

Wrong. It was pretty terrible. So terrible in fact that, until I found this recipe—this recipe for The Best Cauliflower Crust Pizza ever—I vowed that I wouldn’t succumb to the trend once again.

Now, I’m so glad that I did. Michelle is one smart cookie.

Not only is the crust simple, it is FAST. That’s the key for me. Now, let me say that I don’t think I will ever replace my favorite pizza crust. I make a mean whole-wheat dough and love it all up. But this is an awesome recipe for when you want pizza and you are short on time, or when you want pizza but are willing to draw outside the lines a bit, or when you want pizza but need to stay away from gluten. Or maybe you’re trying to sneak in some extra veg. Story of my life.

This gets even better with an array of toppings. I am boring in my pizza choices so I kept it simple with some cheese and sauce. But now, all I’m envisioning is buffalo chicken, grilled vegetables, cheeseburger pizza, and other endless options. So excited. Let’s get started!


Tasty Kitchen Blog: Cauliflower Crust Pizza. Guest post by Jessica Merchant of How Sweet It Is, recipe submitted by TK member Michelle of The Lucky Penny.

This is all you need for your crust: a small (emphasis on small!) head of cauliflower, one egg, some mozzarella and Parmesan cheese, salt, pepper, garlic powder, oregano, basil and crushed red pepper flakes. That’s it! Plus, whatever toppings you choose.

This specific method uses a pizza stone or baking sheet. Begin by adding the stone or sheet to the oven and preheating your oven. Having a pizza peel is ideal, but if you have another object (like a cutting board) that you can flour, it will work too.


Tasty Kitchen Blog: Cauliflower Crust Pizza. Guest post by Jessica Merchant of How Sweet It Is, recipe submitted by TK member Michelle of The Lucky Penny.

First up, add the cauliflower to your food processor and pulse.


Tasty Kitchen Blog: Cauliflower Crust Pizza. Guest post by Jessica Merchant of How Sweet It Is, recipe submitted by TK member Michelle of The Lucky Penny.

You want it to look like cauliflower “snow.” That expression made me so happy.


Tasty Kitchen Blog: Cauliflower Crust Pizza. Guest post by Jessica Merchant of How Sweet It Is, recipe submitted by TK member Michelle of The Lucky Penny.

Once your cauliflower is pulsed into tiny crumbs, you want to microwave it. Let it cool completely or else you’ll burn the heck out of your hands.


Tasty Kitchen Blog: Cauliflower Crust Pizza. Guest post by Jessica Merchant of How Sweet It Is, recipe submitted by TK member Michelle of The Lucky Penny.

After the cauliflower has cooled, place it in a towel and ring the heck out of it to remove as much liquid as possible.


Tasty Kitchen Blog: Cauliflower Crust Pizza. Guest post by Jessica Merchant of How Sweet It Is, recipe submitted by TK member Michelle of The Lucky Penny.

You will be left with something like this—a sort of cauliflower “pulp,” if you will.


Tasty Kitchen Blog: Cauliflower Crust Pizza. Guest post by Jessica Merchant of How Sweet It Is, recipe submitted by TK member Michelle of The Lucky Penny.

Add in the cheeses and the spices and mix the mixture until combined. Then add in your egg.


Tasty Kitchen Blog: Cauliflower Crust Pizza. Guest post by Jessica Merchant of How Sweet It Is, recipe submitted by TK member Michelle of The Lucky Penny.

Using your hands to bring the dough together is necessary, and it happens easily. Form the dough into a ball. Spray a sheet of parchment paper with nonstick spray and place it on top of a pizza peel. Add the dough ball on top.


Tasty Kitchen Blog: Cauliflower Crust Pizza. Guest post by Jessica Merchant of How Sweet It Is, recipe submitted by TK member Michelle of The Lucky Penny.

Form the dough into a thin circle and bake it for a few minutes until golden.


Tasty Kitchen Blog: Cauliflower Crust Pizza. Guest post by Jessica Merchant of How Sweet It Is, recipe submitted by TK member Michelle of The Lucky Penny.

It will look like this! At this point, it smells freaking delicious. Definitely good enough to eat. So much cheeeeeeese.


Tasty Kitchen Blog: Cauliflower Crust Pizza. Guest post by Jessica Merchant of How Sweet It Is, recipe submitted by TK member Michelle of The Lucky Penny.

But clearly not enough cheese, as you add your toppings and bake it a bit longer. Uh huh.


Tasty Kitchen Blog: Cauliflower Crust Pizza. Guest post by Jessica Merchant of How Sweet It Is, recipe submitted by TK member Michelle of The Lucky Penny.

Cheesy goodness. All the way.


Tasty Kitchen Blog: Cauliflower Crust Pizza. Guest post by Jessica Merchant of How Sweet It Is, recipe submitted by TK member Michelle of The Lucky Penny.

Let the pizza cool slightly before cutting. By doing this, the crust remains intact.


Tasty Kitchen Blog: Cauliflower Crust Pizza. Guest post by Jessica Merchant of How Sweet It Is, recipe submitted by TK member Michelle of The Lucky Penny.

Serve it up. Savor the cheese. So, so good.

I am so glad I took another shot at the cauliflower crust because my mind has changed. It’s totally a winner in my book. Thanks so much to Michelle for the fabulous recipe. Be sure to check out her blog, The Lucky Penny, for more delicious recipes.


Printable Recipe

The Best Cauliflower Crust Pizza

See post on The Lucky Penny Blog’s site!
5.00 Mitt(s) 8 Rating(s)8 votes, average: 5.00 out of 58 votes, average: 5.00 out of 58 votes, average: 5.00 out of 58 votes, average: 5.00 out of 58 votes, average: 5.00 out of 5

Prep Time:

Cook Time:

Difficulty: Easy

Servings: 2

2
x

Print Options

Page size Letter 3x5 4x6
Text Size Small Medium Large
Content Include description
Include prep time, etc.
Show image

Description

This cauliflower crust pizza is so good it’s hard to believe it is gluten and grain-free! You can even pick it up like a regular slice of pizza.

Ingredients

  • 1 head (Small Head) Cauliflower
  • ¼ cups Parmesan Cheese
  • ¼ cups Mozzarella Cheese
  • ¼ teaspoons Kosher Salt
  • ½ teaspoons Dried Basil
  • ½ teaspoons Dried Oregano
  • ½ teaspoons Garlic Powder
  • Red Pepper Flakes (optional)
  • 1 Tablespoon Almond Meal (optional)
  • 1 whole Egg

Preparation Instructions

Place a pizza stone in the oven, or baking sheet if you don’t have a pizza stone. Preheat oven to 450ºF. On a cutting board, place a large piece of parchment paper and spray it with nonstick cooking oil.

Wash and throughly dry a small head of cauliflower. Don’t get one the size of your head unless you are planning on making 2 pizzas. Cut off the florets—you don’t need much stem, just stick with the florets. Pulse in your food processor for about 30 seconds, until you get powdery snow like cauliflower. You should end up with 2 to 3 cups cauliflower “snow”. Place the cauliflower in a microwave safe bowl and cover. Cook for 4 minutes. Dump cooked cauliflower onto a clean tea towel and allow to cool for a bit before attempting the next step.

Once cauliflower is cool enough to handle, wrap it up in the dish towel and wring the heck out of it. You want to squeeze out as much water as possible. This will ensure you get a chewy pizza like crust instead of a crumbly mess.

Dumped squeezed cauliflower into a bowl. Now add Parmesan cheese, mozzarella cheese, kosher salt, dried basil (crush up the leaves even more between your fingers before adding), dried oregano (crush up the leaves even more between your fingers before adding), garlic powder (not garlic salt), and a dash of red pepper if you want. I also added 1 tablespoon almond meal because my cauliflower yielded closer to 2 cups of cauli snow; this is optional and I would not add the almond meal if you have closer to 3 cups of cauli snow. Now add the egg and mix away. Hands tend to work best.

Once mixed together, use your hands to form the dough into a crust on your oiled parchment paper. Pat it down throughly, you want it nice and tightly formed together. Don’t make it too thick or thin either.

Using a cutting board, slide the parchment paper onto your hot pizza stone or baking sheet in the oven. Bake for 8-11 minutes, until it starts to turn golden brown. Remove from oven.

Add however much sauce, cheese, and toppings you want. I’m not gonna give you measurements for this. You know how you like your pizza—so go for it! Slide parchment with topped pizza back in the hot oven and cook for another 5 to 7 minutes until the cheese is melted, bubbly, and slightly golden.

Test your patience and allow it to cool for a minute or two. Probably closer to two. Then using a pizza cutter and a spatula, serve up your delicious grain-free cauliflower crust pizza!


_______________________________________

Jessica Merchant is a personal trainer turned food writer and blogger. Her blog, How Sweet Eats, is where she proclaims her love for all things sweet, all things bacon, and everything else in between. She works her magic in her Pittsburgh kitchen, which she shares with her husband of 2 years.


Profile photo of Megan {Country Cleaver}

Cerveza-garitas for the Weekend!

Posted by in Step-by-Step Recipes

When you want a margarita, you want a margarita. And margaritas are best served with friends around! Have you seen cerveza-ritas on Mexican restaurant menus lately? I’m probably tardy to the party on this one, but after seeing them in every Mexican restaurant I’ve been to since college and then seeing TK Member

Profile photo of Erica Lea

Chai Gingerbread Bars

Posted by in Baking, Step-by-Step Recipes

  Chai meets Gingerbread. These bars, brought to us by Nika (who also shared the utterly delicious Red Curry Coconut Noodles), are the perfect addition to a steaming cup of coffee, cocoa, or tea. Curl up with your toes by the fire and savor a wonderful treat. What really drew me to these Chai Gingerbread […]

Profile photo of Erica Lea

Chai Pots de Creme

Posted by in Step-by-Step Recipes

  Creamy, smooth custard contrasted with intense, spicy flavors. Today, I bring you these lovely Chai Pots de Creme, shared by Stacey (butterbean). I’ll not lie. The ingredient list contains a few specialty items. And the process is a bit time-consuming. But these little custards are very much worth it. So rich and full of flavor; […]

Profile photo of HowSweetEats

Cheddar Tailgating Bread

Posted by in Baking, Step-by-Step Recipes

I hope you’re in the mood for something fantastically warm, gooey, comforting, and most of all, fun. We’re right in the heart of football season and who doesn’t love to bring the snack to the party that everyone can’t stop talking about? That’s exactly what this bread is. And more. I never need to be sold when cheese and bread are involved, so the…