The Pioneer Woman Tasty Kitchen
Profile photo of Erica Lea

Maple and Onion Jam

Posted by in Step-by-Step Recipes

Tasty Kitchen Blog: Maple and Onion Jam. Guest post by Erica Kastner of Buttered Side Up, recipe submitted by TK member Veronica of My Catholic Kitchen.

I have to admit that canning is one of my biggest cooking fears. I’m probably the world’s biggest canning baby. The thought of putting food in a pot that builds pressure that could potentially blow slightly terrifies me. I know this is highly unlikely, but the complication of the process also scares me.

While I was reading over Veronica’s recipe for this Maple and Onion Jam, I noticed that she used the water bath method. Right away my apprehension was greatly reduced. All that’s required is processing the jam for 10 minutes in boiling water. It really is that simple. 

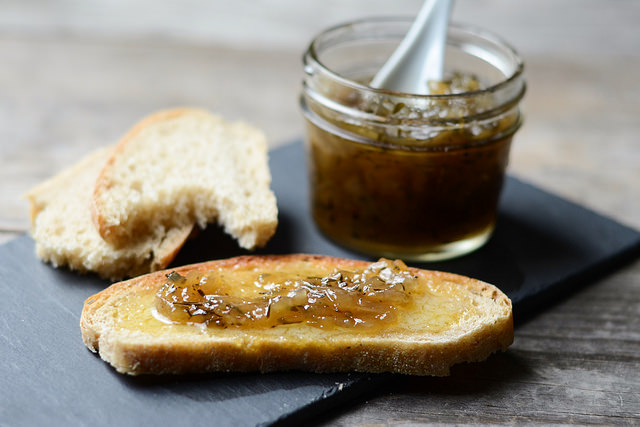
The flavor of this jam is kind of amazing. I definitely wouldn’t say it’s strictly savory because it is quite sweet; it’s jam, after all. And it’s amazing on toast. Or grilled cheese. But I’ll get to that later.


Tasty Kitchen Blog: Maple and Onion Jam. Guest post by Erica Kastner of Buttered Side Up, recipe submitted by TK member Veronica of My Catholic Kitchen.

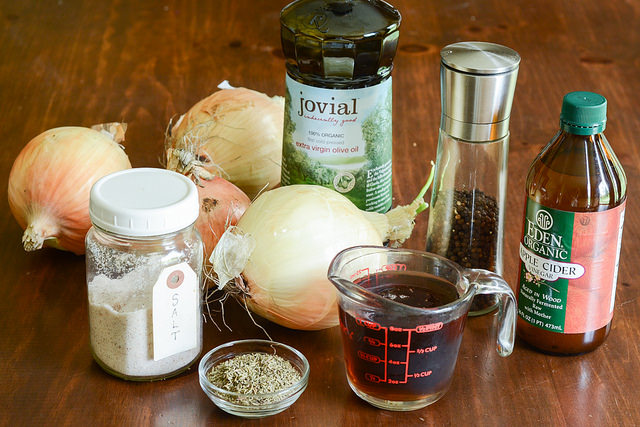
Here are all of the lovely ingredients you’ll need: olive oil, sweet onions (I used some local Walla Walla onions), salt, pepper, thyme, maple syrup, and apple cider vinegar.


Tasty Kitchen Blog: Maple and Onion Jam. Guest post by Erica Kastner of Buttered Side Up, recipe submitted by TK member Veronica of My Catholic Kitchen.

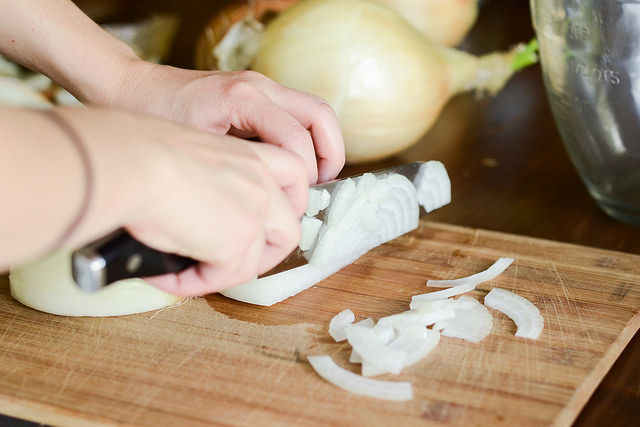
Step one: If you’re wearing mascara, make sure it’s waterproof, because we’re gonna chop a lot of onions. Does anyone else roll their eyes and do a little dance when their eyes start to smart? I’m pretty certain it helps.


Tasty Kitchen Blog: Maple and Onion Jam. Guest post by Erica Kastner of Buttered Side Up, recipe submitted by TK member Veronica of My Catholic Kitchen.

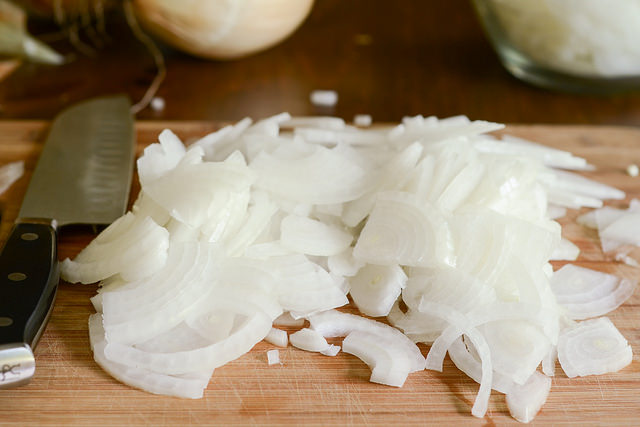
I actually only needed two large onions to get the required eight cups of chopped onions. If you’re using small or medium onions, you will, of course, need more.


Tasty Kitchen Blog: Maple and Onion Jam. Guest post by Erica Kastner of Buttered Side Up, recipe submitted by TK member Veronica of My Catholic Kitchen.

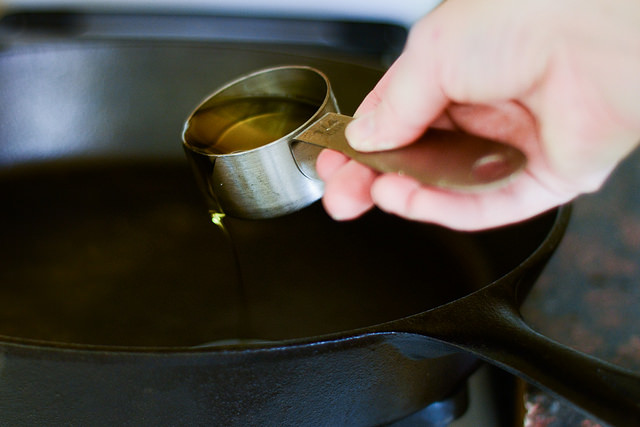
Now it’s time to cook down your onions. Heat the olive oil in a large skillet.


Tasty Kitchen Blog: Maple and Onion Jam. Guest post by Erica Kastner of Buttered Side Up, recipe submitted by TK member Veronica of My Catholic Kitchen.

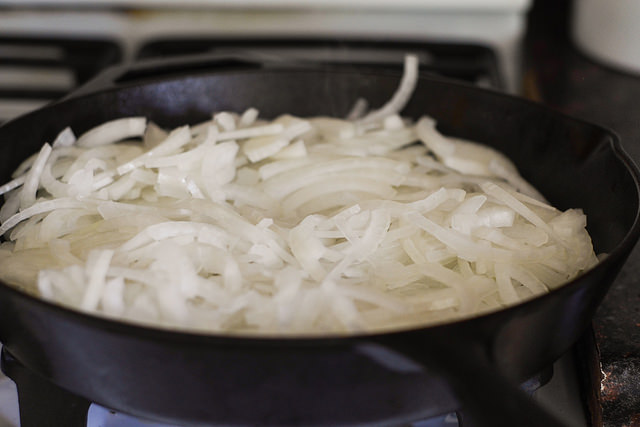
Add your chopped onions and cook until the onions become translucent, about 10 minutes or so.


Tasty Kitchen Blog: Maple and Onion Jam. Guest post by Erica Kastner of Buttered Side Up, recipe submitted by TK member Veronica of My Catholic Kitchen.

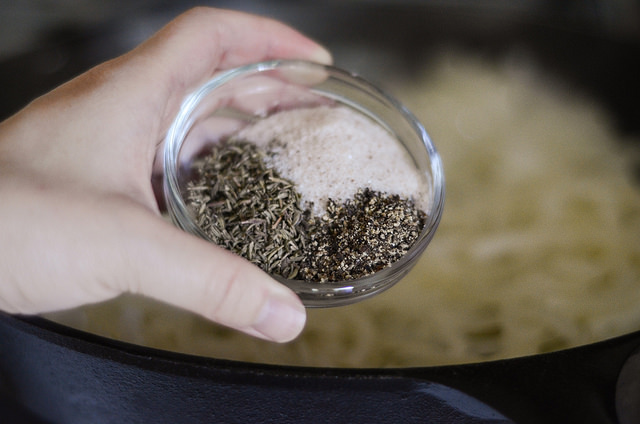
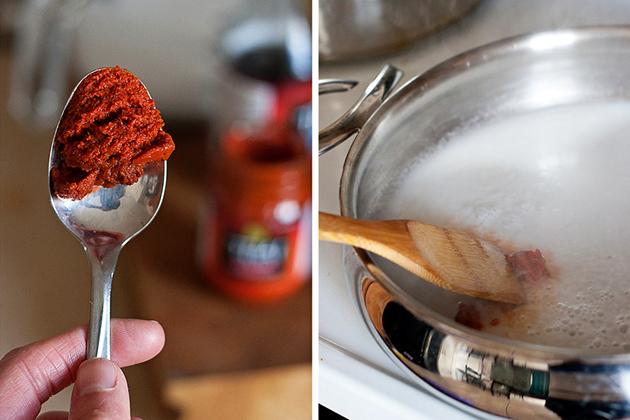
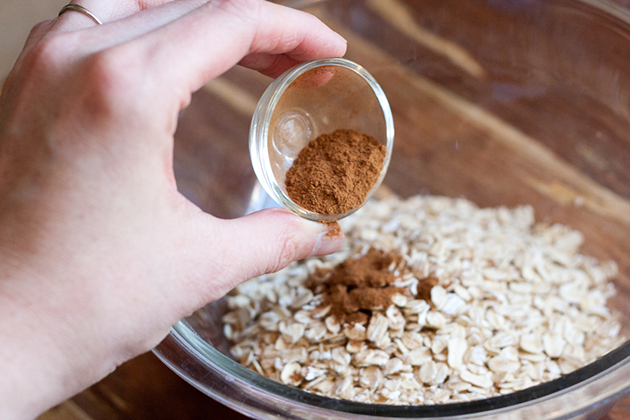
Add the salt, pepper, and thyme.
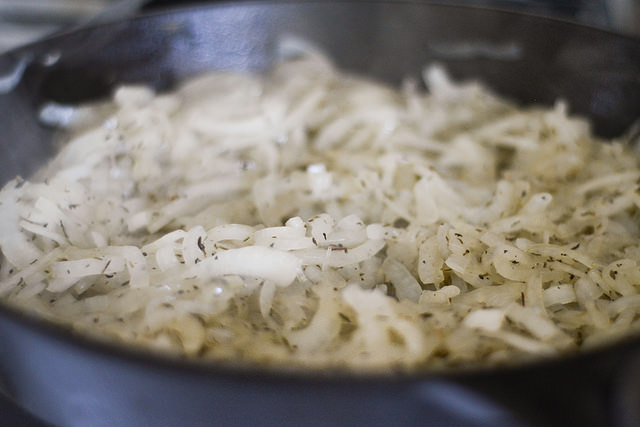


Tasty Kitchen Blog: Maple and Onion Jam. Guest post by Erica Kastner of Buttered Side Up, recipe submitted by TK member Veronica of My Catholic Kitchen.

Isn’t it pretty?


Tasty Kitchen Blog: Maple and Onion Jam. Guest post by Erica Kastner of Buttered Side Up, recipe submitted by TK member Veronica of My Catholic Kitchen.

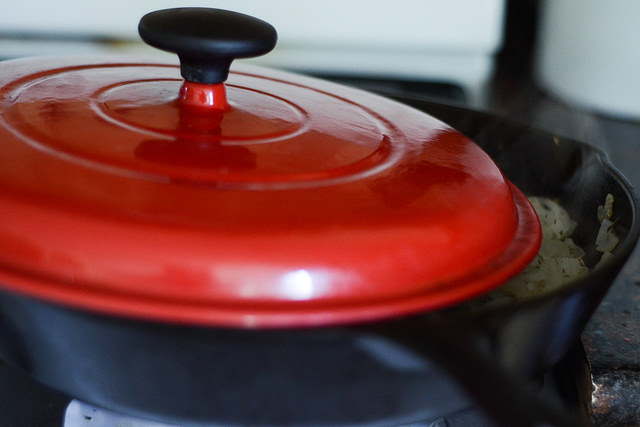
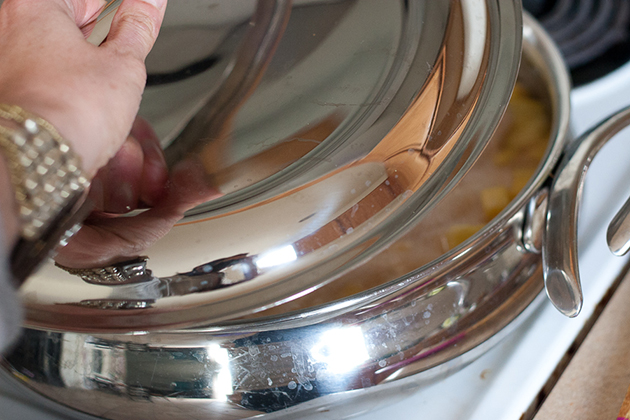
Turn down the heat and cover your skillet. I don’t have a lid for my cast iron skillet, so I improvised and used the largest lid I had. 


Tasty Kitchen Blog: Maple and Onion Jam. Guest post by Erica Kastner of Buttered Side Up, recipe submitted by TK member Veronica of My Catholic Kitchen.

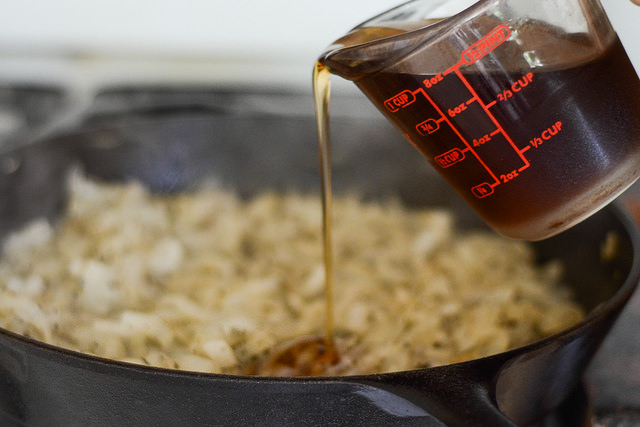
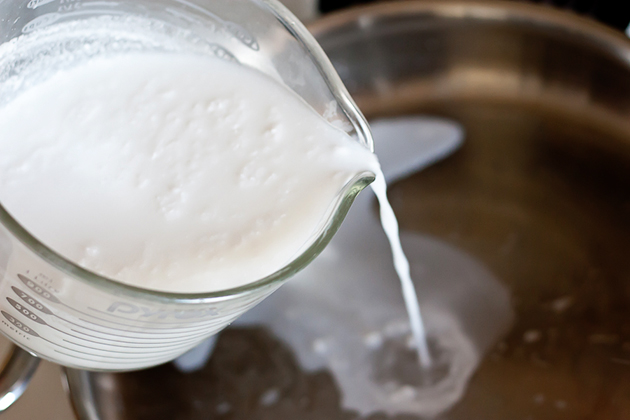
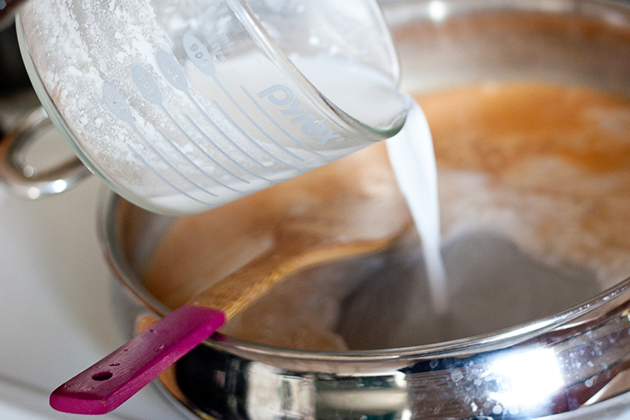
Once the onions have cooked for another 10 minutes or so, pour in the maple syrup. Oh yeah. 

Cook uncovered for another 15 minutes, or until most of the liquid has evaporated. I had to cook mine for at least an extra 10 minutes.


Tasty Kitchen Blog: Maple and Onion Jam. Guest post by Erica Kastner of Buttered Side Up, recipe submitted by TK member Veronica of My Catholic Kitchen.

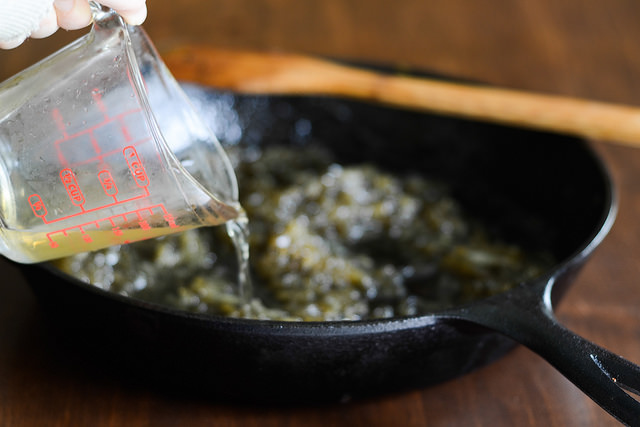
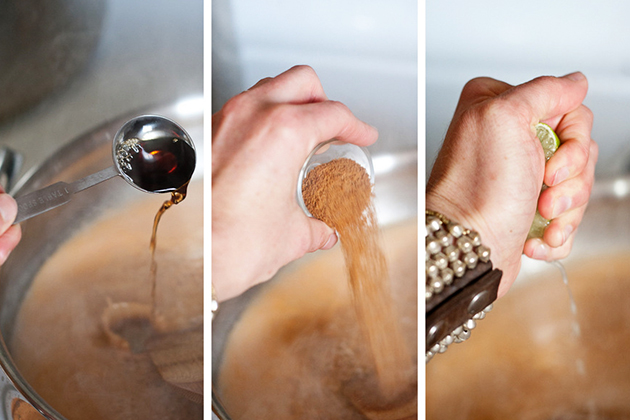
Remove from heat and stir in the vinegar.


Tasty Kitchen Blog: Maple and Onion Jam. Guest post by Erica Kastner of Buttered Side Up, recipe submitted by TK member Veronica of My Catholic Kitchen.

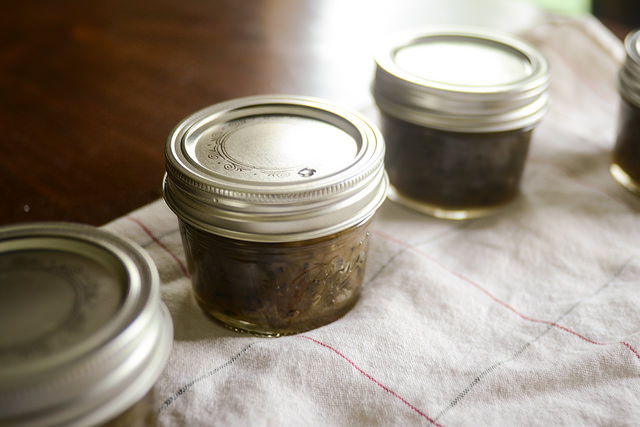
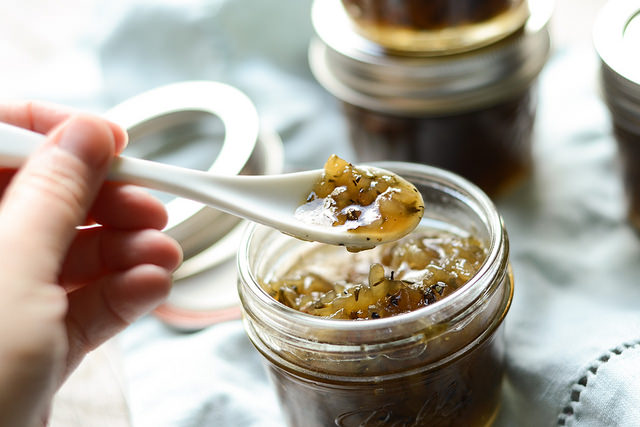
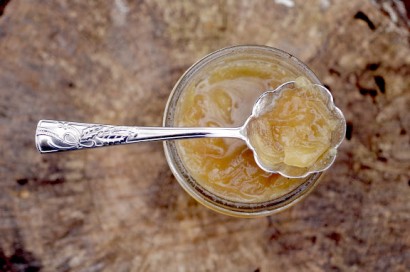
Ladle the jam into (sterilized) jars and screw on the lids. 


Tasty Kitchen Blog: Maple and Onion Jam. Guest post by Erica Kastner of Buttered Side Up, recipe submitted by TK member Veronica of My Catholic Kitchen.

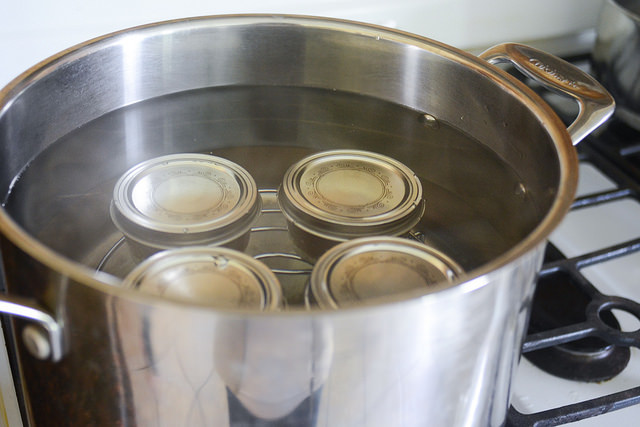
Process in a (boiling) water bath for 10 minutes. Carefully remove the jars and allow to cool. I say, “Another one bites the dust!” when I hear the ping of the jars sealing. My toddler probably thinks I’m crazy.


Tasty Kitchen Blog: Maple and Onion Jam. Guest post by Erica Kastner of Buttered Side Up, recipe submitted by TK member Veronica of My Catholic Kitchen.

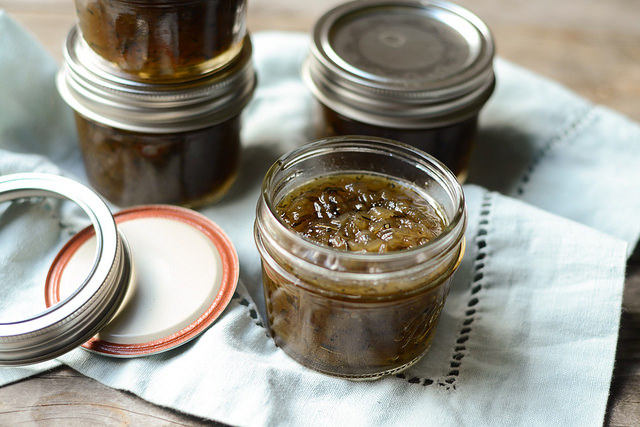
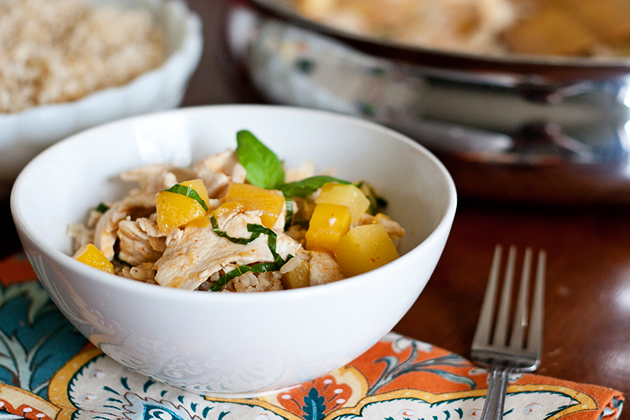
I think this is the tastiest jam I’ve ever made. As soon as I open a jar, my kitchen smells wonderful. There are so many potential uses: on burgers, toast, as a relish for meat (pork pairs well), or fancy grilled cheese.


Tasty Kitchen Blog: Maple and Onion Jam. Guest post by Erica Kastner of Buttered Side Up, recipe submitted by TK member Veronica of My Catholic Kitchen.

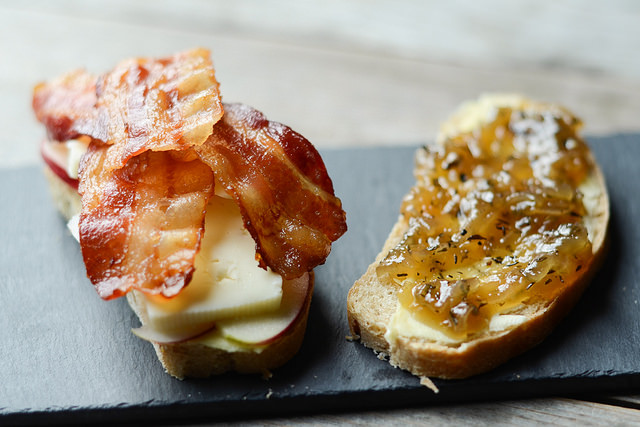
I made a grown-up grilled cheese with butter, thinly sliced apples, Havarti, bacon, and the onion jam. It’s one of the best things I’ve created in a while.


Tasty Kitchen Blog: Maple and Onion Jam. Guest post by Erica Kastner of Buttered Side Up, recipe submitted by TK member Veronica of My Catholic Kitchen.

Notes:

  1. I recommend filling your canning pot with water and turning on the heat first thing. It takes FOREVER for a large pot of water to boil.
  2. As I mentioned before, you don’t need a special canning pot for water bath canning. All you need is a large, deep pot and a round rack to keep the jars off the bottom of the pan. I’ve heard that you can even use lid rings!

Many thanks to Veronica for sharing her recipe here on Tasty Kitchen. If you want to see more of her comfort-food recipes, stop by her blog, My Catholic Kitchen. Her Caramel Apple Bread and Butter Pudding sounds really good right now.


Printable Recipe

Maple and Onion Jam

See post on Veronica @ My Catholic Kitchen’s site!
5.00 Mitt(s) 1 Rating(s)1 vote, average: 5.00 out of 51 vote, average: 5.00 out of 51 vote, average: 5.00 out of 51 vote, average: 5.00 out of 51 vote, average: 5.00 out of 5

Prep Time:

Cook Time:

Difficulty: Easy

Servings: 5

5
x

Print Options

Page size Letter 3x5 4x6
Text Size Small Medium Large
Content Include description
Include prep time, etc.
Show image

Description

Maple and onion jam is sweet and savory. It makes a great foodie gift. You probably have all the ingredients in your pantry.

Ingredients

  • ¼ cups Olive Oil
  • 8 cups Sweet Onion, Quartered And Sliced Thin
  • 2 teaspoons Kosher Salt
  • 1 Tablespoon Thyme
  • 1 teaspoon Black Pepper
  • 1 cup Maple Syrup
  • ¼ cups Cider Vinegar
  • 5 jars 4-ounce Size Canning Jars With Lids And Rings, Sterilized According To Standard Safe Canning Practices

Preparation Instructions

In an 8 inch skillet (I use my cast iron) heat the olive oil and add the onions. Cook over medium heat for 10 minutes or until the onions become translucent. Reduce the heat to medium low and add salt, thyme and pepper. Cover the skillet and cook for another 10 minutes. Increase heat to medium and add maple syrup. Bring to a boil and lower heat just a bit so you keep it at a simmer. Cook uncovered another 15 minutes. At this point most of the liquid should have evaporated. Remove the skillet from the heat and add the vinegar.

Ladle the mixture into hot sterilized canning jars (I used the 4 ounce kind) leaving a 1/4 inch head space. Wipe off the jar rims with a damp clean towel and adjust the lids. Process in a water bath for 10 minutes. Remove from the water bath and cool. Wait for the lovely ping of the lid when it seals.

This makes about five 4 ounce jars.


_______________________________________

Erica Kastner has always been one of our most cherished members of the Tasty Kitchen community. She shares her wonderful recipes and amazing food photography on her blog, Buttered Side Up, and she also writes about crafts and posts more of her beautiful photography in her personal blog, Simple Days. There really isn’t much that this amazing young wife and mother can’t do, and we’re thrilled she does some of it here.


Profile photo of Natalie | Perry's Plate

Tropical Thai Chicken Curry

Posted by in Step-by-Step Recipes

Tasty Kitchen Blog: Tropical Thai Chicken Curry. Guest post by Natalie Perry of Perry's Plate, recipe submitted by TK member Anetta of The Wanderlust Kitchen.

I love Thai food. And I’m thankful for the fact that I can walk into almost any grocery store in this country and buy tropical fruit and Thai curry paste. Isn’t it amazing that we have access to all of these things? It wasn’t that long ago when ethnic flavors and produce just weren’t available here. It’s fantastic.

You know what else is great? Easy, approachable ethnic recipes to make during the holidays. I can only eat so much bread, potatoes, and heavy cream, you know? I need recipes that are quick and different from the typically rich meals of the season. 

Enter: Tropical Thai Chicken Curry This recipe submitted by Anetta is exactly what I was looking for. If you prep the ingredients ahead of time you can have this on the table in about 15 minutes. Really.

Here, I’ll show you.


Tasty Kitchen Blog: Tropical Thai Chicken Curry. Guest post by Natalie Perry of Perry's Plate, recipe submitted by TK member Anetta of The Wanderlust Kitchen.

You’ll need a few things, but luckily they’re all relatively easy to find. Boneless, skinless chicken breasts or thighs, pineapple, mangoes, fresh basil, a lime, coconut milk, a sweetener (I used coconut sugar), red Thai curry paste, and fish sauce.

The coconut milk, curry paste, and fish sauce can be found in that Asian section I was talking about. Or an ethnic grocery store, if you’re lucky to have one in your town. 

Don’t ask me what fish sauce it. And don’t smell it. Just use it and you won’t be sorry.


Tasty Kitchen Blog: Tropical Thai Chicken Curry. Guest post by Natalie Perry of Perry's Plate, recipe submitted by TK member Anetta of The Wanderlust Kitchen. 

First, get a big, sturdy pan out and warm up the half of the coconut milk until it’s bubbly.


Tasty Kitchen Blog: Tropical Thai Chicken Curry. Guest post by Natalie Perry of Perry's Plate, recipe submitted by TK member Anetta of The Wanderlust Kitchen.

Add the curry paste.

If I’m not mistaken, red curry paste is the most spicy of the Thai curry pastes, followed by green paste and then yellow being the least spicy. 

Because I have little ones I need to feed, I was conservative with the amount I initially added, but I ended up putting more in later. And it still wasn’t too spicy! I’m pretty sure the coconut milk and sweetness from the fruit mellowed it out. So, don’t be shy with it!


Tasty Kitchen Blog: Tropical Thai Chicken Curry. Guest post by Natalie Perry of Perry's Plate, recipe submitted by TK member Anetta of The Wanderlust Kitchen.

Once you get the paste incorporated and a lovely salmon-colored sauce started, add the fish sauce (you smelled it, didn’t you?), sweetener, and lime juice.

The recipe originally called for wild lime leaves, but I was unable to find them. Perhaps I could have looked harder, but I didn’t want to tote my crazy never-wants-to-stay-in-the-cart-monkey-child to one more place. 

So, I took Anetta’s advice and used half a lime. And kept my sanity.


Tasty Kitchen Blog: Tropical Thai Chicken Curry. Guest post by Natalie Perry of Perry's Plate, recipe submitted by TK member Anetta of The Wanderlust Kitchen.

Now, add the rest of the coconut milk. 


Tasty Kitchen Blog: Tropical Thai Chicken Curry. Guest post by Natalie Perry of Perry's Plate, recipe submitted by TK member Anetta of The Wanderlust Kitchen.

In go the thinly sliced chicken, mango, and pineapple chunks. 

The next time I make this, I think I’ll add a handful or two of butternut squash chunks. It’ll blend right in! (It’s physically painful for me to make a meal without vegetables. There, I said it.)


Tasty Kitchen Blog: Tropical Thai Chicken Curry. Guest post by Natalie Perry of Perry's Plate, recipe submitted by TK member Anetta of The Wanderlust Kitchen.

Stir it well, then cover and let it simmer for a few minutes until the chicken is cooked through. It’ll go fast and give you just enough time to chiffonade the basil. 


Tasty Kitchen Blog: Tropical Thai Chicken Curry. Guest post by Natalie Perry of Perry's Plate, recipe submitted by TK member Anetta of The Wanderlust Kitchen.

To chiffonade sounds fancy, but it just means you’re cutting the basil into little strips. That’s all. You could even say it with a French accent. 

First, stack the leaves.


Tasty Kitchen Blog: Tropical Thai Chicken Curry. Guest post by Natalie Perry of Perry's Plate, recipe submitted by TK member Anetta of The Wanderlust Kitchen.

Roll them tightly.


Tasty Kitchen Blog: Tropical Thai Chicken Curry. Guest post by Natalie Perry of Perry's Plate, recipe submitted by TK member Anetta of The Wanderlust Kitchen.

Then slice it up! 


Tasty Kitchen Blog: Tropical Thai Chicken Curry. Guest post by Natalie Perry of Perry's Plate, recipe submitted by TK member Anetta of The Wanderlust Kitchen.

When the curry is finished, sprinkle the basil over top. 


Tasty Kitchen Blog: Tropical Thai Chicken Curry. Guest post by Natalie Perry of Perry's Plate, recipe submitted by TK member Anetta of The Wanderlust Kitchen.

Aaaaaand serve.

I used brown basmati rice, but you can use jasmine rice, quinoa, or even cauliflower rice if you’re watching your grain intake.

Be sure to check out Anetta’s Tasty Kitchen recipe box. Hers should really be called a treasure box with so many easy recipes from around the globe. Check out her blog, The Wanderlust Kitchen, too!


Tasty Kitchen Blog: Tropical Thai Chicken Curry. Guest post by Natalie Perry of Perry's Plate, recipe submitted by TK member Anetta of The Wanderlust Kitchen.

Note: I replaced the water in the recipe with additional coconut milk. I make my own coconut milk, which tends to be thinner than commercially canned coconut milk. Next time, I’ll just leave it out completely or reduce the coconut milk to get some of the water out. 


Printable Recipe

Tropical Thai Chicken Curry

See post on Anetta (The Wanderlust Kitchen)’s site!
5.00 Mitt(s) 1 Rating(s)1 vote, average: 5.00 out of 51 vote, average: 5.00 out of 51 vote, average: 5.00 out of 51 vote, average: 5.00 out of 51 vote, average: 5.00 out of 5

Prep Time:

Cook Time:

Difficulty: Easy

Servings: 4

4
x

Print Options

Page size Letter 3x5 4x6
Text Size Small Medium Large
Content Include description
Include prep time, etc.
Show image

Description

Pineapple and mango add sweetness to this rich and flavorful chicken curry dish. Under 500 calories per serving, and only 30 minutes until dinner is ready.

Ingredients

  • 1 can (14 Oz. Size) Coconut Milk, Divided
  • 2 Tablespoons Plus 1 Teaspoon Red Curry Paste
  • 2 Tablespoons Fish Sauce
  • 1 Tablespoon Palm Sugar Or Brown Sugar
  • 4 whole Wild Lime Leaves (or Juice From Half A Lime)
  • ½ cups Water
  • 1 pound Boneless, Skinless Chicken Breast, Very Thinly Sliced
  • 1 cup Fresh Pineapple Chunks
  • 1 whole Mango, Peeled And Diced
  • ⅓ cups Fresh Basil Leaves, Sliced
  • Cooked Jasmine Rice, To Serve

Preparation Instructions

1. Heat half the coconut milk in a wok or heavy-bottomed skillet over medium-high heat until foaming.

2. Add curry paste and stir to combine. Add fish sauce, sugar, and lime leaves and let cook for 1 minute. Add remaining coconut milk and water.

3. Add chicken, pineapple, and mango to the curry and let cook for 2-3 minutes. Reduce heat to simmer and continue to cook for 5 minutes or until chicken is cooked through.

4. Remove from heat. Remove wild lime leaves and stir in the sliced basil. Serve with jasmine rice.


_______________________________________

Be sure to check out Natalie’s own beautiful food blog, Perrys’ Plate, where you can see her growing collection of lovely recipes. There’s always something new to see there. Go visit now!

Profile photo of HowSweetEats

Pizza Stuffed Mushrooms

Posted by in Step-by-Step Recipes

Tasty Kitchen Blog: Pizza Stuffed Mushrooms. Guest post by Jessica Merchant of How Sweet It Is, recipe submitted by TK member Lauren of Lauren's Latest.

 
Once upon a time I loathed mushrooms. I mean, really. I wouldn’t even consider eating them—I didn’t care if they were on pizza or piled high atop a filet. Didn’t matter. It wasn’t happening.

Then I got married.

My husband goes through these huge phases with different foods (I once caramelized onions every day for what was probably three or four months) and sure enough, mushrooms made the list. For a few weeks he wanted soft and juicy sauteed mushrooms in every meal that I could fit them. And one day? Well, I got hungry and took a bite.

Pleasantly surprised, I kept on eating. My aversion quickly turned to love and soon enough, I was the one who couldn’t get enough of mushrooms. These days I find myself including them in grilled sandwiches, pasta dishes and even grains. Sometimes I eat them (gasp!) plain as a side dish. It gets pretty crazy over here.

And then … then I saw Lauren’s recipe for Pizza Stuffed Mushrooms. Seriously? Could my life get any better? I knew they’d be happening—like, immediately. And they did. And they were to die for. And now I want to eat more. For breakfast.

Here’s how you make ‘em!


Tasty Kitchen Blog: Pizza Stuffed Mushrooms. Guest post by Jessica Merchant of How Sweet It Is, recipe submitted by TK member Lauren of Lauren's Latest.

You need: baby bella stuffing mushrooms, cream cheese, green pepper, red onion, pepperoni, black olives, garlic salt or powder, dried basil and oregano and black pepper. And also some grated Parmesan or mozzarella cheese!


Tasty Kitchen Blog: Pizza Stuffed Mushrooms. Guest post by Jessica Merchant of How Sweet It Is, recipe submitted by TK member Lauren of Lauren's Latest.

First up, clean those mushrooms. Using a damp rag or paper towel, simply wipe the dirt off each. Then remove the stem. It should pop right out.


Tasty Kitchen Blog: Pizza Stuffed Mushrooms. Guest post by Jessica Merchant of How Sweet It Is, recipe submitted by TK member Lauren of Lauren's Latest.

In a bowl, mix together the cream cheese, grated cheese, garlic powder, basil, oregano, salt and pepper.


Tasty Kitchen Blog: Pizza Stuffed Mushrooms. Guest post by Jessica Merchant of How Sweet It Is, recipe submitted by TK member Lauren of Lauren's Latest.

Add in the chopped green peppers, olives, pepperoni and red onion. Mix it together well.


Tasty Kitchen Blog: Pizza Stuffed Mushrooms. Guest post by Jessica Merchant of How Sweet It Is, recipe submitted by TK member Lauren of Lauren's Latest.

Stuff about a teaspoon or so of the cheesy mix into each mushroom.


Tasty Kitchen Blog: Pizza Stuffed Mushrooms. Guest post by Jessica Merchant of How Sweet It Is, recipe submitted by TK member Lauren of Lauren's Latest.

After every mushroom is stuffed, you want to bake them for 20 minutes. When 20 minutes has passed, switch on the broiler and broil until the cheese is golden and bubbly …


Tasty Kitchen Blog: Pizza Stuffed Mushrooms. Guest post by Jessica Merchant of How Sweet It Is, recipe submitted by TK member Lauren of Lauren's Latest.

Just like this.


Tasty Kitchen Blog: Pizza Stuffed Mushrooms. Guest post by Jessica Merchant of How Sweet It Is, recipe submitted by TK member Lauren of Lauren's Latest.

Serve warm, so the cheese is melty and creamy. Like a mini portable pizza!


Tasty Kitchen Blog: Pizza Stuffed Mushrooms. Guest post by Jessica Merchant of How Sweet It Is, recipe submitted by TK member Lauren of Lauren's Latest.

We couldn’t believe how much the mushrooms really did taste like pizza. Even my husband, who isn’t a huge fan of black olives, scarfed three right out of the oven, searing his taste buds out of existence. These are truly fantastic and will surely be one of my go-to appetizers.

Thanks so much to Lauren’s for the recipe. Check out her fabulous blog Lauren’s Latest where she shares her incredible culinary creativity.


Printable Recipe

Pizza Stuffed Mushrooms

See post on Lauren's Latest’s site!
4.66 Mitt(s) 3 Rating(s)3 votes, average: 4.66 out of 53 votes, average: 4.66 out of 53 votes, average: 4.66 out of 53 votes, average: 4.66 out of 53 votes, average: 4.66 out of 5

Prep Time:

Cook Time:

Difficulty: Easy

Servings: 2

2
x

Print Options

Page size Letter 3x5 4x6
Text Size Small Medium Large
Content Include description
Include prep time, etc.
Show image

Description

A great way to turn mushroom haters into lovers!

Ingredients

  • 10 whole Baby Bella Or Crimini Mushrooms
  • 4 ounces, weight Cream Cheese, Softened
  • ¼ cups Grated Parmesan Or Mozzarella Cheese
  • ¼ teaspoons Dried Basil
  • ⅛ teaspoons Dried Oregano
  • Garlic Salt And Pepper, To Taste
  • ¼ cups Finely Diced Pepperoni
  • 2 Tablespoons Finely Chopped Green Pepper
  • 2 Tablespoons Finely Chopped Red Onion
  • 2 Tablespoons Finely Chopped Black Olives

Preparation Instructions

Preheat oven to 350ºF. Spray two mini iron skillets with non stick cooking spray and set aside. (A sheet tray will work just fine, too!)

Wash mushrooms with a damp cloth and remove stems. (They should just pop out!) Set aside.

In a small bowl, stir cream cheese, parmesan, basil, oregano, garlic salt and pepper together until combined. Stir in remaining ingredients, excluding the mushrooms.

Spoon into prepared mushroom caps by the heaping teaspoonful. Place 5 in each skillet and bake 20 minutes. After 20 minutes, switch your oven from bake to broil and brown the tops of each mushroom. Remove and serve hot.


_______________________________________

Jessica Merchant is a personal trainer turned food writer and blogger. Her blog, How Sweet Eats, is where she proclaims her love for all things sweet, all things bacon, and everything else in between. She works her magic in her Pittsburgh kitchen, which she shares with her husband of 2 years.


Profile photo of Natalie | Perry's Plate

Quick and Easy Baked Apples

Posted by in Baking

It’s apple season! Celebrate with these quick and easy baked apples. Reposted from December 2014.

 
Tasty Kitchen Blog: Baked Apples. Guest post by Natalie Perry of Perry's Plate, recipe submitted by TK member Laura of My Friend's Bakery.

I’m not sure if it’s fair that pumpkin gets the most culinary attention when fall rolls around. As much as I love me some pumpkin [insert any dish that can feasibly be made with pumpkin], I’d much prefer something with apples. 

I could live off of apple pie, apple crisp, apple-filled crepes, apple cider syrup-covered pancakes, apple-cheddar squash soup … you get the idea. Just bury me in apples, and I’ll be a happy girl. 

One treat I don’t make too often is baked apples. I’m not sure why. Oh, wait, yes I do. It’s the hollowing out of the apples, which, in my head, seems like a chore, but in reality only takes a few minutes. I need to quit playing mind games with myself because I’ve been seriously missing out. 

We had some friends over for dinner recently, and I searched for a simple and delicious dessert to make. I also wanted something that screamed fall. The Baked Apples recipe submitted by TK member Laura seemed like just the thing I was searching for. 


Tasty Kitchen Blog: Baked Apples. Guest post by Natalie Perry of Perry's Plate, recipe submitted by TK member Laura of My Friend's Bakery.

First, let’s gather our ingredients! To be honest, when I gathered everything I kept thinking that this couldn’t possibly be everything. I even grabbed an extra stick of butter. (You know, just in case.) Really, all you need are smallish baking apples, oats, brown sugar, cinnamon, and softened butter. That’s it.

This is an excellent jumping point for adaptations! If you’re avoiding dairy, grains, or refined sugar, you can use coconut oil, chopped nuts/dried fruit/coconut, and honey. You could also play with the spices and add some nutmeg or cardamom for a more exotic taste. The only substitution I made was using coconut sugar instead of brown sugar. 


Tasty Kitchen Blog: Baked Apples. Guest post by Natalie Perry of Perry's Plate, recipe submitted by TK member Laura of My Friend's Bakery.

Okay, now for the part that I dread (which isn’t that bad, really). Grab a sharp paring knife and cut around the stem of the apple, going about 1/3 the way into the center. 


Tasty Kitchen Blog: Baked Apples. Guest post by Natalie Perry of Perry's Plate, recipe submitted by TK member Laura of My Friend's Bakery.

You can also use a spoon at this point to scrape out any seeds or tough bits of core remaining. Repeat with remaining apples.


Tasty Kitchen Blog: Baked Apples. Guest post by Natalie Perry of Perry's Plate, recipe submitted by TK member Laura of My Friend's Bakery.

If you’re assembling these early and plan to refrigerate them for a few hours before baking them, I would rub some lemon juice on the insides of the apples so they don’t turn brown. Lemon juice will brighten the flavor of the apples, too.  If you happen to have a two-year-old around who is dying to help you, they’re great for that.


Tasty Kitchen Blog: Baked Apples. Guest post by Natalie Perry of Perry's Plate, recipe submitted by TK member Laura of My Friend's Bakery.

Grab a baking dish large enough to hold all of the apples. My 9×13 inch glass baking dish was the perfect size. Brush a liberal amount of butter on the sides and bottom of the pan. Don’t be shy. 


Tasty Kitchen Blog: Baked Apples. Guest post by Natalie Perry of Perry's Plate, recipe submitted by TK member Laura of My Friend's Bakery.

Sprinkle some of the brown sugar into the pan as well.


Tasty Kitchen Blog: Baked Apples. Guest post by Natalie Perry of Perry's Plate, recipe submitted by TK member Laura of My Friend's Bakery.

Nestle your apples into the pan so they all stay upright. You don’t want that precious filling to spill out!


Tasty Kitchen Blog: Baked Apples. Guest post by Natalie Perry of Perry's Plate, recipe submitted by TK member Laura of My Friend's Bakery.

Speaking of the filling, grab a small bowl and pour the oats in. 


Tasty Kitchen Blog: Baked Apples. Guest post by Natalie Perry of Perry's Plate, recipe submitted by TK member Laura of My Friend's Bakery.

Add the cinnamon (and any other spices you’d like to add).


Tasty Kitchen Blog: Baked Apples. Guest post by Natalie Perry of Perry's Plate, recipe submitted by TK member Laura of My Friend's Bakery.

And the rest of the brown sugar.


Tasty Kitchen Blog: Baked Apples. Guest post by Natalie Perry of Perry's Plate, recipe submitted by TK member Laura of My Friend's Bakery.

Give it a good mix. Or have your kitchen-maid-in-training do it for you.


Tasty Kitchen Blog: Baked Apples. Guest post by Natalie Perry of Perry's Plate, recipe submitted by TK member Laura of My Friend's Bakery.

This is the fun part. Put the rest of the softened butter in the oats and, using your hands, blend it until the butter is incorporated and you get a crumbly texture.


Tasty Kitchen Blog: Baked Apples. Guest post by Natalie Perry of Perry's Plate, recipe submitted by TK member Laura of My Friend's Bakery.

I knew she wouldn’t be able to resist this part.


Tasty Kitchen Blog: Baked Apples. Guest post by Natalie Perry of Perry's Plate, recipe submitted by TK member Laura of My Friend's Bakery.

This is roughly the texture you’re looking for. Try not to eat it right out of the bowl. Believe me, it’s hard.


Tasty Kitchen Blog: Baked Apples. Guest post by Natalie Perry of Perry's Plate, recipe submitted by TK member Laura of My Friend's Bakery.

Call your lovely assistant back over and have her spoon the filling into the apples. I was surprised at how well she did this. This is such a great recipe to involve kids in the kitchen!


Tasty Kitchen Blog: Baked Apples. Guest post by Natalie Perry of Perry's Plate, recipe submitted by TK member Laura of My Friend's Bakery.

We just kept piling it on until we ran out of filing. 

Pop them into the oven for a while and …


Tasty Kitchen Blog: Baked Apples. Guest post by Natalie Perry of Perry's Plate, recipe submitted by TK member Laura of My Friend's Bakery.

Not only will your house smell amazing, but you’re super close to heaven in a bowl.


Tasty Kitchen Blog: Baked Apples. Guest post by Natalie Perry of Perry's Plate, recipe submitted by TK member Laura of My Friend's Bakery.

The instructions say to spoon the caramel sauce from the pan over the apples, but I didn’t have much sauce to speak of. Instead, we served these with vanilla bean gelato.

I also whipped up some sea salt vanilla bean caramel sauce and poured it over the top. Why I didn’t do that in the beginning is beyond me. If you’d like to make some homemade caramel sauce, there are a lots of recipes here on Tasty Kitchen! I included a few below that caught my eye.

Easy Caramel Sauce from Ree
Spiced Caramel Butter Sauce from Terri of That’s Some Good Cookin’
Vegan Caramel Sauce from tonijean
Salted Caramel Sauce from Megan Betz

Many thanks go to Laura for a fantastic and easy recipe to do with my kids! Be sure to check out her TK recipe box and her beautiful blog, My Friend’s Bakery, for more recipes. 


Printable Recipe

Baked Apples

See post on Laura @ My Friend's Bakery’s site!
5.00 Mitt(s) 1 Rating(s)1 vote, average: 5.00 out of 51 vote, average: 5.00 out of 51 vote, average: 5.00 out of 51 vote, average: 5.00 out of 51 vote, average: 5.00 out of 5

Prep Time:

Cook Time:

Difficulty: Easy

Servings: 9

9
x

Print Options

Page size Letter 3x5 4x6
Text Size Small Medium Large
Content Include description
Include prep time, etc.
Show image

Description

A simple, delicious dessert using fresh picked apples. Enjoy the season’s bountiful harvest.

Ingredients

  • FOR THE APPLES:
  • 9 whole Small Baking Apples, Like MacIntosh
  • 2 Tablespoons Butter, Room Temperature, For Greasing The Dish
  • 2 Tablespoons Brown Sugar
  • FOR THE FILLING:
  • ⅓ cups Butter, Room Temperature
  • ⅓ cups Brown Sugar
  • 1 cup Quick Cooking Oats
  • 1 teaspoon Ground Cinnamon

Preparation Instructions

Preheat the oven to 350 F.

Wash and core the apples. Generously coat the bottom of an oven-safe baking dish (use one that’s big enough to fit all the apples into) with butter. Sprinkle the first amount of brown sugar over the base of the dish. Arrange the apples into the baking dish to fit.

In a separate bowl, crumble together the filling ingredients. Fill each cored apple with a generous amount of the filling.

Bake the apples for 30 to 40 minutes until soft. Remove from the oven and place 1 or 2 apples on each serving plate. Use a spoon to scoop some of the hot caramel from the bottom of the dish, and spoon it over each apple. Serve with a scoop of vanilla ice cream.


_______________________________________

Be sure to check out Natalie’s own beautiful food blog, Perrys’ Plate, where you can see her growing collection of lovely recipes. There’s always something new to see there. Go visit now!


Profile photo of Erica Lea

Gingerbread Waffles

Posted by in Holidays

This Gingerbread Waffle recipe, brought to us by the lovely Emily, is basically an excuse to eat dessert for breakfast (or any meal of the day). And I'm very much okay with that.

Profile photo of Natalie | Perry's Plate

Scalloped Hasselback Sweet Potatoes

Posted by in Holidays

This Scalloped Hasselback Sweet Potatoes recipe submitted by TK member Tove is the newest addition to my special occasion recipe file.

Profile photo of Erica Lea

Figgy Piggy Pizza

Posted by in Step-by-Step Recipes

This little pizza would make a fantastic (fancy) appetizer for a dinner party. It is surprisingly easy to make, and the list of (just ten) ingredients is actually quite reasonable.

Profile photo of georgiapellegrini

Homemade Grape Nuts

Posted by in Step-by-Step Recipes

  Homemade cereal, what a revelation! Zoe Dawn’s recipe for homemade grape nuts thrilled me. I’ve made homemade granola before, but never grape nuts. So I was excited to give this a try. And I have to say, I liked it even more than the kind you get in the store.       You […]