The Pioneer Woman Tasty Kitchen
Profile photo of Natalie | Perry's Plate

Bacon Stuffed Roasted Chicken with Cauliflower

Posted by in Step-by-Step Recipes

Tasty Kitchen Blog: Bacon Stuffed Whole Roasted Chicken with Cauliflower. Guest post by Natalie Perry of Perry's Plate, recipe submitted by TK member Jennifer of Mama Schelle Says.

 
I’ve been dying to share this with you. This recipe for Bacon Stuffed Roasted Chicken with Caulflower comes from TK member Mama Schell. But I really think it came from angels. Or maybe Mama Schell is actually an angel herself. Wouldn’t surprise me. 

A roasted chicken with bacon stuffed under the skin cooking over pieces of cauliflower and fresh garlic can only be heaven-sent. You’ll never look at chicken the same way again. Or cauliflower.

You’ll never believe how simple this is, too! Let’s get started.


Tasty Kitchen Blog: Bacon Stuffed Whole Roasted Chicken with Cauliflower. Guest post by Natalie Perry of Perry's Plate, recipe submitted by TK member Jennifer of Mama Schelle Says.

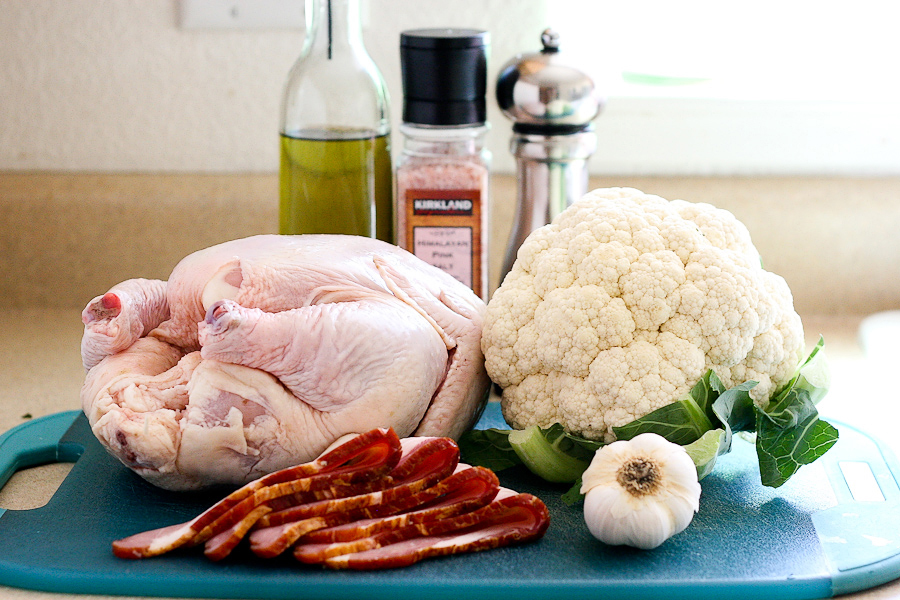
You only need a few things: a whole chicken, some bacon, a head of cauliflower, and a head of garlic. Oh, and some heat-safe oil (I used grapeseed), salt, and black pepper.


Tasty Kitchen Blog: Bacon Stuffed Whole Roasted Chicken with Cauliflower. Guest post by Natalie Perry of Perry's Plate, recipe submitted by TK member Jennifer of Mama Schelle Says.

Start preheating your oven while you get the chicken prepped. Once you remove the packaging and the creepy sack of organs (sorry, but it creeps me out), lift the skin and separate the skin from the breasts with your fingers. You can also use the end of a wooden spoon, but try not to rip the skin.


Tasty Kitchen Blog: Bacon Stuffed Whole Roasted Chicken with Cauliflower. Guest post by Natalie Perry of Perry's Plate, recipe submitted by TK member Jennifer of Mama Schelle Says.

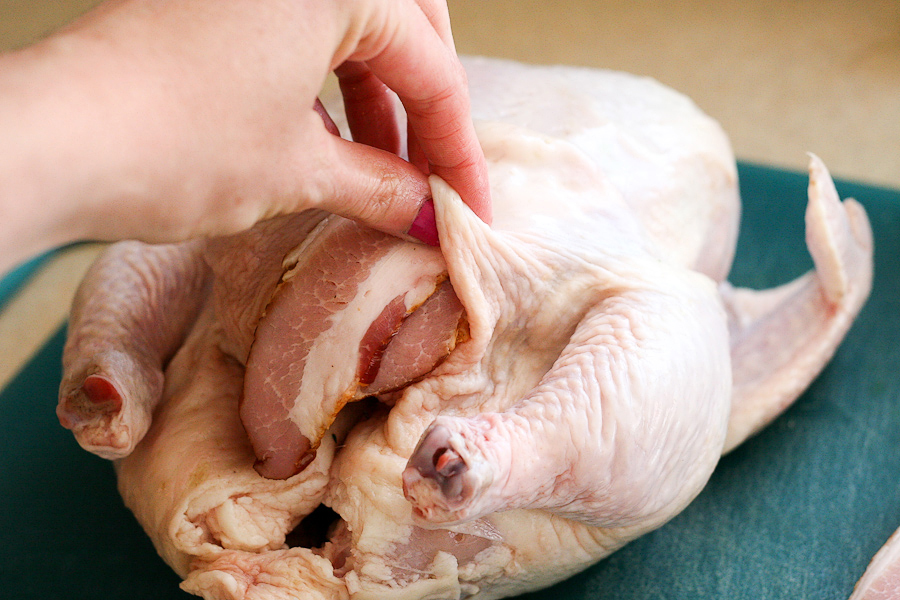
Now stuff two slices of bacon into each side. I folded mine in half and shoved them in there.


Tasty Kitchen Blog: Bacon Stuffed Whole Roasted Chicken with Cauliflower. Guest post by Natalie Perry of Perry's Plate, recipe submitted by TK member Jennifer of Mama Schelle Says.

I made the mistake of using thick-cut bacon, and you’ll see why it was a mistake in a minute.


Tasty Kitchen Blog: Bacon Stuffed Whole Roasted Chicken with Cauliflower. Guest post by Natalie Perry of Perry's Plate, recipe submitted by TK member Jennifer of Mama Schelle Says.

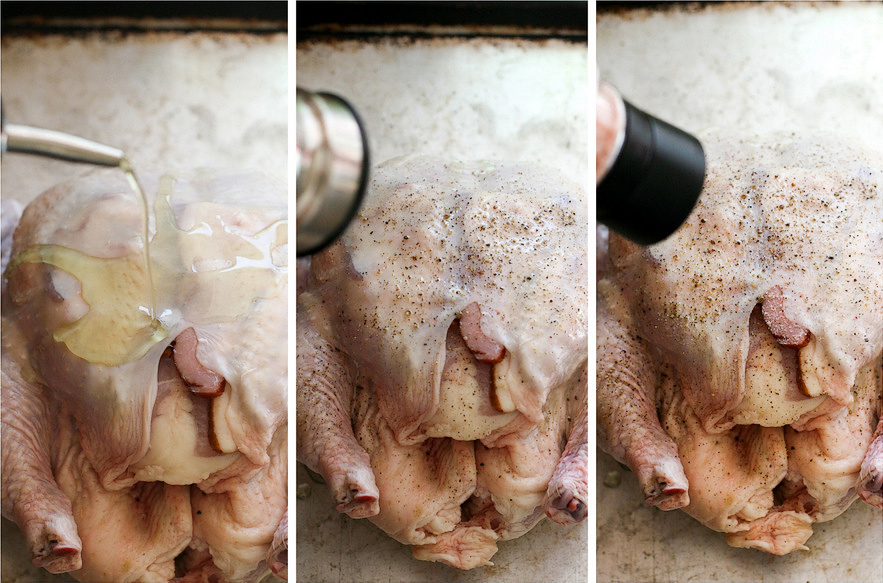
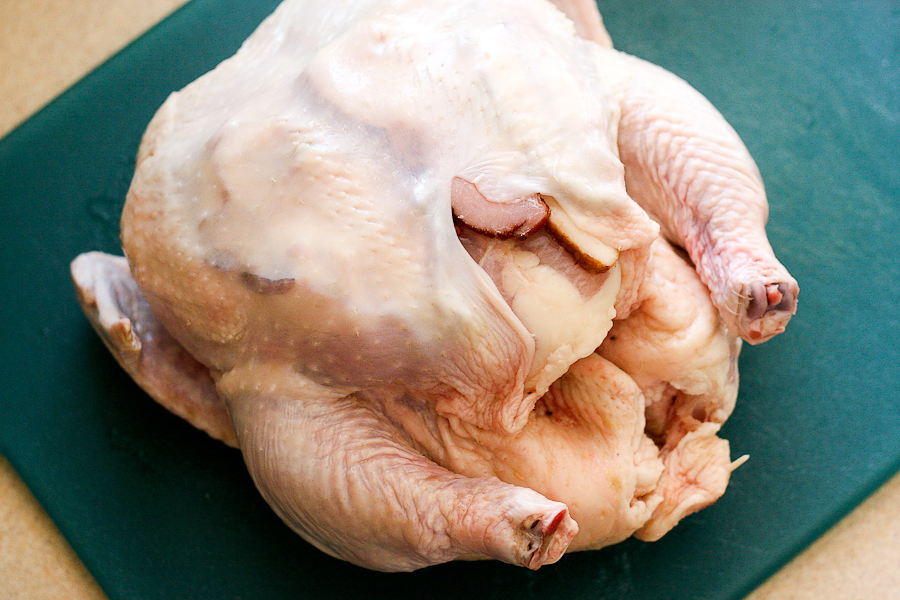
Place the chicken in a roasting pan or a rimmed metal baking sheet. I used a baking sheet because I wanted more of the cauliflower to have contact with the pan. Drizzle the chicken with oil and sprinkle with a generous amount of freshly ground black pepper and salt.


Tasty Kitchen Blog: Bacon Stuffed Whole Roasted Chicken with Cauliflower. Guest post by Natalie Perry of Perry's Plate, recipe submitted by TK member Jennifer of Mama Schelle Says. 

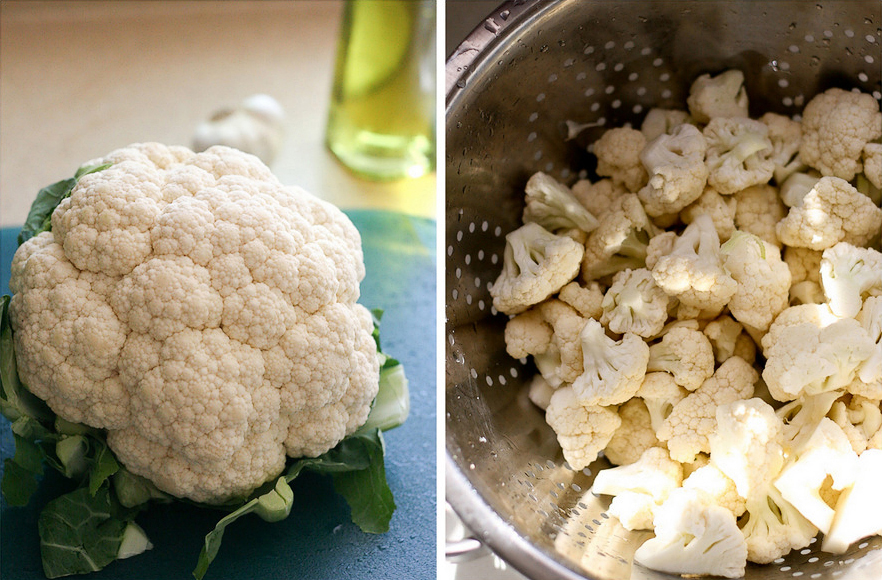
While the chicken is roasting away, start prepping the cauliflower! Cut away all of the greens and the tough stem, cut it into florets and rinse them off.


Tasty Kitchen Blog: Bacon Stuffed Whole Roasted Chicken with Cauliflower. Guest post by Natalie Perry of Perry's Plate, recipe submitted by TK member Jennifer of Mama Schelle Says.

Then take the head of garlic, place it root-side up and press hard on it with the palm of your hand. Lots easier than trying to pick apart those blasted cloves.


Tasty Kitchen Blog: Bacon Stuffed Whole Roasted Chicken with Cauliflower. Guest post by Natalie Perry of Perry's Plate, recipe submitted by TK member Jennifer of Mama Schelle Says.

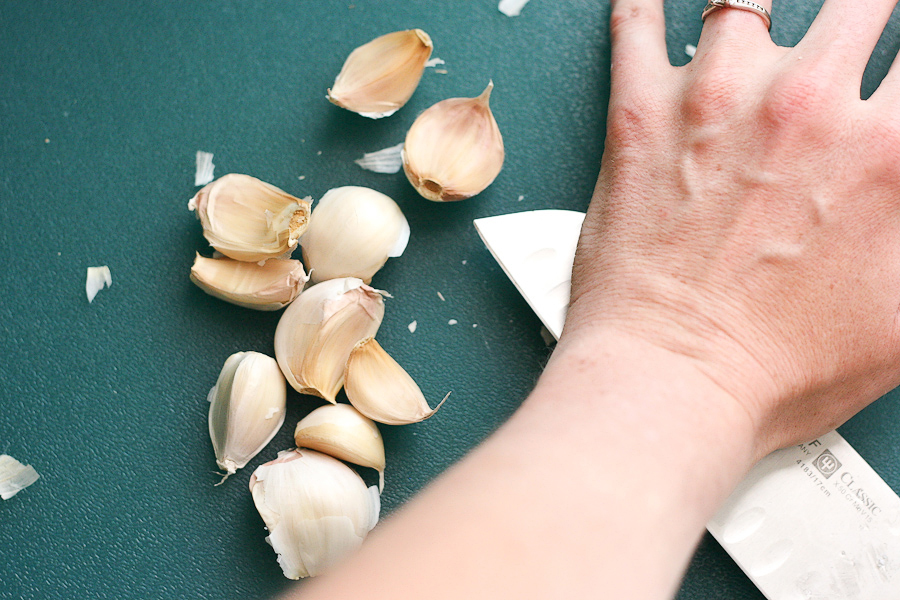
Here comes the fun part. Ok, not really. Just slightly annoying, but completely worth it in the end.

To make this go quickly, smash each clove with the side of your knife (and the palm of your hand), then the skin should fall off the clove easily. Most of the time.


Tasty Kitchen Blog: Bacon Stuffed Whole Roasted Chicken with Cauliflower. Guest post by Natalie Perry of Perry's Plate, recipe submitted by TK member Jennifer of Mama Schelle Says.

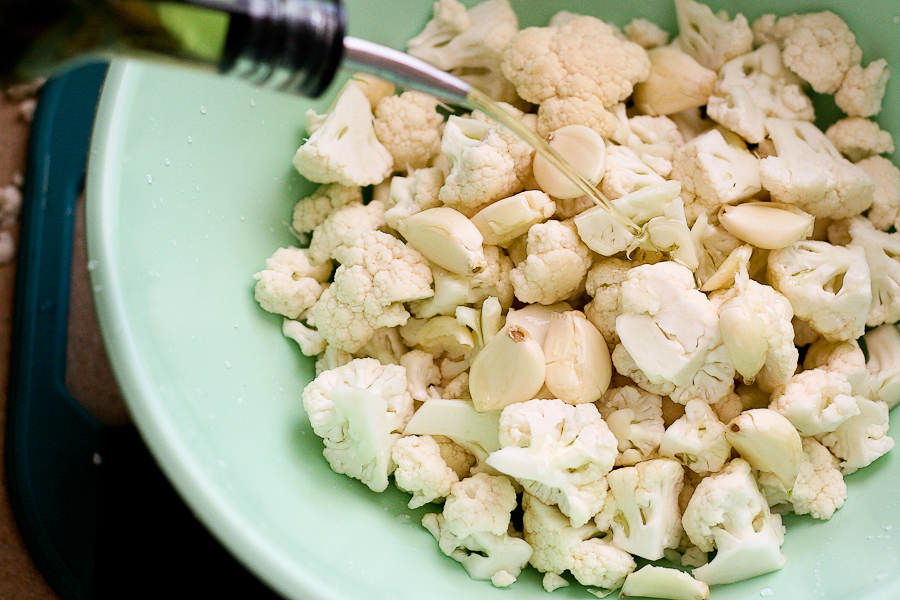
Put the cloves in a bowl with the washed cauliflower and drizzle with heat-safe oil (again, I used grapeseed).


Tasty Kitchen Blog: Bacon Stuffed Whole Roasted Chicken with Cauliflower. Guest post by Natalie Perry of Perry's Plate, recipe submitted by TK member Jennifer of Mama Schelle Says.

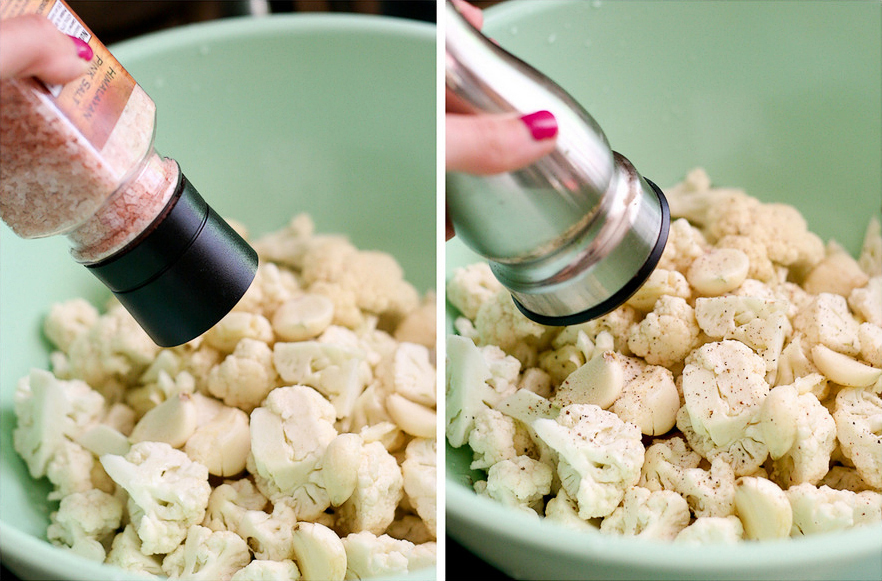
Hello again, salt and pepper. Set the cauliflower aside for a few minutes.


Tasty Kitchen Blog: Bacon Stuffed Whole Roasted Chicken with Cauliflower. Guest post by Natalie Perry of Perry's Plate, recipe submitted by TK member Jennifer of Mama Schelle Says.

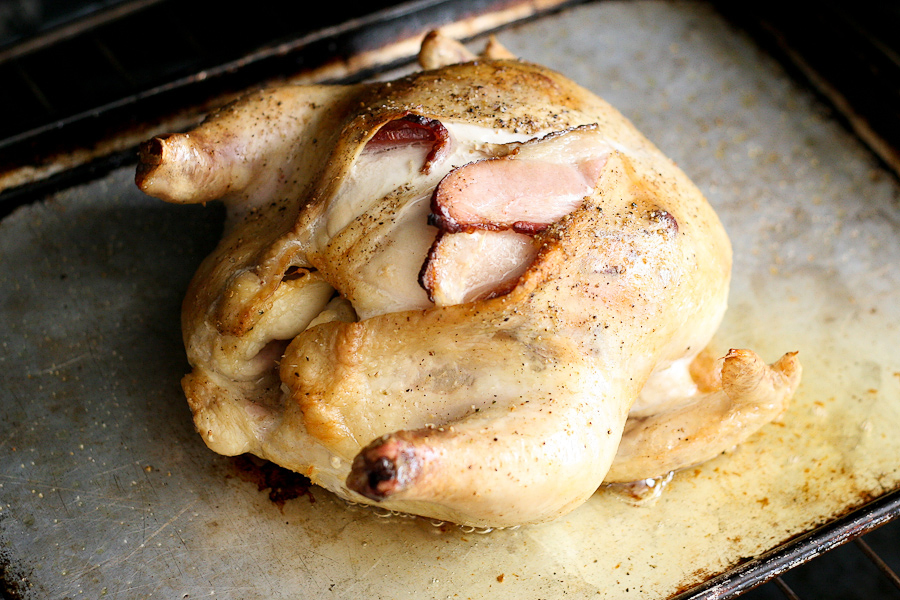
About halfway through roasting the chicken should look like this. Remember how I said I shouldn’t have used thick-cut bacon? I think that may be the reason why the chicken skin split. I wasn’t too concerned, though, because my entire house smelled like bacon and roasted chicken. That’s enough to take all your cares away. 


Tasty Kitchen Blog: Bacon Stuffed Whole Roasted Chicken with Cauliflower. Guest post by Natalie Perry of Perry's Plate, recipe submitted by TK member Jennifer of Mama Schelle Says.

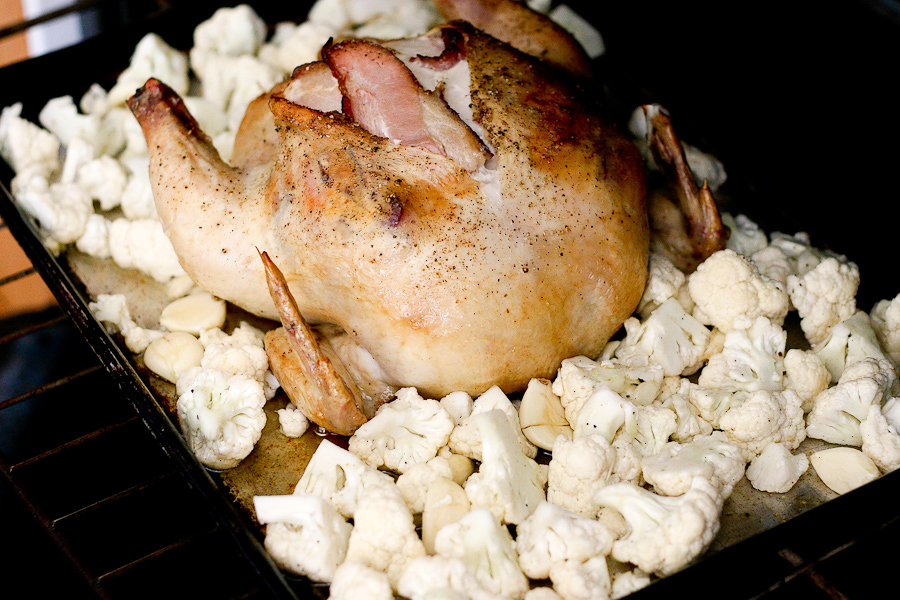
Spread the cauliflower and garlic around the chicken. Like I said, I prefer using a rimmed baking sheet for this because more of the cauliflower ends up having those dark, caramelized crispy bits on it. And because I don’t own a roasting pan. (Seriously, what’s wrong with me?)


Tasty Kitchen Blog: Bacon Stuffed Whole Roasted Chicken with Cauliflower. Guest post by Natalie Perry of Perry's Plate, recipe submitted by TK member Jennifer of Mama Schelle Says.

Stir the cauliflower around a couple of times while the chicken finishes up and this is what you end up with. I can hardly stand it. I’m salivating again just thinking about it.


Tasty Kitchen Blog: Bacon Stuffed Whole Roasted Chicken with Cauliflower. Guest post by Natalie Perry of Perry's Plate, recipe submitted by TK member Jennifer of Mama Schelle Says.

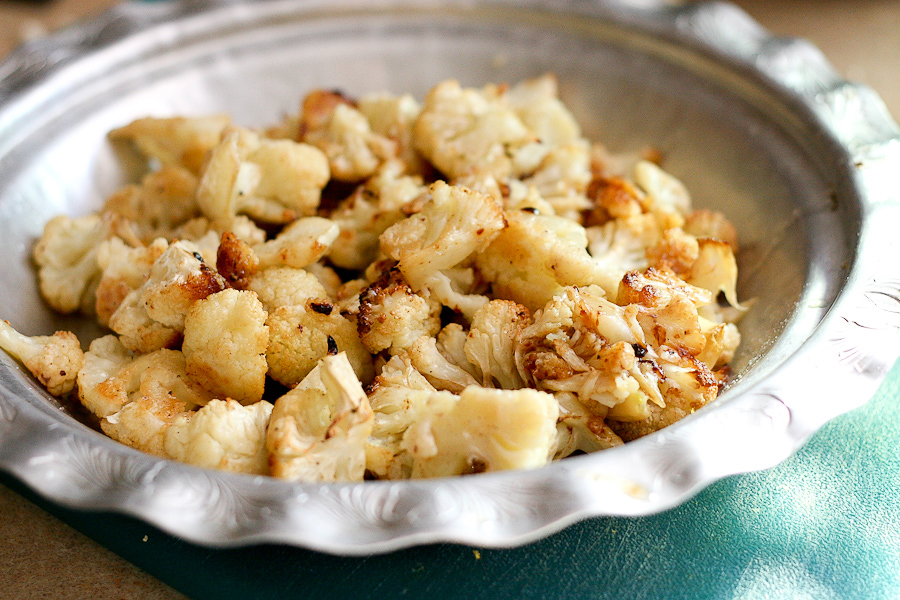
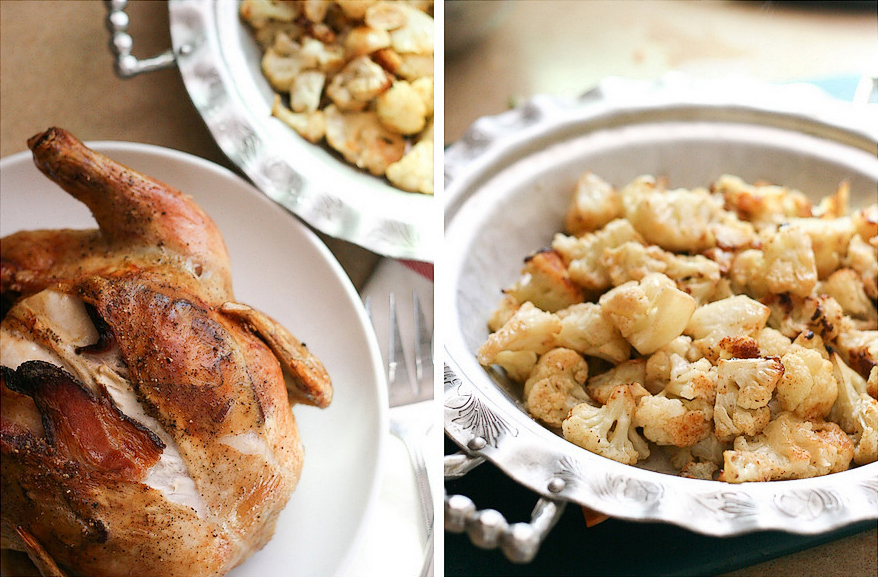
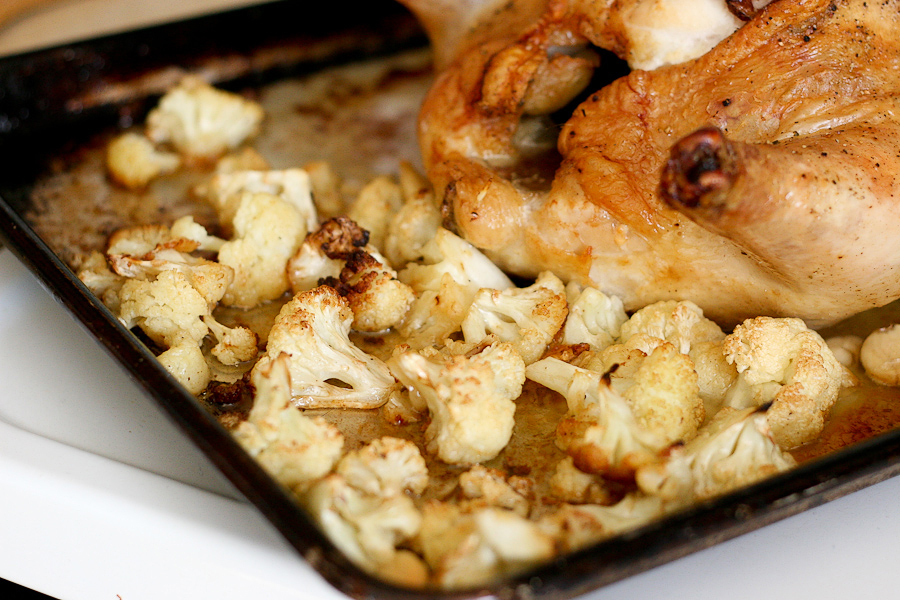
THIS is why you need to make this as soon as possible. I like cauliflower, but I never knew it could taste this good. Just about any vegetable roasted in bacon and chicken drippings will be palatable to any vegetable hater, but if you happen to love vegetables to begin with, you’ll be craving this every. single. day.


Tasty Kitchen Blog: Bacon Stuffed Whole Roasted Chicken with Cauliflower. Guest post by Natalie Perry of Perry's Plate, recipe submitted by TK member Jennifer of Mama Schelle Says.

Oh ya, the chicken was excellent as well. The breast meat that the bacon oozed on had this incredibly smoky flavor. And I kind of like that the skin split because it made some of the bacon crispy!

Thank you, Jennifer, for this recipe! Check out her TK Recipe Box and her blog, Mama Schell Says for more recipes and beautiful photography.

You’ll find the complete recipe and instructions in the handy printable below!


Printable Recipe

Bacon Stuffed Whole Roasted Chicken with Cauliflower

5.00 Mitt(s) 2 Rating(s)2 votes, average: 5.00 out of 52 votes, average: 5.00 out of 52 votes, average: 5.00 out of 52 votes, average: 5.00 out of 52 votes, average: 5.00 out of 5

Prep Time:

Cook Time:

Difficulty: Easy

Servings: 6

6
x

Print Options

Page size Letter 3x5 4x6
Text Size Small Medium Large
Content Include description
Include prep time, etc.
Show image

Description

Bacon Stuffed Whole Roasted Chicken with Cauliflower and garlic, or the only way to get my son and husband to eat cauliflower!

Ingredients

  • 1 whole Chicken
  • 4 slices Bacon
  • 1 head Cauliflower
  • 1 bulb Garlic (10-15 Cloves)
  • Salt And Pepper, To Taste
  • 3 Tablespoons Olive Oil

Preparation Instructions

Preheat oven to 450 degrees.

Clean 1 whole roasting chicken. Gently pull skin away from the breast and insert the four slices of bacon between the skin and breast of the chicken.

Place whole chicken (breast side up) in a roasting pan. Spray with cooking spray and sprinkle with salt and pepper or any other seasonings you may like.

Bake chicken in the oven at 450 degrees for 30 minutes.

While chicken is baking, cut up cauliflower into bite-sized pieces. Peel garlic cloves, leaving them whole, and place cauliflower and peeled garlic into a bowl. Toss with olive oil and season with salt and pepper.

Add cauliflower and garlic to the roasting pan with the chicken. Reduce heat to 400 degrees and cook for 30 more minutes, or until chicken is done.

Serve and enjoy!


_______________________________________

Be sure to check out Natalie’s own beautiful food blog, Perrys’ Plate, where you can see her growing collection of lovely recipes. There’s always something new to see there. Go visit now!


Profile photo of georgiapellegrini

Gluten-Free Coconut Muffins

Posted by in Baking, Step-by-Step Recipes

Tasty Kitchen Blog: Gluten-Free Coconut Muffins. Guest post by Georgia Pellegrini, recipe submitted by TK member Julia of The Roasted Root.

 
I tend to go for savory foods over sweet ones, but these Gluten Free Coconut Muffins from Tasty Kitchen member Julia really had me going back for more. They’re not too sweet, and filled with healthy coconut and rich olive oil. Eat them for breakfast or on the go, they’re very satisfying.


Tasty Kitchen Blog: Gluten-Free Coconut Muffins. Guest post by Georgia Pellegrini, recipe submitted by TK member Julia of The Roasted Root.

To make them you will need: shredded coconut, olive oil, baking soda, baking powder, eggs, vanilla extract, gluten free all purpose flour, salt, sugar, coconut milk and coconut flour.

Note: My first attempt at this recipe did not turn out quite as expected and the muffins collapsed. (I must have been missing my gluten-free baking mojo that day!) But they tasted good, so I was determined to make it work. I made some changes to the recipe, which did the trick for me. I’ll list those changes at the end of the post.


Tasty Kitchen Blog: Gluten-Free Coconut Muffins. Guest post by Georgia Pellegrini, recipe submitted by TK member Julia of The Roasted Root.

In a bowl combine the two flours.


Tasty Kitchen Blog: Gluten-Free Coconut Muffins. Guest post by Georgia Pellegrini, recipe submitted by TK member Julia of The Roasted Root.

Add the baking soda …


Tasty Kitchen Blog: Gluten-Free Coconut Muffins. Guest post by Georgia Pellegrini, recipe submitted by TK member Julia of The Roasted Root.

And baking powder.


Tasty Kitchen Blog: Gluten-Free Coconut Muffins. Guest post by Georgia Pellegrini, recipe submitted by TK member Julia of The Roasted Root.

Sprinkle in the sugar (I used 3/4 cup) …


Tasty Kitchen Blog: Gluten-Free Coconut Muffins. Guest post by Georgia Pellegrini, recipe submitted by TK member Julia of The Roasted Root.

Followed by part of the coconut.


Tasty Kitchen Blog: Gluten-Free Coconut Muffins. Guest post by Georgia Pellegrini, recipe submitted by TK member Julia of The Roasted Root.

Give it all a nice stir and set aside.


Tasty Kitchen Blog: Gluten-Free Coconut Muffins. Guest post by Georgia Pellegrini, recipe submitted by TK member Julia of The Roasted Root.

In a separate bowl combine the wet ingredients, first the egg …


Tasty Kitchen Blog: Gluten-Free Coconut Muffins. Guest post by Georgia Pellegrini, recipe submitted by TK member Julia of The Roasted Root.

Then the olive oil (I used 1/4 cup) …


Tasty Kitchen Blog: Gluten-Free Coconut Muffins. Guest post by Georgia Pellegrini, recipe submitted by TK member Julia of The Roasted Root.

Then coconut milk (I used 1 cup) …


Tasty Kitchen Blog: Gluten-Free Coconut Muffins. Guest post by Georgia Pellegrini, recipe submitted by TK member Julia of The Roasted Root.

And finally the anilla extract. Mix it all together very, very well.


Tasty Kitchen Blog: Gluten-Free Coconut Muffins. Guest post by Georgia Pellegrini, recipe submitted by TK member Julia of The Roasted Root.

Pour the liquid ingredients into the bowl of dry ingredients.


Tasty Kitchen Blog: Gluten-Free Coconut Muffins. Guest post by Georgia Pellegrini, recipe submitted by TK member Julia of The Roasted Root.

Combine them together with a spatula…


Tasty Kitchen Blog: Gluten-Free Coconut Muffins. Guest post by Georgia Pellegrini, recipe submitted by TK member Julia of The Roasted Root.

Until you have a uniform consistency.


Tasty Kitchen Blog: Gluten-Free Coconut Muffins. Guest post by Georgia Pellegrini, recipe submitted by TK member Julia of The Roasted Root.

Pour the batter into some greased tins.


Tasty Kitchen Blog: Gluten-Free Coconut Muffins. Guest post by Georgia Pellegrini, recipe submitted by TK member Julia of The Roasted Root.

And sprinkle the tops with shredded coconut.


Tasty Kitchen Blog: Gluten-Free Coconut Muffins. Guest post by Georgia Pellegrini, recipe submitted by TK member Julia of The Roasted Root.

In about 20 minutes you will have fluffy, soft and healthy coconut muffins. They are great for any time of day, even a midnight snack. Thanks to Julia for this recipe! Visit her website The Roasted Root for other delicious treats.

As promised, here are the changes I made. I used:

1/4 cup olive oil
1 cup coconut milk
3/4 cup sugar

Fill the tins 3/4 full and you will yield 9 muffins.


Printable Recipe

Gluten Free Coconut Muffins

See post on Julia {The Roasted Root}’s site!
0.00 Mitt(s) 0 Rating(s)0 votes, average: 0.00 out of 50 votes, average: 0.00 out of 50 votes, average: 0.00 out of 50 votes, average: 0.00 out of 50 votes, average: 0.00 out of 5

Prep Time:

Cook Time:

Difficulty: Easy

Servings: 12

12
x

Print Options

Page size Letter 3x5 4x6
Text Size Small Medium Large
Content Include description
Include prep time, etc.
Show image

Description

Delicious and nutritious coconut muffins made with all sorts of coconut-y greatness!

Ingredients

  • 1 cup Gluten-free All-purpose Flour
  • ½ cups Coconut Flour
  • 2 teaspoons Baking Powder
  • 1 teaspoon Baking Soda
  • 1 cup Granulated Sugar
  • ½ teaspoons Salt
  • 1-½ cup Unsweetened Shredded Coconut, Divided
  • 2 whole Eggs
  • ⅓ cups Olive Oil
  • 2 cups Full-fat Coconut Milk
  • 1 teaspoon Vanilla Extract

Preparation Instructions

Preheat the oven to 350 F and lightly oil a 12-muffin pan. Set pan aside.

In a large mixing bowl, combine the flours, baking powder, baking soda, sugar, salt and one cup of the shredded coconut.

In a separate bowl, whisk together the remaining (wet) ingredients.

Pour the wet ingredients into the bowl with the flour mixture and mix until combined.

Pour the batter into the prepared muffin pan.

Sprinkle the remaining half cup of shredded coconut over the batter and bake in the oven for 22 to 25 minutes until a toothpick inserted into the center of a muffin comes out clean.


_______________________________________

There’s so much to say about Georgia, we don’t know where to start. Leaving Wall Street for the French Culinary Institute, followed by a stint at the Gramercy Tavern and La Chassagnette in France, her passion for food and food traditions are evident and inspiring. Visit her site at Georgia Pellegrini, where you’ll find more recipes, photos, learn all about her wonderful books Girl Hunter and Food Heroes, and enjoy her latest adventures.


Profile photo of Amber {Sprinkled With Flour}

Darn Good Ham and Cheese Sliders

Posted by in Step-by-Step Recipes

Tasty Kitchen Blog: Darn Good Ham and Cheese Sliders. Guest post by Amber Potter of Sprinkled with Flour, recipe submitted by TK member Lindsay of Perfecting the Pairing.


I love quick and easy weeknight meals, especially when they taste like you’ve been slaving in the kitchen for hours, creating a fusion of delicious flavors that’s nothing short of a masterpiece. Extra points are awarded if I can get the entire family to eat it, which is what happened when I whipped up these Ham and Cheese Sliders from TK member Lindsay.

The secret is in the special sauce that’s drizzled on top, then the little nuggets of gold are baked until they are gooey and caramelized. Trust me, these babies are good and your whole family will thank you for making them.


Tasty Kitchen Blog: Darn Good Ham and Cheese Sliders. Guest post by Amber Potter of Sprinkled with Flour, recipe submitted by TK member Lindsay of Perfecting the Pairing.

You’ll need: Hawaiian rolls, deli ham, sliced provolone cheese, butter, brown sugar, Dijon mustard, Worcestershire sauce and poppy seeds. Sounds good already, doesn’t it?


Tasty Kitchen Blog: Darn Good Ham and Cheese Sliders. Guest post by Amber Potter of Sprinkled with Flour, recipe submitted by TK member Lindsay of Perfecting the Pairing.

Preheat your oven to 350ºF. Line a rimmed baking sheet with nonstick foil. Arrange your sliced rolls on the baking sheet.


Tasty Kitchen Blog: Darn Good Ham and Cheese Sliders. Guest post by Amber Potter of Sprinkled with Flour, recipe submitted by TK member Lindsay of Perfecting the Pairing.

Place a slice of ham on each roll.


Tasty Kitchen Blog: Darn Good Ham and Cheese Sliders. Guest post by Amber Potter of Sprinkled with Flour, recipe submitted by TK member Lindsay of Perfecting the Pairing.

Followed by a slice of your cheese.


Tasty Kitchen Blog: Darn Good Ham and Cheese Sliders. Guest post by Amber Potter of Sprinkled with Flour, recipe submitted by TK member Lindsay of Perfecting the Pairing.

In a small bowl combine the butter …


Tasty Kitchen Blog: Darn Good Ham and Cheese Sliders. Guest post by Amber Potter of Sprinkled with Flour, recipe submitted by TK member Lindsay of Perfecting the Pairing.

The brown sugar …


Tasty Kitchen Blog: Darn Good Ham and Cheese Sliders. Guest post by Amber Potter of Sprinkled with Flour, recipe submitted by TK member Lindsay of Perfecting the Pairing.

The mustard …


Tasty Kitchen Blog: Darn Good Ham and Cheese Sliders. Guest post by Amber Potter of Sprinkled with Flour, recipe submitted by TK member Lindsay of Perfecting the Pairing.

And the Worcestershire sauce.


Tasty Kitchen Blog: Darn Good Ham and Cheese Sliders. Guest post by Amber Potter of Sprinkled with Flour, recipe submitted by TK member Lindsay of Perfecting the Pairing.

Microwave until the butter is just melted, about 30-60 seconds.


Tasty Kitchen Blog: Darn Good Ham and Cheese Sliders. Guest post by Amber Potter of Sprinkled with Flour, recipe submitted by TK member Lindsay of Perfecting the Pairing.

Add the poppy seeds and stir until combined.


Tasty Kitchen Blog: Darn Good Ham and Cheese Sliders. Guest post by Amber Potter of Sprinkled with Flour, recipe submitted by TK member Lindsay of Perfecting the Pairing.

Place the top half of the roll on top to assemble your sandwich.


Tasty Kitchen Blog: Darn Good Ham and Cheese Sliders. Guest post by Amber Potter of Sprinkled with Flour, recipe submitted by TK member Lindsay of Perfecting the Pairing.

Drizzle the butter mixture evenly over the sandwiches.


Tasty Kitchen Blog: Darn Good Ham and Cheese Sliders. Guest post by Amber Potter of Sprinkled with Flour, recipe submitted by TK member Lindsay of Perfecting the Pairing.

Just use your own judgement on how much to use. I used all of my sauce.


Tasty Kitchen Blog: Darn Good Ham and Cheese Sliders. Guest post by Amber Potter of Sprinkled with Flour, recipe submitted by TK member Lindsay of Perfecting the Pairing.

Bake in the oven until the cheese has melted and the butter mixture starts to caramelize, about 10 minutes. 


Tasty Kitchen Blog: Darn Good Ham and Cheese Sliders. Guest post by Amber Potter of Sprinkled with Flour, recipe submitted by TK member Lindsay of Perfecting the Pairing.

Serve warm and enjoy the deliciousness!


Tasty Kitchen Blog: Darn Good Ham and Cheese Sliders. Guest post by Amber Potter of Sprinkled with Flour, recipe submitted by TK member Lindsay of Perfecting the Pairing.

Thanks Lindsay for sharing such a delicious sandwich recipe with us! This will make a regular rotation at our house. Don’t forget to stop by Lindsay’s blog Perfecting The Pairing, where you can find the original recipe and see more of her tasty dishes!


Printable Recipe

Darn Good Ham and Cheese Sliders

See post on Lindsay’s site!
4.90 Mitt(s) 20 Rating(s)20 votes, average: 4.90 out of 520 votes, average: 4.90 out of 520 votes, average: 4.90 out of 520 votes, average: 4.90 out of 520 votes, average: 4.90 out of 5

Prep Time:

Cook Time:

Difficulty: Easy

Servings: 6

6
x

Print Options

Page size Letter 3x5 4x6
Text Size Small Medium Large
Content Include description
Include prep time, etc.
Show image

Description

These Darn Good Ham and Cheese Sliders may look like any other sandwich, but they are so much better. They are darn good.

Ingredients

  • 12 whole Hawaiian Rolls, Split
  • 12 slices Deli Ham
  • 6 slices Deli Provolone Cheese, Halved
  • 4 Tablespoons Butter
  • 1 Tablespoon Brown Sugar
  • 1-½ teaspoon Dijon Mustard
  • 1-½ teaspoon Worcestershire Sauce
  • ¼ teaspoons Poppy Seeds

Preparation Instructions

Preheat your oven to 350 F.

Line a rimmed baking sheet with non-stick foil. Assemble the sandwiches with a slice of ham and a half slice of cheese on the bottom half of each roll and top with the top half of the roll. Place the assembled sandwiches close together on the baking sheet.

In a small bowl combine the butter, sugar, mustard and Worcestershire sauce. Microwave until the butter is just melted, about 30-60 seconds. Add the poppy seeds and stir until combined.

Drizzle the butter mixture evenly over the sandwiches. Bake in the oven until the cheese has melted and the butter mixture starts to caramelize, about 10 minutes. Serve warm.


_______________________________________

Amber is a stay at home mom who lives in the heart of the Missouri Ozarks. It’s a long way from where she grew up, in Wales (yes, way over in the U.K.). The recipes in her blog Sprinkled with Flour include her original creations as well as her family recipes. Go check them out!


Profile photo of HowSweetEats

Pull-Apart Bread

Posted by in Baking, Step-by-Step Recipes

Tasty Kitchen Blog: Pull-Apart Bread. Guest post by Jessica Merchant of How Sweet It Is, recipe submitted by TK member Fanny of Oh Sweet Day!

 
Pull-apart breads have been blowing up Pinterest for a few years now, and all I’ve gotta say is that I love it. Which truly is saying a lot because, if I’m being honest, Pinterest kinda stresses me out these days. There are just so many things! I browse Pinterest for all of seven minutes and instantly want to plan another wedding, buy a new wardrobe, put jewels on my nails, paint my TV stand robin’s egg blue, travel to Mykonos and design a killer party for a 3-year old kiddo that I don’t even have. And I’d like to do it all next week. It’s like complete sensory overload.

In the world of pull-apart breads, this cinnamon sugar version from TK member Fanny is a classic. A few years ago I made one filled with cheese (which was ah-mazing), but knowing the value in a good gooey, sugar-coated cinnamon bread is the key to all life’s problems. Right?


Tasty Kitchen Blog: Pull-Apart Bread. Guest post by Jessica Merchant of How Sweet It Is, recipe submitted by TK member Fanny of Oh Sweet Day!

Here’s what you need: some flour and sugar, vegetable oil, whole milk, baking soda and powder, active dry yeast (don’t be scared!), salt, cinnamon, and of course, butter.


Tasty Kitchen Blog: Pull-Apart Bread. Guest post by Jessica Merchant of How Sweet It Is, recipe submitted by TK member Fanny of Oh Sweet Day!

First, heat the milk, oil and sugar together, stirring until the sugar is dissolved and the liquid is slightly warm, but not hot. Remove it from the heat.


Tasty Kitchen Blog: Pull-Apart Bread. Guest post by Jessica Merchant of How Sweet It Is, recipe submitted by TK member Fanny of Oh Sweet Day!

Stir in the flour and the yeast. At this point I was afraid that my pot was a bit too hot, so I transferred the mixture to a different pot and it worked perfectly. All in the name of saving cinnamon bread.

Cover the dough with a towel and let it rise for about an hour.


Tasty Kitchen Blog: Pull-Apart Bread. Guest post by Jessica Merchant of How Sweet It Is, recipe submitted by TK member Fanny of Oh Sweet Day!

After an hour, stir in the remaining flour, baking soda, powder and salt. If the dough is super sticky, you can add a little extra flour if needed. I probably added in a tablespoon or two.


Tasty Kitchen Blog: Pull-Apart Bread. Guest post by Jessica Merchant of How Sweet It Is, recipe submitted by TK member Fanny of Oh Sweet Day!

Roll the dough into a large rectangle on a floured surface and cover the entire thing in melted butter…


Tasty Kitchen Blog: Pull-Apart Bread. Guest post by Jessica Merchant of How Sweet It Is, recipe submitted by TK member Fanny of Oh Sweet Day!

Then cover it in sugar and cinnamon. This is getting good.


Tasty Kitchen Blog: Pull-Apart Bread. Guest post by Jessica Merchant of How Sweet It Is, recipe submitted by TK member Fanny of Oh Sweet Day!

Using a pizza cutter or a large knife, slice the rectangle into six equal strips. Or, uh, five strips. I’m not very skilled at equally cutting dough into perfect strips, so I accidentally ended up with five. Still worked, so if you have that issue, don’t fear.


Tasty Kitchen Blog: Pull-Apart Bread. Guest post by Jessica Merchant of How Sweet It Is, recipe submitted by TK member Fanny of Oh Sweet Day!

After slicing the strips lengthwise, pile them on top of each other (carefully!) and cut the dough again in six places, creating six stacks. Cute little dough stacks!


Tasty Kitchen Blog: Pull-Apart Bread. Guest post by Jessica Merchant of How Sweet It Is, recipe submitted by TK member Fanny of Oh Sweet Day!

Stuff the cute dough stacks in a buttered 9×5 loaf pan, then cover with the towel and let it rise for another hour or so.


Tasty Kitchen Blog: Pull-Apart Bread. Guest post by Jessica Merchant of How Sweet It Is, recipe submitted by TK member Fanny of Oh Sweet Day!

It should look puffy and pretty!

Stick it in the oven and bake for 30 minutes. If the top gets too brown while baking, tent it with aluminum foil. A few minutes before the bread is finished, whisk together the powdered sugar and milk to create the glaze.


Tasty Kitchen Blog: Pull-Apart Bread. Guest post by Jessica Merchant of How Sweet It Is, recipe submitted by TK member Fanny of Oh Sweet Day!

Remove the bread from the oven and let cool for just a few minutes, then gently remove the loaf from the pan and immediately cover in icing.


Tasty Kitchen Blog: Pull-Apart Bread. Guest post by Jessica Merchant of How Sweet It Is, recipe submitted by TK member Fanny of Oh Sweet Day!

The sugary goodness sinks in to all the cracks and crevices since the bread it still warm.


Tasty Kitchen Blog: Pull-Apart Bread. Guest post by Jessica Merchant of How Sweet It Is, recipe submitted by TK member Fanny of Oh Sweet Day!

I’d tell you to wait a few minutes before serving so you don’t burn your mouth, but that’s basically impossible. Just look at it! You’ll want to dig in instantly and I don’t blame you.

Thanks to Fanny for sharing this! Go check out her blog Oh Sweet Day! for more sweetness.


_______________________________________

Jessica Merchant is a personal trainer turned food writer and blogger. Her blog, How Sweet Eats, is where she proclaims her love for all things sweet, all things bacon, and everything else in between. She works her magic in her Pittsburgh kitchen, which she shares with her husband of 2 years.


Profile photo of whatsgabycooking

Dark Chocolate Peanut Butter Cup Pretzel Cookies

Posted by in Baking, Step-by-Step Recipes

  When I first made these Dark Chocolate Peanut Butter Cup Pretzel Cookies from TK member Katie, I posted a pic on Instagram and someone commented saying, “HOLY UNIVERSE” and I really haven’t been able to come up with a better way to introduce these bites of heaven to you since. They will rock your […]

Profile photo of Laurie - Simply Scratch

Crunchy Cashew Thai Quinoa Salad with Ginger Peanut Dressing

Posted by in Step-by-Step Recipes

  This salad is many things. It’s colorful, it’s healthy and it has one of my favorite ingredients: quinoa. For me, quinoa is a lot like brown rice in taste and texture, so it works splendidly in this salad and especially with soaking up all those amazing Thai flavors. When Monique posted this recipe for Crunchy […]

Profile photo of Erica Lea

Sausage and Potato Soup

Posted by in Step-by-Step Recipes

  One day, over two years ago, I asked my dad what he wanted for supper. His reply? Soup. This was fine by me since soup is one of my favorite meals to make. I planned to make his favorite: cream of broccoli soup, but was stopped short by freezer-burnt broccoli. Not appetizing. Avoiding panic, […]

Profile photo of Faith (An Edible Mosaic)

Middle Eastern Date-Filled Cookies (Ma’amoul)

Posted by in Baking, Step-by-Step Recipes

  I am absolutely thrilled to be sharing this recipe with you today. Not only because these cookies are delicious and sure to impress whoever you share them with but also because for me, they hold a deeper, much more special meaning: I learned how to make them from my Syrian mother-in-law Sahar in her […]