The Pioneer Woman Tasty Kitchen
Profile photo of Erika (TK)

The Theme Is … Popsicles!

Posted by in The Theme Is...

Tasty Kitchen Blog: The Theme Is Popsicles!

 
Summer is most definitely here, at least where I am. We’ve been battling thunderstorms and mosquitoes and a string of days marked by an unwelcome and overstaying holy-moly-I’m-melting-here blanket of heat. And let me tell you, it’s hot. During one particularly oppressively hot day—a day our brand new air conditioning system decided it had had enough and started impersonating a rock—I decided it was time to move to the North Pole and live in an igloo. So we packed up our stuff, booked a flight on Priceline, and off we went. The end.

Okay, so we didn’t really move to the North Pole. For one, I’m allergic to dogs so I’d have to drive those sleds alone. No fun. Second, I’d be up all day every day wondering why I haven’t seen any penguins yet. Or why the sun is taking forever to set. Again, no fun.

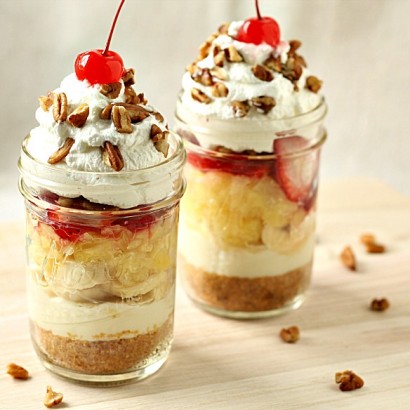
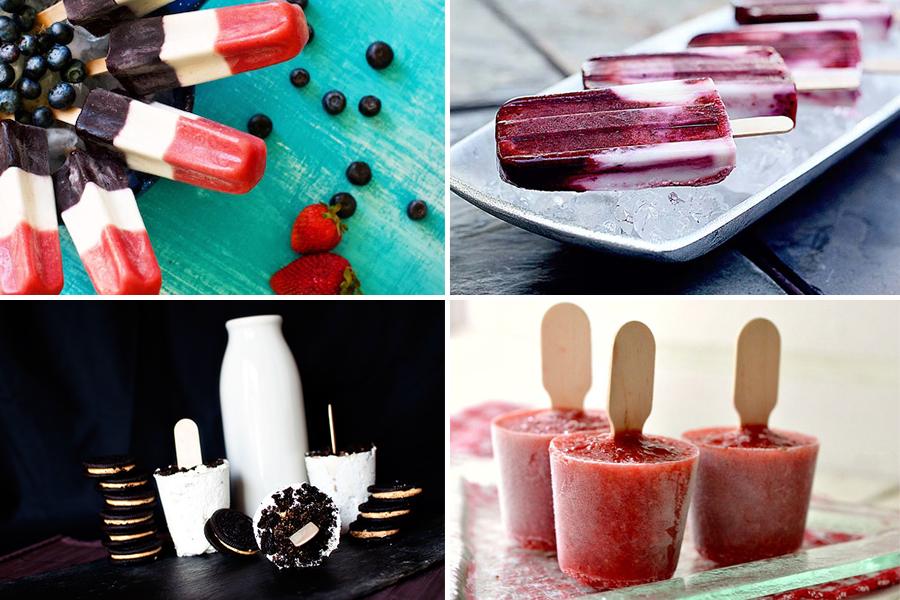
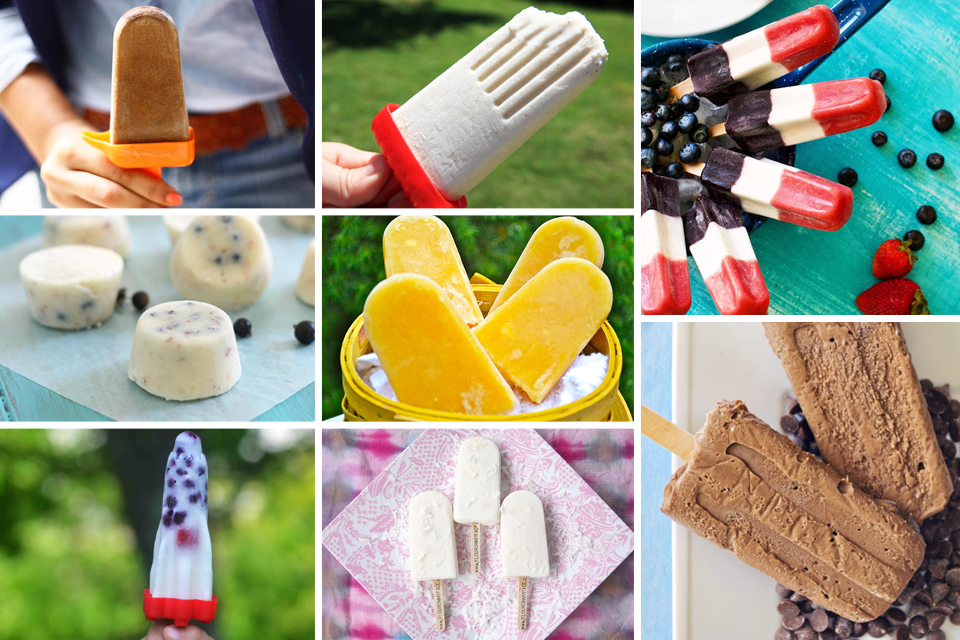
So instead of migrating to the Arctic, I’ll do the next best thing. Instead of giant blocks of ice, I’ll go with smaller portions of ice. Flavored. Preferably handheld. I spent a few days staring longingly at the bounty of popsicle recipes here in Tasty Kitchen, wishing I had enough time to make them all. So I can eat them all. Though hopefully not too quickly to avoid freezing my brain.

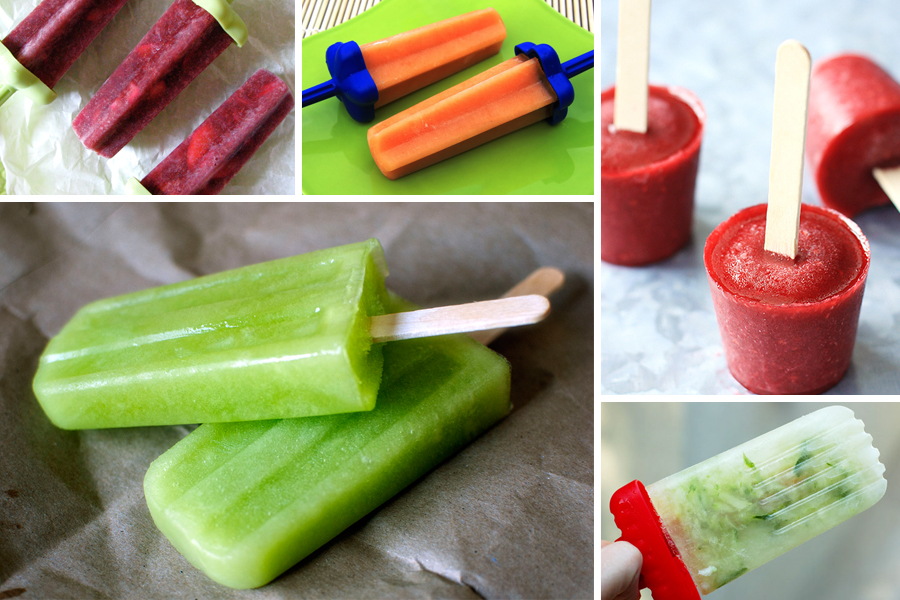
But even if my brain freezes and stops working, that’s okay because this perfect summer heat relief is thankfully easy to make. All you need is water (or juice!), something to flavor that water, and a freezer. And okay, maybe a stick or two.

Tasty Kitchen Blog: The Theme Is Popsicles!
Vanilla Balsamic Strawberry Popsicles from Lauren Spicy Cantaloupe Popsicles from cookingdunkinstyle Pomegranate, Raspberry, and Nectarine Popsicles from goodlifeeats Cucumber-Basil Limeade Popsicles from A Cozy Kitchen Honeydew Popsicles from passthesushi


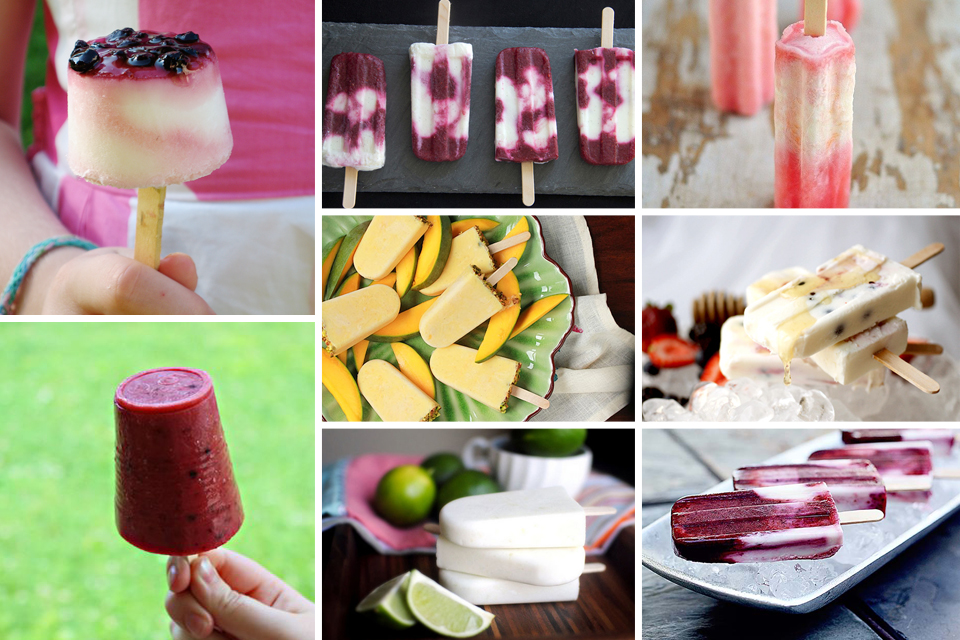
You can go a little fancy and make a creamy version. All you need to do is add a little … something creamy. Did I mention these were easy to make?

Tasty Kitchen Blog: The Theme Is Popsicles!

Mocha Popsicles from A Cozy Kitchen Frozen Coconut Peach Bites from Gina (Running to the Kitchen) Coconut Berry Popsicles from Carrie Burrill Limber de Coco (Coconut Cream Popsicle) from The Noshery Peachy Coconut Popsicles from Jennifer | Mother Thyme Homemade Tropical Ice Pops from Flour On My Face Berry Bliss Rocket Pops! from Marla Meridith Fudgsicles! from Shelley


You can also add yogurt instead, and because it’s healthy and gives a protein boost, you can have an extra serving. Or three!

Tasty Kitchen Blog: The Theme Is Popsicles!

Strawberry and Blueberry Yogurt Pops from foodieplus4 Yogurt Popsicles from Noshings Triple Berries and Cream Swirl Pops from The Scrumptious Pumpkin Mango Lassi Popsicles from aspicyperspective Coconut Lime Yogurt Popsicles from Laurie {Simply Scratch} Raspberry & White Cherry Yogurt Pops from Mike (Verses from my Kitchen) Honey Yogurt Berry Pops from Joy Cherry Yogurt Popsicles from Meredith {In Sock Monkey Slippers}


Okay, who am I kidding? My favorite popsicles are the ones are the ones that tempt me with frozen versions of my favorite desserts.

Tasty Kitchen Blog: The Theme Is Popsicles!

Pumpkin Pie Popsicles from Marla Meridith Peanut Butter Oreo Popsicles from passthesushi Raspberry Cheesecakesicles from rainydaygal Cheesecake Popsicles from DessertForTwo Homemade Jello Pudding Pops from Mommy's Kitchen


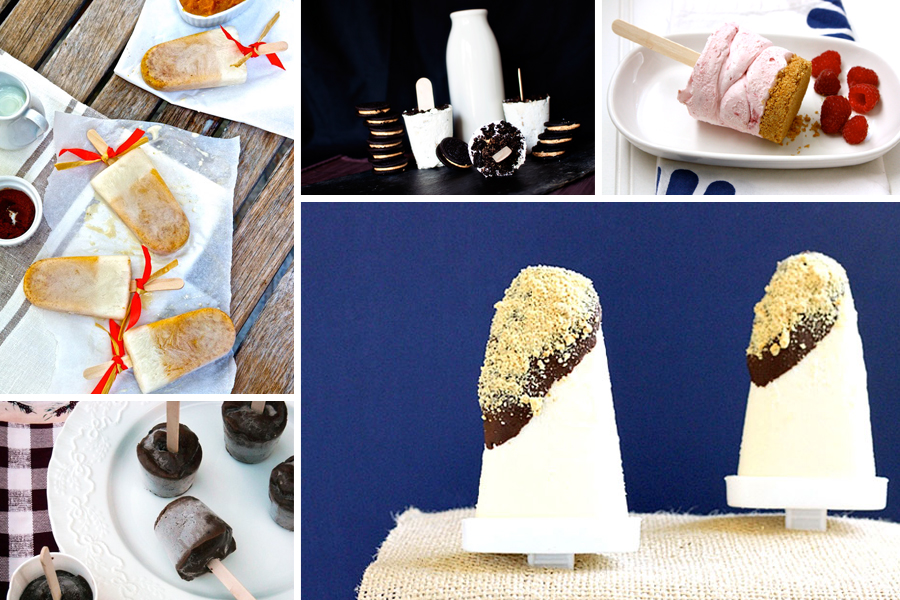
You can also liven up a party or summer barbecue with a boozy treat for the adults. Do be stingy with the alcohol though—too much will prevent your popsicle from freezing. (Though I’m pretty sure anyone interested in a boozy popsicle will rarely refuse a cup of boozy slush instead.)

Tasty Kitchen Blog: The Theme Is Popsicles!

Boozy Pomegranate Popsicles from claireg12 Cantaloupe Popsicles from Laura | Tutti Dolci Piña Colada Popsicles from Laura | Tutti Dolci Margarita Popsicles from Kim (SunflowerSupperClub) Beer Popsicles: Lemon Pale Ale from Jackie Dodd


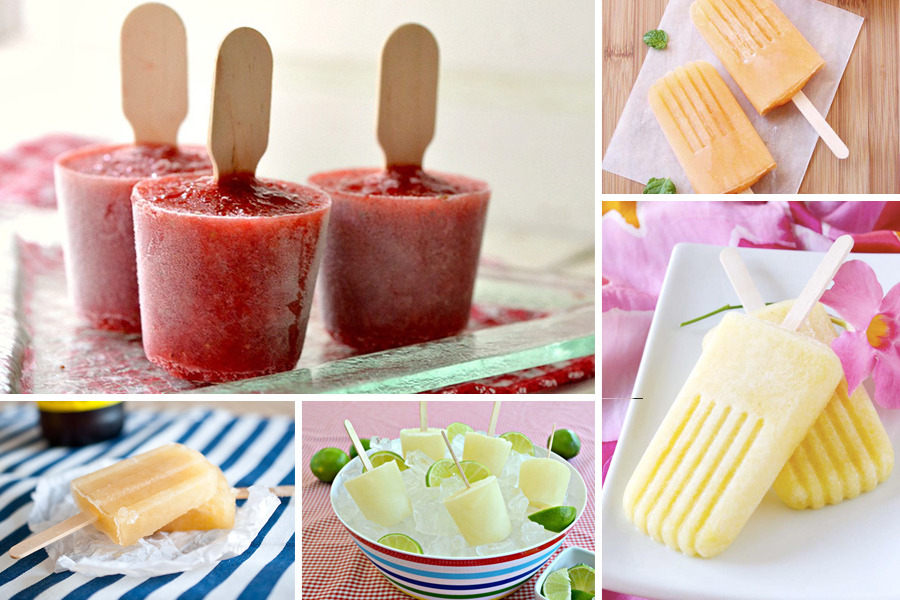
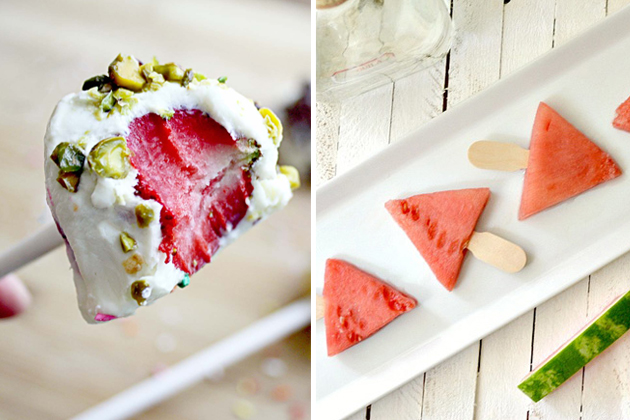
If you’d rather go a different route with the popsicles and actually use frozen fruit, here are two versions for you: one for the kids, and one for those who can handle their tequila. One for little Johnny, two for me. One for little Sally, three for me … (Anyone who knows me will be laughing and calling me out, because in truth, the only way I know how to handle tequila is in a shopping bag, walking out of the store after being sent there on an errand.)

Tasty Kitchen Blog: The Theme Is Popsicles!

Frozen Yogurt Fruit Pops from Meredith {In Sock Monkey Slippers} Boozy Watermelon Wedges from claireg12


I think I have to go clear room in my freezer because I want to make at least 17 of these recipes right now. I can have popsicles for breakfast, yes?

Hope everyone’s staying cool this week! Have any favorite heat busters? I know I’ll need all the help I can get.


Profile photo of Faith (An Edible Mosaic)

Banana Split Cake Cups

Posted by in Step-by-Step Recipes

Tasty Kitchen Blog: Banana Split Cake Cups. Guest post by Faith Gorsky of An Edible Mosaic, recipe submitted by TK member Amber of Sprinkled with Flour.

 
Everyone I know is a fan of banana splits. Literally everyone, no matter how picky an eater they are. (Editor’s note: Hear that, Ree? Hmm?) And I’ve sort-of found that banana splits have magic properties. Take someone who’s having a bad day, put a banana split in front of them, and watch their face change. Yup, I’d call that magic. When I saw Tasty Kitchen member and fellow TK Blog contributor Amber’s recipe for Banana Split Cake Cups, I knew it wouldn’t be long before they happened in my house.


Tasty Kitchen Blog: Banana Split Cake Cups. Guest post by Faith Gorsky of An Edible Mosaic, recipe submitted by TK member Amber of Sprinkled with Flour.

One of the great things about this recipe is that you can either make it in a 9- by 13-inch baking dish or in individual Mason jars. The Mason jars are not only completely adorable, but also perfect for portion control; however, the 9 by 13-inch dish also has its advantages. For starters, it’s perfect for a birthday cake-like treat, which made it very timely for me since it was recently my dad’s birthday and we needed a cake! Also, making this dessert in a larger dish made it easier for me to show you all the layers.

But I couldn’t resist, I made one of these treats in a (half-pint-sized) glass jar. Hey, the cook needs to sample her work, right?

Right.

Let’s get started!


Tasty Kitchen Blog: Banana Split Cake Cups. Guest post by Faith Gorsky of An Edible Mosaic, recipe submitted by TK member Amber of Sprinkled with Flour.

For this dessert you’ll need: butter, graham cracker crumbs, cream cheese, powdered sugar, bananas, crushed pineapple, pecans or walnuts (I used walnuts), strawberries, whipping cream, and maraschino cherries.


Tasty Kitchen Blog: Banana Split Cake Cups. Guest post by Faith Gorsky of An Edible Mosaic, recipe submitted by TK member Amber of Sprinkled with Flour.

First things first, start with the crust. Melt 1 stick of butter (on the stovetop or in the microwave), add the graham cracker crumbs, and stir to combine.


Tasty Kitchen Blog: Banana Split Cake Cups. Guest post by Faith Gorsky of An Edible Mosaic, recipe submitted by TK member Amber of Sprinkled with Flour.

Press the crumbs evenly into the bottom of a 9 by 13-inch baking dish …


Tasty Kitchen Blog: Banana Split Cake Cups. Guest post by Faith Gorsky of An Edible Mosaic, recipe submitted by TK member Amber of Sprinkled with Flour.

Or press them into the bottom of individual Mason jars. I found that the easiest way to press the crumbs into small jars was to use the flat end of a pestle.

Bake the crust for 7 to 10 minutes at 350ºF, let it cool a bit, and then let it chill in the freezer for about 10 minutes.


Tasty Kitchen Blog: Banana Split Cake Cups. Guest post by Faith Gorsky of An Edible Mosaic, recipe submitted by TK member Amber of Sprinkled with Flour.

Beat together the cream cheese, 1/4 cup butter, and the powdered sugar until smooth. Don’t be tempted to add milk—it will take a few minutes, but the mixture will blend up perfectly!


Tasty Kitchen Blog: Banana Split Cake Cups. Guest post by Faith Gorsky of An Edible Mosaic, recipe submitted by TK member Amber of Sprinkled with Flour.

Spread that creamy layer evenly on top of the crust.


Tasty Kitchen Blog: Banana Split Cake Cups. Guest post by Faith Gorsky of An Edible Mosaic, recipe submitted by TK member Amber of Sprinkled with Flour.

Slice the bananas.


Tasty Kitchen Blog: Banana Split Cake Cups. Guest post by Faith Gorsky of An Edible Mosaic, recipe submitted by TK member Amber of Sprinkled with Flour.

Layer them on top of the cream cheese mixture.


Tasty Kitchen Blog: Banana Split Cake Cups. Guest post by Faith Gorsky of An Edible Mosaic, recipe submitted by TK member Amber of Sprinkled with Flour.

Drain the pineapple.


Tasty Kitchen Blog: Banana Split Cake Cups. Guest post by Faith Gorsky of An Edible Mosaic, recipe submitted by TK member Amber of Sprinkled with Flour.

And add it on top of the banana slices.


Tasty Kitchen Blog: Banana Split Cake Cups. Guest post by Faith Gorsky of An Edible Mosaic, recipe submitted by TK member Amber of Sprinkled with Flour.

Sprinkle about 2/3 to 3/4 of the nuts on top of the pineapple.


Tasty Kitchen Blog: Banana Split Cake Cups. Guest post by Faith Gorsky of An Edible Mosaic, recipe submitted by TK member Amber of Sprinkled with Flour.

Rinse, hull, and slice the strawberries.


Tasty Kitchen Blog: Banana Split Cake Cups. Guest post by Faith Gorsky of An Edible Mosaic, recipe submitted by TK member Amber of Sprinkled with Flour.

Spread them evenly on top of the pineapple/nut layer.


Tasty Kitchen Blog: Banana Split Cake Cups. Guest post by Faith Gorsky of An Edible Mosaic, recipe submitted by TK member Amber of Sprinkled with Flour.

Whip the cream and sweeten it to taste. (I use 2 teaspoons powdered sugar and 1/4 teaspoon pure vanilla extract per 1/2 cup of cream to sweeten and flavor it.) For this recipe, instead of 1 cup cream, I used 1 1/2 cups just to make sure there was enough; I thought it ended up being the perfect amount!


Tasty Kitchen Blog: Banana Split Cake Cups. Guest post by Faith Gorsky of An Edible Mosaic, recipe submitted by TK member Amber of Sprinkled with Flour.

Spread the whipped cream on top of the strawberries (or pipe it on top if you’re using Mason jars).


Tasty Kitchen Blog: Banana Split Cake Cups. Guest post by Faith Gorsky of An Edible Mosaic, recipe submitted by TK member Amber of Sprinkled with Flour.

Then sprinkle on the halved maraschino cherries and the rest of the nuts.


Tasty Kitchen Blog: Banana Split Cake Cups. Guest post by Faith Gorsky of An Edible Mosaic, recipe submitted by TK member Amber of Sprinkled with Flour.

Doesn’t that look fun?! I don’t know anyone who wouldn’t want to dive right in. Since this treat has such a short bake time (just for the crust), it’s served chilled, and it’s a bit lighter than a normal cake, I think it’s the perfect dessert for warmer months. And it was a huge hit at my dad’s birthday party—I had two people ask me for the recipe!


Tasty Kitchen Blog: Banana Split Cake Cups. Guest post by Faith Gorsky of An Edible Mosaic, recipe submitted by TK member Amber of Sprinkled with Flour.

Don’t forget, you can also make it in individual Mason jars!

Thank you, Amber, for sharing this treat! Just a heads-up, Amber’s blog Sprinkled with Flour is full of more beautiful, delicious recipes!


Printable Recipe

Banana Split Cake Cups

See post on Amber {Sprinkled With Flour}’s site!
5.00 Mitt(s) 1 Rating(s)1 vote, average: 5.00 out of 51 vote, average: 5.00 out of 51 vote, average: 5.00 out of 51 vote, average: 5.00 out of 51 vote, average: 5.00 out of 5

Prep Time:

Cook Time:

Difficulty: Easy

Servings: 8

8
x

Print Options

Page size Letter 3x5 4x6
Text Size Small Medium Large
Content Include description
Include prep time, etc.
Show image

Description

A sweet childhood treat layered in mason jars.

Ingredients

  • 1 stick Butter, Melted
  • 2 cups Graham Cracker Crumbs
  • 8 ounces, weight Package Cream Cheese, Softened
  • ¼ cups Butter, Softened
  • 3 cups Powdered Sugar
  • 4 whole Bananas, Sliced
  • 20 ounces, weight Can Crushed Pineapple, Drained
  • 1 cup Chopped Pecans (or Walnuts)
  • 1 quart Strawberries, Hulled And Sliced
  • 1 cup Heavy Whipping Cream
  • 9 ounces, weight Jar Maraschino Cherries, Drained And Halved

Preparation Instructions

In a medium bowl, combine the melted butter and graham crackers crumbs. Press the mixture into the bottom of your baking dish (see note below). Bake at 350ºF for 7–10 minutes, then place in the freezer to chill and set for about 10 minutes.

Beat the cream cheese, softened butter and powdered sugar until creamy, about 5 minutes. Spread the cream cheese mixture over the cooled graham cracker crust. Add a layer of sliced bananas over the cream cheese mixture. Drain the pineapple and spread evenly over the bananas. Sprinkle some of the nuts over the pineapple, then add a layer of sliced strawberries.

In a cold bowl, with cold beaters, whip the cream on high until soft peaks form, about 5 minutes. Sweeten your whipped cream to taste. Spread the whipped cream over everything.

Garnish with more nuts and the cherry halves. Refrigerate at least 4 hours before serving. Enjoy!

Notes: This dessert is normally made in a 9 x 13 baking dish. If you want to make this dessert in mason jars as I did, follow the same directions, but divide each of the layers between your jars. When baking the crust, place the jars on a baking sheet and bake as usual. Also, if your strawberries are not very sweet, you may toss them with a little sugar to sweeten them.


_______________________________________

Faith Gorsky is the writer, recipe developer, photographer, and food stylist behind the blog An Edible Mosaic. She lives in Upstate New York and loves to travel, especially to places steeped in rich culture and history. She also enjoys reading, vintage shopping, watching movies, and is enamored with ancient cultures. She just released her first cookbook, “An Edible Mosaic: Middle Eastern Fare with Extraordinary Flair” (Tuttle Publishing), a collection of authentic Middle Eastern recipes handed down to her from her husband’s family.


Profile photo of twopeasandtheirpod

S’mores Pie

Posted by in Baking, Step-by-Step Recipes

Note: We’re bringing back this oldie but goodie, just in time for summer. S’mores, baby. In pie form. Just too dang irresistible.

 
Tasty Kitchen Blog: S'mores Pie. Guest post by Maria Lichty of Two Peas and Their Pod, recipe submitted by TK member Tonya of 4 Little Fergusons.

 
Summer isn’t summer without ooey, gooey S’mores! There is nothing better than sitting around a bonfire with some graham crackers, mallows, and Hershey bars. I love traditional S’mores, but I am always looking for fun and unique ways to enjoy S’mores. I love making S’mores cookies and bars, so when I saw TK member Tonya’s recipe for S’mores Pie, I knew it would be the perfect dessert for our summer BBQ. 


Tasty Kitchen Blog: S'mores Pie. Guest post by Maria Lichty of Two Peas and Their Pod, recipe submitted by TK member Tonya of 4 Little Fergusons.

To make the pie you need the following ingredients: butter, sugar, an egg, vanilla, flour, graham cracker crumbs, baking powder, marshmallow creme, Hershey’s chocolate bars, mini marshmallows, and chocolate chips. 

Preheat the oven to 350°F and spray a 9″ pie pan with baking spray. Set aside. 


Tasty Kitchen Blog: S'mores Pie. Guest post by Maria Lichty of Two Peas and Their Pod, recipe submitted by TK member Tonya of 4 Little Fergusons.

In a large bowl, beat the butter and sugar together until creamy and smooth. 


Tasty Kitchen Blog: S'mores Pie. Guest post by Maria Lichty of Two Peas and Their Pod, recipe submitted by TK member Tonya of 4 Little Fergusons.

Add the egg. 


Tasty Kitchen Blog: S'mores Pie. Guest post by Maria Lichty of Two Peas and Their Pod, recipe submitted by TK member Tonya of 4 Little Fergusons.

Add the vanilla extract and mix until combined. 


Tasty Kitchen Blog: S'mores Pie. Guest post by Maria Lichty of Two Peas and Their Pod, recipe submitted by TK member Tonya of 4 Little Fergusons.

Add in the flour. 


Tasty Kitchen Blog: S'mores Pie. Guest post by Maria Lichty of Two Peas and Their Pod, recipe submitted by TK member Tonya of 4 Little Fergusons.

Pour in the graham cracker crumbs. 


Tasty Kitchen Blog: S'mores Pie. Guest post by Maria Lichty of Two Peas and Their Pod, recipe submitted by TK member Tonya of 4 Little Fergusons.

Add the baking powder


Tasty Kitchen Blog: S'mores Pie. Guest post by Maria Lichty of Two Peas and Their Pod, recipe submitted by TK member Tonya of 4 Little Fergusons.

Mix until just combined. 


Tasty Kitchen Blog: S'mores Pie. Guest post by Maria Lichty of Two Peas and Their Pod, recipe submitted by TK member Tonya of 4 Little Fergusons.

Divide the dough in half and press half of the dough into the prepared pie pan. 


Tasty Kitchen Blog: S'mores Pie. Guest post by Maria Lichty of Two Peas and Their Pod, recipe submitted by TK member Tonya of 4 Little Fergusons.

Evenly spread the marshmallow cream over the bottom of the crust. 


Tasty Kitchen Blog: S'mores Pie. Guest post by Maria Lichty of Two Peas and Their Pod, recipe submitted by TK member Tonya of 4 Little Fergusons.

Place the Hershey chocolate squares over the marshmallow creme. 


Tasty Kitchen Blog: S'mores Pie. Guest post by Maria Lichty of Two Peas and Their Pod, recipe submitted by TK member Tonya of 4 Little Fergusons.

Place the mini marshmallows over the chocolate bars. 


Tasty Kitchen Blog: S'mores Pie. Guest post by Maria Lichty of Two Peas and Their Pod, recipe submitted by TK member Tonya of 4 Little Fergusons.

Carefully pat the remaining dough over the marshmallows. Some of the marshmallows will peek through and that’s ok. 


Tasty Kitchen Blog: S'mores Pie. Guest post by Maria Lichty of Two Peas and Their Pod, recipe submitted by TK member Tonya of 4 Little Fergusons.

Sprinkle the chocolate chips on top of the pie. 


Tasty Kitchen Blog: S'mores Pie. Guest post by Maria Lichty of Two Peas and Their Pod, recipe submitted by TK member Tonya of 4 Little Fergusons.

Bake the pie for 20 minutes or until lightly browned. 


Tasty Kitchen Blog: S'mores Pie. Guest post by Maria Lichty of Two Peas and Their Pod, recipe submitted by TK member Tonya of 4 Little Fergusons.

Let the pie cool completely and slice! 

The pie was a huge hit at our BBQ! Everyone loved it. A thick graham cracker/cookie crust filled with marshmallow creme, chocolate bars, more marshmallows, and topped with chocolate chips! How could they not have loved it? It was the perfect end to our meal! And it’s the perfect dessert for summer. 


Tasty Kitchen Blog: S'mores Pie. Guest post by Maria Lichty of Two Peas and Their Pod, recipe submitted by TK member Tonya of 4 Little Fergusons.

Gather around the bonfire or just gather around this S’mores Pie with a fork! It’s a winner! Thanks Tonya for the fabulous recipe! Visit her blog 4 Little Fergusons, where Tonya writes openly and honestly about faith, family and parenting—and food!


Printable Recipe

S’mores Pie

4.83 Mitt(s) 6 Rating(s)6 votes, average: 4.83 out of 56 votes, average: 4.83 out of 56 votes, average: 4.83 out of 56 votes, average: 4.83 out of 56 votes, average: 4.83 out of 5

Prep Time:

Cook Time:

Difficulty: Easy

Servings: 6

6
x

Print Options

Page size Letter 3x5 4x6
Text Size Small Medium Large
Content Include description
Include prep time, etc.
Show image

Description

You will want S’more of this delicious pie! No bonfire necessary!

Ingredients

  • 1 stick Softened Butter
  • ½ cups White Sugar
  • 1 whole Egg
  • 1 teaspoon Vanilla
  • 1 cup Flour
  • 1 cup Graham Cracker Crumbs
  • 1 teaspoon Baking Powder
  • 7 ounces, weight Container Of Marshmallow Creme
  • 8 whole (1.55 Oz Bars) Hershey's Chocolate Bars, Unwrapped
  • 1 cup Marshmallows
  • ¼ cups Chocolate Chips

Preparation Instructions

Preheat oven to 350°F and spray a 9″ pie pan with baking spray.

In a large bowl beat butter and sugar together until combined, then add egg and vanilla and stir them in. Stir in flour, graham cracker crumbs and baking powder.

Divide the dough in half. Press half the dough in the bottom and up the sides of the prepared pie pan. Evenly spread the Marshmallow Creme over the bottom crust. Separate chocolate squares and place on top of the Marshmallow Creme. Place 1 cup of marshmallows on top.

Using the remaining crust, pat sections of dough on top of and around all the marshmallows (they will still show through and that is great!). Sprinkle with 1/4 cup chocolate chips, then bake 20 minutes until lightly browned.

Remove pan from oven and set it on a wire rack. Cool completely before cutting, or you will have a gooey mess. Not that I know …


_______________________________________

Maria and her husband Josh (who she affectionately refers to as her “dough boy”) blog at Two Peas and Their Pod. They’ve been featured on Saveur, Eatocracy, Gourmet Live, Glamour, and the Los Angeles Times, to name just a few. They’d also just recently added a little pea to their pod. We’re so glad to have them here!


Profile photo of Amber {Sprinkled With Flour}

Lemon Sugar Cookies With Lemon Buttercream Frosting

Posted by in Baking, Step-by-Step Recipes

Tasty Kitchen Blog: Lemon Sugar Cookies With Lemon Buttercream Frosting. Guest post by Amber Potter of Sprinkled with Flour, recipe submitted by TK member Jennifer of Mother Thyme.

 
If there is one surefire way to make any dessert even better, it has to be turning it into a lemon concoction. I love lemons, and I especially love lemon desserts. Now that summer is in full swing, it’s the perfect time to enjoy all the magic that can come from the humble lemon. There’s nothing quite as refreshing as sipping on an ice cold glass of lemonade. If I happen to be holding a plate of lemon meringue pie or munching on a lemon bar at the same time, even better.

Did I mention that I love lemons?

Now that my lemony love affair has been established, we really should get to the point of my post today, which happens to be these delicious Lemon Sugar Cookies with Lemon Buttercream Frosting. When I found this recipe from Jennifer of Mother Thyme, I knew I had found my next lemony calling. These cookies are so soft and pillowy, a perfect match for the popular Lofthouse sugar cookies, and covered with a healthy dollop of a creamy lemon buttercream frosting. They are so good.

Let’s begin shall we?


Tasty Kitchen Blog: Lemon Sugar Cookies With Lemon Buttercream Frosting. Guest post by Amber Potter of Sprinkled with Flour, recipe submitted by TK member Jennifer of Mother Thyme.

You’ll need cake flour, baking powder, salt, butter, sugar, eggs, fresh lemon juice, fresh lemons, vanilla and powdered sugar.


Tasty Kitchen Blog: Lemon Sugar Cookies With Lemon Buttercream Frosting. Guest post by Amber Potter of Sprinkled with Flour, recipe submitted by TK member Jennifer of Mother Thyme.

In a medium bowl, combine cake flour, baking powder and salt and set aside.


Tasty Kitchen Blog: Lemon Sugar Cookies With Lemon Buttercream Frosting. Guest post by Amber Potter of Sprinkled with Flour, recipe submitted by TK member Jennifer of Mother Thyme.

Using an electric mixer, cream together butter and sugar until light and fluffy.


Tasty Kitchen Blog: Lemon Sugar Cookies With Lemon Buttercream Frosting. Guest post by Amber Potter of Sprinkled with Flour, recipe submitted by TK member Jennifer of Mother Thyme.

Add in eggs one at a time.


Tasty Kitchen Blog: Lemon Sugar Cookies With Lemon Buttercream Frosting. Guest post by Amber Potter of Sprinkled with Flour, recipe submitted by TK member Jennifer of Mother Thyme.

Stir after each addition.


Tasty Kitchen Blog: Lemon Sugar Cookies With Lemon Buttercream Frosting. Guest post by Amber Potter of Sprinkled with Flour, recipe submitted by TK member Jennifer of Mother Thyme.

Stir in lemon juice, lemon zest and vanilla until combined.


Tasty Kitchen Blog: Lemon Sugar Cookies With Lemon Buttercream Frosting. Guest post by Amber Potter of Sprinkled with Flour, recipe submitted by TK member Jennifer of Mother Thyme.

Gradually add in the flour mixture.


Tasty Kitchen Blog: Lemon Sugar Cookies With Lemon Buttercream Frosting. Guest post by Amber Potter of Sprinkled with Flour, recipe submitted by TK member Jennifer of Mother Thyme.

Mix until combined. Chill dough for at least 1 hour in the refrigerator. Preheat oven to 350ºF. Line a baking sheet with parchment paper.


Tasty Kitchen Blog: Lemon Sugar Cookies With Lemon Buttercream Frosting. Guest post by Amber Potter of Sprinkled with Flour, recipe submitted by TK member Jennifer of Mother Thyme.

Roll 3 tablespoons of dough into a ball (see note below for shaped cookies). Use flour on your hands if needed. Place ball on baking sheet and flatten to about 1/2 inch thick, molding sides to keep round shape if necessary. Continue with remaining dough, placing each 2 inches apart.


Tasty Kitchen Blog: Lemon Sugar Cookies With Lemon Buttercream Frosting. Guest post by Amber Potter of Sprinkled with Flour, recipe submitted by TK member Jennifer of Mother Thyme.

Bake in preheated oven for 10-12 minutes. Cool for a few minutes on baking sheet, and transfer to wire rack to cool completely before frosting.


Tasty Kitchen Blog: Lemon Sugar Cookies With Lemon Buttercream Frosting. Guest post by Amber Potter of Sprinkled with Flour, recipe submitted by TK member Jennifer of Mother Thyme.

For the frosting, using an electric mixer, combine butter and confectioner’s sugar, gradually adding the sugar. When all sugar is added, add in lemon zest, lemon juice and blend on medium until fluffy. Add in food color if desired. If frosting is too thick, add more lemon juice, water or milk until desired consistency is reached.


Tasty Kitchen Blog: Lemon Sugar Cookies With Lemon Buttercream Frosting. Guest post by Amber Potter of Sprinkled with Flour, recipe submitted by TK member Jennifer of Mother Thyme.

Once the cookies have cooled frost with the buttercream.

Note: For shapes, roll out chilled dough ¼ inch thick on a well floured surface. Flour rolling pin and cut out to prevent sticking. Cut out desired shapes and place on parchment-lined baking sheet. Bake in preheated oven for 10-12 minutes. Do not overbake. Cool for a few minutes and transfer to wire rack to cool. Shapes will spread from the baking powder. To define the shape used after the cookie has cooled, place cookie cutter on top of cookie and firmly press all the way down, removing any excess cookie for the edges.


Tasty Kitchen Blog: Lemon Sugar Cookies With Lemon Buttercream Frosting. Guest post by Amber Potter of Sprinkled with Flour, recipe submitted by TK member Jennifer of Mother Thyme.

I loved these cookies.They really are so soft and delicious with the perfect balance of sweet lemon tartness. Add a glass of cold milk and you’ve got the perfect afternoon snack that your family will love. 


Tasty Kitchen Blog: Lemon Sugar Cookies With Lemon Buttercream Frosting. Guest post by Amber Potter of Sprinkled with Flour, recipe submitted by TK member Jennifer of Mother Thyme.

I’m so glad Jennifer shared this recipe with us—it will be a regular in the cookie rotation at our house! You can find more of Jennifer’s recipes at her blog Mother Thyme. Warning: There is so much deliciousness, you may be there for a while.


Printable Recipe

See post on Jennifer | Mother Thyme’s site!
3.67 Mitt(s) 3 Rating(s)3 votes, average: 3.67 out of 53 votes, average: 3.67 out of 53 votes, average: 3.67 out of 53 votes, average: 3.67 out of 53 votes, average: 3.67 out of 5

Prep Time:

Cook Time:

Difficulty: Easy

Servings: 12

12
x

Print Options

Page size Letter 3x5 4x6
Text Size Small Medium Large
Content Include description
Include prep time, etc.
Show image

Description

When life hands you lemons make lemonade, or better yet, lemon sugar cookies. This is a soft sugar cookie with hints of fresh lemon and lemon zest topped with a thick lemon buttercream frosting.

Ingredients

  • FOR THE COOKIES:
  • 3 cups Cake Flour
  • 3 teaspoons Baking Powder
  • ½ teaspoons Salt
  • 1 cup Butter, Room Temperature
  • 1 cup Sugar
  • 2  Large Eggs
  • 2 Tablespoons Fresh Lemon Juice
  • 1 whole Lemon, Zested
  • ½ teaspoons Vanilla Extract
  • FOR THE LEMON BUTTERCREAM FROSTING:
  • ½ cups Unsalted Butter, Room Temperature
  • 3 cups Confectioners Sugar
  • 1 whole Lemon, Zested
  • 2 Tablespoons Fresh Lemon Juice
  • Food Coloring (optional)

Preparation Instructions

In a medium bowl, combine cake flour, baking powder and salt and set aside.

Using an electric mixer, cream together butter and sugar until light and fluffy. Add in eggs one at a time stirring after each addition. Stir in lemon juice, lemon zest and vanilla until combined. Gradually add in flour mixture combined.

Chill dough for at least 1 hour in the refrigerator.

Preheat oven to 350ºF. Line a baking sheet with parchment paper.

Roll 3 tablespoons of dough into a ball (see note below for shaped cookies). Use flour on your hands if needed. Place ball on baking sheet and flatten to about 1/2 inch thick, molding sides to keep round shape if necessary. Continue with remaining dough, placing each 2 inches apart.

Bake in preheated oven for 10-12 minutes. Cool for a few minutes on baking sheet, and transfer to wire rack to cool completely before frosting.

For the frosting, using an electric mixer, combine butter and confectioner’s sugar, gradually adding the sugar. When all sugar is added, add in lemon zest, lemon juice and blend on medium until fluffy. Add in food color if desired. If frosting is too thick, add more lemon juice, water or milk until desired consistency is reached.

Note: For shapes, roll out chilled dough ¼ inch thick on a well floured surface. Flour rolling pin and cut out to prevent sticking. Cut out desired shapes and place on parchment-lined baking sheet. Bake in preheated oven for 10-12 minutes. Do not overbake. Cool for a few minutes and transfer to wire rack to cool.

Shapes will spread from the baking powder. To define the shape used after the cookie has cooled, place cookie cutter on top of cookie and firmly press all the way down, removing any excess cookie for the edges.


_______________________________________

Amber is a stay at home mom who lives in the heart of the Missouri Ozarks. It’s a long way from where she grew up, in Wales (yes, way over in the U.K.). The recipes in her blog Sprinkled with Flour include her original creations as well as her family recipes. Go check them out!


Profile photo of georgiapellegrini

Spicy Black Bean Burger

Posted by in Step-by-Step Recipes

You will need: red bell pepper, Sriracha my love, chili powder, cumin, onion powder, bread crumbs, parsley, onion, garlic, one egg, and black beans. You don’t need mustard. I’m not sure why I put it in the picture. Maybe I was anticipating what I was going to put on my burger. But the truth is […]

Profile photo of EatLiveRun

Birthday Cake Batter Popcorn

Posted by in Step-by-Step Recipes

  When I was saw this recipe by Mrs. Schwatz a few weeks ago, I knew I had to stop everything and make it immediately. Birthday Cake Batter Popcorn? Yes, please. As a lover of anything salty and sweet, I knew it would be a winner. Plus, it involved rainbow sprinkles. Enough said.   I […]

Profile photo of Faith (An Edible Mosaic)

Crunchy Asian Slaw

Posted by in Step-by-Step Recipes

  Summer is synonymous with potlucks, picnics, and BBQs. Starting with Memorial Day and ending with Labor Day, and of course not forgetting Independence Day and regular backyard get-togethers, it seems like there’s something going on every week! Where I live, summer is a short and sweet affair so we have to make the most […]

Profile photo of georgiapellegrini

Lemon Ricotta Blueberry Bread

Posted by in Baking, Step-by-Step Recipes

  I’m not a big baker; I prefer to improvise in the kitchen, which doesn’t really work with baked goods. But I decided to be a little adventurous this time because I love how fluffy baked goods are when ricotta is incorporated. Also, blueberries are in their peak season! You will love this Lemon Blueberry […]