The Pioneer Woman Tasty Kitchen
Profile photo of ThreeManyCooks

Amazing Spiced Chai Concentrate

Posted by in Step-by-Step Recipes

Tasty Kitchen Blog: Amazing Spiced Chai Concentrate. Guest post by Maggy Keet of Three Many Cooks, recipe submitted by TK member thecatnipcat.

 
Warm spices, strong tea and steamed milk swirling around in my tummy make chai lattes a favorite during the winter months. It warms me from the inside out in a way that puts coffee and tea to shame. Unfortunately, the chai concentrate from certain coffee chains is too sweet. But there is something better.

It never occurred to me to make my own chai. (Certainly it must be too hard.) But when I saw this recipe from thecatnipcat for this Amazing Spiced Chai Concentrate, something about the whole thing seemed doable. If I had known how easy it was, I would have started making my own years ago. Needless to say, this version is delicious! And I love that I can up the quantities of the flavors I like more and reduce the quantities of the flavors I like less. For example, we used less sugar and doubled the cinnamon. Make the original version, then tweak the recipe based on your preferences. I wouldn’t be surprised if you find her recipe is just right for you.


Tasty Kitchen Blog: Amazing Spiced Chai Concentrate. Guest post by Maggy Keet of Three Many Cooks, recipe submitted by TK member thecatnipcat.

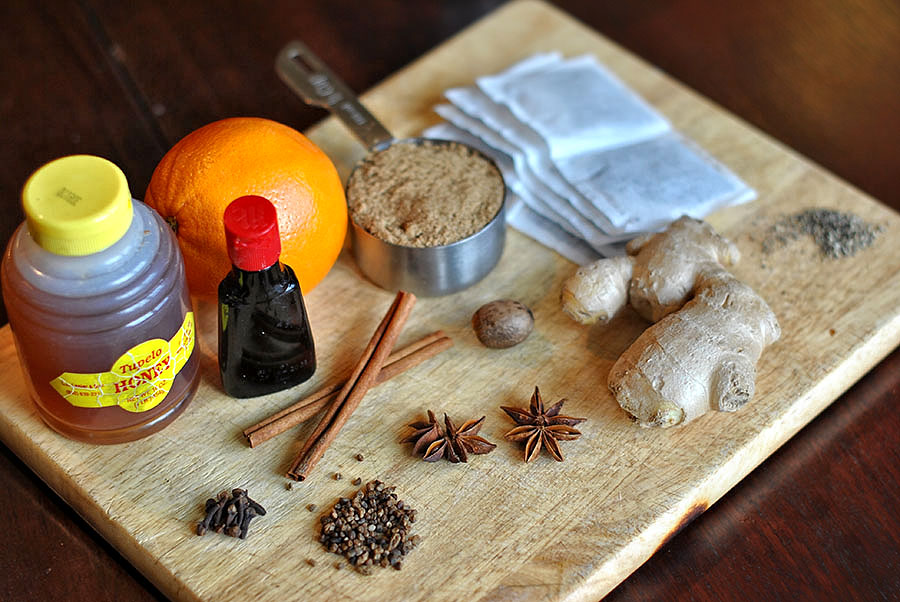
Here are the ingredients you’ll need: cinnamon, ginger, cardamom, star anise, cloves, black pepper, nutmeg, orange zest, tea bags, brown sugar, honey, and vanilla.

Start by bringing 4 1/2 cups water to the boil on the stove.


Tasty Kitchen Blog: Amazing Spiced Chai Concentrate. Guest post by Maggy Keet of Three Many Cooks, recipe submitted by TK member thecatnipcat.

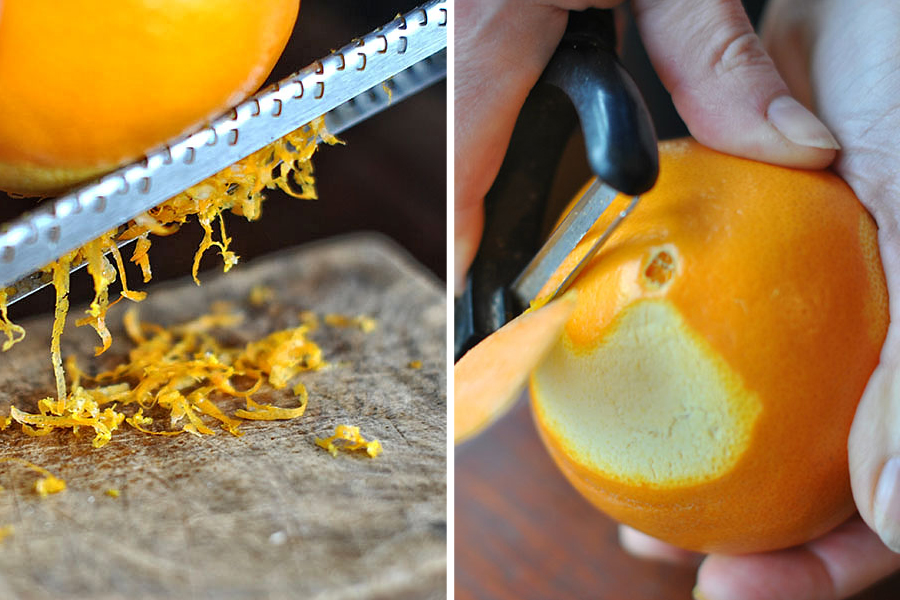
Then you need some orange zest. If you don’t have a zester, you can use a vegetable peeler.


Tasty Kitchen Blog: Amazing Spiced Chai Concentrate. Guest post by Maggy Keet of Three Many Cooks, recipe submitted by TK member thecatnipcat.

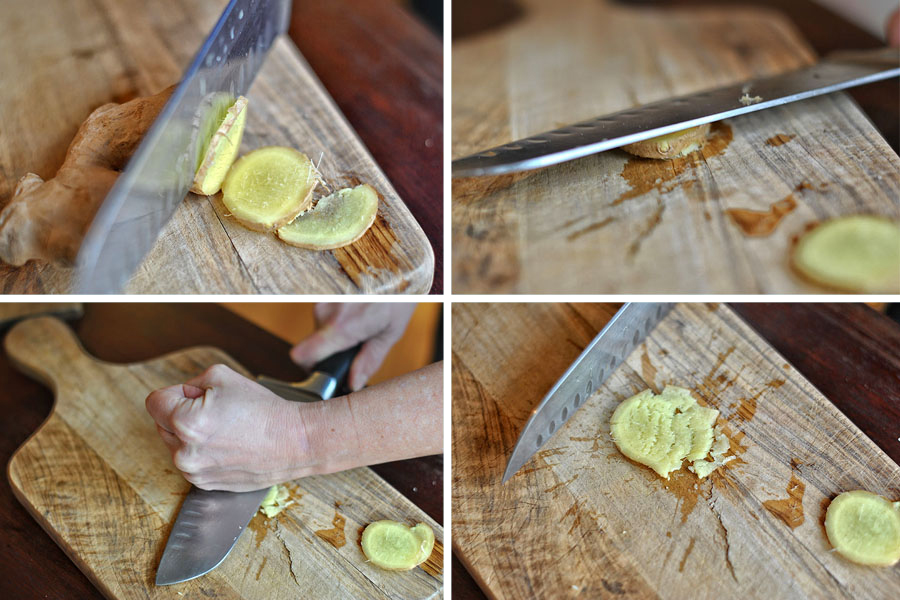
The recipe says to use a piece of ginger. For us that meant three large coins which we smashed to release more flavor.


Tasty Kitchen Blog: Amazing Spiced Chai Concentrate. Guest post by Maggy Keet of Three Many Cooks, recipe submitted by TK member thecatnipcat.

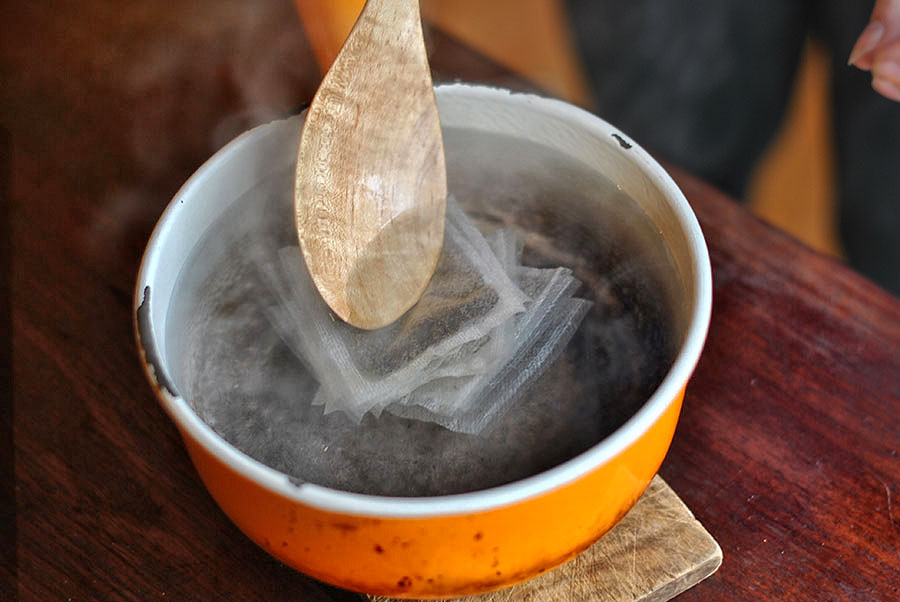
Once the water has come to a boil, remove the pot from the heat and add the tea bags.


Tasty Kitchen Blog: Amazing Spiced Chai Concentrate. Guest post by Maggy Keet of Three Many Cooks, recipe submitted by TK member thecatnipcat.

Then add your cinnamon sticks (we only add two—it just looks like we’re using four because we broke them in half).


Tasty Kitchen Blog: Amazing Spiced Chai Concentrate. Guest post by Maggy Keet of Three Many Cooks, recipe submitted by TK member thecatnipcat.

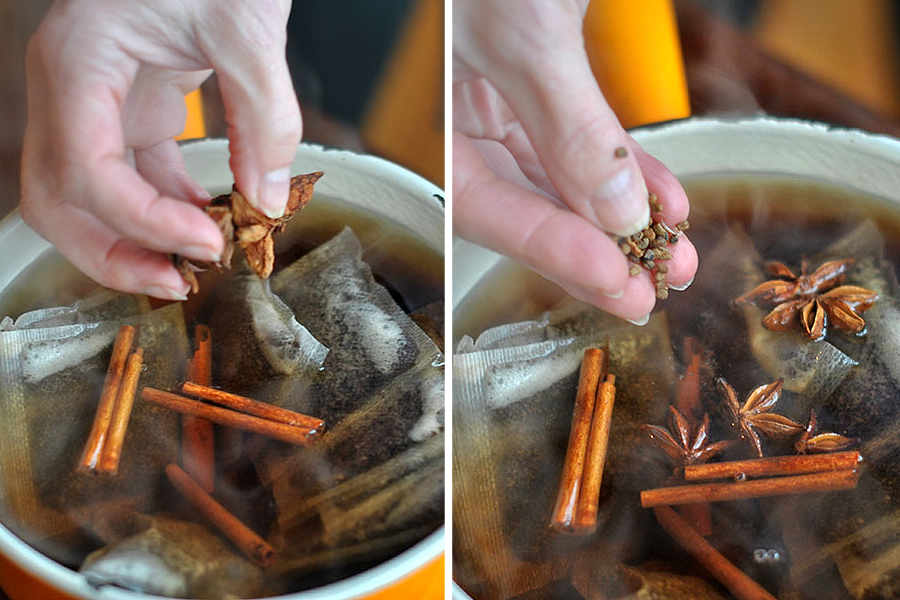
Then add your star anise and seven cardamom pods. We only had cardamom seeds so we looked up how many seeds there are in a pod. The answer is “about 12” so we added roughly 80 cardamom seeds (no we did not count them out).


Tasty Kitchen Blog: Amazing Spiced Chai Concentrate. Guest post by Maggy Keet of Three Many Cooks, recipe submitted by TK member thecatnipcat.

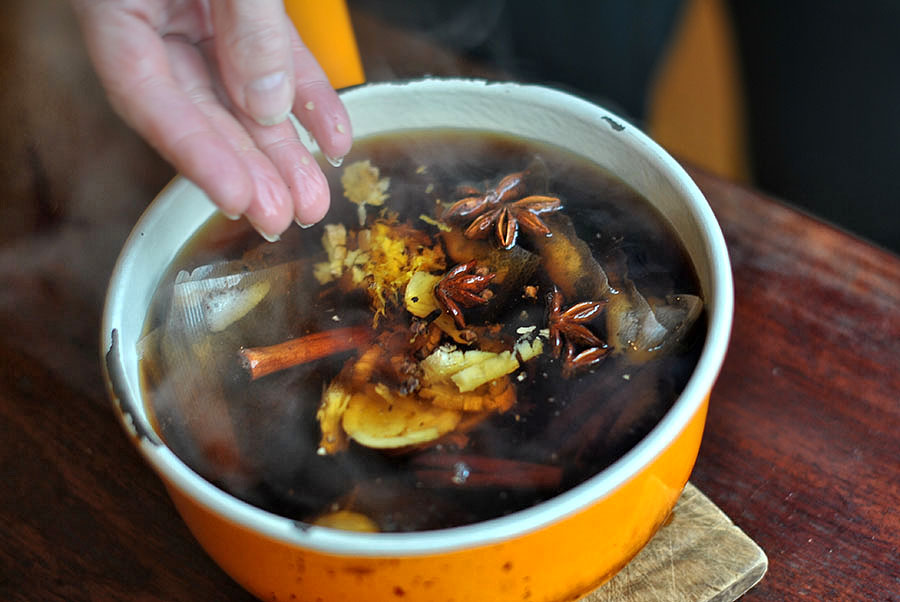
Then add the rest of the spices: the whole cloves, freshly ground pepper, zest (or peel), smashed ginger, and freshly grated nutmeg. Stir the pot to mix all the ingredients. This is the point at which Mom said, “This is starting to look like a witch’s brew.” I concurred.

Add sugar, vanilla and honey and then let this steep for 15-20 minutes. Our family likes our chai concentrate like we like our tea and coffee, strong and dark. So we let it go the full 20 minutes.


Tasty Kitchen Blog: Amazing Spiced Chai Concentrate. Guest post by Maggy Keet of Three Many Cooks, recipe submitted by TK member thecatnipcat.

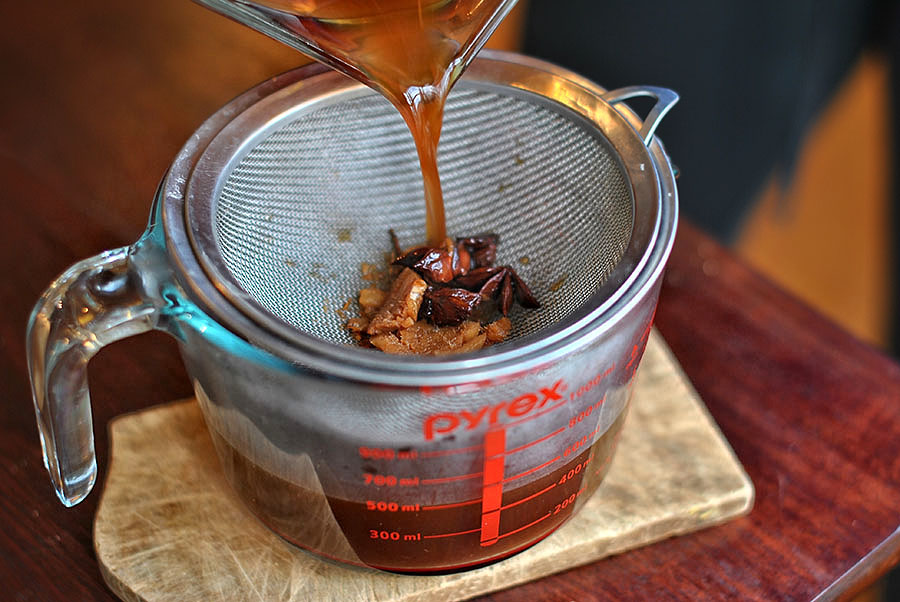
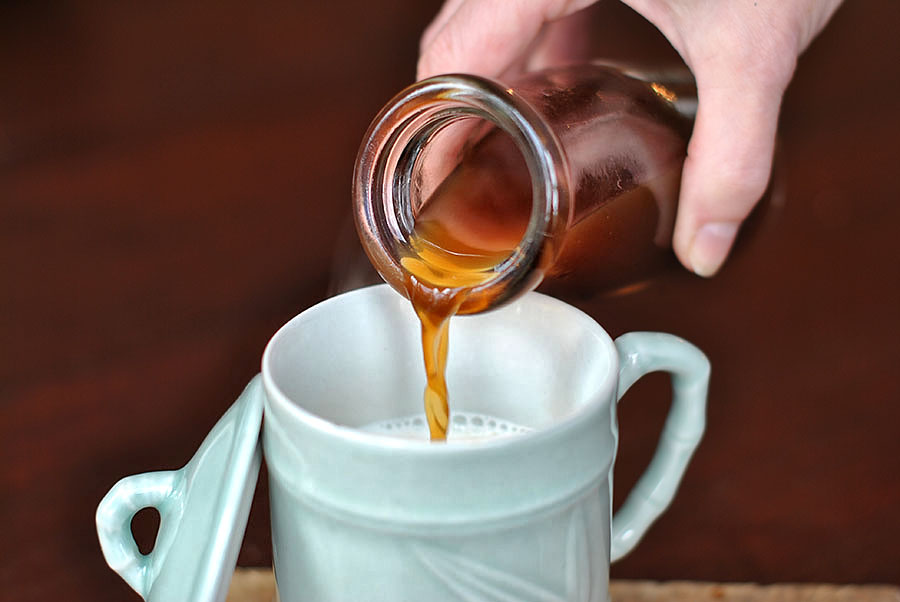
When the chai concentrate has reached desired taste and color, strain out the spices and zest.


Tasty Kitchen Blog: Amazing Spiced Chai Concentrate. Guest post by Maggy Keet of Three Many Cooks, recipe submitted by TK member thecatnipcat.

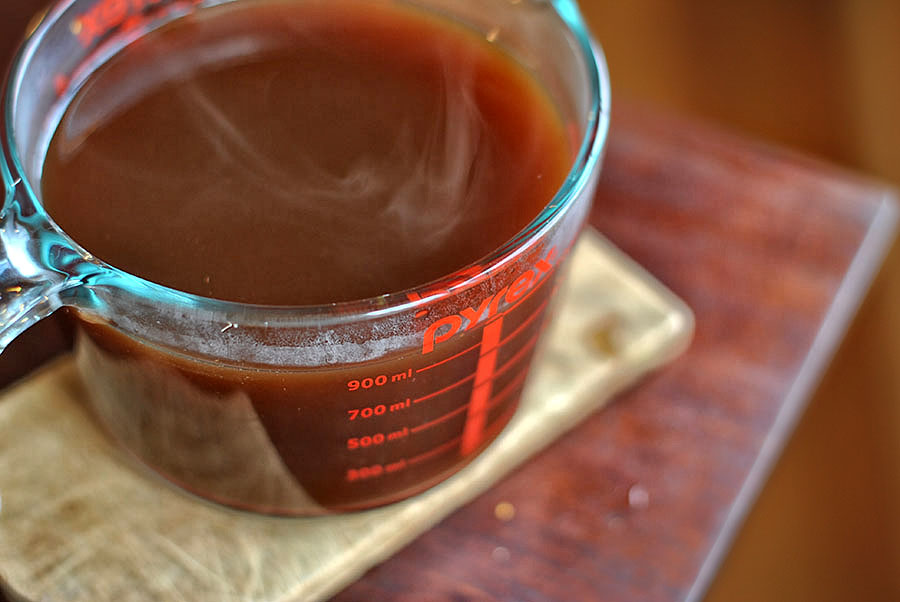
Now you are left with delicious, homemade chai concentrate.


Tasty Kitchen Blog: Amazing Spiced Chai Concentrate. Guest post by Maggy Keet of Three Many Cooks, recipe submitted by TK member thecatnipcat.

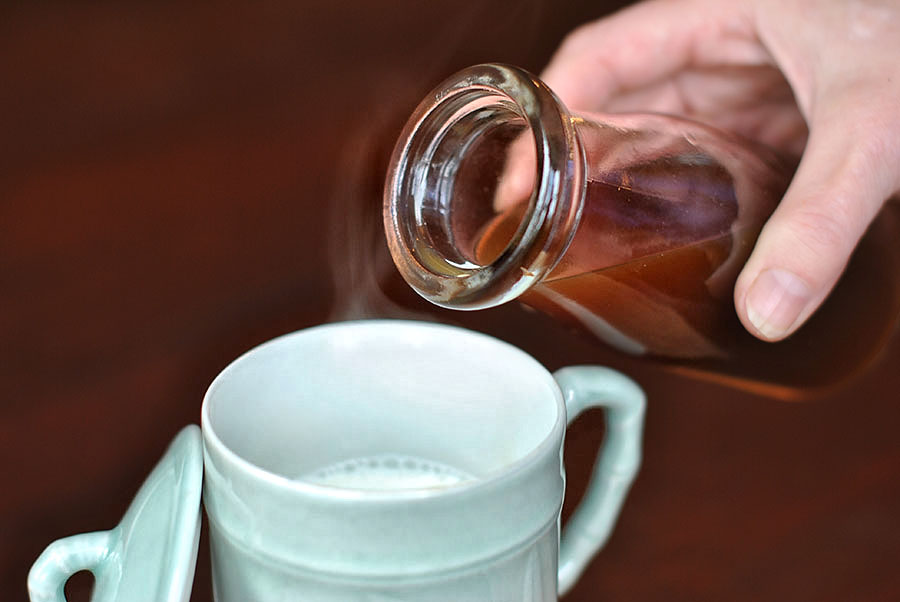
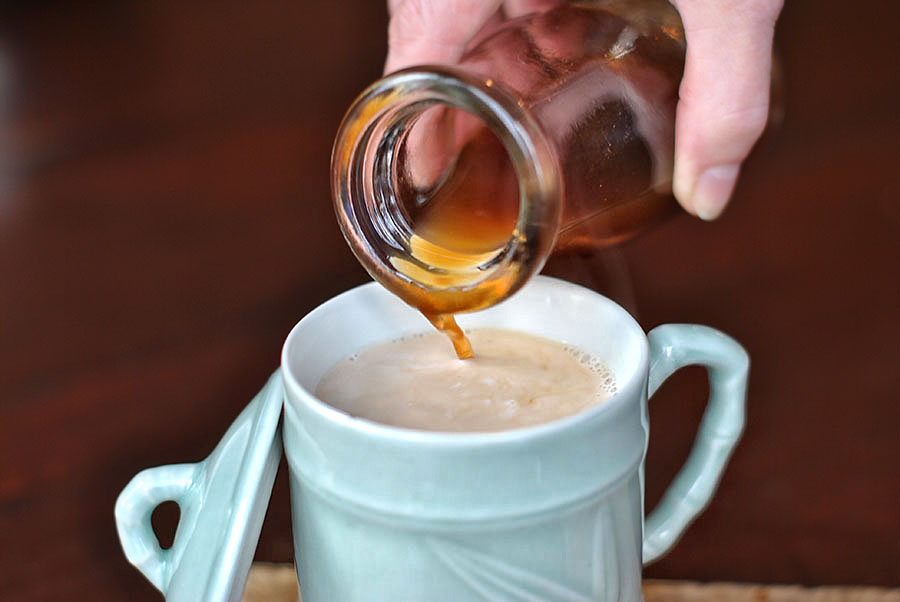
We added the chai concentrate to steamed milk, but you could mix it with ice cream or yogurt to give plain vanilla a flavor kick.


Tasty Kitchen Blog: Amazing Spiced Chai Concentrate. Guest post by Maggy Keet of Three Many Cooks, recipe submitted by TK member thecatnipcat.

All I know is that I will never pay $3.25 for an overly-sweet chai again.

Thanks again, thecatnipcat!


Printable Recipe

Amazing Spiced Chai Concentrate

4.92 Mitt(s) 26 Rating(s)26 votes, average: 4.92 out of 526 votes, average: 4.92 out of 526 votes, average: 4.92 out of 526 votes, average: 4.92 out of 526 votes, average: 4.92 out of 5

Prep Time:

Cook Time:

Difficulty: Easy

Servings: 8

8
x

Print Options

Page size Letter 3x5 4x6
Text Size Small Medium Large
Content Include description
Include prep time, etc.
Show image

Description

All the flavor of a mix, with no funky additives or preservatives! The benefits to making your own mix are obvious: you can customize it all you want, you know exactly what’s in it, and if you buy them in bulk, the spices can be dirt cheap!

Ingredients

  • 4-½ cups Water
  • 1 stick Cinnamon
  • 1 piece Fresh Ginger Chopped
  • 7 whole Cardamom Pods
  • 2 whole Star Anise Pods
  • 10 whole Cloves
  • ¼ teaspoons Freshly Ground Black Pepper
  • ½ teaspoons Freshly-ground Nutmeg
  • 1 teaspoon Orange Zest
  • 10 teaspoons Green Or Black Tea Or 10 Tea Bags
  • ⅔ cups Brown Sugar
  • 1 Tablespoon Honey
  • 1 Tablespoon Vanilla

Preparation Instructions

Bring the water to a boil. Add the spices and tea, remove from heat and let steep 15-20 minutes, depending on how strong you want it. Strain and add the brown sugar, honey, and vanilla. Stir to combine.

Mix 1 part concentrate with 1 part milk, heat and enjoy or pour over ice.

For a stronger flavor, mix 2 parts concentrate with 1 part milk or half-and-half (if you’re like me).

This concentrate will keep in the fridge for around 2 weeks. Freeze it in an icecube tray and add to smoothies!


_______________________________________

Three Many Cooks is the always-entertaining food blog of Pam Anderson and her two daughters, Maggy and Sharon. Pam is a well-known and much-respected food writer and author, Maggy is a “hippy adventurer meets 1950s housewife,” and Sharon refers to herself as a recovering food snob learning to survive on a graduate student’s budget. Theirs is a strong relationship both inside and outside the kitchen, and it shows in the food they create and the stories they tell.


Profile photo of callimakesdo

Bow Tie Pasta with Oven Dried Tomatoes

Posted by in Step-by-Step Recipes

Tasty Kitchen Blog: Bowtie Pasta with Oven Dried Tomatoes Asparagus and Boursin. Guest post by Calli Taylor of Make It Do, recipe submitted by TK member Dorothy of Belle of the Kitchen.

Ask my nine-year-old daughter what she wants for dinner and nine times out of ten the answer will be, “Bow Tie Pasta.” What can I say, she is a very reliable girl.

As a mom, I find myself cooking foods that appeal to my husband and me, and I don’t cater to the kids a whole lot. I hope that doesn’t make me a bad parent. Luckily, my kids are pretty good eaters (maybe from necessity). But that doesn’t mean I don’t look out for the foods I know they love, especially when it’s something we all can agree is delicious.

Because of my daughter’s little obsession, I usually check out Bow Tie Pasta recipes when they catch my eye. When I saw the recipe for Bow Tie Pasta with Oven Dried Tomatoes, Asparagus, and Boursin from Tasty Kitchen member barefootbelle, I knew I had to give it a try.

Asparagus, oven dried tomatoes, pine nuts and Boursin … hold the phone, did you it just say Boursin?


Tasty Kitchen Blog: Bowtie Pasta with Oven Dried Tomatoes Asparagus and Boursin. Guest post by Calli Taylor of Make It Do, recipe submitted by TK member Dorothy of Belle of the Kitchen.

Oh me, oh my. How I love Boursin.

“Yes sweetie, I’d be happy to make Bow Tie Pasta for dinner tonight.”

This is an easy recipe, but not one you can throw together at the last minute. The oven dried tomatoes take 3 1/2 hours. So you’ll need to plan ahead. Despite the time involved, it’s the oven dried tomatoes that totally stole the show for me. They have such a lovely sweetness and concentration of flavors.

Here’s how I made barefootbelle’s lovely Bow Tie Pasta:


Tasty Kitchen Blog: Bowtie Pasta with Oven Dried Tomatoes Asparagus and Boursin. Guest post by Calli Taylor of Make It Do, recipe submitted by TK member Dorothy of Belle of the Kitchen.

Start with cherry tomatoes. I think grape tomatoes would be delicious, too. Do yourself favor and make more than the recipe calls for. They are so yummy you’ll want some for a crostini or for crackers with cheese (Boursin anyone?), or even eaten straight off the pan.


Tasty Kitchen Blog: Bowtie Pasta with Oven Dried Tomatoes Asparagus and Boursin. Guest post by Calli Taylor of Make It Do, recipe submitted by TK member Dorothy of Belle of the Kitchen.

Halve the tomatoes and place them on your baking sheet facing up and tuck in the whole cloves of garlic. They slow cook until their flavor is mild, creamy and delicious.

Drizzle them with oil, pepper, a pinch of salt, and a pinch of sugar.


Tasty Kitchen Blog: Bowtie Pasta with Oven Dried Tomatoes Asparagus and Boursin. Guest post by Calli Taylor of Make It Do, recipe submitted by TK member Dorothy of Belle of the Kitchen.

Sprinkle on some fresh chopped basil.

Throw the whole thing in the oven for 3 1/2 hours. It’s a long time, but there is an upside: your kitchen will smell like a great Italian restaurant all afternoon.


Tasty Kitchen Blog: Bowtie Pasta with Oven Dried Tomatoes Asparagus and Boursin. Guest post by Calli Taylor of Make It Do, recipe submitted by TK member Dorothy of Belle of the Kitchen.

In a hot pan, toast the pine nuts until fragrant. That’s my rule of thumb with any nuts. Cook ‘em until they smell nice.


Tasty Kitchen Blog: Bowtie Pasta with Oven Dried Tomatoes Asparagus and Boursin. Guest post by Calli Taylor of Make It Do, recipe submitted by TK member Dorothy of Belle of the Kitchen.

Cook your pasta in well-salted water. Since my husband doesn’t like pasta cooked TOO al dente, I cooked my pasta according to the package instructions, and not the eight minutes recommended on the recipe. I think good Italian pasta takes a little longer anyway. Even after heating everything in the pan at the end, the pasta tasted perfectly cooked and not mushy. Be sure to reserve 2/3 cup of the pasta water before you strain it all away.


Tasty Kitchen Blog: Bowtie Pasta with Oven Dried Tomatoes Asparagus and Boursin. Guest post by Calli Taylor of Make It Do, recipe submitted by TK member Dorothy of Belle of the Kitchen.

Here’s where I departed a bit from the text. The recipe calls for the asparagus to be cooked in the last two minutes, boiled with the pasta. While I’m sure that would work just great, I love the flavor of roasted asparagus, so I chopped up my asparagus into bite-sized pieces …


Tasty Kitchen Blog: Bowtie Pasta with Oven Dried Tomatoes Asparagus and Boursin. Guest post by Calli Taylor of Make It Do, recipe submitted by TK member Dorothy of Belle of the Kitchen.

And I tossed them on a baking sheet, drizzled with olive oil, salt and pepper, then roasted at 400ºF until tender crisp, about 8 minutes depending on the size of your spears.


Tasty Kitchen Blog: Bowtie Pasta with Oven Dried Tomatoes Asparagus and Boursin. Guest post by Calli Taylor of Make It Do, recipe submitted by TK member Dorothy of Belle of the Kitchen.

Now it’s time to toss it all together. In a large pan, heat the olive oil over medium heat. Add the garlic. The recipe doesn’t mention it, but I minced mine. Add the tomatoes to warm them. Add the pasta, asparagus and the reserved water. Toss to combine.


Tasty Kitchen Blog: Bowtie Pasta with Oven Dried Tomatoes Asparagus and Boursin. Guest post by Calli Taylor of Make It Do, recipe submitted by TK member Dorothy of Belle of the Kitchen.

Pinch and drop the Boursin into the pan. Add the lemon pepper and pine nuts.


Tasty Kitchen Blog: Bowtie Pasta with Oven Dried Tomatoes Asparagus and Boursin. Guest post by Calli Taylor of Make It Do, recipe submitted by TK member Dorothy of Belle of the Kitchen.

Sprinkle in the Parmesan cheese. Then season with salt and pepper to taste.


Tasty Kitchen Blog: Bowtie Pasta with Oven Dried Tomatoes Asparagus and Boursin. Guest post by Calli Taylor of Make It Do, recipe submitted by TK member Dorothy of Belle of the Kitchen.

Enjoy! The pasta is great combination of flavors, and feels fresh and springy. I think I mentioned that I loved the oven dried tomatoes; they are amazing. I also love what the lemon pepper does to give the pasta a lighter zip. This is a meal that makes me and my girl very happy.

Thank you Dorothy for sharing all of your wonderful recipes! Be sure to check out Dorothy’s wonderful TK recipe box and her blog Belle of the Kitchen. And have you read her Tasty Kitchen feature yet? You’ll fall in love with her even more.


Printable Recipe

Bow Tie Pasta with Oven Dried Tomatoes, Asparagus, and Boursin

See post on barefootbelle’s site!
4.80 Mitt(s) 10 Rating(s)10 votes, average: 4.80 out of 510 votes, average: 4.80 out of 510 votes, average: 4.80 out of 510 votes, average: 4.80 out of 510 votes, average: 4.80 out of 5

Prep Time:

Cook Time:

Difficulty: Easy

Servings: 4

4
x

Print Options

Page size Letter 3x5 4x6
Text Size Small Medium Large
Content Include description
Include prep time, etc.
Show image

Description

This fresh dish hits the spot for a springtime dinner.

Ingredients

  • FOR THE OVEN DRIED TOMATOES:
  • 12 whole Cherry Tomatoes, Halved
  • 3 cloves Garlic
  • 1 teaspoon To 2 Teaspoons Olive Oil
  • 1 pinch Sugar
  • 1 pinch Kosher Salt
  • Freshly Ground Pepper
  • 4 leaves Basil, Julienned
  • _____
  • FOR THE PASTA:
  • ⅓ cups Pine Nuts
  • 8 ounces, weight Bow Tie Pasta
  • 1 bunch Asparagus, Ends Trimmed And Cut Into 2-3 Inch Pieces
  • 1 Tablespoon Olive Oil
  • 3 cloves Roasted Garlic (from The Above List), Chopped
  • 12 whole Oven Roasted Cherry Tomatoes (from The Above List)
  • 1 Tablespoon Fresh Basil, Julienned
  • ¼ cups Grated Parmesan Cheese
  • ¼ cups Garlic And Herb Boursin Cheese, Crumbled (a Good Herbed Goat Cheese Will Work, Too)
  • ¾ teaspoons Lemon Pepper
  • Kosher Salt And Pepper

Preparation Instructions

For the oven-dried tomatoes:

Preheat the oven to 225 degrees. In a small baking pan (I used a round cake pan), place the cherry tomato halves, cut side up. Drizzle with olive oil, sprinkle with sugar, salt and pepper. Sprinkle with basil. Tuck the garlic cloves in between the tomatoes. Bake for 3 1/2 hours. The tomatoes should be shriveled, but still have some moisture. Refrigerate the tomatoes and garlic until ready to use.

For the pasta:

Place a medium saucepan over medium heat. Cook the pine nuts in the dry skillet, shaking or stirring the pan constantly, until the pine nuts are slightly brown on all sides. Remove to a bowl.

In the same saucepan, bring six cups of well-salted water to a boil. Add the pasta and cook for 8 minutes. Add the asparagus and cook for two more minutes. Reserve 2/3 cups pasta water and drain the pasta and asparagus in a colander.

In the same saucepan, heat the olive oil over medium heat. Add the roasted garlic and cook for 30 seconds, then add the roasted tomatoes to warm through. Add the pasta, asparagus and reserved water, tossing to combine. Add the basil, cheeses, lemon pepper, and pine nuts. Toss everything together and taste for salt and pepper.


_______________________________________

Calli is truly a woman of many talents, from cooking, sewing, crafts, beautiful photography and gardening. Her blog, Make it Do is a treasure trove of recipes, household tips, crafts projects, sewing patterns … you name it. It’s also peppered with photos of her beautiful kids. Go visit her site, and visit it often. There’s always something new to learn there!


Profile photo of twopeasandtheirpod

Last Minute Sesame Noodles

Posted by in Step-by-Step Recipes

Tasty Kitchen Blog: Last Minute Sesame Noodles. Guest post by Maria Lichty of Two Peas and Their Pod, recipe submitted by TK member Aggie of Aggie's Kitchen.

 
The holidays were filled with good food and fun, but I think I overdosed on sugar this year. Ree’s cookie week, turned into cookie month for me. I couldn’t stop baking and eating cookies. I think I am finally sugared out and ready to cook up some healthy recipes. First up, Last Minute Sesame Noodles from Tasty Kitchen member Aggie, who blogs at Aggie’s Kitchen. This whole grain noodle dish is filled with fresh vegetables and is super easy to make. If you are looking for a healthy recipe to jump start the new year, it is your lucky day! Let’s get started.


Tasty Kitchen Blog: Last Minute Sesame Noodles. Guest post by Maria Lichty of Two Peas and Their Pod, recipe submitted by TK member Aggie of Aggie's Kitchen.

To make this noodle dish, you will need: soba noodles (or whole wheat spaghetti), soy sauce, sesame oil, canola oil, rice vinegar, red pepper flakes, green onions, cilantro, red pepper, red cabbage, carrots, edamame, and sesame seeds. 


Tasty Kitchen Blog: Last Minute Sesame Noodles. Guest post by Maria Lichty of Two Peas and Their Pod, recipe submitted by TK member Aggie of Aggie's Kitchen.

Begin by cooking the noodles, according to package instructions. 


Tasty Kitchen Blog: Last Minute Sesame Noodles. Guest post by Maria Lichty of Two Peas and Their Pod, recipe submitted by TK member Aggie of Aggie's Kitchen.

Carefully drain the pasta noodles. 


Tasty Kitchen Blog: Last Minute Sesame Noodles. Guest post by Maria Lichty of Two Peas and Their Pod, recipe submitted by TK member Aggie of Aggie's Kitchen.

Rinse noodles under cold water and set aside. 


Tasty Kitchen Blog: Last Minute Sesame Noodles. Guest post by Maria Lichty of Two Peas and Their Pod, recipe submitted by TK member Aggie of Aggie's Kitchen.

Chop up the colorful vegetables. 


Tasty Kitchen Blog: Last Minute Sesame Noodles. Guest post by Maria Lichty of Two Peas and Their Pod, recipe submitted by TK member Aggie of Aggie's Kitchen.

To make the dressing, combine soy sauce, oils, rice vinegar, crushed red pepper, green onions, and cilantro in a large bowl. 


Tasty Kitchen Blog: Last Minute Sesame Noodles. Guest post by Maria Lichty of Two Peas and Their Pod, recipe submitted by TK member Aggie of Aggie's Kitchen.

Whisk dressing ingredients together, until well combined. 


Tasty Kitchen Blog: Last Minute Sesame Noodles. Guest post by Maria Lichty of Two Peas and Their Pod, recipe submitted by TK member Aggie of Aggie's Kitchen.

Add noodles and vegetables to the dressing. 


Tasty Kitchen Blog: Last Minute Sesame Noodles. Guest post by Maria Lichty of Two Peas and Their Pod, recipe submitted by TK member Aggie of Aggie's Kitchen.

Gently toss until noodles and vegetables are well coated. Add sesame seeds. 


Tasty Kitchen Blog: Last Minute Sesame Noodles. Guest post by Maria Lichty of Two Peas and Their Pod, recipe submitted by TK member Aggie of Aggie's Kitchen.

Serve cold and enjoy! 

If healthy eating is on your New Year’s resolution list, you have to try this recipe. It is nutritious and delicious. Feel free to add in whatever veggies you have in the fridge. I love that this recipe is so versatile. This noodle dish makes a great weeknight meal and the leftovers are perfect for a light lunch. Start the new year off right with Last Minute Sesame Noodles. I know I will be making this healthy recipe all year long.

Thanks, Aggie, for this wonderful dish. Visit her blog, Aggie’s Kitchen, for more of her recipes!


Printable Recipe

Last Minute Sesame Noodles

See post on Aggie's Kitchen’s site!
5.00 Mitt(s) 4 Rating(s)4 votes, average: 5.00 out of 54 votes, average: 5.00 out of 54 votes, average: 5.00 out of 54 votes, average: 5.00 out of 54 votes, average: 5.00 out of 5

Prep Time:

Cook Time:

Difficulty: Easy

Servings: 6

6
x

Print Options

Page size Letter 3x5 4x6
Text Size Small Medium Large
Content Include description
Include prep time, etc.
Show image

Description

Just boil water, and then use it all up! Raid your fridge and throw it in! These noodles are very versatile.

Ingredients

  • 1 pound Spaghetti, Whole Wheat Spaghetti, Soba Noodles, Quinoa Pasta
  • ½ cups Reduced Sodium Soy Sauce
  • 2 Tablespoons Sesame Oil
  • 2 Tablespoons Canola Oil
  • 2 Tablespoons Rice Wine Vinegar
  • 1-½ teaspoon Red Pepper Flakes
  • 1 bunch Green Onions, Sliced, Divided
  • ¼ cups Cilantro, Chopped
  • 1 whole Red Pepper, Sliced Thin
  • ¼ heads Red Cabbage, Sliced Thin
  • 2 whole Carrots, Shredded With Vegetable Peeler
  • 1-½ cup Shelled Edamame, Cooked
  • ½ cups Toasted Sesame Seeds

Preparation Instructions

Cook pasta according to directions. Drain, rinse under cold water.

To make dressing, whisk soy sauce, sesame oil, canola oil, vinegar, crushed red pepper, scallions, and cilantro in a large bowl. Add noodles and vegetables, toss to coat. Top with sesame seeds.


_______________________________________

Maria and her husband Josh (who she affectionately refers to as her “dough boy”) blog at Two Peas and Their Pod. They’ve been featured on Saveur, Eatocracy, Gourmet Live, Glamour, and the Los Angeles Times, to name just a few. We’re so glad to have them here!


Profile photo of HowSweetEats

Cookies and Cream Cheesecake Bars

Posted by in Baking, Step-by-Step Recipes

Tasty Kitchen Blog: Cookies and Cream Cheesecake Bars. Guest post by Jessica Merchant of How Sweet It Is, recipe submitted by TK member Lori Lange of Recipe Girl.

 
If you asked me what my all-time favorite dessert is, the answer would most likely be cheesecake. Cheesecake is not only creamy and delightful but it can also take on almost any flavor, making the options limitless. I love every bite of the delectable treat, from chocolate ganache-topped fluffy sour cream, to the dense, cold cake in the middle, all the way down to the slightly sweet, slightly salty, always buttery crust. If we’re being honest, it doesn’t get much better than cheesecake.

When I spied these Cookies and Cream Cheesecake Bars from Lori of Recipe Girl , my heart skipped a beat. Actually, it nearly fluttered out of my chest. Cheesecake in bar form … portable slices I could eat with my hands … sweet, chocolate crust … sold. Before I knew it, I was dragging out my stand mixer, finding the bag or Oreos that I knew I saved for a reason, and cutting my cream cheese into cubes so it could quickly come to room temperature. If you haven’t noticed, patience isn’t one of my strong points. It took everything in my being to not devour the entire pan of these incredible cheesecake slices. Check them out below.


Tasty Kitchen Blog: Cookies and Cream Cheesecake Bars. Guest post by Jessica Merchant of How Sweet It Is, recipe submitted by TK member Lori Lange of Recipe Girl.

You only need a few ingredients to create these mouth watering bars: one package of Oreos, three packages of room temperature cream cheese, sour cream at room temperature, butter, room temperature eggs, sugar, salt and vanilla extract. Simple and tasty. Let’s get started!


Tasty Kitchen Blog: Cookies and Cream Cheesecake Bars. Guest post by Jessica Merchant of How Sweet It Is, recipe submitted by TK member Lori Lange of Recipe Girl.

Preheat your oven to 325 degrees F. Line a 9 x 13 pan with aluminum foil and spray with non-stick spray.


Tasty Kitchen Blog: Cookies and Cream Cheesecake Bars. Guest post by Jessica Merchant of How Sweet It Is, recipe submitted by TK member Lori Lange of Recipe Girl.

Begin with the crust. Add exactly 28 Oreos to your food processor. This is two sleeves of Oreos.


Tasty Kitchen Blog: Cookies and Cream Cheesecake Bars. Guest post by Jessica Merchant of How Sweet It Is, recipe submitted by TK member Lori Lange of Recipe Girl.

Process until the cookies become fine crumbs.


Tasty Kitchen Blog: Cookies and Cream Cheesecake Bars. Guest post by Jessica Merchant of How Sweet It Is, recipe submitted by TK member Lori Lange of Recipe Girl.

Melt four tablespoons of butter and add it to a large bowl. Pour in Oreo crumbs and using a flexible spatula, mix until moistened and combined.


Tasty Kitchen Blog: Cookies and Cream Cheesecake Bars. Guest post by Jessica Merchant of How Sweet It Is, recipe submitted by TK member Lori Lange of Recipe Girl.

Pour the crumbs into the foil-lined pan.


Tasty Kitchen Blog: Cookies and Cream Cheesecake Bars. Guest post by Jessica Merchant of How Sweet It Is, recipe submitted by TK member Lori Lange of Recipe Girl.

Distribute the crumbs evenly and press down with your fingers to flatten the crust. Place the pan in the oven and bake the crust for 10 minutes. After 10 minutes, remove the pan and let it cool. Leave the oven on because the cheesecake is going right back in.


Tasty Kitchen Blog: Cookies and Cream Cheesecake Bars. Guest post by Jessica Merchant of How Sweet It Is, recipe submitted by TK member Lori Lange of Recipe Girl.

While the crust is baking, start on your filling. First, break the remaining Oreos in half and add to the food processor. Pulse a few times just to break them apart; you still want some big cookie chunks. I pulsed my processor about five or six times.


Tasty Kitchen Blog: Cookies and Cream Cheesecake Bars. Guest post by Jessica Merchant of How Sweet It Is, recipe submitted by TK member Lori Lange of Recipe Girl.

In the bowl of your electric mixer, add your softened cream cheese and sugar. Beat until the mixture is smooth and fluffy, about two minutes. Make sure to scrape down the sides and beat until it is uniformly thick.


Tasty Kitchen Blog: Cookies and Cream Cheesecake Bars. Guest post by Jessica Merchant of How Sweet It Is, recipe submitted by TK member Lori Lange of Recipe Girl.

It should look like this. Great. Now I’m hungry!


Tasty Kitchen Blog: Cookies and Cream Cheesecake Bars. Guest post by Jessica Merchant of How Sweet It Is, recipe submitted by TK member Lori Lange of Recipe Girl.

Beat in your sour cream, salt and vanilla extract, again making sure to scrape down the sides of the bowl.


Tasty Kitchen Blog: Cookies and Cream Cheesecake Bars. Guest post by Jessica Merchant of How Sweet It Is, recipe submitted by TK member Lori Lange of Recipe Girl.

Add your eggs one at a time, beating after each addition. Make sure the eggs are completely mixed in and scrape down the sides of the bowl one last time to make sure everything is combined.


Tasty Kitchen Blog: Cookies and Cream Cheesecake Bars. Guest post by Jessica Merchant of How Sweet It Is, recipe submitted by TK member Lori Lange of Recipe Girl.

Add your chopped Oreos into the filling.


Tasty Kitchen Blog: Cookies and Cream Cheesecake Bars. Guest post by Jessica Merchant of How Sweet It Is, recipe submitted by TK member Lori Lange of Recipe Girl.

Fold the Oreos in with your spatula and try not to drool. I was unsuccessful.


Tasty Kitchen Blog: Cookies and Cream Cheesecake Bars. Guest post by Jessica Merchant of How Sweet It Is, recipe submitted by TK member Lori Lange of Recipe Girl.

Pour the mixture on top of the crust and spread evenly with a spatula to distribute the filling.

Bake for 40 minutes, or until the outside is set but the middle is still a bit jiggly. Remove the pan and set aside on a cooling rack to cool completely. Once cool, cover it with foil and place it in the fridge to chill for a few hours, or overnight.

Wait … and wait … and wait … and dream about cookies and cream cheesecake.

One the bars have chilled, lift the foil overhang out of the pan and place it on a cutting board. Using a large knife, cut the cheesecake into uniform squares, rinsing the knife with warm water between each slice.


Tasty Kitchen Blog: Cookies and Cream Cheesecake Bars. Guest post by Jessica Merchant of How Sweet It Is, recipe submitted by TK member Lori Lange of Recipe Girl.

Serve yourself a big slice. Or two.


Tasty Kitchen Blog: Cookies and Cream Cheesecake Bars. Guest post by Jessica Merchant of How Sweet It Is, recipe submitted by TK member Lori Lange of Recipe Girl.

And enjoy!

These bars surpassed my expectations and tasted like heaven on a plate. I am already plotting my second go-round and can’t wait to share them at a few summer barbecues. Thanks so much for the recipe, Lori! Be sure to check out Lori’s website Recipe Girl. It’s loaded with hundreds of delicious recipes. Her site is one of my go-to sites for easy dinner ideas!


Printable Recipe

Cookies and Cream Cheesecake Bars

See post on RecipeGirl’s site!
4.75 Mitt(s) 20 Rating(s)20 votes, average: 4.75 out of 520 votes, average: 4.75 out of 520 votes, average: 4.75 out of 520 votes, average: 4.75 out of 520 votes, average: 4.75 out of 5

Prep Time:

Cook Time:

Difficulty: Intermediate

Servings: 24

24
x

Print Options

Page size Letter 3x5 4x6
Text Size Small Medium Large
Content Include description
Include prep time, etc.
Show image

Description

Oreo cookie fans everywhere will delight in these delicious cheesecake bars. :)

Ingredients

  • 1 pound Oreo Cookies
  • 4 Tablespoons Unsalted Butter, melted
  • 24 ounces, weight Cream Cheese, At Room Temperature
  • ¾ cups Granulated Sugar
  • ¾ cups Sour Cream At Room Temperature
  • 1 teaspoon Vanilla Extract
  • ½ teaspoons Salt
  • 3 whole Large Eggs, At Room Temperature

Preparation Instructions

1. Preheat oven to 325°F. Line a 9 x 13-inch pan with foil, leaving a 2-inch overhang on two sides (I spray mine with cooking spray).

2. Make the crust: place 28 Oreos in a food processor and process until finely ground. Pour into a large bowl, add the melted butter, and stir with a flexible spatula until all crumbs are moistened. Place the cookie-crumb mixture in the lined pan and, using your fingers, press the mixture firmly and evenly into the bottom. Bake for 10 minutes, then remove to a wire cooling rack (leave the oven on) while you make the filling. Snap the remaining Oreos in half, put them in the food processor, and turn on and off quickly a few times, just until the cookies are roughly chopped.

3. Make the filling: In a large bowl, using an electric mixer on medium speed, beat the cream cheese and sugar until well blended, about 2 minutes. Scrape down the sides and bottom of the bowl with a flexible spatula and beat again until uniform. Beat in sour cream, vanilla and salt. Scrape down the bowl and mix again. Add the eggs, one at a time, beating well after each. After beating in the last egg, scrape down the sides and bottom of the bowl and beat one more time, to make sure the mixture is fully combined. Stir in chopped Oreos with the same spatula.

4. Pour the cream cheese mixture over the baked cookie crust, smooth the top with the spatula, and bake for 40 minutes, until the filling is set around the edges but still slightly wobbly in the center when you gently shake the pan. Remove the pan to a wire rack to cool to room temperature, about 1 hour. When cool, cover it with foil and refrigerate until well chilled, at least 3 hours. (I chill mine overnight.)

5. To cut, use the foil overhang to lift the cheesecake out of the pan and place on a large cutting board. Use a sharp chef’s knife to cut the cheesecake into bars, rinsing off the knife with hot water and wiping it dry between each cut. Keep refrigerated until ready to serve.

Yield: 24 bars

Cooking Tips:
These work best served on flattened out cupcake papers with a fork stuck on top.


_______________________________________

Jessica Merchant is a personal trainer turned food writer and blogger. Her blog, How Sweet Eats, is where she proclaims her love for all things sweet, all things bacon, and everything else in between. She works her magic in her Pittsburgh kitchen, which she shares with her husband of 2 years.


Profile photo of ThreeManyCooks

Old-Fashioned Oatmeal Cake

Posted by in Baking, Step-by-Step Recipes

  This Old-fashioned Oatmeal Cake with Broiled Topping called out to me because I love simple, no fuss cakes that can be thrown together quickly and aren’t overly sweet. But more than the cake, I love the headnote Tasty Kitchen member Brandi N wrote. She found the hand-written recipe for this cake in her grandmother’s old tin […]

Profile photo of callimakesdo

Spicy Grilled Fish Tacos

Posted by in Step-by-Step Recipes

  My husband and I LOVE fish tacos. We order them every chance we get. But since we live in a small community roughly 700 miles from the nearest ocean, a great fish taco is hard to come by. When Patio Daddio’s Spicy Grilled Fish Tacos recipe popped up on Tasty Kitchen, I knew it […]

Profile photo of ThreeManyCooks

Light and Crisp Waffles

Posted by in Step-by-Step Recipes

  As a P.K. (preacher’s kid), Christmas morning has never been normal for our family. Growing up, Sharon and I would have to wait until Dad got back from Christmas services before opening our presents (torture), and breakfast was something like eggs and toast or muffins. Don’t feel sorry for us; we didn’t know any […]

Profile photo of ThreeManyCooks

New Year’s Black-Eyed Peas

Posted by in Holidays, Step-by-Step Recipes

  For Southerners, black-eyed peas on New Year’s Day are as mandatory a tradition as turkey on Thanksgiving Day. We’ve had black-eyed peas, collard greens and cornbread on New Year’s Day for as long as I can remember. Even the year my family spent the week after Christmas in Hawaii. While most families would have […]