The Pioneer Woman Tasty Kitchen
Profile photo of Erica Lea

Favorite Cheese Ball

Posted by in Step-by-Step Recipes

Tasty Kitchen Blog: Favorite Cheese Ball. Guest post and recipe from Erica Kastner of Cooking for Seven.

 
I have made this recipe so often that I could probably do it with my eyes shut and one hand held behind my back. My dad loves it and complains if we try to alter it in any way.

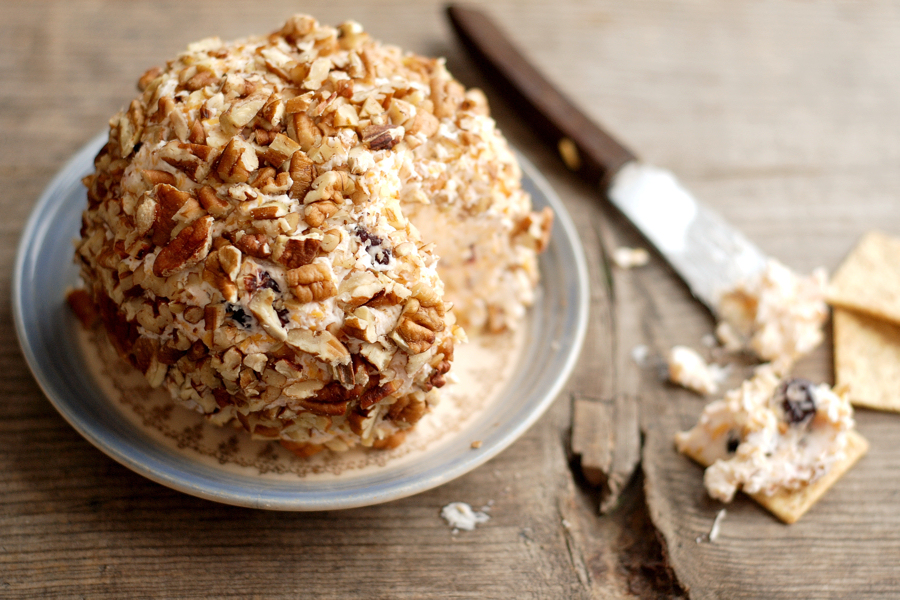
My sister and I developed this cheese ball because we couldn’t find a recipe to suit our fancy. We added a little of this, a handful of that, and, to our surprise, created something deliciously savory with a mere hint of sweetness.

It’s ridiculously easy to make. Care to learn how?


Tasty Kitchen Blog: Favorite Cheese Ball. Guest post and recipe from Erica Kastner of Cooking for Seven.

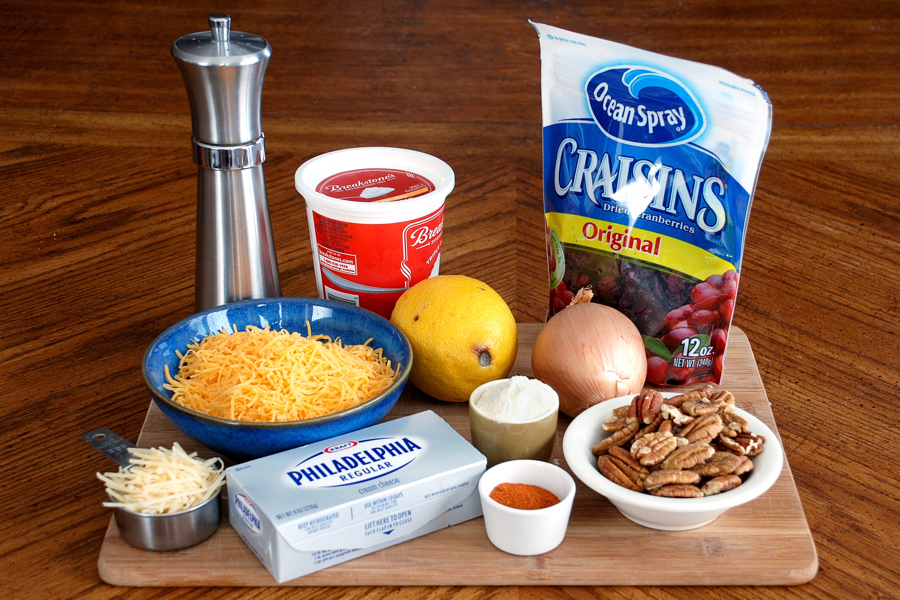
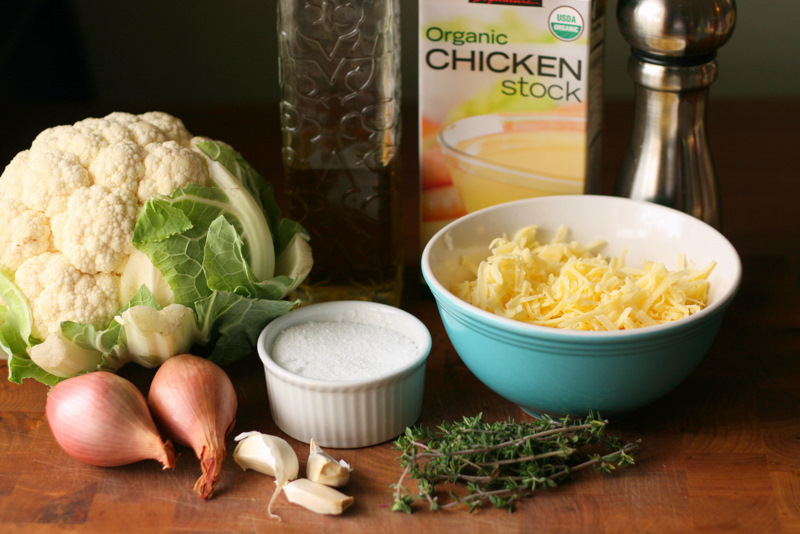
Here’s what you’ll need: cream cheese, sour cream, cheddar cheese, parmesan cheese, garlic powder, cayenne pepper, lemon, onion, dried cranberries (optional), freshly ground black pepper, and pecans.


Tasty Kitchen Blog: Favorite Cheese Ball. Guest post and recipe from Erica Kastner of Cooking for Seven.

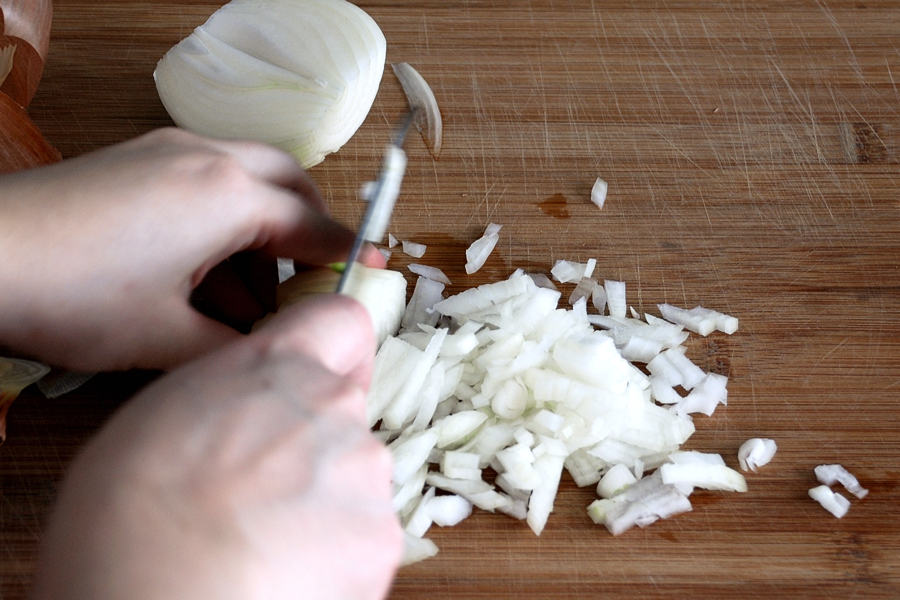
Begin by chopping the onion fine. You only need about 1/4 cup.


Tasty Kitchen Blog: Favorite Cheese Ball. Guest post and recipe from Erica Kastner of Cooking for Seven.

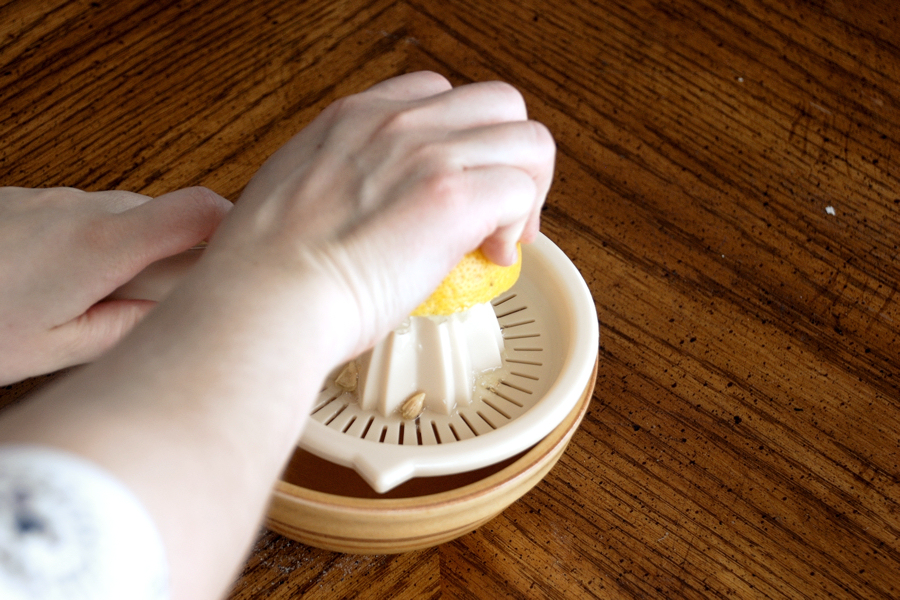
Roll the lemon and squeeze out the juice. You only need 1 teaspoon.


Tasty Kitchen Blog: Favorite Cheese Ball. Guest post and recipe from Erica Kastner of Cooking for Seven.

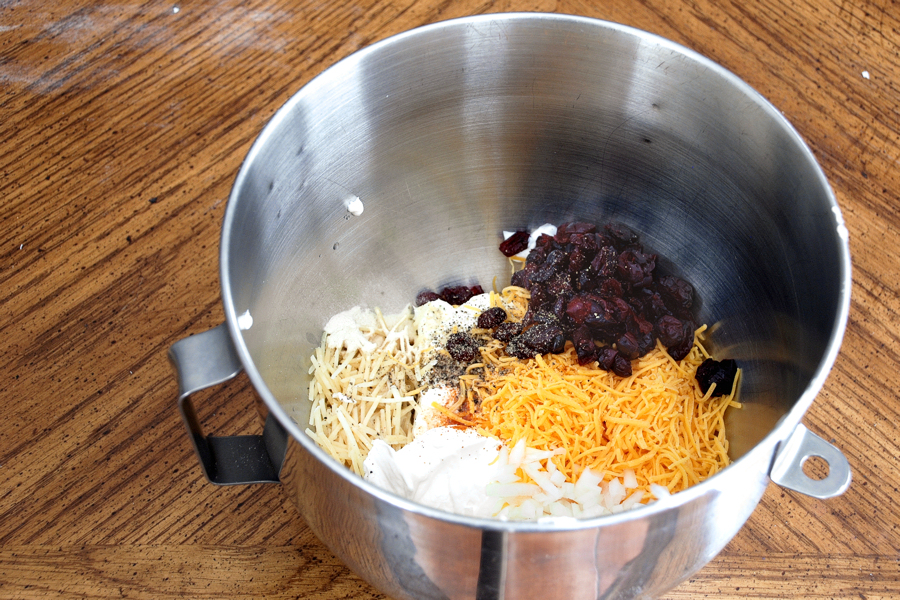
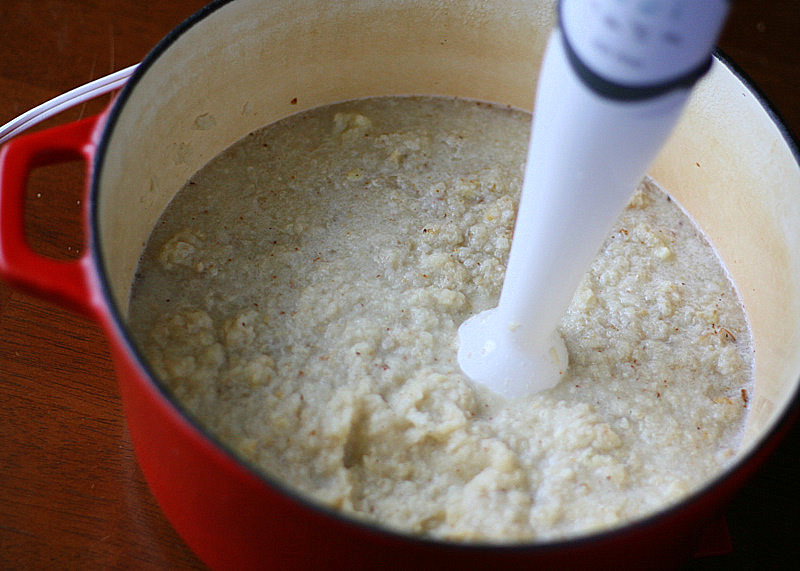
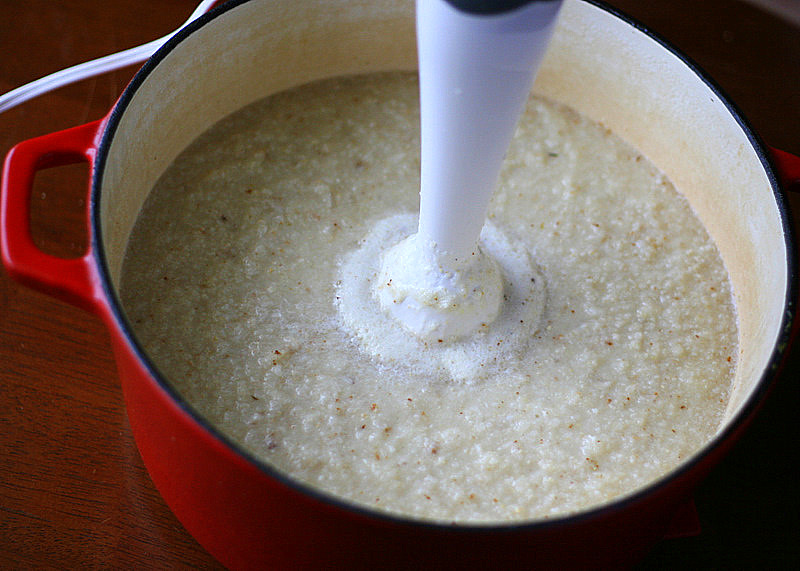
Place all of the ingredients except the pecans into the bowl of a stand mixer.


Tasty Kitchen Blog: Favorite Cheese Ball. Guest post and recipe from Erica Kastner of Cooking for Seven.

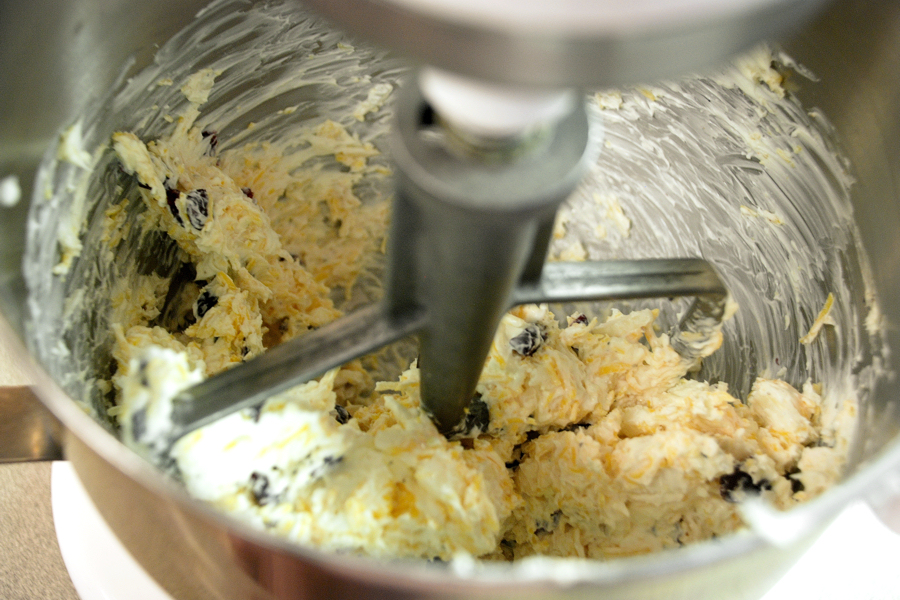
Beat until combined.


Tasty Kitchen Blog: Favorite Cheese Ball. Guest post and recipe from Erica Kastner of Cooking for Seven.

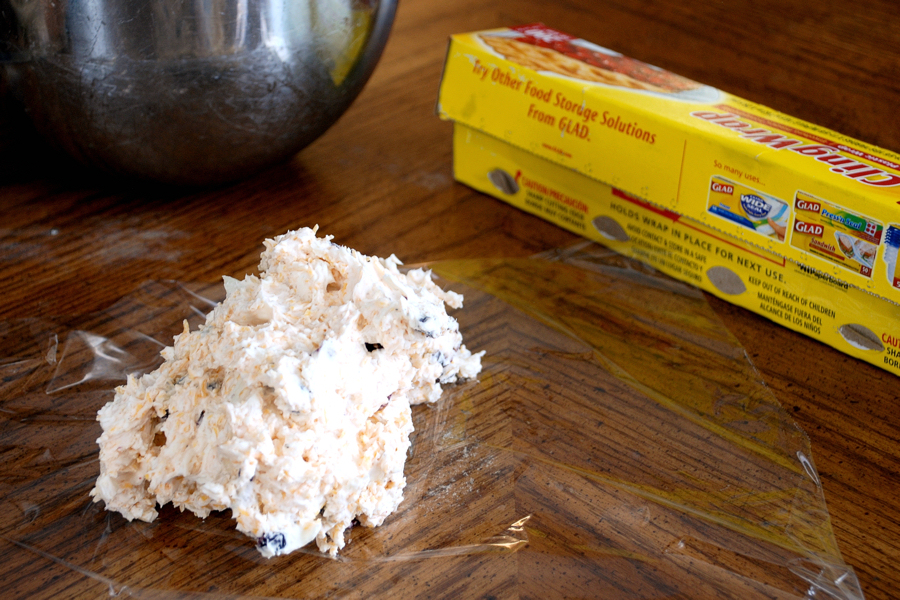
Scrape onto a piece of plastic wrap.


Tasty Kitchen Blog: Favorite Cheese Ball. Guest post and recipe from Erica Kastner of Cooking for Seven.

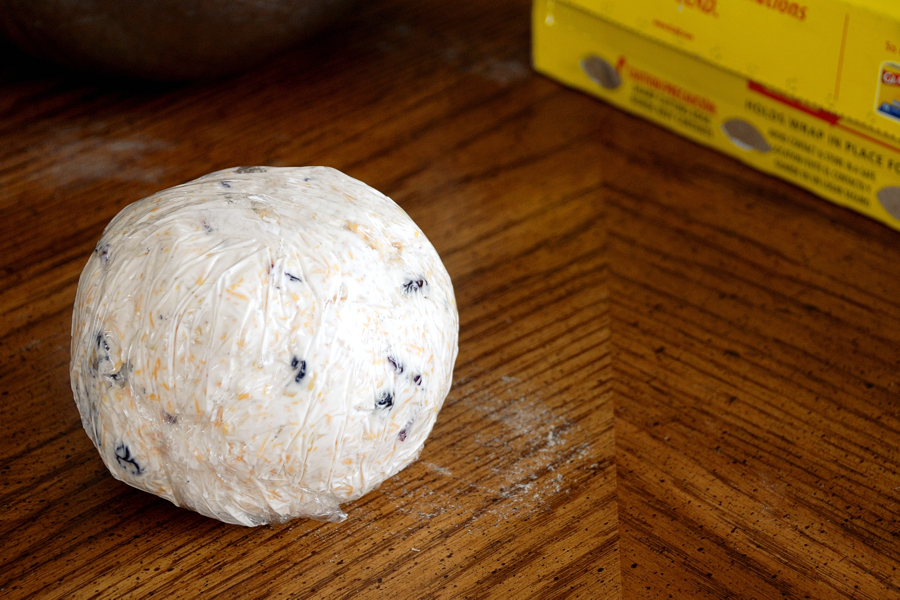
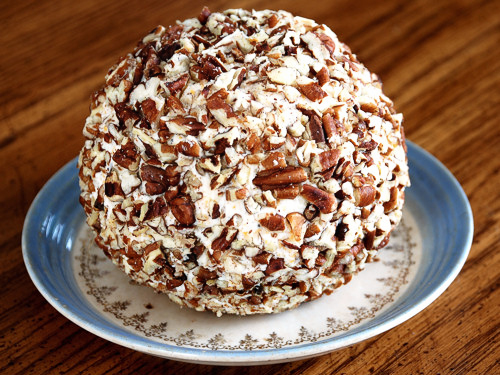
Form into a ball. Place in the refrigerator until it firms up a bit, about 30 minutes.


Tasty Kitchen Blog: Favorite Cheese Ball. Guest post and recipe from Erica Kastner of Cooking for Seven.

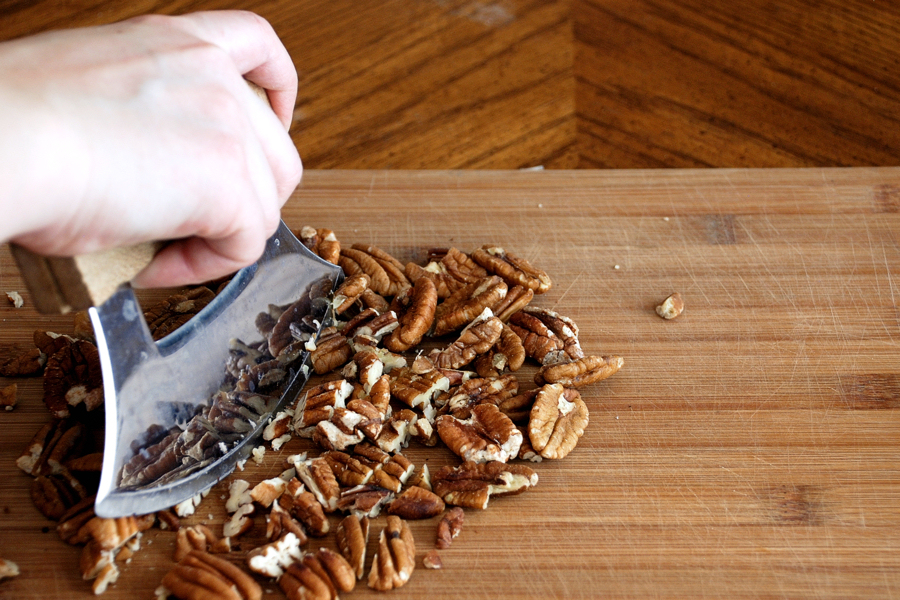
Toast the pecans and chop coarsely.


Tasty Kitchen Blog: Favorite Cheese Ball. Guest post and recipe from Erica Kastner of Cooking for Seven.

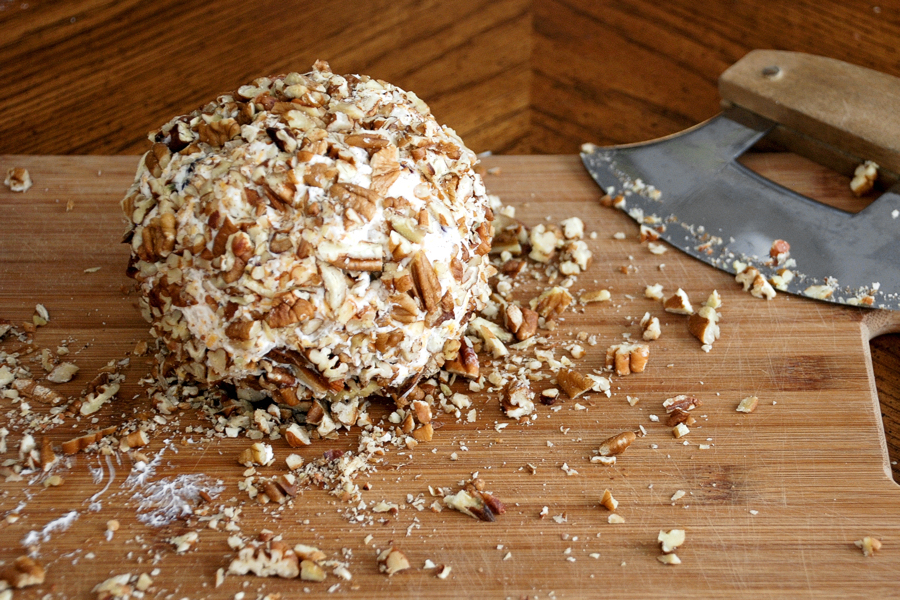
Just before serving, roll the cheese ball in the nuts to cover completely. You may need to press the nuts into the ball with your hands to make them stick.


Tasty Kitchen Blog: Favorite Cheese Ball. Guest post and recipe from Erica Kastner of Cooking for Seven.

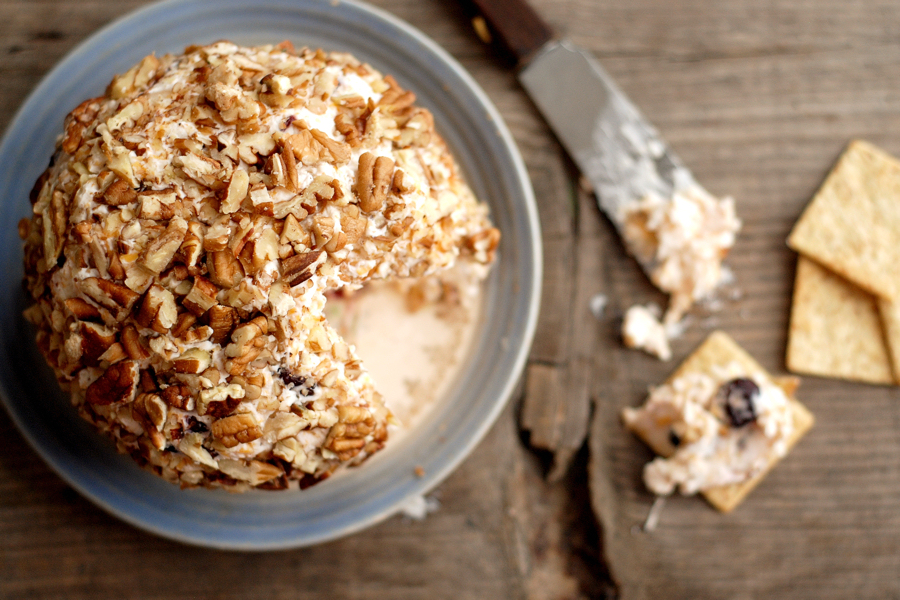
Serve with your favorite crackers. I recommend something simple without intense flavors. You don’t want to overpower the cheese ball. These crispy wheats from Back to Nature are quite good.


Tasty Kitchen Blog: Favorite Cheese Ball. Guest post and recipe from Erica Kastner of Cooking for Seven.

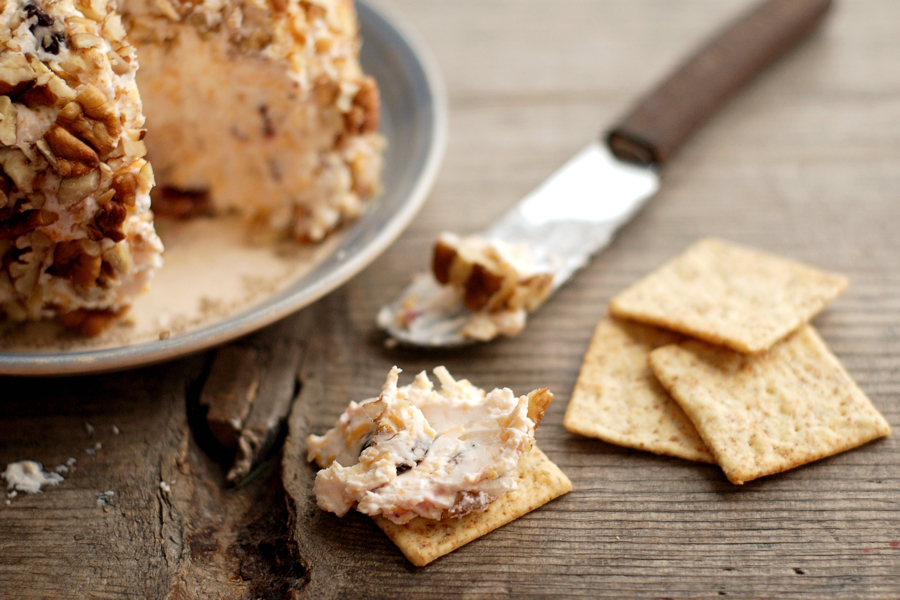
Notes: The cranberries are completely optional. If you dislike fruit in your cheese ball, simply omit them. You can also switch out the nuts for walnuts, almonds, etc. Pecans are our favorite.

For the best flavor, take the cheese ball out of the refrigerator about 20 minutes before serving.


Printable Recipe

Favorite Cheese Ball

See post on Erica Lea’s site!
5.00 Mitt(s) 7 Rating(s)7 votes, average: 5.00 out of 57 votes, average: 5.00 out of 57 votes, average: 5.00 out of 57 votes, average: 5.00 out of 57 votes, average: 5.00 out of 5

Prep Time:

Cook Time:

Difficulty: Easy

Servings: 12

12
x

Print Options

Page size Letter 3x5 4x6
Text Size Small Medium Large
Content Include description
Include prep time, etc.
Show image

Description

Our favorite cheese ball recipe. Dad complains if we make any other.

Ingredients

  • 8 ounces, weight Cream Cheese
  • ¼ cups Sour Cream
  • 1 cup Finely Shredded Cheddar Cheese
  • ¼ cups Shredded Parmesan Cheese
  • ¼ cups Finely Chopped Onion
  • ½ teaspoons Teaspoon Garlic Powder
  • 1 pinch Cayenne Powder
  • 1 teaspoon Lemon Juice
  • ¼ teaspoons Freshly Ground Black Pepper
  • ⅓ cups Dried Cranberries (optional)
  • ½ cups Toasted Pecans, Chopped Coarse (optional)

Preparation Instructions

1) Place all ingredients except pecans in a large bowl. Beat with a hand mixer on medium-low speed until well combined.

2) Scrape the mixture onto a piece of plastic wrap. Cover with the plastic wrap and shape into a ball or log. Put the cheese ball on a plate and place in the refrigerator to harden, about 30 minutes – 1 hour.

3) Roll the cheese ball in the chopped pecans and place on a serving plate. Serve with crackers.

Note: this cheese is best if allowed to sit for at least 1 hour in the refrigerator to allow the flavors to blend. The flavors are best if it is allowed to sit at room temperature for 15-20 minutes before serving.


_______________________________________

Erica Berge shares her wonderful recipes and amazing food photography on her blog, Cooking for Seven. She also writes about crafts and posts more of her beautiful photography in her personal blog, EricaLea.com. There really isn’t much that this amazing young lady can’t do, and we’re thrilled she does some of it here.


Profile photo of Natalie | Perry's Plate

Roasted Cauliflower Soup

Posted by in Step-by-Step Recipes

Tasty Kitchen Blog: Roasted Cauliflower Soup. Guest post by Natalie Perry of Perry's Plate, recipe submitted by TK member Hailey of Hail's Kitchen.

 
Cauliflower, to me, is a humble vegetable. It’s rarely the star of the meal, it doesn’t have a flashy color or a strong flavor, and let’s face it—its complexion could use some work. Despite its frumpy characteristics, cauliflower has a few tricks up its sleeve. Case in point: this Roasted Cauliflower Soup with White Cheddar Cheese recipe submitted by TK member hailskitchen. Pureeing the cauliflower creates the illusion of a creamy soup without the added richness from cream. Not only did this soup taste great, it was simultaneously light yet rich tasting.

Okay, it does have cheese, too. But if you use a sharp white cheddar, you might not need as much. (If you’re concerned with such things. I wasn’t one of those who swore off cheese-laden foods this year.)


Tasty Kitchen Blog: Roasted Cauliflower Soup. Guest post by Natalie Perry of Perry's Plate, recipe submitted by TK member Hailey of Hail's Kitchen.

For the soup you’ll need a nice, big head of cauliflower, shallots, fresh garlic, fresh thyme, shredded white cheddar cheese, salt, pepper, olive oil, and chicken (or vegetable) broth.


Tasty Kitchen Blog: Roasted Cauliflower Soup. Guest post by Natalie Perry of Perry's Plate, recipe submitted by TK member Hailey of Hail's Kitchen.

First, preheat your oven to 400 degrees F.

Then prep the cauliflower. I like to turn it upside down and make a few slashes in the bottom to get the tough stem out and remove the leaves.


Tasty Kitchen Blog: Roasted Cauliflower Soup. Guest post by Natalie Perry of Perry's Plate, recipe submitted by TK member Hailey of Hail's Kitchen.

I also like to quarter the head before breaking it down into florets. It’s easier to manage than a giant head.


Tasty Kitchen Blog: Roasted Cauliflower Soup. Guest post by Natalie Perry of Perry's Plate, recipe submitted by TK member Hailey of Hail's Kitchen.

Once you have it broken down, toss it onto a large rimmed baking sheet.


Tasty Kitchen Blog: Roasted Cauliflower Soup. Guest post by Natalie Perry of Perry's Plate, recipe submitted by TK member Hailey of Hail's Kitchen.

Next, peel the shallots and garlic. If you lay your knife on the garlic and give it a whack with the palm of your hand, the peel comes right off. Don’t chop them too small. Quartering the shallots and cutting the garlic in half ought to do it.


Tasty Kitchen Blog: Roasted Cauliflower Soup. Guest post by Natalie Perry of Perry's Plate, recipe submitted by TK member Hailey of Hail's Kitchen.

Add the prepped shallots and garlic to the cauliflower on the baking sheet. Drizzle liberally with olive oil, sprinkle with salt, and stick it in that screaming hot oven.


Tasty Kitchen Blog: Roasted Cauliflower Soup. Guest post by Natalie Perry of Perry's Plate, recipe submitted by TK member Hailey of Hail's Kitchen.

After 40-50 minutes it should look like this. See those dark, caramelized pieces? Roasting should be a part of all vegetable preparation, in my opinion. That’s how I got myself to like Brussels sprouts. Try it.


Tasty Kitchen Blog: Roasted Cauliflower Soup. Guest post by Natalie Perry of Perry's Plate, recipe submitted by TK member Hailey of Hail's Kitchen.

Transfer all of that roasted goodness to a big pot. (I doubled the batch, which is why it looks like my cauliflower suddenly reproduced.) Pour in half of the chicken broth—it makes pureeing much easier.


Tasty Kitchen Blog: Roasted Cauliflower Soup. Guest post by Natalie Perry of Perry's Plate, recipe submitted by TK member Hailey of Hail's Kitchen.

If you have an immersion or stick blender, this will be a snap. Just stick it in and start buzzing it around. If you don’t have one, go buy one. If you can’t go buy one, you can ladle the mixture into a blender and process in batches, returning it back into the pot when you’re finished.


Tasty Kitchen Blog: Roasted Cauliflower Soup. Guest post by Natalie Perry of Perry's Plate, recipe submitted by TK member Hailey of Hail's Kitchen.

Back to blending. You can leave it a bit chunky if you like. I made it this way the first time and I liked a few chunks. But I found that the texture was really odd.


Tasty Kitchen Blog: Roasted Cauliflower Soup. Guest post by Natalie Perry of Perry's Plate, recipe submitted by TK member Hailey of Hail's Kitchen.

So this time I blended it even more until it was smoother. I liked it better that way.

Place the pot on the stove and bring it to a boil. Reduce the heat and let it simmer for 10 minutes.


Tasty Kitchen Blog: Roasted Cauliflower Soup. Guest post by Natalie Perry of Perry's Plate, recipe submitted by TK member Hailey of Hail's Kitchen.

While the soup simmers away, get your thyme ready. Grab it at the top with one hand, and with the other hand, pinch toward the top and pull down the stem to remove leaves.


Tasty Kitchen Blog: Roasted Cauliflower Soup. Guest post by Natalie Perry of Perry's Plate, recipe submitted by TK member Hailey of Hail's Kitchen.

Give them a quick chop if you like. This is just my personal preference, but I found the soup to be really “thyme-y”, so I reduced the measurement by half the second time I made it. The thyme really sings in this soup.


Tasty Kitchen Blog: Roasted Cauliflower Soup. Guest post by Natalie Perry of Perry's Plate, recipe submitted by TK member Hailey of Hail's Kitchen.

When the soup is done simmering, cut the heat and add the thyme and shredded cheese. Season to taste with a generous dose of salt and black pepper.


Tasty Kitchen Blog: Roasted Cauliflower Soup. Guest post by Natalie Perry of Perry's Plate, recipe submitted by TK member Hailey of Hail's Kitchen.

Time to serve it up with crusty bread or biscuits and a fresh salad! One of my favorite things about this recipe is that the steps can be broken up to accommodate your schedule. Roast the vegetables a day or two ahead and when you’re ready to prepare the soup, it’ll be ready in under 30 minutes.

 
Thanks Hailey for a unique and delicious soup! Visit her beautiful blog, Hail’s Kitchen, for more of her great recipes.


Printable Recipe

Roasted Cauliflower Soup with White Cheddar Cheese

See post on hailskitchen’s site!
4.40 Mitt(s) 5 Rating(s)5 votes, average: 4.40 out of 55 votes, average: 4.40 out of 55 votes, average: 4.40 out of 55 votes, average: 4.40 out of 55 votes, average: 4.40 out of 5

Prep Time:

Cook Time:

Difficulty: Easy

Servings: 4

4
x

Print Options

Page size Letter 3x5 4x6
Text Size Small Medium Large
Content Include description
Include prep time, etc.
Show image

Description

This light soup is surprisingly rich and hearty. Perfect for the change in the weather!

Ingredients

  • 1 head Cauliflower, Roughly Chopped
  • 2 whole Shallots, Roughly Chopped
  • 3 cloves Garlic, Roughly Chopped
  • 1 Tablespoon Olive Oil
  • 4 cups Chicken Broth
  • 1-½ cup White Cheddar Cheese, Shredded
  • 1 Tablespoon Fresh Thyme, Chopped
  • 1 Tablespoon Coarse Salt

Preparation Instructions

Preheat your oven to 400 degrees. On a cookie sheet, drizzle the cauliflower, shallots and garlic with the olive oil and season with coarse salt. Roast for about 40 minutes or until the cauliflower is fork-tender.

Carefully place the vegetables in a food processor or blender and roughly puree. Texture is good, large chunks are not so good. Place the vegetables in a pot along with the chicken broth. Bring to a boil. Reduce heat and simmer for about ten minutes. Add the cheese, thyme and a good dose of black pepper. Season to taste with salt. Serve with warm, crusty bread and enjoy!


_______________________________________

Be sure to check out Natalie’s own beautiful food blog, Perrys’ Plate, where you can see her growing collection of lovely recipes. There’s always something new to see there. Go visit now!


Profile photo of Natalie | Perry's Plate

Bakery Style Rosemary Flatbread

Posted by in Baking, Step-by-Step Recipes

Tasty Kitchen Blog: Bakery Style Rosemary Flatbread. Guest post by Natalie Perry of Perry's Plate, recipe submitted by TK member culinarycapers.

 
We’re big hummus eaters at our house. Sometimes the only way I can get my little girls to eat raw vegetables is to place a bowl full of hummus in front of them. Lately I’ve grown weary of carrot sticks and cucumber slices and wanted to find something healthier to dip than a store-bought cracker. When I first stumbled upon this recipe for Bakery Style Rosemary Flatbread, I thought it was for a thin, soft bread, similar to naan.

Nope. Crunchier. Like a cracker trying its hardest to be a tortilla. But still a cracker. And the best part? There’s no yeast involved.

Today’s recipe comes from culinarycapers—a vegetarian TK member whose recipe box is filled with all kinds of delicious concoctions!

Let’s get started, shall we?


Tasty Kitchen Blog: Bakery Style Rosemary Flatbread. Guest post by Natalie Perry of Perry's Plate, recipe submitted by TK member culinarycapers.

No mysterious ingredients here: flour (I used white whole wheat), fresh rosemary, salt, olive oil, baking powder, freshly ground black pepper, and some parchment paper.


Tasty Kitchen Blog: Bakery Style Rosemary Flatbread. Guest post by Natalie Perry of Perry's Plate, recipe submitted by TK member culinarycapers.

First, get the leaves off of the rosemary stems. The easiest way to do this is by grabbing it with one hand where the tough stem begins. With your other hand, pinch the stem, slide your fingers down, and …


Tasty Kitchen Blog: Bakery Style Rosemary Flatbread. Guest post by Natalie Perry of Perry's Plate, recipe submitted by TK member culinarycapers.

ZIP! Off they come. The first time I did this I’m pretty sure I giggled at how easy it was.


Tasty Kitchen Blog: Bakery Style Rosemary Flatbread. Guest post by Natalie Perry of Perry's Plate, recipe submitted by TK member culinarycapers.

You’ll need about three sprigs. Give those leaves a good chop.


Tasty Kitchen Blog: Bakery Style Rosemary Flatbread. Guest post by Natalie Perry of Perry's Plate, recipe submitted by TK member culinarycapers.

Then put them in a big bowl with the other dry ingredients.


Tasty Kitchen Blog: Bakery Style Rosemary Flatbread. Guest post by Natalie Perry of Perry's Plate, recipe submitted by TK member culinarycapers.

Whisk away.


Tasty Kitchen Blog: Bakery Style Rosemary Flatbread. Guest post by Natalie Perry of Perry's Plate, recipe submitted by TK member culinarycapers.

Then pour in the oil.


Tasty Kitchen Blog: Bakery Style Rosemary Flatbread. Guest post by Natalie Perry of Perry's Plate, recipe submitted by TK member culinarycapers.

And some warm water. (No, I didn’t rinse my measuring cup. You probably wouldn’t either. Admit.)


Tasty Kitchen Blog: Bakery Style Rosemary Flatbread. Guest post by Natalie Perry of Perry's Plate, recipe submitted by TK member culinarycapers.

Stir until it comes together and gets clumpy.


Tasty Kitchen Blog: Bakery Style Rosemary Flatbread. Guest post by Natalie Perry of Perry's Plate, recipe submitted by TK member culinarycapers.

At this point you may want to knead it a bit. Not a lot. Just to get it into a big ball.


Tasty Kitchen Blog: Bakery Style Rosemary Flatbread. Guest post by Natalie Perry of Perry's Plate, recipe submitted by TK member culinarycapers.

Then cover it with a clean towel and let it rest for 30 minutes while you check your email, take a shower, eat one or two clementine oranges. Or eight. I’m so glad they’re back in season, aren’t you?


Tasty Kitchen Blog: Bakery Style Rosemary Flatbread. Guest post by Natalie Perry of Perry's Plate, recipe submitted by TK member culinarycapers.

Meanwhile, stick a cookie sheet in the oven and preheat it to 450 degrees. If it’s rimmed, place it upside down so you can get the flatbread in and out of the oven easier.


Tasty Kitchen Blog: Bakery Style Rosemary Flatbread. Guest post by Natalie Perry of Perry's Plate, recipe submitted by TK member culinarycapers.

When the dough’s ready, get a clean workspace ready by sprinkling it with flour. Have a rolling pin and a dough cutter (if you’ve got one) ready.


Tasty Kitchen Blog: Bakery Style Rosemary Flatbread. Guest post by Natalie Perry of Perry's Plate, recipe submitted by TK member culinarycapers.

Divide the dough into 6 or 8 pieces, depending on how large you want your flatbreads to be. Dough cutters are great for this, but you could surely use a knife.


Tasty Kitchen Blog: Bakery Style Rosemary Flatbread. Guest post by Natalie Perry of Perry's Plate, recipe submitted by TK member culinarycapers.

Place all but one section of the dough back into the bowl and keep them covered as you work. Sprinkle a bit of flour on the dough you’re working with.


Tasty Kitchen Blog: Bakery Style Rosemary Flatbread. Guest post by Natalie Perry of Perry's Plate, recipe submitted by TK member culinarycapers.

Roll it out fairly thin. You could go paper thin if you’d like. Experiment with it and see what makes you happy. It doesn’t have to be perfectly round. Perfect edges and symmetry were soooo 5 years ago—lucky for those of us who are incapable of making perfect circles.


Tasty Kitchen Blog: Bakery Style Rosemary Flatbread. Guest post by Natalie Perry of Perry's Plate, recipe submitted by TK member culinarycapers.

Using your dough cutter (or a spatula) loosen the dough from the workspace …


Tasty Kitchen Blog: Bakery Style Rosemary Flatbread. Guest post by Natalie Perry of Perry's Plate, recipe submitted by TK member culinarycapers.

And transfer it to a smallish piece of parchment.


Tasty Kitchen Blog: Bakery Style Rosemary Flatbread. Guest post by Natalie Perry of Perry's Plate, recipe submitted by TK member culinarycapers.

Brush liberally with olive oil.


Tasty Kitchen Blog: Bakery Style Rosemary Flatbread. Guest post by Natalie Perry of Perry's Plate, recipe submitted by TK member culinarycapers.

Sprinkle with sea salt, then place it (carefully!!) on that screaming hot pan in the oven. I just picked up the paper and put it in there with my hands. You could also put it on another flat baking sheet or pizza peel and slide it into the oven.

Oh, and I’m pretty sure it says on my box of parchment paper that I shouldn’t use it in an oven hotter than 420 degrees. I used the same two pieces of parchment for all of my flatbreads and they did not spontaneously combust. I’m not a parchment safety officer, but I think it helps not to have excess (like, a LOT of) parchment around the dough.

And I like to live on the edge.

But, seriously. Keep an eye on it.


Tasty Kitchen Blog: Bakery Style Rosemary Flatbread. Guest post by Natalie Perry of Perry's Plate, recipe submitted by TK member culinarycapers.

When it comes out of the oven it should look something like this. Golden brown with a few bubbles (or some giant ones) baked onto the surface. Yum.


Tasty Kitchen Blog: Bakery Style Rosemary Flatbread. Guest post by Natalie Perry of Perry's Plate, recipe submitted by TK member culinarycapers.

Let it cool for a bit, then break it in to pieces. This flatbread would be great alongside some crudites and hummus (or any kind of vegetable dip) at a holiday gathering. It’s very light and has a subtle rosemary flavor that pairs well with all kinds of things.

Thanks for a great recipe culinarycapers!


Printable Recipe

Bakery Style Rosemary Flatbread

5.00 Mitt(s) 12 Rating(s)12 votes, average: 5.00 out of 512 votes, average: 5.00 out of 512 votes, average: 5.00 out of 512 votes, average: 5.00 out of 512 votes, average: 5.00 out of 5

Prep Time:

Cook Time:

Difficulty: Easy

Servings: 12

12
x

Print Options

Page size Letter 3x5 4x6
Text Size Small Medium Large
Content Include description
Include prep time, etc.
Show image

Description

I love these rosemary crackers by themselves or dipped in hummus or baba ghanoush. I use a spicy dark green extra virgin olive oil because I love the taste, but any olive oil will work fine.

Ingredients

  • 3-½ cups Flour
  • 1 teaspoon Salt
  • 2 teaspoons Baking Powder
  • 2 Tablespoons Chopped Fresh Rosemary
  • 1 Tablespoon Coarsely Ground Black Pepper (optional)
  • 1 cup Warm Water
  • ¾ cups Olive Oil
  • 8 pieces Parchment Paper
  • 1 cup Olive Oil For Brushing
  • 8 dashes Medium Coarse Sea Salt

Preparation Instructions

Place a large rimless baking sheet or an inverted rimmed baking sheet in the oven and heat to 450 degrees.

Whisk flour, salt, baking powder, rosemary and black pepper together in a large bowl. With a wooden spoon, stir in the water and olive oil until a medium stiff dough forms. Knead gently if necessary to combine. Let rest in the bowl covered with a plate or plastic wrap for 30 minutes.

Divide dough into 6 to 8 portions, depending on the size of your cookie sheet. One at a time, roll dough out with lots of flour into a paper-thin rustic round; the thinner you roll it, the thinner the cracker will be. Experiment to find just the thickness that suits you.

Place on the parchment paper and brush excess flour off the dough, then brush liberally with olive oil and sprinkle with a little sea salt. With another cookie sheet or pizza peel, transfer to the hot baking sheet and bake for 8 to 12 minutes until lightly browned on the edges with specks of brown throughout. Remove from the oven, cool and break into large pieces. Repeat with the remaining dough.


_______________________________________

Be sure to check out Natalie’s own beautiful food blog, Perrys’ Plate, where you can see her growing collection of lovely recipes. There’s always something new to see there. Go visit now!


Profile photo of missamy

Almond Roca

Posted by in Holidays, Step-by-Step Recipes

Tasty Kitchen Blog: Almond Roca. Guest post by Amy Johnson of She Wears Many Hats, recipe submitted by TK member mdatwell.

 
As far as candy making goes, I pretty much stink. So when I stumbled across this recipe from Tasty Kitchen member mdatwell for Almond Roca, even though I was tempted by the short list of tasty ingredients, I was a bit hesitant knowing my lack of skilz in that department. For realz. I’ve gotz no candy making skilz.

Or at least I didn’t used to have any.

Now, I can attest that, with the help of mdatwell and her excellent directions, I rocked the roca. It was super easy and quick. In no time, and with only one pot and one pan dirty, there was Heath Bar-like goodness before me. Not that it lasted long. This Almond Roca is some mighty fine eats y’all.

So what are we waiting for? Let’s get started! Let’s rock the roca!


Tasty Kitchen Blog: Almond Roca. Guest post by Amy Johnson of She Wears Many Hats, recipe submitted by TK member mdatwell.

You’ll need butter, sugar, water, chopped or slivered almonds, chocolate chips, and more almonds, finely chopped. Simple.

(For this demonstration, I halved the ingredients. Be sure to check out the full recipe with ingredient amounts listed.)

Before starting, have a sheet pan(s) greased and ready to the side. For half the recipe, I used a quarter-size sheet pan (13″ x 9″), so the full recipe should call for a half-size sheet pan (18″ x 13″).


Tasty Kitchen Blog: Almond Roca. Guest post by Amy Johnson of She Wears Many Hats, recipe submitted by TK member mdatwell.

Begin by combining the first three ingredients—the butter, water and sugar—in a medium saucepan. I started by melting the butter first.


Tasty Kitchen Blog: Almond Roca. Guest post by Amy Johnson of She Wears Many Hats, recipe submitted by TK member mdatwell.

Add the sugar.


Tasty Kitchen Blog: Almond Roca. Guest post by Amy Johnson of She Wears Many Hats, recipe submitted by TK member mdatwell.

Then the water. What I liked about mdatwell’s instructions was the visual indicators she gave. I’m a visual person, so the three stages she described to watch for—runny, “cheesy” and runny/smooth—worked perfectly for me.

Here, I’ll show you.


Tasty Kitchen Blog: Almond Roca. Guest post by Amy Johnson of She Wears Many Hats, recipe submitted by TK member mdatwell.

Once the first three ingredients are combined, cook on high, stirring constantly. This is what the first stage, the “runny” stage, looks like. Keep stirring. This takes a few minutes and will move right along into the second stage, the “cheesy” stage or what I like to call the “marshmallow” stage.


Tasty Kitchen Blog: Almond Roca. Guest post by Amy Johnson of She Wears Many Hats, recipe submitted by TK member mdatwell.

It kinda gets a little more gooey at first. Then it really does start looking like melted, bubbling cheese. Keep on stirring. Now is not the time to change your Facebook status, transfer the clothes from the washer to the dryer, or dust the ceiling fans. Change is a comin’. And it’s comin’ fast.


Tasty Kitchen Blog: Almond Roca. Guest post by Amy Johnson of She Wears Many Hats, recipe submitted by TK member mdatwell.

The next thing you’re looking for is the “runny, smooth, caramel brown color” stage. Like this.


Tasty Kitchen Blog: Almond Roca. Guest post by Amy Johnson of She Wears Many Hats, recipe submitted by TK member mdatwell.

When it gets to this point, remove the pot from the heat. And be careful! The pot will be hot—way hot! Move quickly at this point as the caramel mixture will begin to cool.


Tasty Kitchen Blog: Almond Roca. Guest post by Amy Johnson of She Wears Many Hats, recipe submitted by TK member mdatwell.

Now add the slivered/chopped almonds.


Tasty Kitchen Blog: Almond Roca. Guest post by Amy Johnson of She Wears Many Hats, recipe submitted by TK member mdatwell.

Combine the almonds and caramel mixture well.


Tasty Kitchen Blog: Almond Roca. Guest post by Amy Johnson of She Wears Many Hats, recipe submitted by TK member mdatwell.

When the almonds are combined well with the caramel mixture, spread them out evenly on a rimmed, greased baking sheet pan (I mentioned pan sizes above). Look! You have toffee. You could stop right there, let it cool and enjoy, but we’re moving on to the chocolate.


Tasty Kitchen Blog: Almond Roca. Guest post by Amy Johnson of She Wears Many Hats, recipe submitted by TK member mdatwell.

Next, sprinkle the chocolate chips across the top of the toffee. At this point I thought there was not enough chocolate chips and that I must’ve measured incorrectly. But wait just a few seconds. The chocolate chips will begin to melt and they spread a long way. I was surprised how much chocolate is packed in a chocolate chip.


Tasty Kitchen Blog: Almond Roca. Guest post by Amy Johnson of She Wears Many Hats, recipe submitted by TK member mdatwell.

Using a rubber spatula, smooth out the chocolate across the top of the caramel/almond.


Tasty Kitchen Blog: Almond Roca. Guest post by Amy Johnson of She Wears Many Hats, recipe submitted by TK member mdatwell.

See how far that little bit of chocolate chips goes? Amazing.


Tasty Kitchen Blog: Almond Roca. Guest post by Amy Johnson of She Wears Many Hats, recipe submitted by TK member mdatwell.

Top the melted chocolate with the finely chopped almonds. If you want even-sized Almond Roca pieces, score the candy with a knife while it’s still warm and soft. I’m all about the rustic look, so I let it be.

Now comes the hardest part: waiting. Wait until the roca has cooled. But after about 10 minutes, because I was impatient, I stuck my batch in the freezer for about 5-10 minutes to finish cooling. It worked fine.


Tasty Kitchen Blog: Almond Roca. Guest post by Amy Johnson of She Wears Many Hats, recipe submitted by TK member mdatwell.

Once it’s cooled and the chocolate has solidified, if you’re going for the rustic look, flip the baking sheet upside down on a cutting board or surface.


Tasty Kitchen Blog: Almond Roca. Guest post by Amy Johnson of She Wears Many Hats, recipe submitted by TK member mdatwell.

It will break apart some on its own but use a knife to break it into smaller pieces. If you’ve scored your candy, carefully separate the pieces. And you’re finished!


Tasty Kitchen Blog: Almond Roca. Guest post by Amy Johnson of She Wears Many Hats, recipe submitted by TK member mdatwell.

This piece is all I ate … that minute. We enjoyed our share, packed up the rest and sent it far and away. It’s dangerously delicious.


Tasty Kitchen Blog: Almond Roca. Guest post by Amy Johnson of She Wears Many Hats, recipe submitted by TK member mdatwell.

A big thanks to mdatwell for helping me get over my fear of candy making. I’ll definitely be making more batches of this over the holiday season. And maybe afterwards too! Happy cooking y’all!


Printable Recipe

Almond Roca

4.96 Mitt(s) 25 Rating(s)25 votes, average: 4.96 out of 525 votes, average: 4.96 out of 525 votes, average: 4.96 out of 525 votes, average: 4.96 out of 525 votes, average: 4.96 out of 5

Prep Time:

Cook Time:

Difficulty: Intermediate

Servings: 36

36
x

Print Options

Page size Letter 3x5 4x6
Text Size Small Medium Large
Content Include description
Include prep time, etc.
Show image

Description

This is a super easy, quick candy recipe I make every Christmas. It does contain a whole pound of butter, so I can’t make it too often. The recipe is easily halved or doubled for different occasions.

Ingredients

  • 4 sticks Butter
  • 2 cups Sugar (rounded)
  • 4 Tablespoons Water
  • 2 cups Almonds, Chopped
  • 1 cup Chocolate Chips
  • ½ cups Almonds, Finely Chopped, For Sprinkling

Preparation Instructions

Combine the first 3 ingredients and cook on high, stirring constantly through 3 stages:
1. Runny
2. “Cheesy”—it will look like melted white cheese
3. Runny and smooth, caramel brown color

Make sure you have the fan on your stove going, cause you’ll probably set off the smoke alarm towards the end. ;)

When it is runny, smooth and caramel brown in color, remove it from the heat and add the almonds. Stir until combined and pour the mixture onto greased cookie sheets. Spread it into an even layer. It will harden as it cools.

While it is still warm, sprinkle chocolate chips on top and let them melt enough to get soft. Spread the chocolate in an even layer across the candy. While the chocolate is still “wet,” sprinkle the finely chopped almonds on top.
At this point, while it is still warm and soft, you can score the candy with a butter knife to make it break evenly, or just let it harden and break it into rustic pieces.

Store in airtight containers. Enjoy!


_______________________________________

Amy Johnson is a blogger who writes about food, travel, the home (both inside and out), and various observations and random musings about anything and everything. Visit her blog She Wears Many Hats for a dose of deliciousness, practicality, hilarity, or just plain fun. She lives in South Carolina with her husband and two children.


Profile photo of patiodaddio

Sauerkraut and Pork

Posted by in Step-by-Step Recipes

I’d like to welcome John Dawson, also known as Patio Daddio, as a new contributor to the Tasty Kitchen Blog. We’re happy to have a brave dude among our ranks. Welcome, John! –Ree     This is one of those recipes. There are certain family recipes that, by the mere smell of them cooking, bring […]

Profile photo of missamy

Scalloped Sweet Potatoes

Posted by in Step-by-Step Recipes

Amy does it again, bringing us beautiful step-by-step instructions for Scalloped Sweet Potatoes, submitted by Tasty Kitchen member quincyskeeper. Thank you, Amy! –PW     When I think of sweet potatoes, I think of the holidays—in particular, Thanksgiving. So when I stumbled across this recipe for Scalloped Sweet Potatoes, submitted by Tasty…

Profile photo of cookincanuck

White Chocolate Walnut Blondies with Maple Butter Sauce

Posted by in Baking, Step-by-Step Recipes

I’m so excited to welcome Dara, also known as prolific Tasty Kitchen contributor Cookin’ Canuck, as a new contributor to the Tasty Kitchen Blog. I’ve been loving Dara’s recipes, both on Tasty Kitchen and on her own food blog, Cookin’ Canuck, for quite some time, so meeting her in person recently was a real treat […]

Profile photo of missamy

Pumpkin Creme Pies

Posted by in Baking, Step-by-Step Recipes

  While searching for some goodies to bake during the upcoming holidays, I stumbled across this yummy recipe submitted by TK member The Deutsch Girl for Pumpkin Creme Pies, the perfect portable fall treat. I grew up eating Oatmeal Creme Pies, but never enjoyed a pumpkin version. This time of the year, pumpkin anything is […]