The Pioneer Woman Tasty Kitchen
Profile photo of twopeasandtheirpod

Tortellini Soup

Posted by in Step-by-Step Recipes

Tasty Kitchen Blog: Tortellini Soup. Guest post by Maria Lichty of Two Peas and Their Pod, recipe submitted by TK member Katie of The Well-Fed Newlyweds.

 
January is not my favorite month. It is hard getting back to “normal” life after the holidays. It is also long, cold, and COLD! I dress in layers, live under my electric blanket, and eat comforting foods to try and stay warm.

My favorite comfort foods are soup and pasta dishes. When I saw The Well-Fed Newlyweds’recipe for Tortellini Soup, I knew I had to try it. My favorite comfort foods in one recipe. This tomato broth soup is loaded with plump cheese tortellini and fresh spinach. It is simple to make and will warm you up in a matter of minutes. 


Tasty Kitchen Blog: Tortellini Soup. Guest post by Maria Lichty of Two Peas and Their Pod, recipe submitted by TK member Katie of The Well-Fed Newlyweds.

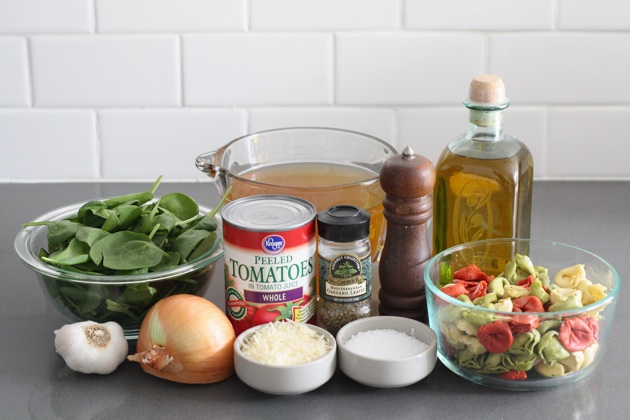
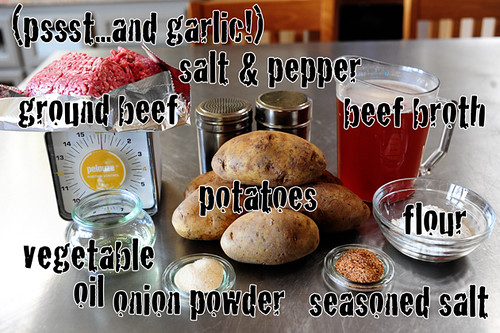
For the soup you will need olive oil, garlic, onion, oregano, chicken or vegetable broth, canned whole tomatoes, salt and pepper, cheese tortellini, fresh spinach, and Parmesan cheese. 


Tasty Kitchen Blog: Tortellini Soup. Guest post by Maria Lichty of Two Peas and Their Pod, recipe submitted by TK member Katie of The Well-Fed Newlyweds.

In a large pot, heat the olive oil over medium high heat. Add the onion and garlic. Cook until the onion is softened and the garlic is light golden brown, about five minutes. 


Tasty Kitchen Blog: Tortellini Soup. Guest post by Maria Lichty of Two Peas and Their Pod, recipe submitted by TK member Katie of The Well-Fed Newlyweds.

Add the oregano. 


Tasty Kitchen Blog: Tortellini Soup. Guest post by Maria Lichty of Two Peas and Their Pod, recipe submitted by TK member Katie of The Well-Fed Newlyweds.

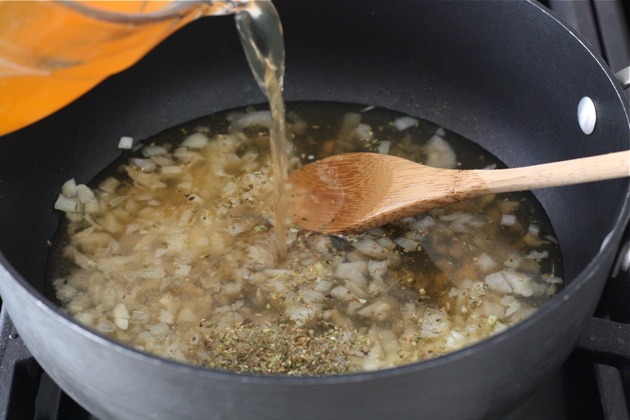
Stir in the vegetable broth. (You can use chicken broth.)


Tasty Kitchen Blog: Tortellini Soup. Guest post by Maria Lichty of Two Peas and Their Pod, recipe submitted by TK member Katie of The Well-Fed Newlyweds.

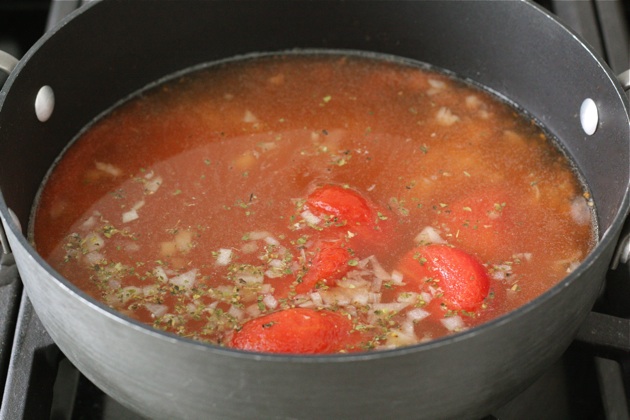
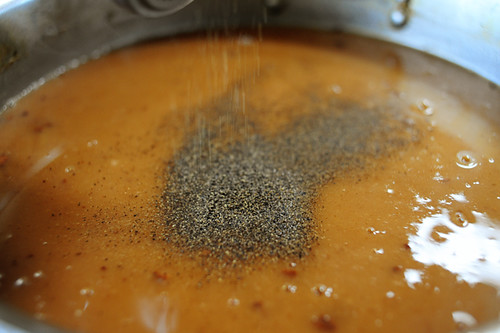
Add the whole tomatoes and season with salt and pepper. Break up the tomatoes with a wooden spoon. 


Tasty Kitchen Blog: Tortellini Soup. Guest post by Maria Lichty of Two Peas and Their Pod, recipe submitted by TK member Katie of The Well-Fed Newlyweds.

Bring the soup to a boil and add the tortellini. Cook according to package directions. 


Tasty Kitchen Blog: Tortellini Soup. Guest post by Maria Lichty of Two Peas and Their Pod, recipe submitted by TK member Katie of The Well-Fed Newlyweds.

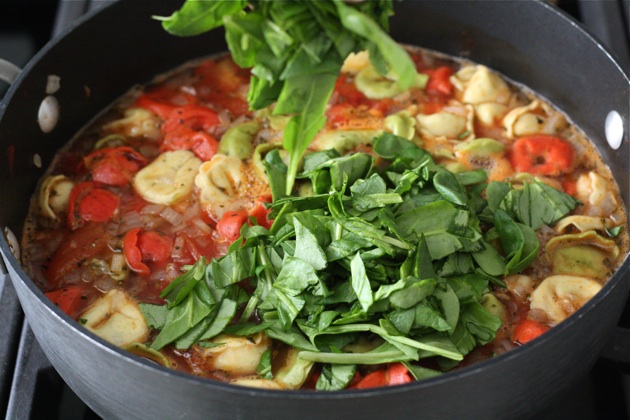
One minute before the tortellini is done, stir in the fresh spinach. 


Tasty Kitchen Blog: Tortellini Soup. Guest post by Maria Lichty of Two Peas and Their Pod, recipe submitted by TK member Katie of The Well-Fed Newlyweds.

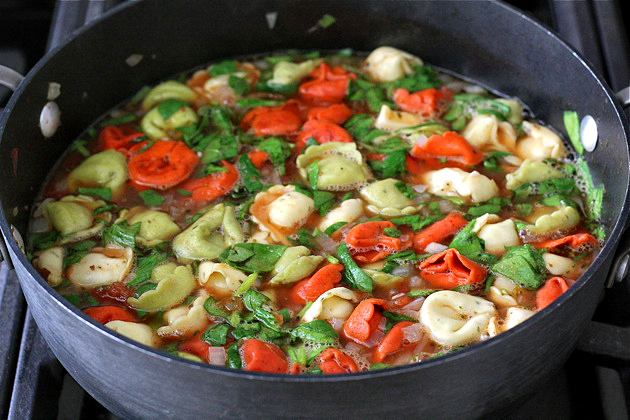
When the tortellini are cooked, remove the soup from the heat. Season with additional salt and pepper, if necessary. 


Tasty Kitchen Blog: Tortellini Soup. Guest post by Maria Lichty of Two Peas and Their Pod, recipe submitted by TK member Katie of The Well-Fed Newlyweds.

Garnish the soup with Parmesan cheese and serve hot. 

 
We really enjoyed this soup. I love that it is easy to make, but still impressive to serve. It is perfect for a weeknight meal with the family or when you are entertaining company. Each bite of soup is filled with flavor and will warm your heart and soul. Serve with a nice salad and crusty bread. Add Tortellini Soup to your menu right now, it is the perfect soup for a cold day. 

Thanks to Katie for a fantastic recipe! And check out her blog The Well-Fed Newlyweds, too. Lots of great-looking recipes there!


Printable Recipe

Tortellini Soup

See post on The Well-Fed Newlyweds’s site!
4.93 Mitt(s) 45 Rating(s)45 votes, average: 4.93 out of 545 votes, average: 4.93 out of 545 votes, average: 4.93 out of 545 votes, average: 4.93 out of 545 votes, average: 4.93 out of 5

Prep Time:

Cook Time:

Difficulty: Easy

Servings: 4

4
x

Print Options

Page size Letter 3x5 4x6
Text Size Small Medium Large
Content Include description
Include prep time, etc.
Show image

Description

Plump tortellini and fresh spinach in a tomato-y broth. It’s quick and simple to make, and it packs a lot of flavor in every bite.

Ingredients

  • 1 Tablespoon Olive Oil
  • 2 cloves Garlic, Minced
  • ½ whole Small Onion, Minced (about 1/4 Cup)
  • ½ teaspoons Dried Oregano
  • 1 quart Low-sodium Chicken Broth (or Vegetable Broth)
  • 15 ounces, weight Canned Whole Tomatoes
  • Salt And Freshly Ground Black Pepper
  • 9 ounces, weight Package Tortellini, Any Variety, Fresh Or Frozen
  • 3 cups Fresh Spinach, Chopped And Loosely Packed
  • Parmesan Cheese, To Serve

Preparation Instructions

In a large pot, heat the oil over medium heat. Add the garlic and onion. Cook until the onion is softened and the garlic has turned light gold, about 5 minutes.

Add the oregano, broth, tomatoes, and salt and pepper to taste. (You can break up the tomatoes with your fingers as you add them to the pot, or break them up with a spoon once you’ve added them to the soup.)

Bring the soup to a boil and add the tortellini. Cook according to the package directions.

One minute before the tortellini are done, add the spinach. Stir to combine.

When the tortellini are cooked, remove the pot from the heat immediately so they do not overcook. Season with additional salt and pepper, if necessary.

Serve the soup immediately, topped with grated Parmesan cheese.


_______________________________________

Maria and her husband Josh (who she affectionately refers to as her “dough boy”) blog at Two Peas and Their Pod. They’ve been featured on Saveur, Eatocracy, Gourmet Live, Glamour, and the Los Angeles Times, to name just a few. We’re so glad to have them here!


Profile photo of Ree | The Pioneer Woman

Murphy’s Hot Hamburger

Posted by in Step-by-Step Recipes

I almost fell over when I came across this recipe on Tasty Kitchen. Submitted by AlishaGibb, the recipe’s from an old (and still open!) haunt in my hometown called Murphy’s.

I can’t even begin to adequately summarize what it is about Murphy’s that’s so wonderful. The burgers…the garlic salad dressing (I have that recipe, too)…the incredibly delicious French fries. A meal at Murphy’s is a treat, a splurge (calorically speaking), an unparalleled burger experience. Anyone who’s ever eaten there knows exactly what I mean. Kids come home from college? They go straight to Murphy’s. Adults come to town to visit their parents for Christmas? They pick up Murphy’s to go on the first night they’re there. Murphy’s is simply a part of the soul of anyone who grew up there.

The most famous item on the Murphy’s menu has to be their Hot Hamburger. I…I…I can’t even describe it. And I won’t even try. Instead, I’ll just show you.

Before I begin, just remember one thing: “Gravy Over All“.

We’ll revisit that in a minute.

Thank you, Alisha, for sharing this!


TPW_1277

Here’s what you need. I didn’t have any beef broth, so I did beef bouillon cubes in hot water.


TPW_1283

First thing we’re gonna do is make some fries, baby.


TPW_1285

I have this lovely little french fry cutter. It’s a miracle, and it gets fries into my mouth much faster than if I have to slice them by hand.


TPW_1286

TPW_1287

TPW_1289

These are about the thickness of fries at Murphy’s, if I remember correctly.


TPW_1296

Drizzle some canola oil all over the fries and toss them around with your hands.


TPW_1300

Then sprinkle on some salt or seasoned salt. I used Slap Ya Mama Cajun seasoning.


TPW_1310

Slap Ya Mama on fries is so, so good.


TPW_1307

Now pop the pan into a 425 degree oven and bake for 45 minutes, shaking them around a few times here and there so they don’t totally stick to the pan.


TPW_1317

When the fries have about 15 minutes left, mix the hamburger meat with minced garlic, onion powder, and seasoned salt (or just plain salt would be fine.) Note: I went a little heavy on the garlic for this one pound of meat. If you’re unsure, cut the seasonings by half.


TPW_1319

Use your hands to knead the meat mixture together until it’s thoroughly combined.


TPW_1326

Divide the meat into fourths, then make the hamburgers. But Murphy’s doesn’t have lovely, uniform patties.


TPW_1334

They just slap a wad of meat on the grill and flatten it into a rustic shape. At least I think that’s how they do it.

Either way, these are not perfectly formed patties. Imperfection is the way to go.


TPW_1342

Cook the burgers on both sides until done…


TPW_1346

Then remove them to a paper towel-lined plate. Cover them with another plate to keep warm!


TPW_1348

There should be plenty of grease in the pan, but if not, feel free to splash in a little oil. Turn the heat to medium-low.


TPW_1352

Sprinkle on 4 to 5 tablespoons flour, whisking as you sprinkle it in to make sure the flour evenly distributes in the grease.


TPW_1355

Whisk it all together until combined. Ideally, you would cook this roux for a good 3 to 5 minutes in order to get the color as dark as possible without burning. (Murphy’s gravy is very dark brown.) But I was in a bit of a hurry.


TPW_1360

Then pour in the beef broth slowly, whisking as you pour.


TPW_1365

Now you just need to cook the gravy until it bubbles and thickens, about ten minutes or so.


TPW_1368

Whisk as you go, scraping the sides of the pan to make sure you loosen all the bits.


TPW_1373

Sometime during the cooking process, throw in a bunch (ya THINK?) of black pepper. Black pepper is a must.


TPW_1379

Cook and whisk until it’s nice and thick.


TPW_1394

By now the fries are ready. And they’re divine!


TPW_1396

And now…I need to talk to you brace yourself. Place some fries on a plate.


TPW_1406

Then place one of the burger patties on top.


TPW_1423

And then…and then…GRAVY OVER ALL.


TPW_1426

Yes, I just poured brown gravy over everything on the plate. Who wants to know?

And that’s the beauty of a hot hamburger. And if you don’t want to go through all the steps, you can take a shortcut and buy a packet of brown gravy mix—or even better, buy the stuff in the jar! I won’t tell anyone.

I’m pretty sure Murphy’s serves bread underneath the burger patty, then the fries over to the side, then drowns it all with the delicious brown gravy. That way, the bread underneath is not only soft from the grease of the burger…it’s deliciously soaked with gravy. Perfect!

You have to experience it once in your life.


TPW_1432

Another option would be to serve the burger in its normal state—with a bun and everything—then serve the fries with a bowl of gravy. When ballet season was over every year and I felt like I could eat something besides carrot sticks, I’d go straight to Murphy’s and order fries with a side of gravy. It was my own brand of teenage rebellion.

Whatever you do, the fries must go with the gravy.

It’s a universal mandate.

Enjoy, and thanks again to Alisha for sharing this hometown treat!

Love,
Pioneer Woman

Here’s the printable recipe: Murphy’s Hot Hamburgers, by AlishaGibb

Profile photo of Natalie | Perry's Plate

Lamb Tostadas

Posted by in Step-by-Step Recipes

Tasty Kitchen Blog: Lamb Tostadas. Guest post by Natalie Perry of Perry's Plate, recipe submitted by TK member Rebecca (rbrasher) of Revising Rebecca.

 
Ah, lamb. I must admit, I haven’t eaten a lot of lamb in my life. My grandpa was a sheep farmer before he passed away, and my parents ate quite a bit of mutton meals in their home during the early years of marriage. My mom always thought mutton (and lamb) smelled funny, so we never ate it while I was growing up. Never. Ever.

Occasionally I’d take a few bites of my husband’s lamb curry when we’d eat out, but that is the whole of my experience with lamb. And with all of the lamb recipes buzzing around this past month, I got curious. These Lamb Tostadas from TK member rbrasher (Rebecca) were a successful attempt at recreating a dish she ate at a restaurant. I thought that would be a good way to ease myself into a new meat.

And it would be awfully hard to mess up a tostada.


Tasty Kitchen Blog: Lamb Tostadas. Guest post by Natalie Perry of Perry's Plate, recipe submitted by TK member Rebecca (rbrasher) of Revising Rebecca.

So after making the very first lamb purchase of my life, I gathered the rest of the ingredients: black beans, tostada shells, sour cream, yogurt, chipotle peppers, tomatoes, a jalapeno, Mexican cotija cheese, salad greens, and the seasonings: salt, pepper, smoked paprika, cinnamon, and cocoa.

(See notes below for the adjustments I made in this recipe.)


Tasty Kitchen Blog: Lamb Tostadas. Guest post by Natalie Perry of Perry's Plate, recipe submitted by TK member Rebecca (rbrasher) of Revising Rebecca.

First get the beans started. Dump the drained beans into a medium saucepan.


Tasty Kitchen Blog: Lamb Tostadas. Guest post by Natalie Perry of Perry's Plate, recipe submitted by TK member Rebecca (rbrasher) of Revising Rebecca.

Add some smoked paprika. Smoked paprika is pretty easy to find these days, in the spice section of your grocery store. If you don’t have (or can’t find) smoked paprika, cumin would be a better substitute than regular paprika.


Tasty Kitchen Blog: Lamb Tostadas. Guest post by Natalie Perry of Perry's Plate, recipe submitted by TK member Rebecca (rbrasher) of Revising Rebecca.

And some water. Simmer the beans on the stove over medium-low heat while you prepare the rest.


Tasty Kitchen Blog: Lamb Tostadas. Guest post by Natalie Perry of Perry's Plate, recipe submitted by TK member Rebecca (rbrasher) of Revising Rebecca.

Next, combine the yogurt, sour cream, and pureed (or minced) chipotle peppers in a small bowl and let it hang out.

By the way, I’d recommend removing the seeds before you puree the peppers. They’re pretty spicy without the seeds. And if you’re wondering what to do with the leftovers, you can always spoon it into an ice cube tray. Once they’re frozen, transfer the cubes to a freezer bag and store them in the freezer. You can find canned chipotles in adobo sauce in the Latin/ethnic aisles of most grocery stores.


Tasty Kitchen Blog: Lamb Tostadas. Guest post by Natalie Perry of Perry's Plate, recipe submitted by TK member Rebecca (rbrasher) of Revising Rebecca.

Now for the lamb. Get a large skillet heated to medium-high heat and add the lamb and the cocoa, cinnamon, and smoked paprika. Stir it around a bit.


Tasty Kitchen Blog: Lamb Tostadas. Guest post by Natalie Perry of Perry's Plate, recipe submitted by TK member Rebecca (rbrasher) of Revising Rebecca.

Now add some water.


Tasty Kitchen Blog: Lamb Tostadas. Guest post by Natalie Perry of Perry's Plate, recipe submitted by TK member Rebecca (rbrasher) of Revising Rebecca.

Stir it around. Although the lamb already looks browned, it’s really the cocoa playing tricks on you. Let it simmer uncovered over medium heat for 15 minutes or so until the lamb is fully cooked, the water has cooked off, and the flavors have mingled.


Tasty Kitchen Blog: Lamb Tostadas. Guest post by Natalie Perry of Perry's Plate, recipe submitted by TK member Rebecca (rbrasher) of Revising Rebecca.

Once the lamb has finished cooking, the beans should be nice and flavorful as well. Taste both and add salt and/or pepper as needed.


Tasty Kitchen Blog: Lamb Tostadas. Guest post by Natalie Perry of Perry's Plate, recipe submitted by TK member Rebecca (rbrasher) of Revising Rebecca.

Chop the tomatoes and jalapenos and get ready to assemble!


Tasty Kitchen Blog: Lamb Tostadas. Guest post by Natalie Perry of Perry's Plate, recipe submitted by TK member Rebecca (rbrasher) of Revising Rebecca.

Layer the tostada shell, salad greens, lamb, beans, tomatoes, chipotle cream, cotija, and jalapenos.

I really don’t need to tell you what to do next, do I? Just make sure you have napkins handy. Tostadas don’t make for very graceful eating.


Tasty Kitchen Blog: Lamb Tostadas. Guest post by Natalie Perry of Perry's Plate, recipe submitted by TK member Rebecca (rbrasher) of Revising Rebecca.

These were great. I loved the combination of the flavors—the pungent meat, smoky beans, salty cheese, and spicy chipotle cream. The meat, alone, had a very strong flavor. I don’t know if it was my preconceived notions of lamb’s funky smell or the unusual spice combination, but I’m going to be honest with you. I didn’t enjoy eating the lamb alone. Assembled in the tostada? Yes. Please. If you’re a fan of lamb, you probably won’t have my weird issues.

I also want to call attention to this ah-mazing chipotle cream. It’s really the bomb. Rebecca recommends storing it in a squirt bottle (mine’s in storage. I almost cried.) and using it on salads, tacos, quesadillas, or any of your Mexican favorites.

My girls and I happily ate these for lunch three days in a row. Thanks so much Rebecca for a unique twist on a Mexican favorite! Visit her blog, Revising Rebecca, where she writes about finding balance in life (something we all need!).

 
Recipe adjustments: I omitted the rice (out of personal preference), and substituted sour cream for the mayo in the chipotle cream. If you omit the rice as well, I would cut the amount of cocoa and smoked paprika (in the lamb) in half to tone down the flavor of the meat. I also used queso cotija instead of queso blanco because that’s what I had on hand. Feta or goat cheese would also work well.


Printable Recipe

Lamb Tostadas

5.00 Mitt(s) 1 Rating(s)1 vote, average: 5.00 out of 51 vote, average: 5.00 out of 51 vote, average: 5.00 out of 51 vote, average: 5.00 out of 51 vote, average: 5.00 out of 5

Prep Time:

Cook Time:

Difficulty: Easy

Servings: 8

8
x

Print Options

Page size Letter 3x5 4x6
Text Size Small Medium Large
Content Include description
Include prep time, etc.
Show image

Description

We stopped into a little restaurant for the first time a few weeks ago and I tried this dish on a whim. Seemed like a good idea since almost everyone else in the restaurant were ordering it and raving about it. Loved it. Came home and tried to recreate it. This is really close, if not it!

Ingredients

  • 2 cups Cooked Rice
  • 1 can (15 Oz. Can) Black Beans, Drained
  • 1 cup Water, Divided
  • 2 teaspoons Smoked Paprika, Divided
  • 1 pound Ground Lamb
  • 1 teaspoon Cinnamon
  • 2 Tablespoons Dutch Processed Chocolate
  • 1 pinch Salt
  • 1 pinch Pepper
  • ½ cups Mayonnaise
  • ½ cups Plain Yogurt
  • 2 teaspoons Pureed Chipotle In Adobo Sauce
  • 8 whole Tostada Shells
  • 1 cup Queso Blanco, Crumbled Or Pepper Jack, Shredded
  • 2 cups Shredded Lettuce
  • 1 whole Tomato, Diced
  • 1 whole Jalapeno, Diced

Preparation Instructions

Cook rice according to directions.

Place black beans in a small sauce pan. Add half the water and half the smoked paprika. Stir and heat on low while you make the rest of the dish.

In a large skillet, combine the ground lamb, remaining smoked paprika, cinnamon, Dutch processed chocolate, salt, pepper, and remaining water and allow meat to brown. Stir often to break up meat and mix flavors. Allow to simmer for about 15 minutes.

Combine mayonnaise, yogurt, and chipotle peppers and put in a squeeze jar. (You won’t use it all on this recipe but it makes for great burritos, quesadillas, and tacos!)

When meat is cooked, assemble tostadas on a thin bed of rice. First layer is black beans, then meat, then cheese, lettuce, tomato, and jalapeno. Drizzle with the chipotle sauce and enjoy!


_______________________________________

Be sure to check out Natalie’s own beautiful food blog, Perrys’ Plate, where you can see her growing collection of lovely recipes. There’s always something new to see there. Go visit now!


Profile photo of georgiapellegrini

Turkey Swedish Meatballs

Posted by in Step-by-Step Recipes

Tasty Kitchen Blog: Turkey Swedish Meatballs. Guest post by Georgia Pellegrini, recipe submitted by TK member GottaFeedEmAll (panditsgirl).

 
I have fond memories of strolling a shopping cart around with my mother as a kid wandering through the living rooms of Ikea. It wasn’t that I loved Ikea per se, but I knew what was about to come just around the bend: the Ikea cafeteria. There, it was a Mecca for little Swedish meatballs slathered in gravy, and along with it often came a dollop of mashed potatoes and some lingonberry sauce of sorts. These little meatballs have always been in the back of my mind, one of those childhood food memories that seem to linger. This is why I was so exited to stumble upon many versions of this recipe here on Tasty Kitchen. This one, Turkey Swedish Meatballs by GottaFeedEmAll caught my eye in particular.


Tasty Kitchen Blog: Turkey Swedish Meatballs. Guest post by Georgia Pellegrini, recipe submitted by TK member GottaFeedEmAll (panditsgirl).

You begin by combining ground turkey with allspice, nutmeg, Worcestershire, salt, pepper, dried parsley, breadcrumbs and an egg.

I need to take a moment to give a shout out to one of my chickens for laying this egg. Isn’t it purty and bright? Good job girls!

Okay, where was I …


Tasty Kitchen Blog: Turkey Swedish Meatballs. Guest post by Georgia Pellegrini, recipe submitted by TK member GottaFeedEmAll (panditsgirl).

Separately, you’ll need finely diced onion and garlic (you can blend it in the food processor), along with flour and sour cream.


Tasty Kitchen Blog: Turkey Swedish Meatballs. Guest post by Georgia Pellegrini, recipe submitted by TK member GottaFeedEmAll (panditsgirl).

You’ll also need a healthy dose of my friend, butter. You can also use oil, but I love the flavor of butter when browning meat and vegetables.

And stock! (Not pictured). You’ll also need beef stock or whatever stock you have on hand.


Tasty Kitchen Blog: Turkey Swedish Meatballs. Guest post by Georgia Pellegrini, recipe submitted by TK member GottaFeedEmAll (panditsgirl).

You’ll sweat the onions and garlic in a bit of butter until they’re tender and translucent.


Tasty Kitchen Blog: Turkey Swedish Meatballs. Guest post by Georgia Pellegrini, recipe submitted by TK member GottaFeedEmAll (panditsgirl).

Then you’ll set them aside and let them cool for a few minutes.


Tasty Kitchen Blog: Turkey Swedish Meatballs. Guest post by Georgia Pellegrini, recipe submitted by TK member GottaFeedEmAll (panditsgirl).

Once the onion has cooled a bit, you mix it all together. I may or may not have added some fresh parsley in there. It was a gray day and I needed some color in my life.


Tasty Kitchen Blog: Turkey Swedish Meatballs. Guest post by Georgia Pellegrini, recipe submitted by TK member GottaFeedEmAll (panditsgirl).

Then you roll it all into precious little balls, about 1-inch in diameter.


Tasty Kitchen Blog: Turkey Swedish Meatballs. Guest post by Georgia Pellegrini, recipe submitted by TK member GottaFeedEmAll (panditsgirl).

Next, I diverged from the recipe a bit, because I wanted to make this a one-pan meal, but you could also bake these as the recipe suggests. Or you could get some butter bubbling like I did. It depends on your mood, really.


Tasty Kitchen Blog: Turkey Swedish Meatballs. Guest post by Georgia Pellegrini, recipe submitted by TK member GottaFeedEmAll (panditsgirl).

Brown these meatballs in batches, giving them a turn every so often so that they stay round. You don’t need to cook them through, since they will go back into the sauce in just a moment. Simply brown on all sides, then remove with a slotted spoon to a dish. Or like I said, you could bake them.


Tasty Kitchen Blog: Turkey Swedish Meatballs. Guest post by Georgia Pellegrini, recipe submitted by TK member GottaFeedEmAll (panditsgirl).

Next you make a roux. I noticed GottaFeedEmAll did something nifty by simply shaking the flour and stock together in a jar. I just tossed the flour into the pan grease though and whisked.


Tasty Kitchen Blog: Turkey Swedish Meatballs. Guest post by Georgia Pellegrini, recipe submitted by TK member GottaFeedEmAll (panditsgirl).

It will become brown and cook for a few minutes, and that’s when you can add the stock and continue to whisk.


Tasty Kitchen Blog: Turkey Swedish Meatballs. Guest post by Georgia Pellegrini, recipe submitted by TK member GottaFeedEmAll (panditsgirl).

As you whisk you’ll see it begin to thicken and the lumps will disappear. That’s when you add the meatballs back in and let them simmer and cook while the sauce reduces.

I should also note that I added an additional cup of stock than what the recipes says. It could be because I didn’t use the shaker method that I felt it was too thick. So if you decide to use the pan method, you’ll need some extra stock. I also find it helps to warm the stock before adding it to the flour. Extra gravy never hurt anyone, I say.


Tasty Kitchen Blog: Turkey Swedish Meatballs. Guest post by Georgia Pellegrini, recipe submitted by TK member GottaFeedEmAll (panditsgirl).

If you want to really go Ikea-style here, you could also add a bit of red currant jelly, raspberry jelly, or lingonberry sauce right into the mixture. It gives it a hint of sweetness, which I like. You could also just serve it on the side.


Tasty Kitchen Blog: Turkey Swedish Meatballs. Guest post by Georgia Pellegrini, recipe submitted by TK member GottaFeedEmAll (panditsgirl).

Once everything is cooked through, you turn off the heat and whisk in the sour cream. You won’t want to cook it much after that. Or if you’re not a fan of sour cream, thick plain yogurt would also be great.


Tasty Kitchen Blog: Turkey Swedish Meatballs. Guest post by Georgia Pellegrini, recipe submitted by TK member GottaFeedEmAll (panditsgirl).

It will lighten your sauce and give it a bit of a tang.


Tasty Kitchen Blog: Turkey Swedish Meatballs. Guest post by Georgia Pellegrini, recipe submitted by TK member GottaFeedEmAll (panditsgirl).

And there you have it! Ikea would be proud.

Thanks to TK member GottaFeedEmAll for the recipe and inspiration!

 
Here are some other mini meatball recipes here on TK:

Baked Turkey Teriyaki Meatballs by CookinCanuck

Family Favorite Swedish Meatballs by AngieN24

Swedish Meatballs by Mama-M

Cheesy Turkey Meatballs by MommieCooks


Printable Recipe

Turkey Swedish Meatballs

4.00 Mitt(s) 3 Rating(s)3 votes, average: 4.00 out of 53 votes, average: 4.00 out of 53 votes, average: 4.00 out of 53 votes, average: 4.00 out of 53 votes, average: 4.00 out of 5

Prep Time:

Cook Time:

Difficulty: Easy

Servings: 6

6
x

Print Options

Page size Letter 3x5 4x6
Text Size Small Medium Large
Content Include description
Include prep time, etc.
Show image

Description

I came up with this recipe as a way to lighten up the original dish. Nobody in my family even realized they were eating turkey!

Ingredients

  • FOR THE MEATBALLS:
  • 1 Tablespoon Olive Oil
  • ½ cups Minced Fresh Onion
  • 2 cloves Garlic, Minced
  • 20 ounces, weight Lean Ground Turkey
  • 1 whole Egg
  • ½ cups Dry Bread Crumbs
  • 1 Tablespoon Worcestershire Sauce
  • ½ Tablespoons Dried Parsley
  • 1 teaspoon Ground Allspice
  • ¼ teaspoons Ground Nutmeg
  • FOR THE SAUCE:
  • 14-½ ounces, fluid Low Sodium Beef Broth
  • 3 Tablespoons All-purpose Flour
  • 1 Tablespoon Worcestershire Sauce
  • ½ Tablespoons Dried Parsley
  • ¼ teaspoons Ground Black Pepper
  • ½ teaspoons Salt, Or To Taste
  • ¼ cups Light Sour Cream

Preparation Instructions

For the meatballs:

Preheat oven to 350ºF.

In a small skillet, heat olive oil over medium heat. Add onion and garlic, saute 2-3 minutes. Let cool 5 minutes.

In a medium mixing bowl, combine turkey, onions and garlic, egg, breadcrumbs, Worcestershire sauce, parsley, allspice, and nutmeg. Shape meat mixture into 1″ balls and place in a baking dish. Bake 25-30 minutes, or until cooked through.

For the sauce:

Pour beef broth and flour into a jar with a tight fitting lid. Shake vigorously until flour is dissolved.

Pour beef broth mixture into a large skillet with a lid and add Worcestershire and parsley, black pepper, and salt to taste. Heat to a boil over medium-high heat, stirring frequently. Reduce heat to medium and simmer until thickened, 2-3 minutes, stirring occasionally. Reduce heat to medium-low and stir in sour cream.

Add meatballs and cover. Simmer 10-15 minutes, stirring occasionally. Serve over egg noodles, if desired.


_______________________________________

There’s so much to say about Georgia, we don’t know where to start. Leaving Wall Street for the French Culinary Institute, followed by a stint at the Gramercy Tavern and La Chassagnette in France, her passion for food and food traditions are evident and inspiring. Visit her site at Georgia Pellegrini, where you’ll find more recipes, photos, learn all about her wonderful book Food Heroes, and enjoy her latest adventures.


Profile photo of missamy

Lemon Cream Granola Parfaits

Posted by in Step-by-Step Recipes

It’s funny how our bodies crave certain things at different times of the year isn’t it? As soon as the temperature rises—and it has risen indeed, my friends—my taste buds crave all things citrus. So when this Lemon Cream Fruit Dip from The Suzzzz was recently added to Tasty Kitchen, I didn’t waste any time […]

Profile photo of georgiapellegrini

Homemade Spaetzle

Posted by in Step-by-Step Recipes

I love spaetzle. It’s so comforting and German. It’s pasta with a twist, with some crunch, with some extra butter, and some herbs when you feel like it. This recipe from TK member Candi reminded me how great and versatile spaetzle can be.       One of the things I like about her recipe […]

Profile photo of Laurie - Simply Scratch

Strawberry Streusel Bars with White Chocolate Drizzle

Posted by in Baking, Step-by-Step Recipes

Help us welcome another guest contributor, Laurie of Simply Scratch, who is sharing a wonderfully easy and impressive recipe for Strawberry White Chocolate Streusel Bars from TK member angpritch. It’s a great dessert for your cookout today. Welcome, Laurie and thank you, Angela! _______________________________________     Strawberries! Beautiful,…

Profile photo of A Cozy Kitchen

Frozen Hot Chocolate!

Posted by in Step-by-Step Recipes

Today’s post is from Adrianne and Caroline of A Cozy Kitchen. Their blog is so full of mouthwatering recipes and beautiful photographs, you could spend hours in there trying to figure out what to try first. They picked the perfect warm weather treat to share with us today: Frozen Hot Chocolate Milkshake from TK member […]