The Pioneer Woman Tasty Kitchen
Profile photo of HowSweetEats

Bacon Cheddar Bubble Bread

Posted by in Baking, Step-by-Step Recipes

Tasty Kitchen Blog: Bacon Cheddar Bubble Bread. Guest post by Jessica Merchant of How Sweet It Is, recipe submitted by TK member Rebecca of Foodie with Family.

 
With one look at this title, I knew the recipe would be a winner. Let’s be honest: bacon + cheddar + bread? Who in the world could go wrong with that? I couldn’t have found this at a more perfect time with the start of football season and knew it would be a great game day snack. I also had so much success with Rebecca’s General Tso’s Chicken that I was already imagining how we’d devour this bread.

And devour it we did!

This recipe is ideal when it comes to leftovers. Leftover dough, leftover bacon, bunches of grated cheese … I just wish I knew what it was like to have leftover bacon, because somehow all of mine disappears. But even if you don’t have leftovers, you can fry the bacon and whip up your favorite dough recipe—pizza or bread—in order to make this when you’re really craving it.


Tasty Kitchen Blog: Bacon Cheddar Bubble Bread. Guest post by Jessica Merchant of How Sweet It Is, recipe submitted by TK member Rebecca of Foodie with Family.

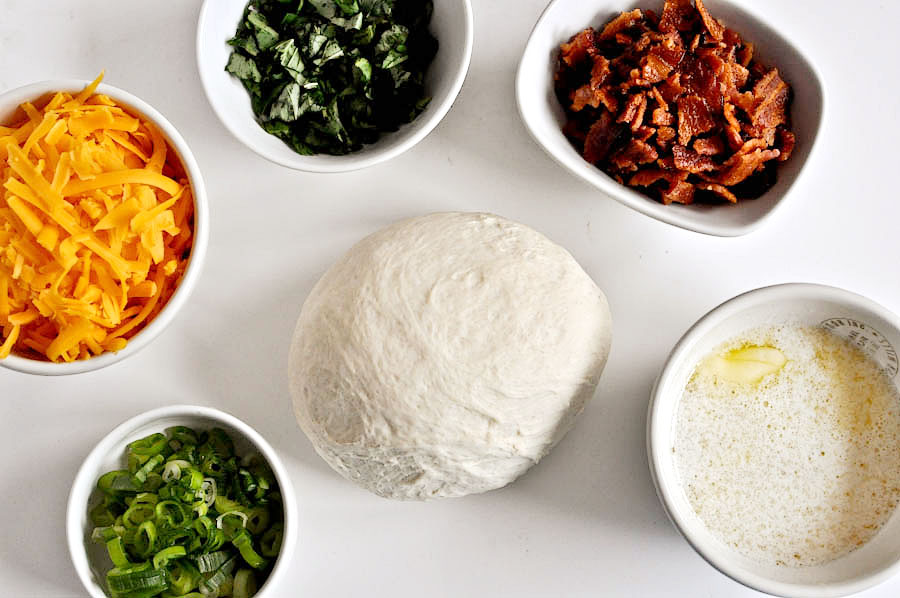
You need a batch of bread dough, crumbled bacon, melted butter, shredded cheddar, chives (or in my case, scallions) and chopped parsley. These flavors work magic together.


Tasty Kitchen Blog: Bacon Cheddar Bubble Bread. Guest post by Jessica Merchant of How Sweet It Is, recipe submitted by TK member Rebecca of Foodie with Family.

Start by preheating your oven to 350ºF. In a bowl, mix 1 cup of the cheese, and the bacon, scallions and parsley together, then set aside.


Tasty Kitchen Blog: Bacon Cheddar Bubble Bread. Guest post by Jessica Merchant of How Sweet It Is, recipe submitted by TK member Rebecca of Foodie with Family.

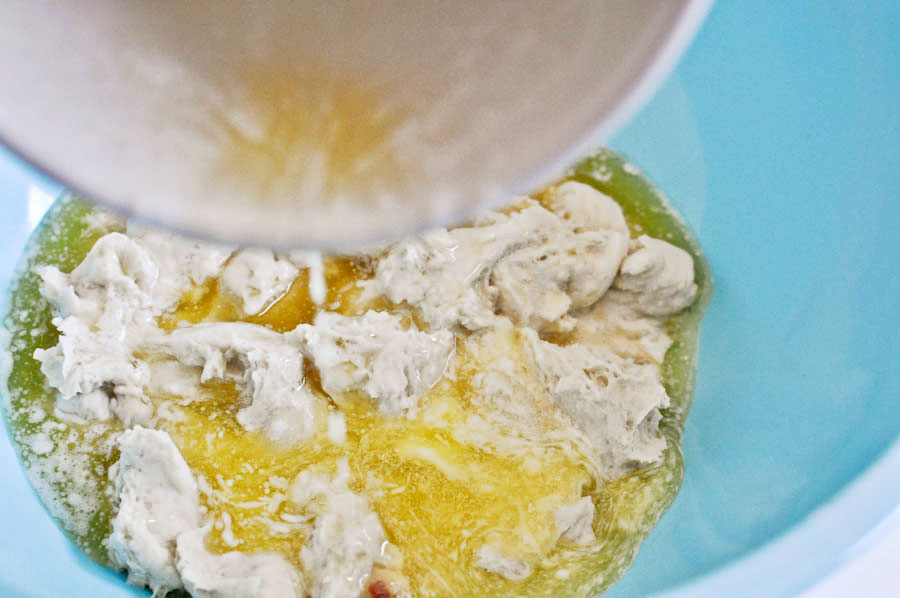
Tear your dough into 32 pieces. You can cut it with kitchen shears or do whatever works best for you, but I simply tore it with my hands. I loved that the pieces were not uniform in size. Add the dough to a bowl and pour melted butter on top. Yes it looks like a lot, but it’s butter—and it’s never too much. Trust me.


Tasty Kitchen Blog: Bacon Cheddar Bubble Bread. Guest post by Jessica Merchant of How Sweet It Is, recipe submitted by TK member Rebecca of Foodie with Family.

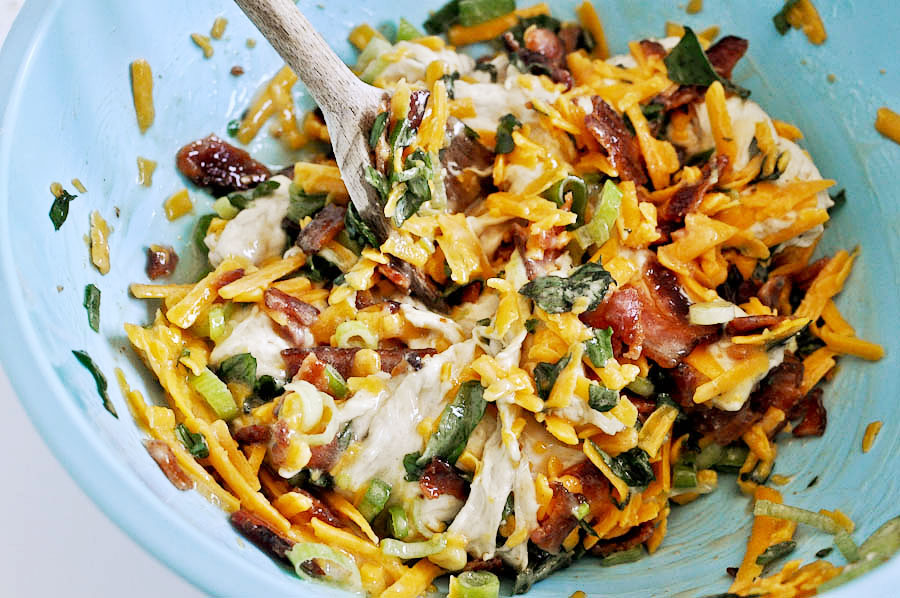
Add in the cheese and bacon mixture then mix thoroughly with a spoon, making sure to coat each and every piece.


Tasty Kitchen Blog: Bacon Cheddar Bubble Bread. Guest post by Jessica Merchant of How Sweet It Is, recipe submitted by TK member Rebecca of Foodie with Family.

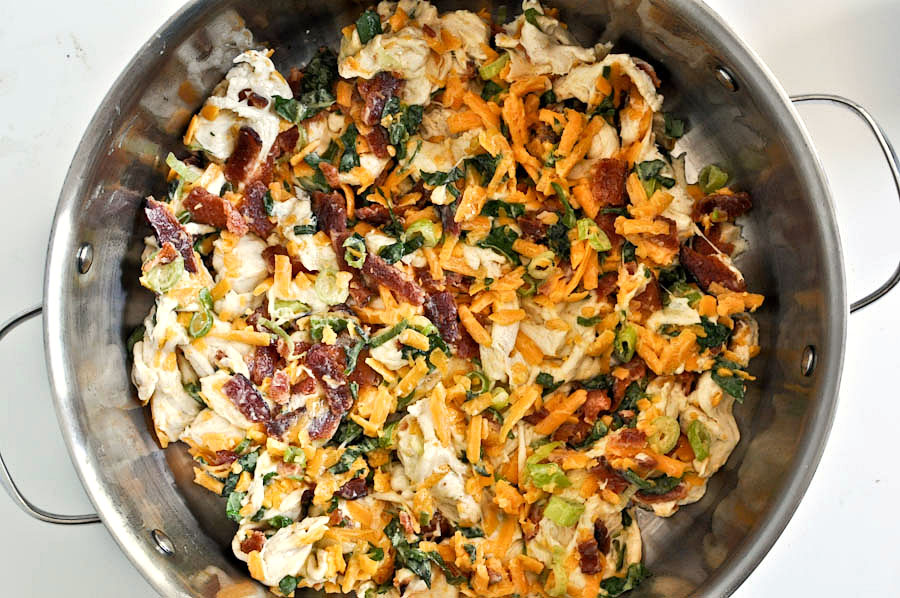
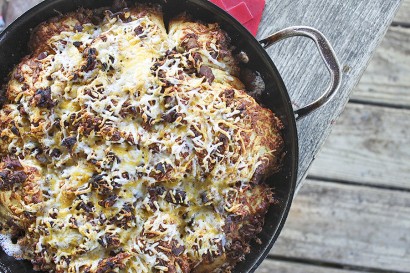
Add the bread pieces to the bottom of an oven-safe stock pot or a large cast iron skillet. The recipe calls for baking the bread for 25-30 minutes, but I found that the time depends on the dough. I baked mine for about 40 minutes and it was golden and chewy. I recommend watching it and removing it when it’s a bit brown on top.


Tasty Kitchen Blog: Bacon Cheddar Bubble Bread. Guest post by Jessica Merchant of How Sweet It Is, recipe submitted by TK member Rebecca of Foodie with Family.

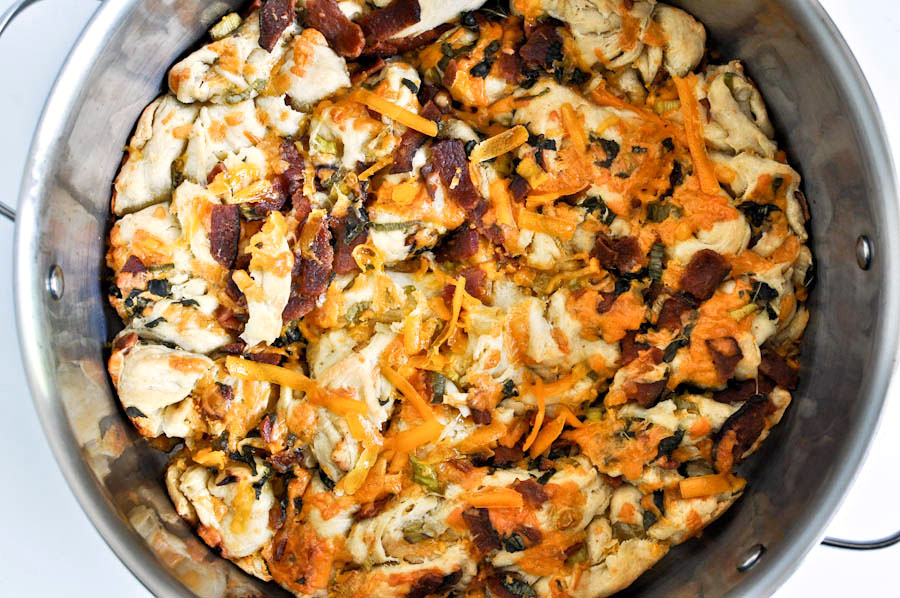
As if this is some cruel joke, let it cool for 10 minutes or so. I definitely burned three of my fingertips picking random strands of melted cheese and crispy bacon from the top of the bread. At this time, you can add the remaining cheese on top so it gives the bread a melty, gooey blanket. Heaven.


Tasty Kitchen Blog: Bacon Cheddar Bubble Bread. Guest post by Jessica Merchant of How Sweet It Is, recipe submitted by TK member Rebecca of Foodie with Family.

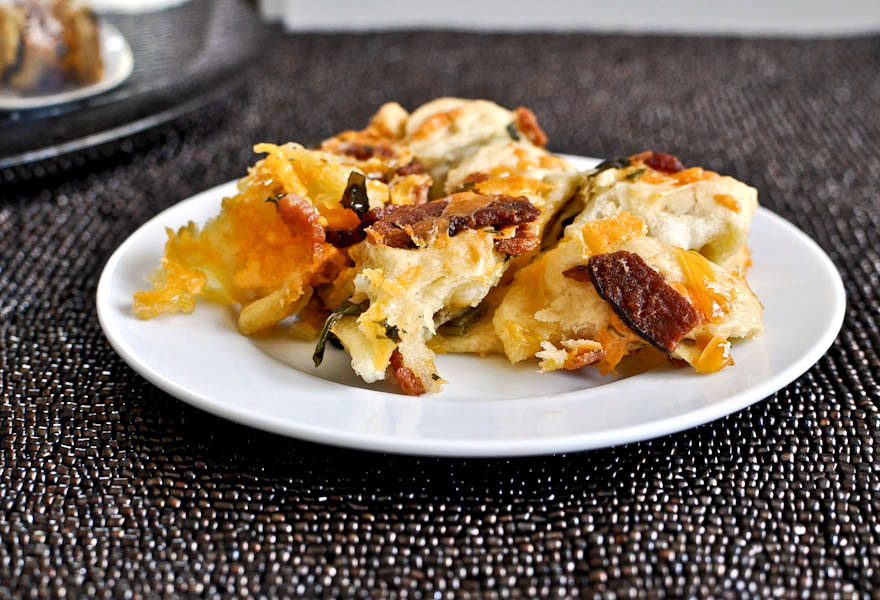
Don’t let it get too cool. Nothing beats a warm chunk of bread.


Tasty Kitchen Blog: Bacon Cheddar Bubble Bread. Guest post by Jessica Merchant of How Sweet It Is, recipe submitted by TK member Rebecca of Foodie with Family.

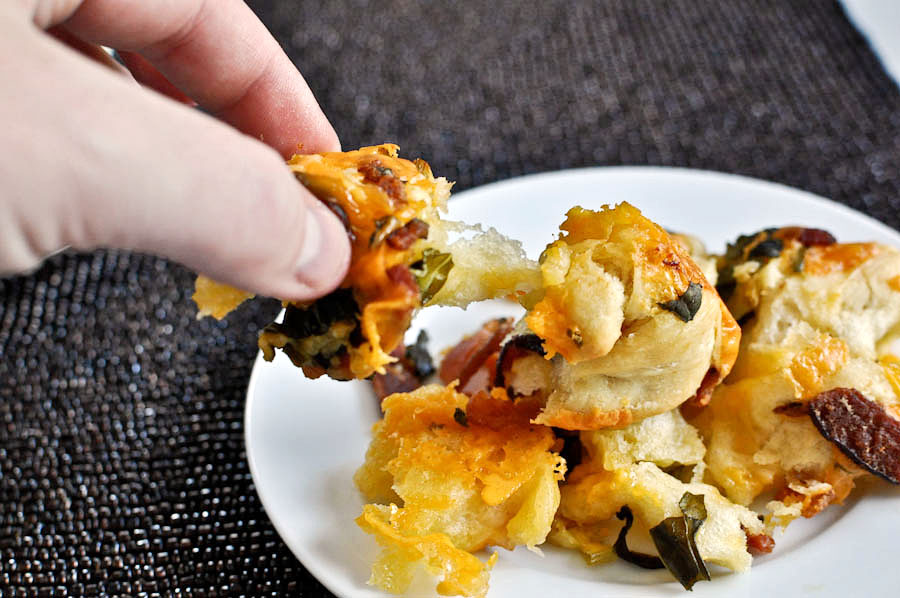
Especially when you can pull it apart with your fingers. Oh! And especially when cheddar and bacon are involved. No words.

Thanks so much to Rebecca for another fabulous recipe! Be sure to check out her blog, Foodie with Family, which has quickly risen to the top of my favorites. If you do one thing today, make this bread!


Printable Recipe

Bacon Cheddar Bubble Bread

See post on Rebecca’s site!
4.83 Mitt(s) 6 Rating(s)6 votes, average: 4.83 out of 56 votes, average: 4.83 out of 56 votes, average: 4.83 out of 56 votes, average: 4.83 out of 56 votes, average: 4.83 out of 5

Prep Time:

Cook Time:

Difficulty: Easy

Servings: 6

6
x

Print Options

Page size Letter 3x5 4x6
Text Size Small Medium Large
Content Include description
Include prep time, etc.
Show image

Description

When bacon and cheese talk, you’d better be ready to listen. Thankfully, it’s easy to listen when this is what you’re craving. Made of leftover bacon, shredded cheese, refrigerated bread dough, butter, and a handful of herbs and spices, this throws together in five minutes and bakes in thirty.

Ingredients

  • ½ cups Butter, Melted
  • 1-½ cup Finely Shredded Cheddar (or A Mixture Of Cheddar And Monterey Jack), Divided Use
  • 1 cup Crumbled Leftover Cooked Bacon
  • 2 Tablespoons Chopped Fresh Chives, Parsley, Or A Combination Of The Two
  • 1 Tablespoon Minced Onions, Optional
  • 1 pound Refrigerated (or Thawed, Previously Frozen) Bread Dough
  • Nonstick Cooking Spray Or Additional Butter Or Oil For The Pan

Preparation Instructions

Preheat oven to 350°F.

Generously grease (or spray with nonstick cooking spray) an oven-safe 12-inch skillet or a bundt pan.

In a small mixing bowl, stir together the butter, 1 cup of the cheese cheese, bacon, chives or parsley, and minced onions. Set aside.

Divide the bread dough into 32 pieces and place the pieces in a large mixing bowl.

Pour the butter mixture over the bread and toss gently to distribute everything evenly and coat all the dough well.

Use your hands to arrange the dough evenly over the bottom of the greased pan. Sprinkle the remaining cheese over the top of the dough.

Bake for 25-30 minutes or until the cheese on top is fully melted and crisped and the bread is golden brown.

Either turn out onto a serving plate or wait until the pan is comfortable to the touch before serving.


_______________________________________

Jessica Merchant is a personal trainer turned food writer and blogger. Her blog, How Sweet Eats, is where she proclaims her love for all things sweet, all things bacon, and everything else in between. She works her magic in her Pittsburgh kitchen, which she shares with her husband of 2 years.


Profile photo of twopeasandtheirpod

Pumpkin Cornbread

Posted by in Baking, Step-by-Step Recipes

Tasty Kitchen Blog: Pumpkin Cornbread. Guest post by Maria Lichty of Two Peas and Their Pod, recipe submitted by TK member Tracy of Sugarcrafter.

 
Fall is here and that means it’s pumpkin season. I love cooking and baking with pumpkin and I am always looking for new ways to use pumpkin in the kitchen. I recently stumbled upon this recipe for Pumpkin Cornbread from Tasty Kitchen member Tracy (sugarcrafter) and immediately added it to my “must try” pumpkin list. I made vegetarian chili for dinner one night and decided it was the perfect time to whip up a batch of Pumpkin Cornbread. 


Tasty Kitchen Blog: Pumpkin Cornbread. Guest post by Maria Lichty of Two Peas and Their Pod, recipe submitted by TK member Tracy of Sugarcrafter.

To make the Pumpkin Cornbread, you will need the following ingredients: flour, baking powder, salt, cinnamon, nutmeg, brown sugar, cornmeal, eggs, pumpkin puree, olive oil, and molasses. 


Tasty Kitchen Blog: Pumpkin Cornbread. Guest post by Maria Lichty of Two Peas and Their Pod, recipe submitted by TK member Tracy of Sugarcrafter.

Preheat the oven to 400 degrees F and grease an 8×8 baking dish. Set aside. 


Tasty Kitchen Blog: Pumpkin Cornbread. Guest post by Maria Lichty of Two Peas and Their Pod, recipe submitted by TK member Tracy of Sugarcrafter.

In a medium bowl, whisk together the flour, baking powder, salt, cinnamon, nutmeg, brown sugar, and cornmeal. 


Tasty Kitchen Blog: Pumpkin Cornbread. Guest post by Maria Lichty of Two Peas and Their Pod, recipe submitted by TK member Tracy of Sugarcrafter.

Mix until combined and there are no brown sugar clumps. 


Tasty Kitchen Blog: Pumpkin Cornbread. Guest post by Maria Lichty of Two Peas and Their Pod, recipe submitted by TK member Tracy of Sugarcrafter.

In a small bowl, lightly beat the eggs. 


Tasty Kitchen Blog: Pumpkin Cornbread. Guest post by Maria Lichty of Two Peas and Their Pod, recipe submitted by TK member Tracy of Sugarcrafter.>

Stir in the pumpkin, olive oil, and molasses. 


Tasty Kitchen Blog: Pumpkin Cornbread. Guest post by Maria Lichty of Two Peas and Their Pod, recipe submitted by TK member Tracy of Sugarcrafter.

Add the wet ingredients to the dry ingredients and stir until just combined. 


Tasty Kitchen Blog: Pumpkin Cornbread. Guest post by Maria Lichty of Two Peas and Their Pod, recipe submitted by TK member Tracy of Sugarcrafter.

Pour the cornbread batter into the prepared pan and smooth with a spatula. Bake for 30 minutes or until a knife inserted in the center comes out clean. 


Tasty Kitchen Blog: Pumpkin Cornbread. Guest post by Maria Lichty of Two Peas and Their Pod, recipe submitted by TK member Tracy of Sugarcrafter.

We served the warm cornbread with our chili and it was heavenly. It is good dunked into the chili or with a little butter and honey drizzled on top. I love the texture and color of this cornbread. It’s a winner indeed! 


Tasty Kitchen Blog: Pumpkin Cornbread. Guest post by Maria Lichty of Two Peas and Their Pod, recipe submitted by TK member Tracy of Sugarcrafter.

The slightly sweet cornbread is moist with a hint of fall spices. It is super easy to whip up and is a perfect side to any fall meal. It is also great for breakfast. We reheated a few slices and enjoyed them in the morning.


Tasty Kitchen Blog: Pumpkin Cornbread. Guest post by Maria Lichty of Two Peas and Their Pod, recipe submitted by TK member Tracy of Sugarcrafter.

If you are a pumpkin fan and are looking for a new recipe to try, make this Pumpkin Cornbread. It is fantastic! Thanks Tracy for sharing your recipe. Make sure you head on over to Tracy’s blog, Sugarcrafter, for other delicious recipes. I guarantee you will leave hungry. 


Printable Recipe

Pumpkin Cornbread

See post on Tracy (sugarcrafter)’s site!
4.93 Mitt(s) 30 Rating(s)30 votes, average: 4.93 out of 530 votes, average: 4.93 out of 530 votes, average: 4.93 out of 530 votes, average: 4.93 out of 530 votes, average: 4.93 out of 5

Prep Time:

Cook Time:

Difficulty: Easy

Servings: 12

12
x

Print Options

Page size Letter 3x5 4x6
Text Size Small Medium Large
Content Include description
Include prep time, etc.
Show image

Description

A delightful fall twist on a classic, perfect with a big bowl of chili!

Ingredients

  • 1 cup Flour
  • 1 Tablespoon Baking Powder
  • 1 teaspoon Kosher Salt
  • ½ teaspoons Ground Cinnamon
  • ¼ teaspoons Ground Nutmeg
  • ½ cups Brown Sugar
  • 1 cup Cornmeal
  • 2 whole Eggs
  • 1 cup Pumpkin Puree
  • ¼ cups Olive Oil
  • 1 Tablespoon Molasses

Preparation Instructions

Preheat the oven to 400 degrees F and grease an 8×8″ baking dish.

In a medium bowl, whisk together the flour, baking powder, salt, spices, brown sugar, and cornmeal.

In a small bowl, lightly beat the eggs, and then stir in the pumpkin, oil, and molasses.

Stir the wet ingredients into the dry ingredients just until combined, and then pour the batter into the pan, smoothing out the top as much as possible.

Bake 30 minutes or until a knife inserted in the center comes out clean. Serve warm.


_______________________________________

Maria and her husband Josh (who she affectionately refers to as her “dough boy”) blog at Two Peas and Their Pod. They’ve been featured on Saveur, Eatocracy, Gourmet Live, Glamour, and the Los Angeles Times, to name just a few. We’re so glad to have them here!


Profile photo of missamy

Baked Sweet Potato Fries

Posted by in Step-by-Step Recipes

Tasty Kitchen Blog: Baked Sweet Potato Fries. Guest post by Amy Johnson of She Wears Many Hats, recipe submitted by TK member Caitlin (maude10).

 
Healthy snack options mean, well, it means options. And options are good, especially when we’re heading into the holiday season, packed with all flavors of goodies at every turn. Yes, having healthy and tasty options in your repertoire is always a good thing. This recipe for Baked Sweet Potato Fries submitted by Tasty Kitchen member Caitlin is one of those options. Sweet potatoes are packed with carotenoids, vitamin C, potassium, and fiber, and baking the fries, as this recipe calls for, keeps the fat down. Good for snacking, or as a side dish, these Baked Sweet Potato Fries are satisfying to the max. Simple too. Let me show ya.

For starters, I’d recommend doubling or tripling this recipe right off the bat. They’re good and will get gobbled up quick.


Tasty Kitchen Blog: Baked Sweet Potato Fries. Guest post by Amy Johnson of She Wears Many Hats, recipe submitted by TK member Caitlin (maude10).

You’ll need: sweet potato(es), olive oil, salt, pepper, garlic powder, and cayenne pepper.

(The spices/herbs can easily be changed for different flavor combos, so be creative with these. Maybe rosemary, salt, and olive oil? A simple trio, but mighty tasty too.)


Tasty Kitchen Blog: Baked Sweet Potato Fries. Guest post by Amy Johnson of She Wears Many Hats, recipe submitted by TK member Caitlin (maude10).

Slice the sweet potato into strips, about 1/2″ thick. The thinner they are, the crispier they’ll be. They’ll cook quicker too, so make sure you account for that in the cook time.


Tasty Kitchen Blog: Baked Sweet Potato Fries. Guest post by Amy Johnson of She Wears Many Hats, recipe submitted by TK member Caitlin (maude10).

Place the fries in a bowl and add the olive oil.


Tasty Kitchen Blog: Baked Sweet Potato Fries. Guest post by Amy Johnson of She Wears Many Hats, recipe submitted by TK member Caitlin (maude10).

Then add the spices and combine well, coating all fries evenly. We like it spicy, so I added a full 1/8 teaspoon of cayenne to ours. Yum!


Tasty Kitchen Blog: Baked Sweet Potato Fries. Guest post by Amy Johnson of She Wears Many Hats, recipe submitted by TK member Caitlin (maude10).

Spread in a single layer on a baking sheet and bake for 15 minutes. Toss and continue baking another 10-15 minutes until crisp. Ovens vary, so make sure to watch your first batch closely to see what cook time is appropriate for your oven.


Tasty Kitchen Blog: Baked Sweet Potato Fries. Guest post by Amy Johnson of She Wears Many Hats, recipe submitted by TK member Caitlin (maude10).

That’s it! Easy huh? And totally drool worthy. Try them soon and let me know what you think. And again, you may wanna double the batch.

A big thanks to Caitlin for the recipe. We’ve already made it three times this week. My 13-year-old son even asked for them for a snack. Smart kid, I think. Definitely a good option.


Printable Recipe

Baked Sweet Potato Fries

5.00 Mitt(s) 8 Rating(s)8 votes, average: 5.00 out of 58 votes, average: 5.00 out of 58 votes, average: 5.00 out of 58 votes, average: 5.00 out of 58 votes, average: 5.00 out of 5

Prep Time:

Cook Time:

Difficulty: Easy

Servings: 1

1
x

Print Options

Page size Letter 3x5 4x6
Text Size Small Medium Large
Content Include description
Include prep time, etc.
Show image

Description

These puppies are quickly becoming my new popcorn, a.k.a. my new late-night, movie watching snack. They are quick and easy, as well as healthier than the starchy alternative. I leave the skins on them, because Maude tells me to, but you should follow your instincts on that one. Don’t be surprised if you find yourself making these at 11 pm when everyone else is asleep, but you have a lot of Grey’s Anatomy to catch up on.

Ingredients

  • 1 whole Sweet Potato
  • 2 Tablespoons Olive Oil
  • ½ teaspoons Kosher Salt
  • ¼ teaspoons Freshly Ground Pepper
  • ¼ teaspoons Garlic Powder
  • 1 pinch Cayenne Pepper (if You're Down With That)

Preparation Instructions

1. Preheat the oven to 450F.

2. Scrub the sweet potato and cut into 1/2 inch slices (or thinner if you like your fries crispier).

3. In a bowl, toss the sweet potatoes with the olive oil, kosher salt, pepper, garlic powder, and cayenne (if you like-ah some spice-ah).

4. Arrange fries evenly on a cookie sheet and bake for about 20 to 30 minutes minutes, checking after 20 minutes to prevent burning (ovens vary). Flip halfway so they cook evenly.

5. Settle in for a good movie and a glass of wine with a delicious snack.

Suggestion: Try throwing on some parmesan cheese during the last few minutes of baking for a yummy surprise!


_______________________________________

Amy Johnson is a blogger who writes about food, travel, the home (both inside and out), and various observations and random musings about anything and everything. Visit her blog She Wears Many Hats for a dose of deliciousness, practicality, hilarity, or just plain fun. She lives in South Carolina with her husband and two children.


Profile photo of callimakesdo

Candied Jalapeños (Cowboy Candy)

Posted by in Step-by-Step Recipes

Tasty Kitchen Blog: Candied Jalapenos Cowboy Candy. Guest post by Calli Taylor of Make It Do, recipe submitted by TK member Rebecca of Foodie with Family.

 
Every year my spice-lovin’ husband plants WAY too many hot peppers in our vegetable garden. He can’t help himself, I suppose, but our family can only eat so much salsa and Chile Verde.

This year, rather than letting our delicious crop of jalapeños go to waste, I searched Tasty Kitchen for new recipes and could hardly believe my luck when I came across a recipe for Candied Jalapeños (Cowboy Candy) from TK member Rebecca.

Canned jalapeños? Yes please! What could be better than enjoying the fruit of our summer labor on a cold day in February?

After making a batch of Rebecca’s Candied Jalapeños, I know one thing for sure: there is no way I’ve canned enough jars to make it till February.

You may be wondering what Candied Jalapeños taste like. It’s a wonderful mix of sweet and heat. I made my first batch with the seeds and membranes included and it was SPICY! The tangy, savory sweet flavor of the syrup knocked my socks off. In short, Cowboy Candy is delicious and totally addicting.

I’ll be making another batch for my family this week, and one to give as gifts for the holidays. This time around I’ll remove the seeds and membranes (which is where most of the spicy heat is found), so the rest of my family can enjoy their treat without watery eyes and runny noses.

Here’s how to make Cowboy Candy.


Tasty Kitchen Blog: Candied Jalapenos Cowboy Candy. Guest post by Calli Taylor of Make It Do, recipe submitted by TK member Rebecca of Foodie with Family.

Start with fresh, firm jalapeños. As with any canning recipe, the quality of your vegetable (or fruit) is very important.


Tasty Kitchen Blog: Candied Jalapenos Cowboy Candy. Guest post by Calli Taylor of Make It Do, recipe submitted by TK member Rebecca of Foodie with Family.

Remove the stems from your peppers. Yes, I’m wearing gloves, which might seem a bit cautious. But try inadvertently rubbing your eye after chopping a quantity of spicy peppers, and you’ll opt for gloves too.

This would be a good time to core out the seeds and membrane if you like a milder flavor.


Tasty Kitchen Blog: Candied Jalapenos Cowboy Candy. Guest post by Calli Taylor of Make It Do, recipe submitted by TK member Rebecca of Foodie with Family.

Slice the peppers into 1/8 to 1/4 inch slices.


Tasty Kitchen Blog: Candied Jalapenos Cowboy Candy. Guest post by Calli Taylor of Make It Do, recipe submitted by TK member Rebecca of Foodie with Family.

Beyond the obvious jalapeños, the ingredients are sugar, cider vinegar, turmeric, celery seed, ground cayenne pepper and granulated garlic. I live in a smaller community and couldn’t find granulated garlic. I chose powdered garlic at half the measurement (1-1/2 teaspoons) as a substitute, since powered is much finer than granulated. Powdered garlic was easy and worked great for me. After reading the comments on Rebecca’s blog, I discovered that she recommends one clove of garlic per 1/4 teaspoon of granulated, if you have trouble finding granulated like I did.


Tasty Kitchen Blog: Candied Jalapenos Cowboy Candy. Guest post by Calli Taylor of Make It Do, recipe submitted by TK member Rebecca of Foodie with Family.

Pour 6 cups of white granulated sugar into a large pot.


Tasty Kitchen Blog: Candied Jalapenos Cowboy Candy. Guest post by Calli Taylor of Make It Do, recipe submitted by TK member Rebecca of Foodie with Family.

Add the vinegar and spices.


Tasty Kitchen Blog: Candied Jalapenos Cowboy Candy. Guest post by Calli Taylor of Make It Do, recipe submitted by TK member Rebecca of Foodie with Family.

Bring to a boil. Reduce the heat and simmer for 5 minutes.


Tasty Kitchen Blog: Candied Jalapenos Cowboy Candy. Guest post by Calli Taylor of Make It Do, recipe submitted by TK member Rebecca of Foodie with Family.

Add the peppers and simmer for exactly 4 minutes. Remove from the heat. Some of the slices looked more cooked than others, but that’s okay.


Tasty Kitchen Blog: Candied Jalapenos Cowboy Candy. Guest post by Calli Taylor of Make It Do, recipe submitted by TK member Rebecca of Foodie with Family.

Using a slotted spoon or mesh skimmer, transfer the peppers into clean, sterile, hot canning jars. Fill to within 1/4 inch from the rim of the jar. You can use half pint or if you have big eaters, go for pint jars. Knowing my husband, I opted for pints and yielded 4 jars.


Tasty Kitchen Blog: Candied Jalapenos Cowboy Candy. Guest post by Calli Taylor of Make It Do, recipe submitted by TK member Rebecca of Foodie with Family.

Return the syrup to the stove, turn up the heat and bring back to a full rolling boil. Boil hard for 6 minutes.

Use a ladle to pour the boiling syrup over the jalapeños.


Tasty Kitchen Blog: Candied Jalapenos Cowboy Candy. Guest post by Calli Taylor of Make It Do, recipe submitted by TK member Rebecca of Foodie with Family.

Insert a clean, sterile chopstick to the bottom of the jar several times to release any trapped air. Add or remove syrup if necessary to leave 1/4 inch head space.


Tasty Kitchen Blog: Candied Jalapenos Cowboy Candy. Guest post by Calli Taylor of Make It Do, recipe submitted by TK member Rebecca of Foodie with Family.

Wipe the rims of the jars using a clean, damp paper towel to remove any stickiness. A clean rim is important for a good seal.


Tasty Kitchen Blog: Candied Jalapenos Cowboy Candy. Guest post by Calli Taylor of Make It Do, recipe submitted by TK member Rebecca of Foodie with Family.

Fix on new two-piece lids to fingertip tightness.

Rebecca included recommended canning times on the recipe: 10 minutes for 1/2 pint and 15 minutes for pint jars. However, I live in the Rocky Mountains at almost 5000 feet, so I made a quick call to my local State Extension service for canning times at my altitude. The canning times vary depending on where you live, so I highly recommend making the same phone call to find the right time for you. I processed my pint jars for 25 minutes.

Add your cans to your canner with two inches of water over the tops of the lid. Start timing only after your water has come to a full boil.


Tasty Kitchen Blog: Candied Jalapenos Cowboy Candy. Guest post by Calli Taylor of Make It Do, recipe submitted by TK member Rebecca of Foodie with Family.

Rebecca recommends waiting about 2 weeks before eating your jalapenos, for best flavor. This turned out to be a tall order for our house and my husband broke into a jar in less than a week.

Already we’ve enjoyed them on burgers with jack cheese and on turkey sandwiches.


Tasty Kitchen Blog: Candied Jalapenos Cowboy Candy. Guest post by Calli Taylor of Make It Do, recipe submitted by TK member Rebecca of Foodie with Family.

We’ve also loved them as an appetizer on crackers with cream cheese. I get the feeling we’ve just begun finding ways to enjoy this spicy treat.

Just be sure to spoon some of the syrup onto whatever you are eating! It is the star of the show.

Thank you Rebecca for sharing Cowboy Candy with us. You are truly a genius in the kitchen.

Be sure to check out Rebecca’s Tasty Kitchen recipe box for more of her delicious recipes. You’ll also love her blog Foodie with Family.


Printable Recipe

Candied Jalapenos (Cowboy Candy)

See post on Rebecca’s site!
4.97 Mitt(s) 34 Rating(s)34 votes, average: 4.97 out of 534 votes, average: 4.97 out of 534 votes, average: 4.97 out of 534 votes, average: 4.97 out of 534 votes, average: 4.97 out of 5

Prep Time:

Cook Time:

Difficulty: Intermediate

Servings: 36

36
x

Print Options

Page size Letter 3x5 4x6
Text Size Small Medium Large
Content Include description
Include prep time, etc.
Show image

Description

These little beauties are so addictive: sweet, spicy, and tangy. Once you start eating these, you’ll find all sorts of places to stash them—sandwiches, potato salad, grilled meat, and pasta, just to name a few.

Ingredients

  • 3 pounds Firm, Fresh Jalapeno Peppers, Washed
  • 2 cups Cider Vinegar
  • 6 cups White Granulated Sugar
  • ½ teaspoons Turmeric
  • ½ teaspoons Celery Seed
  • 3 teaspoons Granulated Garlic
  • 1 teaspoon Ground Cayenne Pepper

Preparation Instructions

Wearing gloves, remove the stems from all of the jalapeno peppers. The easiest way to do this is to slice a small disc off of the stem-end along with the stem. Discard the stems.

Slice the peppers into uniform 1/8-1/4 inch rounds. Set aside.

In a large pot, bring cider vinegar, white sugar, turmeric, celery seed, granulated garlic and cayenne pepper to a boil. Reduce heat and simmer for 5 minutes. Add the pepper slices and simmer for exactly 4 minutes. Use a slotted spoon to transfer the peppers, loading into clean, sterile canning jars to within 1/4 inch of the upper rim of the jar. Turn heat up under the pot with the syrup and bring to a full rolling boil. Boil hard for 6 minutes.

Use a ladle to pour the boiling syrup into the jars over the jalapeno slices. Insert a cooking chopstick to the bottom of the jar two or three times to release any trapped pockets of air. Adjust the level of the syrup if necessary. Wipe the rims of the jars with a clean, damp paper towel and fix on new, two-piece lids to finger-tip tightness.

If you do not want to can these to the point of shelf stable, you can simply put the jars in your refrigerator and store them there. I prefer to keep the fridge space free so I can them. If you wish to can them, follow the instructions below.

Note: If you have leftover syrup, and it is likely that you will, you may can it in half-pint or pint jars, too. It’s wonderful brushed on meat on the grill or added to potato salad or, or, or … in short, don’t toss it out!

To can, place jars in a canner and cover with water by 2-inches. Bring the water to a full rolling boil. When it reaches a full rolling boil, set the timer for 10 minutes for half-pints or 15 minutes for pints. When timer goes off, use canning tongs to transfer the jars to a cooling rack. Leave them to cool, undisturbed, for 24 hours. When fully cooled, wipe them with a clean, damp washcloth, then label.

Allow to mellow for at least two weeks, but preferably a month before eating. Or don’t. I won’t tell!


_______________________________________

Calli is truly a woman of many talents, from cooking, sewing, crafts, beautiful photography and gardening. Her blog, Make it Do is a treasure trove of recipes, household tips, crafts projects, sewing patterns … you name it. It’s also peppered with photos of her beautiful kids. Go visit her site, and visit it often. There’s always something new to learn there!


Profile photo of whatsgabycooking

BLT Pizza

Posted by in Step-by-Step Recipes

BLT Pizza might just be my most recent favorite dinner. It’s super easy to prepare and only requires a handful of ingredients but leaves everyone at the dinner table satisfied and happy. I haven’t always been a big bacon fan (I know, something was obviously wrong with me) but recently I’ve decided it’s totally necessary in life. The idea of eating all these…

Profile photo of georgiapellegrini

Fried Green Tomatoes

Posted by in Step-by-Step Recipes

Every September I always have at least a few green tomatoes dangling in the garden. This is always a good thing because while ripe juicy red tomatoes are wonderful, green tomatoes are much more of a delicacy for me and hard to come by any other time of year. This was the perfect time for me to make this Fried Green Tomato recipe by Stephanie of Cookin' Cowgirl.

Profile photo of EatLiveRun

The Yummiest Peach Cobbler

Posted by in Baking, Step-by-Step Recipes

I may be a chocolate girl, but peaches will always have my heart. They bring me back to my true Southern roots! And though I love a good slice of gooey chocolate cake like the rest of them, if given the choice I will always choose peach cobbler for dessert. Sweet, juicy peaches topped with sweet biscuits and served with vanilla ice cream. It doesn’t really get…

Profile photo of Natalie | Perry's Plate

Ice Cream in a Bag

Posted by in Step-by-Step Recipes

  Really quick ice cream. Like, zero to sweet, frozen goodness in under 15 minutes. NOT too good to be true! When I saw Ice Cream in a Bag by Tasty Kitchen member whatthedogate (Donna) I wondered why I had never tried this before. I thought it might be a fun project to do with […]