The Pioneer Woman Tasty Kitchen
Profile photo of Megan {Country Cleaver}

Roasted Yams with Candied Walnuts and Raisins

Posted by in Holidays

Tasty Kitchen Blog: Roasted Yams with Candied Walnuts and Raisins. Guest post by Megan Keno of Wanna Be a Country Cleaver, recipe submitted by TK member Julia of The Roasted Root.

When it comes to Thanksgiving, my family goes the traditional route: roasted turkey, cranberries from a can, and yams with marshmallows on top. Every once in a while, I think it’s fun to change things up and try new variations on the classics. Now, don’t get me wrong, any time you can get away with popping marshmallows onto a veggie is fine by me, but making that classic a little healthier will leave you feeling slightly less guilty as you unbutton your jeans at the end of the night.

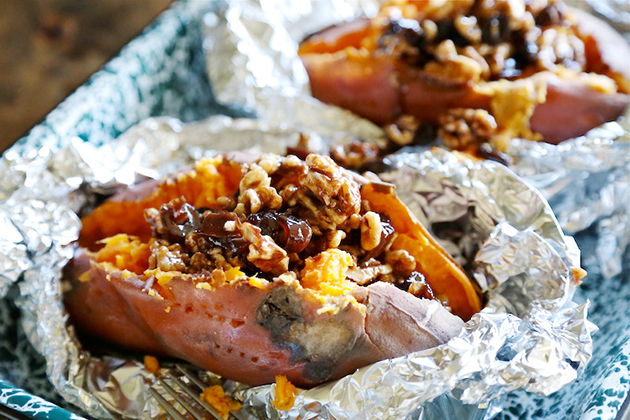
Tasty Kitchen Member Julia really nails this twist on the Thanksgiving classic with these Roasted Yams with Candied Walnuts and Raisins. The walnuts come out deliciously coated and the raisins just sweeten the whole deal. I guarantee you won’t miss the marshmallows this year!


Tasty Kitchen Blog: Roasted Yams with Candied Walnuts and Raisins. Guest post by Megan Keno of Wanna Be a Country Cleaver, recipe submitted by TK member Julia of The Roasted Root.

The last thing you need on Turkey Day is a big list of complex ingredients, so you’re safe with this simple recipe. Line up four yams, walnuts, a little butter, honey, raisins, cinnamon, ginger, cardamom, and salt for this recipe. I didn’t have cardamom on hand, so I omitted it but these yams were packed with warm flavors and didn’t miss a thing.


Tasty Kitchen Blog: Roasted Yams with Candied Walnuts and Raisins. Guest post by Megan Keno of Wanna Be a Country Cleaver, recipe submitted by TK member Julia of The Roasted Root.

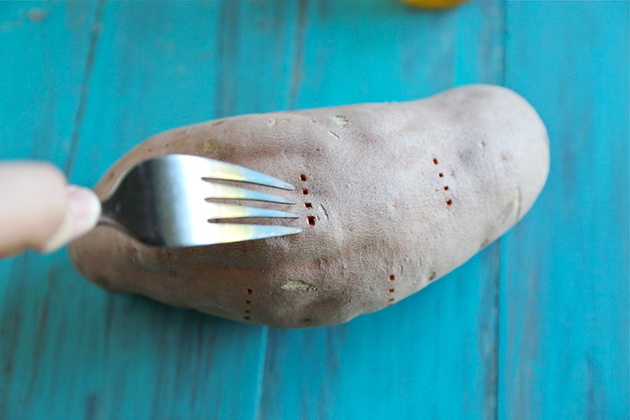
To get started, preheat your oven to 425ºF. While the oven preheats, wash and dry your yams. Using a fork, poke several holes in the skin of the yams so they vent while baking. The last thing you need is them exploding in the oven and creating more of a mess to clean up!


Tasty Kitchen Blog: Roasted Yams with Candied Walnuts and Raisins. Guest post by Megan Keno of Wanna Be a Country Cleaver, recipe submitted by TK member Julia of The Roasted Root.

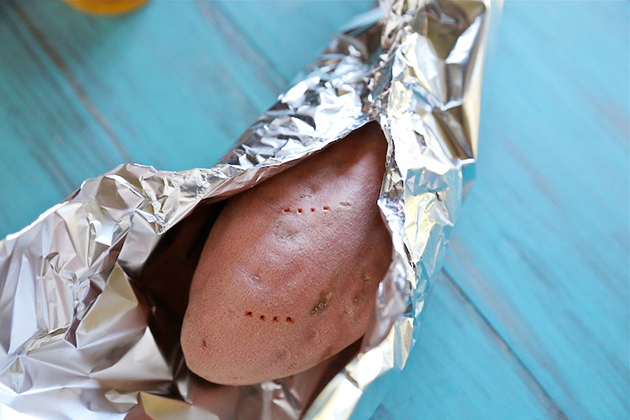
Wrap each yam in aluminum foil, just like a baked potato. Roast the yams until fork tender, about 45–60 minutes depending on the size of your yams.


Tasty Kitchen Blog: Roasted Yams with Candied Walnuts and Raisins. Guest post by Megan Keno of Wanna Be a Country Cleaver, recipe submitted by TK member Julia of The Roasted Root.

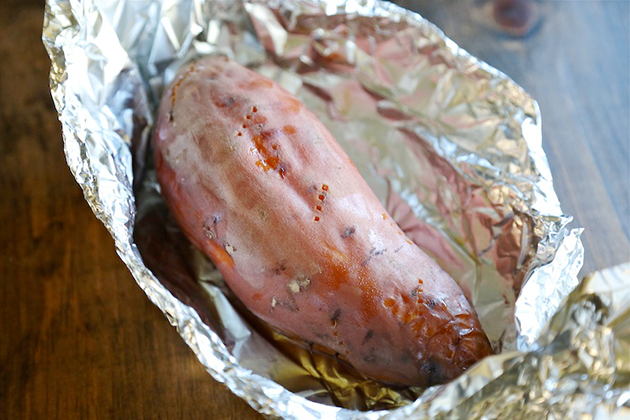
Once you’re able to handle the yams and unwrap them, take a couple of forks and split open the yams to cool slightly. While they rest momentarily, move on to the walnuts.


Tasty Kitchen Blog: Roasted Yams with Candied Walnuts and Raisins. Guest post by Megan Keno of Wanna Be a Country Cleaver, recipe submitted by TK member Julia of The Roasted Root.

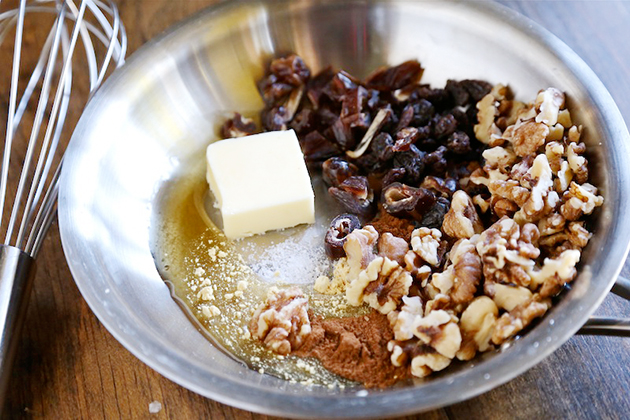
The filling is always the best part, and this is no different. Even better is that it all goes into one pan!


Tasty Kitchen Blog: Roasted Yams with Candied Walnuts and Raisins. Guest post by Megan Keno of Wanna Be a Country Cleaver, recipe submitted by TK member Julia of The Roasted Root.

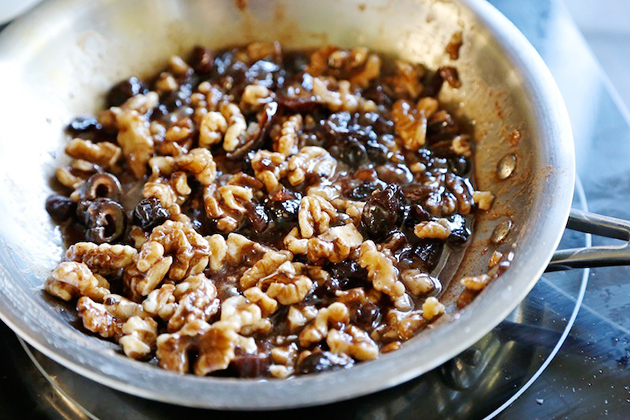
Add the remaining ingredients into a skillet and over medium heat stir the ingredients together until the walnuts are coated completely.


Tasty Kitchen Blog: Roasted Yams with Candied Walnuts and Raisins. Guest post by Megan Keno of Wanna Be a Country Cleaver, recipe submitted by TK member Julia of The Roasted Root.

Once the walnuts are coated, pour them into the middle of the split yams. Serve these immediately. And if by some miracle there are leftovers of these yams, these are great as leftovers right out of the fridge. Not that I would know from experience or anything.

Julia has a boatload of other fantastic recipes in her TK recipe box, and on her site, The Roasted Root. Be sure to check them out for your everyday inspiration and special occasion gems. These turkey burgers with chipotle sauce are where it is at. Thanks, Julia!

What is your favorite side dish during the holidays? Are you a traditionalist, or an adventurer during the holidays? Leave a comment below, or a link to your favorite Tasty Kitchen recipe to inspire the whole TK Community!


Printable Recipe

Roasted Yams with Candied Walnuts & Raisins

See post on Julia {The Roasted Root}’s site!
0.00 Mitt(s) 0 Rating(s)0 votes, average: 0.00 out of 50 votes, average: 0.00 out of 50 votes, average: 0.00 out of 50 votes, average: 0.00 out of 50 votes, average: 0.00 out of 5

Prep Time:

Cook Time:

Difficulty: Easy

Servings: 4

4
x

Print Options

Page size Letter 3x5 4x6
Text Size Small Medium Large
Content Include description
Include prep time, etc.
Show image

Description

Keep Thanksgiving healthy with an easy and nutritious holiday treat: roasted yams topped with candied walnuts, raisins and warm spices!

Ingredients

  • 4 whole Large Yams, Roasted
  • 1-½ cup Walnuts
  • 1 Tablespoon Unsalted Butter
  • ⅓ cups Honey
  • ½ cups Golden Raisins
  • ¾ teaspoons Cinnamon
  • ½ teaspoons Cardamom
  • ½ teaspoons Ground Ginger
  • ½ teaspoons Salt

Preparation Instructions

Preheat the oven to 425ºF

Wash the yams and pat them dry.

Poke yams a few times with a fork, wrap them in aluminum foil and bake them in the oven for 45 to 60 minutes (depending on size; mine took a full hour). The yams are done when thick juice is seeping out of them and they’re soft when poked.

Remove yams from the oven and set aside.

Add remaining ingredients at the same time to a medium-sized skillet and heat to medium or medium high. Stir with a wooden spoon until honey is coating everything, walnuts become fragrant and raisins plump up, about 2 to 3 minutes, being careful not to burn.

Once yams are cool enough to handle, quarter them and top with desired amount of topping.

Serve hot!

A fabulous idea: Give them a squirt of whipped cream or a drizzle of melted butter.


_______________________________________

Megan Keno is the writer and photographer of Country Cleaver, a food blog fueled by Nutella and images of June Cleaver—if June wore cowboy boots and flannel, that is. A self-proclaimed country bum, Megan creates from-scratch recipes that range from simple to sublime and how-to’s to build your cooking repertoire. But she couldn’t do it without the help of her trusty—and furry—sous chef, Huckleberry. He’s a world class floor cleaner.


Profile photo of savorysweetlife

Rocky Road Rice Krispie Treats

Posted by in Step-by-Step Recipes

We’re so happy to have our good friend Alice back on the Tasty Kitchen Blog. She couldn’t have picked a more delicious recipe to prepare than Chrissy and Lauren’s Rocky Road Rice Krispie Treats. Great to see you, Alice!


Tasty Kitchen Blog: Rocky Road Rice Krispie Treats. Guest post by Alice Currah of Savory Sweet Life, recipe submitted by TK members Chrissy and Lauren of From the Yellow Kitchen.

 
Just when I thought I had seen every variation of Rice Krispie treats, Tasty Kitchen members Chrissy/Lauren (Chrissy and Lauren of From the Yellow Kitchen) delightfully prove me wrong with their fun and creative Rocky Road Rice Krispie Treats made with chocolate, Nutella, peanut butter, marshmallows, pecans, and rice cereal. These bars are a chocolate lover’s best friend, especially since no baking is required and they only take minutes to prepare. For the record, I’m partial to these types of recipes because of the “easy factor” with a huge chocolate payoff. Who is with me?!

Let us begin.


Tasty Kitchen Blog: Rocky Road Rice Krispie Treats. Guest post by Alice Currah of Savory Sweet Life, recipe submitted by TK members Chrissy and Lauren of From the Yellow Kitchen.

First you’ll need the following ingredients: chocolate chips, peanut butter, Nutella, mini marshmallows, pecans, and Rice Krispies. The recipe calls for semi-sweet chocolate, but you could easily substitute milk bittersweet, or dark chocolate depending on your personal preferences.


Tasty Kitchen Blog: Rocky Road Rice Krispie Treats. Guest post by Alice Currah of Savory Sweet Life, recipe submitted by TK members Chrissy and Lauren of From the Yellow Kitchen.

Mix the chocolate chips, peanut butter, and Nutella together in a microwave safe bowl. Heat the mixture in the microwave by cooking it in 30-second intervals, making sure to stir the mixture immediately after every interval until the chocolate chips have melted and the mixture is completely smooth.


Tasty Kitchen Blog: Rocky Road Rice Krispie Treats. Guest post by Alice Currah of Savory Sweet Life, recipe submitted by TK members Chrissy and Lauren of From the Yellow Kitchen.

Stir in the pecans, marshmallows, and rice cereal until all the ingredients are well coated with chocolate.


Tasty Kitchen Blog: Rocky Road Rice Krispie Treats. Guest post by Alice Currah of Savory Sweet Life, recipe submitted by TK members Chrissy and Lauren of From the Yellow Kitchen.

I added an additional cup of cereal to mine because I thought it could use a bit more. Use your own judgment in deciding to add more cereal, pecans, or marshmallows.


Tasty Kitchen Blog: Rocky Road Rice Krispie Treats. Guest post by Alice Currah of Savory Sweet Life, recipe submitted by TK members Chrissy and Lauren of From the Yellow Kitchen.

Transfer the mixture to an 8×8 pan or small baking dish coated in non-stick spray.


Tasty Kitchen Blog: Rocky Road Rice Krispie Treats. Guest post by Alice Currah of Savory Sweet Life, recipe submitted by TK members Chrissy and Lauren of From the Yellow Kitchen.

Spread the mixture until it is evenly distributed.


Tasty Kitchen Blog: Rocky Road Rice Krispie Treats. Guest post by Alice Currah of Savory Sweet Life, recipe submitted by TK members Chrissy and Lauren of From the Yellow Kitchen.

Add more pecans and marshmallows on the top and press down.


Tasty Kitchen Blog: Rocky Road Rice Krispie Treats. Guest post by Alice Currah of Savory Sweet Life, recipe submitted by TK members Chrissy and Lauren of From the Yellow Kitchen.

Place the pan in the refrigerator for one hour before cutting into squares. Tip: Forty minutes in the freezer works nicely, too!


Tasty Kitchen Blog: Rocky Road Rice Krispie Treats. Guest post by Alice Currah of Savory Sweet Life, recipe submitted by TK members Chrissy and Lauren of From the Yellow Kitchen.

The texture on these bars is not like a traditional rice cereal treat. It is more on par with a yummy chocolate bar somewhere between fudge and a haystack. I would also recommend allowing the chocolate mixture to cool to room temperature before adding marshmallows, otherwise they melt and you don’t get those gorgeous (whole) marshmallow chunks in the middle of each bar.


Tasty Kitchen Blog: Rocky Road Rice Krispie Treats. Guest post by Alice Currah of Savory Sweet Life, recipe submitted by TK members Chrissy and Lauren of From the Yellow Kitchen.

My suggestions and tips are slightly different than the original recipe (based on my preferences). The original recipe is a good base which can easily handle more amounts of the listed ingredients based on your own personal preferences. Check out their original blog post too, for suggested variations.

Thanks ladies!


Printable Recipe

Rocky Road Rice Krispie Treats

See post on LittleYellowKitchen’s site!
4.86 Mitt(s) 7 Rating(s)7 votes, average: 4.86 out of 57 votes, average: 4.86 out of 57 votes, average: 4.86 out of 57 votes, average: 4.86 out of 57 votes, average: 4.86 out of 5

Prep Time:

Cook Time:

Difficulty: Easy

Servings: 9

9
x

Print Options

Page size Letter 3x5 4x6
Text Size Small Medium Large
Content Include description
Include prep time, etc.
Show image

Description

All the ingredients for a sweet and crispy Rocky Road treat with a little peanut butter and Nutella to top it all off.

Ingredients

  • 1 cup Semi-Sweet Chocolate Chips
  • ½ cups Peanut Butter
  • ½ cups Nutella
  • ½ cups Mini Marshmallows
  • ¼ cups Pecans
  • ¾ cups Rice Krispies

Preparation Instructions

Melt the chocolate chips, peanut butter and nutella for 2 minutes in the microwave. Stir.

Mix in the marshmallows and pecans. Fold in the Rice Krispies.

Pour mixture into a well-greased 8×8 glass baking dish. Refrigerate for 1 hour.

Optional: top with extra pecan pieces and marshmallows.


_______________________________________

Alice Currah is the force behind Sweet Savory Life and Everyday Alice. She and her husband Rob are the proud parents of three children: Abbi, Mimi, and Elli. Alice is the winner of Saveur’s Cover Contest and is on the Forbes.com list of Eight of The Very Best Food Bloggers. She’s also a weekly writer for PBS Parents’ Kitchen Explorers. She’s the best-est.


Profile photo of Erica Lea

Rosemary and Thyme Spread

Posted by in Step-by-Step Recipes

Tasty Kitchen Blog: Rosemary and Thyme Spread. Guest post and recipe from Erica Kastner of Cooking for Seven.

 
Five. Simple. Ingredients. Seriously! That’s all that goes into this ultra-simple yet super-yummy dip. You’ll weep when you realize how easily it comes together. Okay, maybe you won’t have quite that emotional reaction, but you’re sure to be pleased at how quickly you’ll have it on the table.

Let me show you how!


Tasty Kitchen Blog: Rosemary and Thyme Spread. Guest post and recipe from Erica Kastner of Cooking for Seven.

Here are the five simple ingredients: cream cheese, dried rosemary, dried thyme, garlic powder, and freshly ground black pepper.


Tasty Kitchen Blog: Rosemary and Thyme Spread. Guest post and recipe from Erica Kastner of Cooking for Seven.

Place the cream cheese in a bowl and mash it around a bit with a fork.


Tasty Kitchen Blog: Rosemary and Thyme Spread. Guest post and recipe from Erica Kastner of Cooking for Seven.

Add 1 teaspoon of dried rosemary …


Tasty Kitchen Blog: Rosemary and Thyme Spread. Guest post and recipe from Erica Kastner of Cooking for Seven.

1/2 teaspoon dried thyme …


Tasty Kitchen Blog: Rosemary and Thyme Spread. Guest post and recipe from Erica Kastner of Cooking for Seven.

And 1/4 teaspoon of garlic powder.


Tasty Kitchen Blog: Rosemary and Thyme Spread. Guest post and recipe from Erica Kastner of Cooking for Seven.

Grind in some black pepper.


Tasty Kitchen Blog: Rosemary and Thyme Spread. Guest post and recipe from Erica Kastner of Cooking for Seven.

Here are your five ingredients in all their glory.


Tasty Kitchen Blog: Rosemary and Thyme Spread. Guest post and recipe from Erica Kastner of Cooking for Seven.

Mash it around with your fork until well mixed.


Tasty Kitchen Blog: Rosemary and Thyme Spread. Guest post and recipe from Erica Kastner of Cooking for Seven.

All mixed up.


Tasty Kitchen Blog: Rosemary and Thyme Spread. Guest post and recipe from Erica Kastner of Cooking for Seven.

Spread on your favorite crackers. Enjoy!


Tasty Kitchen Blog: Rosemary and Thyme Spread. Guest post and recipe from Erica Kastner of Cooking for Seven.

 
Notes:
 
1. This spread is best if you allow it to come to room temperature. This really allows you to taste the flavors.

2. It’s best to choose crackers without a lot of extra flavor so they don’t overpower the dip.

3. If you wish, you could try using fresh ingredients instead of dry. However, you will need to increase the amounts since dried herbs are more “concentrated.”


Printable Recipe

Rosemary & Thyme Spread

See post on Erica Lea’s site!
5.00 Mitt(s) 4 Rating(s)4 votes, average: 5.00 out of 54 votes, average: 5.00 out of 54 votes, average: 5.00 out of 54 votes, average: 5.00 out of 54 votes, average: 5.00 out of 5

Prep Time:

Cook Time:

Difficulty: Easy

Servings: 8

8
x

Print Options

Page size Letter 3x5 4x6
Text Size Small Medium Large
Content Include description
Include prep time, etc.
Show image

Description

A delicious blend of spices and cream cheese.

Ingredients

  • 8 ounces, weight Cream Cheese
  • 1 teaspoon Dried Rosemary
  • ½ teaspoons Dried Thyme
  • ¼ teaspoons Garlic Powder
  • ¼ teaspoons Ground Black Pepper

Preparation Instructions

Mix all ingredients together thoroughly. Taste and adjust seasonings if needed. Serve with crackers, toast, or crostini.


_______________________________________

Erica Berge shares her wonderful recipes and amazing food photography on her blog, Cooking for Seven. She also writes about crafts and posts more of her beautiful photography in her personal blog, EricaLea.com. There really isn’t much that this amazing young lady can’t do, and we’re thrilled she does some of it here.


Profile photo of missamy

Rosemary Turkey Pockets

Posted by in Step-by-Step Recipes

Tasty Kitchen Blog: Rosemary Turkey Pockets. Guest post by Amy Johnson of She Wears Many Hats, recipe submitted by TK member punkrebelmama.

 
Tasty Kitchen is full of recipes that bring back memories from potlucks, parties and shindigs long past. As I was meandering through the Tasty Kitchen offerings, I found this recipe for Rosemary Chicken Pockets, submitted by Tasty Kitchen member, punkrebelmama. It reminded me of a recipe my mother used to make each year using leftover turkey. It’s a quick recipe, using simple ingredients. And the pockets would be a nice addition to a party spread, brunch or even dinner. Even though the original recipe calls for cooked chicken, I substituted leftover turkey from a turkey breast we just roasted.

Wanna see how easy it is?


Tasty Kitchen Blog: Rosemary Turkey Pockets. Guest post by Amy Johnson of She Wears Many Hats, recipe submitted by TK member punkrebelmama.

You’ll need cooked turkey (or chicken), black pepper, poultry seasoning, seasoned salt, dried rosemary, cream cheese, and canned croissant dough. If you’re not a rosemary fan, you can easily substitute other seasonings or herbs. An Italian combo of herbs would be perfect.


Tasty Kitchen Blog: Rosemary Turkey Pockets. Guest post by Amy Johnson of She Wears Many Hats, recipe submitted by TK member punkrebelmama.

Begin by softening the cream cheese in a bowl.


Tasty Kitchen Blog: Rosemary Turkey Pockets. Guest post by Amy Johnson of She Wears Many Hats, recipe submitted by TK member punkrebelmama.

Add the seasonings.


Tasty Kitchen Blog: Rosemary Turkey Pockets. Guest post by Amy Johnson of She Wears Many Hats, recipe submitted by TK member punkrebelmama.

Combine the seasonings and cream cheese well.


Tasty Kitchen Blog: Rosemary Turkey Pockets. Guest post by Amy Johnson of She Wears Many Hats, recipe submitted by TK member punkrebelmama.

Next add the turkey (or chicken) and combine well.


Tasty Kitchen Blog: Rosemary Turkey Pockets. Guest post by Amy Johnson of She Wears Many Hats, recipe submitted by TK member punkrebelmama.

On a baking sheet, unroll croissant dough triangles.


Tasty Kitchen Blog: Rosemary Turkey Pockets. Guest post by Amy Johnson of She Wears Many Hats, recipe submitted by TK member punkrebelmama.

Place a dollop (about 1/4 cup) of filling onto each triangle and begin to fold the edges over the filling.


Tasty Kitchen Blog: Rosemary Turkey Pockets. Guest post by Amy Johnson of She Wears Many Hats, recipe submitted by TK member punkrebelmama.

Close up like a pretty little package, pinching the sides shut to seal completely. The croissant dough will stretch quite a bit, so make sure you’ve sealed it up good and tight.


Tasty Kitchen Blog: Rosemary Turkey Pockets. Guest post by Amy Johnson of She Wears Many Hats, recipe submitted by TK member punkrebelmama.

I wrapped each turkey pocket differently from the next. Here’s another pocket wrapping.


Tasty Kitchen Blog: Rosemary Turkey Pockets. Guest post by Amy Johnson of She Wears Many Hats, recipe submitted by TK member punkrebelmama.

See? They all look completely different. I’m kinda random like that, but if you like uniformity, go for it.

Bake at 350°F as directed on the croissant package. Please note: I actually baked these for a few more minutes than directed, until they were just beginning to brown.


Tasty Kitchen Blog: Rosemary Turkey Pockets. Guest post by Amy Johnson of She Wears Many Hats, recipe submitted by TK member punkrebelmama.

Here they are.


Tasty Kitchen Blog: Rosemary Turkey Pockets. Guest post by Amy Johnson of She Wears Many Hats, recipe submitted by TK member punkrebelmama.

I like how they’re all unique. Look, the top right one looks like a peep, one of those marshmallow bird thingys. For such little effort, they look pretty fancy, huh? And tasty too!


Tasty Kitchen Blog: Rosemary Turkey Pockets. Guest post by Amy Johnson of She Wears Many Hats, recipe submitted by TK member punkrebelmama.

 
A big thanks and virtual hug to punkrebelmama for submitting this one. Yum!


Printable Recipe

Rosemary Chicken Pockets

4.28 Mitt(s) 7 Rating(s)7 votes, average: 4.28 out of 57 votes, average: 4.28 out of 57 votes, average: 4.28 out of 57 votes, average: 4.28 out of 57 votes, average: 4.28 out of 5

Prep Time:

Cook Time:

Difficulty: Easy

Servings: 8

8
x

Print Options

Page size Letter 3x5 4x6
Text Size Small Medium Large
Content Include description
Include prep time, etc.
Show image

Description

Easy, cheesy, impressive and simple! It’s the perfect brunch or party food. And you can adjust the amount more or less to taste!

Ingredients

  • 1 package Cream Cheese (8 Ounces)
  • 1 can (9 Oz. Size) Cooked Chicken Chunks
  • 2 Tablespoons Dried Rosemary
  • 1 teaspoon Black Pepper
  • 2 dashes Salt (Preferably Seasoned Salt)
  • 1 dash Poultry Seasoning
  • 1 package (8 Oz. Size) Croissant Dough

Preparation Instructions

Pre-heat oven to 350 degrees.

Soften the cream cheese for easier mixing. Add the chicken and seasonings and mix well.

Unroll croissant dough triangles. Place a dollop of filling onto each triangle. Fold over edges and pinch shut to enclose completely. Place on baking sheet. Repeat with the remaining filling and croissant triangles.

Bake as directed on croissant package.


_______________________________________

Amy Johnson is a blogger who writes about food, travel, the home (both inside and out), and various observations and random musings about anything and everything. Visit her blog She Wears Many Hats for a dose of deliciousness, practicality, hilarity, or just plain fun. She lives in South Carolina with her husband and two children.


Profile photo of twopeasandtheirpod

S’more Rice Krispie Squares

Posted by in Step-by-Step Recipes

  I love summer, but being pregnant during the summer is not my favorite. It is extra hot these days. Every day I am torn—do I turn on the oven to bake or keep the house cool? My love for baking and sweets usually wins, but then I have to suffer through the heat. I […]

Profile photo of twopeasandtheirpod

S’mores Pie

Posted by in Baking, Step-by-Step Recipes

Note: We’re bringing back this oldie but goodie, just in time for summer. S’mores, baby. In pie form. Just too dang irresistible.     Summer isn’t summer without ooey, gooey S’mores! There is nothing better than sitting around a bonfire with some graham crackers, mallows, and Hershey bars. I love traditional S’mores, but I am…

Profile photo of EatLiveRun

Salted Chocolate and Pecan Cake Bars

Posted by in Baking, Step-by-Step Recipes

  If you haven’t noticed yet, I really have a thing for sweet and savory baked goods. I’m of the firm belief that a little sea salt sprinkled on top of a piece of cake or a brownie makes everything better, and for that reason, was incredibly excited when I found these Salted Chocolate and […]

Profile photo of EatLiveRun

Salted Fudge Brownies

Posted by in Baking, Step-by-Step Recipes

I’m so excited to introduce Jenna of Eat, Live, Run as our newest contributor here at the Tasty Kitchen Blog. She’s a doll who dearly loves the TK community. She also has quite the recipe box and it just keeps growing every day. We’re absolutely thrilled to have her! –Ree     The first moment […]