The Pioneer Woman Tasty Kitchen
Profile photo of missamy

Pasta Carbonara with Corn and Chiles

Posted by in Step-by-Step Recipes

Tasty Kitchen Blog: Corn Chile Pasta Carbonara. Guest post by Amy Johnson of She Wears Many Hats, recipe submitted by TK member Erin of Dinners, Dishes and Desserts.

 
Nothing tempts my palate more than a tasty plate of pasta, and Tasty Kitchen is chock full of fabulous pasta recipes. There’s so many to choose from. How do you ever begin to decide? Decisions, decisions …

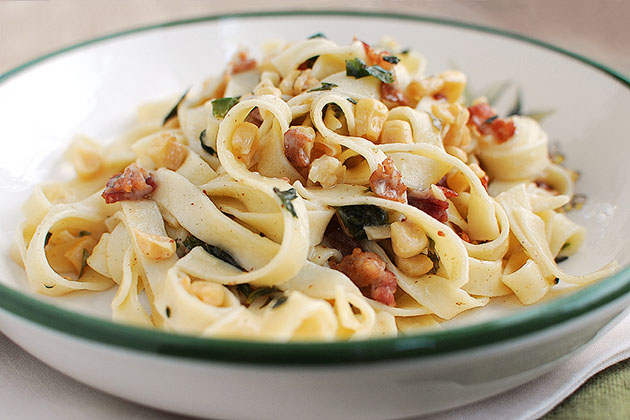
Since I still have jalapeño coming out of my ears, I decided to try a version of pasta carbonara from Erin that she adapted from Everyday with Rachael Ray called Pasta Carbonara with Corn and Chiles. It combines sweet corn, spicy jalapeño, with the savory traditional carbonara ingredients to create a perfect pasta bite.


Tasty Kitchen Blog: Corn Chile Pasta Carbonara. Guest post by Amy Johnson of She Wears Many Hats, recipe submitted by TK member Erin of Dinners, Dishes and Desserts.

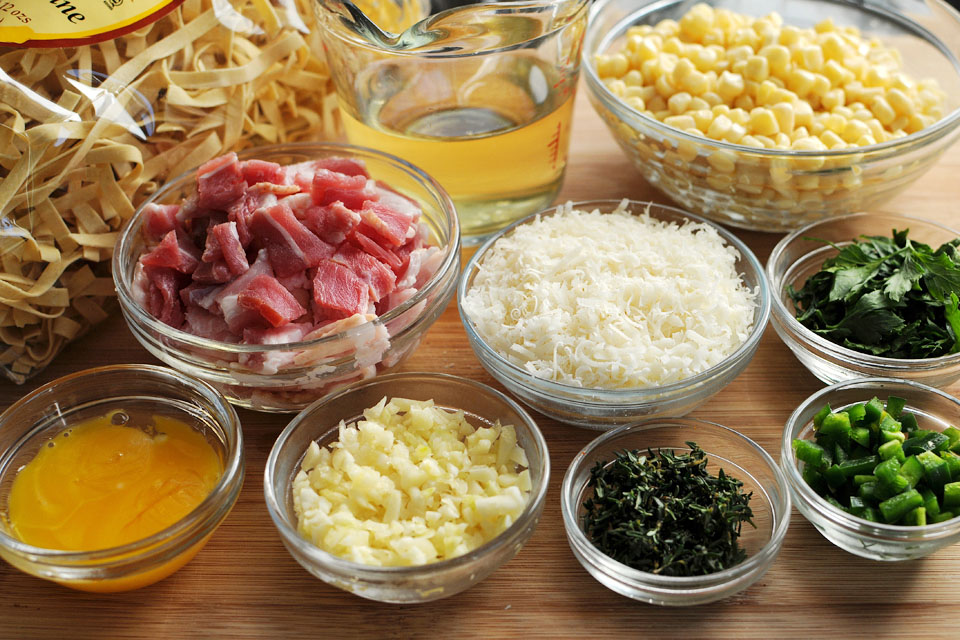
Here’s what you’ll need: egg noodles (or pasta of choice), bacon, sweet corn, jalapeño, garlic, thyme, parsley, white wine, egg yolks, parmesan cheese, and of course, salt and pepper to taste.

Begin by cooking your pasta according to package directions. Before draining the pasta, you’ll need to save one cup of the pasta water for use in the recipe. Be sure to read through the full printable recipe for detailed directions for amounts, etcetera.


Tasty Kitchen Blog: Corn Chile Pasta Carbonara. Guest post by Amy Johnson of She Wears Many Hats, recipe submitted by TK member Erin of Dinners, Dishes and Desserts.

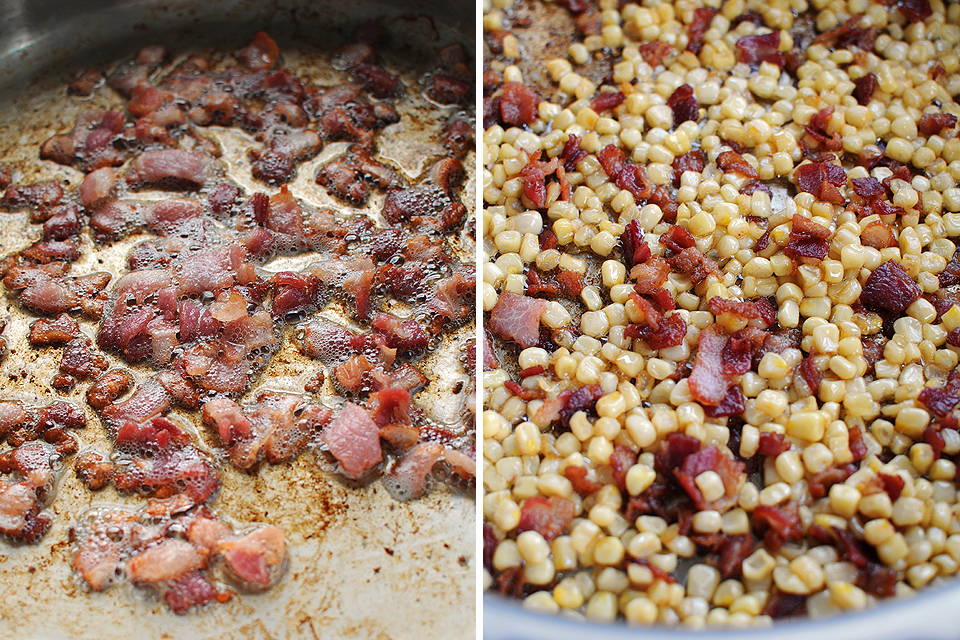
While the pasta is cooking, brown the bacon over medium-high heat.

Add the corn and let it cook until slightly beginning to brown on the edges, about 5 minutes.

The recipe calls for fresh corn, scraped off the cob. I didn’t have any so I substituted canned sweet corn. (Egads!) It worked just fine, but when available, fresh is always better.


Tasty Kitchen Blog: Corn Chile Pasta Carbonara. Guest post by Amy Johnson of She Wears Many Hats, recipe submitted by TK member Erin of Dinners, Dishes and Desserts.

Next goes in the jalapeño, garlic and thyme. Stir it all up and cook for another couple of minutes.


Tasty Kitchen Blog: Corn Chile Pasta Carbonara. Guest post by Amy Johnson of She Wears Many Hats, recipe submitted by TK member Erin of Dinners, Dishes and Desserts.

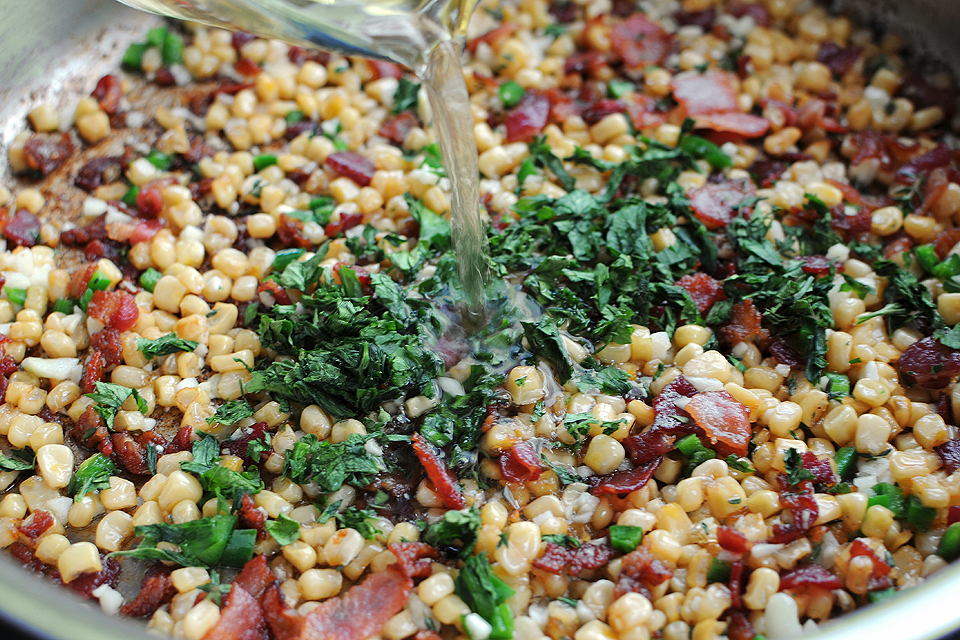
The parsley and wine get mixed in next. Then simmer on low heat while you prepare the rest of the dish.


Tasty Kitchen Blog: Corn Chile Pasta Carbonara. Guest post by Amy Johnson of She Wears Many Hats, recipe submitted by TK member Erin of Dinners, Dishes and Desserts.

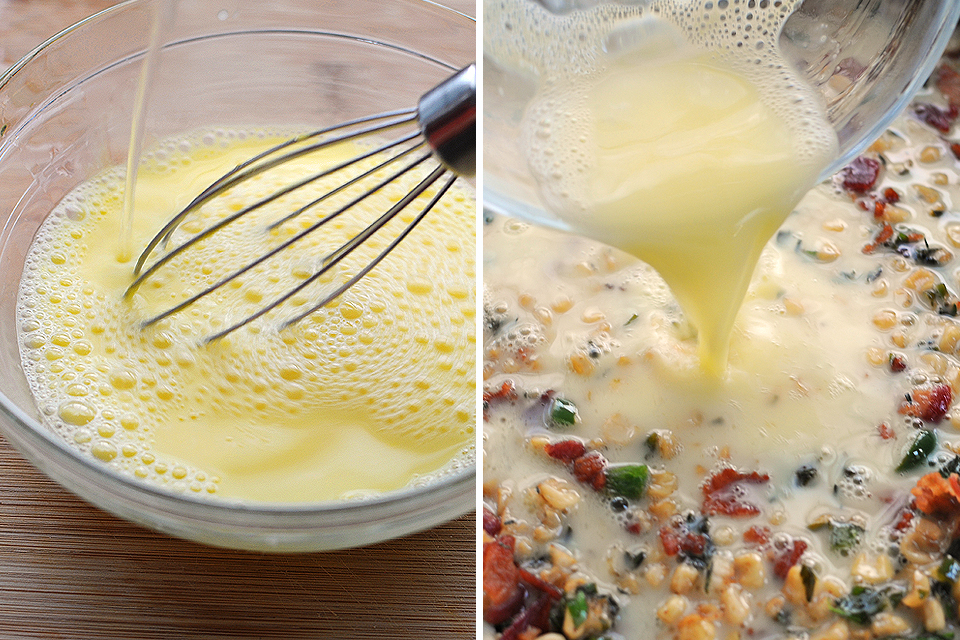
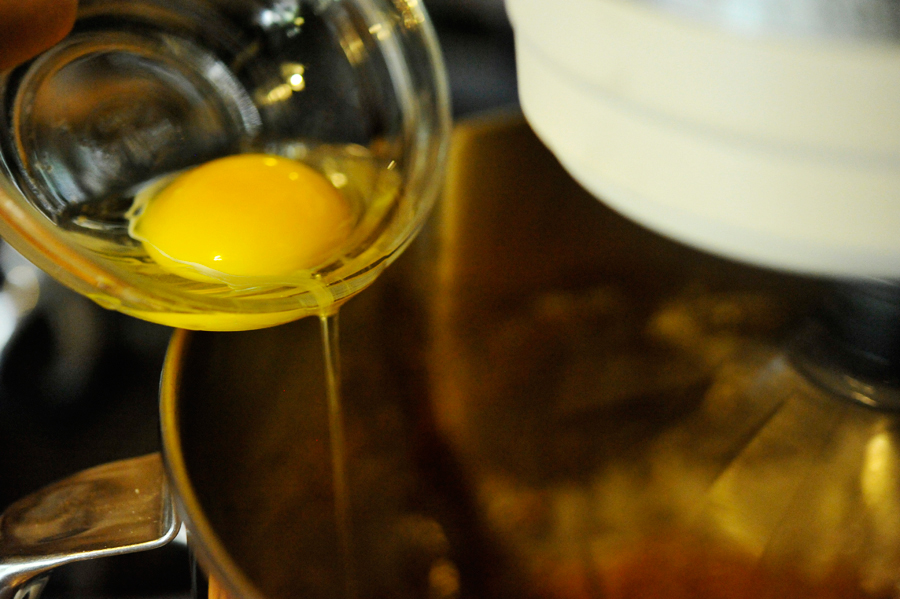
Beat the egg yolks in a small bowl, then slowly whisk in the reserved cup of pasta water to temper them, so they slowly warm without scrambling. Take your time, then add to the mixture.


Tasty Kitchen Blog: Corn Chile Pasta Carbonara. Guest post by Amy Johnson of She Wears Many Hats, recipe submitted by TK member Erin of Dinners, Dishes and Desserts.

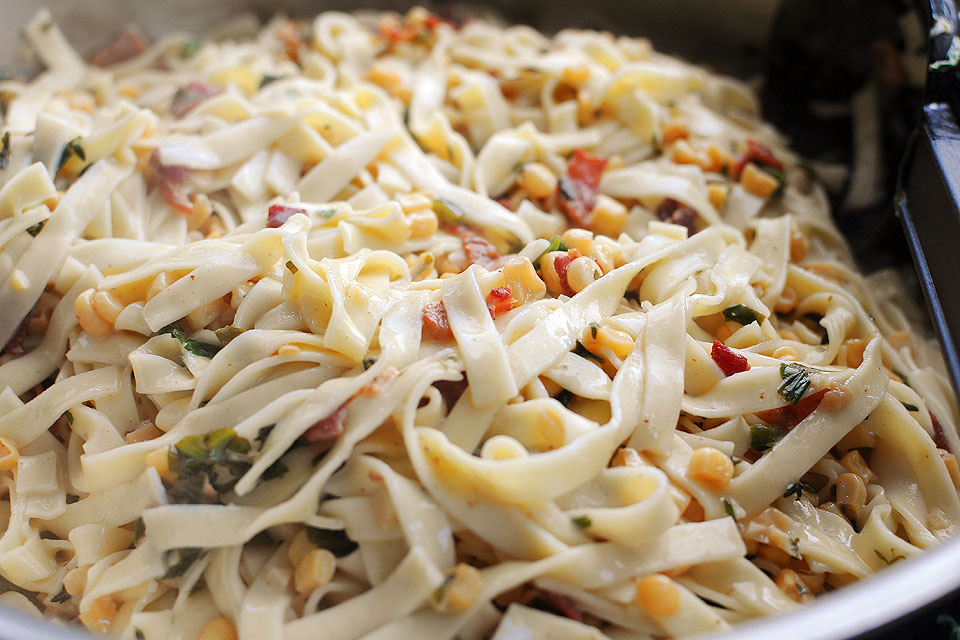
Add the pasta and toss it all well to coat. Try very hard to not dive in now because you have one more thing to add: the cheese.


Tasty Kitchen Blog: Corn Chile Pasta Carbonara. Guest post by Amy Johnson of She Wears Many Hats, recipe submitted by TK member Erin of Dinners, Dishes and Desserts.

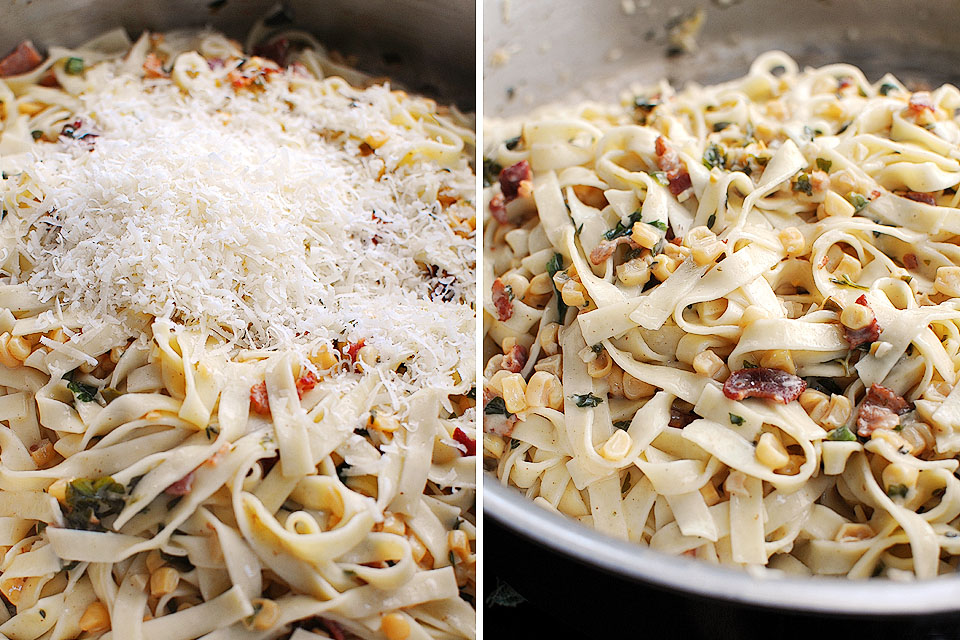
Cut the heat, in goes the cheese, and toss until all pasta is coated well.
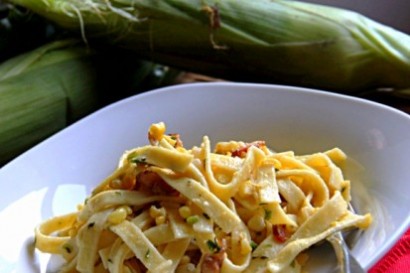
Yummy. Yum. Yum.


Tasty Kitchen Blog: Corn Chile Pasta Carbonara. Guest post by Amy Johnson of She Wears Many Hats, recipe submitted by TK member Erin of Dinners, Dishes and Desserts.

I honestly could enjoy this a couple of times a week, or, truth be told, everyday. But all good things in moderation right?

Thanks Erin for adding this one to the pasta mix here on Tasty Kitchen. My kitchen was definitely a tasty place to be with this dish. Visit Erin’s blog Dinners, Dishes and Desserts for more deliciousness!

Remember to check out the full printable recipe below for all measurements and more detailed instructions.


Printable Recipe

Pasta Carbonara with Corn and Chiles

See post on Erin’s site!
4.00 Mitt(s) 1 Rating(s)1 vote, average: 4.00 out of 51 vote, average: 4.00 out of 51 vote, average: 4.00 out of 51 vote, average: 4.00 out of 51 vote, average: 4.00 out of 5

Prep Time:

Cook Time:

Difficulty: Easy

Servings: 4

4
x

Print Options

Page size Letter 3x5 4x6
Text Size Small Medium Large
Content Include description
Include prep time, etc.
Show image

Description

Creamy Pasta Carbonara with Fresh Sweet Corn and a little kick!

Ingredients

  • 1 pound Egg Noodles
  • ⅓ pounds Bacon, Diced
  • 4 ears Sweet Corn, Scraped
  • ½ whole Jalapeno, Seeded And Chopped
  • 6 cloves Garlic, Chopped
  • 1 Tablespoon Fresh Thyme
  • ¼ cups Fresh Parsley, Chopped
  • ½ cups Dry White Wine
  • 3 whole Egg Yolks
  • ½ cups Parmesan Cheese

Preparation Instructions

Cook the pasta according to the package directions. Reserve 1 cup of the cooking liquid.

While the pasta is cooking, over medium-high heat, brown the bacon. Add the corn and lightly brown the edges. After about 5 minutes, add the jalapeno, garlic, and thyme. Stir for 2 minutes. Add the parsley and wine. Simmer on low heat.

In a small bowl, beat the eggs. Slowly add in the reserved cooking liquid to temper them. Add the pasta and egg yolks to the corn mixture and toss. Remove from heat, add the cheese and toss vigorously to form a silky sauce, 1 to 2 minutes.

Top with extra cheese and chives if desired.


_______________________________________

Amy Johnson is a blogger who writes about food, travel, the home (both inside and out), and various observations and random musings about anything and everything. Visit her blog She Wears Many Hats for a dose of deliciousness, practicality, hilarity, or just plain fun. She lives in South Carolina with her husband and two children.


Profile photo of georgiapellegrini

PB&J Sandwich Cookies

Posted by in Baking, Step-by-Step Recipes

Tasty Kitchen Blog: Peanut Butter and Jelly Sandwich Cookies. Guest post by Georgia Pellegrini, recipe submitted by TK member Erica of Sweet Tooth.

 
I’m not much of a baker but these Peanut Butter and Jelly Sandwich Cookies made me smile when I saw them posted here by Erica.

I’ve seen a similar recipe posted in an Australian blog Raspberri Cupcakes that uses sugar cookie dough and peanut butter and jelly sandwiched in between; Erica’s recipe incorporates the peanut butter into the dough, making one delicious peanut butter sandwich cookie.

Peanut butter and jelly sandwich cookies are such a playful sweet treat to serve. They are delicious and, best of all, they are easy to make.


Tasty Kitchen Blog: Peanut Butter and Jelly Sandwich Cookies. Guest post by Georgia Pellegrini, recipe submitted by TK member Erica of Sweet Tooth.

You will need: peanut butter, granulated sugar, light brown sugar, an egg, milk, vanilla extract, flour, baking powder, baking soda, vodka (or some alcohol), brown food coloring (you can mix red, green, and yellow), and your favorite jelly.


Tasty Kitchen Blog: Peanut Butter and Jelly Sandwich Cookies. Guest post by Georgia Pellegrini, recipe submitted by TK member Erica of Sweet Tooth.

In an electric mixer, add the peanut butter.


Tasty Kitchen Blog: Peanut Butter and Jelly Sandwich Cookies. Guest post by Georgia Pellegrini, recipe submitted by TK member Erica of Sweet Tooth.

Next add the white sugar …


Tasty Kitchen Blog: Peanut Butter and Jelly Sandwich Cookies. Guest post by Georgia Pellegrini, recipe submitted by TK member Erica of Sweet Tooth.

Then the brown sugar.


Tasty Kitchen Blog: Peanut Butter and Jelly Sandwich Cookies. Guest post by Georgia Pellegrini, recipe submitted by TK member Erica of Sweet Tooth.

Then slowly add a combination of the milk and vanilla, along with the egg.


Tasty Kitchen Blog: Peanut Butter and Jelly Sandwich Cookies. Guest post by Georgia Pellegrini, recipe submitted by TK member Erica of Sweet Tooth.

While the wet ingredients mix together, combine your dry ingredients in a separate bowl: the flour, baking soda, and baking powder.


Tasty Kitchen Blog: Peanut Butter and Jelly Sandwich Cookies. Guest post by Georgia Pellegrini, recipe submitted by TK member Erica of Sweet Tooth.

Slowly add it to the mixer as it blends with the wet ingredients. Use a spatula to scrape the sides so that it mixes evenly until you have a uniform cookie dough.


Tasty Kitchen Blog: Peanut Butter and Jelly Sandwich Cookies. Guest post by Georgia Pellegrini, recipe submitted by TK member Erica of Sweet Tooth.

Divide the dough in half and roll it into logs. Make an indentation along the top as well as along the sides, so that it looks like a very long loaf of bread. Wrap it in plastic wrap and put it in the refrigerator for an hour or overnight.

Once it is cold, remove it from the plastic and with a sharp knife slice ¼-inch pieces of “bread.”


Tasty Kitchen Blog: Peanut Butter and Jelly Sandwich Cookies. Guest post by Georgia Pellegrini, recipe submitted by TK member Erica of Sweet Tooth.

Lay them on a silicone baking pad or greased parchment over a sheet tray. Bake them in the oven at 350 degrees F for 7-9 minutes.


Tasty Kitchen Blog: Peanut Butter and Jelly Sandwich Cookies. Guest post by Georgia Pellegrini, recipe submitted by TK member Erica of Sweet Tooth.

They will be slightly puffy when they first come out but will deflate as they cool.


Tasty Kitchen Blog: Peanut Butter and Jelly Sandwich Cookies. Guest post by Georgia Pellegrini, recipe submitted by TK member Erica of Sweet Tooth.

Meanwhile, mix your food coloring to make brown paint for the crust. I used 2 drops of red, 1 drop of green and 1 drop of yellow.

And then I mixed it with a touch of whiskey. You could also use any other alcohol. This works better than water because it evaporates rather than turns soggy the way water would!


Tasty Kitchen Blog: Peanut Butter and Jelly Sandwich Cookies. Guest post by Georgia Pellegrini, recipe submitted by TK member Erica of Sweet Tooth.

After you paint the edges of the cookies with brown food coloring, lay one piece on a dish and spread it with jelly. Then add another half on top.


Tasty Kitchen Blog: Peanut Butter and Jelly Sandwich Cookies. Guest post by Georgia Pellegrini, recipe submitted by TK member Erica of Sweet Tooth.

Keep making your cookie sandwiches until all of your pairs have been assembled.


Tasty Kitchen Blog: Peanut Butter and Jelly Sandwich Cookies. Guest post by Georgia Pellegrini, recipe submitted by TK member Erica of Sweet Tooth.

It will be a tray of beautiful sandwiches that may look like savory finger foods but are really sweet treats. These will trick your guests in a delightful way, and will thrill your kids when they see these in their lunch boxes.


Tasty Kitchen Blog: Peanut Butter and Jelly Sandwich Cookies. Guest post by Georgia Pellegrini, recipe submitted by TK member Erica of Sweet Tooth.

This was such an easy, whimsical, and delicious recipe. It made me happy. Thank you to Erica for sharing it with us! Be sure to check out her website Erica’s Sweet Tooth for other sweet treats.


Printable Recipe

Peanut Butter and Jelly Sandwich Cookies

See post on sweettooth’s site!
4.00 Mitt(s) 1 Rating(s)1 vote, average: 4.00 out of 51 vote, average: 4.00 out of 51 vote, average: 4.00 out of 51 vote, average: 4.00 out of 51 vote, average: 4.00 out of 5

Prep Time:

Cook Time:

Difficulty: Easy

Servings: 20

20
x

Print Options

Page size Letter 3x5 4x6
Text Size Small Medium Large
Content Include description
Include prep time, etc.
Show image

Description

Peanut butter sugar cookies made to look like slices of bread and filled with jelly—the perfect back to school treat!

Ingredients

  • FOR THE PEANUT BUTTER COOKIES:
  • ½ cups Creamy Peanut Butter
  • ¼ cups Plus 2 Tablespoons, Granulated Sugar
  • ¼ cups Plus 2 Tablespoons Light Brown Sugar
  • 1 whole Egg
  • 2-½ Tablespoons Milk
  • ½ teaspoons Vanilla Extract
  • 1-¼ cup All-purpose Flour
  • ¼ teaspoons Baking Powder
  • ¼ teaspoons Baking Soda
  • FOR THE CRUST:
  • 2 Tablespoons Vodka
  • 2 drops Brown Food Coloring
  • FOR THE FILLING:
  • ¼ cups Jelly (flavor Of Your Choice)

Preparation Instructions

In the bowl of an electric mixer, beat together the peanut butter and sugars until light and fluffy, 2-3 minutes. Beat in the egg, milk, and vanilla until well combined.

In a separate bowl, whisk together the flour, baking powder, and baking soda. With the mixer on low, gradually add the flour mixture to the peanut butter mixture and beat until just combined.

Divide dough in half and roll each half into a rectangular block. Using your fingers, pinch along the middle of the top and along the two sides to form indentations along the length of the block so the dough looks like a bread loaf. Wrap each half in Saran wrap and refrigerate at least 1 hour or overnight.

When dough is chilled, unwrap the dough and use a sharp knife to cut slices of “bread” in 1/4″ thickness. Place 1″ apart on a parchment paper or Silpat-lined cookie sheet and bake for 7-9 minutes, or until edges just begin to brown. Cool for 5 minutes on the pan, then transfer to a wire rack to cool completely.

To paint crusts onto the baked cookies, combine vodka and brown food coloring. Use a clean paint brush to brush mixture on the sides of all the cookies. Using vodka instead of water will prevent the cookies from getting soggy since the alcohol will evaporate!

To make the sandwiches, take one cookie slice and spread with jelly. Match cookie with another slice of similar size and make your PB&J sandwich!


_______________________________________

There’s so much to say about Georgia, we don’t know where to start. Leaving Wall Street for the French Culinary Institute, followed by a stint at the Gramercy Tavern and La Chassagnette in France, her passion for food and food traditions are evident and inspiring. Visit her site at Georgia Pellegrini, where you’ll find more recipes, photos, learn all about her wonderful books Girl Hunter and Food Heroes, and enjoy her latest adventures.


Profile photo of Natalie | Perry's Plate

Peaches and Cream Crumble Bars

Posted by in Baking, Step-by-Step Recipes

Tasty Kitchen Blog: Peaches and Cream Crumble Bars. Guest post by Natalie Perry of Perry's Plate, recipe submitted by TK member Courtney of Bake, Eat, Repeat.

 
I think I should come clean before I start telling you about this recipe.

Confession: I really don’t like peaches. Like, despise them. I like peaches about as much as Ree likes bananas.

What business did I have making a dessert with peaches? Well, it was all about love, people. The rest of my family loves peaches, and I love my family. I had a few peaches from my last farmers’ market trip that needed to be used ASAP on a day when I needed to make a potluck dessert. It was destiny, I suppose.

This recipe is a combination of a cheesecake and a crumble, and I think you may even substitute a different kind of fruit for the peaches (pears, apples, berries, etc.). Thank you TK member Courtney (who blogs at Bake, Eat, Repeat) for posting these Peaches and Cream Crumble Bars!


Tasty Kitchen Blog: Peaches and Cream Crumble Bars. Guest post by Natalie Perry of Perry's Plate, recipe submitted by TK member Courtney of Bake, Eat, Repeat.

Let’s begin by making a few preparations. Oven at 350ºF? Check. Baking dish lined with foil and greased? Check.


Tasty Kitchen Blog: Peaches and Cream Crumble Bars. Guest post by Natalie Perry of Perry's Plate, recipe submitted by TK member Courtney of Bake, Eat, Repeat.

To make the crust you only need three things: flour, brown sugar, and butter. (If you use unsalted butter, you’ll need to add a bit of salt.)


Tasty Kitchen Blog: Peaches and Cream Crumble Bars. Guest post by Natalie Perry of Perry's Plate, recipe submitted by TK member Courtney of Bake, Eat, Repeat.

Add the butter to a medium-sized mixing bowl. (Or the work bowl of your best friend—er, I mean stand mixer. Please tell me you named yours, too?)


Tasty Kitchen Blog: Peaches and Cream Crumble Bars. Guest post by Natalie Perry of Perry's Plate, recipe submitted by TK member Courtney of Bake, Eat, Repeat.

Add the brown sugar, then beat it to soften the butter and incorporate the sugar.


Tasty Kitchen Blog: Peaches and Cream Crumble Bars. Guest post by Natalie Perry of Perry's Plate, recipe submitted by TK member Courtney of Bake, Eat, Repeat.

Add the flour.


Tasty Kitchen Blog: Peaches and Cream Crumble Bars. Guest post by Natalie Perry of Perry's Plate, recipe submitted by TK member Courtney of Bake, Eat, Repeat.

Mix well, scraping down the sides. At first it’ll look really crumbly. Then it will look like …


Tasty Kitchen Blog: Peaches and Cream Crumble Bars. Guest post by Natalie Perry of Perry's Plate, recipe submitted by TK member Courtney of Bake, Eat, Repeat.

This. A beautiful, somewhat-sticky mass about the consistency of cookie dough.


Tasty Kitchen Blog: Peaches and Cream Crumble Bars. Guest post by Natalie Perry of Perry's Plate, recipe submitted by TK member Courtney of Bake, Eat, Repeat.

Press the dough evenly into the prepared baking dish and bake it for about 20 minutes. It should begin to turn golden brown on the edges and the middle should be set.


Tasty Kitchen Blog: Peaches and Cream Crumble Bars. Guest post by Natalie Perry of Perry's Plate, recipe submitted by TK member Courtney of Bake, Eat, Repeat.

Meanwhile you can start on the other components. First, the filling. You’ll need three ripe peaches, eggs, peach jam (thanks Grandma!), cream cheese, sour cream, flour, and vanilla.

You’ll need some sugar, too. Just pretend it’s in the photo, snuggled in between the sour cream and cream cheese. Yep, right there.


Tasty Kitchen Blog: Peaches and Cream Crumble Bars. Guest post by Natalie Perry of Perry's Plate, recipe submitted by TK member Courtney of Bake, Eat, Repeat.

Put the cream cheese and sour cream into a mixing bowl.


Tasty Kitchen Blog: Peaches and Cream Crumble Bars. Guest post by Natalie Perry of Perry's Plate, recipe submitted by TK member Courtney of Bake, Eat, Repeat.

Beat the daylights out of it until you have a relatively lump-free mixture. Be sure to scrape down the sides a few times to get those tricky parts in the bottom.


Tasty Kitchen Blog: Peaches and Cream Crumble Bars. Guest post by Natalie Perry of Perry's Plate, recipe submitted by TK member Courtney of Bake, Eat, Repeat.

Add the sugar and the flour …


Tasty Kitchen Blog: Peaches and Cream Crumble Bars. Guest post by Natalie Perry of Perry's Plate, recipe submitted by TK member Courtney of Bake, Eat, Repeat.

And the eggs and vanilla.


Tasty Kitchen Blog: Peaches and Cream Crumble Bars. Guest post by Natalie Perry of Perry's Plate, recipe submitted by TK member Courtney of Bake, Eat, Repeat.

Like before, beat the daylights out of it until you have a silky-smooth batter. (Scrape down the sides again!)


Tasty Kitchen Blog: Peaches and Cream Crumble Bars. Guest post by Natalie Perry of Perry's Plate, recipe submitted by TK member Courtney of Bake, Eat, Repeat.

Next, let’s get the topping done. In a small bowl, add the flour, brown sugar, cinnamon, and ginger. (If you use unsalted butter, add 1/4 teaspoon of salt.)


Tasty Kitchen Blog: Peaches and Cream Crumble Bars. Guest post by Natalie Perry of Perry's Plate, recipe submitted by TK member Courtney of Bake, Eat, Repeat.

You’ll need to add a stick of melted butter to this mixture, but you might want to whisk it together first. I didn’t. My daughters (3 and 5) were glued to me asking, “CAN I HELP NOW?” “CAN I TASTE IT?” “CAN I STIR IT UP?” “WHEN ARE YOU GOING TO BE DONE?!” “CAN I HELP NOW?” And somehow I forgot to whisk it. It happens.

I think they have a built-in radar that tells them I’m making a dessert. They usually aren’t glued to me when I make dinner.


Tasty Kitchen Blog: Peaches and Cream Crumble Bars. Guest post by Natalie Perry of Perry's Plate, recipe submitted by TK member Courtney of Bake, Eat, Repeat.

But, see? It all turned out well in the end. The crumble was wetter than I anticipated, but it was easily broken apart with my fingers.


Tasty Kitchen Blog: Peaches and Cream Crumble Bars. Guest post by Natalie Perry of Perry's Plate, recipe submitted by TK member Courtney of Bake, Eat, Repeat.

One last thing: Slice up the peaches. Aren’t they pretty?


Tasty Kitchen Blog: Peaches and Cream Crumble Bars. Guest post by Natalie Perry of Perry's Plate, recipe submitted by TK member Courtney of Bake, Eat, Repeat.

Alright. Assembly time. Grab the baked crust and smear some peach jam over it.


Tasty Kitchen Blog: Peaches and Cream Crumble Bars. Guest post by Natalie Perry of Perry's Plate, recipe submitted by TK member Courtney of Bake, Eat, Repeat.

Grab some helpers (or your own two hands) and lay the peaches on top.


Tasty Kitchen Blog: Peaches and Cream Crumble Bars. Guest post by Natalie Perry of Perry's Plate, recipe submitted by TK member Courtney of Bake, Eat, Repeat.

My 5-year-old enjoys lining things up in nice, even rows. (Ahem. She gets that from her mother.) This is how ours turned out. We used two yellow peaches and one white one.


Tasty Kitchen Blog: Peaches and Cream Crumble Bars. Guest post by Natalie Perry of Perry's Plate, recipe submitted by TK member Courtney of Bake, Eat, Repeat.

You know that batter you’d like to put your face in? Pour that over the peaches. Then lick that bowl clean. I didn’t make it into the closet in time so I had to share with my minions.


Tasty Kitchen Blog: Peaches and Cream Crumble Bars. Guest post by Natalie Perry of Perry's Plate, recipe submitted by TK member Courtney of Bake, Eat, Repeat.

Speaking of minions, they’re awfully good at sprinkling the crumble mixture over the cheesecake batter.


Tasty Kitchen Blog: Peaches and Cream Crumble Bars. Guest post by Natalie Perry of Perry's Plate, recipe submitted by TK member Courtney of Bake, Eat, Repeat.

My younger one ate more than she sprinkled, but we had enough to cover the whole thing.

Time to bake! Throw it in the oven for 30-40 minutes or until the middle sets up.


Tasty Kitchen Blog: Peaches and Cream Crumble Bars. Guest post by Natalie Perry of Perry's Plate, recipe submitted by TK member Courtney of Bake, Eat, Repeat.

Let it cool for 15-20 minutes before you dig in. I was able to lift the foil and slide the whole thing onto a cutting board.


Tasty Kitchen Blog: Peaches and Cream Crumble Bars. Guest post by Natalie Perry of Perry's Plate, recipe submitted by TK member Courtney of Bake, Eat, Repeat.

I love how beautiful the layers are in these!


Tasty Kitchen Blog: Peaches and Cream Crumble Bars. Guest post by Natalie Perry of Perry's Plate, recipe submitted by TK member Courtney of Bake, Eat, Repeat.

And I even liked how they tasted. Yes, even the peach-hater liked them! Like cheesecake, they get even better when they sit in the fridge and cool for several hours.

Thanks again Courtney! Be sure to check out Courtney’s TK recipe box and her recipes over on her blog, Bake, Eat, Repeat.

Recipe alterations: I replaced all of the flour with whole wheat pastry flour, reduced all of the sugars by half, used salted butter and omitted the added salt, and omitted the step of brushing the crust with melted butter. (I didn’t think that last one was necessary.)


Printable Recipe

Peaches and Cream Crumble Bars

See post on Courtney’s site!
4.75 Mitt(s) 4 Rating(s)4 votes, average: 4.75 out of 54 votes, average: 4.75 out of 54 votes, average: 4.75 out of 54 votes, average: 4.75 out of 54 votes, average: 4.75 out of 5

Prep Time:

Cook Time:

Difficulty: Easy

Servings: 24

24
x

Print Options

Page size Letter 3x5 4x6
Text Size Small Medium Large
Content Include description
Include prep time, etc.
Show image

Description

Sweet juicy peaches paired with tender shortbread, rich custard and spiced crumble. It’s summer in a bar.

Ingredients

  • FOR THE SHORTBREAD:
  • 2 sticks Unsalted Butter, Cut Into Small Chunks
  • ¼ cups Brown Sugar
  • ½ teaspoons Kosher Salt
  • 2 cups Flour
  • FOR THE FILLING:
  • 1 Tablespoon Butter
  • ½ cups Peach Jam
  • 3  Large Peaches, Pitted And Thinly Sliced
  • 12 ounces, weight Cream Cheese, Softened
  • ¼ cups Sour Cream
  • ½ cups Sugar
  • 1 Tablespoon Flour
  • 2  Eggs
  • 1 teaspoon Vanilla
  • FOR THE CRUMB TOPPING:
  • 1 cup Flour
  • ¼ cups Sugar
  • ¼ cups Brown Sugar
  • ½ teaspoons Ginger
  • 1 teaspoon Cinnamon
  • ¼ teaspoons Salt
  • 1 stick Unsalted Butter, melted

Preparation Instructions

1. For the shortbread crust: Preheat the oven to 350 F. Line a 13 x 9 inch baking dish with foil, then grease the foil on all sides. Set the dish aside. In the bowl of an electric mixer, beat the butter until it begins to soften, about 30 seconds. Add sugar and salt and beat on low speed until just combined. Add the flour and beat on low speed until incorporated then increase to high speed and beat until a cohesive dough is formed. Using your fingers, press the dough into the baking dish and bake for 20 minutes or until puffy and golden brown. When it’s done remove it from the oven and start the next step.

2. For the filling: Brush shortbread crust with 1 tablespoon of melted butter. Spread peach jam evenly over the crust, then layer with sliced peaches. To make the cream layer, put the cream cheese and sour cream in a bowl and beat on high speed until smooth. Add sugar and 1 tablespoon flour and beat another 30 seconds. Add eggs and vanilla and beat until smooth and thoroughly combined. Pour cheesecake mixture over peach slices. Set aside.

3. For the topping: In a small bowl, combine flour, sugars, ginger, cinnamon, and salt. Pour melted butter over all of it and use your fingers to mix everything together until coarse crumbles form. Sprinkle over the top of the cheesecake layer. Bake again at 350 F for 30 minutes or until crumbles are golden brown and center is set.


_______________________________________

Be sure to check out Natalie’s own beautiful food blog, Perrys’ Plate, where you can see her growing collection of lovely recipes. There’s always something new to see there. Go visit now!


Profile photo of Erica Lea

Peachy-keen Muffins

Posted by in Baking, Step-by-Step Recipes

Tasty Kitchen Blog Peachy-keen Muffins. Guest post by Erica Kastner of Cooking for Seven, recipe submitted by TK member Karalie.

 
Ever since I can remember, peaches have been a special treat. This beautiful, golden fruit has such a delicate yet fabulous flavor. Soft and juicy, sweet but not overly so.

These muffins, brought to us by Karalie, are a wonderful way to feast upon peaches. Not only are they scrumptious, they’re nutritious as well! Whole wheat flour, natural sugar, and yogurt make this a treat you can feel good about eating or sharing.

Let me show you how to make them!


Tasty Kitchen Blog Peachy-keen Muffins. Guest post by Erica Kastner of Cooking for Seven, recipe submitted by TK member Karalie.

Here’s what you’ll need: whole wheat flour, quick cooking oats, turbinado (I used maple) sugar, baking powder, salt, an egg, peach or vanilla yogurt, butter, vanilla extract, and peaches.


Tasty Kitchen Blog Peachy-keen Muffins. Guest post by Erica Kastner of Cooking for Seven, recipe submitted by TK member Karalie.

First off, preheat your oven to 400°F. Grease a muffin tin or line it with papers. Put the flour, oats, sugar, and baking soda in a large mixing bowl.


Tasty Kitchen Blog Peachy-keen Muffins. Guest post by Erica Kastner of Cooking for Seven, recipe submitted by TK member Karalie.

The recipe didn’t call for it but I added a bit of salt to enhance the flavors. Whisk it all together until well-mixed.


Tasty Kitchen Blog Peachy-keen Muffins. Guest post by Erica Kastner of Cooking for Seven, recipe submitted by TK member Karalie.

Peel and chop the peaches. Aren’t they pretty?


Tasty Kitchen Blog Peachy-keen Muffins. Guest post by Erica Kastner of Cooking for Seven, recipe submitted by TK member Karalie.

In a separate mixing bowl, lightly whisk the egg. Add the yogurt, melted butter, and vanilla extract. Whisk until well-combined.


Tasty Kitchen Blog Peachy-keen Muffins. Guest post by Erica Kastner of Cooking for Seven, recipe submitted by TK member Karalie.

Pour the wet ingredients into the dry ingredients.


Tasty Kitchen Blog Peachy-keen Muffins. Guest post by Erica Kastner of Cooking for Seven, recipe submitted by TK member Karalie.

Stir just until combined.


Tasty Kitchen Blog Peachy-keen Muffins. Guest post by Erica Kastner of Cooking for Seven, recipe submitted by TK member Karalie.

Add the peaches and gently fold them in.


Tasty Kitchen Blog Peachy-keen Muffins. Guest post by Erica Kastner of Cooking for Seven, recipe submitted by TK member Karalie.

Spoon into the prepared muffin tin. Bake in preheated oven for 15-20 minutes, or until they test done. Cool in the pan 10 minutes before removing to a cooling rack.


Tasty Kitchen Blog Peachy-keen Muffins. Guest post by Erica Kastner of Cooking for Seven, recipe submitted by TK member Karalie.

Serve warm or at room temperature. Spread with butter.

Notes:
1. As mentioned above, I added a bit of salt to the recipe to enhance the flavor of the muffins. 
2. I found these muffins to be a bit dense. Next time I may add a little milk, some baking soda, or a little more baking powder to the batter.
3. These freeze beautifully. Simply place cooled leftover muffins in a freezer bag. Defrost on the counter, or in the oven if you like your muffins warm.


Tasty Kitchen Blog Peachy-keen Muffins. Guest post by Erica Kastner of Cooking for Seven, recipe submitted by TK member Karalie.

Thank you, Karalie, for sharing this fabulous recipe!


Printable Recipe

Peachy-keen Muffins

5.00 Mitt(s) 3 Rating(s)3 votes, average: 5.00 out of 53 votes, average: 5.00 out of 53 votes, average: 5.00 out of 53 votes, average: 5.00 out of 53 votes, average: 5.00 out of 5

Prep Time:

Cook Time:

Difficulty: Easy

Servings: 12

12
x

Print Options

Page size Letter 3x5 4x6
Text Size Small Medium Large
Content Include description
Include prep time, etc.
Show image

Description

Moist peach muffins, great for breakfast or as a snack!

Ingredients

  • 1-½ cup Whole Wheat Flour
  • ½ cups Quick Cooking Oats
  • ⅔ cups Turbinado Sugar
  • 1-½ teaspoon Baking Powder
  • 1 whole Egg, Lightly Beaten
  • ½ cups Peach Or Vanilla Yogurt
  • ¼ cups Butter, Melted
  • ¼ cups Oil
  • 1 teaspoon Vanilla Extract
  • 1 cup Fresh Peaches, Peeled And Chopped OR Well-drained Canned Peaches, Chopped

Preparation Instructions

In a large bowl, combine flour, oats, sugar and baking powder. Combine egg, yogurt, butter, oil, and vanilla; mix well. Stir into dry ingredients just until moistened. Fold in peaches. Fill greased or paper-lined muffin cups two-thirds full. Bake at 400°F for 15-20 minutes, or until muffins test done. Cool in the pan 10 minutes before removing to a wire rack.

Makes 12 muffins. Calories per muffin: 196.


_______________________________________

Newly-married Erica Kastner shares her wonderful recipes and amazing food photography on her blog, Cooking for Seven. She also writes about crafts and posts more of her beautiful photography in her personal blog, EricaLea.com. There really isn’t much that this amazing young lady can’t do, and we’re thrilled she does some of it here.


Profile photo of Ree | The Pioneer Woman

Peanut Butter Kiss Cookies

Posted by in Baking, Step-by-Step Recipes

A few weeks ago, my older daughter wanted some cookies. So I said “Well, go find a recipe you like on Tasty Kitchen!” Then, ever the dutiful mother, I added, “Then march on into the kitchen and make ‘em.” She looked at me with a puzzled expression. “See that room over there?” I continued. “The […]

Profile photo of HowSweetEats

Peanut Butter Stuffed Hot Fudge Cupcakes

Posted by in Baking, Step-by-Step Recipes

  I think it’s true what they say: you can never go wrong with peanut butter and chocolate. It’s the combination that I consoled myself with after my first high school heartbreak (think a spoon in the jar and a sprinkling of chocolate chips) and the way we celebrated our marriage (think the best cheesecake […]

Profile photo of missamy

Pecan Pie Muffins

Posted by in Baking, Step-by-Step Recipes

  Your attention please … Your attention please … This is a public service announcement. Make these Pecan Pie Muffins. You will be glad you did. Your friends and family will thank you. That is all. I’m sure glad I ran across this Tasty Kitchen recipe submitted by blackhawkwife. Between the butter and the pecans, […]

Profile photo of Natalie | Perry's Plate

Pepitas Shrimp Skewers

Posted by in Step-by-Step Recipes

  The sun seems to be shining more lately, and after all of the freezing cold weather most of us here in the US have been experiencing (snow in San Francisco?!) I’m definitely ready for warmer weather. And flip flops. And throwing everything we eat on the grill. I was drawn to this recipe for […]