The Pioneer Woman Tasty Kitchen
Profile photo of Erica Lea

Tiramisu Ice Cream

Posted by in Step-by-Step Recipes

Tasty Kitchen Blog: Tiramisu Ice Cream. Guest post by Erica Kastner of Buttered Side Up, recipe submitted by TK member Mira of Cooking LSL.

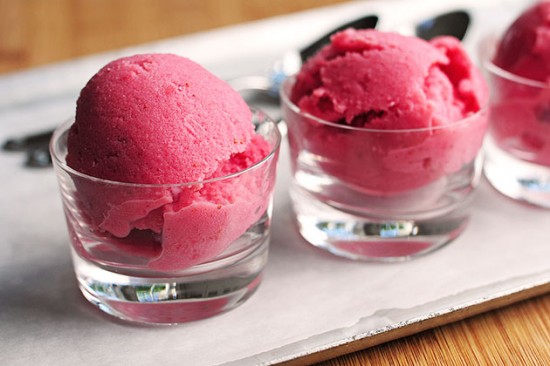
Hooray for ice cream season!

Of course, if someone were to make the argument that ice cream is a year ’round affair, I wouldn’t try to convince them otherwise.

This Tiramisu Ice Cream recipe, brought to us by Mira, may sound all fancy-schmancy, but the only difficult part is locating a couple of ingredients. Most supermarkets carry mascarpone, and Kahlúa is actually a very popular liqueur. I’ve been wanting to try it in cooking for years, and now I have a bottle to experiment with.

Side note: I like to pronounce mascarpone incorrectly on purpose to bug Reuben. I’m such a good wife.


Tasty Kitchen Blog: Tiramisu Ice Cream. Guest post by Erica Kastner of Buttered Side Up, recipe submitted by TK member Mira of Cooking LSL.

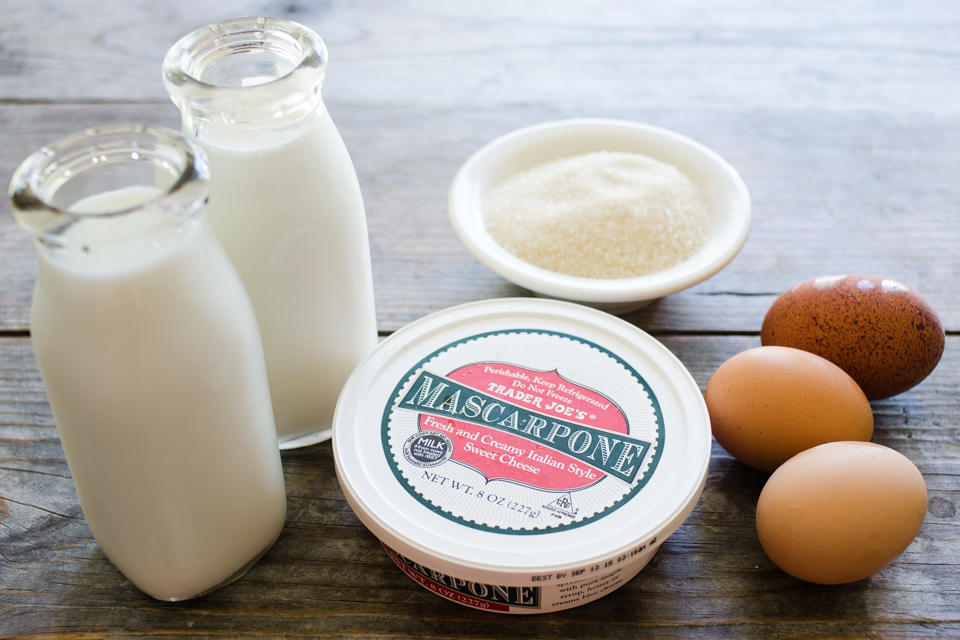
For the base of the ice cream, you only need 5 ingredients: milk, cream, eggs (just the yolks), sugar, and mascarpone.


Tasty Kitchen Blog: Tiramisu Ice Cream. Guest post by Erica Kastner of Buttered Side Up, recipe submitted by TK member Mira of Cooking LSL.

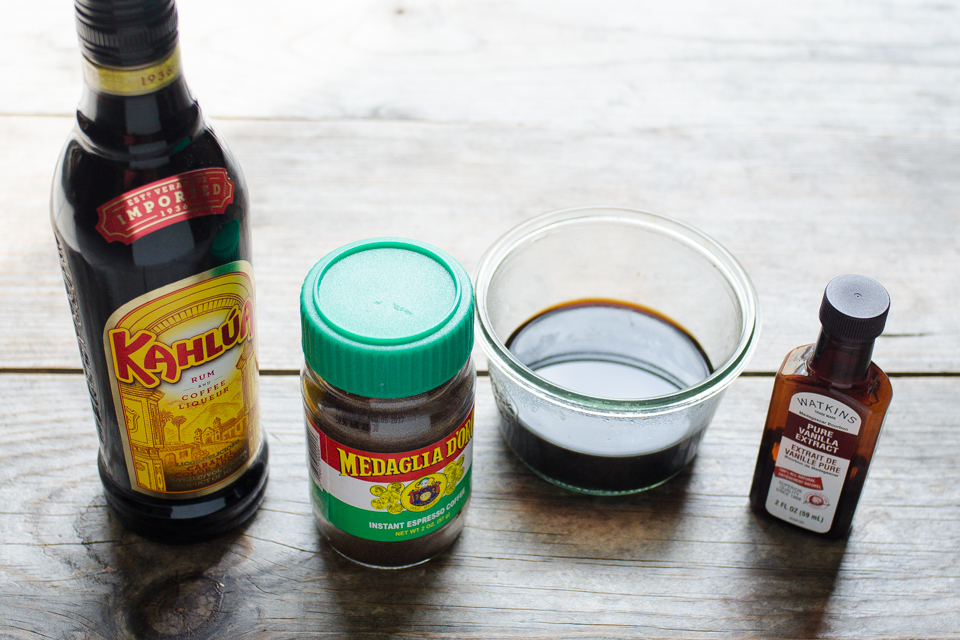
You’ll also need 4 ingredients to flavor the ice cream: Kahlúa (or any coffee liqueur), instant espresso powder, brewed espresso, and vanilla extract.


Tasty Kitchen Blog: Tiramisu Ice Cream. Guest post by Erica Kastner of Buttered Side Up, recipe submitted by TK member Mira of Cooking LSL.

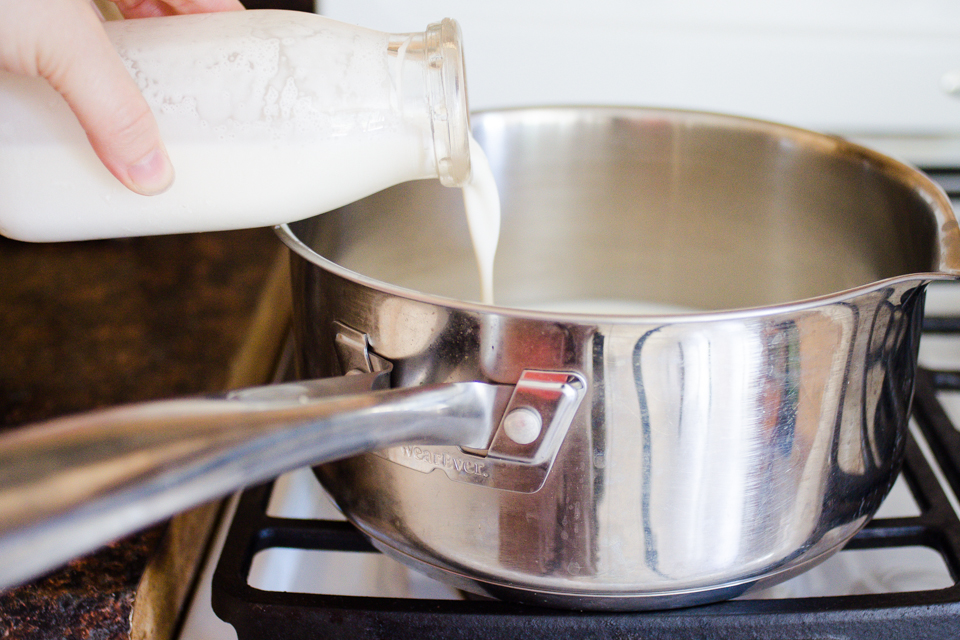
Start by heating the milk and cream in a saucepan.


Tasty Kitchen Blog: Tiramisu Ice Cream. Guest post by Erica Kastner of Buttered Side Up, recipe submitted by TK member Mira of Cooking LSL.

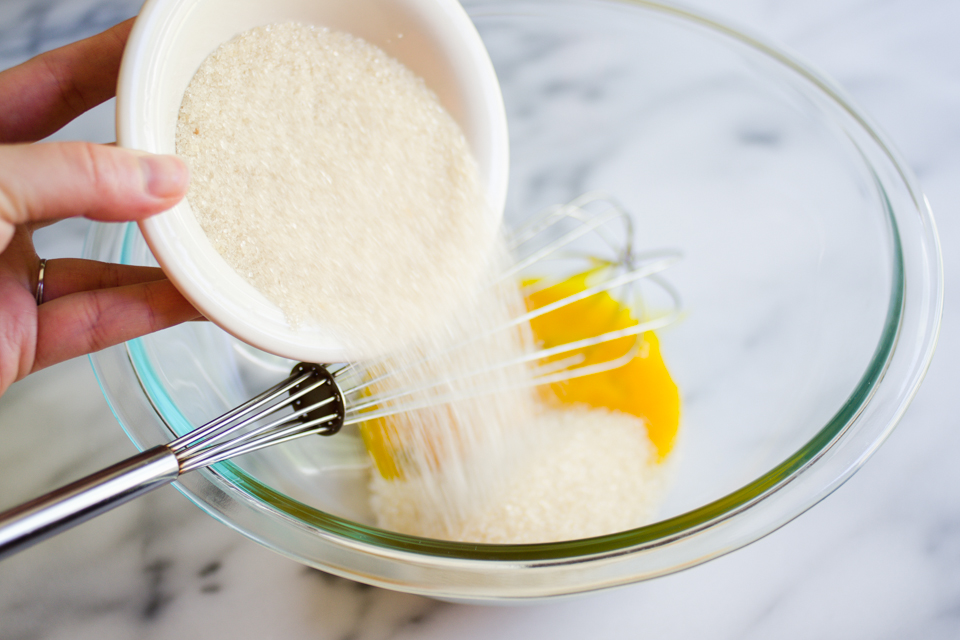
Meanwhile, put your egg yolks and sugar into a largish bowl.


Tasty Kitchen Blog: Tiramisu Ice Cream. Guest post by Erica Kastner of Buttered Side Up, recipe submitted by TK member Mira of Cooking LSL.

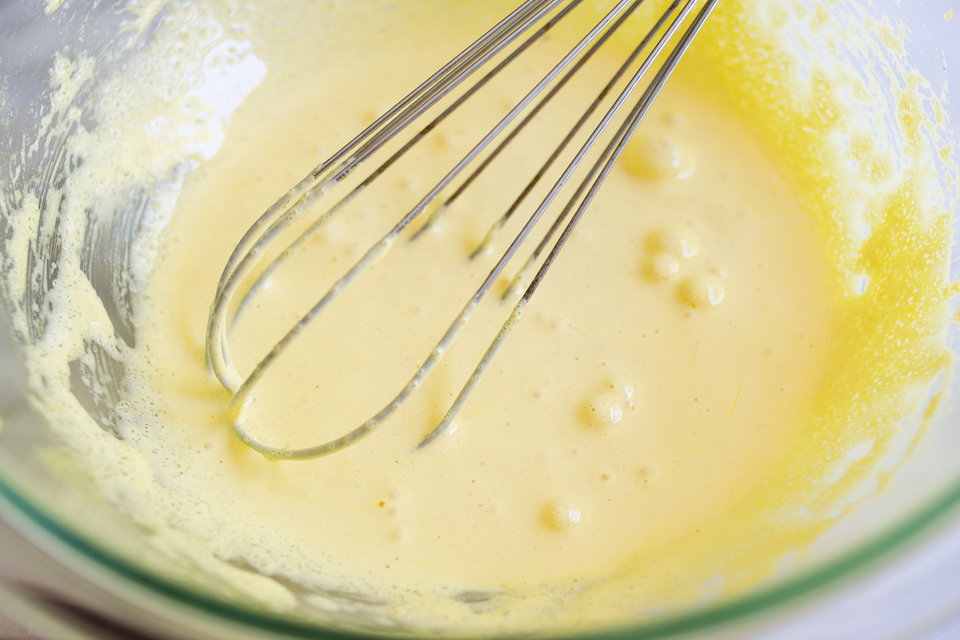
Whisk them together until the mixture is pale and frothy (mine never quite got to the frothy stage, but it did have bubbles).
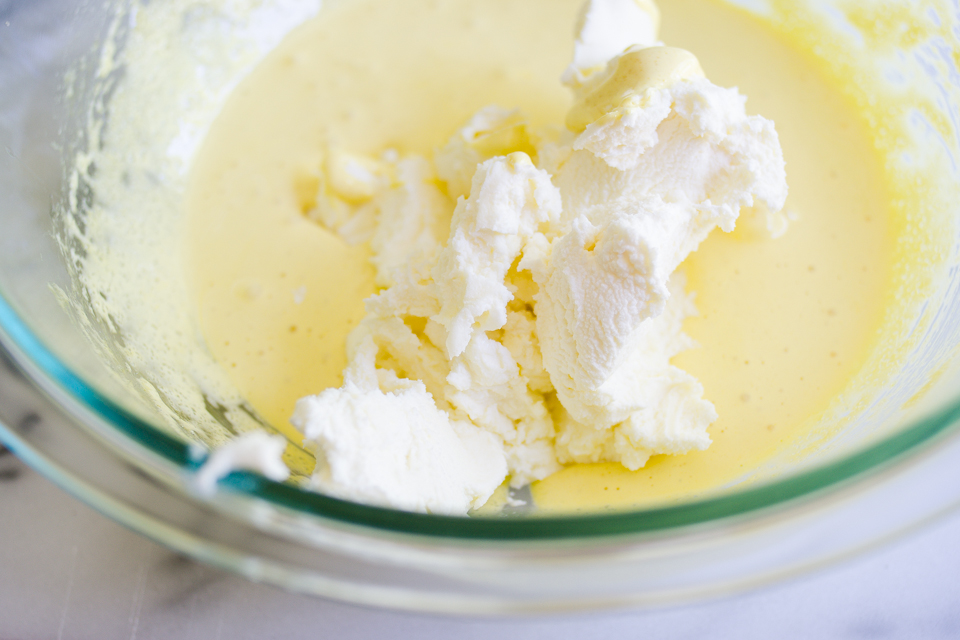
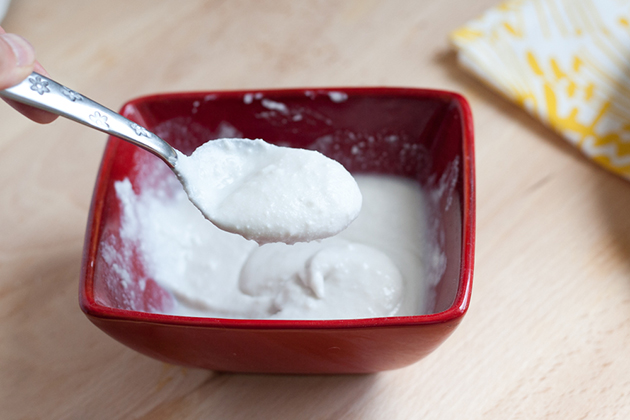


Tasty Kitchen Blog: Tiramisu Ice Cream. Guest post by Erica Kastner of Buttered Side Up, recipe submitted by TK member Mira of Cooking LSL.

Add the mascarpone.


Tasty Kitchen Blog: Tiramisu Ice Cream. Guest post by Erica Kastner of Buttered Side Up, recipe submitted by TK member Mira of Cooking LSL.

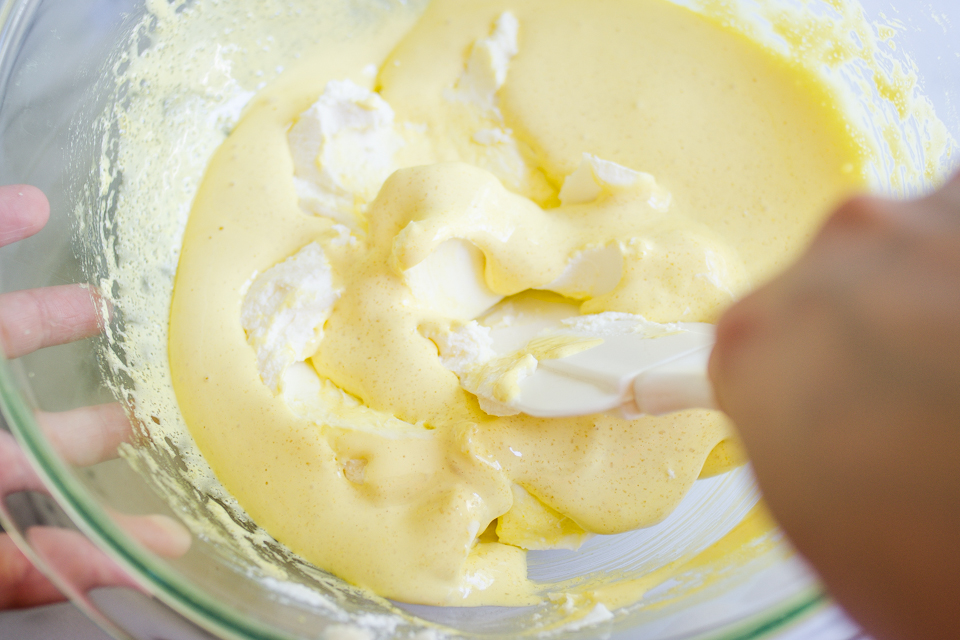
Gently fold in the cheese with a rubber spatula or spoon.


Tasty Kitchen Blog: Tiramisu Ice Cream. Guest post by Erica Kastner of Buttered Side Up, recipe submitted by TK member Mira of Cooking LSL.

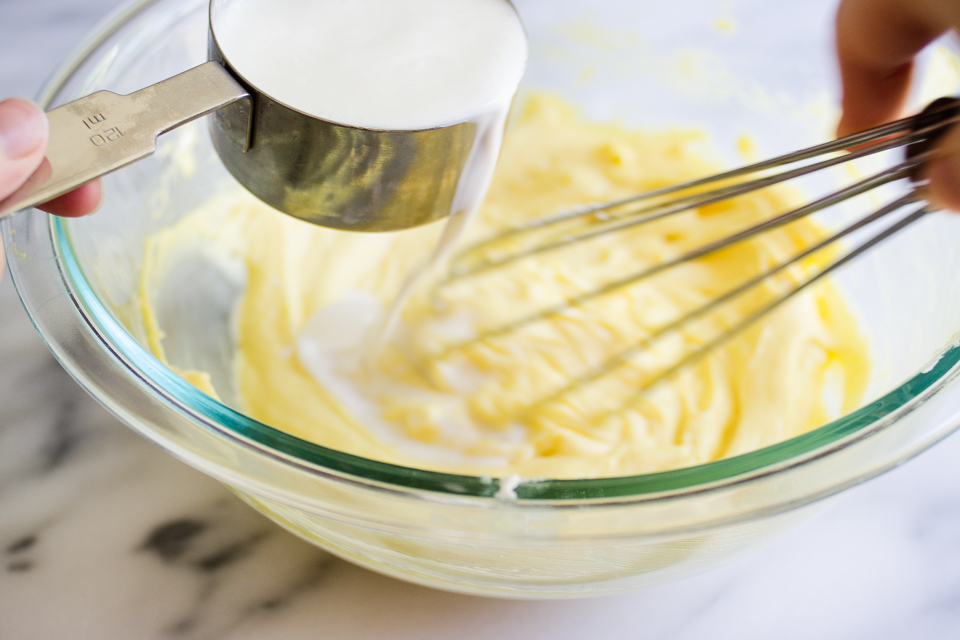
Once the milk and cream are simmering, slowly add half a cup to the egg/sugar/mascarpone mixture. Make sure you whisk while you add the hot milk and cream!


Tasty Kitchen Blog: Tiramisu Ice Cream. Guest post by Erica Kastner of Buttered Side Up, recipe submitted by TK member Mira of Cooking LSL.

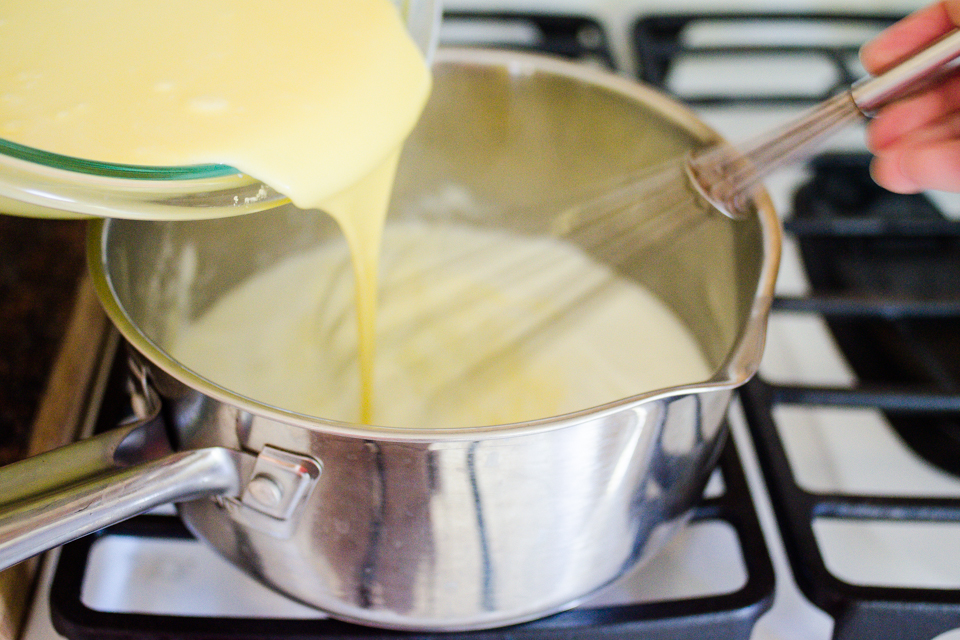
Pour the tempered egg mixture back into the pot on the stove.


Tasty Kitchen Blog: Tiramisu Ice Cream. Guest post by Erica Kastner of Buttered Side Up, recipe submitted by TK member Mira of Cooking LSL.

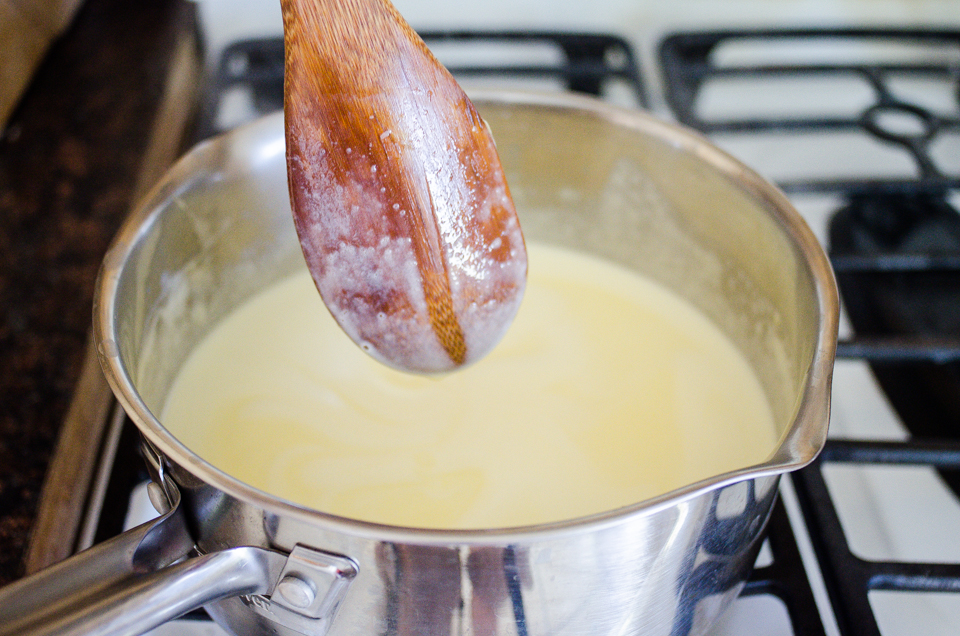
Turn the heat up to medium and cook until the custard coats the back of a wooden spoon. This should only take about 5-8 minutes. Don’t overcook the mixture and scramble your eggs! Not like I speak from experience or anything.


Tasty Kitchen Blog: Tiramisu Ice Cream. Guest post by Erica Kastner of Buttered Side Up, recipe submitted by TK member Mira of Cooking LSL.

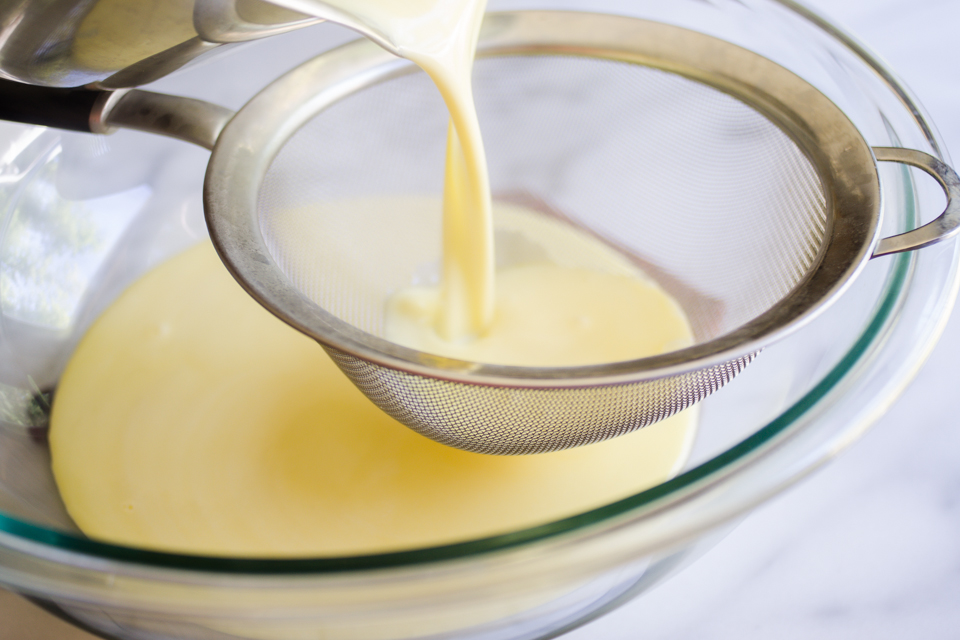
This step is optional, but I like to pour my custard base through a fine-mesh sieve to catch any bits that got a little too cooked.


Tasty Kitchen Blog: Tiramisu Ice Cream. Guest post by Erica Kastner of Buttered Side Up, recipe submitted by TK member Mira of Cooking LSL.

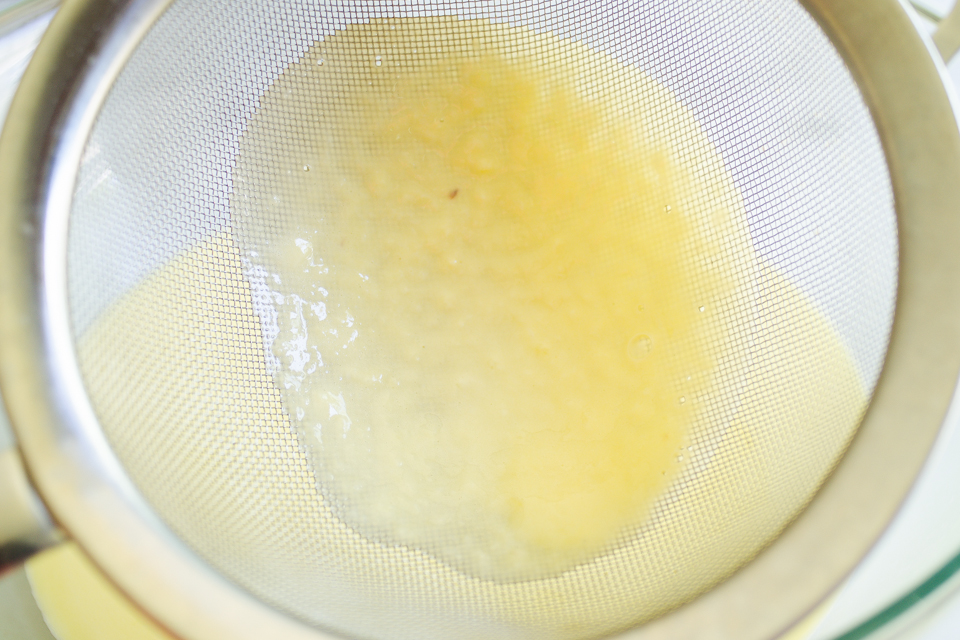
See? Do you want that in your ice cream? I think not.

Once the custard cools to room temperature, cover and place in the refrigerator. Let it chill until it’s bone cold. I left mine overnight.


Tasty Kitchen Blog: Tiramisu Ice Cream. Guest post by Erica Kastner of Buttered Side Up, recipe submitted by TK member Mira of Cooking LSL.

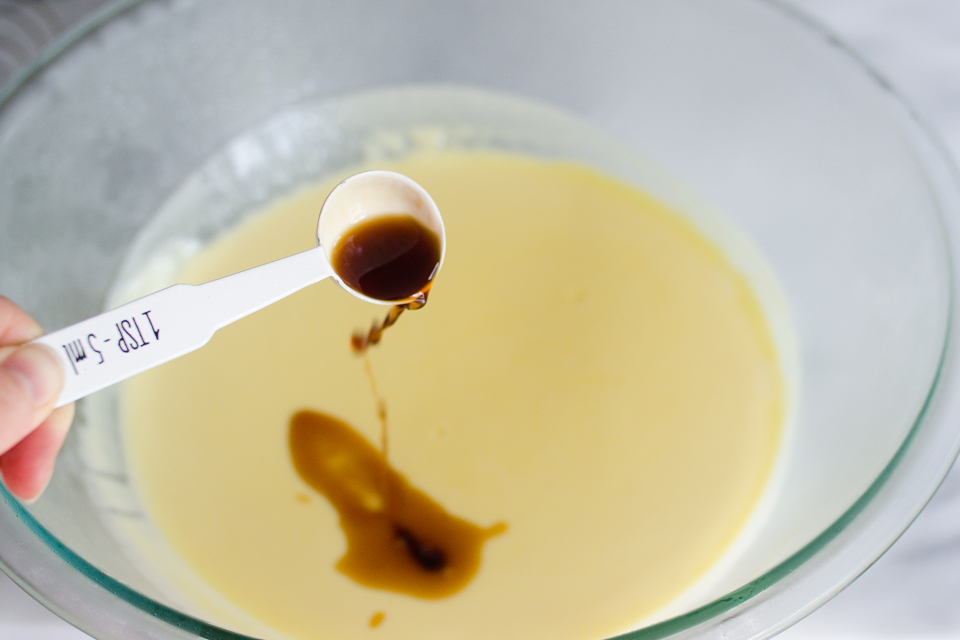
Now that your ice cream base is completely cold, it’s time to add the flavorings! A teaspoon of vanilla extract…


Tasty Kitchen Blog: Tiramisu Ice Cream. Guest post by Erica Kastner of Buttered Side Up, recipe submitted by TK member Mira of Cooking LSL.

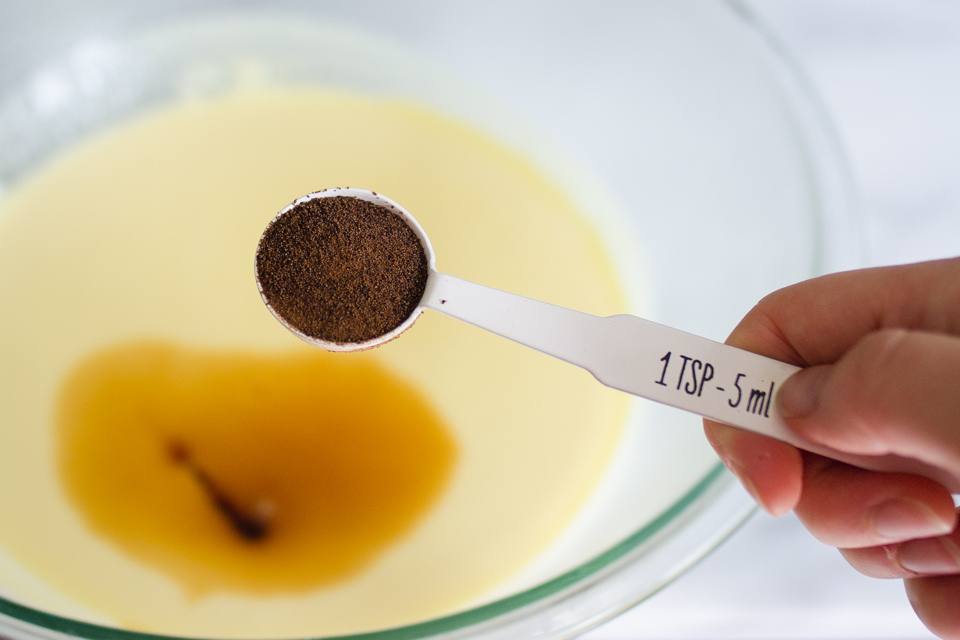
A teaspoon of instant espresso powder…


Tasty Kitchen Blog: Tiramisu Ice Cream. Guest post by Erica Kastner of Buttered Side Up, recipe submitted by TK member Mira of Cooking LSL.

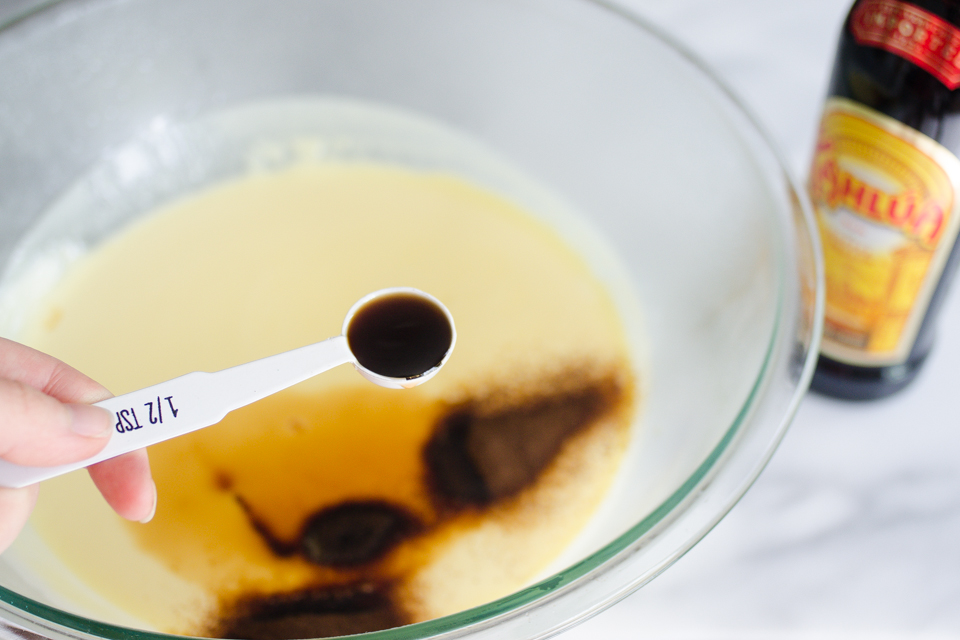
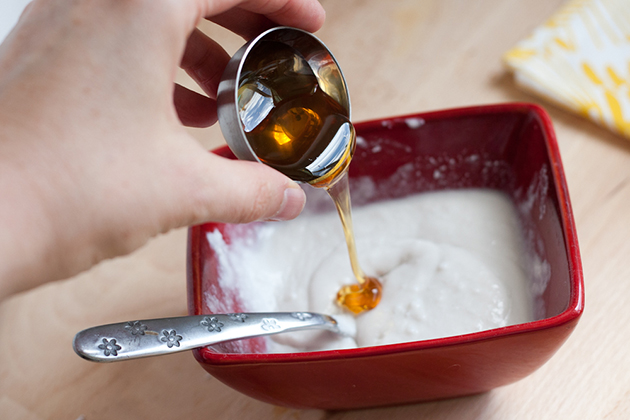
Just half a teaspoon of Kahlúa (or coffee liqueur of choice)…


Tasty Kitchen Blog: Tiramisu Ice Cream. Guest post by Erica Kastner of Buttered Side Up, recipe submitted by TK member Mira of Cooking LSL.

And 1/4 cup of brewed espresso. Now you have layers of coffee flavors.


Tasty Kitchen Blog: Tiramisu Ice Cream. Guest post by Erica Kastner of Buttered Side Up, recipe submitted by TK member Mira of Cooking LSL.

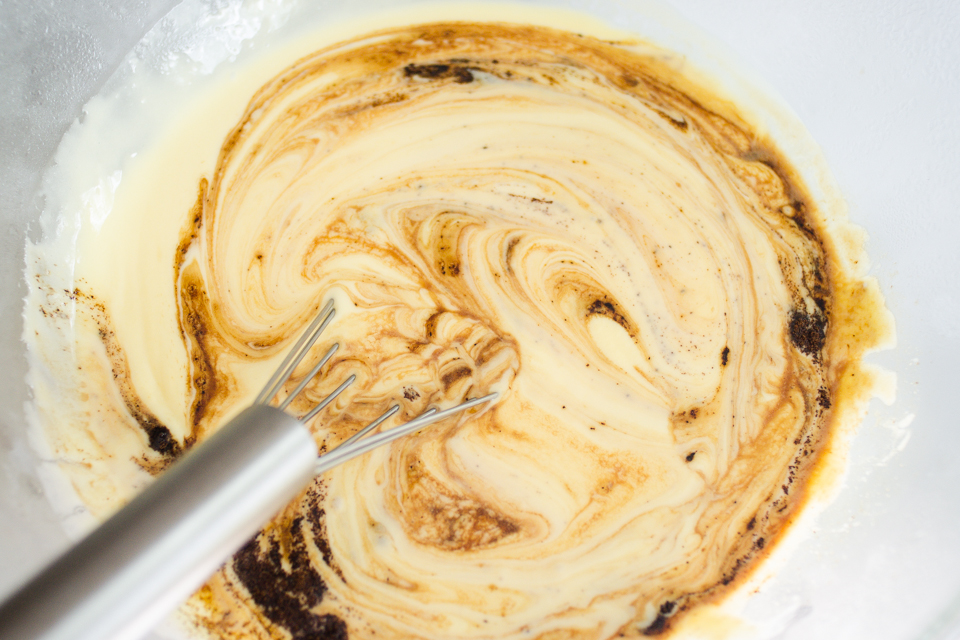
Whisk it all together until smooth.


Tasty Kitchen Blog: Tiramisu Ice Cream. Guest post by Erica Kastner of Buttered Side Up, recipe submitted by TK member Mira of Cooking LSL.

Pour the custard into your ice cream maker and churn according to the manufacturer’s instructions.


Tasty Kitchen Blog: Tiramisu Ice Cream. Guest post by Erica Kastner of Buttered Side Up, recipe submitted by TK member Mira of Cooking LSL.

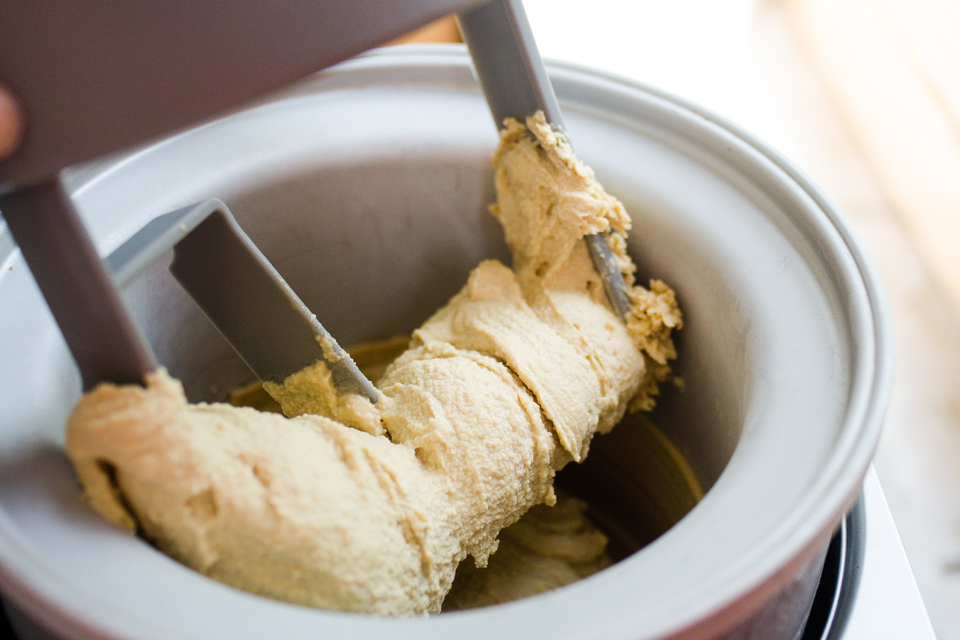
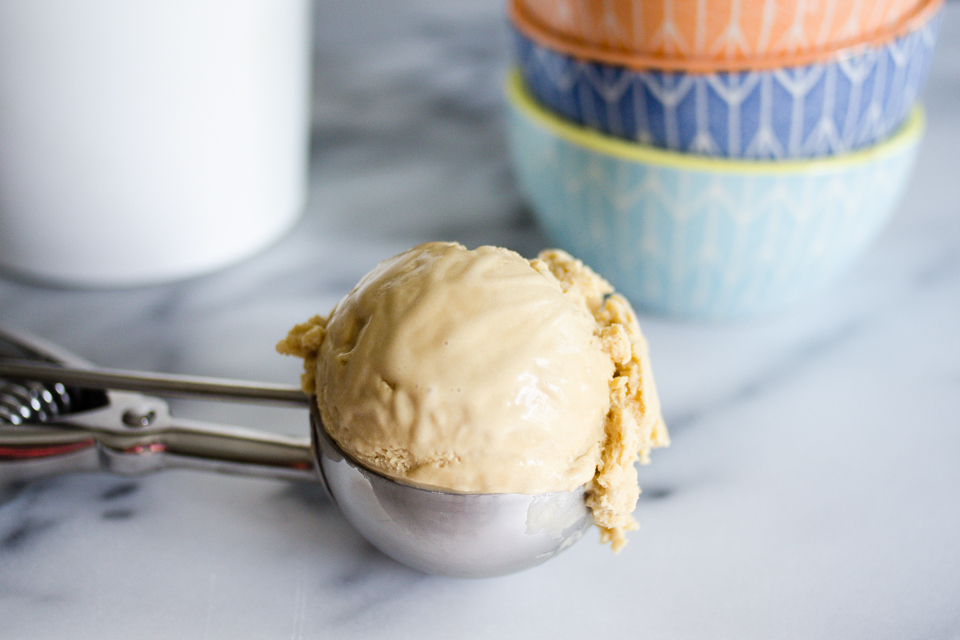
It only took about 20 minutes for mine to turn into a creamy, soft-serve consistency.


Tasty Kitchen Blog: Tiramisu Ice Cream. Guest post by Erica Kastner of Buttered Side Up, recipe submitted by TK member Mira of Cooking LSL.

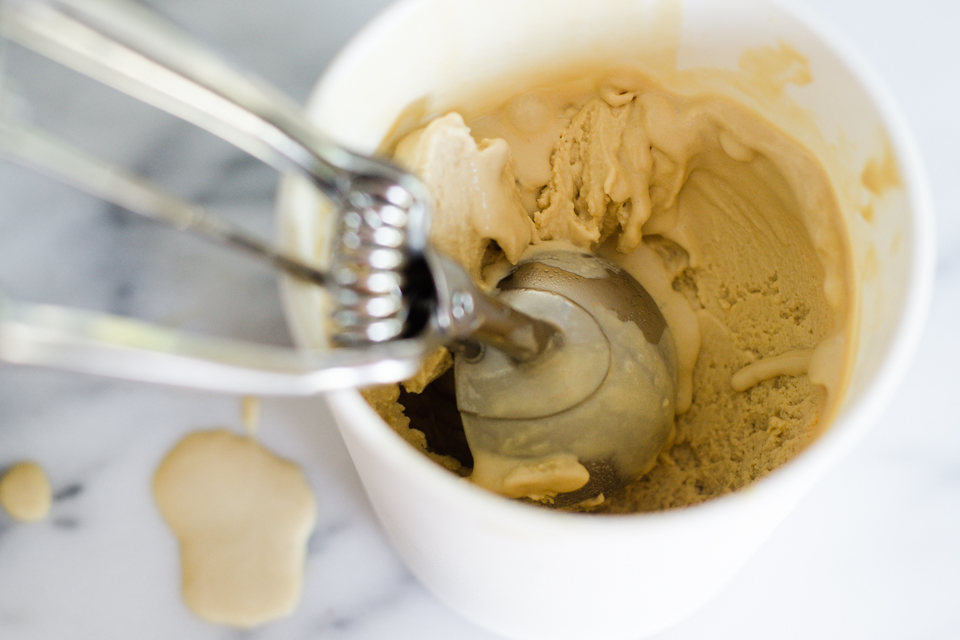
Scoop the ice cream into a freezer-safe container and freeze until firm. Or eat it straight out of the ice cream maker—I won’t judge!


Tasty Kitchen Blog: Tiramisu Ice Cream. Guest post by Erica Kastner of Buttered Side Up, recipe submitted by TK member Mira of Cooking LSL.

Note: The mascarpone has a bit of a grainy texture. If you’re a stickler about perfectly smooth ice cream, you could always substitute another soft cheese that is creamier. I personally didn’t mind it, and my sister said that the graininess was reminiscent of real tiramisu.


Tasty Kitchen Blog: Tiramisu Ice Cream. Guest post by Erica Kastner of Buttered Side Up, recipe submitted by TK member Mira of Cooking LSL.

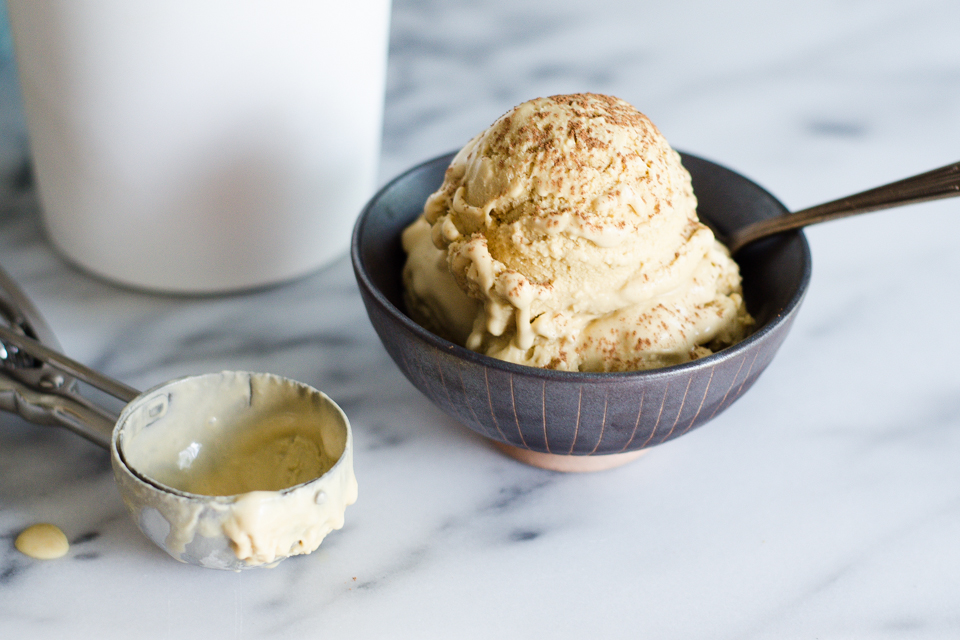
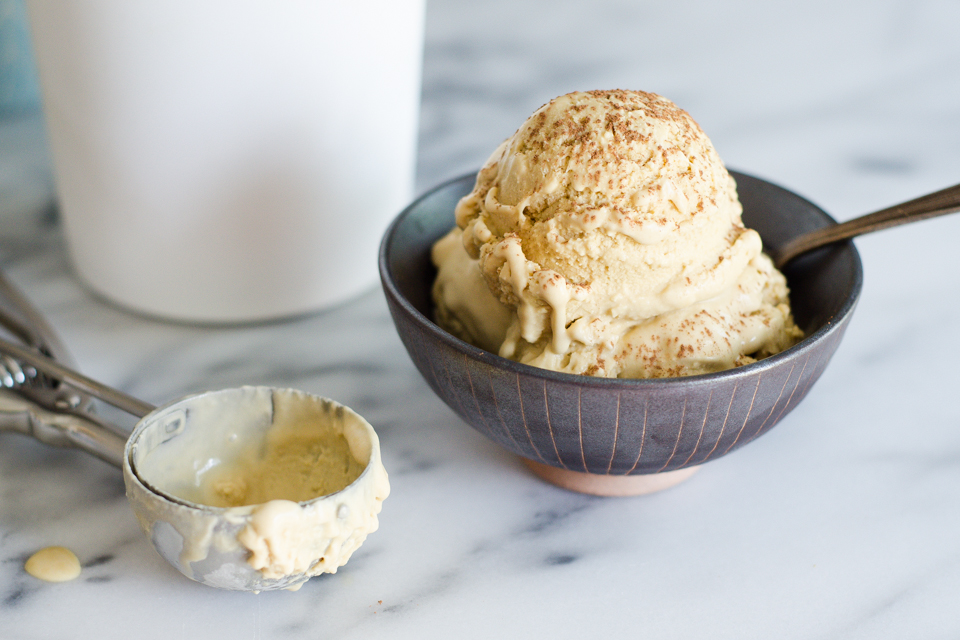
If you like, you can dust the top of the ice cream with cocoa powder, or sprinkle with it with finely chopped chocolate. This gives it even more of a tiramisu vibe.

Thanks to Mira for sharing her recipe with us here on Tasty Kitchen. Stop by her blog, Cooking LSL, for more delicious recipes. Her Berries and Peach Pudding Tart sounds scrumptious.


Printable Recipe

Tiramisu Ice Cream

See post on Cookinglsl’s site!
0.00 Mitt(s) 0 Rating(s)0 votes, average: 0.00 out of 50 votes, average: 0.00 out of 50 votes, average: 0.00 out of 50 votes, average: 0.00 out of 50 votes, average: 0.00 out of 5

Prep Time:

Cook Time:

Difficulty: Easy

Servings: 6

6
x

Print Options

Page size Letter 3x5 4x6
Text Size Small Medium Large
Content Include description
Include prep time, etc.
Show image

Description

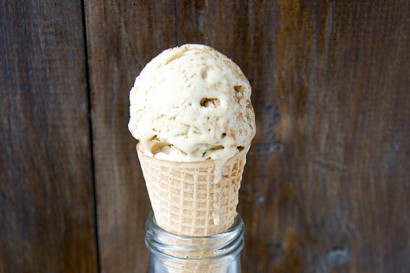
Creamy, coffee-flavored frozen dessert to enjoy on its own or add it on top of brownies, crepes or cookies.

Recipe makes a little less than 1 quart. I used an ice cream maker with 1 to 1 1/2 quart capacity.

Ingredients

  • 1 cup Whole Milk
  • 1 cup Heavy Cream
  • 3  Egg Yolks
  • ½ cups Sugar
  • 1 cup Mascarpone Cheese, At Room Temperature
  • 1 teaspoon Vanilla
  • 1 teaspoon Instant Espresso Powder
  • ¼ cups Espresso
  • ½ teaspoons Kahlua Or Other Coffee Flavored Liqueur (optional)

Preparation Instructions

In a saucepan, combine milk and cream and turn on heat to medium-low. Heat milk until it is simmering.

In a deep bowl, whisk together egg yolks and sugar, until pale and frothy. Add mascarpone cheese and mix until combined. (Use a wooden spoon or spatula, don’t beat mascarpone with electric mixer).

Add ½ cup hot milk to the mascarpone mixture and whisk to combine. Pour mixture back in the pan with hot milk and mix to combine. Cook for 5–8 minutes on medium heat, stirring constantly, until custard it thick and covers the back of the spoon with a thin film.

Pour mixture to a bowl and let cool completely. Use an ice bath to speed up the process, or you can leave it in the fridge overnight.

Before you add mixture to ice cream machine, add vanilla, espresso powder, espresso and coffee liqueur.
Following manufacturer’s instructions for your ice cream maker, freeze until it resembles soft serve ice cream.

Transfer to a 9″x13″ in pan, lined with parchment paper, cover and freeze until firm. Serve and enjoy!


_______________________________________

Erica Kastner has always been one of our most cherished members of the Tasty Kitchen community. She shares her wonderful recipes and amazing food photography on her blog, Buttered Side Up, and she also writes about crafts and posts more of her beautiful photography in her personal blog, Simple Days. There really isn’t much that this amazing young wife and mother can’t do, and we’re thrilled she does some of it here.


Profile photo of Megan {Country Cleaver}

Grilled Turkey Meatball Gyros

Posted by in Step-by-Step Recipes

Tasty Kitchen Blog: Grilled Turkey Meatball Gyros. Guest post by Megan Keno of Wanna Be a Country Cleaver, recipe submitted by TK member Julie of The Gourmet RD.

It’s only a little embarrassing when you find yourself going to the same restaurant every Friday night, the guys behind the counter greeting you by name with your order memorized. Beef and lamb gyros with rice and hummus with a baklava for dessert, of course! But I realized I needed to take a break from take-out and try my hand at making my own gyros. Then I found Julie’s recipe for Grilled Lamb Meatball Gyros! It was fate, and I know you will revel in these as much as I did.

The ingredients list may seem long, but don’t let that deter you. If you want to substitute pre-made tzatziki sauce and pre-made pesto, I understand, but making it from scratch is pretty simple and will really elevate these gyros to a whole new level.


Tasty Kitchen Blog: Grilled Turkey Meatball Gyros. Guest post by Megan Keno of Wanna Be a Country Cleaver, recipe submitted by TK member Julie of The Gourmet RD.

For the tzatziki, gather plain Greek yogurt, sour cream, mayo, lemon, garlic, dill, sugar, cucumber, and salt and pepper.

Note: Julie says you can use either sour cream or coconut milk, and promises that the coconut milk version is amazing. I went the sour cream route, but do give the coconut milk version a try sometime!


Tasty Kitchen Blog: Grilled Turkey Meatball Gyros. Guest post by Megan Keno of Wanna Be a Country Cleaver, recipe submitted by TK member Julie of The Gourmet RD.

One of the best things about homemade tzatziki is that it’s a one-dish treat—simply combine all of the ingredients in a food processor and puree until smooth.


Tasty Kitchen Blog: Grilled Turkey Meatball Gyros. Guest post by Megan Keno of Wanna Be a Country Cleaver, recipe submitted by TK member Julie of The Gourmet RD.

Scrape down the sides once through the blending process to make sure it’s all blended evenly. Place it in the fridge until it’s ready for use.


Tasty Kitchen Blog: Grilled Turkey Meatball Gyros. Guest post by Megan Keno of Wanna Be a Country Cleaver, recipe submitted by TK member Julie of The Gourmet RD.

Next, gather all your ingredients for the mint pesto, including mint, spinach, nuts (I used walnuts), garlic, lemon and salt and pepper.


Tasty Kitchen Blog: Grilled Turkey Meatball Gyros. Guest post by Megan Keno of Wanna Be a Country Cleaver, recipe submitted by TK member Julie of The Gourmet RD.

Just like the tzatziki, combine all of the ingredients in a food processor and pulse to combine. Check the seasoning to suit your taste and add a little more salt and pepper if needed. Make sure it works for you!


Tasty Kitchen Blog: Grilled Turkey Meatball Gyros. Guest post by Megan Keno of Wanna Be a Country Cleaver, recipe submitted by TK member Julie of The Gourmet RD.

Set pesto aside to until gyros are ready.


Tasty Kitchen Blog: Grilled Turkey Meatball Gyros. Guest post by Megan Keno of Wanna Be a Country Cleaver, recipe submitted by TK member Julie of The Gourmet RD.

Now, preheat your grill to medium high heat and prepare all your ingredients for the meatballs. My store didn’t have lamb, so I used ground turkey instead. Don’t forget your Dijon, onion, more garlic (because you know that’s never a bad thing!), egg, breadcrumbs, ground coriander, cumin, ground cinnamon, and pepper. Grab the cooking spray too!


Tasty Kitchen Blog: Grilled Turkey Meatball Gyros. Guest post by Megan Keno of Wanna Be a Country Cleaver, recipe submitted by TK member Julie of The Gourmet RD.

In a bowl, combine the ground turkey, egg, breadcrumbs, cumin, and all the remaining ingredients into the bowl. Use your hands if you’re feeling daring, or a spatula.


Tasty Kitchen Blog: Grilled Turkey Meatball Gyros. Guest post by Megan Keno of Wanna Be a Country Cleaver, recipe submitted by TK member Julie of The Gourmet RD.

I used a large cookie scoop to form the meatballs to keep them uniform in size. Just scoop and roll.


Tasty Kitchen Blog: Grilled Turkey Meatball Gyros. Guest post by Megan Keno of Wanna Be a Country Cleaver, recipe submitted by TK member Julie of The Gourmet RD.

Then, onto the grill they go! Let them grill uninterrupted, until they released naturally from the grill to turn. Don’t force them to turn or they will fall apart. Grill until they reach safe cooking temperature, about 165ºF for ground turkey. Remove from the grill.


Tasty Kitchen Blog: Grilled Turkey Meatball Gyros. Guest post by Megan Keno of Wanna Be a Country Cleaver, recipe submitted by TK member Julie of The Gourmet RD.

To assemble these beauties, split the pitas and add a couple of meatballs inside, pouring the pesto and tzatziki over the top. Don’t forget the additional chopped up cucumber and feta! Devour these immediately. Then toss out that take-out menu because you won’t be needing it again any time soon!

Thanks for sharing your recipe, Julie! If you need more inspired creations, check out Julie’s TK recipe box.

What is your favorite take-out fake-out? Leave a comment below, or share a link for all to see!


Printable Recipe

Grilled Lamb Meatball Gyros

See post on Julie Andrews’s site!
0.00 Mitt(s) 0 Rating(s)0 votes, average: 0.00 out of 50 votes, average: 0.00 out of 50 votes, average: 0.00 out of 50 votes, average: 0.00 out of 50 votes, average: 0.00 out of 5

Prep Time:

Cook Time:

Difficulty: Easy

Servings: 4

4
x

Print Options

Page size Letter 3x5 4x6
Text Size Small Medium Large
Content Include description
Include prep time, etc.
Show image

Description

Grilled lamb meatball gyros with mint pesto and coconut milk tzatziki.

Ingredients

  • FOR THE TZATZIKI SAUCE:
  • 6 ounces, fluid Plain Greek Yogurt
  • ¼ cups Unsweetened Coconut Milk Or Sour Cream
  • 2 Tablespoons Mayonnaise
  • 1 teaspoon Lemon Zest
  • 1 teaspoon Lemon Juice
  • 2 cloves Garlic
  • 2 teaspoons Fresh Dill
  • 1-½ teaspoon Granulated Sugar
  • 1 dash Coarse Salt And Ground Black Pepper
  • ½ whole English Cucumber, Diced
  • FOR THE MINT PESTO:
  • 2 cups Fresh Mint Leaves
  • 1 cup Fresh Spinach
  • ¼ cups Unsalted Nuts {almonds Or Walnuts}
  • 2 cloves Garlic
  • ½  Lemon, Zest And Juice
  • Dash Coarse Salt And Ground Black Pepper
  • ¼ cups Extra Virgin Olive Oil
  • FOR THE MEATBALLS:
  • 1 pound Ground Lamb (or Chicken If Preferred)
  • 1 teaspoon Dijon Mustard
  • ½ whole Yellow Onion, Finely Minced
  • 2 cloves Garlic, Finely Minced (or Sub 2 Teaspoons Garlic Powder For The 2 Cloves)
  • 1 whole Large Egg
  • ½ cups Breadcrumbs
  • 1 teaspoon Ground Coriander
  • 1 Tablespoon Ground Cumin
  • ½ teaspoons Coarse Salt
  • ¼ teaspoons Ground Cinnamon
  • ¼ teaspoons Ground Black Pepper
  • Cooking Spray
  • FOR THE ASSEMBLY:
  • 4 whole Whole Grain Pitas
  • ½ whole English Cucumber, Diced Or Sliced
  • ½ cups Crumbled Feta Cheese
  • Fresh Cilantro Leaves, For Garnish

Preparation Instructions

1. For the tzatziki sauce: Combine all of the tzatziki ingredients (yogurt through sugar) in a food processor. Season with a dash of salt and black pepper; pulse until smooth. Taste and adjust seasoning, if necessary. Add diced cucumber and fold with a spatula. Spoon into a bowl and refrigerate. Rinse food processor with water.
2. For the mint pesto: Combine ingredients (mint through lemon) in a food processor and add a dash of salt and pepper. Pulse while drizzling olive oil in through the vegetable shoot until you reach desired consistency. Taste and adjust seasonings, if necessary.
3. Preheat a grill to medium high heat. In a bowl, combine all the meatball ingredients (except cooking spray). Work with your hands until everything is thoroughly combined. Form meatballs using your hands and place them on a plate. Brush meatballs with canola oil or spritz with cooking spray. Place them on the grill and cook, rotating a few times, about 8-10 minutes or until cooked through.
4. To serve, place meatballs in toasted or grilled pita bread. Drizzle with tzatziki and mint pesto and top with cucumbers, feta and fresh cilantro leaves.


_______________________________________

Megan Keno is the writer and photographer of Country Cleaver, a food blog fueled by Nutella and images of June Cleaver—if June wore cowboy boots and flannel, that is. A self-proclaimed country bum, Megan creates from-scratch recipes that range from simple to sublime and how-to’s to build your cooking repertoire. But she couldn’t do it without the help of her trusty—and furry—sous chef, Huckleberry. He’s a world class floor cleaner.


Profile photo of Natalie | Perry's Plate

Grilled Macadamia-Crusted Pineapple with Coconut Cream

Posted by in Step-by-Step Recipes

Tasty Kitchen Blog: Grilled Macadamia-Crusted Pineapple with Coconut Cream. Guest post by Natalie Perry of Perry's Plate, recipe submitted by TK member Taylor Kiser of Food Faith Fitness.

I big puffy heart love grilled pineapple. To me, it’s right up there with corn on the cob, watermelon, and drippy popsicles on my favorite summer food list. Cover it in crushed macadamia nuts and coconut cream, though? It’ll seem like you’re indulging, but it’s actually a pretty healthy treat!

I’ve been eyeing Taylor Kiser’s recipes for a while and her Grilled Macadamia-Crusted Pineapple with Coconut Cream caught my eye. Naturally.

Let’s make some!


Tasty Kitchen Blog: Grilled Macadamia-Crusted Pineapple with Coconut Cream. Guest post by Natalie Perry of Perry's Plate, recipe submitted by TK member Taylor Kiser of Food Faith Fitness.

You’ll need coconut milk, pineapple rings,macadamia nuts, honey, coconut oil, coconut sugar, and an egg.

Yes, I went with canned pineapple rings. I don’t have one of those nifty pineapple slicers. Plus, I had a 4-month-old baby strapped to my chest.

You’ll need to put the coconut milk in the fridge for several hours—preferably 24 hours.


Tasty Kitchen Blog: Grilled Macadamia-Crusted Pineapple with Coconut Cream. Guest post by Natalie Perry of Perry's Plate, recipe submitted by TK member Taylor Kiser of Food Faith Fitness.

Sprinkle some coconut sugar on the pineapple rings.


Tasty Kitchen Blog: Grilled Macadamia-Crusted Pineapple with Coconut Cream. Guest post by Natalie Perry of Perry's Plate, recipe submitted by TK member Taylor Kiser of Food Faith Fitness.

Flip them over and do the same on the other side.


Tasty Kitchen Blog: Grilled Macadamia-Crusted Pineapple with Coconut Cream. Guest post by Natalie Perry of Perry's Plate, recipe submitted by TK member Taylor Kiser of Food Faith Fitness.

Brush them with coconut oil.


Tasty Kitchen Blog: Grilled Macadamia-Crusted Pineapple with Coconut Cream. Guest post by Natalie Perry of Perry's Plate, recipe submitted by TK member Taylor Kiser of Food Faith Fitness.

Is your grill hot? You mean you don’t just leave it on all summer and constantly throw stuff on it? Party pooper.

Okay, grill those rings. You don’t have to make distinct grill marks, just get them golden brown and heated through. Flip them once, let them grill a little longer, then pull them off and set them aside.


Tasty Kitchen Blog: Grilled Macadamia-Crusted Pineapple with Coconut Cream. Guest post by Natalie Perry of Perry's Plate, recipe submitted by TK member Taylor Kiser of Food Faith Fitness.

Crush the nuts in a food processor or if your processor bowl happens to be in the dishwasher, use your blender. But be careful not to make macadamia nut butter. Not that that’s a bad thing, but in this case you might not want it.

Transfer the nuts to a shallow bowl.


Tasty Kitchen Blog: Grilled Macadamia-Crusted Pineapple with Coconut Cream. Guest post by Natalie Perry of Perry's Plate, recipe submitted by TK member Taylor Kiser of Food Faith Fitness.

Put your egg white into another shallow bowl.


Tasty Kitchen Blog: Grilled Macadamia-Crusted Pineapple with Coconut Cream. Guest post by Natalie Perry of Perry's Plate, recipe submitted by TK member Taylor Kiser of Food Faith Fitness.

Dip each ring into the egg white.


Tasty Kitchen Blog: Grilled Macadamia-Crusted Pineapple with Coconut Cream. Guest post by Natalie Perry of Perry's Plate, recipe submitted by TK member Taylor Kiser of Food Faith Fitness.

Then coat with the crushed nuts.


Tasty Kitchen Blog: Grilled Macadamia-Crusted Pineapple with Coconut Cream. Guest post by Natalie Perry of Perry's Plate, recipe submitted by TK member Taylor Kiser of Food Faith Fitness.

Throw the pineapple back on the grill for a few minutes until the nuts are lightly toasted. They burn easy, so keep an eye on them. I wouldn’t try to flip them or you’ll lose the coating.


Tasty Kitchen Blog: Grilled Macadamia-Crusted Pineapple with Coconut Cream. Guest post by Natalie Perry of Perry's Plate, recipe submitted by TK member Taylor Kiser of Food Faith Fitness.

Pull the coconut milk out of the fridge. Turn it upside down and open it from the bottom. Pour out the watery coconut milk and scrape out the cream at the bottom of the can. This is the coconut cream. Pretty cool, huh?


Tasty Kitchen Blog: Grilled Macadamia-Crusted Pineapple with Coconut Cream. Guest post by Natalie Perry of Perry's Plate, recipe submitted by TK member Taylor Kiser of Food Faith Fitness.

Stir in the honey, to taste.


Tasty Kitchen Blog: Grilled Macadamia-Crusted Pineapple with Coconut Cream. Guest post by Natalie Perry of Perry's Plate, recipe submitted by TK member Taylor Kiser of Food Faith Fitness.

Stack a few of those grilled, toasty pineapple rings …


Tasty Kitchen Blog: Grilled Macadamia-Crusted Pineapple with Coconut Cream. Guest post by Natalie Perry of Perry's Plate, recipe submitted by TK member Taylor Kiser of Food Faith Fitness.

And drizzle some cream on top. You could also put the cream in the fridge for several hours so it thickens up. I can’t wait that long. (Nor plan ahead these days.)


Tasty Kitchen Blog: Grilled Macadamia-Crusted Pineapple with Coconut Cream. Guest post by Natalie Perry of Perry's Plate, recipe submitted by TK member Taylor Kiser of Food Faith Fitness.

Eat up, friends.

Many thanks to Taylor Kiser for a delicious, light (paleo-friendly!) dessert! Go check out her blog Food Faith Fitness and her TK recipe box, which are both overflowing with great recipes.


Printable Recipe

Grilled Macadamia-Crusted Pineapple with Coconut Cream

See post on Taylor Kiser’s site!
0.00 Mitt(s) 0 Rating(s)0 votes, average: 0.00 out of 50 votes, average: 0.00 out of 50 votes, average: 0.00 out of 50 votes, average: 0.00 out of 50 votes, average: 0.00 out of 5

Prep Time:

Cook Time:

Difficulty: Easy

Servings: 4

4
x

Print Options

Page size Letter 3x5 4x6
Text Size Small Medium Large
Content Include description
Include prep time, etc.
Show image

Description

Smokey-sweet grilled pineapple is crusted with macadamia nuts and then layered with coconut whipped cream for an easy, healthy, paleo-friendly summer dessert!

Ingredients

  • FOR THE PINEAPPLE:
  • 12  Pineapple Rings
  • 5-½ Tablespoons Coconut Sugar, Divided
  • 1-¼ cup Dry Roasted Macadamia Nut Pieces
  • 2  Large Egg Whites
  • Coconut Oil, Melted (for Grilling)
  • FOR THE COCONUT CREAM:
  • 13 ounces, weight Canned Full-fat Coconut Milk, Chilled At Least 24 Hours
  • 2 Tablespoons Honey
  • Mint, For Garnish

Preparation Instructions

Note: I like to whip my coconut cream a few hours in advance and then cover and refrigerate it. This way it hardens up and doesn’t melt as quickly one sandwiched between the warm pineapple. If you want to do this, do step 7 first.

1. Rub your grill generously with coconut oil and preheat to medium/high heat.
2. Lightly pat the pineapple rings dry and place them into a large bowl. Toss with 3 tablespoons of the coconut sugar until evenly coated.
3. Place the pineapple onto the preheated grill and cook until lightly charred and caramelized, about 2 minutes. Flip and repeat again. Place grilled pineapple on a plate and set aside. Turn your grill down to medium heat.
4. While the pineapple cools, place macadamia pieces into a small food processor (mine is 3 cups size) and process until large crumbs form. Spread the crumbs into a large, sided plate. Place the egg whites into a medium bowl.
5. Take one pineapple ring and dunk it into the egg whites, shaking off the excess. Then, place the pineapple into the macadamia pieces, using your opposite hand, and gently press both sides into the nut pieces. You’ll need to lightly press the nuts on to adhere them to the pineapple. Place onto a separate plate and repeat with remaining pieces.
6. Brush a little more coconut oil on the grill and place the pineapple back on it. Cook until the macadamia pieces are just beginning to look charred and the egg appears to set, about 1-2 minutes per side. Watch carefully so you don’t burn them. Transfer to a plate and let them cool while you make the coconut cream.
7. Turn your can of chilled coconut milk upside down and open. Pour out the liquid that has risen to the top (save it for a smoothie later) and scoop the thick cream from the bottom of the can into a large bowl. Add in the honey and beat with an electric hand mixer until light and fluffy (see note).
8. Place one ring of pineapple down on your serving plate and spoon (or pipe, like I did) some coconut cream (about a heaping 1 ½ tablespoons) onto the center. Top with another ring and repeat. Finish with one more piece of pineapple and a squeeze of coconut cream. Repeat with remaining rings.
9. Garnish with mint, if desired, and devour immediately!


_______________________________________

Be sure to check out Natalie’s own beautiful food blog, Perrys’ Plate, where you can see her growing collection of lovely recipes. There’s always something new to see there. Go visit now!


Profile photo of georgiapellegrini

Barbecued Shrimp, New Orleans Style

Posted by in Step-by-Step Recipes

Tasty Kitchen Blog: Paul's Barbecued Shrimp. Guest post by Georgia Pellegrini, recipe submitted by TK member Jennifer of Food Orleans.

 
This barbecued shrimp recipe from Food Orleans was utterly wonderful. There was just enough breading and seasoning without it dominating the flavor of the shrimp, but enough to give it a great texture. Jennifer explains that New Orleans style barbecued shrimp is buttered, not barbecued. I’m down with that.


Tasty Kitchen Blog: Paul's Barbecued Shrimp. Guest post by Georgia Pellegrini, recipe submitted by TK member Jennifer of Food Orleans.

Here is what you will need: onion powder, garlic powder, white pepper, dried thyme, dried oregano, dried rosemary, ground cumin, cayenne pepper, paprika, kosher salt, cracked black pepper, all-purpose flour, shrimp (shelled and deveined), and unsalted butter.


Tasty Kitchen Blog: Paul's Barbecued Shrimp. Guest post by Georgia Pellegrini, recipe submitted by TK member Jennifer of Food Orleans.

Combine all of the spices together!


Tasty Kitchen Blog: Paul's Barbecued Shrimp. Guest post by Georgia Pellegrini, recipe submitted by TK member Jennifer of Food Orleans.

Then whisk in the flour.


Tasty Kitchen Blog: Paul's Barbecued Shrimp. Guest post by Georgia Pellegrini, recipe submitted by TK member Jennifer of Food Orleans.

Pat your shrimp dry and then throw them in the bowl.


Tasty Kitchen Blog: Paul's Barbecued Shrimp. Guest post by Georgia Pellegrini, recipe submitted by TK member Jennifer of Food Orleans.

Give them a nice toss in the mixture, making sure to scoop it all from the bottom.


Tasty Kitchen Blog: Paul's Barbecued Shrimp. Guest post by Georgia Pellegrini, recipe submitted by TK member Jennifer of Food Orleans.

Like so. You want a nice coating so that all of the flavor gets used up.


Tasty Kitchen Blog: Paul's Barbecued Shrimp. Guest post by Georgia Pellegrini, recipe submitted by TK member Jennifer of Food Orleans.

Meanwhile, in a skillet melt a good dose of butter. If you want extra juice to sop up with the bread, you’ll want extra butter. Or if you just want to gobble the shrimp up without the bread, you won’t need quite as much.


Tasty Kitchen Blog: Paul's Barbecued Shrimp. Guest post by Georgia Pellegrini, recipe submitted by TK member Jennifer of Food Orleans.

Add the shrimp to the skillet in one layer.


Tasty Kitchen Blog: Paul's Barbecued Shrimp. Guest post by Georgia Pellegrini, recipe submitted by TK member Jennifer of Food Orleans.

After about 3 minutes, when things are nice and golden brown on one side, turn them over one at a time and let them brown on the other side. They’ll curl and firm up and turn reddish under the breading once they’re ready.


Tasty Kitchen Blog: Paul's Barbecued Shrimp. Guest post by Georgia Pellegrini, recipe submitted by TK member Jennifer of Food Orleans.

You can serve this with bread if you have extra sauce, or it would also be wonderful with some greens as part of a salad. It was such an addictive dish, thanks so much to Jennifer for sharing it with us! Check out her blog Food Orleans for more deliciousness.


Printable Recipe

Paul’s Barbecued Shrimp

See post on food orleans’s site!
4.40 Mitt(s) 5 Rating(s)5 votes, average: 4.40 out of 55 votes, average: 4.40 out of 55 votes, average: 4.40 out of 55 votes, average: 4.40 out of 55 votes, average: 4.40 out of 5

Prep Time:

Cook Time:

Difficulty: Easy

Servings: 4

4
x

Print Options

Page size Letter 3x5 4x6
Text Size Small Medium Large
Content Include description
Include prep time, etc.
Show image

Description

New Orleans-style barbecued shrimp isn’t barbecued—it’s buttered. Serve small portions as tapas, for the love of all that’s holy.

Ingredients

  • ¼ teaspoons Onion Powder
  • ¼ teaspoons Garlic Powder
  • ¼ teaspoons White Pepper
  • ¼ teaspoons Dried Thyme
  • ¼ teaspoons Dried Oregano
  • ¼ teaspoons Dried Rosemary, Crumbled
  • ¼ teaspoons Ground Cumin
  • ½ teaspoons Cayenne Pepper
  • 1 teaspoon Paprika
  • 1 teaspoon Kosher Salt
  • 1 teaspoon Cracked Black Pepper
  • ¼ cups All-purpose Flour
  • 1 pound Shrimp, Shelled And Deveined
  • 6 Tablespoons Unsalted Butter
  • 4 slices Ciabatta Or Other Bread, For Serving

Preparation Instructions

Combine onion powder and the rest of the spices in a small bowl. Mix well and taste it a little bit; the mixture should be very tasty and spicy, so add more of anything you think it needs. Add flour and mix well.

Pat shrimp dry with paper towels, then toss to coat with spice mixture.

Heat a medium cast-iron or other heavy skillet over high heat. Add butter and swirl pan to melt.

When butter is just melted, add shrimp to pan and cook without disturbing for about 2 minutes. Turn shrimp over and cook another 3–4 minutes, or until curled and opaque throughout.

Serve shrimp and butter drizzled over bread. Gracious.


_______________________________________

There’s so much to say about Georgia, we don’t know where to start. Leaving Wall Street for the French Culinary Institute, followed by a stint at the Gramercy Tavern and La Chassagnette in France, her passion for food and food traditions are evident and inspiring. Visit her site at Georgia Pellegrini, where you’ll find more recipes, photos, learn all about her wonderful books Girl Hunter and Food Heroes, and enjoy her latest adventures.


Profile photo of cookincanuck

Rhubarb Margaritas

Posted by in Step-by-Step Recipes

  One of the joys of late spring and early summer is the abundance of rhubarb at the markets and in my neighbors’ backyards. Okay, those neighbors haven’t actually offered to share their rhubarb with me yet, but perhaps I could bribe them with a couple of rhubarb desserts or, better yet, one of these […]

Profile photo of missamy

Strawberry Sherbet

Posted by in Step-by-Step Recipes

  Aren’t simple recipes the best? Tasty recipes that call for a few simple ingredients, and very little fuss are the ones I turn to time and time again. They’re easy to remember, usually cost very little, and more often than not, with little to muddle the flavors of the few ingredients involved, they usually […]

Profile photo of EatLiveRun

Fresh Ginger Dressing

Posted by in Step-by-Step Recipes

  I love homemade salad dressing, but for some odd reason, never make it! Then, after having dinner at a friend’s house a few weeks ago where I tasted the most delicious homemade dressing that she just whipped up a few minutes before the meal, I got inspired. I was ready. Good salad dressing really […]

Profile photo of Erika (TK)

Looks Delicious! Roasted Salmon

Posted by in Looks Delicious!

  Now that Tuesday’s revelry is behind us, it’s time to slow it down a bit. Gastronomically speaking, that is. Today marks the day that many begin a period of fasting and sacrifice. Most choose to give up the one thing they enjoy the most: chocolate, cheese, alcohol, bacon (say it isn’t so), red meat […]