The Pioneer Woman Tasty Kitchen
Profile photo of twopeasandtheirpod

Sea Salt and Honey Almond Butter

Posted by in Step-by-Step Recipes

Tasty Kitchen Blog: Sea Salt and Honey Almond Butter. Guest post by Maria Lichty of Two Peas and Their Pod, recipe submitted by TK member Erin of Naturally Ella.

 
Have you ever made nut butter at home? If not, what are you waiting for? It is so easy and much cheaper than buying at the store. I make homemade peanut butter and almond butter all of the time. I like to try new variations of my favorite nut butters, so when I saw Erin’s (Naturally Ella) recipe for Sea Salt and Honey Almond Butter I knew I was in for a special treat. I had everything in my pantry so I busted out my food processor and got started. 


Tasty Kitchen Blog: Sea Salt and Honey Almond Butter. Guest post by Maria Lichty of Two Peas and Their Pod, recipe submitted by TK member Erin of Naturally Ella.

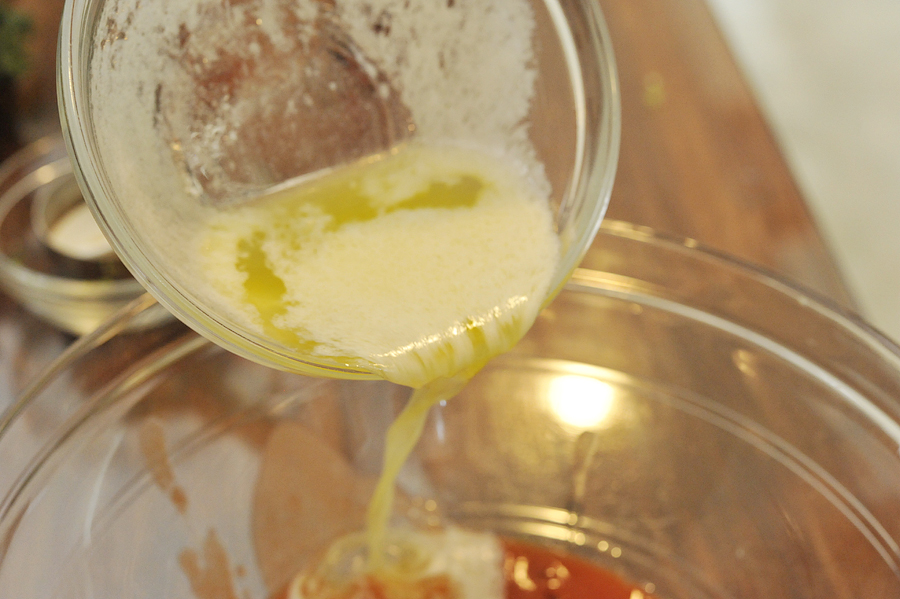
To make it you will need: almonds, honey, and sea salt. Yes, there are only three ingredients involved in making this delicious almond butter. Big time bonus, huh? 


Tasty Kitchen Blog: Sea Salt and Honey Almond Butter. Guest post by Maria Lichty of Two Peas and Their Pod, recipe submitted by TK member Erin of Naturally Ella.

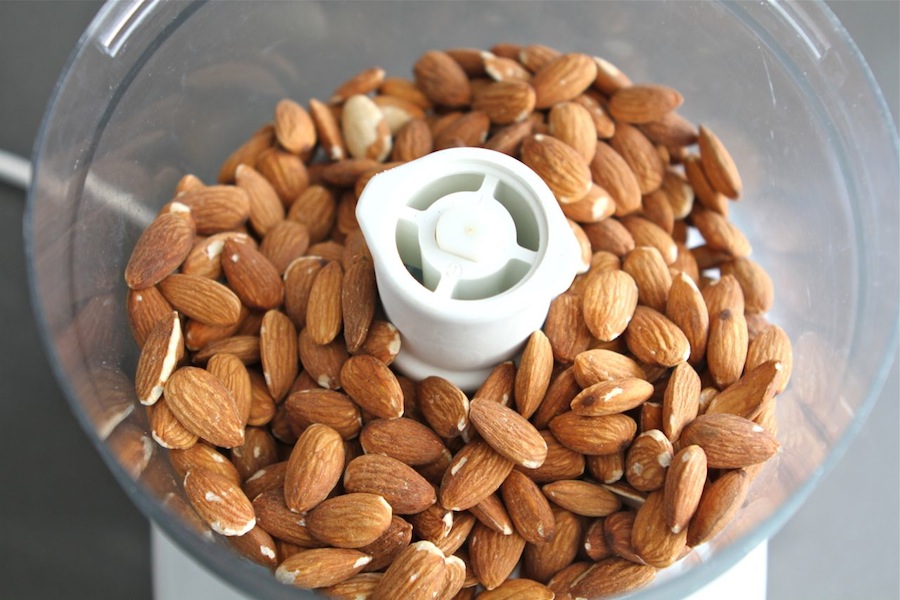
Place the almonds in the food processor. 


Tasty Kitchen Blog: Sea Salt and Honey Almond Butter. Guest post by Maria Lichty of Two Peas and Their Pod, recipe submitted by TK member Erin of Naturally Ella.

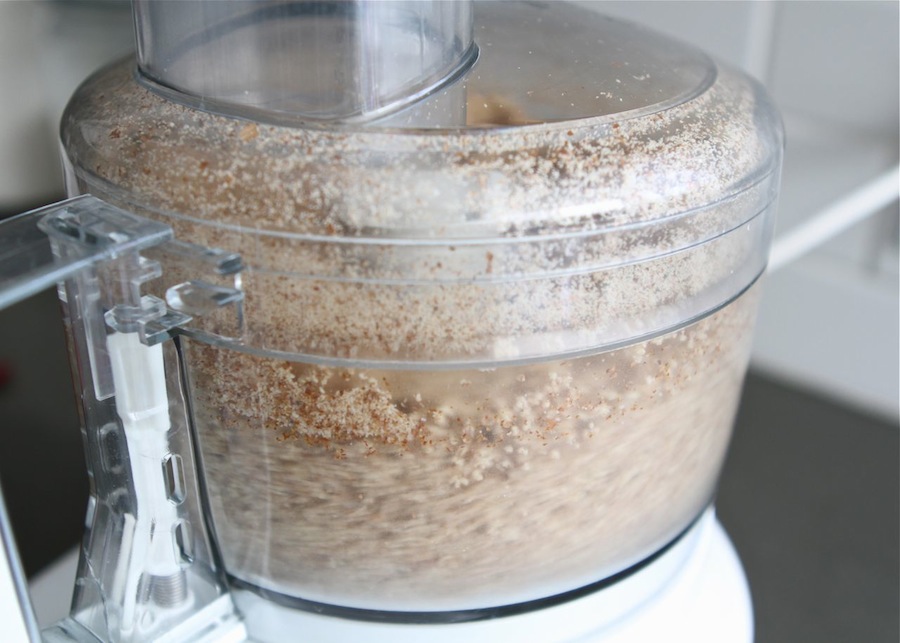
Turn on the food processor and let it work its magic. 


Tasty Kitchen Blog: Sea Salt and Honey Almond Butter. Guest post by Maria Lichty of Two Peas and Their Pod, recipe submitted by TK member Erin of Naturally Ella.

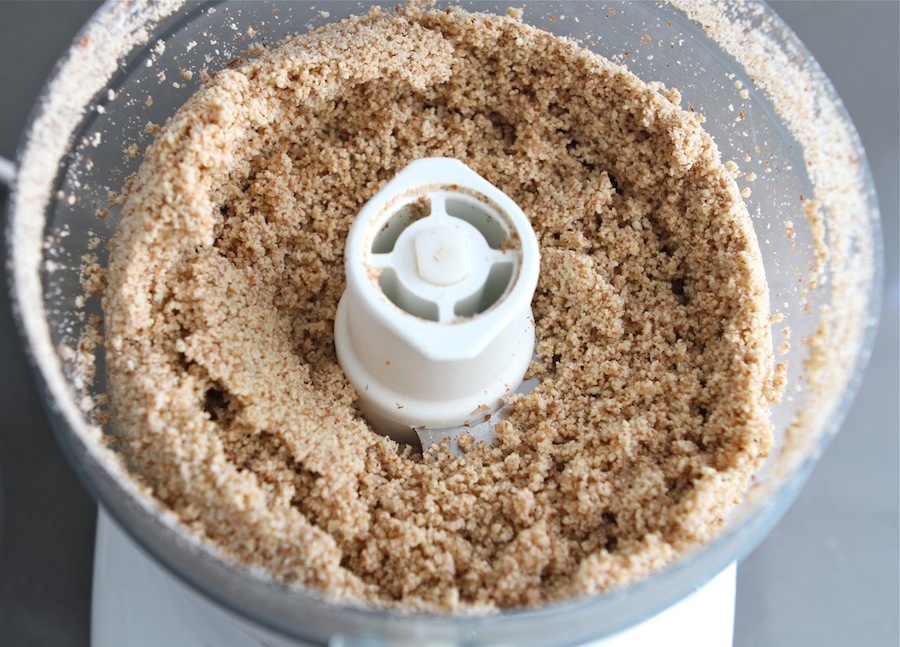
The almonds will go through different stages. Keep the food processor going until the almonds release their oils. 


Tasty Kitchen Blog: Sea Salt and Honey Almond Butter. Guest post by Maria Lichty of Two Peas and Their Pod, recipe submitted by TK member Erin of Naturally Ella.

The almonds will start to ball up right before it is ready. 


Tasty Kitchen Blog: Sea Salt and Honey Almond Butter. Guest post by Maria Lichty of Two Peas and Their Pod, recipe submitted by TK member Erin of Naturally Ella.

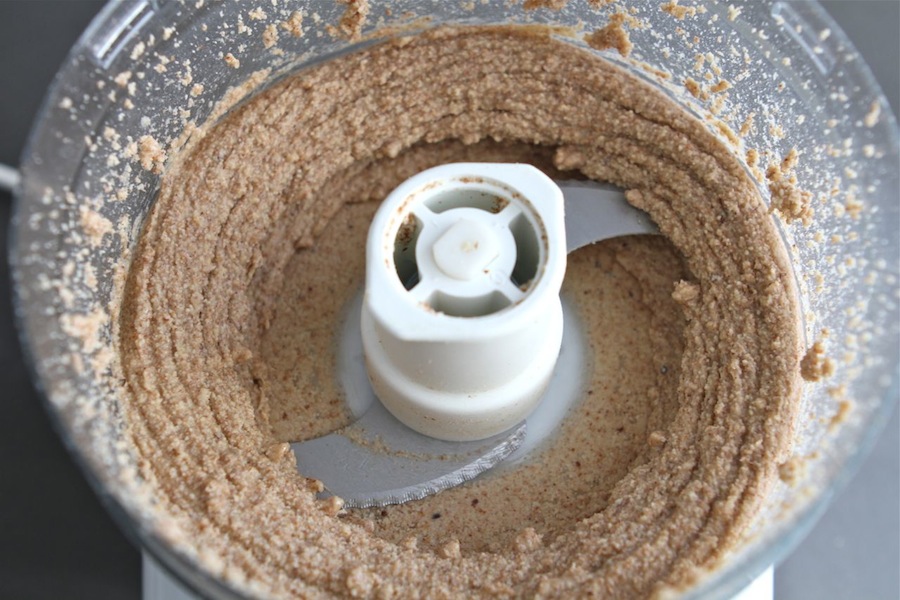
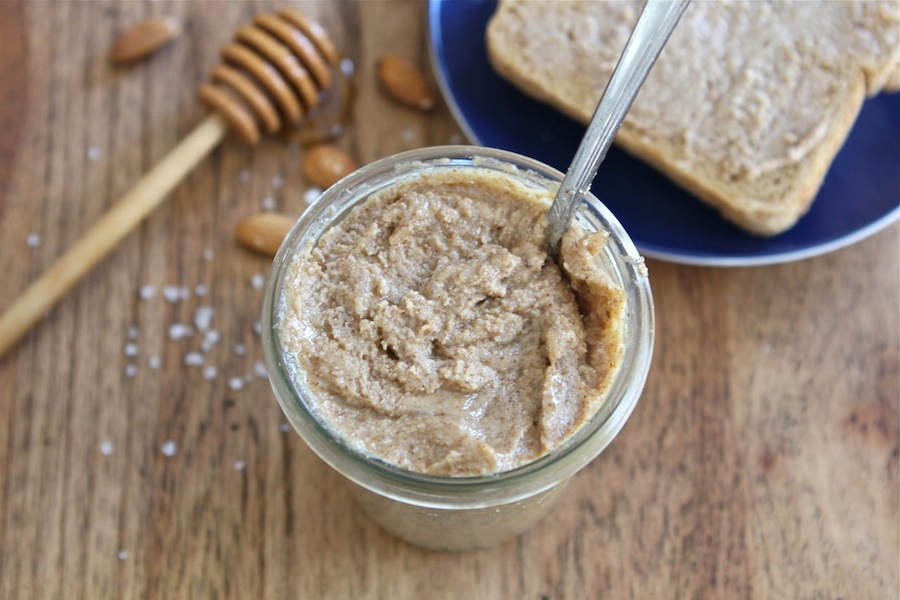
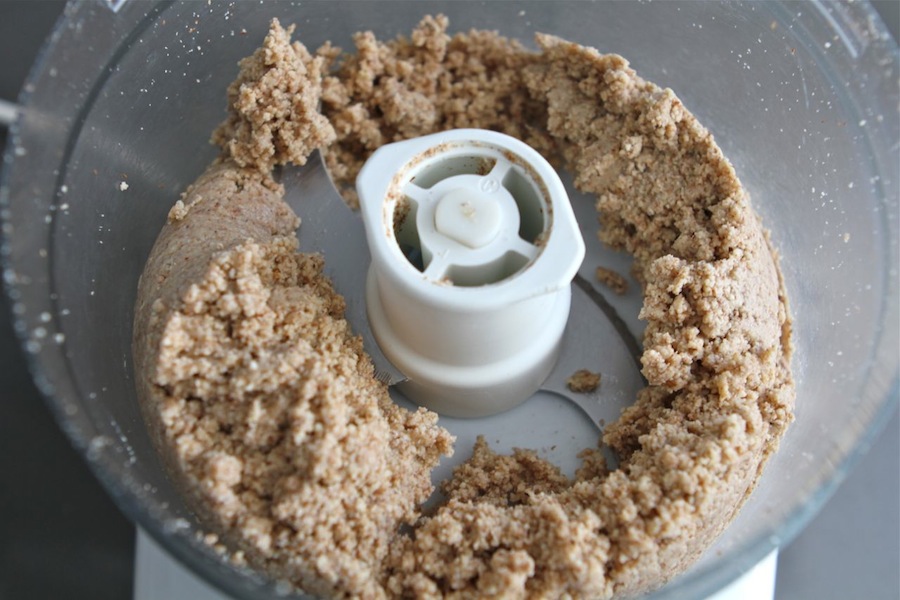
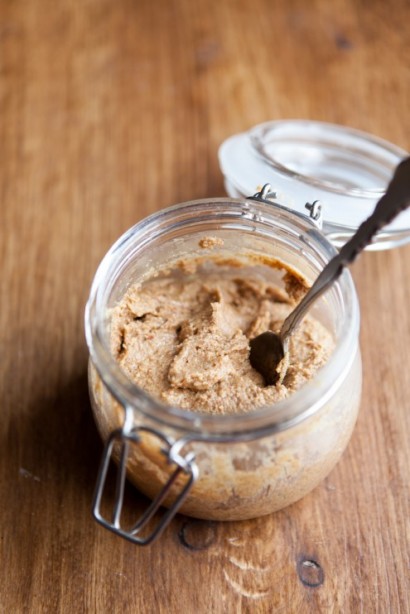
Then the almonds will turn into a smooth and creamy butter. When you get to this stage, you are good to go. 


Tasty Kitchen Blog: Sea Salt and Honey Almond Butter. Guest post by Maria Lichty of Two Peas and Their Pod, recipe submitted by TK member Erin of Naturally Ella.

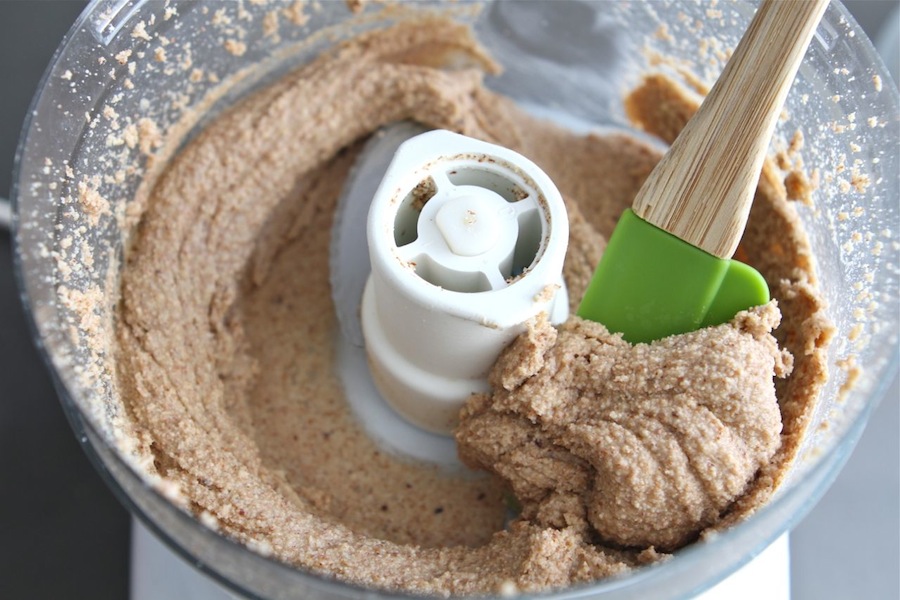
Turn off the food processor and scrape the almond butter into a large jar. 


Tasty Kitchen Blog: Sea Salt and Honey Almond Butter. Guest post by Maria Lichty of Two Peas and Their Pod, recipe submitted by TK member Erin of Naturally Ella.

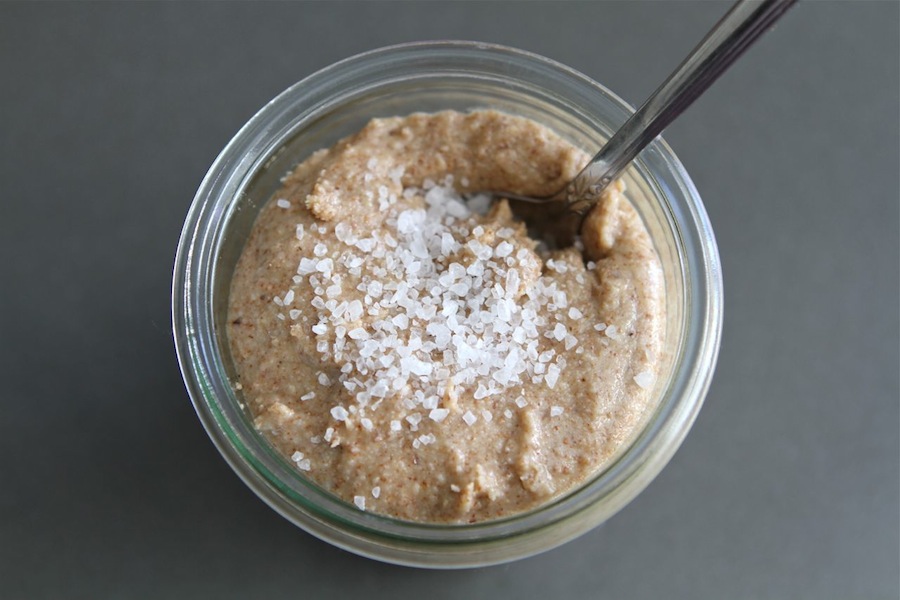
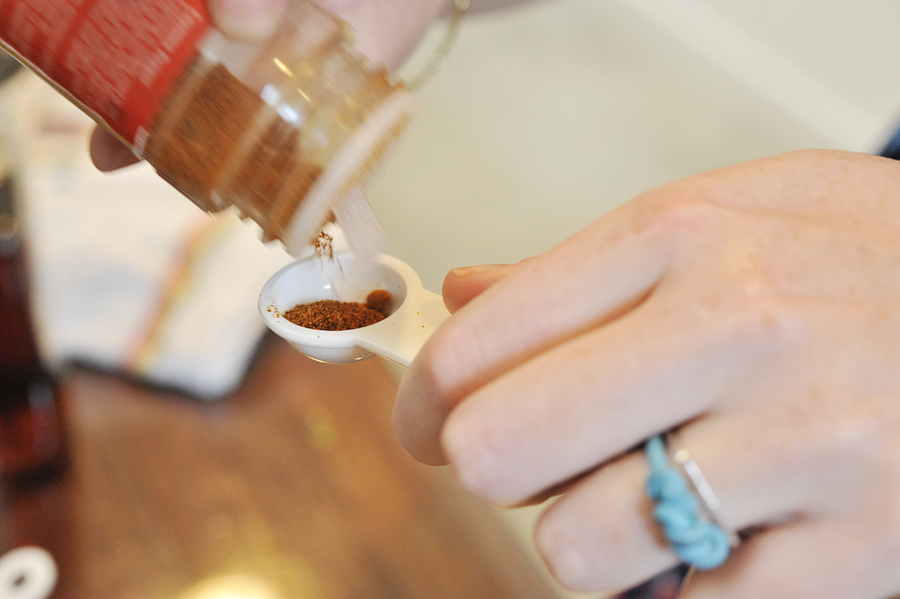
Sprinkle in sea salt. 


Tasty Kitchen Blog: Sea Salt and Honey Almond Butter. Guest post by Maria Lichty of Two Peas and Their Pod, recipe submitted by TK member Erin of Naturally Ella.

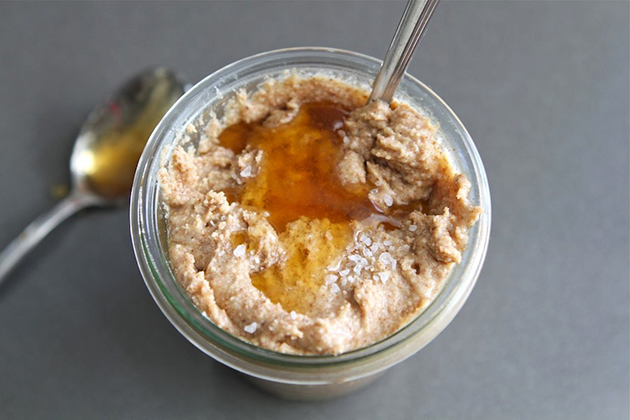
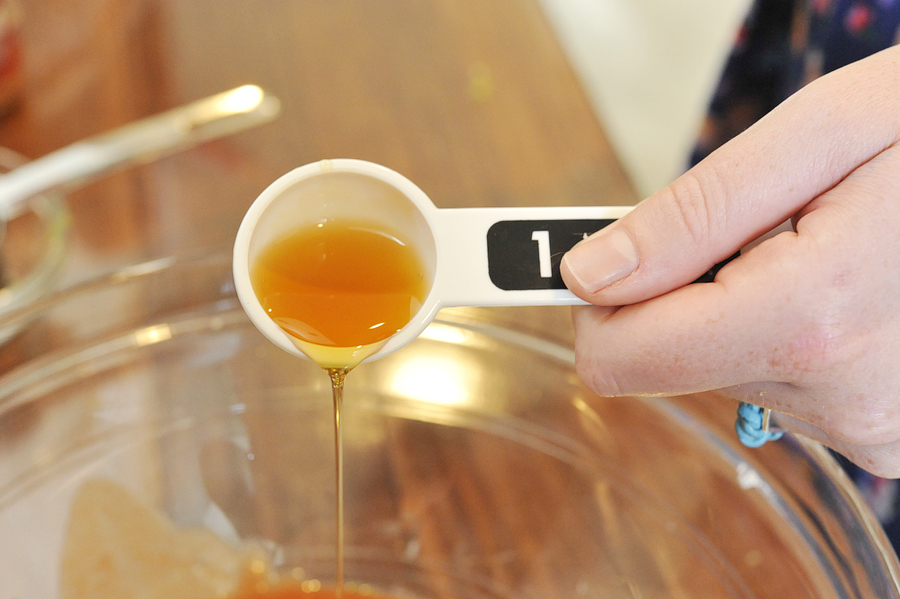
Add in the honey. Stir until combined. Taste the almond butter and adjust sweet/salty combination to your liking. 


Tasty Kitchen Blog: Sea Salt and Honey Almond Butter. Guest post by Maria Lichty of Two Peas and Their Pod, recipe submitted by TK member Erin of Naturally Ella.

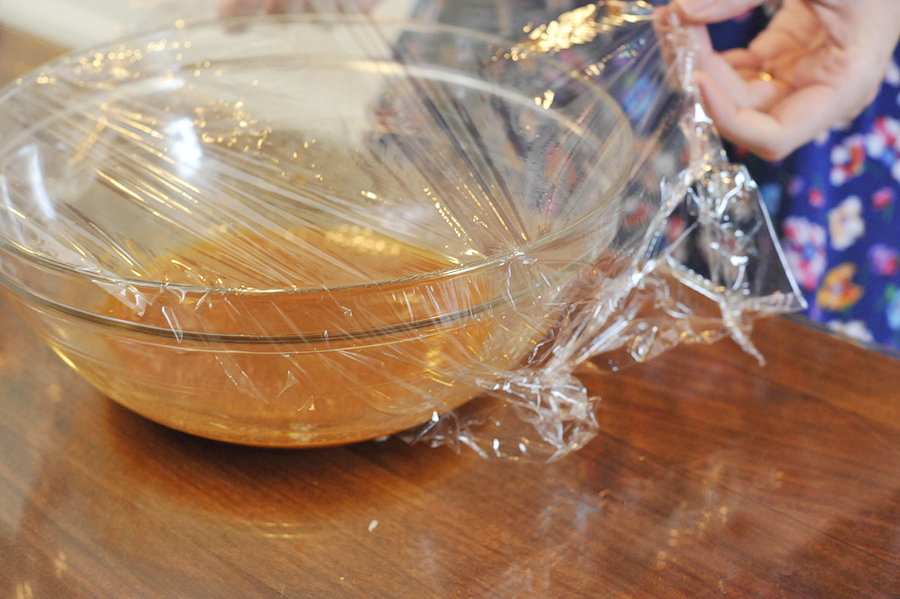
Cover the jar with a lid and store in the refrigerator. 


Tasty Kitchen Blog: Sea Salt and Honey Almond Butter. Guest post by Maria Lichty of Two Peas and Their Pod, recipe submitted by TK member Erin of Naturally Ella.

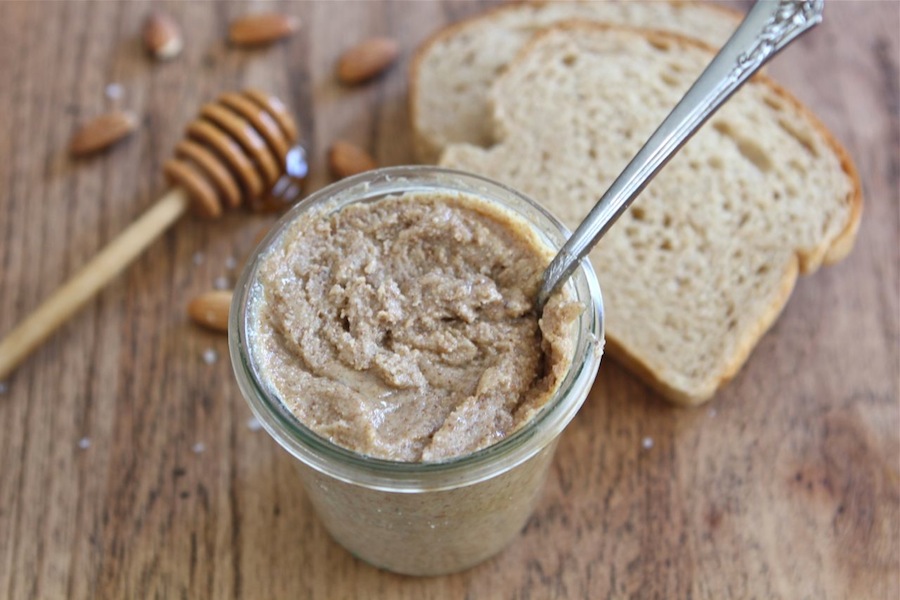
Homemade nut butter in under ten minutes, with only three ingredients—you’ve got to get in on this! It’s so easy and so good! I am in love with the sweet and salty combo. I could eat it straight from the jar, but I try to control myself. I love to eat it on apple slices, toast, or crackers. It is great for breakfast or a healthy snack. 

Thanks Erin for sharing your Sea Salt and Honey Almond Butter recipe. My jar is already half empty and it’s only been a few days. I guess I will be whipping up another batch soon. For other delicious and healthy recipes, visit Erin’s beautiful blog, Naturally Ella


Printable Recipe

Sea Salt and Honey Almond Butter

See post on Erin’s site!
5.00 Mitt(s) 2 Rating(s)2 votes, average: 5.00 out of 52 votes, average: 5.00 out of 52 votes, average: 5.00 out of 52 votes, average: 5.00 out of 52 votes, average: 5.00 out of 5

Prep Time:

Cook Time:

Difficulty: Easy

Servings: 12

12
x

Print Options

Page size Letter 3x5 4x6
Text Size Small Medium Large
Content Include description
Include prep time, etc.
Show image

Description

Homemade almond butter that beats out store bought any day!

Ingredients

  • 2 cups Dry Roasted Almonds
  • 1 teaspoon Sea Salt
  • 2 Tablespoons Honey

Preparation Instructions

Place almonds in a food processor and turn on. Almonds will go through different stages but you will want to let your food processor run until the oil has released and almond butter has smoothed out (it will ball up right before this happens). Turn off food processor and transfer to a mason jar.

Stir in salt and honey; taste. Adjust sweet/salty combination to your liking. Cover with an airtight lid and keep in the refrigerator.


_______________________________________

Maria and her husband Josh (who she affectionately refers to as her “dough boy”) blog at Two Peas and Their Pod. They’ve been featured on Saveur, Eatocracy, Gourmet Live, Glamour, and the Los Angeles Times, to name just a few. They’d also just recently added a little pea to their pod. We’re so glad to have them here!


Profile photo of Laurie - Simply Scratch

Orecchiette Bolognese

Posted by in Step-by-Step Recipes

Tasty Kitchen Blog: Orecchiette Bolognese. Guest post by Laurie McNamara of Simply Scratch, recipe submitted by TK member Nam of The Culinary Chronicles.

 
Chilly evenings, to me, call for a big pot of Bolognese bubbling away on the stove.

As soon as the cold weather sets in, there isn’t anything I crave more than this Orecchiette Bolognese. Maybe it’s the different meats and spices, maybe it’s the wine, or all of the above? I’m not quite sure but I’m pretty certain I give a little sigh after each and every bite I take.

Fact: This is the fourth time I’ve made Nam’s recipe. Yes, fourth! Nam posted this recipe a while back and it has been in my recipe repertoire ever since. And after the third time of making this amazing sauce it dawned on me that maybe I should share it with all of you here on the Tasty Kitchen Blog because honestly, it’s way too good not to!


Tasty Kitchen Blog: Orecchiette Bolognese. Guest post by Laurie McNamara of Simply Scratch, recipe submitted by TK member Nam of The Culinary Chronicles.

The base to any Bolognese is the mirepoix or the combination of celery, onions and carrots. And from thereon out you build and layer ingredients, simmer and layer some more to create the magnificent flavors of this Bolognese sauce. Then the sauce simmers until your nostrils can no longer stand the fabulous aroma and you simply need to have a big bowl of pasta ASAP.


Tasty Kitchen Blog: Orecchiette Bolognese. Guest post by Laurie McNamara of Simply Scratch, recipe submitted by TK member Nam of The Culinary Chronicles.

So grab your celery, carrots, onion and garlic. Use a sharp knife to dice them pretty fine.


Tasty Kitchen Blog: Orecchiette Bolognese. Guest post by Laurie McNamara of Simply Scratch, recipe submitted by TK member Nam of The Culinary Chronicles.

Add a little olive oil to a 4 to 5-quart Dutch oven and add the minced vegetables and garlic to the pot.


Tasty Kitchen Blog: Orecchiette Bolognese. Guest post by Laurie McNamara of Simply Scratch, recipe submitted by TK member Nam of The Culinary Chronicles.

Sauté until the vegetables are soft, stirring occasionally. Measure and add in the red pepper flakes and continue to cook for an additional minute.


Tasty Kitchen Blog: Orecchiette Bolognese. Guest post by Laurie McNamara of Simply Scratch, recipe submitted by TK member Nam of The Culinary Chronicles.

Now add in both the ground beef and veal and use a wooden spoon to break up the meat into small pieces.


Tasty Kitchen Blog: Orecchiette Bolognese. Guest post by Laurie McNamara of Simply Scratch, recipe submitted by TK member Nam of The Culinary Chronicles.

Once the meat is fully cooked, add in the fresh thyme, bay leaf and tomato paste.


Tasty Kitchen Blog: Orecchiette Bolognese. Guest post by Laurie McNamara of Simply Scratch, recipe submitted by TK member Nam of The Culinary Chronicles.

Stir to combine and cook for 2-3 minutes.


Tasty Kitchen Blog: Orecchiette Bolognese. Guest post by Laurie McNamara of Simply Scratch, recipe submitted by TK member Nam of The Culinary Chronicles.

Now add in the heavy cream (or whole milk) and let it simmer until the cream has evaporated, about 10 minutes.


Tasty Kitchen Blog: Orecchiette Bolognese. Guest post by Laurie McNamara of Simply Scratch, recipe submitted by TK member Nam of The Culinary Chronicles.

Once that is done, add in the wine. Just like the heavy cream, let it simmer until evaporated, about 10 more minutes.


Tasty Kitchen Blog: Orecchiette Bolognese. Guest post by Laurie McNamara of Simply Scratch, recipe submitted by TK member Nam of The Culinary Chronicles.

Next add in the crushed tomatoes and their juices.


Tasty Kitchen Blog: Orecchiette Bolognese. Guest post by Laurie McNamara of Simply Scratch, recipe submitted by TK member Nam of The Culinary Chronicles.

Stir and bring the sauce to a boil, then reduce to the lowest setting and simmer for 2-1/2 hours, stirring every 20 minutes or so. In the last half hour is when I like to bring a large pot of water to a boil, season with kosher salt and make the pasta as directed on the package. My rule of thumb: the sauce can always wait for the pasta and not the other way around. So I make sure the pasta sauce is pretty much done before starting on the orecchiette.


Tasty Kitchen Blog: Orecchiette Bolognese. Guest post by Laurie McNamara of Simply Scratch, recipe submitted by TK member Nam of The Culinary Chronicles.

I quickly check the Bolognese sauce and season with kosher salt and fresh ground black pepper to taste.


Tasty Kitchen Blog: Orecchiette Bolognese. Guest post by Laurie McNamara of Simply Scratch, recipe submitted by TK member Nam of The Culinary Chronicles.

Remove the bay leaves before combining the sauce with the cooked and drained orecchiette.


Tasty Kitchen Blog: Orecchiette Bolognese. Guest post by Laurie McNamara of Simply Scratch, recipe submitted by TK member Nam of The Culinary Chronicles.

Simply serve with minced parsley and, in my case, lots of fresh grated Parmesan cheese!

I’m so excited to feature this recipe on the Tasty Kitchen Blog. It’s my go-to Bolognese because it’s so simple and straight-forward. Oh, and it’s pretty darn delicious, too! This also freezes beautifully so you can definitely make a double batch and freeze it for a quick and cozy dinner on a busy weeknight. The wine is subtle, but the sauce has so many flavors going on and will have you licking your bowl. Trust me on this.


Tasty Kitchen Blog: Orecchiette Bolognese. Guest post by Laurie McNamara of Simply Scratch, recipe submitted by TK member Nam of The Culinary Chronicles.

Be sure you check out Nam’s blog The Culinary Chronicles and browse through her well-established TK recipe box. She’s has a plethora of delicious recipes to choose from!

Thank you Nam for this gem of a recipe. It definitely is a much-loved recipe in our home—and many others, I’m sure!


Printable Recipe

Orecchiette Bolognese

See post on Nam | The Culinary Chronicles’s site!
5.00 Mitt(s) 6 Rating(s)6 votes, average: 5.00 out of 56 votes, average: 5.00 out of 56 votes, average: 5.00 out of 56 votes, average: 5.00 out of 56 votes, average: 5.00 out of 5

Prep Time:

Cook Time:

Difficulty: Easy

Servings: 6

6
x

Print Options

Page size Letter 3x5 4x6
Text Size Small Medium Large
Content Include description
Include prep time, etc.
Show image

Description

Orecchiette Bolognese, rich and meaty and deliciously tummy-warming.

Ingredients

  • 3 Tablespoons Olive Oil
  • 1 cup White Onion, Finely Minced
  • 1 cup Carrots, Finely Minced
  • 1 cup Celery, Finely Minced
  • 1 Tablespoon Fresh Garlic, Finely Minced
  • ½ teaspoons Dried Red Chili Flakes (or Less Depending On Your Heat Preference)
  • 1 pound Ground Beef
  • ½ pounds Ground Veal
  • 1 Tablespoon Fresh Thyme Leaves
  • 2 whole Bay Leaves
  • 2 Tablespoons Tomato Paste
  • 1 cup Milk Or Cream
  • 1 cup Dry Red Wine
  • 1 can (28 Oz. Size) Crushed Tomatoes
  • Kosher Salt And Black Pepper To Taste
  • 1 pound Orecchiette Pasta, Cooked Al Dente
  • Grated Parmesan Cheese
  • Fresh Italian Parsley, Chopped

Preparation Instructions

Heat olive oil in a large heavy pot. Add onions, carrots, celery, and garlic. Saute until softened but not browned. Add chili flakes and sauté for an additional minute. Add beef, veal, and ½ teaspoon of kosher salt. Use a wooden spoon to crumble the meat and break into small pieces. Once the meat is no longer pink, add thyme and bay leaves. Add tomato paste and cook for an additional 2-3 minutes.

Add the milk and bring to a simmer. Continue simmering until all the milk has evaporated and only clear juices remain, about 10 minutes. Add the wine and bring to a simmer. Continue simmering until all the wine has evaporated, about 10 minutes.

Add tomatoes with their juices and bring to a boil, then place the heat at the lowest setting. Continue on this very low simmer for 2 – 2 ½ hours, stirring every 20 minutes until you get a rich, thick meaty sauce. Check for seasonings and add kosher salt and pepper accordingly.

Toss the cooked orecchiette in the bolognese sauce and serve topped with parmesan cheese. Garnish with Italian parsley and enjoy!


_______________________________________

Laurie is the force behind Simply Scratch, a blog that documents her efforts to find and create recipes that are made simply from scratch. (We think it’s sweet that her mother-in-law helped her set up her blog and get started.) We love her recipes; they’re not just tried and true, but they look gorgeous as well. Check out her blog and you’ll become a fan too.


Profile photo of Faith (An Edible Mosaic)

Chicken Alfredo Garlic Bread Pizza

Posted by in Step-by-Step Recipes

Tasty Kitchen Blog: Chicken Alfredo Garlic Bread Pizza. Guest post by Faith Gorsky of An Edible Mosaic, recipe submitted by TK member Jennifer of Mother Thyme.

 
Tasty Kitchen member Jennifer is the mastermind behind the brilliant idea that is Chicken Alfredo Garlic Bread Pizza.

Did you hear that? Chicken Alfredo. Garlic Bread. Pizza. All rolled into one!

Those are three pretty fantastic reasons to make this recipe.

This is perfect as an appetizer, party finger food, or even a weeknight main dish along with a side salad. It literally has layer upon layer of flavor: buttery garlic bread spread, then chicken in a creamy Alfredo sauce, broccoli, and finally a layer of gooey cheese. It doesn’t get any more satisfying.

You know you want to make it!


Tasty Kitchen Blog: Chicken Alfredo Garlic Bread Pizza. Guest post by Faith Gorsky of An Edible Mosaic, recipe submitted by TK member Jennifer of Mother Thyme.

The recipe starts off by shredding a couple different kinds of cheese. First, some Parmesan for making the Alfredo sauce …


Tasty Kitchen Blog: Chicken Alfredo Garlic Bread Pizza. Guest post by Faith Gorsky of An Edible Mosaic, recipe submitted by TK member Jennifer of Mother Thyme.

And mozzarella for topping. Mmm, cheese.


Tasty Kitchen Blog: Chicken Alfredo Garlic Bread Pizza. Guest post by Faith Gorsky of An Edible Mosaic, recipe submitted by TK member Jennifer of Mother Thyme.

The ingredient list is fairly short for something so delicious! You’ll need cooked, shredded chicken, steamed broccoli, butter, half and half, mozzarella cheese, Parmesan cheese, parsley flakes, garlic powder, salt, pepper, a loaf of Italian bread, and a clove of garlic (which I think was hiding behind my bread in the photo above!).


Tasty Kitchen Blog: Chicken Alfredo Garlic Bread Pizza. Guest post by Faith Gorsky of An Edible Mosaic, recipe submitted by TK member Jennifer of Mother Thyme.

Press or mince the garlic.


Tasty Kitchen Blog: Chicken Alfredo Garlic Bread Pizza. Guest post by Faith Gorsky of An Edible Mosaic, recipe submitted by TK member Jennifer of Mother Thyme.

Melt the butter.


Tasty Kitchen Blog: Chicken Alfredo Garlic Bread Pizza. Guest post by Faith Gorsky of An Edible Mosaic, recipe submitted by TK member Jennifer of Mother Thyme.

Add the garlic and cook for a minute.

Slowly stir in the half-and-half. I had a little bit of a half-and-half mishap while trying to simultaneously stir, slowly pour, and shoot a picture. I won’t get into it but suffice to say, you’ll have to use your imagination to visualize the adding of the half-and-half.


Tasty Kitchen Blog: Chicken Alfredo Garlic Bread Pizza. Guest post by Faith Gorsky of An Edible Mosaic, recipe submitted by TK member Jennifer of Mother Thyme.

Add the Parmesan cheese.


Tasty Kitchen Blog: Chicken Alfredo Garlic Bread Pizza. Guest post by Faith Gorsky of An Edible Mosaic, recipe submitted by TK member Jennifer of Mother Thyme.

Give it a stir, cooking a couple minutes until thickened.


Tasty Kitchen Blog: Chicken Alfredo Garlic Bread Pizza. Guest post by Faith Gorsky of An Edible Mosaic, recipe submitted by TK member Jennifer of Mother Thyme.

Take the Alfredo sauce off the heat and add parsley flakes, salt, and pepper. Try not to eat it with a spoon.


Tasty Kitchen Blog: Chicken Alfredo Garlic Bread Pizza. Guest post by Faith Gorsky of An Edible Mosaic, recipe submitted by TK member Jennifer of Mother Thyme.

For the garlic bread, blend together more butter, garlic powder, and more parsley flakes in a bowl.

In another bowl, stir together the chicken and Alfredo sauce.

Preheat the oven to 375ºF. Line a large baking sheet with foil or a Silpat liner. (I was out of foil.)


Tasty Kitchen Blog: Chicken Alfredo Garlic Bread Pizza. Guest post by Faith Gorsky of An Edible Mosaic, recipe submitted by TK member Jennifer of Mother Thyme.

Slice the loaf of bread in half lengthwise and place it on the prepared baking sheet.


Tasty Kitchen Blog: Chicken Alfredo Garlic Bread Pizza. Guest post by Faith Gorsky of An Edible Mosaic, recipe submitted by TK member Jennifer of Mother Thyme.

Top with the butter spread.


Tasty Kitchen Blog: Chicken Alfredo Garlic Bread Pizza. Guest post by Faith Gorsky of An Edible Mosaic, recipe submitted by TK member Jennifer of Mother Thyme.

Then the chicken-Alfredo mixture.


Tasty Kitchen Blog: Chicken Alfredo Garlic Bread Pizza. Guest post by Faith Gorsky of An Edible Mosaic, recipe submitted by TK member Jennifer of Mother Thyme.

And the broccoli …


Tasty Kitchen Blog: Chicken Alfredo Garlic Bread Pizza. Guest post by Faith Gorsky of An Edible Mosaic, recipe submitted by TK member Jennifer of Mother Thyme.

And then finally that beautiful mountain of mozzarella.


Tasty Kitchen Blog: Chicken Alfredo Garlic Bread Pizza. Guest post by Faith Gorsky of An Edible Mosaic, recipe submitted by TK member Jennifer of Mother Thyme.

Bake until the cheese is melted, about 15 to 18 minutes. I wanted my pizza browned a bit in places, so I briefly ran it under the broiler after the cheese was melted (after about 15 minutes). Stay with it if you decide to broil though—it can go from perfect to burned in a matter of seconds!


Tasty Kitchen Blog: Chicken Alfredo Garlic Bread Pizza. Guest post by Faith Gorsky of An Edible Mosaic, recipe submitted by TK member Jennifer of Mother Thyme.

Slice it up and serve.


Tasty Kitchen Blog: Chicken Alfredo Garlic Bread Pizza. Guest post by Faith Gorsky of An Edible Mosaic, recipe submitted by TK member Jennifer of Mother Thyme.

Just try to resist a slice! Give it a try and I’m sure you’ll have found a new favorite way to enjoy garlic bread, chicken Alfredo, and pizza. Thank you to Jennifer for the delicious inspiration. Be sure to check out the great recipes on her lovely blog Mother Thyme!


Printable Recipe

Chicken Alfredo Garlic Bread Pizza

See post on Jennifer | Mother Thyme’s site!
5.00 Mitt(s) 1 Rating(s)1 vote, average: 5.00 out of 51 vote, average: 5.00 out of 51 vote, average: 5.00 out of 51 vote, average: 5.00 out of 51 vote, average: 5.00 out of 5

Prep Time:

Cook Time:

Difficulty: Easy

Servings: 8

8
x

Print Options

Page size Letter 3x5 4x6
Text Size Small Medium Large
Content Include description
Include prep time, etc.
Show image

Description

Crusty Italian bread smothered with garlic butter and topped with Alfredo sauce, chicken and cheese for one tasty pizza.

Ingredients

  • FOR THE ALFREDO SAUCE:
  • 2 Tablespoons Butter
  • 1 clove Garlic, Minced
  • ½ cups Half And Half, Regular Or Fat Free
  • 1 cup Grated Parmesan Cheese
  • 1 pinch Parsley Flakes
  • 1 pinch Freshly Cracked Black Pepper
  • Salt To Taste
  • FOR THE PIZZA ASSEMBLY:
  • 1 loaf Italian Bread
  • ½ cups Butter, Room Temperature
  • 2 teaspoons Garlic Powder
  • ½ teaspoons Parsley Flakes
  • 1-½ cup Cooked Chicken Shredded
  • 2 cups Cooked Broccoli Florets (a Steamable Bag Works Great)
  • 3 cups Shredded Mozzarella Cheese

Preparation Instructions

For the Alfredo sauce:
Melt butter in a medium saucepan over medium heat. Then add garlic and cook for about one minute longer. Gradually stir in half-and-half followed by Parmesan cheese and continue stirring until blended and sauce thickens.

Reduce heat to a simmer, stirring occasionally until heated through.
Remove from heat. Stir in parsley flakes, pepper and salt.

For the pizza:
Preheat oven to 375 F. Line a large baking sheet with aluminum foil and set aside. Slice Italian bread in half lengthwise. Put the bread halves onto the sheet, cut side up.

In a medium bowl mix butter, garlic powder and parsley flakes until blended. Generously spread over bread.

In a medium bowl toss chicken with prepared Alfredo sauce. Spread evenly over the Italian bread slices. Top with broccoli then sprinkle with cheese.

Bake for 15-18 minutes until cheese is melted. Cut into desired slices and serve.

Note: Leftover chicken, store bought rotisserie chicken works great for this recipe.


_______________________________________

Faith Gorsky is the writer, receipt developer, photographer, and food stylist behind the blog An Edible Mosaic, and the cookbook author of An Edible Mosaic: Middle Eastern Fare with Extraordinary Flair (Tuttle Publishing; November 2012). She was born, raised, and spent most of her life in Upstate New York, and she currently lives in Kuwait. When it comes to cooking, her favorite thing to do is go into the kitchen hungry, open the fridge, and start creating. She loves to travel, especially to places steeped in rich culture and history. She also enjoys reading (cookbooks mostly), vintage shopping (especially in old markets), watching movies (of all genres), and is enamored with ancient cultures (especially Rome and Egypt.


Profile photo of georgiapellegrini

Sticky Lime Chicken Wings

Posted by in Step-by-Step Recipes

Tasty Kitchen Blog: Sticky Lime Chicken Wings. Guest post by Georgia Pellegrini, recipe submitted by TK member Mike of Verses from My Kitchen.

The only thing Texans love more than game day is an irresistible game day wing! This week, our love for all things tailgate inspired us to test out these Sticky Lime Chicken Wings provided by TK member Mike.


Tasty Kitchen Blog: Sticky Lime Chicken Wings. Guest post by Georgia Pellegrini, recipe submitted by TK member Mike of Verses from My Kitchen.

Here’s what you’ll need: 3 pounds chicken wings (3 pounds should be roughly 25 wings), washed and patted dry; fresh squeezed lime juice, whole limes for their zest, Frank’s Red Hot Original, maple syrup, melted butter, crushed garlic, cayenne pepper, olive oil, and Kosher salt and fresh ground pepper.


Tasty Kitchen Blog: Sticky Lime Chicken Wings. Guest post by Georgia Pellegrini, recipe submitted by TK member Mike of Verses from My Kitchen.

We decided to bake the wings rather than grill them since it is so cold out, so it required a slightly longer cooking time. Preheat the oven to 400ºF. Season the meat generously with salt and pepper, and then bake the chicken for 40 minutes, or until browned nicely.


Tasty Kitchen Blog: Sticky Lime Chicken Wings. Guest post by Georgia Pellegrini, recipe submitted by TK member Mike of Verses from My Kitchen.

In the meantime, we started on the sauce by juicing enough lime juice to make 1/4 cup.


Tasty Kitchen Blog: Sticky Lime Chicken Wings. Guest post by Georgia Pellegrini, recipe submitted by TK member Mike of Verses from My Kitchen.

Fully zest limes over a small bowl.


Tasty Kitchen Blog: Sticky Lime Chicken Wings. Guest post by Georgia Pellegrini, recipe submitted by TK member Mike of Verses from My Kitchen.

Pour the lime juice into a large bowl.


Tasty Kitchen Blog: Sticky Lime Chicken Wings. Guest post by Georgia Pellegrini, recipe submitted by TK member Mike of Verses from My Kitchen.

Add the fresh lime zest …


Tasty Kitchen Blog: Sticky Lime Chicken Wings. Guest post by Georgia Pellegrini, recipe submitted by TK member Mike of Verses from My Kitchen.

Pour in the Frank’s Red Hot Original …


Tasty Kitchen Blog: Sticky Lime Chicken Wings. Guest post by Georgia Pellegrini, recipe submitted by TK member Mike of Verses from My Kitchen.

Add the maple syrup …


Tasty Kitchen Blog: Sticky Lime Chicken Wings. Guest post by Georgia Pellegrini, recipe submitted by TK member Mike of Verses from My Kitchen.

Melted butter …


Tasty Kitchen Blog: Sticky Lime Chicken Wings. Guest post by Georgia Pellegrini, recipe submitted by TK member Mike of Verses from My Kitchen.

The garlic that has been chopped …


Tasty Kitchen Blog: Sticky Lime Chicken Wings. Guest post by Georgia Pellegrini, recipe submitted by TK member Mike of Verses from My Kitchen.

And the cayenne pepper.


Tasty Kitchen Blog: Sticky Lime Chicken Wings. Guest post by Georgia Pellegrini, recipe submitted by TK member Mike of Verses from My Kitchen.

Cover the bowl with plastic wrap and refrigerate.


Tasty Kitchen Blog: Sticky Lime Chicken Wings. Guest post by Georgia Pellegrini, recipe submitted by TK member Mike of Verses from My Kitchen.

Right before the wings are done cooking, pour the sauce into a medium saucepan and heat thoroughly over medium low.


Tasty Kitchen Blog: Sticky Lime Chicken Wings. Guest post by Georgia Pellegrini, recipe submitted by TK member Mike of Verses from My Kitchen.

Transfer the cooked chicken to a large bowl and then pour the heated sauce over the wings.


Tasty Kitchen Blog: Sticky Lime Chicken Wings. Guest post by Georgia Pellegrini, recipe submitted by TK member Mike of Verses from My Kitchen.

Use a spatula to be sure to scrape all the “goody-bits” from the pan. Toss until the wings are well coated.


Tasty Kitchen Blog: Sticky Lime Chicken Wings. Guest post by Georgia Pellegrini, recipe submitted by TK member Mike of Verses from My Kitchen.

Plate the chicken wings with a generous amount of the sauce to accompany them.


Tasty Kitchen Blog: Sticky Lime Chicken Wings. Guest post by Georgia Pellegrini, recipe submitted by TK member Mike of Verses from My Kitchen.

In the end, you should have beautiful, colorful chunks of seasonings and flavorful garlic on top of golden-skinned wings. We went crazy for the perfectly harmonious balance of tang and a kick just hard enough to wake up your senses but still deliciously easy enough on the palette to share with all your tailgate peers! For other mouth-watering ideas and beautiful writing, visit Mike’s blog Verses from My Kitchen.


Printable Recipe

Sticky Lime Chicken Wings

See post on Mike (Verses from my Kitchen)’s site!
4.00 Mitt(s) 1 Rating(s)1 vote, average: 4.00 out of 51 vote, average: 4.00 out of 51 vote, average: 4.00 out of 51 vote, average: 4.00 out of 51 vote, average: 4.00 out of 5

Prep Time:

Cook Time:

Difficulty: Easy

Servings: 2

2
x

Print Options

Page size Letter 3x5 4x6
Text Size Small Medium Large
Content Include description
Include prep time, etc.
Show image

Description

Sticky Lime Grilled Chicken Wings. Perfect for a group of friends.

Ingredients

  • 3 pounds Chicken Wings, (3 Pounds Should Be Roughly 25 Wings), Washed And Patted Dry
  • ¼ cups Fresh Squeezed Lime Juice
  • 2 whole Limes, Zested
  • ⅔ cups Frank's Red Hot Original
  • 3 Tablespoons Maple Syrup
  • ¼ cups Butter, Melted
  • 2 cloves Garlic, Skin Removed And Crushed
  • 1 teaspoon Cayenne Pepper
  • 2 pinches Kosher Salt And Fresh Ground Pepper
  • 2 Tablespoons Oil For The Grill

Preparation Instructions

1. Heat the grill to medium high heat (400 F). Season the wings with a generous amount of coarse salt and black pepper. Rub the grill grates with oil so the wings do not stick. Add the wings to the grill and cover the grill. Flip every couple of minutes or so, until they’re slightly charred and crisp and cooked through, roughly 20 minutes. Keep an eye for flare-ups and burning, turning down the heat or moving the wings off the direct hot spot until the flares are under control.
2. Meanwhile, combine the lime juice, lime zest, hot sauce, maple syrup, butter, garlic and cayenne pepper in a large bowl. Cover and refrigerate. Before the wings are done, transfer the sauce to a medium pan over medium low and heat the sauce.
3. Remove the wings from the grill and transfer to a large bowl. Pour the warmed sauce over top and stir to combine. Enjoy!!


_______________________________________

There’s so much to say about Georgia, we don’t know where to start. Leaving Wall Street for the French Culinary Institute, followed by a stint at the Gramercy Tavern and La Chassagnette in France, her passion for food and food traditions are evident and inspiring. Visit her site at Georgia Pellegrini, where you’ll find more recipes, photos, learn all about her wonderful books Girl Hunter and Food Heroes, and enjoy her latest adventures.


Profile photo of georgiapellegrini

Coconut Honey Rice Pudding

Posted by in Step-by-Step Recipes

  This dairy-free Coconut Honey Rice Pudding from Fuji Mama rocked my world. It had the traditional creaminess of rice pudding but with the extra richness that only coconut milk can offer. My kitchen also smelled amazing for many hours, which was an added bonus.       To make it, you will need: soy […]

Profile photo of Erika (TK)

14 Favorites for Super Bowl 2014

Posted by in The Theme Is...

So the big game is this Sunday: the first cold weather Super Bowl played in an open air stadium. Last week’s forecast called for snow this weekend; now they’re saying it’ll be in the 40s, and everyone’s thrilled about that. I’m telling you, 40 is the new 60 now, at least when it comes to […]

Profile photo of georgiapellegrini

Orzo with Kale and Roasted Tomatoes

Posted by in Step-by-Step Recipes

In a season filled with hearty stews, warm baked goods, and rich sauces, we found this Orzo with Kale and Roasted Tomatoes from TK member Lindsay to be refreshing and light while still being festive for the cold months. This recipe is quick with flavors that, although simple, will knock those winter socks off. And […]

Profile photo of Ree | The Pioneer Woman

Panko Mozzarella Sticks!

Posted by in Step-by-Step Recipes

I first discovered panko bread crumbs back in 1999. Please don’t ask me how I know that; I just do. I remember vividly reading a recipe that contained panko bread crumbs, and I remember vividly that I was nursing my second baby, and I remember vividly that I was hormonal and desperate, and the next […]