The Pioneer Woman Tasty Kitchen
Profile photo of Ree | The Pioneer Woman

How To Make Chocolate Curls

Posted by in Kitchen Talk

Here’s how I make chocolate curls. I put them on pies, cakes, and ice cream sundaes.

They make me feel frilly and fancy.

Try them sometime!


choc pie creamed spinach pizza crust 019
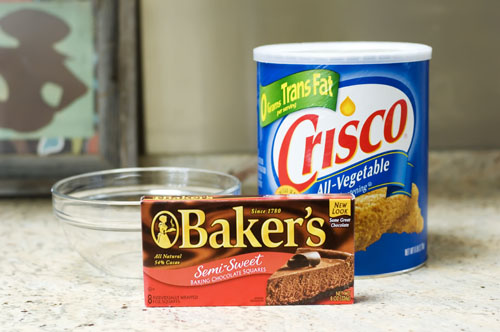
Grab some Crisco and some semi-sweet baking chocolate. (Any brand will do, and you can even use semi-sweet chocolate chips if you’d like!)


choc pie creamed spinach pizza crust 020Place three ounces (usually three squares) of chocolate into a microwave-safe bowl.


choc pie creamed spinach pizza crust 021
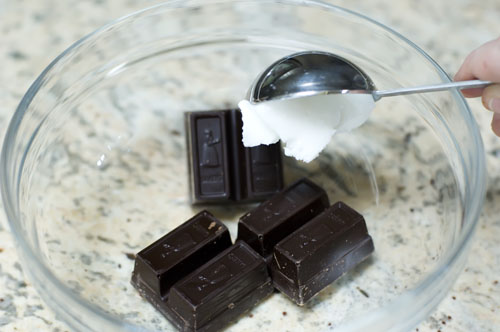
Now place one tablespoon of Crisco (vegetable shortening) into the bowl.


choc pie creamed spinach pizza crust 022
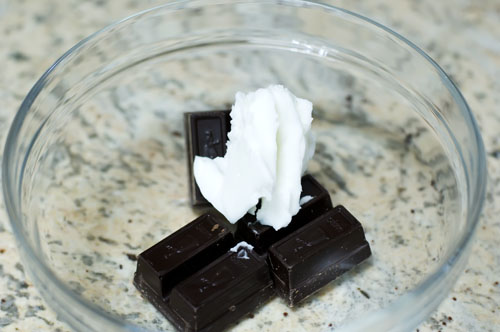
Now throw it in the microwave for 30 to 45 seconds, or until the shortening is melted and hot.
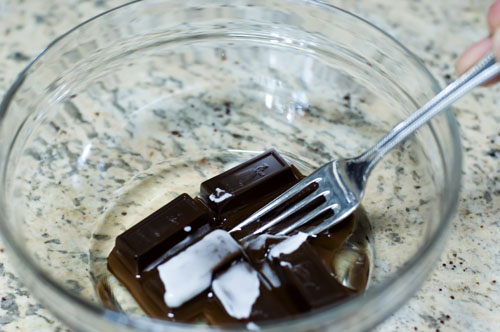
 
 
choc pie creamed spinach pizza crust 023With a fork…


choc pie creamed spinach pizza crust 024
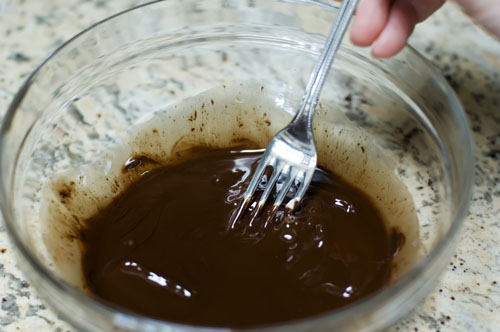
Stir to combine thoroughly.


choc pie creamed spinach pizza crust 024And there you have it—chocolate curls!

Just kidding. I just love doing that, though.

 
choc pie creamed spinach pizza crust 030
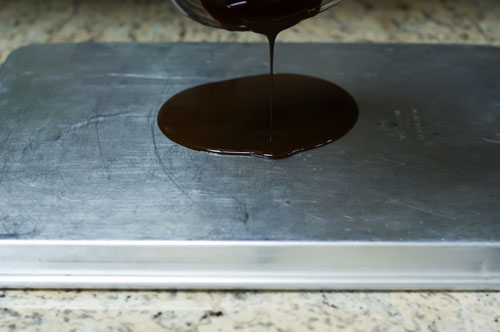
Now, grab a metal cookie sheet, turn it upside down, and pour the melted chocolate on.


choc pie creamed spinach pizza crust 031
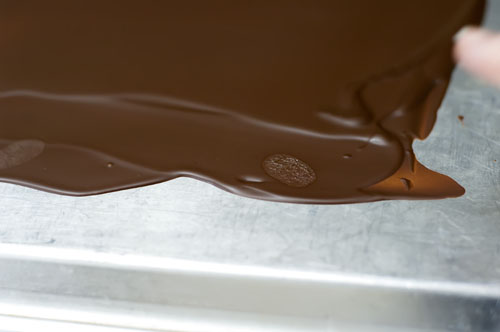
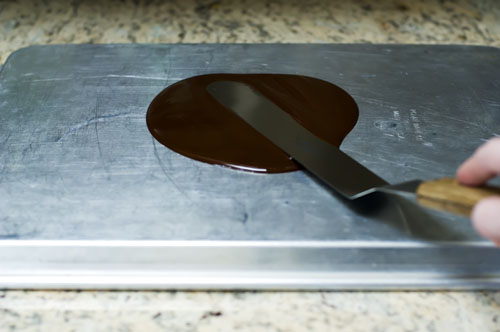
Then, with a flat spatula (or heck, a knife), spread the chocolate in a thin layer…


choc pie creamed spinach pizza crust 034
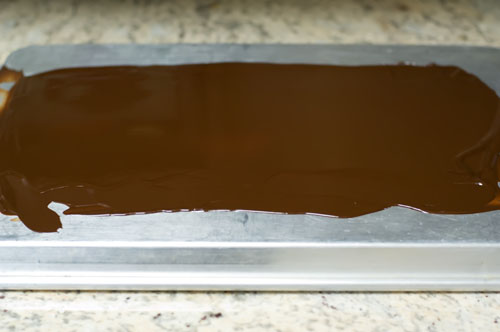
Keep going until it’s very, very thin. Then…and this is the key…stick it in the freezer for a few minutes.


choc pie creamed spinach pizza crust 035Now, this is after one minute in the freezer. I gave the chocolate the ol’ fingerprint test, and it failed miserably. It’s still way too soft to make the curls. So I put it back in for exactly two minutes.


choc pie creamed spinach pizza crust 036
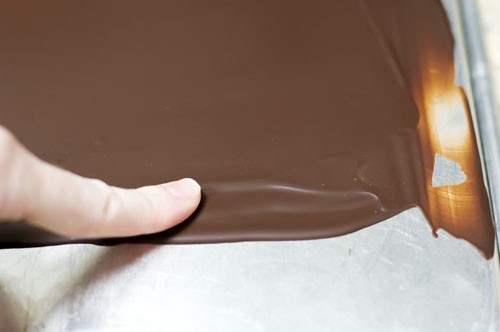
Be sure to give it the ol’ fingerprint test. And when it’s ready, it should leave the slightest mark, but not an actual depression.

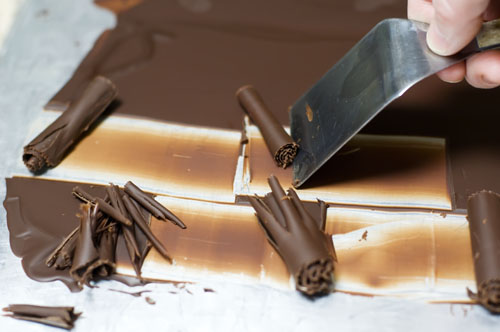
Next, get a somewhat sharp-edged spatula and begin to scrape the chocolate from the bottom of the pan. When the chocolate is just the right temperature, it’ll curl instead of break.


choc pie creamed spinach pizza crust 038
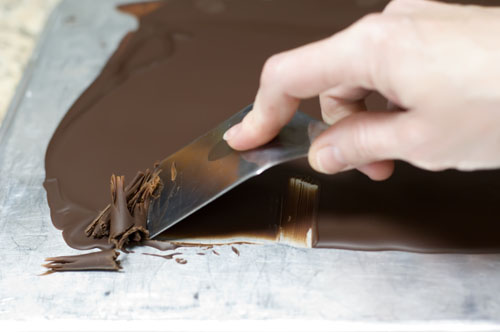
See, right now it’s still just a tad too cold/hard. So I waited one minute and tried again.


choc pie creamed spinach pizza crust 041And guess what? It’s just right.


choc pie creamed spinach pizza crust 042
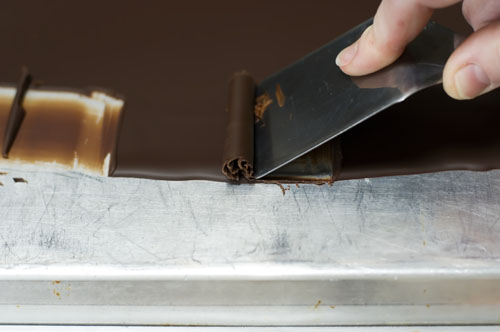
Now you have a couple of minutes before the chocolate gets too soft.


choc pie creamed spinach pizza crust 044So just scrape along the bottom of the pan…


choc pie creamed spinach pizza crust 047…And the chocolate will curl right up. If it’s too hard, give it a minute, then try again. If it gets too soft, stick it back in the freezer for a minute.


choc pie creamed spinach pizza crust 048
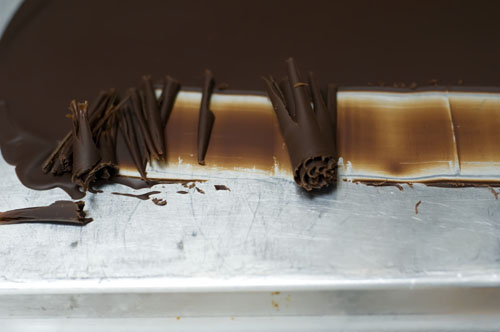
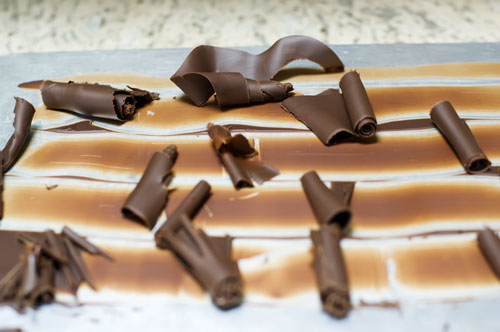
Pretty soon you’ll have a bunch of fun little chocolate curls. If you’re not trying to take photos with one hand while you’re doing this, the curls will turn out better. But you get the general idea!


choc pie creamed spinach pizza crust 049
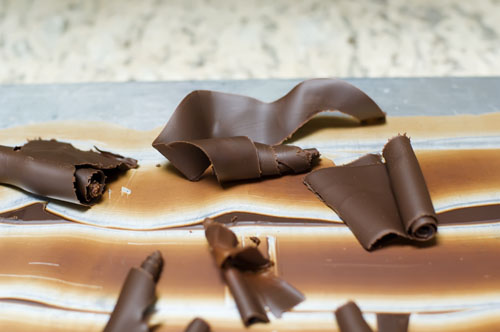
And I have no idea how this one happened, but I think it’s kinda neat. And I totally meant to do it.

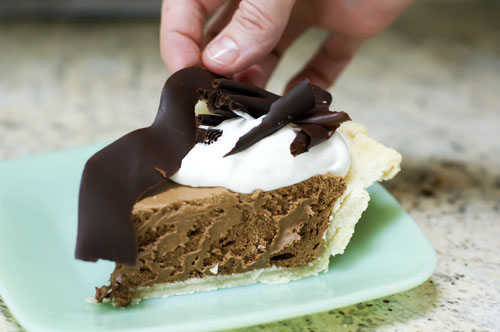
Important: as soon as possible, transfer the curls to a cold pan or plate, then stick them in the freezer to harden. Store in the freezer in a Ziploc bag until you need them. Use them to adorn pies, cakes, or platters of fruit. You’ll feel instantly fancy!

And frilly.

Then end.

 
choc pie creamed spinach pizza crust 058

*This Tasty Kitchen How-To was extracted from the Pioneer Woman recipe, “Delicious Chocolate Pie”. I recommend making it sometime before you croak.

Profile photo of Amber {Sprinkled With Flour}

Skillet Asparagus Tart

Posted by in Step-by-Step Recipes

Tasty Kitchen Blog: Skillet Asparagus Tart. Guest post by Amber Potter of Sprinkled with Flour, recipe submitted by TK member Claire of A Realistic Nutritionist.

 
I love asparagus. Serve it to me any way: grilled, roasted, pureed in a soup … thrown across the room while I catch it like a seal. Yes, I am slightly weird. Yes, I love it that much.

With spring in full bloom, it’s the perfect season to enjoy my favorite vegetable. So when I came across Claire’s recipe for Skillet Asparagus Tart (which she adapted from Good Housekeeping), my watering taste buds were begging me to make this dish. Not only does this tart feature the most amazing vegetable ever made, it’s filled with lemon zest, cream, and fresh Parmesan. When you top it with fresh basil or any other herb of your choice, the result is truly delicious. 


Tasty Kitchen Blog: Skillet Asparagus Tart. Guest post by Amber Potter of Sprinkled with Flour, recipe submitted by TK member Claire of A Realistic Nutritionist.

You will need: all-purpose flour, whole wheat flour, baking powder, salt, pepper, butter, ice water, asparagus, eggs, milk, cream, lemon juice and zest, Parmesan cheese and fresh basil (or any other fresh herb).

Preheat oven to 425ºF. Spray a nonstick 10-inch skillet with cooking spray. Set aside.


Tasty Kitchen Blog: Skillet Asparagus Tart. Guest post by Amber Potter of Sprinkled with Flour, recipe submitted by TK member Claire of A Realistic Nutritionist.

In a large bowl, mix together the flours, baking powder, salt and pepper. Using a pastry blender or fork, cut butter into the flour mixture until the mixture appears coarse. Add ice-water to the mixture until moist clumps form and dough can be held together when you form it into a ball.


Tasty Kitchen Blog: Skillet Asparagus Tart. Guest post by Amber Potter of Sprinkled with Flour, recipe submitted by TK member Claire of A Realistic Nutritionist.

On a lightly floured surface with a floured rolling pin, roll dough out to about 13 inches. Carefully move crust over the skillet and press it down to the bottom and up the sides. Remove any overhang. Bake crust for about 15 minutes, or until lightly browned. Set aside.


Tasty Kitchen Blog: Skillet Asparagus Tart. Guest post by Amber Potter of Sprinkled with Flour, recipe submitted by TK member Claire of A Realistic Nutritionist.

In another 10-inch skillet, add about 1 inch of water and bring to a boil. Add asparagus and cook for 5 minutes, or until just tender.


Tasty Kitchen Blog: Skillet Asparagus Tart. Guest post by Amber Potter of Sprinkled with Flour, recipe submitted by TK member Claire of A Realistic Nutritionist.

Remove asparagus from the skillet, rinse it off and let it cool slightly. Once cooled, cut into 5-inch long spears and set aside.


Tasty Kitchen Blog: Skillet Asparagus Tart. Guest post by Amber Potter of Sprinkled with Flour, recipe submitted by TK member Claire of A Realistic Nutritionist.

Prepare the filling by whisking the eggs, milk, cream, lemon juice, lemon zest and salt until fully mixed.


Tasty Kitchen Blog: Skillet Asparagus Tart. Guest post by Amber Potter of Sprinkled with Flour, recipe submitted by TK member Claire of A Realistic Nutritionist.

Place the asparagus on top of the crust so the leafy top is in the middle. Arrange it so you form a circle. Carefully pour the egg mixture over the asparagus to cover it. Sprinkled the top with Parmesan cheese and fresh basil leaves, or herb of your choice. Bake for 20-25 minutes, or until tart is firm but a little jiggly in the middle. Let sit to firm up, then serve warm.


Tasty Kitchen Blog: Skillet Asparagus Tart. Guest post by Amber Potter of Sprinkled with Flour, recipe submitted by TK member Claire of A Realistic Nutritionist.

I’m so glad Claire shared this delicious tart recipe with us; I will definitely be making this again soon. You can find more of Claire’s wonderful looking dishes on her blog, A Realistic Nutritionist.


Printable Recipe

Skillet Asparagus Tart

See post on claireg12’s site!
4.00 Mitt(s) 3 Rating(s)3 votes, average: 4.00 out of 53 votes, average: 4.00 out of 53 votes, average: 4.00 out of 53 votes, average: 4.00 out of 53 votes, average: 4.00 out of 5

Prep Time:

Cook Time:

Difficulty: Intermediate

Servings: 8

8
x

Print Options

Page size Letter 3x5 4x6
Text Size Small Medium Large
Content Include description
Include prep time, etc.
Show image

Description

A perfect savory tart that will make a great addition to your Easter brunch menu!

Ingredients

  • FOR THE BISCUIT CRUST:
  • 1 cup All-purpose Flour
  • ¾ cups Whole Wheat Flour
  • 1 teaspoon Baking Powder
  • 1 dash Each Of Salt And Pepper
  • 6 Tablespoons Cold Butter, Cut Into Cubes
  • 8 Tablespoons Ice Cold Water
  • FOR THE FILLING:
  • 1 pound Asparagus, Ends Trimmed
  • 3 whole Eggs
  • 1 cup Skim Milk
  • ⅓ cups Light Cream
  • 1 Tablespoon Lemon Juice
  • 1 Tablespoon Lemon Zest
  • 1 dash Salt
  • ⅔ cups Parmesan Cheese
  • Basil Leaves, For Sprinkling On Top

Preparation Instructions

Preheat oven to 425 F. Spray a non-stick 10-inch skillet with non-stick cooking spray. Set aside.

In a large bowl, mix together the flours, baking powder and salt and pepper. Using a pastry blender or two knives, cut butter into the flour mixture until the mixture appears coarse and sandy. Add ice-water to the mixture until moist clumps form and dough can be held together when you form it into a ball. On a lightly floured surface with a floured rolling pin, roll dough out to about 13 inches. Carefully move crust over the skillet and press it down to the bottom and up the sides. Remove any overhang.

Bake crust for about 15 minutes, or until lightly browned. Set aside.

In another 10 inch skillet, add about 1 inch of water and bring to a boil. Add asparagus and cook for 5 minutes, or until just tender. Remove asparagus from the skillet, rinse it off and let it cool slightly. Once cooled, cut into 5 inch long spears and set aside.

Prepare the filling by whisking the eggs, milk, cream, lemon juice, lemon zest and salt until fully mixed.

Place the asparagus on top of the crust so the leafy top is in the middle. Arrange it so you form a circle (kind of like bicycle wheel spokes). Carefully pour egg mixture over the asparagus to cover it. Sprinkle top with Parmesan cheese and basil leaves.

Bake for 20-25 minutes, or until tart is firm but a little jiggly in the middle. Let sit to firm up and serve!

Recipe adapted from Good Housekeeping.


_______________________________________

Amber is a stay at home mom who lives in the heart of the Missouri Ozarks. It’s a long way from where she grew up, in Wales (yes, way over in the U.K.). The recipes in her blog Sprinkled with Flour include her original creations as well as her family recipes. Go check them out!


Profile photo of Erica Lea

Ramen Noodle Soup

Posted by in Step-by-Step Recipes

Tasty Kitchen Blog: Ramen Noodle Soup. Guest post by Erica Kastner of Buttered Side Up, recipe submitted by TK member Justine Sulia of Cooking and Beer.

When we were kids, we loved packaged ramen. Mom would try to make it herself, but we weren’t fooled: Nothing could live up to the MSG-laden packets. 

Fast forward a few years and my taste in food has changed a bit. Don’t get me wrong, I still enjoy an occasional pre-packaged ramen for a guilty snack. But it hurts me to know how many icky ingredients I’m consuming.

Then one day my sisters made traditional ramen from scratch. It opened my eyes to the idea that perhaps the humble ramen could be a delicious meal. 

To my surprise, I was able to make a soup that was as good (or better!) than the little processed version I remembered from my childhood. If you put in a little extra effort, you’ll be surprised at the complexity of the flavors of this Ramen Noodle Soup from Tasty Kitchen member Justine. With the eggs and sausage for protein it’s definitely a filling, satisfying supper.


Tasty Kitchen Blog: Ramen Noodle Soup. Guest post by Erica Kastner of Buttered Side Up, recipe submitted by TK member Justine Sulia of Cooking and Beer.

Here’s everything you’ll need to make the ramen: olive oil, onion, carrots, celery, garlic, parsley, salt and pepper, beef broth (I made mine from scratch), Sriracha (or any hot sauce you prefer), soy sauce, eggs, Italian sausage links (I made my own), ramen (or another Asian-style noodle), eggs, and green onions.


Tasty Kitchen Blog: Ramen Noodle Soup. Guest post by Erica Kastner of Buttered Side Up, recipe submitted by TK member Justine Sulia of Cooking and Beer.

Begin by chopping up your onions, celery and carrots.


Tasty Kitchen Blog: Ramen Noodle Soup. Guest post by Erica Kastner of Buttered Side Up, recipe submitted by TK member Justine Sulia of Cooking and Beer.

Heat the olive oil in a Dutch oven (or a big soup pot) over medium heat.


Tasty Kitchen Blog: Ramen Noodle Soup. Guest post by Erica Kastner of Buttered Side Up, recipe submitted by TK member Justine Sulia of Cooking and Beer.

Once the oil is hot, add your veggies.


Tasty Kitchen Blog: Ramen Noodle Soup. Guest post by Erica Kastner of Buttered Side Up, recipe submitted by TK member Justine Sulia of Cooking and Beer.

Give it a good stir.


Tasty Kitchen Blog: Ramen Noodle Soup. Guest post by Erica Kastner of Buttered Side Up, recipe submitted by TK member Justine Sulia of Cooking and Beer.

Add the salt …


Tasty Kitchen Blog: Ramen Noodle Soup. Guest post by Erica Kastner of Buttered Side Up, recipe submitted by TK member Justine Sulia of Cooking and Beer.

And pepper. Cook, stirring every once in a while, until everything is nice and tender.


Tasty Kitchen Blog: Ramen Noodle Soup. Guest post by Erica Kastner of Buttered Side Up, recipe submitted by TK member Justine Sulia of Cooking and Beer.

Meanwhile, cook your sausages until no longer pink.


Tasty Kitchen Blog: Ramen Noodle Soup. Guest post by Erica Kastner of Buttered Side Up, recipe submitted by TK member Justine Sulia of Cooking and Beer.

Chop up the parsley and garlic.


Tasty Kitchen Blog: Ramen Noodle Soup. Guest post by Erica Kastner of Buttered Side Up, recipe submitted by TK member Justine Sulia of Cooking and Beer.

Once the veggies in the pot are soft, add the parsley …


Tasty Kitchen Blog: Ramen Noodle Soup. Guest post by Erica Kastner of Buttered Side Up, recipe submitted by TK member Justine Sulia of Cooking and Beer.

And the garlic. Cook for a couple more minutes. 


Tasty Kitchen Blog: Ramen Noodle Soup. Guest post by Erica Kastner of Buttered Side Up, recipe submitted by TK member Justine Sulia of Cooking and Beer.

Add the beef broth, water (I just used more broth in place of the water) …


Tasty Kitchen Blog: Ramen Noodle Soup. Guest post by Erica Kastner of Buttered Side Up, recipe submitted by TK member Justine Sulia of Cooking and Beer.

And soy sauce. Stir and bring to a boil. Lower the heat so the soup is just simmering and simmer for 20 minutes.


Tasty Kitchen Blog: Ramen Noodle Soup. Guest post by Erica Kastner of Buttered Side Up, recipe submitted by TK member Justine Sulia of Cooking and Beer.

Add the Sriracha …


Tasty Kitchen Blog: Ramen Noodle Soup. Guest post by Erica Kastner of Buttered Side Up, recipe submitted by TK member Justine Sulia of Cooking and Beer.

Cooked sausages …


Tasty Kitchen Blog: Ramen Noodle Soup. Guest post by Erica Kastner of Buttered Side Up, recipe submitted by TK member Justine Sulia of Cooking and Beer.

And noodles. Boil until the noodles are cooked to your preferred softness. Taste and adjust the seasonings if necessary. Boil up some eggs to your preferred doneness (I like mine soft boiled, or about 7 minutes).


Tasty Kitchen Blog: Ramen Noodle Soup. Guest post by Erica Kastner of Buttered Side Up, recipe submitted by TK member Justine Sulia of Cooking and Beer.

Serve up a big bowl with lots of sausage and an egg and green onions for garnish. Chopsticks optional (don’t make fun of my chopstick skills, or lack thereof).

Note: My sister and I thought this was the bomb-diggity, but our husbands thought it was too spicy. If you don’t like your ramen with any heat, you may want to scale back on or leave out the hot sauce.


Tasty Kitchen Blog: Ramen Noodle Soup. Guest post by Erica Kastner of Buttered Side Up, recipe submitted by TK member Justine Sulia of Cooking and Beer.

Thank you so much to Justine for sharing this awesome soup with us. Make sure to stop by her blog Cooking & Beer for more recipes. Her Asian Wings look particularly yummy.


Printable Recipe

Ramen Noodle Soup

See post on Justine Sulia (Cooking and Beer)’s site!
5.00 Mitt(s) 4 Rating(s)4 votes, average: 5.00 out of 54 votes, average: 5.00 out of 54 votes, average: 5.00 out of 54 votes, average: 5.00 out of 54 votes, average: 5.00 out of 5

Prep Time:

Cook Time:

Difficulty: Easy

Servings: 6

6
x

Print Options

Page size Letter 3x5 4x6
Text Size Small Medium Large
Content Include description
Include prep time, etc.
Show image

Description

This soup brings the subtle flavors of Asian cuisine and wholesome warmth into one great recipe!

Ingredients

  • 3 Tablespoons Olive Oil
  • 1 whole Large Onion, Diced
  • 3 whole Medium-sized Carrots, Diced
  • 2 stalks Celery, Diced
  • 1 teaspoon Salt + More As Needed
  • 1 teaspoon Pepper + More As Needed
  • 3 cloves Garlic, Minced
  • ¼ cups Fresh Parsley, Chopped + More For Garnish
  • 4 cups Low Sodium Beef Broth
  • 1 cup Water
  • 3 Tablespoons Soy Sauce
  • 2 teaspoons Sriracha
  • ½ pounds Asian-style Noodles Or Ramen
  • 3 whole Italian Sausage Links, Fully Cooked And Sliced
  • 4 whole Hard Boiled Eggs For Garnish
  • ¼ cups Green Onions, Chopped For Garnish

Preparation Instructions

In a 5-quart Dutch oven, heat the oil over medium heat. Add the onion, carrots and celery. Season with salt and pepper and cook until tender, about 8 minutes. Add the garlic and the parsley and cook for another 2 minutes or until you begin to smell the garlic. Now, add the beef broth, water and soy sauce. Stir to combine. Bring to a boil then lower the heat to simmer and cook for 20 minutes.

Add the Sriracha, noodles, and sausage and continue to simmer until the noodles are al dente, about 6-7 minutes (or according to package instructions for al dente). Adjust the seasoning by adding more salt, pepper and/or Sriracha.

Serve hot and garnish with hard-boiled eggs, green onions and parsley. Enjoy!


_______________________________________

Newly-married Erica Kastner shares her wonderful recipes and amazing food photography on her blog, Buttered Side Up. She also writes about crafts and posts more of her beautiful photography in her personal blog, Simple Days. There really isn’t much that this amazing young wife and mother can’t do, and we’re thrilled she does some of it here.


Profile photo of georgiapellegrini

Red Wine and Herb Beef Stew

Posted by in Step-by-Step Recipes

Tasty Kitchen Blog: Red Wine and Herb Beef Stew. Guest post by Georgia Pellegrini, recipe submitted by TK member Anita of Hungry Couple.

 
This hearty Red Wine and Herb Beef Stew recipe from TK member Anita is comforting and rich with fresh herbs and red wine. The sauce is delicious poured over polenta, rice, pasta or simple on its own. It would also lend itself well to the addition of other types of root vegetables.


Tasty Kitchen Blog: Red Wine and Herb Beef Stew. Guest post by Georgia Pellegrini, recipe submitted by TK member Anita of Hungry Couple.

Here’s what you’ll need: all-purpose flour, round roast, onion, garlic, carrots, olive oil, tomato paste, beef stock, chopped fresh rosemary, chopped fresh thyme, salt and pepper to taste.


Tasty Kitchen Blog: Red Wine and Herb Beef Stew. Guest post by Georgia Pellegrini, recipe submitted by TK member Anita of Hungry Couple.

While your oven preheats to 350F, dice your garlic, onions, and carrots.


Tasty Kitchen Blog: Red Wine and Herb Beef Stew. Guest post by Georgia Pellegrini, recipe submitted by TK member Anita of Hungry Couple.

Cut your beef into cubes.


Tasty Kitchen Blog: Red Wine and Herb Beef Stew. Guest post by Georgia Pellegrini, recipe submitted by TK member Anita of Hungry Couple.

In a large bowl, mix the flour in the beef until well coated.


Tasty Kitchen Blog: Red Wine and Herb Beef Stew. Guest post by Georgia Pellegrini, recipe submitted by TK member Anita of Hungry Couple.

Heat 1 tablespoon of the oil in a Dutch oven over medium-high heat.


Tasty Kitchen Blog: Red Wine and Herb Beef Stew. Guest post by Georgia Pellegrini, recipe submitted by TK member Anita of Hungry Couple.

Add half the beef.


Tasty Kitchen Blog: Red Wine and Herb Beef Stew. Guest post by Georgia Pellegrini, recipe submitted by TK member Anita of Hungry Couple.

Sear for a couple of minutes, rotating the cubes during cooking to brown on all sides.


Tasty Kitchen Blog: Red Wine and Herb Beef Stew. Guest post by Georgia Pellegrini, recipe submitted by TK member Anita of Hungry Couple.

Transfer the cubes to a plate. Repeat the searing process with the remainder of the oil and beef cubes.


Tasty Kitchen Blog: Red Wine and Herb Beef Stew. Guest post by Georgia Pellegrini, recipe submitted by TK member Anita of Hungry Couple.

Remove all meat from the pot, and then whisk in 1 cup of the beef stock.


Tasty Kitchen Blog: Red Wine and Herb Beef Stew. Guest post by Georgia Pellegrini, recipe submitted by TK member Anita of Hungry Couple.

Make sure to scrape all the bits and goodies from the bottom of the pot to mix in with the stock.


Tasty Kitchen Blog: Red Wine and Herb Beef Stew. Guest post by Georgia Pellegrini, recipe submitted by TK member Anita of Hungry Couple.

Chop the rosemary, garlic and thyme.


Tasty Kitchen Blog: Red Wine and Herb Beef Stew. Guest post by Georgia Pellegrini, recipe submitted by TK member Anita of Hungry Couple.

Add the veggies and herbs to the stock …


Tasty Kitchen Blog: Red Wine and Herb Beef Stew. Guest post by Georgia Pellegrini, recipe submitted by TK member Anita of Hungry Couple.

Along with the seared beef cubes.


Tasty Kitchen Blog: Red Wine and Herb Beef Stew. Guest post by Georgia Pellegrini, recipe submitted by TK member Anita of Hungry Couple.

Add the red wine …


Tasty Kitchen Blog: Red Wine and Herb Beef Stew. Guest post by Georgia Pellegrini, recipe submitted by TK member Anita of Hungry Couple.

Then add the remainder of the beef stock.


Tasty Kitchen Blog: Red Wine and Herb Beef Stew. Guest post by Georgia Pellegrini, recipe submitted by TK member Anita of Hungry Couple.

Stir in the tomato paste and salt and pepper to taste.


Tasty Kitchen Blog: Red Wine and Herb Beef Stew. Guest post by Georgia Pellegrini, recipe submitted by TK member Anita of Hungry Couple.

Cover the pot and put in the oven to cook for 3 hours.


Tasty Kitchen Blog: Red Wine and Herb Beef Stew. Guest post by Georgia Pellegrini, recipe submitted by TK member Anita of Hungry Couple.

You now have a hearty, comforting meal you can serve over rice, potatoes, or egg noodles. I’m a purist, so I prefer the stew by itself.

Thanks for the recipe, Anita! For more recipes like this (and creative cocktail ideas!), visit Anita’s blog at Hungry Couple.


Printable Recipe

Red Wine and Herb Beef Stew

See post on Anita at Hungry Couple’s site!
5.00 Mitt(s) 3 Rating(s)3 votes, average: 5.00 out of 53 votes, average: 5.00 out of 53 votes, average: 5.00 out of 53 votes, average: 5.00 out of 53 votes, average: 5.00 out of 5

Prep Time:

Cook Time:

Difficulty: Easy

Servings: 4

4
x

Print Options

Page size Letter 3x5 4x6
Text Size Small Medium Large
Content Include description
Include prep time, etc.
Show image

Description

Not just warm, comforting beef stew but a kicked up version with red wine and lots of fresh herbs for the ultimate one-pot comfort meal!

Ingredients

  • ¼ cups All-purpose Flour
  • 1 pound Beef (Round Roast) Cubes
  • 2 Tablespoons Olive Or Canola Oil
  • 4 cups Beef Stock (canned Is Fine)
  • 1 whole Onion, Peeled And Diced
  • 3 whole Carrots, Peeled And Sliced
  • 4 cloves Garlic, Peeled And Minced
  • 1 Tablespoon Chopped Fresh Rosemary
  • 2 Tablespoons Chopped Fresh Thyme Leaves
  • ½ cups Red Wine
  • 1 Tablespoon Tomato Paste
  • Salt And Pepper, to taste

Preparation Instructions

Place the flour in a large bowl and add the beef cubes. Roll them around to coat.

Preheat oven to 350ºF.

Pour 1 tablespoon of the oil into a large Dutch oven or other oven-safe stew pot over medium-high heat. Once hot add half of the beef cubes (it’s important to not overcrowd the beef if you want it to brown instead of boil) and sear on medium-high heat for a couple of minutes, rotating the cubes during cooking to get the sear on all sides. Remove the beef from the pot and put it on a plate. Add the remaining tablespoon of oil and repeat with the remainder of the beef.

When beef has all been seared and removed from the pot, whisk in 1 cup of stock. Scrape up all the bits on the bottom of the pot and whisk them into the stock. Return the beef to the pot and add the onions, carrots, garlic, rosemary, thyme, remaining beef stock and red wine. Stir in the tomato paste and season with salt and pepper to taste.

Cover the pot and put it into the 350 F oven to cook for 3 hours.

Serve over potatoes, egg noodles or rice. Makes approximately 4 servings but the recipe can easily be doubled.


_______________________________________

There’s so much to say about Georgia, we don’t know where to start. Leaving Wall Street for the French Culinary Institute, followed by a stint at the Gramercy Tavern and La Chassagnette in France, her passion for food and food traditions are evident and inspiring. Visit her site at Georgia Pellegrini, where you’ll find more recipes, photos, learn all about her wonderful books Girl Hunter and Food Heroes, and enjoy her latest adventures.


Profile photo of Megan {Country Cleaver}

Baked Blueberry Pecan French Toast

Posted by in Baking

Baked French toast, or bread pudding, always reminds me of my mom. She loves it. And so do I! It’s comforting, warm, and best of all, full of carbs. When I found Mel’s recipe for Baked…

Profile photo of halfbakedharvest

Chinese Orange Chicken

Posted by in Step-by-Step Recipes

Some of my favorite foods to re-create at home are the ones you would normally order from your favorite carryout restaurants. Some people call it fake-out take-out but I just like to think of it as making good food healthier, quicker and tastier at home. This Chinese Orange Chicken is…

Profile photo of EatLiveRun

Tiramisu Sandwich Cookies

Posted by in Baking

Tiramisu is our favorite dessert to order out at a restaurant. Whenever we see it on a menu, we always have to get it! No self-control there. I rarely make it at home because it’s pretty time consuming and, let’s be honest, a little complicated. That being said, when I saw these mouth-watering Tiramisu Sandwich […]

Profile photo of EatLiveRun

Spicy Tequila Lime Chicken Marinade

Posted by in Step-by-Step Recipes

  I don’t know about you, but I’m always on the lookout for a new chicken marinade recipe. It seems like throwing a marinade together would be easy, but for some reason the idea of creating my own stresses me out. Which is why I was so excited when I found this recipe for Spicy […]