The Pioneer Woman Tasty Kitchen
Profile photo of HowSweetEats

Homemade Refried Beans

Posted by in Step-by-Step Recipes

Tasty Kitchen Blog: Homemade Refried Beans. Guest post by Jessica Merchant of How Sweet It Is, recipe submitted by TK member Julie of Table for Two.

 
If I could, I’d gladly eat Mexican food for the rest of my life. I’m pretty sure that I will never, ever, ever get sick of warm and fluffy tortillas, spiced chicken, melted cheese, warm chips dipped in warmer salsa, guacamole bowls the size of my head and ladlefuls of queso. Oh and margaritas! Who could forget margaritas? I’d like one right now, please and thank you.

Growing up, we ate tacos at least one night a week—many times twice with some makeshift leftovers. It wasn’t until I reached my teens that I discovered my love for refried beans, and this is years after my mom would heat a huge pot on the stove for herself that the rest of us wouldn’t touch. I’d ask her how on earth she could eat something that looks like … THAT … and then she’d stare at me like I had four heads.

I’m so glad I was wrong about that.

Obviously, the minute I saw Table for Two’s recipe for said beans, I bookmarked it that day. It fit in perfectly with our weekly Mexican feast (I mean, I can’t help but carry on that tradition) and is so simple that I can barely stand it.


Tasty Kitchen Blog: Homemade Refried Beans. Guest post by Jessica Merchant of How Sweet It Is, recipe submitted by TK member Julie of Table for Two.

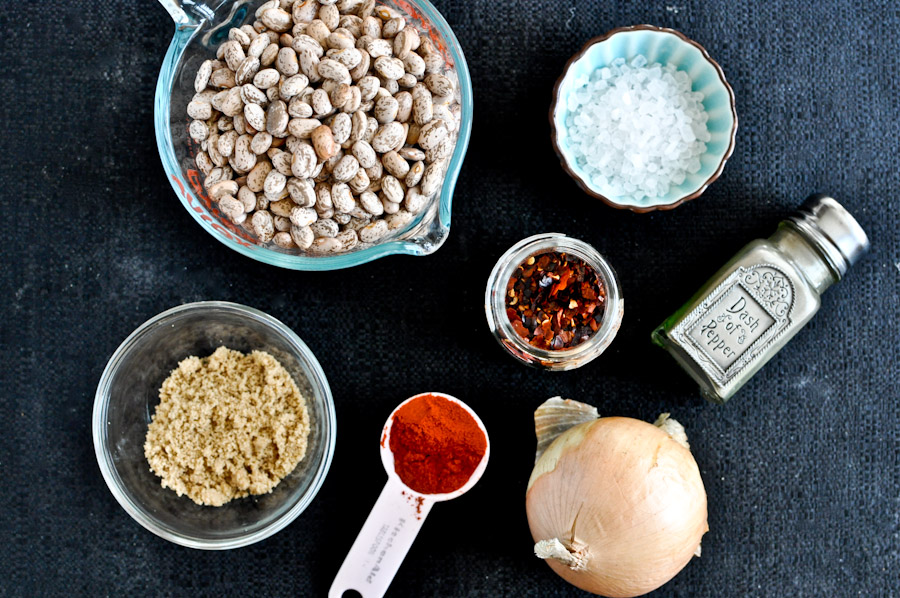
Here’s all your need! Pinto beans, salt, pepper, an onion, red pepper flakes, paprika and brown sugar. Oh and tons of water. About 3 quarts to be exact.


Tasty Kitchen Blog: Homemade Refried Beans. Guest post by Jessica Merchant of How Sweet It Is, recipe submitted by TK member Julie of Table for Two.

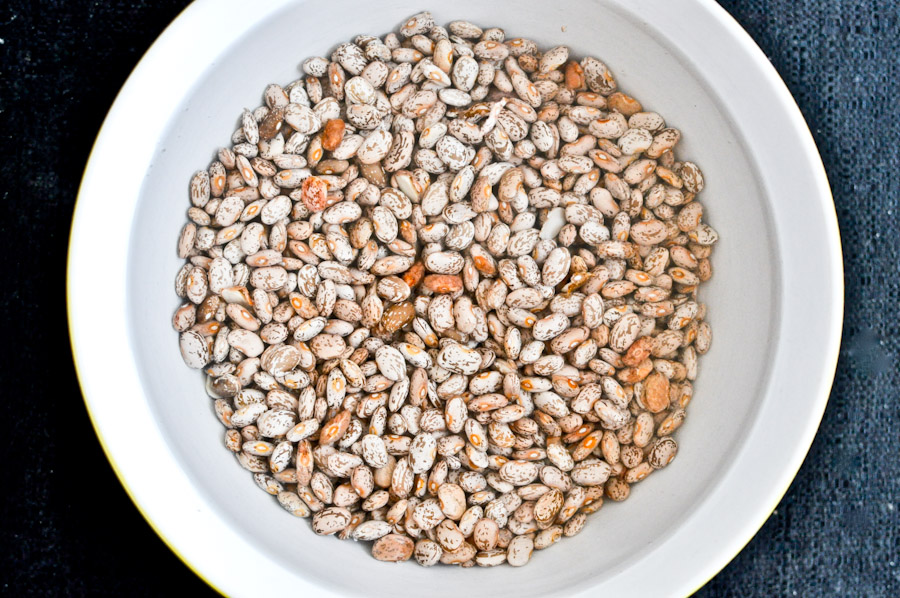
The first step—soaking the beans overnight—is optional. I know, I know. Sometimes it’s difficult to remember to do such things at night when you really just want to smash your head onto your pillow and watch the four episodes of Friends on Nikelodeon. I get it! If you forget or simply don’t want to soak the beans, no worries. You will just cook them slightly longer and I’ll tell you more about that later. Whether you soak them or not, give them a really great rinse. K?


Tasty Kitchen Blog: Homemade Refried Beans. Guest post by Jessica Merchant of How Sweet It Is, recipe submitted by TK member Julie of Table for Two.

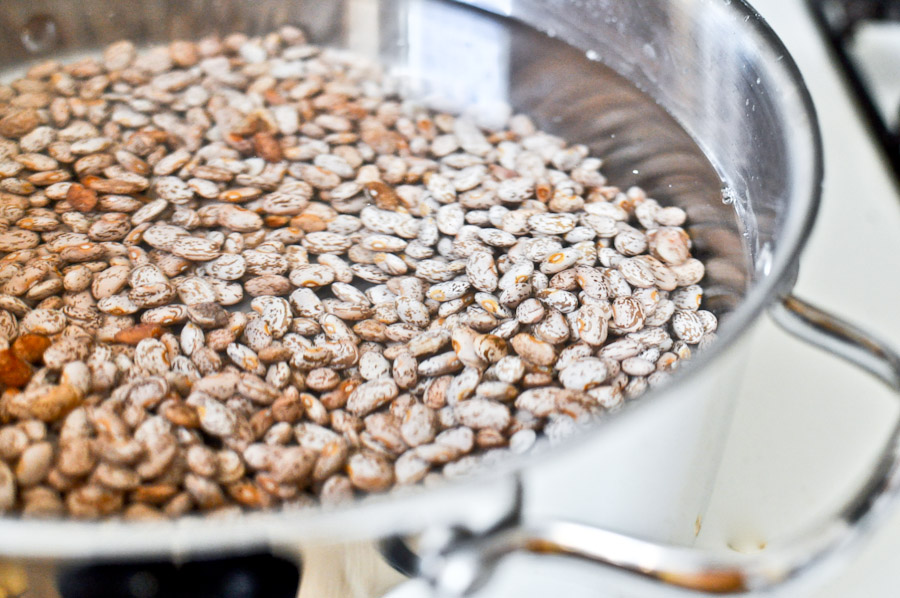
Next, throw your beans in a large pot and add 3 quarts (a little more or less is fine) of water. The key is to have about 3-4 inches of water above the beans. If you are a nerd like me, you might measure it with a ruler. If you are cool and don’t measure, I wish we were friends.


Tasty Kitchen Blog: Homemade Refried Beans. Guest post by Jessica Merchant of How Sweet It Is, recipe submitted by TK member Julie of Table for Two.

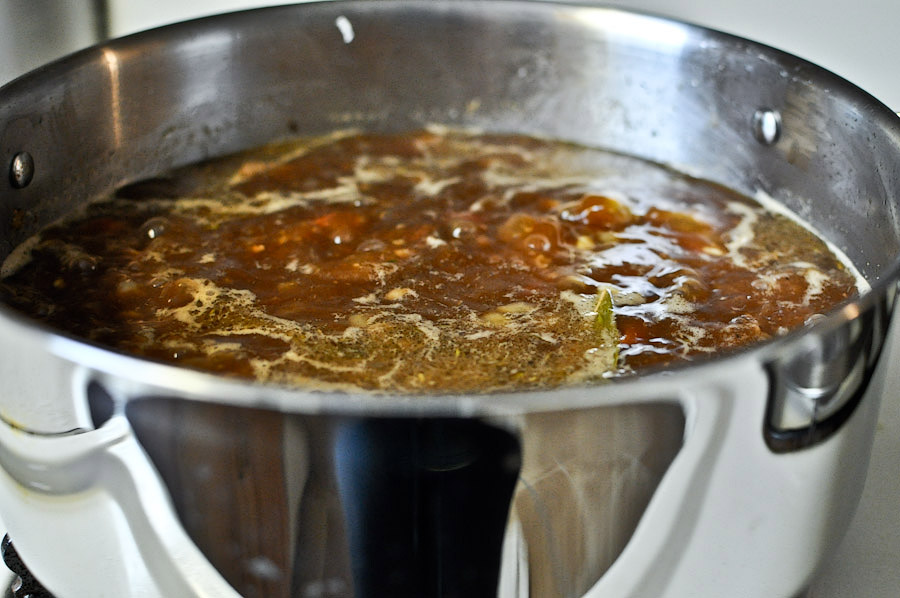
Bring the beans to a boil, then reduce to a simmer. If you soaked your beans overnight, you are going to cook them for 1 1/2 hours. If you didn’t soak the beans, you are going to tack another hour on to the cooking time for a total of 2 1/2 hours. I did not cover my pot o’ beans, FYI. I’m sure it would be fine if you did. Just make sure to check them periodically and give them a stir.


Tasty Kitchen Blog: Homemade Refried Beans. Guest post by Jessica Merchant of How Sweet It Is, recipe submitted by TK member Julie of Table for Two.

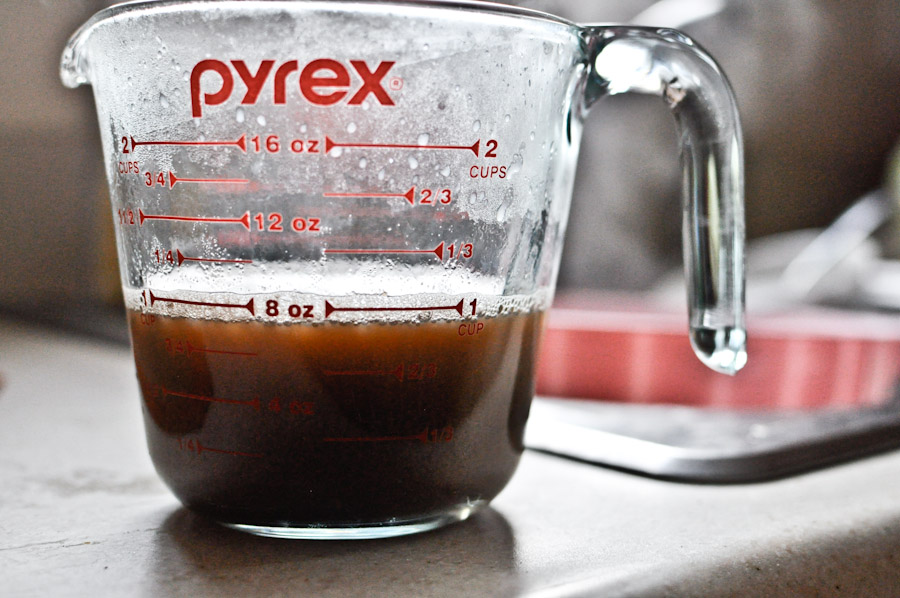
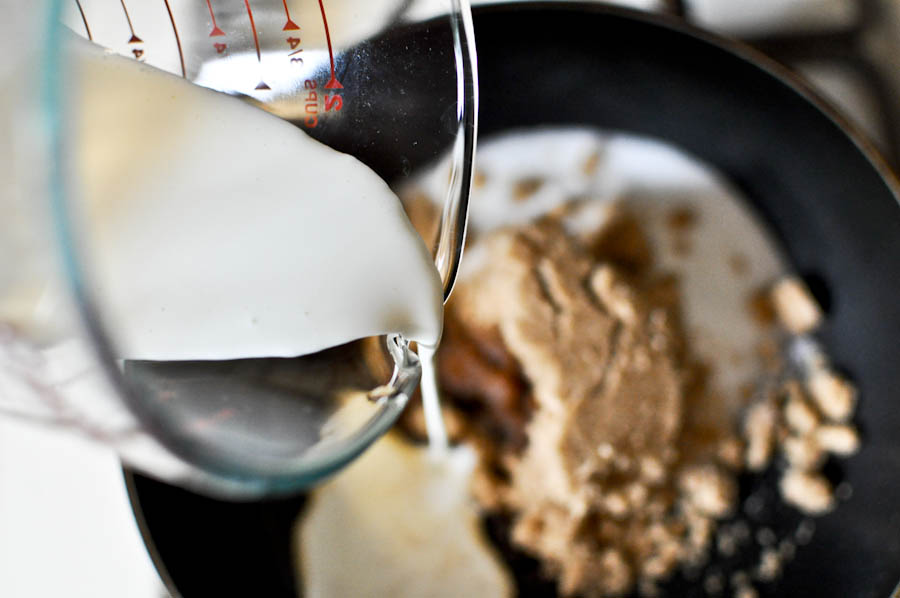
This part is important! Before draining your beans, reserve 1 cup of liquid and set it aside. And I mean before you drain your beans. Because, uh, someone I know once drained the beans, pouring all the delicious liquid down the sink. I don’t know who would do such a thing.


Tasty Kitchen Blog: Homemade Refried Beans. Guest post by Jessica Merchant of How Sweet It Is, recipe submitted by TK member Julie of Table for Two.

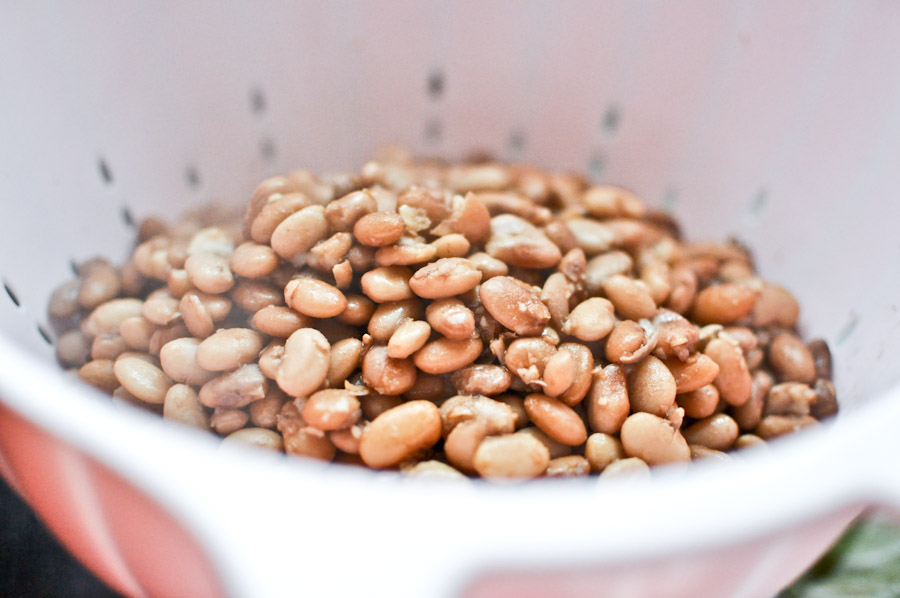
After reserving the liquid, drain the beans, then throw them back in the pot and set them aside for a few minutes.


Tasty Kitchen Blog: Homemade Refried Beans. Guest post by Jessica Merchant of How Sweet It Is, recipe submitted by TK member Julie of Table for Two.

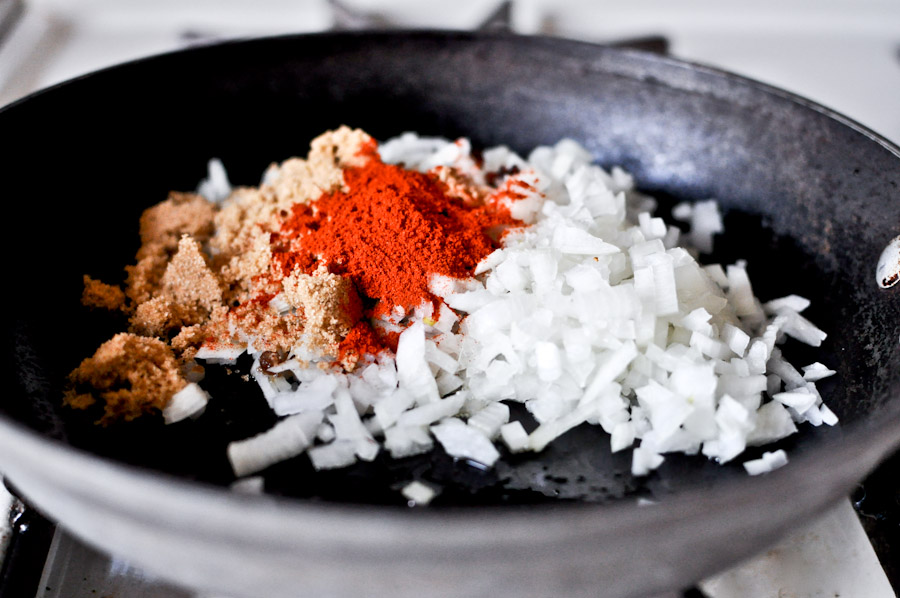
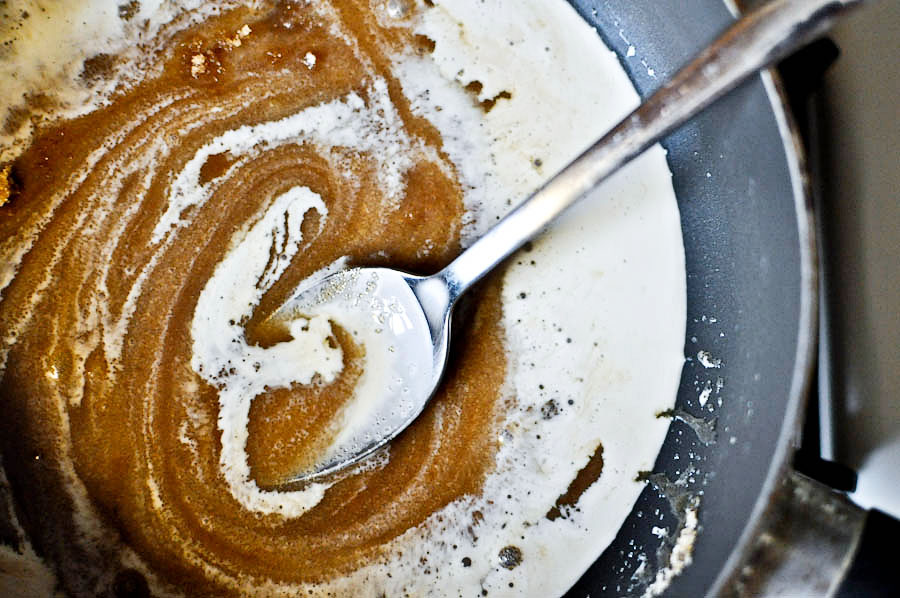
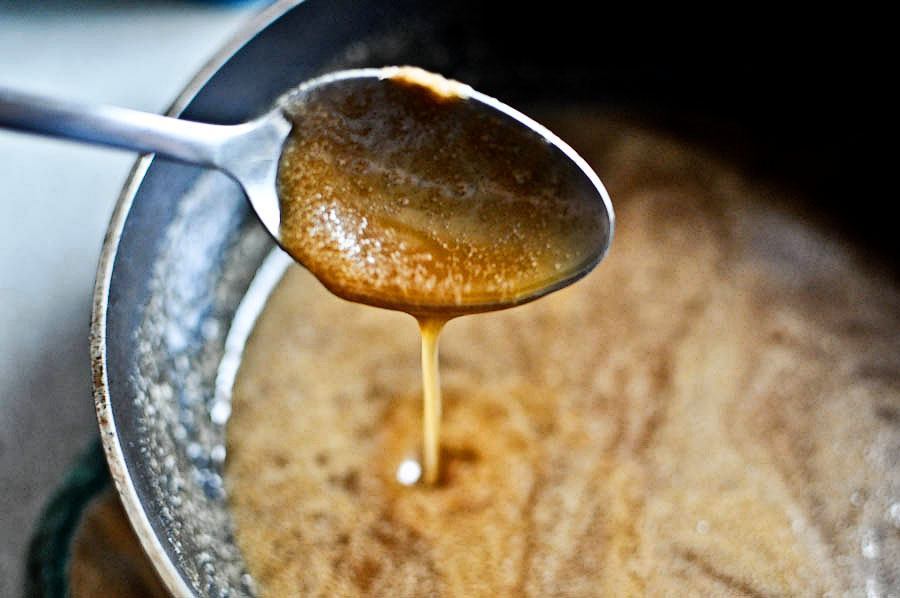
Grab a skillet and saute your chopped onion, paprika (I used smoked paprika), brown sugar and red pepper flakes until soft, about 5 minutes.


Tasty Kitchen Blog: Homemade Refried Beans. Guest post by Jessica Merchant of How Sweet It Is, recipe submitted by TK member Julie of Table for Two.

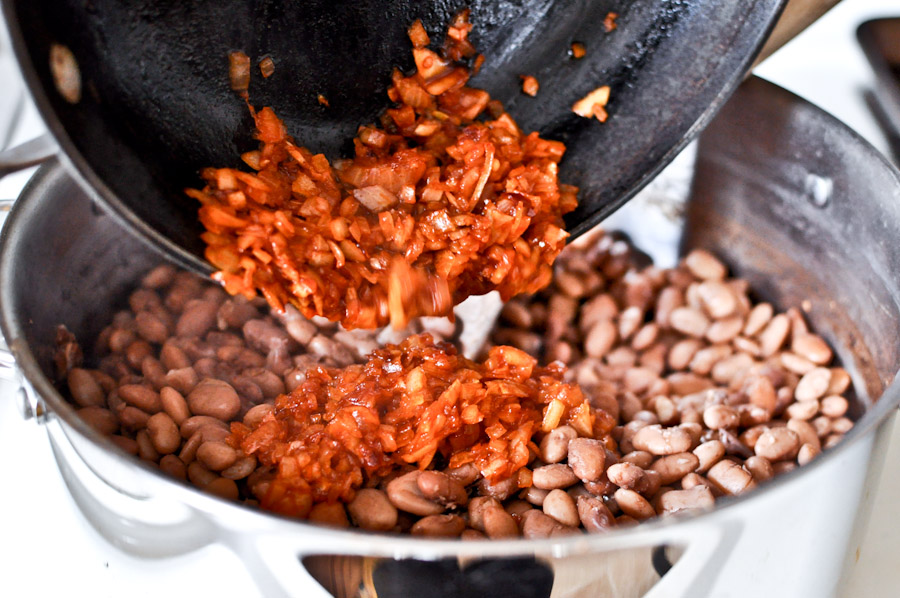
Add the contents of that skillet to the big pot of beans. Oh yes.


Tasty Kitchen Blog: Homemade Refried Beans. Guest post by Jessica Merchant of How Sweet It Is, recipe submitted by TK member Julie of Table for Two.

And add the reserved liquid too.


Tasty Kitchen Blog: Homemade Refried Beans. Guest post by Jessica Merchant of How Sweet It Is, recipe submitted by TK member Julie of Table for Two.

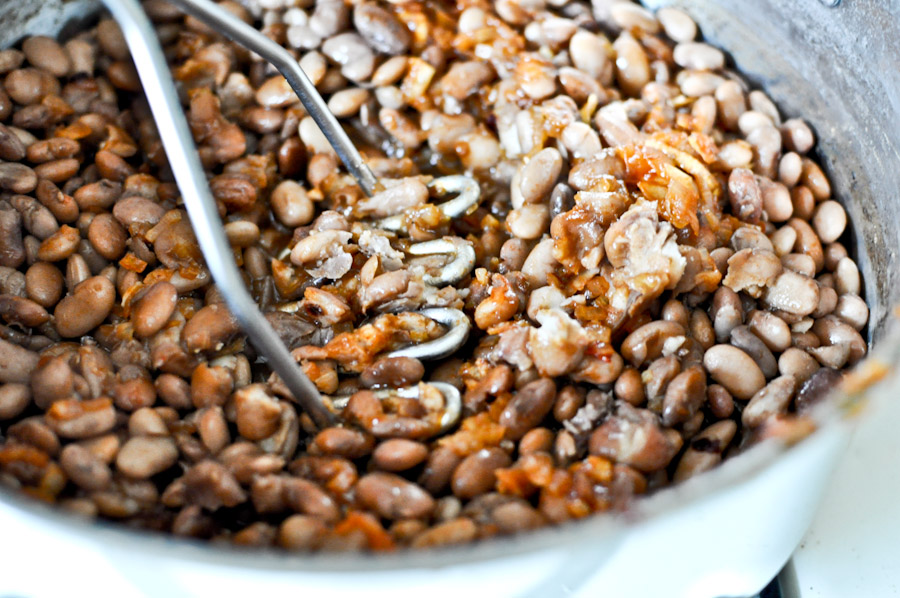
Next comes the mashing of the beans. To begin, I used a potato masher to smash everything together. You can also use a pastry blender or heck, even a few forks. That will give you a good arm workout, but it will work.


Tasty Kitchen Blog: Homemade Refried Beans. Guest post by Jessica Merchant of How Sweet It Is, recipe submitted by TK member Julie of Table for Two.

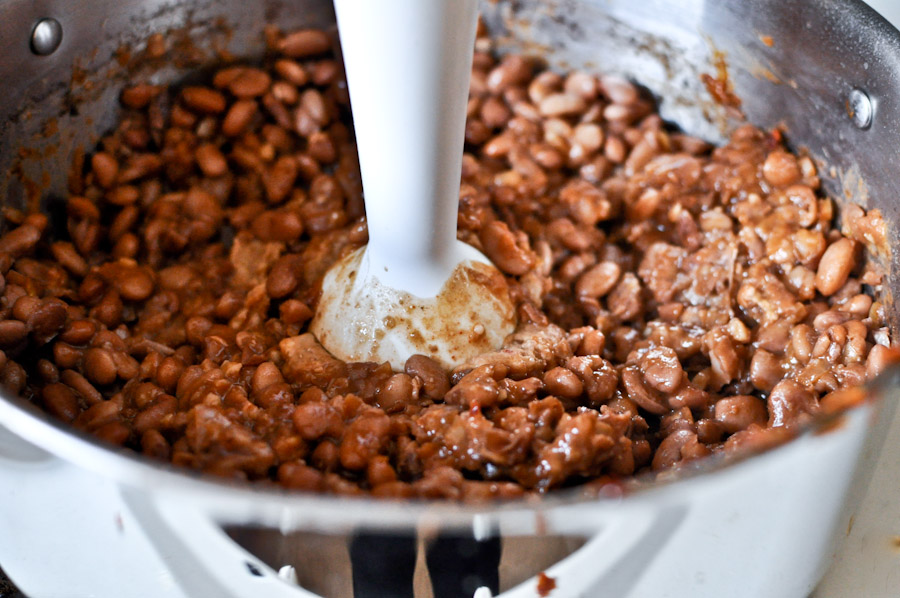
After mashing the beans, I went to town with my immersion blender. This gave the beans a really creamy texture, so if you prefer a more rustic mix, continue mashing with your tool of choice. Additionally, if you do not have an immersion blender, an electric hand mixer also work, though it didn’t smoothen the beans out quite as much. Don’t freak if you can’t get the beans super creamy. They will still be delicious.

At this time, you also want to take a few tastes of your beans. They will taste pretty bland since we haven’t added any salt, so begin with an amount you feel comfortable with. The original recipe called for 4 tablespoons, but I began with 1 teaspoon and got away with about 1 tablespoon of salt for the whole pot. I also think this had to do with my use of the smoked paprika, as well as the pinch of salt I added to my sauteing onions.


Tasty Kitchen Blog: Homemade Refried Beans. Guest post by Jessica Merchant of How Sweet It Is, recipe submitted by TK member Julie of Table for Two.

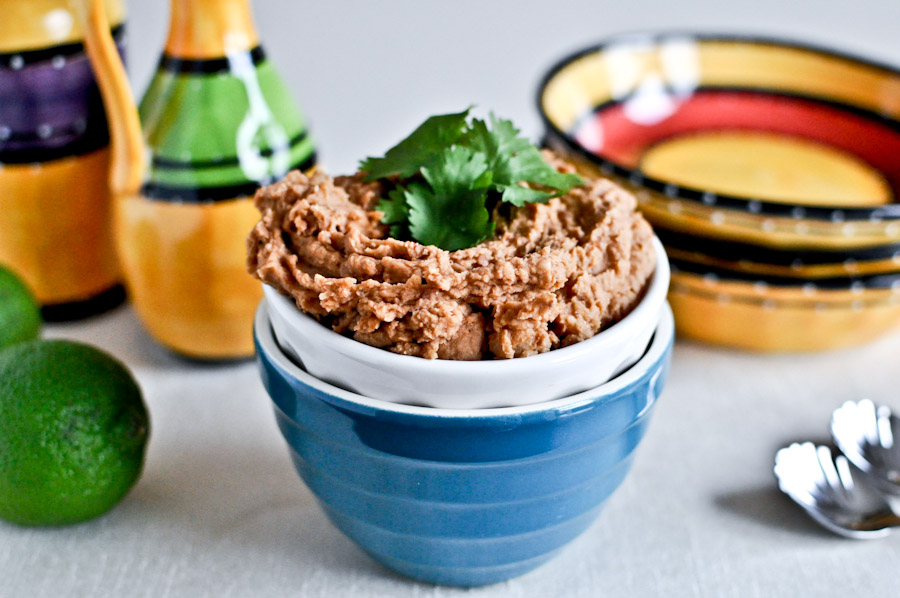
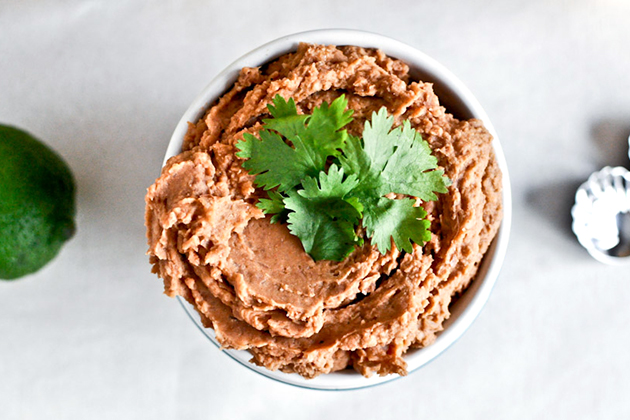
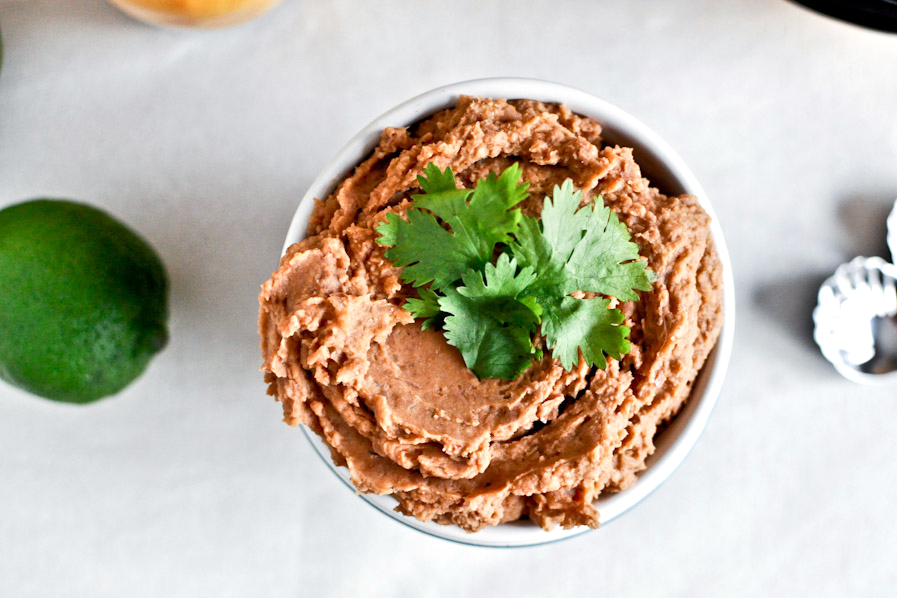
After seasoning, scoop the beans into a bowl (or your mouth) for easier consumption. Top with your favorites, like cheese, green onions and cilantro.


Tasty Kitchen Blog: Homemade Refried Beans. Guest post by Jessica Merchant of How Sweet It Is, recipe submitted by TK member Julie of Table for Two.

Throw on burritos, tacos, nachos or salads. Even use as a delicious dip for blue corn chips! Die and go to heaven. These are fabulous.

Thanks so much to Julie for the recipe! Be sure to check out her blog, Table for Two, where she posts some of the most delicious comfort food I’ve ever seen.


Printable Recipe

Homemade Refried Beans

See post on Table for Two’s site!
2.20 Mitt(s) 5 Rating(s)5 votes, average: 2.20 out of 55 votes, average: 2.20 out of 55 votes, average: 2.20 out of 55 votes, average: 2.20 out of 55 votes, average: 2.20 out of 5

Prep Time:

Cook Time:

Difficulty: Easy

Servings: 10

10
x

Print Options

Page size Letter 3x5 4x6
Text Size Small Medium Large
Content Include description
Include prep time, etc.
Show image

Description

Homemade refried beans: you won’t ever go back to the canned stuff!

Ingredients

  • 2-½ cups Dry Pinto Beans
  • 3 quarts Water
  • 1  Onion, Chopped
  • ½ Tablespoons Red Pepper Flakes, Or More To Taste
  • ½ Tablespoons Paprika
  • 2 Tablespoons Light Brown Sugar
  • 4 Tablespoons Salt, Or As Needed

Preparation Instructions

1. If possible, soak pinto beans overnight. This will cut down your cooking time a lot. If not, it’s okay. Instructions are the same as below.
2. Rinse the beans to get off any dirt.
3. Add the beans to a pot and cover with the water. Make sure there is at least 3-4 inches of water above the beans. Cook the beans for 2 1/2 hours, about 1 1/2 hours for pre-soaked beans.
4. Once the beans are cooked, reserve 1 cup of the water, then drain the rest. Set aside.
5. In a skillet, saute the onions, red pepper flakes, paprika, and brown sugar for about 5 minutes. Add this to the pot where the beans are and add the reserved cup of water.
6. Using an immersion blender, lightly blend the beans until they’re the consistency you want. If you don’t have an immersion blender, you can use a pastry blender (like I did). It gives a coarser consistency than the immersion blender since it’s harder to get every bean.
7. Season with salt as needed. Keep tasting it occasionally. This is also where you can add more red pepper flakes if desired.
8. Serve immediately.


_______________________________________

Jessica Merchant is a personal trainer turned food writer and blogger. Her blog, How Sweet Eats, is where she proclaims her love for all things sweet, all things bacon, and everything else in between. She works her magic in her Pittsburgh kitchen, which she shares with her husband of 2 years.


Profile photo of HowSweetEats

Beef with Barley Soup

Posted by in Step-by-Step Recipes

Tasty Kitchen Blog: Beef Barley Soup. Guest post by Jessica Merchant of How Sweet It Is, recipe submitted by TK member Terri of That's Some Good Cookin'.

 
I don’t know about you, but it’s finally winter in my neck of the woods. It’s cold. I’m hungry. And I’m ready to hibernate.

I could live off soups year round, and find that nothing is more satisfying that a big bowl of stew (or two) followed by a few cookies. Maybe some bread. Maybe a salad. But the soup is where it’s at. According to my mom, my grandma made an excellent beef and barley soup. However, it was never one of the recipes she made in my lifetime. It’s been hidden in my recipe box since she passed away, and I had all but forgotten about it until I came across this Beef with Barley Soup recipe from Terri. I could hardly wait to whip up a pot; it just screamed comfort. And it’s much easier than I thought it would be. Win!


Tasty Kitchen Blog: Beef Barley Soup. Guest post by Jessica Merchant of How Sweet It Is, recipe submitted by TK member Terri of That's Some Good Cookin'.

Here are your super simple ingredients: salt, pepper, thyme, carrots, olive oil barley, stew beef, season salt, diced tomatoes, beef stock, garlic, potatoes, onions and 1 bay leaf.
It should be noted that I had a difficult time finding pearl barley and had to resort to a quick cooking barley. Because of this, I reduced my simmer time a bit, and while I was afraid the barley would be a hot mess, it still came out great! More on that later.


Tasty Kitchen Blog: Beef Barley Soup. Guest post by Jessica Merchant of How Sweet It Is, recipe submitted by TK member Terri of That's Some Good Cookin'.

Begin by dicing your onion. Also peel and chop your potatoes.


Tasty Kitchen Blog: Beef Barley Soup. Guest post by Jessica Merchant of How Sweet It Is, recipe submitted by TK member Terri of That's Some Good Cookin'.

Next up, add your olive oil to a large stock pot and let it get nice and hot. Once hot, add your beef and DON’T TOUCH IT. Let it sear first, then once it can easily be flipped (and is not sticking to the pot), toss it.


Tasty Kitchen Blog: Beef Barley Soup. Guest post by Jessica Merchant of How Sweet It Is, recipe submitted by TK member Terri of That's Some Good Cookin'.

See the caramelly brown color? That’s what you want. Gray meat is the worst. Trust me. Give it some color!


Tasty Kitchen Blog: Beef Barley Soup. Guest post by Jessica Merchant of How Sweet It Is, recipe submitted by TK member Terri of That's Some Good Cookin'.

After about 5 minutes your meat should be browned, and it’s time to add your onions and garlic. Stir everything together.


Tasty Kitchen Blog: Beef Barley Soup. Guest post by Jessica Merchant of How Sweet It Is, recipe submitted by TK member Terri of That's Some Good Cookin'.

Continue stirring every few minutes until the onions become caramelized. You can add a little more oil here if needed, but it wasn’t necessary for me.


Tasty Kitchen Blog: Beef Barley Soup. Guest post by Jessica Merchant of How Sweet It Is, recipe submitted by TK member Terri of That's Some Good Cookin'.

Now it’ time to add everything else! Throw in the potatoes and carrots and barley …


Tasty Kitchen Blog: Beef Barley Soup. Guest post by Jessica Merchant of How Sweet It Is, recipe submitted by TK member Terri of That's Some Good Cookin'.

Dump in the stock …


Tasty Kitchen Blog: Beef Barley Soup. Guest post by Jessica Merchant of How Sweet It Is, recipe submitted by TK member Terri of That's Some Good Cookin'.

Then add your seasonings and bay leaf.


Tasty Kitchen Blog: Beef Barley Soup. Guest post by Jessica Merchant of How Sweet It Is, recipe submitted by TK member Terri of That's Some Good Cookin'.

Bring the soup to a boil, then reduce it to a simmer and let it cook for about 2 hours, stirring occasionally. Again, I shaved a bit of time off here since I used the quick cooking barley. I let mine simmer for about 45-60 minutes.


Tasty Kitchen Blog: Beef Barley Soup. Guest post by Jessica Merchant of How Sweet It Is, recipe submitted by TK member Terri of That's Some Good Cookin'.

After the 2 hours (or 45-60 minutes, in my case), add in your diced tomatoes. Give it a good stir and let it simmer for another hour. Easy!


Tasty Kitchen Blog: Beef Barley Soup. Guest post by Jessica Merchant of How Sweet It Is, recipe submitted by TK member Terri of That's Some Good Cookin'.

Give it a taste and adjust your seasonings. I snuck multiple spoonfuls for about 2 hours straight.


Tasty Kitchen Blog: Beef Barley Soup. Guest post by Jessica Merchant of How Sweet It Is, recipe submitted by TK member Terri of That's Some Good Cookin'.

Remove your bay leaf and serve it hot with a sprinkle of fresh parsley. I added some crusty bread with butter for dipping. Crackers would be good, too!


Tasty Kitchen Blog: Beef Barley Soup. Guest post by Jessica Merchant of How Sweet It Is, recipe submitted by TK member Terri of That's Some Good Cookin'.

Dig in!

This soup actually warmed me to the core and the flavor was just incredible. It is a perfect dish for cold winter nights, and if you use the quick cooking barley, you can even make this as an easy weeknight meal. I didn’t even care that I burn every inch of my mouth.

Thanks so much Terri for the delicious recipe! Be sure to check out her blog That’s Some Good Cookin’. It’s chock full of fabulous dishes and stories.


Printable Recipe

Beef with Barley Soup

See post on Terri @ that's some good cookin'’s site!
4.82 Mitt(s) 17 Rating(s)17 votes, average: 4.82 out of 517 votes, average: 4.82 out of 517 votes, average: 4.82 out of 517 votes, average: 4.82 out of 517 votes, average: 4.82 out of 5

Prep Time:

Cook Time:

Difficulty: Easy

Servings: 8

8
x

Print Options

Page size Letter 3x5 4x6
Text Size Small Medium Large
Content Include description
Include prep time, etc.
Show image

Description

Take the chill off with a warm bowl of this filling soup.

Ingredients

  • 2 Tablespoons Olive Oil
  • 1 pound Beef Cubes (for Stew)
  • 1 whole Large Onion, Medium Diced
  • 2 cloves Minced Garlic
  • 2 whole Carrots, Smaller Ends Cut Into Rounds, Larger Ends Diced
  • 2 whole Potatoes, Large Dice
  • 1-½ teaspoon Seasoning Salt
  • 1 teaspoon Sea Salt (or To Taste)
  • Ground Black Pepper To Taste
  • 6 cups Beef Stock
  • 2 cups Water Or As Needed
  • ½ cups Pearl Barley
  • ½ teaspoons Thyme
  • 1 whole Bay Leaf
  • 1 can (14.5 Oz. Size) Diced Tomatoes

Preparation Instructions

Heat a large stock pot over medium high heat. Add the olive oil.

Brown the beef cubes for three minutes in the oil, then add the onions and garlic. Lower the heat to medium low and cook until the onions are cooked and just start to caramelize. Stir as needed to keep onions and garlic from burning. Lower heat if necessary; drizzle a little more olive oil if needed to keep food from sticking.

Add everything except the tomatoes to the pot and stir well. Increase the heat and bring the soup to a boil, then turn heat to low, cover pot, and simmer for two hours, stirring occasionally. Adjust heat as necessary to keep soup at a slow simmer. If the soup thickens too much, add a little more water or broth.

Taste to correct seasonings, then add tomatoes and simmer for another hour. Remove bay leaf before serving.


_______________________________________

Jessica Merchant is a personal trainer turned food writer and blogger. Her blog, How Sweet Eats, is where she proclaims her love for all things sweet, all things bacon, and everything else in between. She works her magic in her Pittsburgh kitchen, which she shares with her husband of 2 years.


Profile photo of HowSweetEats

Thai Chicken Pizza

Posted by in Step-by-Step Recipes

Tasty Kitchen Blog: Thai Chicken Pizza. Guest post by Jessica Merchant of How Sweet It Is, recipe submitted by TK member Dax Phillips of Simple Comfort Food.

 
While my favorite cuisine has always been Mexican, Thai is coming in at a very, very close second. On any given day, I am craving something with peanut sauce, a giant bowl of pineapple curry, summer rolls with sweet, syrupy chili flavor and pad thai … oh pad thai. Who would have thought that combining chicken or shrimp, peanuts, sweet sauces and bright cilantro would taste so utterly fantastic? Not I.

So when we ate Thai chicken pizza out a few weeks ago, I went on a mission to recreate it at home. After a quick glance, I knew this recipe from TK member Dax Phillips was just the ticket. There was no way I was going one more day without this homemade pizza in my life. I whipped up Erica Lea’s awesome homemade pizza dough and I was ready to roll.


Tasty Kitchen Blog: Thai Chicken Pizza. Guest post by Jessica Merchant of How Sweet It Is, recipe submitted by TK member Dax Phillips of Simple Comfort Food.

To make the pizza, you need one batch of your favorite pizza dough, peanuts, fresh cilantro and basil, zucchini, one shallot, mozzarella cheese, sweet chili sauce, shredded chicken and crushed red pepper. Spicy spicy. And a little sweet.


Tasty Kitchen Blog: Thai Chicken Pizza. Guest post by Jessica Merchant of How Sweet It Is, recipe submitted by TK member Dax Phillips of Simple Comfort Food.

To begin, flour your workspace and shape your pizza dough into the desired circle, rectangle, or goofy blob. The original instructions called for using a pizza stone, which unfortunately I do not have. I know! So deprived. I can almost promise you that this tastes better on a pizza stone. If you use one, make sure to preheat it first! You can also add a few teaspoons of cornmeal under your crust. So delicious and crunchy.


Tasty Kitchen Blog: Thai Chicken Pizza. Guest post by Jessica Merchant of How Sweet It Is, recipe submitted by TK member Dax Phillips of Simple Comfort Food.

Slice your zucchini and your shallot. A mandolin would probably work best here for uniformly thin slices, but alas, another kitchen gadget I do not own! That’s okay—it’s not completely necessary.

I also grated my mozzarella at this point. You can use pre-shredded mozz in a bag, but trust me, nothing tastes as delicious as freshly grated cheese.


Tasty Kitchen Blog: Thai Chicken Pizza. Guest post by Jessica Merchant of How Sweet It Is, recipe submitted by TK member Dax Phillips of Simple Comfort Food.

Spread the chili sauce on the dough. You want a thin layer, but enough to cover the dough.


Tasty Kitchen Blog: Thai Chicken Pizza. Guest post by Jessica Merchant of How Sweet It Is, recipe submitted by TK member Dax Phillips of Simple Comfort Food.

Layer on your zucchini and shallots …


Tasty Kitchen Blog: Thai Chicken Pizza. Guest post by Jessica Merchant of How Sweet It Is, recipe submitted by TK member Dax Phillips of Simple Comfort Food.

Then add your shredded chicken. The original recipe called for one cup of chicken, but I used about 1 1/4 cups. To get this amount, I cooked 3 thinly-sliced chicken breasts. Easy!


Tasty Kitchen Blog: Thai Chicken Pizza. Guest post by Jessica Merchant of How Sweet It Is, recipe submitted by TK member Dax Phillips of Simple Comfort Food.

Add on your crushed red pepper. More for heat, less for wimpy taste buds like my own. Except I dropped a huge spoonful in one spot on the pizza, which of course ended up being the slice that I ate. My mouth was on fiyah!


Tasty Kitchen Blog: Thai Chicken Pizza. Guest post by Jessica Merchant of How Sweet It Is, recipe submitted by TK member Dax Phillips of Simple Comfort Food.

Throw on your cheese.


Tasty Kitchen Blog: Thai Chicken Pizza. Guest post by Jessica Merchant of How Sweet It Is, recipe submitted by TK member Dax Phillips of Simple Comfort Food.

Then place that baby in the oven and watch it get all golden and bubbly.


Tasty Kitchen Blog: Thai Chicken Pizza. Guest post by Jessica Merchant of How Sweet It Is, recipe submitted by TK member Dax Phillips of Simple Comfort Food.

While the pizza is in the oven, chop your peanuts. Do NOT be afraid of the peanuts here, friends! They totally MAKE the pizza. They take it over the Thai edge. They are completely thrilling.


Tasty Kitchen Blog: Thai Chicken Pizza. Guest post by Jessica Merchant of How Sweet It Is, recipe submitted by TK member Dax Phillips of Simple Comfort Food.

As soon as the pizza comes out of the oven, sprinkle on the peanuts …


Tasty Kitchen Blog: Thai Chicken Pizza. Guest post by Jessica Merchant of How Sweet It Is, recipe submitted by TK member Dax Phillips of Simple Comfort Food.

Then top if off with lots of fresh cilantro and basil. Even though it’s nearing winter, I was able to find fresh cilantro and basil at my grocery store for about 98 cents, which is totally unheard of in the Pittsburgh area. Hopefully you can find some too, but if not (or if you choose to make this pizza in say, February or March when the pickin’s are even slimmer) I would go ahead a throw on a little dried basil and cilantro. These two herbs maximized the Thai flavor and I can’t imagine the pizza without them.


Tasty Kitchen Blog: Thai Chicken Pizza. Guest post by Jessica Merchant of How Sweet It Is, recipe submitted by TK member Dax Phillips of Simple Comfort Food.

Cut yourself a nice big slice …


Tasty Kitchen Blog: Thai Chicken Pizza. Guest post by Jessica Merchant of How Sweet It Is, recipe submitted by TK member Dax Phillips of Simple Comfort Food.

And enjoy!

This pizza was absolutely out of this world. Not only was it delicious, but the flavors were incredibly fresh, which was a nice change of pace from the typical comfort food this time of year. On top of that, using high quality ingredients combined with some whole wheat pizza crust and all-white meat chicken means one thing: healthier pizza! Which obviously translates to: have an extra slice (or two!).

Thanks so much to Dax Phillips for the fabulous recipe. Be sure to check out his blog, Simple Comfort Food—I think the title says it all!


Printable Recipe

Thai Chicken Pizza

See post on Dax Phillips’s site!
5.00 Mitt(s) 7 Rating(s)7 votes, average: 5.00 out of 57 votes, average: 5.00 out of 57 votes, average: 5.00 out of 57 votes, average: 5.00 out of 57 votes, average: 5.00 out of 5

Prep Time:

Cook Time:

Difficulty: Easy

Servings: 4

4
x

Print Options

Page size Letter 3x5 4x6
Text Size Small Medium Large
Content Include description
Include prep time, etc.
Show image

Description

A great pizza that has just the right amount of sweet heat to keep you coming back for more.

Ingredients

  • 1 whole Batch Of Your Favorite Pizza Dough, Rolled Out To About A 1/4 Inch, 12 Inch Diameter
  • ¼ cups Flour
  • 1 Tablespoon Fine Corn Meal
  • ½ cups Sweet Asian Chili Sauce, Plus 1 Tablespoon For Drizzle
  • 1 whole Shallot, Thinly Sliced
  • ½ whole Zucchini, Thinly Sliced
  • 1 teaspoon Red Chili Flakes
  • 1 cup Cooked Chicken Shredded
  • ⅔ cups Shredded Mozzarella Cheese
  • ¼ cups Chopped Peanuts
  • 2 Tablespoons Fresh Cilantro
  • 2 Tablespoons Fresh Basil (optional)

Preparation Instructions

Preheat your oven to 500 degrees F with a pizza stone in the oven. If you do not have a pizza stone, put a large baking sheet in the oven (make sure to use one that is large enough to house your dough).

Begin by adding some flour to your rolling surface. Take your dough that has already risen, and lightly knead it. Roll out the dough to about a 1/4 inch thick, or however your like the thickness of your crust.

Lay the dough down on a pizza peel (if you have one) that’s covered with corn meal. Otherwise put the dough on a surface that you can use to slide the entire pizza onto the hot pizza stone or pan. The corn meal helps assist with the pizza dough – so it slides off easily.

Spread the Asian chili sauce on the surface of the dough. Not too thick, not too thin. Add the sliced shallots and zucchini. Top with the red chili flakes and shredded chicken. Top with the cheese.

Using your pizza peel, place the pizza into the oven on your cooking surface (stone or pan) and cook for about 15 minutes, keeping an eye on your crust and toppings so they do not burn. Every oven is different.

Once the pizza dough is golden around the edges and the cheese is nice and bubbly, remove pizza from the oven.

Drizzle more of the Asian chili sauce over the top, top with the crushed peanuts and fresh cilantro. If you are feeling naughty, top it off with some fresh basil.

Slice and serve.

Every bite was pretty darn awesome. You get the great pizza crust with the sweet heat from the chili sauce, and the shallots, cilantro, and zucchini, along with the great crunch from the peanuts. All of this combined made this one a pizza that is hard to beat. Enjoy.


Printable Recipe

Pizza Dough

See post on Erica Lea’s site!
5.00 Mitt(s) 12 Rating(s)12 votes, average: 5.00 out of 512 votes, average: 5.00 out of 512 votes, average: 5.00 out of 512 votes, average: 5.00 out of 512 votes, average: 5.00 out of 5

Prep Time:

Cook Time:

Difficulty: Easy

Servings: 8

8
x

Print Options

Page size Letter 3x5 4x6
Text Size Small Medium Large
Content Include description
Include prep time, etc.
Show image

Description

Can you believe that this dough is 100% whole wheat? Yet it handles so well – better than any pizza dough recipe I’ve ever tried.

Ingredients

  • ½ cups Warm Water (about 110° F)
  • 2-¼ teaspoons Instant Yeast
  • 1-¼ cup Water At Room Temperature
  • 2 Tablespoons Extra-virgin Olive Oil Plus Extra For Greasing The Bowl
  • 4 cups White Whole Wheat Flour
  • 1-½ teaspoon Sea Salt

Preparation Instructions

1) Place the 1/2 cup warm water in a small bowl. Add the yeast and stir. Let sit for about 5 minutes, or until the yeast begins to swell. Add to the room temperature water and oil and stir.

2) Place the flour and salt in the bowl of a stand mixer fitted with the paddle attachment. Mix briefly until combined. With mixer on low speed, slowly add the liquid ingredients. Mix just until a cohesive dough forms. Let the dough rest for 5 minutes.

3) Change to the dough hook attachment. Knead the dough until it becomes smooth and elastic, about 5 more minutes.

4) Oil or butter a medium-sized bowl. Transfer the dough to the prepared bowl. Cover with a kitchen towel or plastic wrap and place in a warm spot. Allow to rise for 1 ½-2 hours, or until it doubles in volume. The dough is now ready to be used in your recipe.

Makes enough dough for approximately 3 thin-crust, large-sized pizzas.


_______________________________________

Jessica Merchant is a personal trainer turned food writer and blogger. Her blog, How Sweet Eats, is where she proclaims her love for all things sweet, all things bacon, and everything else in between. She works her magic in her Pittsburgh kitchen, which she shares with her husband of 2 years.


Profile photo of HowSweetEats

Pumpkin Coffee Cake

Posted by in Baking, Step-by-Step Recipes

Tasty Kitchen Blog Pumpkin Coffee Cake with Brown Sugar Glaze. Guest post by Jessica Merchant of How Sweet It Is, recipe submitted by TK member Heather of Heather's Dish.

 
It seems that I wait all year for pumpkin. Come May, I am already craving pumpkin cookies, pumpkin roll, and pumpkin pie, and can hardly imagine waiting another four or five months to get in on that goodness. And with the recent pumpkin shortages that have been happening around the country, I sort of bought every can at my store. Like, every single can. My downstairs pantry now has a dedicated pumpkin shelf and I couldn’t be happier. And hungrier.

I’ve had Heather’s recipe saved for Pumpkin Coffee Cake with Brown Sugar Glaze since last autumn, so you know exactly what came first on my to-make list. If I’m being honest, it’s the brown sugar glaze that sold me. I have a weird thing for brown sugar and for glazes, so I knew it would be a winner. I could practically taste it through through the screen. And it’s easy too!


Tasty Kitchen Blog Pumpkin Coffee Cake with Brown Sugar Glaze. Guest post by Jessica Merchant of How Sweet It Is, recipe submitted by TK member Heather of Heather's Dish.

You need a can of pumpkin puree, a box of yellow cake mix, pumpkin pie spice, baking soda, vanilla extract, heavy cream, flour, granulated sugar, brown sugar, butter, eggs and water. Heather’s recipe called for walnuts, and as I much as I love them, I’m a firm believer in nutless baked goods. Feel free to add them if you wish!


Tasty Kitchen Blog Pumpkin Coffee Cake with Brown Sugar Glaze. Guest post by Jessica Merchant of How Sweet It Is, recipe submitted by TK member Heather of Heather's Dish.

Begin by adding the pumpkin, eggs, vanilla extract, water and pumpkin pie spice together in a bowl.


Tasty Kitchen Blog Pumpkin Coffee Cake with Brown Sugar Glaze. Guest post by Jessica Merchant of How Sweet It Is, recipe submitted by TK member Heather of Heather's Dish.

Mix it up until it looks pumpkin-y … or, you know, sort of like baby food.


Tasty Kitchen Blog Pumpkin Coffee Cake with Brown Sugar Glaze. Guest post by Jessica Merchant of How Sweet It Is, recipe submitted by TK member Heather of Heather's Dish.

Add in the cake mix and baking soda, and mix with a spoon until combined and minimal lumps remain. It’s okay if you have a few small lumps left.


Tasty Kitchen Blog Pumpkin Coffee Cake with Brown Sugar Glaze. Guest post by Jessica Merchant of How Sweet It Is, recipe submitted by TK member Heather of Heather's Dish.

Pour batter into a 9×13 greased baking dish.


Tasty Kitchen Blog Pumpkin Coffee Cake with Brown Sugar Glaze. Guest post by Jessica Merchant of How Sweet It Is, recipe submitted by TK member Heather of Heather's Dish.

In a small bowl, mix together half of the brown sugar, flour and melted butter. If you are using walnuts, this is where they would go. Pecans would add a nice touch too.


Tasty Kitchen Blog Pumpkin Coffee Cake with Brown Sugar Glaze. Guest post by Jessica Merchant of How Sweet It Is, recipe submitted by TK member Heather of Heather's Dish.

Crumble the brown sugar mixture over the pumpkin cake batter with your fingers.


Tasty Kitchen Blog Pumpkin Coffee Cake with Brown Sugar Glaze. Guest post by Jessica Merchant of How Sweet It Is, recipe submitted by TK member Heather of Heather's Dish.

It should look like this. Absolutely devour-able.

The cake heads into a 350ºF oven and bakes for about 30 minutes, or until a toothpick inserted comes out clean.


Tasty Kitchen Blog Pumpkin Coffee Cake with Brown Sugar Glaze. Guest post by Jessica Merchant of How Sweet It Is, recipe submitted by TK member Heather of Heather's Dish.

While the cake is baking, combine heavy cream, brown sugar, granulated sugar and vanilla extract in a small saucepan.


Tasty Kitchen Blog Pumpkin Coffee Cake with Brown Sugar Glaze. Guest post by Jessica Merchant of How Sweet It Is, recipe submitted by TK member Heather of Heather's Dish.

Mix to combine and bring it to a simmer, then remove from heat and continuously stir until all of the sugar has dissolved. Set it aside until ready to use.


Tasty Kitchen Blog Pumpkin Coffee Cake with Brown Sugar Glaze. Guest post by Jessica Merchant of How Sweet It Is, recipe submitted by TK member Heather of Heather's Dish.

It will become all glazy and be nearly impossible to stay away from. I wanted to pour it in a mug and drink it.


Tasty Kitchen Blog Pumpkin Coffee Cake with Brown Sugar Glaze. Guest post by Jessica Merchant of How Sweet It Is, recipe submitted by TK member Heather of Heather's Dish.

Once the cake comes out of the oven, poke holes all over the top with a toothpick. Or in my case, a fondue sticker thingy. You can also use a fork.


Tasty Kitchen Blog Pumpkin Coffee Cake with Brown Sugar Glaze. Guest post by Jessica Merchant of How Sweet It Is, recipe submitted by TK member Heather of Heather's Dish.

Drizzle glaze over cake evenly…


Tasty Kitchen Blog Pumpkin Coffee Cake with Brown Sugar Glaze. Guest post by Jessica Merchant of How Sweet It Is, recipe submitted by TK member Heather of Heather's Dish.

Then let cool for about 20-30 minutes, or until just slightly warm. It tastes best warm, trust me.


Tasty Kitchen Blog Pumpkin Coffee Cake with Brown Sugar Glaze. Guest post by Jessica Merchant of How Sweet It Is, recipe submitted by TK member Heather of Heather's Dish.

Serve yourself (and um, your guests?) a big square slice …


Tasty Kitchen Blog Pumpkin Coffee Cake with Brown Sugar Glaze. Guest post by Jessica Merchant of How Sweet It Is, recipe submitted by TK member Heather of Heather's Dish.

And go to town. Oh man. This cake is unreal.


Tasty Kitchen Blog Pumpkin Coffee Cake with Brown Sugar Glaze. Guest post by Jessica Merchant of How Sweet It Is, recipe submitted by TK member Heather of Heather's Dish.

You won’t believe how delicious it is, and it fits the bill for breakfast and dessert. The crunchy, gooey top is my favorite part and I can’t imagine a better treat for fall.

Thanks so much to Heather for the fabulous recipe! Be sure to check out her blog, Heather’s Dish, where she serves up delectable food with a side of humor and love.


Printable Recipe

Pumpkin Coffee Cake with Brown Sugar Glaze

See post on Heather Disarro’s site!
4.90 Mitt(s) 29 Rating(s)29 votes, average: 4.90 out of 529 votes, average: 4.90 out of 529 votes, average: 4.90 out of 529 votes, average: 4.90 out of 529 votes, average: 4.90 out of 5

Prep Time:

Cook Time:

Difficulty: Easy

Servings: 18

18
x

Print Options

Page size Letter 3x5 4x6
Text Size Small Medium Large
Content Include description
Include prep time, etc.
Show image

Description

Light and fluffy coffee cake made the decadent way with a cream-and-butter brown sugar glaze. Feel free to thank me for the sugar coma later.

Ingredients

  • ⅓ cups Water
  • 1 can Pureed Pumpkin (15 Oz)
  • 2 whole Eggs
  • 1 Tablespoon Vanilla Extract
  • 2 teaspoons Pumpkin Pie Spice
  • 1 box Yellow Cake Mix (18 Ounce Box)
  • 1 teaspoon Baking Soda
  • 1 cup Brown Sugar, Divided
  • ½ cups Flour
  • ⅓ cups Walnuts, Chopped
  • 4 Tablespoons Butter, Melted
  • ¼ cups Granulated Sugar
  • 1 teaspoon Vanilla Extract
  • ¼ cups Heavy Whipping Cream

Preparation Instructions

Preheat the oven to 350F.

In a large bowl mix together the water, pumpkin, eggs, 1 Tablespoon of vanilla, and pumpkin pie spice until well combined. Add the cake mix and baking soda and mix until just combined.

Grease a 9×13 pan with butter and pour batter into pan.

In a small bowl mix together 1/2 cup of brown sugar, 1/2 cup flour, walnuts, and melted butter. Use fingers to sprinkle over the top of the cake. Bake at 350 for 25-30 minutes, or until a toothpick inserted comes out clean.

For the glaze, combine the other 1/2 cup brown sugar, granulated sugar, 1 teaspoon vanilla, and heavy cream in a saucepan and bring to a simmer. Remove from heat and stir until all sugar is dissolved.

When cake is finished baking, poke holes in the top with a toothpick. Pour glaze over the cake, making sure to cover all surfaces. Serve cake warm or at room temperature.


_______________________________________

Jessica Merchant is a personal trainer turned food writer and blogger. Her blog, How Sweet Eats, is where she proclaims her love for all things sweet, all things bacon, and everything else in between. She works her magic in her Pittsburgh kitchen, which she shares with her husband of 2 years.


Profile photo of HowSweetEats

Bacon Cheddar Bubble Bread

Posted by in Baking, Step-by-Step Recipes

With one look at this title, I knew the recipe would be a winner. Let's be honest: bacon + cheddar + bread? Who in the world could go wrong with that? I couldn't have found this at a more perfect time with the start of football season and knew it would be a great game day snack. I also had so much success with Rebecca's General Tso's Chicken that I was already…

Profile photo of HowSweetEats

General Tso’s Chicken

Posted by in Step-by-Step Recipes

  My husband has a “thing” for General Tso’s chicken. A relationship of sorts. On any given day when I’m in the mood for Chinese takeout, sit down Thai, or a Japanese steakhouse, he’s in the mood for … General Tso’s. He rarely goes outside the box and tries anything new because his love for […]

Profile photo of HowSweetEats

Peanut Butter Stuffed Hot Fudge Cupcakes

Posted by in Baking, Step-by-Step Recipes

  I think it’s true what they say: you can never go wrong with peanut butter and chocolate. It’s the combination that I consoled myself with after my first high school heartbreak (think a spoon in the jar and a sprinkling of chocolate chips) and the way we celebrated our marriage (think the best cheesecake […]

Profile photo of HowSweetEats

Grilled Breakfast Pizza

Posted by in Step-by-Step Recipes

Grilling pizza has been on my bucket list, right smack in between eating baklava on a beach in Greece and owning more shoes than Imelda Marcos. It’s been intimidating, perhaps because I’m often afraid of lighting up the grill on my own and sending my immediate surroundings into flames. But then I spied this Grilled […]