The Pioneer Woman Tasty Kitchen
Profile photo of HowSweetEats

Cheddar Tailgating Bread

Posted by in Baking, Step-by-Step Recipes

Tasty Kitchen Blog: Cheddar Tailgating Bread. Guest post by Jessica Merchant of How Sweet It Is, recipe submitted by TK member Rebecca of Foodie with Family.

 
I hope you’re in the mood for something fantastically warm, gooey, comforting, and most of all, fun. We’re right in the heart of football season and who doesn’t love to bring the snack to the party that everyone can’t stop talking about? That’s exactly what this bread is. And more. I never need to be sold when cheese and bread are involved, so the instant I saw Rebecca’s recipe for Cheddar Tailgating Bread, I was halfway to the store grabbing the ingredients. Just you wait. We have a winner here, folks.


Tasty Kitchen Blog: Cheddar Tailgating Bread. Guest post by Jessica Merchant of How Sweet It Is, recipe submitted by TK member Rebecca of Foodie with Family.

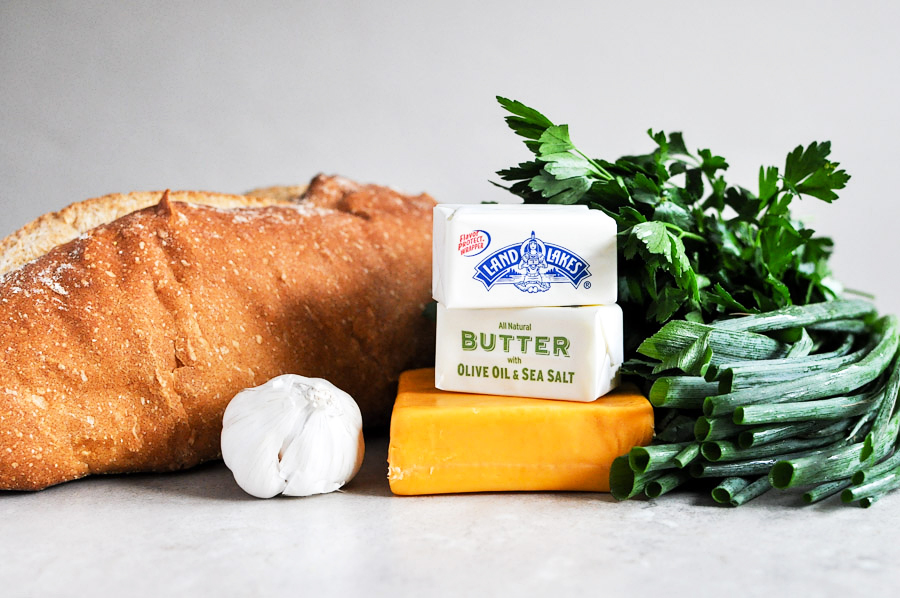
This snack could not be simpler. All you need is a loaf of Italian bread, some cheddar cheese, butter, garlic, green onions and parsley.


Tasty Kitchen Blog: Cheddar Tailgating Bread. Guest post by Jessica Merchant of How Sweet It Is, recipe submitted by TK member Rebecca of Foodie with Family.

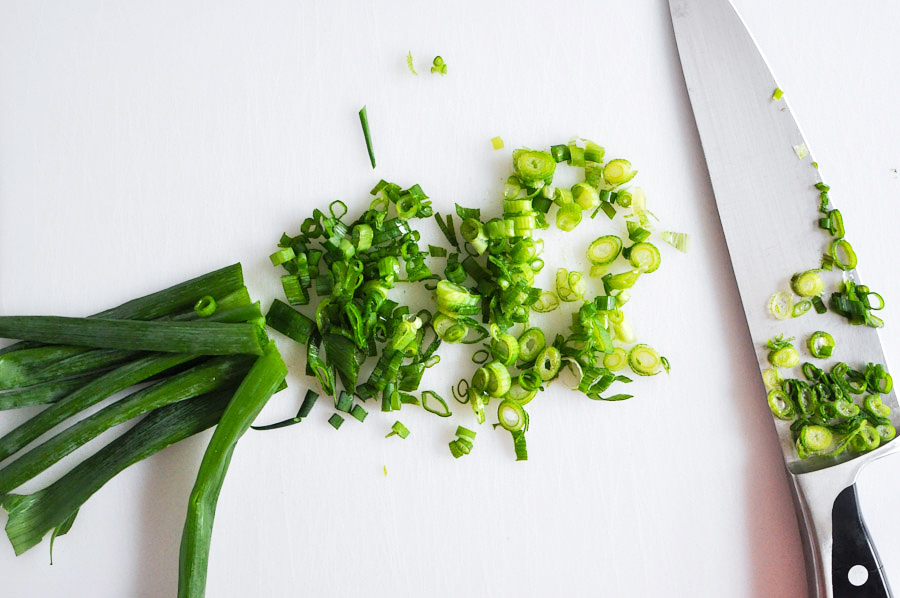
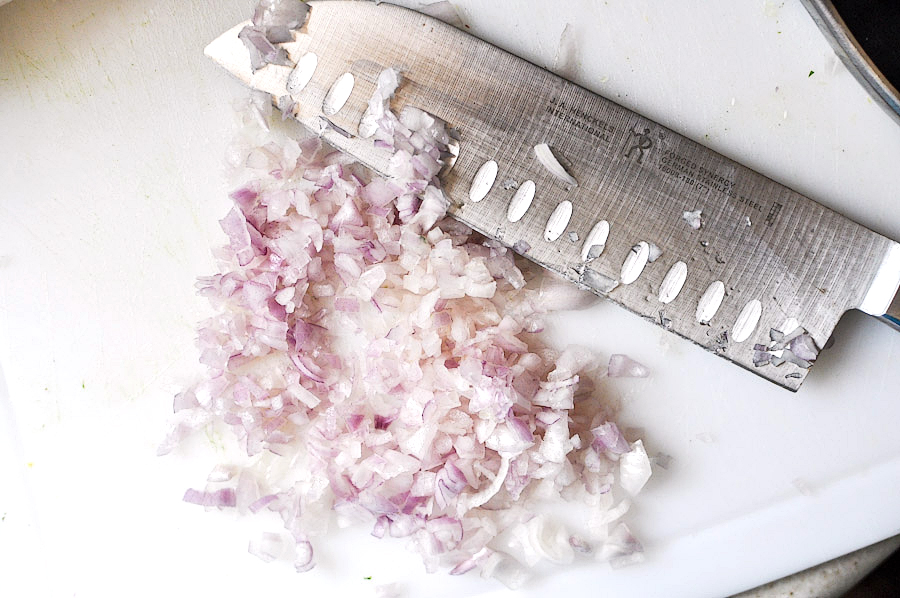
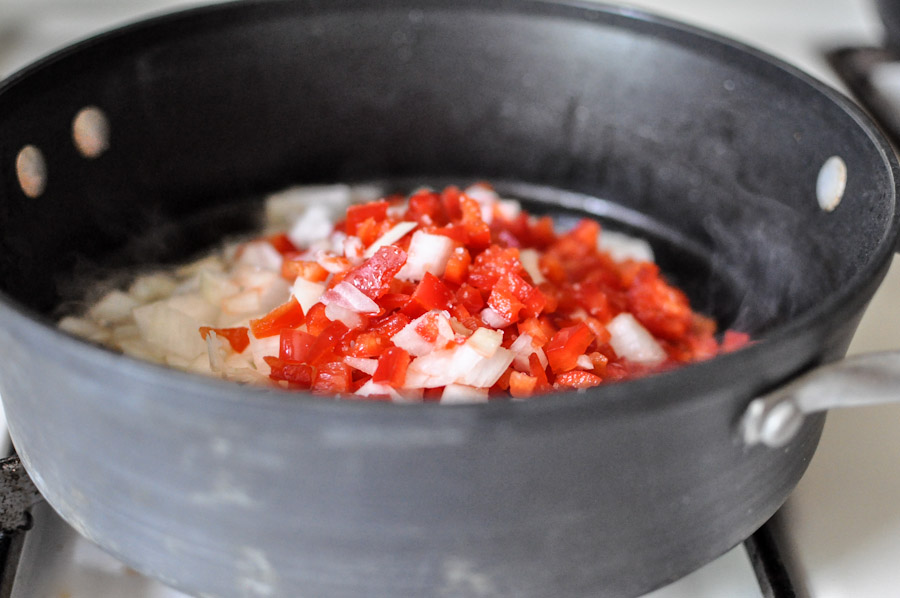
First, slice your onions, mince your garlic and chop your parsley.


Tasty Kitchen Blog: Cheddar Tailgating Bread. Guest post by Jessica Merchant of How Sweet It Is, recipe submitted by TK member Rebecca of Foodie with Family.

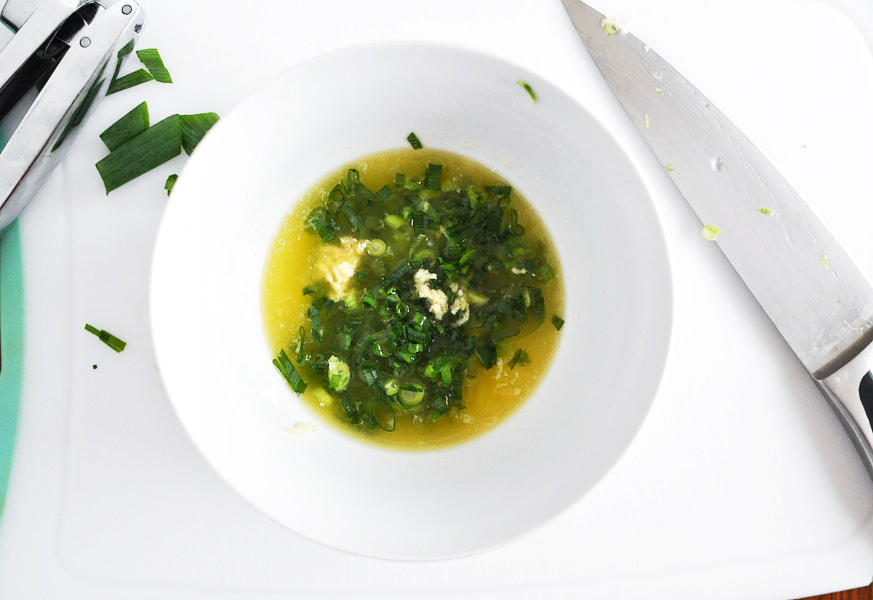
Next, melt that butter and combine it with the onions and garlic. This smells like heaven.


Tasty Kitchen Blog: Cheddar Tailgating Bread. Guest post by Jessica Merchant of How Sweet It Is, recipe submitted by TK member Rebecca of Foodie with Family.

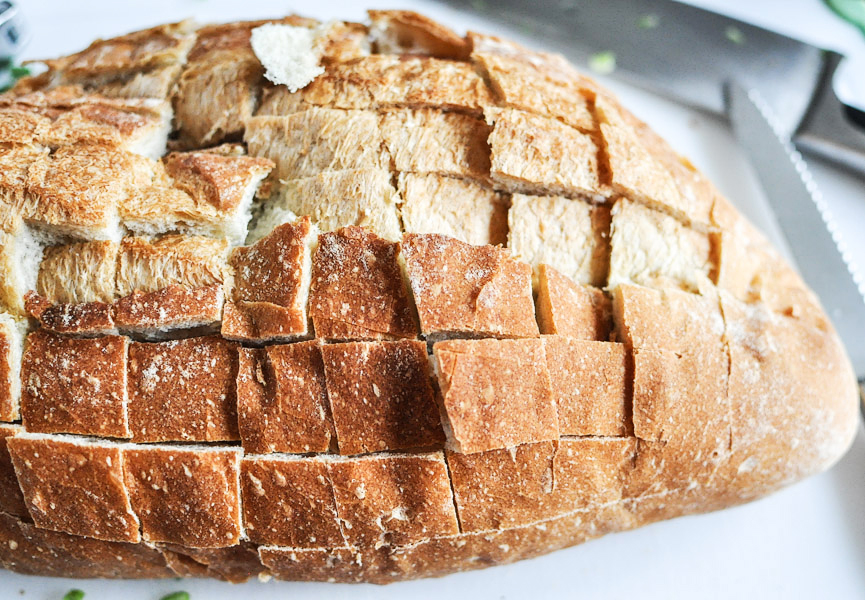
Slice a grid pattern into your bread. This doesn’t have to be perfect, trust me. People are going to devour it no matter what.


Tasty Kitchen Blog: Cheddar Tailgating Bread. Guest post by Jessica Merchant of How Sweet It Is, recipe submitted by TK member Rebecca of Foodie with Family.

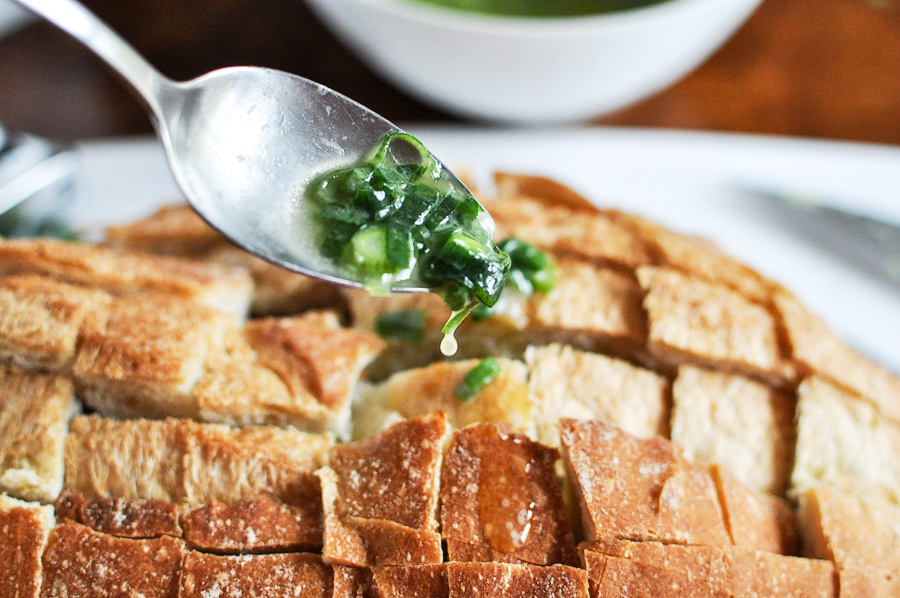
Pulling apart the pieces, spoon the butter mixture into all the seams and crevices. It’s nearly impossible not to eat it at this point.


Tasty Kitchen Blog: Cheddar Tailgating Bread. Guest post by Jessica Merchant of How Sweet It Is, recipe submitted by TK member Rebecca of Foodie with Family.

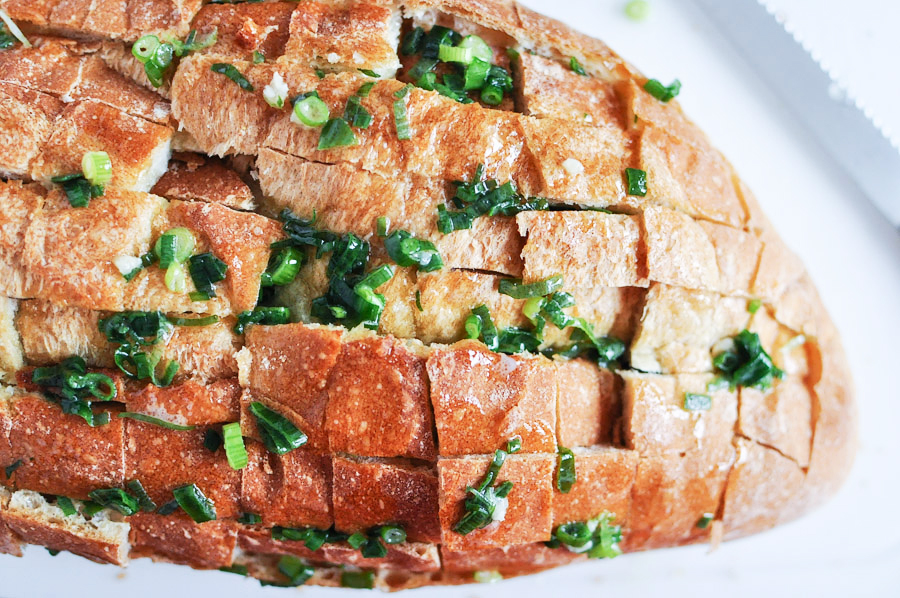
Make sure to get each and every nook and cranny!


Tasty Kitchen Blog: Cheddar Tailgating Bread. Guest post by Jessica Merchant of How Sweet It Is, recipe submitted by TK member Rebecca of Foodie with Family.

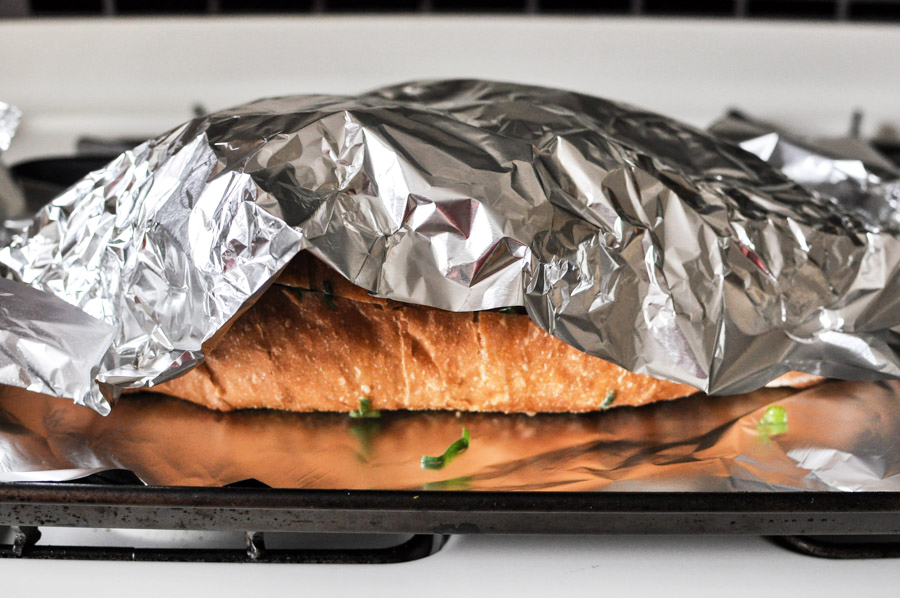
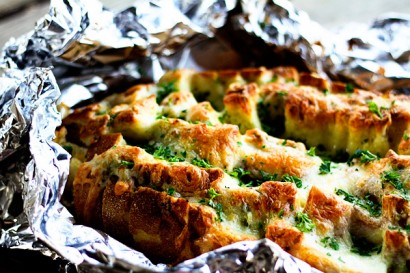
Cover the bread with some foil and bake for 10 minutes.


Tasty Kitchen Blog: Cheddar Tailgating Bread. Guest post by Jessica Merchant of How Sweet It Is, recipe submitted by TK member Rebecca of Foodie with Family.

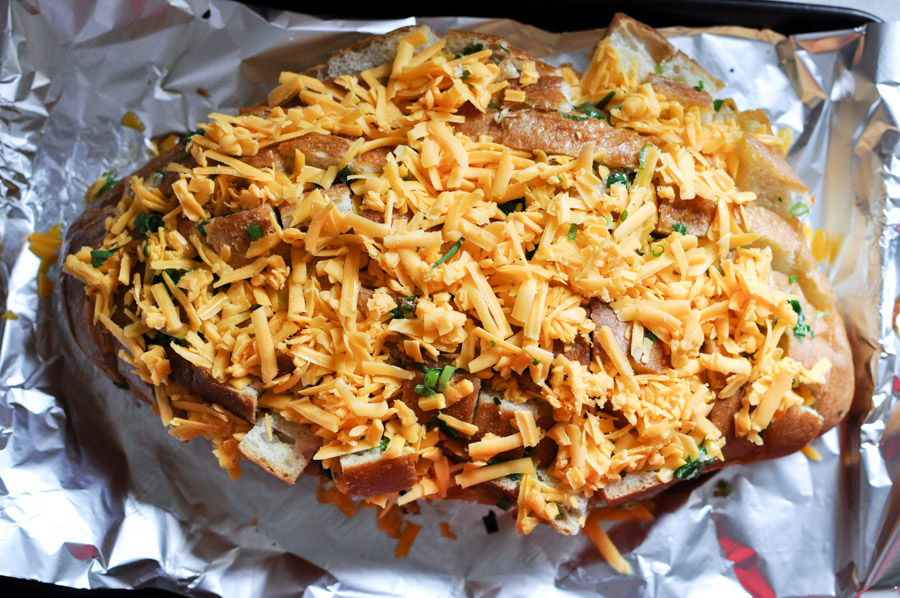
Remove the bread from the oven and take off the foil, then cover it with the cheddar. Shove that cheese down in between the pieces. This is the key to cheesy, gooey fluffiness.


Tasty Kitchen Blog: Cheddar Tailgating Bread. Guest post by Jessica Merchant of How Sweet It Is, recipe submitted by TK member Rebecca of Foodie with Family.

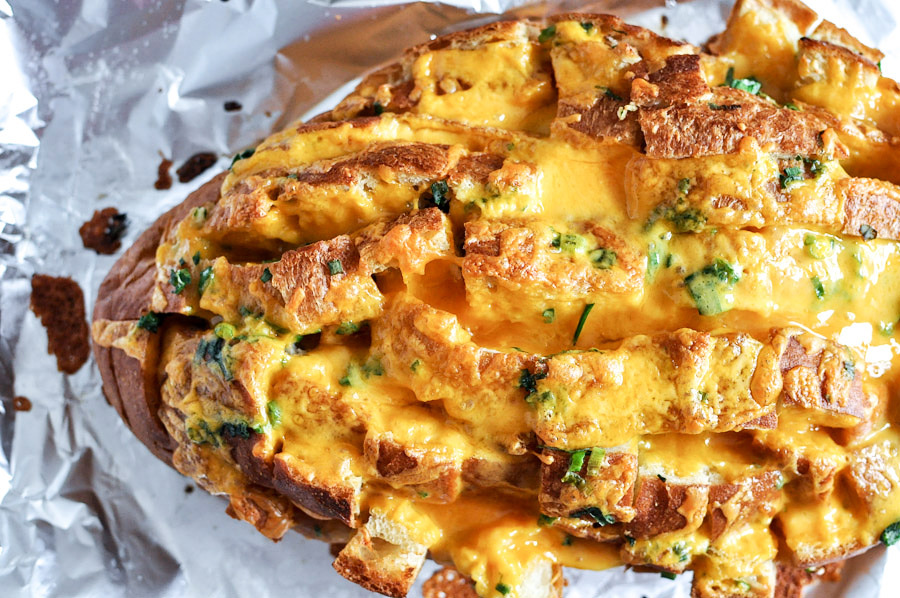
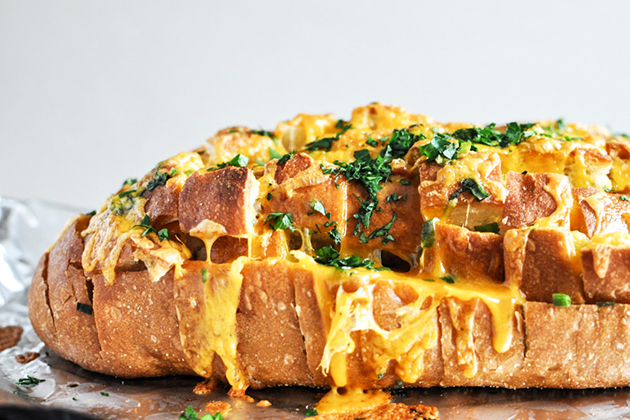
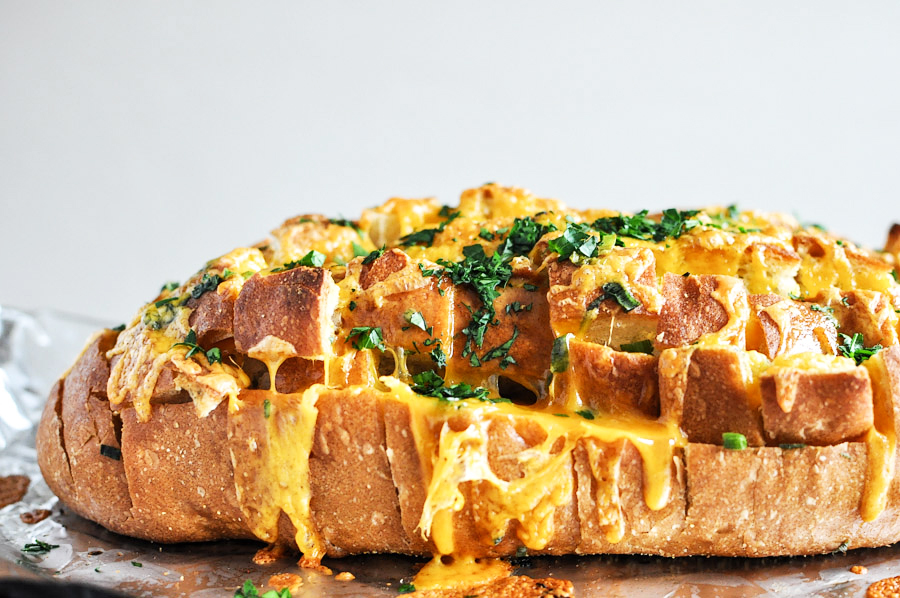
After baking for another 15 minutes, the bread will look like yes. Um … yeah. I can’t even take how delicious it is.


Tasty Kitchen Blog: Cheddar Tailgating Bread. Guest post by Jessica Merchant of How Sweet It Is, recipe submitted by TK member Rebecca of Foodie with Family.

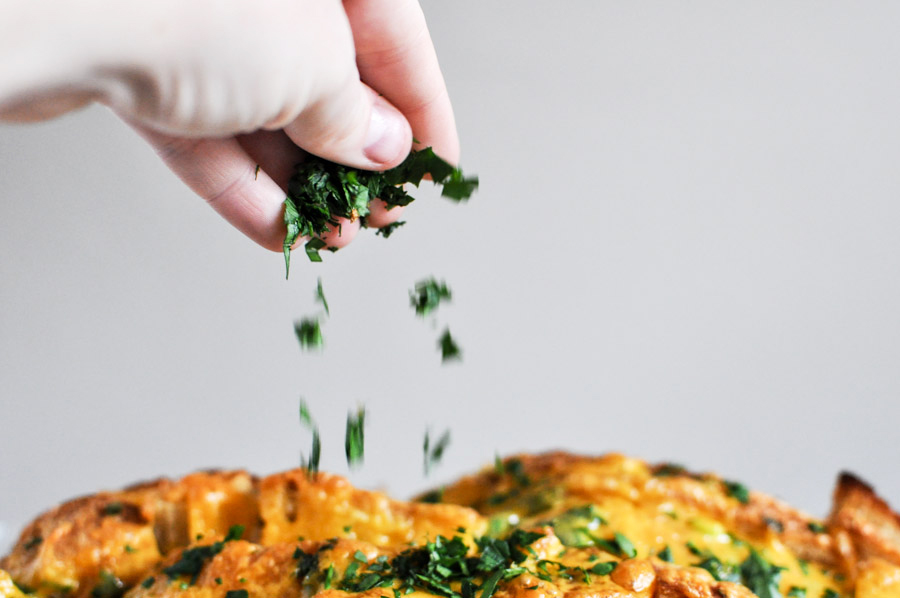
As difficult as it may seem, let the bread cool for a few minutes then cover it in freshly chopped parsley. Pure torture.


Tasty Kitchen Blog: Cheddar Tailgating Bread. Guest post by Jessica Merchant of How Sweet It Is, recipe submitted by TK member Rebecca of Foodie with Family.

Now you can finally serve it! Or, keep it all to yourself? If you share, make sure to snag a few bites quickly. This goes extremely fast. I mean, just look at it.


Tasty Kitchen Blog: Cheddar Tailgating Bread. Guest post by Jessica Merchant of How Sweet It Is, recipe submitted by TK member Rebecca of Foodie with Family.

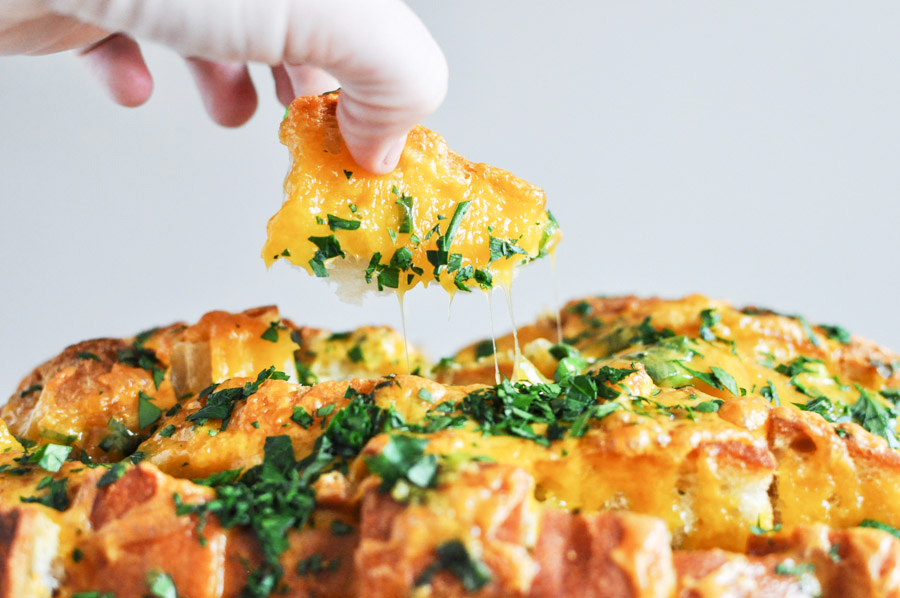
I can only describe this as a slightly toasty and warm garlic bread covered in bubbly cheddar and bursting with flavor. It is nuts. It is addicting. It is highly customizable and you can use whatever cheese, herbs or additional flavors your little heart desires. Basically what I’m trying to say is, it’s perfect.

Thanks so much to Rebecca for the fabulous recipe! Make sure to check out her blog, Foodie with Family, where she shares more delicious creations from her kitchen and tells downright hilarious stories. She is a gem, my friends.


Printable Recipe

Cheddar Tailgating Bread

See post on Rebecca’s site!
4.75 Mitt(s) 4 Rating(s)4 votes, average: 4.75 out of 54 votes, average: 4.75 out of 54 votes, average: 4.75 out of 54 votes, average: 4.75 out of 54 votes, average: 4.75 out of 5

Prep Time:

Cook Time:

Difficulty: Easy

Servings: 6

6
x

Print Options

Page size Letter 3x5 4x6
Text Size Small Medium Large
Content Include description
Include prep time, etc.
Show image

Description

Soft-on-the-inside and crusty-on-the-outside Italian bread that is cut into grab-able squares, generously doused with melted butter mixed with minced green onion and garlic, toasted till hot and tender, then crammed full of cheddar cheese and baked until bubbly with browned bits of cheese capping it. This is a true crowd-pleaser!

Ingredients

  • 1 stick Butter
  • 1 clove Garlic, Large, Peeled And Minced
  • 1 bunch Green Onions, Trimmed And Minced
  • 1 pound Loaf Of Italian Bread
  • 1 pound Grated Extra-sharp Cheddar Cheese
  • 1 bunch Fresh Parsley, Minced

Preparation Instructions

Preheat oven to 350°F (or preheat grill to medium heat). Lay out a double thickness of standard foil (or a single thickness of heavy-duty foil.) Spray lightly with nonstick cooking spray. Set aside.

In a microwave safe bowl, or a heavy-bottomed skillet, heat the butter until melted and mix in the garlic and sliced green onions. Stir with a serving spoon.

Lay the loaf of bread on the cutting board and cut a ½” grid pattern into it, stopping about ¼” above the base of the bread so that it stays connected. Gently pry apart the bread and spoon the butter mixture along the seams. Gently wrap the foil up around the top of the loaf and put on a rimmed baking sheet. Bake for 10 minutes.

Remove the pan from the oven, open the foil and sprinkle the cheddar cheese over the top, gently pushing some of the cheese down into the cut bread.

Leave the foil open and return the pan to the oven or grill and raise the heat to 425°F or High for another 15 minutes or until the cheese is completely melted and bubbly and lightly browned on top.

Let set for 3 minutes before showering with freshly minced parsley and serving.


_______________________________________

Jessica Merchant is a personal trainer turned food writer and blogger. Her blog, How Sweet Eats, is where she proclaims her love for all things sweet, all things bacon, and everything else in between. She works her magic in her Pittsburgh kitchen, which she shares with her husband of 2 years.


Profile photo of HowSweetEats

Lightened Up Chicken Enchiladas

Posted by in Step-by-Step Recipes

Tasty Kitchen Blog: Lightened Up Chicken Enchiladas. Guest post by Jessica Merchant of How Sweet It Is, recipe submitted by TK member Laurie McNamara of Simply Scratch.

 
Enchiladas are a special food in our house. They are, as I like to refer to them, my weapon. They were the first meal I ever made for my husband and THE meal I make when I … well, quite frankly, when I want something. That something could really be anything, like the replacement of the high light bulb I can’t reach, which I’ve incessantly nagged about or the purse I “accidentally” purchased and let him “accidentally” see. Either way, they are one of my husband’s favorite meals and something I make probably twice a month.

The thing is, they are pretty decadent. We like lots of sodium-laced sauce, tons (no really—tons) of cheese inside and out, and really huge puffy flour or soft corn tortillas. And let’s not forget what goes on top: sour cream, more cheese, and obviously guacamole. Hello lover.

So enter Laurie’s recipe for Lightened Up Chicken Enchiladas. Oh my goodness, I was so excited I almost died. But then I was even more excited after I made them and we seriously loved on the entire pan. These are super delicious, so let’s get started!


Tasty Kitchen Blog: Lightened Up Chicken Enchiladas. Guest post by Jessica Merchant of How Sweet It Is, recipe submitted by TK member Laurie McNamara of Simply Scratch.

You need some cooked and shredded chicken, low-sodium chicken stock, flour, a sweet onion, a few garlic cloves, olive oil, whole wheat tortillas, cumin, chipotle peppers in adobo, a red pepper and of course, cheese.


Tasty Kitchen Blog: Lightened Up Chicken Enchiladas. Guest post by Jessica Merchant of How Sweet It Is, recipe submitted by TK member Laurie McNamara of Simply Scratch.

First up, dice your peppers and onions and add them to a skillet with some olive oil. After sautéing until soft, add in your garlic and cook for a few seconds until fragrant.


Tasty Kitchen Blog: Lightened Up Chicken Enchiladas. Guest post by Jessica Merchant of How Sweet It Is, recipe submitted by TK member Laurie McNamara of Simply Scratch.

Stir in the flour, chopped peppers and cumin.


Tasty Kitchen Blog: Lightened Up Chicken Enchiladas. Guest post by Jessica Merchant of How Sweet It Is, recipe submitted by TK member Laurie McNamara of Simply Scratch.

Then add your chicken stock and water, whisking well.


Tasty Kitchen Blog: Lightened Up Chicken Enchiladas. Guest post by Jessica Merchant of How Sweet It Is, recipe submitted by TK member Laurie McNamara of Simply Scratch.

Cook for a few minutes until bubbly and thickened, and boom, you have your sauce! See how simple? Taste and season with salt and pepper if desired.


Tasty Kitchen Blog: Lightened Up Chicken Enchiladas. Guest post by Jessica Merchant of How Sweet It Is, recipe submitted by TK member Laurie McNamara of Simply Scratch.

With your shredded chicken in a large bowl, add some of the sauce and mix it up.


Tasty Kitchen Blog: Lightened Up Chicken Enchiladas. Guest post by Jessica Merchant of How Sweet It Is, recipe submitted by TK member Laurie McNamara of Simply Scratch.

Add a bit more sauce to the bottom of a greased baking dish to make the first layer of deliciousness.


Tasty Kitchen Blog: Lightened Up Chicken Enchiladas. Guest post by Jessica Merchant of How Sweet It Is, recipe submitted by TK member Laurie McNamara of Simply Scratch.

Then start filling your enchis. First up, add a few spoonfuls of the chicken mixture to the tortilla.


Tasty Kitchen Blog: Lightened Up Chicken Enchiladas. Guest post by Jessica Merchant of How Sweet It Is, recipe submitted by TK member Laurie McNamara of Simply Scratch.

Roll it up tightly, placing it in the dish. Repeat with the rest until they are all crammed together and ready to go.


Tasty Kitchen Blog: Lightened Up Chicken Enchiladas. Guest post by Jessica Merchant of How Sweet It Is, recipe submitted by TK member Laurie McNamara of Simply Scratch.

Add the rest of the sauce on top. I gently spread it with a spoon to cover every inch before baking.


Tasty Kitchen Blog: Lightened Up Chicken Enchiladas. Guest post by Jessica Merchant of How Sweet It Is, recipe submitted by TK member Laurie McNamara of Simply Scratch.

Then add some cheese—just a bit—to cover the dish. Bake for a few minutes just until the enchiladas are warmed through and the cheese is melty. Oh melty cheese.


Tasty Kitchen Blog: Lightened Up Chicken Enchiladas. Guest post by Jessica Merchant of How Sweet It Is, recipe submitted by TK member Laurie McNamara of Simply Scratch.

Admire your beautiful work!


Tasty Kitchen Blog: Lightened Up Chicken Enchiladas. Guest post by Jessica Merchant of How Sweet It Is, recipe submitted by TK member Laurie McNamara of Simply Scratch.

Serve your enchiladas and cover them with sour cream (or, as we like, plain Greek yogurt), guacamole, chives, salsa and chopped cilantro. Go to town with all of your favorite garnishes.

We absolutely adored these! Not only are they much lighter ingredients-wise than our typical enchiladas, they are lightly filling, too. They aren’t heavy since you make your own sauce and keep the cheese to a minimum, but they still taste incredible and get the job done. Cravings cured!

Thanks so much to my fellow TK Blog contributor Laurie for the fabulous recipe. Check out her incredible blog, Simply Scratch, where she shares her delicious creations in the kitchen and beautiful step-by-step photography.


Printable Recipe

Lightened-up Chicken Enchiladas

See post on Laurie - Simply Scratch’s site!
5.00 Mitt(s) 9 Rating(s)9 votes, average: 5.00 out of 59 votes, average: 5.00 out of 59 votes, average: 5.00 out of 59 votes, average: 5.00 out of 59 votes, average: 5.00 out of 5

Prep Time:

Cook Time:

Difficulty: Intermediate

Servings: 4

4
x

Print Options

Page size Letter 3x5 4x6
Text Size Small Medium Large
Content Include description
Include prep time, etc.
Show image

Description

Chicken enchiladas lightened up with grilled chicken, whole wheat tortillas and a broth-y chipotle sauce that is to die for!

Ingredients

  • 2 Tablespoons Olive Oil
  • 1 whole Small Onion, Diced Small
  • ½ whole (red, Green Or Orange) Bell Pepper, Diced Small
  • 2 cloves Fresh Garlic, Peeled And Minced
  • ¼ cups All-purpose Flour
  • 1 teaspoon Cumin
  • 1 Tablespoon Minced Chipotle Peppers In Adobo Sauce
  • 1-½ cup Low Sodium Chicken Broth
  • ¼ cups Water
  • 1 Tablespoon Adobo Sauce (optional)
  • ¾ teaspoons Kosher Salt
  • ⅛ teaspoons Black Pepper, More Or Less To Taste
  • 2 whole Grilled Chicken Breasts, Shredded In A Large Bowl
  • 8 whole Whole Wheat Tortillas
  • ½ cups Grated Muenster Cheese
  • Your Favorite Enchilada Toppings, For Serving (Salsa, Sour Cream, Chopped Fresh Cilantro, Etc.)

Preparation Instructions

Lightly spray the bottom of a 13×9 baking dish and set aside. Preheat your oven to 400 F.

In a large skillet over medium heat add the two tablespoons of olive oil.

Add diced onion and peppers and cook, stirring occasionally, until the onions are translucent and the peppers are soft, about 5 minutes.

Add in the minced garlic and cook for one minute. Add in the flour, cumin and the tablespoon of diced chipotle peppers, stir.

Whisk in the broth and water. Add in the tablespoon of adobo sauce if desired and simmer over medium heat until the sauce has thickened. Season with 3/4 teaspoon kosher salt and 1/4 teaspoon black pepper, taste and adjust seasonings.

Put the shredded grilled chicken in a bowl. Add a cup of the “enchilada sauce” to the shredded chicken.

Measure and spread 1/4 of a cup of the sauce in the bottom of the prepared pan.

Wrap the 8 whole wheat tortillas in a damp paper towel and microwave for one minute.

Spoon a little of the chicken mixture down the center of each tortilla, then tuck and roll each tortilla and place it seam side down into the baking dish.

Pour and spread the remainder of the sauce over top of the enchiladas and top with the half cup of grated Muenster cheese.

Bake, uncovered, in your preheated 400 F oven for 15 minutes or until the cheese has melted and bubbly.

Serve two per person topped with a dollop of sour cream, your favorite hot sauce and torn cilantro. Other delicious toppings like sliced olives, salsa, green onions and pickled jalapenos would be fantastic too!

Enjoy!


_______________________________________

Jessica Merchant is a personal trainer turned food writer and blogger. Her blog, How Sweet Eats, is where she proclaims her love for all things sweet, all things bacon, and everything else in between. She works her magic in her Pittsburgh kitchen, which she shares with her husband of 2 years.


Profile photo of HowSweetEats

Coffee BBQ Sauce

Posted by in Step-by-Step Recipes

Tasty Kitchen Blog: Coffee BBQ Sauce. Guest post by Jessica Merchant of How Sweet It Is, recipe submitted by Tk member Kay Heritage of The Church Cook.

 
For years, I have been trying desperately to like coffee. Not because I need the caffeine, and not even because my friends drink it, but because I absolutely adore coffee-flavored foods (read: ice cream, cupcakes, frosting, steak rubs) and it drives me mad that I can’t enjoy the beverage. Plus, I do want to look all cool and casual sitting in a coffee shop and sipping something warm and frothy that has a cute little heart design in the foam. And why can’t actual coffee just TASTE like a frappuccino with ice cream and mocha and whipped cream and tons of sugar?

It’s so not fair.

But it completely makes sense that the minute I saw Kay’s recipe for Coffee BBQ Sauce, I was itching to try it. My husband is the king of condiments in our house, and while he seriously uses cups of ketchup on things like burgers and fries, and while I seriously roll my eyes every single time and scream, “Stop! You’re ruining it!”… BBQ sauce is my favorite go-to dip or topping. I just couldn’t resist.


Tasty Kitchen Blog: Coffee BBQ Sauce. Guest post by Jessica Merchant of How Sweet It Is, recipe submitted by Tk member Kay Heritage of The Church Cook.

This sauce is so super simple. To start, you need coffee (so brew a strong pot!), ketchup, your favorite hot sauce, apple cider vinegar, soy sauce, sweet chili sauce, chili powder, cumin, shallots, garlic and brown sugar.


Tasty Kitchen Blog: Coffee BBQ Sauce. Guest post by Jessica Merchant of How Sweet It Is, recipe submitted by Tk member Kay Heritage of The Church Cook.

Measure out your ingredients.


Tasty Kitchen Blog: Coffee BBQ Sauce. Guest post by Jessica Merchant of How Sweet It Is, recipe submitted by Tk member Kay Heritage of The Church Cook.

Chop up your onion and garlic.


Tasty Kitchen Blog: Coffee BBQ Sauce. Guest post by Jessica Merchant of How Sweet It Is, recipe submitted by Tk member Kay Heritage of The Church Cook.

And combine it all in a saucepan.


Tasty Kitchen Blog: Coffee BBQ Sauce. Guest post by Jessica Merchant of How Sweet It Is, recipe submitted by Tk member Kay Heritage of The Church Cook.

Mix it up well …


Tasty Kitchen Blog: Coffee BBQ Sauce. Guest post by Jessica Merchant of How Sweet It Is, recipe submitted by Tk member Kay Heritage of The Church Cook.

And allow it to come to a boil. Then reduce to a simmer to cook for about 40 minutes or so.


Tasty Kitchen Blog: Coffee BBQ Sauce. Guest post by Jessica Merchant of How Sweet It Is, recipe submitted by Tk member Kay Heritage of The Church Cook.

As it cooks, it will bubble and thicken and become just like your favorite BBQ sauce, all tangy and delicious.


Tasty Kitchen Blog: Coffee BBQ Sauce. Guest post by Jessica Merchant of How Sweet It Is, recipe submitted by Tk member Kay Heritage of The Church Cook.

And after a few hours of sitting at room temperature, it’s good to go.


Tasty Kitchen Blog: Coffee BBQ Sauce. Guest post by Jessica Merchant of How Sweet It Is, recipe submitted by Tk member Kay Heritage of The Church Cook.

This sauce has the perfect consistency and a great balance between a little tanginess and a bit of sweetness. You can taste the coffee—but just a hint of it, and in such a delicious, rich way. We’ve been enjoying this on steak and chicken, and I think it’s one of the best homemade BBQ sauces I’ve made. It’s different from a few other staple sauces I’ve whipped up before, and yes, I find it highly appropriate to have all different kinds of BBQ sauce in the fridge at all times.

Thanks so much Kay for the recipe! Check out her blog The Church Cook, where she serves up incredible dishes every week.


Printable Recipe

Coffee BBQ Sauce

See post on The Church Cook (Kay Heritage)’s site!
0.00 Mitt(s) 0 Rating(s)0 votes, average: 0.00 out of 50 votes, average: 0.00 out of 50 votes, average: 0.00 out of 50 votes, average: 0.00 out of 50 votes, average: 0.00 out of 5

Prep Time:

Cook Time:

Difficulty: Easy

Servings: 6

6
x

Print Options

Page size Letter 3x5 4x6
Text Size Small Medium Large
Content Include description
Include prep time, etc.
Show image

Description

Rich, flavorful, coffee BBQ sauce.

Ingredients

  • ½ cups Strong Brewed Coffee
  • 1 cup Ketchup
  • ¾ cups Firmly Packed Brown Sugar
  • ½ cups Apple Cider Vinegar
  • ½ cups Finely Chopped Shallots
  • ½ cups Sweet Red Chili Sauce
  • 2 cloves Garlic, Grated
  • 2 Tablespoons Soy Sauce
  • 2 Tablespoons Ground Cumin
  • 2 Tablespoons Chili Powder
  • 1 teaspoon Sriracha Or Tabasco Sauce

Preparation Instructions

Stir all ingredients in a medium sauce pan. Bring to simmer then reduce the heat to low until flavor melds, about 40 minutes, occasionally stirring the sauce. Cool to room temperature and serve. Will keep for about 2 weeks or more in the refrigerator.

Makes about 2 1/2 cups.


_______________________________________

Jessica Merchant is a personal trainer turned food writer and blogger. Her blog, How Sweet Eats, is where she proclaims her love for all things sweet, all things bacon, and everything else in between. She works her magic in her Pittsburgh kitchen, which she shares with her husband of 2 years.


Profile photo of HowSweetEats

Mole Rice

Posted by in Step-by-Step Recipes

Tasty Kitchen Blog: Mole Rice. Guest post by Jessica Merchant of How Sweet It Is, recipe submitted by Andrea of Recipes for Divine Living.

 
If ever there was a recipe made for me, this would be it. Bacon, chocolate AND a savory dish? I’m all over this. Before trying it, I never even tasted mole rice. I’ve heard delicious things about it and of course, had multiple people suggest it to me since it has—duh—chocolate in it. But I held out, and now I’m sort of glad I did since my first experience was a homemade one, and an incredible one at that. The minute I spied Andrea’s recipe for Mole Rice, I knew it would be mine.

Oh, and as a side note, I definitely thought (like years ago) that mole rice was pronounced “mole”—like one of those scary litter critters in the ground. Um, no. I later learned that (maybe in college?) it was pronounced “mo-laaaay” and proceeded to say the word in my head for about two weeks straight in disbelief.

All embarrassing mispronunciations aside, let’s get cooking.


Tasty Kitchen Blog: Mole Rice. Guest post by Jessica Merchant of How Sweet It Is, recipe submitted by Andrea of Recipes for Divine Living.

Here is everything you need: bacon, a red pepper (chopped), an onion (chopped), chicken stock, sesame seeds, allspice, semisweet chocolate (chopped), tomato paste, mushrooms, rice, garlic, dried oregano, cumin, red pepper flakes, fresh green onions and fresh parsley. It seems like a lot, but it’s super simple. And please don’t mind my trashy mid-defrosted tomato paste in a plastic bag. Keeps perfectly in the freezer. Try it.


Tasty Kitchen Blog: Mole Rice. Guest post by Jessica Merchant of How Sweet It Is, recipe submitted by Andrea of Recipes for Divine Living.

First up, toast your sesame seeds, cumin, allspice and oregano. Oh my. Smells so good.


Tasty Kitchen Blog: Mole Rice. Guest post by Jessica Merchant of How Sweet It Is, recipe submitted by Andrea of Recipes for Divine Living.

Next, and obviously my favorite part: fry your bacon in a large skillet. I chose to chop mine up first just to skip a step later and so it would cook a bit quicker. Once it is crispy and the fat has been rendered, remove it with a slotted spoon and let drain on a paper towel.


Tasty Kitchen Blog: Mole Rice. Guest post by Jessica Merchant of How Sweet It Is, recipe submitted by Andrea of Recipes for Divine Living.

Add in your onions, peppers and garlic with a pinch of salt. Cook until soft.


Tasty Kitchen Blog: Mole Rice. Guest post by Jessica Merchant of How Sweet It Is, recipe submitted by Andrea of Recipes for Divine Living.

Now add in your mushrooms. Cook those until they are soft too, about five minutes or so.


Tasty Kitchen Blog: Mole Rice. Guest post by Jessica Merchant of How Sweet It Is, recipe submitted by Andrea of Recipes for Divine Living.

Once the vegetables are juicy and fragrant, add in your tomato paste, chicken stock, toasted spices and chopped chocolate. Bring that whole shebang to a boil.


Tasty Kitchen Blog: Mole Rice. Guest post by Jessica Merchant of How Sweet It Is, recipe submitted by Andrea of Recipes for Divine Living.

As the mixture is boiling, add your rice. I used the brown jasmine rice from Trader Joe’s and it was phenomenal.


Tasty Kitchen Blog: Mole Rice. Guest post by Jessica Merchant of How Sweet It Is, recipe submitted by Andrea of Recipes for Divine Living.

At this point, reduce the heat to low, cover and cook for 30-35 minutes. Stir once or twice during cook time to make sure the rice is absorbing the liquid, and if it’s absorbing it too quickly, add more stock. I can’t even tell you how incredible your kitchen will smell.


Tasty Kitchen Blog: Mole Rice. Guest post by Jessica Merchant of How Sweet It Is, recipe submitted by Andrea of Recipes for Divine Living.

Once it’s finished, remove it from the heat and let it sit for five minutes or so as it comes together. I interpreted this instruction as “grab a fork and eat as much as you can before serving it to others.”


Tasty Kitchen Blog: Mole Rice. Guest post by Jessica Merchant of How Sweet It Is, recipe submitted by Andrea of Recipes for Divine Living.

After 5 minutes, stir in the bacon then drop some sliced green onions and torn parsley on top. I also think cilantro would be a fabulous addition, but I pretty much put cilantro on every single thing I eat daily. It might just be me.


Tasty Kitchen Blog: Mole Rice. Guest post by Jessica Merchant of How Sweet It Is, recipe submitted by Andrea of Recipes for Divine Living.

Serve that goodness up! This was hearty enough for me to eat simply as a meal, but it would be a great side dish for a number of recipes. My husband ate some with enchiladas one afternoon and then again with grilled chicken at dinner. The only way I can describe how fantastic this is, is to tell you that it absolutely bursts with flavor. So robust and so layered. If you couldn’t already tell, we adored it.

Thanks so much to Andrea for the wonderful recipe, and for sharing something incredibly delicious that pushed me outside of my cooking comfort zone. Be sure to check out Andrea’s blog, Recipes for Divine Living, where she shares more of her passion for food.


Printable Recipe

Mole Rice

See post on Andrea’s site!
4.75 Mitt(s) 4 Rating(s)4 votes, average: 4.75 out of 54 votes, average: 4.75 out of 54 votes, average: 4.75 out of 54 votes, average: 4.75 out of 54 votes, average: 4.75 out of 5

Prep Time:

Cook Time:

Difficulty: Easy

Servings: 6

6
x

Print Options

Page size Letter 3x5 4x6
Text Size Small Medium Large
Content Include description
Include prep time, etc.
Show image

Description

I love the flavor of the toasted spices and chocolate in this recipe, not to mention the bacon. Delicious!

Ingredients

  • 1 Tablespoon Sesame Seeds
  • 1 teaspoon Dried Oregano
  • ½ teaspoons Cumin
  • ¼ teaspoons Allspice
  • 3 strips Bacon
  • 1  Red Pepper (or Color Of Your Choice) Chopped
  • 1  Onion, Chopped
  • 3 cloves Garlic, Minced
  • 1 pinch Red Pepper Flakes
  • 2 cups Mushrooms, Sliced
  • 2-½ cups Chicken Broth
  • 6 ounces, weight Tomato Paste
  • 1 ounce, weight Semi-sweet Chocolate, Chopped
  • 1 cup Rice, Uncooked
  • Salt And Pepper
  • Green Onions, Chopped For Garnish
  • Fresh Parsley Chopped For Garnish

Preparation Instructions

Toast/cook sesame seeds, oregano, cumin and allspice in a skillet over medium heat for 30-35 seconds. Set aside.

Cook bacon and set aside. To the same skillet with bacon drippings, sauté red pepper, onion, garlic and red pepper flakes with a pinch of salt and pepper until softened. Add mushrooms and cook until soft.

Increase heat to high and add chicken broth, tomato paste, chocolate and toasted spice mixture. Bring to a boil; add rice and reduce heat to low. Cover and cook till tender and liquid is absorbed, 30-35 minutes. Stir rice after 15-20 minutes to make sure it’s not sticking and has enough liquid left to cook completely. Add more stock or water if needed.

Once rice is tender, turn off heat and let stand for 5 minutes. Stir in chopped bacon; check for seasoning, adding salt and pepper if needed.

To serve, top with chopped green onions and parsley.


_______________________________________

Jessica Merchant is a personal trainer turned food writer and blogger. Her blog, How Sweet Eats, is where she proclaims her love for all things sweet, all things bacon, and everything else in between. She works her magic in her Pittsburgh kitchen, which she shares with her husband of 2 years.


Profile photo of HowSweetEats

Graham Cracker Chocolate Chip Muffins

Posted by in Baking, Step-by-Step Recipes

  If there is anything I love, it’s a warm muffin topped with butter. If there is anything I love more than that, it’s a warm muffin topped with butter and studded with melty chocolate chips. And if there is anything I love even more than THAT? It’s a muffin, with the butter and the […]

Profile photo of HowSweetEats

Dark Chocolate Chunk Skillet Cookie

Posted by in Baking, Step-by-Step Recipes

  Everyone loves a chocolate chip cookie, right? And do you know what’s better than a chocolate chip cookie? A GIANT chocolate chip cookie. Massive. We are talking huge. I think chocolate chip cookies—warm and gooey—are one of life’s greatest comfort foods. They usually have a time and a place: rainy days, snowy nights, summer […]

Profile photo of HowSweetEats

Pizza Stuffed Mushrooms

Posted by in Step-by-Step Recipes

  Once upon a time I loathed mushrooms. I mean, really. I wouldn’t even consider eating them—I didn’t care if they were on pizza or piled high atop a filet. Didn’t matter. It wasn’t happening. Then I got married. My husband goes through these huge phases with different foods (I once caramelized onions every day […]

Profile photo of HowSweetEats

Smoky White Bean Chicken Chili

Posted by in Step-by-Step Recipes

  With spring quickly approaching in the next few weeks, I fear my warm and comforting soups may be on their way out. I easily love a bowl of soup no matter the season, but sometimes the thought of standing over a large stock pot for a few hours just isn’t as appealing as laying […]