The Pioneer Woman Tasty Kitchen
Profile photo of HowSweetEats

Pizza Stuffed Mushrooms

Posted by in Step-by-Step Recipes

Tasty Kitchen Blog: Pizza Stuffed Mushrooms. Guest post by Jessica Merchant of How Sweet It Is, recipe submitted by TK member Lauren of Lauren's Latest.

 
Once upon a time I loathed mushrooms. I mean, really. I wouldn’t even consider eating them—I didn’t care if they were on pizza or piled high atop a filet. Didn’t matter. It wasn’t happening.

Then I got married.

My husband goes through these huge phases with different foods (I once caramelized onions every day for what was probably three or four months) and sure enough, mushrooms made the list. For a few weeks he wanted soft and juicy sauteed mushrooms in every meal that I could fit them. And one day? Well, I got hungry and took a bite.

Pleasantly surprised, I kept on eating. My aversion quickly turned to love and soon enough, I was the one who couldn’t get enough of mushrooms. These days I find myself including them in grilled sandwiches, pasta dishes and even grains. Sometimes I eat them (gasp!) plain as a side dish. It gets pretty crazy over here.

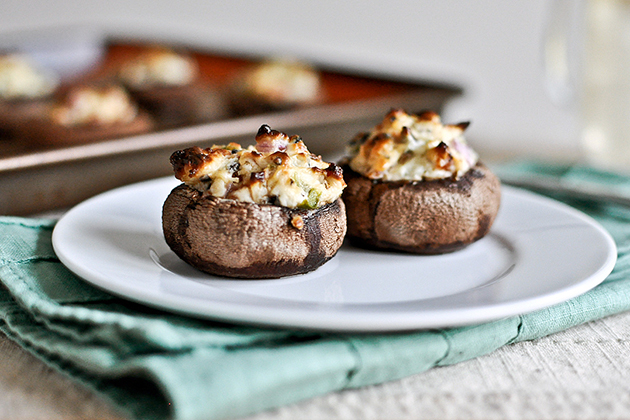
And then … then I saw Lauren’s recipe for Pizza Stuffed Mushrooms. Seriously? Could my life get any better? I knew they’d be happening—like, immediately. And they did. And they were to die for. And now I want to eat more. For breakfast.

Here’s how you make ‘em!


Tasty Kitchen Blog: Pizza Stuffed Mushrooms. Guest post by Jessica Merchant of How Sweet It Is, recipe submitted by TK member Lauren of Lauren's Latest.

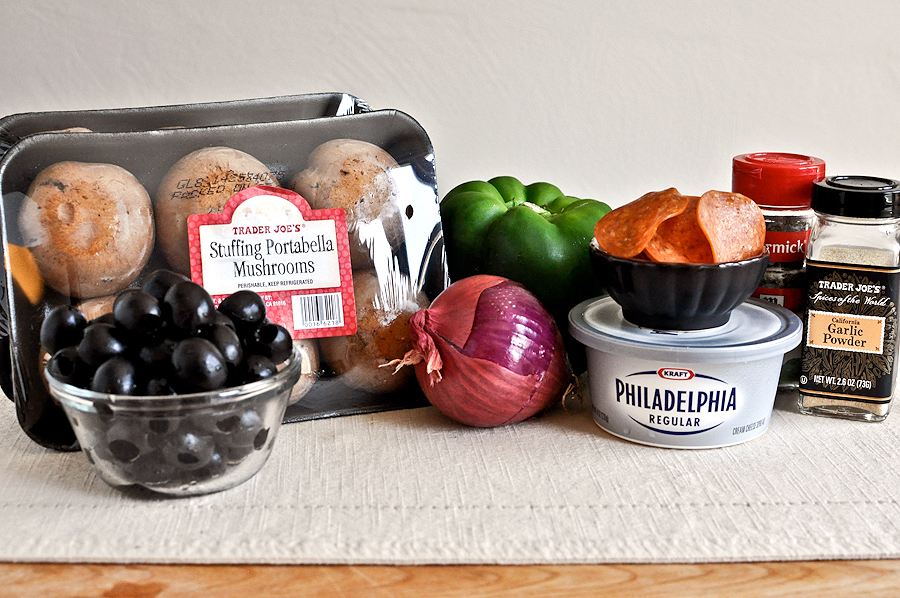
You need: baby bella stuffing mushrooms, cream cheese, green pepper, red onion, pepperoni, black olives, garlic salt or powder, dried basil and oregano and black pepper. And also some grated Parmesan or mozzarella cheese!


Tasty Kitchen Blog: Pizza Stuffed Mushrooms. Guest post by Jessica Merchant of How Sweet It Is, recipe submitted by TK member Lauren of Lauren's Latest.

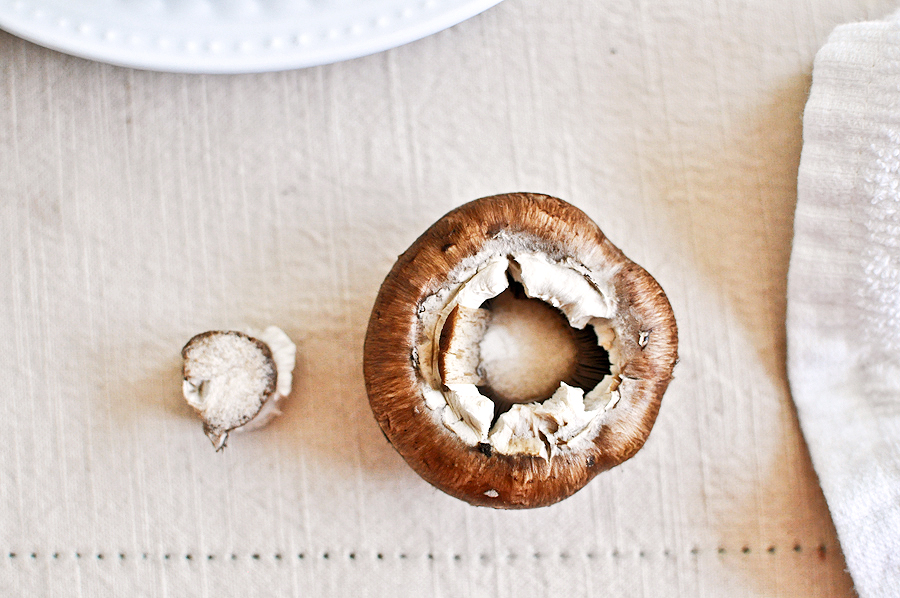
First up, clean those mushrooms. Using a damp rag or paper towel, simply wipe the dirt off each. Then remove the stem. It should pop right out.


Tasty Kitchen Blog: Pizza Stuffed Mushrooms. Guest post by Jessica Merchant of How Sweet It Is, recipe submitted by TK member Lauren of Lauren's Latest.

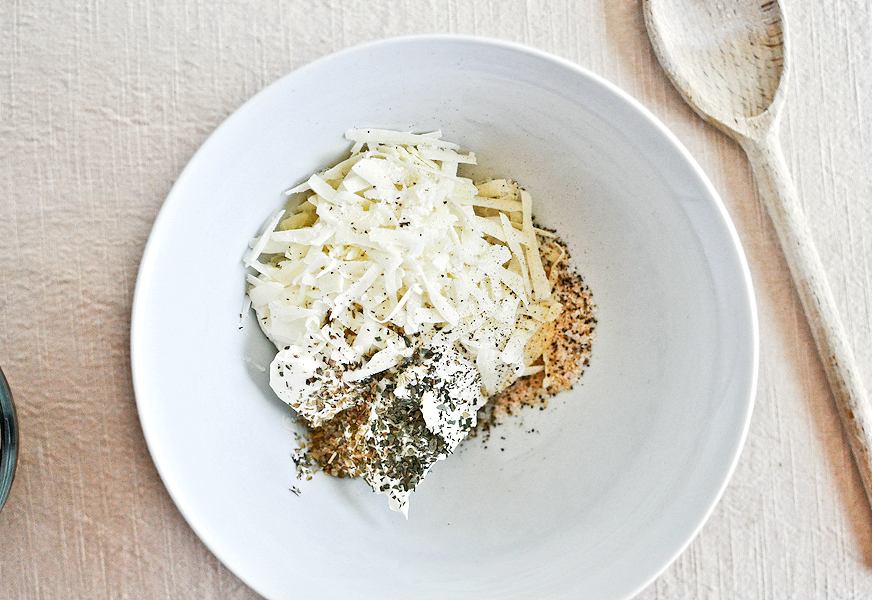
In a bowl, mix together the cream cheese, grated cheese, garlic powder, basil, oregano, salt and pepper.


Tasty Kitchen Blog: Pizza Stuffed Mushrooms. Guest post by Jessica Merchant of How Sweet It Is, recipe submitted by TK member Lauren of Lauren's Latest.

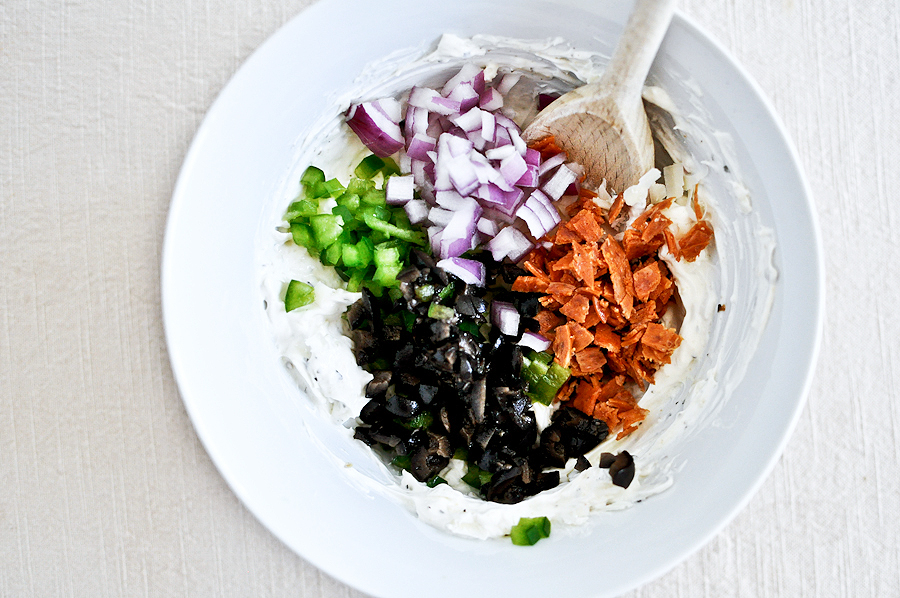
Add in the chopped green peppers, olives, pepperoni and red onion. Mix it together well.


Tasty Kitchen Blog: Pizza Stuffed Mushrooms. Guest post by Jessica Merchant of How Sweet It Is, recipe submitted by TK member Lauren of Lauren's Latest.

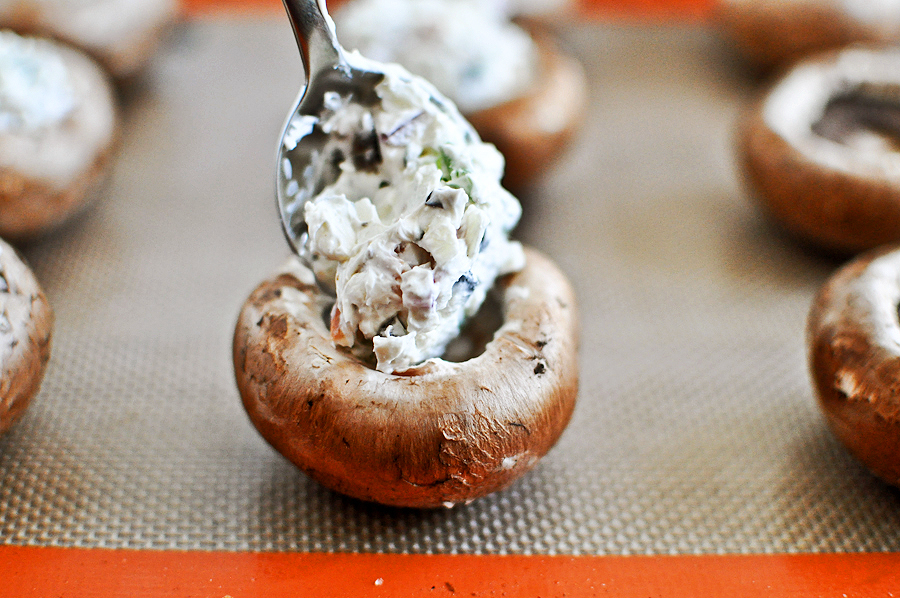
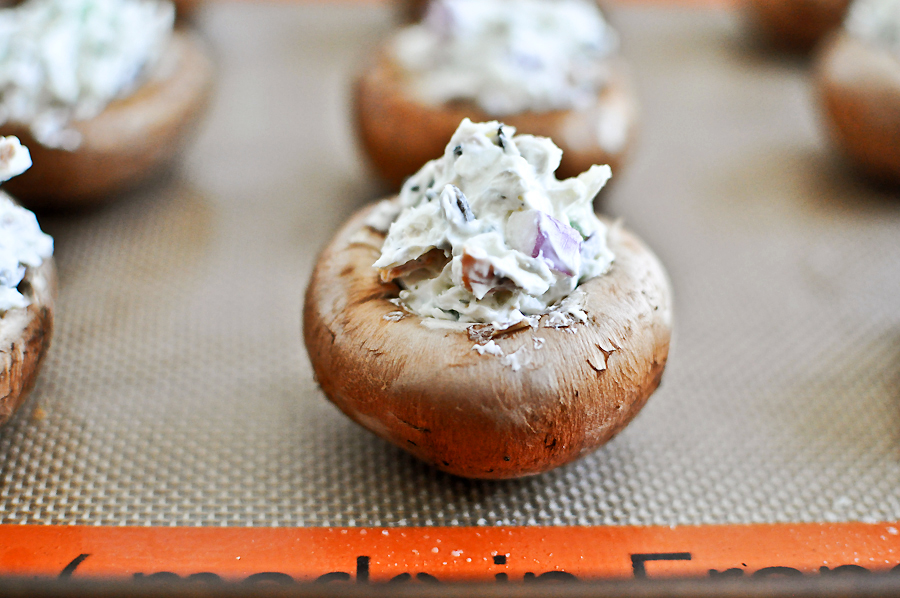
Stuff about a teaspoon or so of the cheesy mix into each mushroom.


Tasty Kitchen Blog: Pizza Stuffed Mushrooms. Guest post by Jessica Merchant of How Sweet It Is, recipe submitted by TK member Lauren of Lauren's Latest.

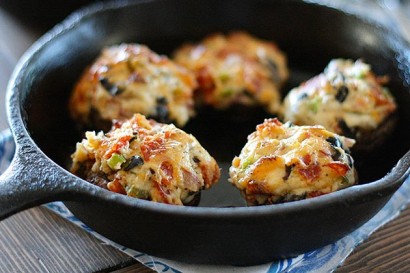
After every mushroom is stuffed, you want to bake them for 20 minutes. When 20 minutes has passed, switch on the broiler and broil until the cheese is golden and bubbly …
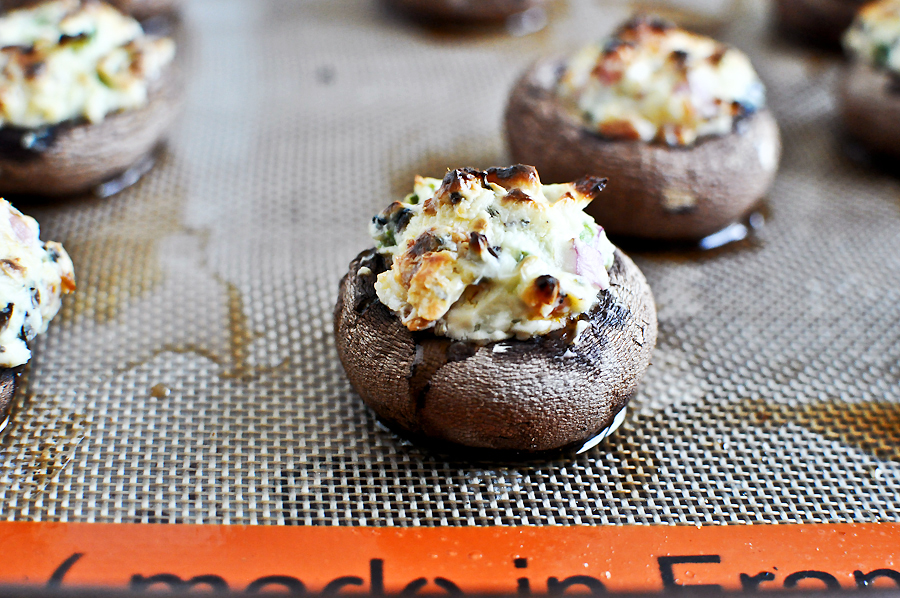


Tasty Kitchen Blog: Pizza Stuffed Mushrooms. Guest post by Jessica Merchant of How Sweet It Is, recipe submitted by TK member Lauren of Lauren's Latest.

Just like this.


Tasty Kitchen Blog: Pizza Stuffed Mushrooms. Guest post by Jessica Merchant of How Sweet It Is, recipe submitted by TK member Lauren of Lauren's Latest.

Serve warm, so the cheese is melty and creamy. Like a mini portable pizza!


Tasty Kitchen Blog: Pizza Stuffed Mushrooms. Guest post by Jessica Merchant of How Sweet It Is, recipe submitted by TK member Lauren of Lauren's Latest.

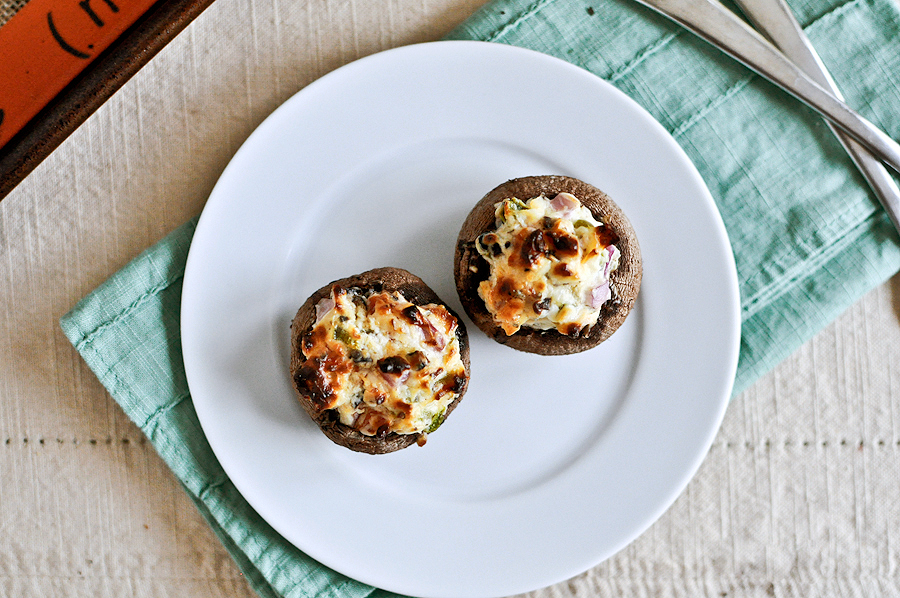
We couldn’t believe how much the mushrooms really did taste like pizza. Even my husband, who isn’t a huge fan of black olives, scarfed three right out of the oven, searing his taste buds out of existence. These are truly fantastic and will surely be one of my go-to appetizers.

Thanks so much to Lauren’s for the recipe. Check out her fabulous blog Lauren’s Latest where she shares her incredible culinary creativity.


Printable Recipe

Pizza Stuffed Mushrooms

See post on Lauren's Latest’s site!
4.66 Mitt(s) 3 Rating(s)3 votes, average: 4.66 out of 53 votes, average: 4.66 out of 53 votes, average: 4.66 out of 53 votes, average: 4.66 out of 53 votes, average: 4.66 out of 5

Prep Time:

Cook Time:

Difficulty: Easy

Servings: 2

2
x

Print Options

Page size Letter 3x5 4x6
Text Size Small Medium Large
Content Include description
Include prep time, etc.
Show image

Description

A great way to turn mushroom haters into lovers!

Ingredients

  • 10 whole Baby Bella Or Crimini Mushrooms
  • 4 ounces, weight Cream Cheese, Softened
  • ¼ cups Grated Parmesan Or Mozzarella Cheese
  • ¼ teaspoons Dried Basil
  • ⅛ teaspoons Dried Oregano
  • Garlic Salt And Pepper, To Taste
  • ¼ cups Finely Diced Pepperoni
  • 2 Tablespoons Finely Chopped Green Pepper
  • 2 Tablespoons Finely Chopped Red Onion
  • 2 Tablespoons Finely Chopped Black Olives

Preparation Instructions

Preheat oven to 350ºF. Spray two mini iron skillets with non stick cooking spray and set aside. (A sheet tray will work just fine, too!)

Wash mushrooms with a damp cloth and remove stems. (They should just pop out!) Set aside.

In a small bowl, stir cream cheese, parmesan, basil, oregano, garlic salt and pepper together until combined. Stir in remaining ingredients, excluding the mushrooms.

Spoon into prepared mushroom caps by the heaping teaspoonful. Place 5 in each skillet and bake 20 minutes. After 20 minutes, switch your oven from bake to broil and brown the tops of each mushroom. Remove and serve hot.


_______________________________________

Jessica Merchant is a personal trainer turned food writer and blogger. Her blog, How Sweet Eats, is where she proclaims her love for all things sweet, all things bacon, and everything else in between. She works her magic in her Pittsburgh kitchen, which she shares with her husband of 2 years.


Profile photo of Erica Lea

Pollo en Salsa al Horno (Roasted Chicken in Sauce)

Posted by in Step-by-Step Recipes

Tasty Kitchen Blog: Pollo en Salsa al Horno (Roasted Chicken in Sauce). Guest post by Erica Kastner of Buttered Side Up, recipe submitted by TK member Tammy of San Pasqual's Kitchen.

I like to think of this dish as fancy fried chicken. It looks (and sounds) like it took some major slaving in the kitchen to achieve, when in reality it’s super simple.

Today’s recipe for Pollo en Salsa al Horno (Roasted Chicken in Sauce), brought to us by Tammy (aka San Pasqual’s Kitchen here on Tasty Kitchen), was one of firsts for me. I can’t remember having cooked traditional Spanish food before. What a lovely introduction! This was also my first time cooking with saffron. I am so glad that I did. The flavor is subtle but adds a beautiful touch of distinction.

Here are the step-by-step instructions so you can see just how easy it is to make:


Tasty Kitchen Blog: Pollo en Salsa al Horno (Roasted Chicken in Sauce). Guest post by Erica Kastner of Buttered Side Up, recipe submitted by TK member Tammy of San Pasqual's Kitchen.

These are all the ingredients that you’ll need: Chicken (I used thighs), wine, butter, flour onion, oil (I used coconut oil), saffron, salt, garlic and parsley.


Tasty Kitchen Blog: Pollo en Salsa al Horno (Roasted Chicken in Sauce). Guest post by Erica Kastner of Buttered Side Up, recipe submitted by TK member Tammy of San Pasqual's Kitchen.

First of all you’ll want to season your chicken with salt. Nobody wants to eat bland chicken.


Tasty Kitchen Blog: Pollo en Salsa al Horno (Roasted Chicken in Sauce). Guest post by Erica Kastner of Buttered Side Up, recipe submitted by TK member Tammy of San Pasqual's Kitchen.

Nest, coat it with the flour.


Tasty Kitchen Blog: Pollo en Salsa al Horno (Roasted Chicken in Sauce). Guest post by Erica Kastner of Buttered Side Up, recipe submitted by TK member Tammy of San Pasqual's Kitchen.

Heat your butter and oil in a large skillet.


Tasty Kitchen Blog: Pollo en Salsa al Horno (Roasted Chicken in Sauce). Guest post by Erica Kastner of Buttered Side Up, recipe submitted by TK member Tammy of San Pasqual's Kitchen.

Once your oil is hot, add the chicken. Careful! It’s gonna sizzle.


Tasty Kitchen Blog: Pollo en Salsa al Horno (Roasted Chicken in Sauce). Guest post by Erica Kastner of Buttered Side Up, recipe submitted by TK member Tammy of San Pasqual's Kitchen.

Cook until the chicken is nice and crispy and browned.


Tasty Kitchen Blog: Pollo en Salsa al Horno (Roasted Chicken in Sauce). Guest post by Erica Kastner of Buttered Side Up, recipe submitted by TK member Tammy of San Pasqual's Kitchen.

Transfer the chicken to a baking dish and preheat your oven to 350ºF.


Tasty Kitchen Blog: Pollo en Salsa al Horno (Roasted Chicken in Sauce). Guest post by Erica Kastner of Buttered Side Up, recipe submitted by TK member Tammy of San Pasqual's Kitchen.

Add the onion to the now-empty skillet of oil.


Tasty Kitchen Blog: Pollo en Salsa al Horno (Roasted Chicken in Sauce). Guest post by Erica Kastner of Buttered Side Up, recipe submitted by TK member Tammy of San Pasqual's Kitchen.

Meanwhile, as the onion is cooking, combine the parsley, garlic and saffron in a mortar.


Tasty Kitchen Blog: Pollo en Salsa al Horno (Roasted Chicken in Sauce). Guest post by Erica Kastner of Buttered Side Up, recipe submitted by TK member Tammy of San Pasqual's Kitchen.

Crush them all together.


Tasty Kitchen Blog: Pollo en Salsa al Horno (Roasted Chicken in Sauce). Guest post by Erica Kastner of Buttered Side Up, recipe submitted by TK member Tammy of San Pasqual's Kitchen.

Add the white wine and give it a stir.


Tasty Kitchen Blog: Pollo en Salsa al Horno (Roasted Chicken in Sauce). Guest post by Erica Kastner of Buttered Side Up, recipe submitted by TK member Tammy of San Pasqual's Kitchen.

Once the onions are nice and tender, stir in the flour and cook, stirring constantly, for another 2 minutes. Nobody wants to eat raw flour.


Tasty Kitchen Blog: Pollo en Salsa al Horno (Roasted Chicken in Sauce). Guest post by Erica Kastner of Buttered Side Up, recipe submitted by TK member Tammy of San Pasqual's Kitchen.

Add the wine mixture to the skillet and bring it all to a boil.


Tasty Kitchen Blog: Pollo en Salsa al Horno (Roasted Chicken in Sauce). Guest post by Erica Kastner of Buttered Side Up, recipe submitted by TK member Tammy of San Pasqual's Kitchen.

Pour the sauce over the chicken in the pan. I switched to a larger pan so that the sauce would more evenly cover the chicken.


Tasty Kitchen Blog: Pollo en Salsa al Horno (Roasted Chicken in Sauce). Guest post by Erica Kastner of Buttered Side Up, recipe submitted by TK member Tammy of San Pasqual's Kitchen.

Bake in the preheated oven for about 35-45 minutes, or until the chicken is cooked through.


Tasty Kitchen Blog: Pollo en Salsa al Horno (Roasted Chicken in Sauce). Guest post by Erica Kastner of Buttered Side Up, recipe submitted by TK member Tammy of San Pasqual's Kitchen.

Make sure you serve with lots of the flavorful sauce! I cooked up some couscous as an accompaniment (I know it’s not traditionally Spanish, but it sure was delicious and perfect for soaking up the sauce).

Note: I used virgin coconut oil to fry the chicken. I would recommend using expeller pressed coconut oil or some other less flavorful oil so that the saffron will shine through more clearly.


Tasty Kitchen Blog: Pollo en Salsa al Horno (Roasted Chicken in Sauce). Guest post by Erica Kastner of Buttered Side Up, recipe submitted by TK member Tammy of San Pasqual's Kitchen.

Thank you so much to Tammy for sharing this recipe with us. Stop by her blog, San Pasqual’s Kitchen, for more international recipes. Her Arrosto All’arancia (Roasted Pork with Orange Sauce) looks heavenly.


Printable Recipe

Pollo en Salsa al Horno (Roasted Chicken in Sauce)

See post on San Pasqual's Kitchen’s site!
0.00 Mitt(s) 0 Rating(s)0 votes, average: 0.00 out of 50 votes, average: 0.00 out of 50 votes, average: 0.00 out of 50 votes, average: 0.00 out of 50 votes, average: 0.00 out of 5

Prep Time:

Cook Time:

Difficulty: Intermediate

Servings: 4

4
x

Print Options

Page size Letter 3x5 4x6
Text Size Small Medium Large
Content Include description
Include prep time, etc.
Show image

Description

A remarkably tender chicken roasted in a saffron wine sauce. A Spanish wonder.

Ingredients

  • ⅓ cups All-purpose Flour, Divided
  • 4 pounds Chicken Parts
  • Salt
  • 1 cup Sunflower Oil
  • 2-½ Tablespoons Butter
  • 1  Small Onion
  • 1 clove Garlic, Peeled
  • 2  Sprigs Fresh Parsley
  • 1 pinch Saffron Threads
  • ¾ cups White Wine

Preparation Instructions

Reserve 1 tablespoon of the flour.

Season the chicken pieces with salt and coat them with the remaining flour.

Heat the oil with the butter in a skillet. Add the pieces of chicken and cook over medium heat until browned. Transfer to an ovenproof casserole.

Preheat oven to 350º.

Add the onion to the skillet and cook over low heat, stirring occasionally for about 10 minutes. While the onion is cooking, crush the garlic, parsley and saffron in a mortar and mix in the wine.

Stir the reserved flour into the onions and stir continuously for 2 minutes. Add in the wine mixture and bring to a boil, stirring continuously, then pour over the chicken.

Put the casserole in the oven and cook for 35 to 45 minutes until chicken is cooked through and tender.

¡Que aproveche! Enjoy!


_______________________________________

Erica Kastner has always been one of our most cherished members of the Tasty Kitchen community. She shares her wonderful recipes and amazing food photography on her blog, Buttered Side Up, and she also writes about crafts and posts more of her beautiful photography in her personal blog, Simple Days. There really isn’t much that this amazing young wife and mother can’t do, and we’re thrilled she does some of it here.


Profile photo of Ree | The Pioneer Woman

Ponzu Beef and Chicken Fajitas

Posted by in Step-by-Step Recipes

This is the second in a two-recipe series for Kikkoman, a sponsor of Tasty Kitchen. The other recipe I posted here was for Panko Mozzarella Sticks (highly recommend!) and I continue to get positive feedback from those of you who’ve made them. For this one, I used a whole different Kikkoman product and made…fajitas!

 
Mmmm, does my house smell yummy. If you walked in right now, you’d drool.

 
Then you’d faint when you saw my laundry pile. But that’s another story!

 
TPW_3867

Grab a sirloin steak and throw it into a dish or a Ziploc bag.


TPW_3865

This is Ponzu sauce!


TPW_3871

Pour it over the beef, add some lime juice, then cover it with plastic wrap (or seal the bag) and refrigerate it for at least a few hours. I like to do this step in the morning and let it marinate all day!)


TPW_3879

Separately, slice two chicken breasts into strips and throw it in a bowl or plastic bag. Pour the ponzu sauce (with lime juice) over the top, cover (or seal) and marinate.

 
Now go…live your life!


TPW_1095

To make the fajitas, wrap a stack of flour tortillas in aluminum foil and warm in the oven. (Though I went for the storebought stuff this time, try making homemade tortillas if you have the time—you won’t regret it!)


TPW_3886

Slice up the veggies. I used onion and three colors of bell peppers because I love color, and because they were in my fridge! But I have made fajitas using sliced mushrooms, zucchini, and summer squash—anything you have on hand.


TPW_3888

Heat some canola oil in a large skillet over high heat. You want to sizzle these veggie, baby!


TPW_3897

Throw in the veggies and pour in a little Ponzu.


TPW_3901

Let them cook over high heat for 4 to 5 minutes, or until they get a little color. You don’t want them to be soggy, though, so taste along the way and remove them while they’re still crisp.


TPW_3914

Remove them to a plate and keep warm.


TPW_3910

Grill up the steak until medium rare, about 1 1/2 to 2 minutes on both sides.


TPW_3913

Remove the steak to a cutting board and let it rest while you cook the chicken.


TPW_3902

Throw the chicken into the same skillet in which you cooked the veggies.


TPW_3916

Flip and cook the chicken until it’s nice and brown (and done), then pour it onto a plate. Remove the tortillas from the oven and get whatever fixins you’d like: sour cream, cilantro, pico de gallo, guacamole (or just sliced avocado), chopped olives—just go for it!


TPW_3922

Throw the veggies on the tortilla…


TPW_3924

Then throw on the chicken.


TPW_3929

Then I threw on some cheddar…


TPW_3930

And sour cream, because I’m a bad, bad girl.


TPW_3918

As for the beef, slice it very thinly. You’ll notice I took two different approaches with the chicken and the beef. For the chicken, I sliced it up, then marinated it, then cooked it. But for the beef, if you slice it before you cook it, you won’t be able to achieve medium rare doneness—it’ll cook too much and too fast. So I like to grill it in one piece, then slice away.


TPW_3940

Pink and beautiful!


TPW_3944

I loved these so much, I’m actually considering serving fajitas for our Fourth of July party. I can do a huge iron skillet on the grill itself, grill several sirloins, then just have a big spread set up with all the fixins.

It’ll be a mess…but a delicious one.

Enjoy! Here’s a link to the printable recipe: Ponzu Beef and Chicken Fajitas

Profile photo of steamykitchen

Popcorn with Parmesan and Truffle Oil

Posted by in Step-by-Step Recipes

I have a new addiction but luckily this time, it’s not quite as unhealthy as my last (ahem … Kit Kats) or budget-breaking as the one before that (ahem … fresh oysters from the Pacific Northwest). It’s all my friend Jennifer’s fault. She gushed on about her new popcorn maker—the stand-alone, old-fashioned design complete with the crank to empty the popping bin.

It’s an absolutely impractical space-hogging small kitchen appliance that only people who have a popcorn fixation (moi) could justify. And so there it sits on my kitchen island, taking up 55% of the counter footprint, leaving no room for anything else.

Of course, my husband Scott just shakes his head and says, “We’ll see how long this popcorn thing lasts …” So what am I to do? Well, I make popcorn. Buckets of it. Every few hours.

Okay, so honestly, my addiction isn’t so much eating the popcorn but rather making it. And if I have to hang my head in shame, stand in the corner, and really, really dig down deep for the absolute truthful answer, the popcorn-making frenzy is all about warding off the “I told you it was a bad idea” thing from Scott!

C’mon, please tell me you do the same thing too?

 
Tasty Kitchen Blog: Popcorn with Parmesan and Truffle Oil. Guest post by Jaden Hair of Steamy Kitchen.

Of the gazillion popcorn combos that I’ve made (and have sourced from Twitter friends!), my favorite is the Popcorn with Parmesan and Truffle Oil. It’s a great way to glam up the humble popcorn! (Though I think popcorn stopped being humble the moment I bought that fancy $80 popcorn maker.)

The first step is to pop yer corn. If you’re doing the microwave thing, make sure you get plain popcorn. If you want to make popcorn on your stove (like your grandma use to do), here’s a recipe from Elise.

Once it’s popped, put the popcorn in a large bowl and drizzle just 1/4 to 1/2 teaspoon of the truffle oil (truffle oil is very strong!). If you have an oil mister, even better.

Tasty Kitchen Blog: Popcorn with Parmesan and Truffle Oil. Guest post by Jaden Hair of Steamy Kitchen.


Mix it all about. The oil goes first, so that it coats the popcorn and gives the salt and parmesan something to stick to.

Tasty Kitchen Blog: Popcorn with Parmesan and Truffle Oil. Guest post by Jaden Hair of Steamy Kitchen.


Now add the sea salt. It’s gotta be good sea salt, like my favorite flaky Maldon sea salt. Hey, if you’re gonna use truffle oil and good parmesan, you might as well use good salt!

Tasty Kitchen Blog: Popcorn with Parmesan and Truffle Oil. Guest post by Jaden Hair of Steamy Kitchen.


And then add a generous grating of good quality parmesan or pecorino.

Tasty Kitchen Blog: Popcorn with Parmesan and Truffle Oil. Guest post by Jaden Hair of Steamy Kitchen.


To finish, just because this is glam popcorn, I use a vegetable peeler to add some nice shavings of parmesan on top.

Tasty Kitchen Blog: Popcorn with Parmesan and Truffle Oil. Guest post by Jaden Hair of Steamy Kitchen.


What’s your favorite popcorn flavor? Got any creative ideas for me? I’ve got at least another 2 weeks of popcorn frenzy before I can safely retire the monster in my garage AND minimize the “I told you so’s.”

 
Hugs and kisses,
Jaden


_______________________________________

Jaden Hair is a food writer, television personality, and food photographer based in Tampa Bay, Florida. Find more of her recipes in her blog, Steamy Kitchen, where you can also read more about Jaden’s new book, The Steamy Kitchen Cookbook, and the rave reviews it’s received!


Profile photo of twopeasandtheirpod

Poppy Chow

Posted by in Step-by-Step Recipes

  One of my favorite snacks as a child was puppy chow. Not the dog food, but the cereal snack that is covered in chocolate, peanut butter, and powdered sugar. (My brother did dare me to taste real dog food once. I don’t recommend it, bleh!) Whenever it was my turn to choose a snack […]

Profile photo of ThreeManyCooks

Posh Pimento Grilled Cheese

Posted by in Step-by-Step Recipes

  I don’t know why National Grilled Cheese month is in April. Grilled Cheese (and tomato soup) reminds me of chilly autumn days when my dad would make my sister and me rake leaves on Saturday afternoons. We loathed this chore and practically loathed him by the time we were called in for lunch. Nine […]

Profile photo of whatsgabycooking

Potatoes Romanoff

Posted by in Step-by-Step Recipes

  Twice Baked Potatoes have always been a favorite of mine, so when I saw this recipe for Potatoes Romanoff (something I had never tried before) I knew I had to make it immediately! It takes the twice baked potato to a whole new level by shredding the baked potato and folding in lots of […]

Profile photo of HowSweetEats

Pretzel Rolls

Posted by in Baking, Step-by-Step Recipes

  From the moment I took a big bite of a soft pretzel at a baseball game when I was seven years old, I’ve been in love. That also happened to be the same baseball game where I sat in a bowl full of nacho cheese sauce and ruined my favorite white jean shorts that […]