The Pioneer Woman Tasty Kitchen
Profile photo of EatLiveRun

Apricot Strudel

Posted by in Baking, Step-by-Step Recipes

Tasty Kitchen Blog: Apricot Strudel. Guest post by Jenna Weber of Eat, Live, Run; recipe submitted by Heather of Heather Christ Cooks.

 
Holy strudel! The moment I saw Heather Christo’s mouth-watering recipe for Apricot Strudel, I knew I had to make it as soon as possible. Apricots are in season now, and these sweet little gems are just flooding the farmers market. I hadn’t made a strudel in years (and never an apricot one!), and was looking forward to playing with some fillo dough. Heather’s strudel turned out a little prettier than mine (I credit her fillo dough handling abilities to the fact that she married a Greek), but wow, was it ever delicious! The apricots could have easily been mistaken for peaches in this flaky strudel, and it was the perfect summer dessert. But don’t believe me—try it yourself! I guarantee it will make an apricot fan out of you for life.


Tasty Kitchen Blog: Apricot Strudel. Guest post by Jenna Weber of Eat, Live, Run; recipe submitted by Heather of Heather Christ Cooks.

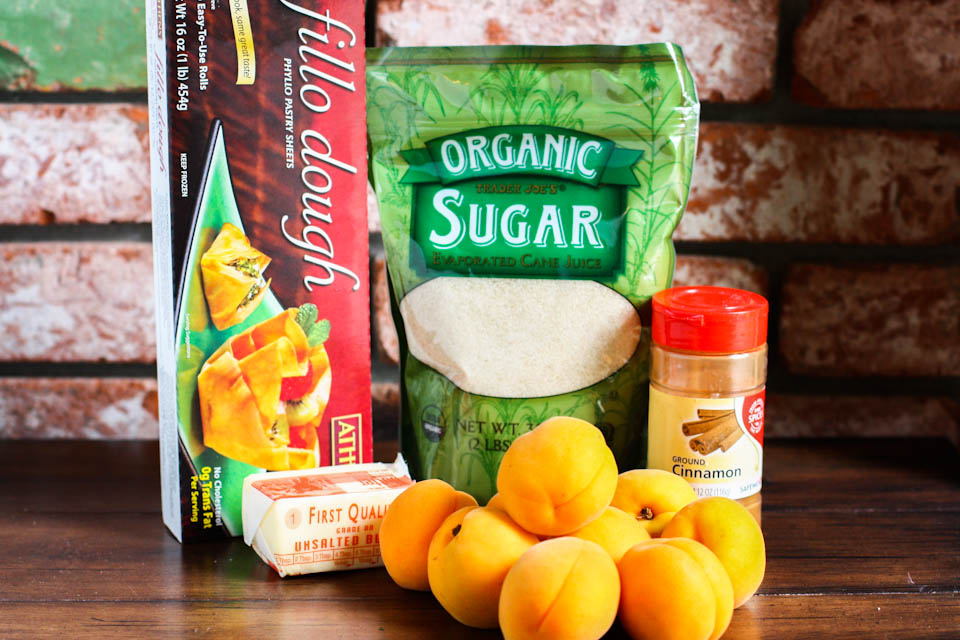
Here’s what you need! Actually, you need all this plus all-purpose flour. I realized I forgot the flour right after I uploaded this photo.

Simple ingredients, really. Just make sure you leave yourself enough time to defrost your fillo dough before starting! Fillo dough defrosts at room temperature in about two hours and trust me, you don’t want to attempt working with this stuff until it has defrosted—-these tissue paper-thin pastry sheets tear easily.


Tasty Kitchen Blog: Apricot Strudel. Guest post by Jenna Weber of Eat, Live, Run; recipe submitted by Heather of Heather Christ Cooks.

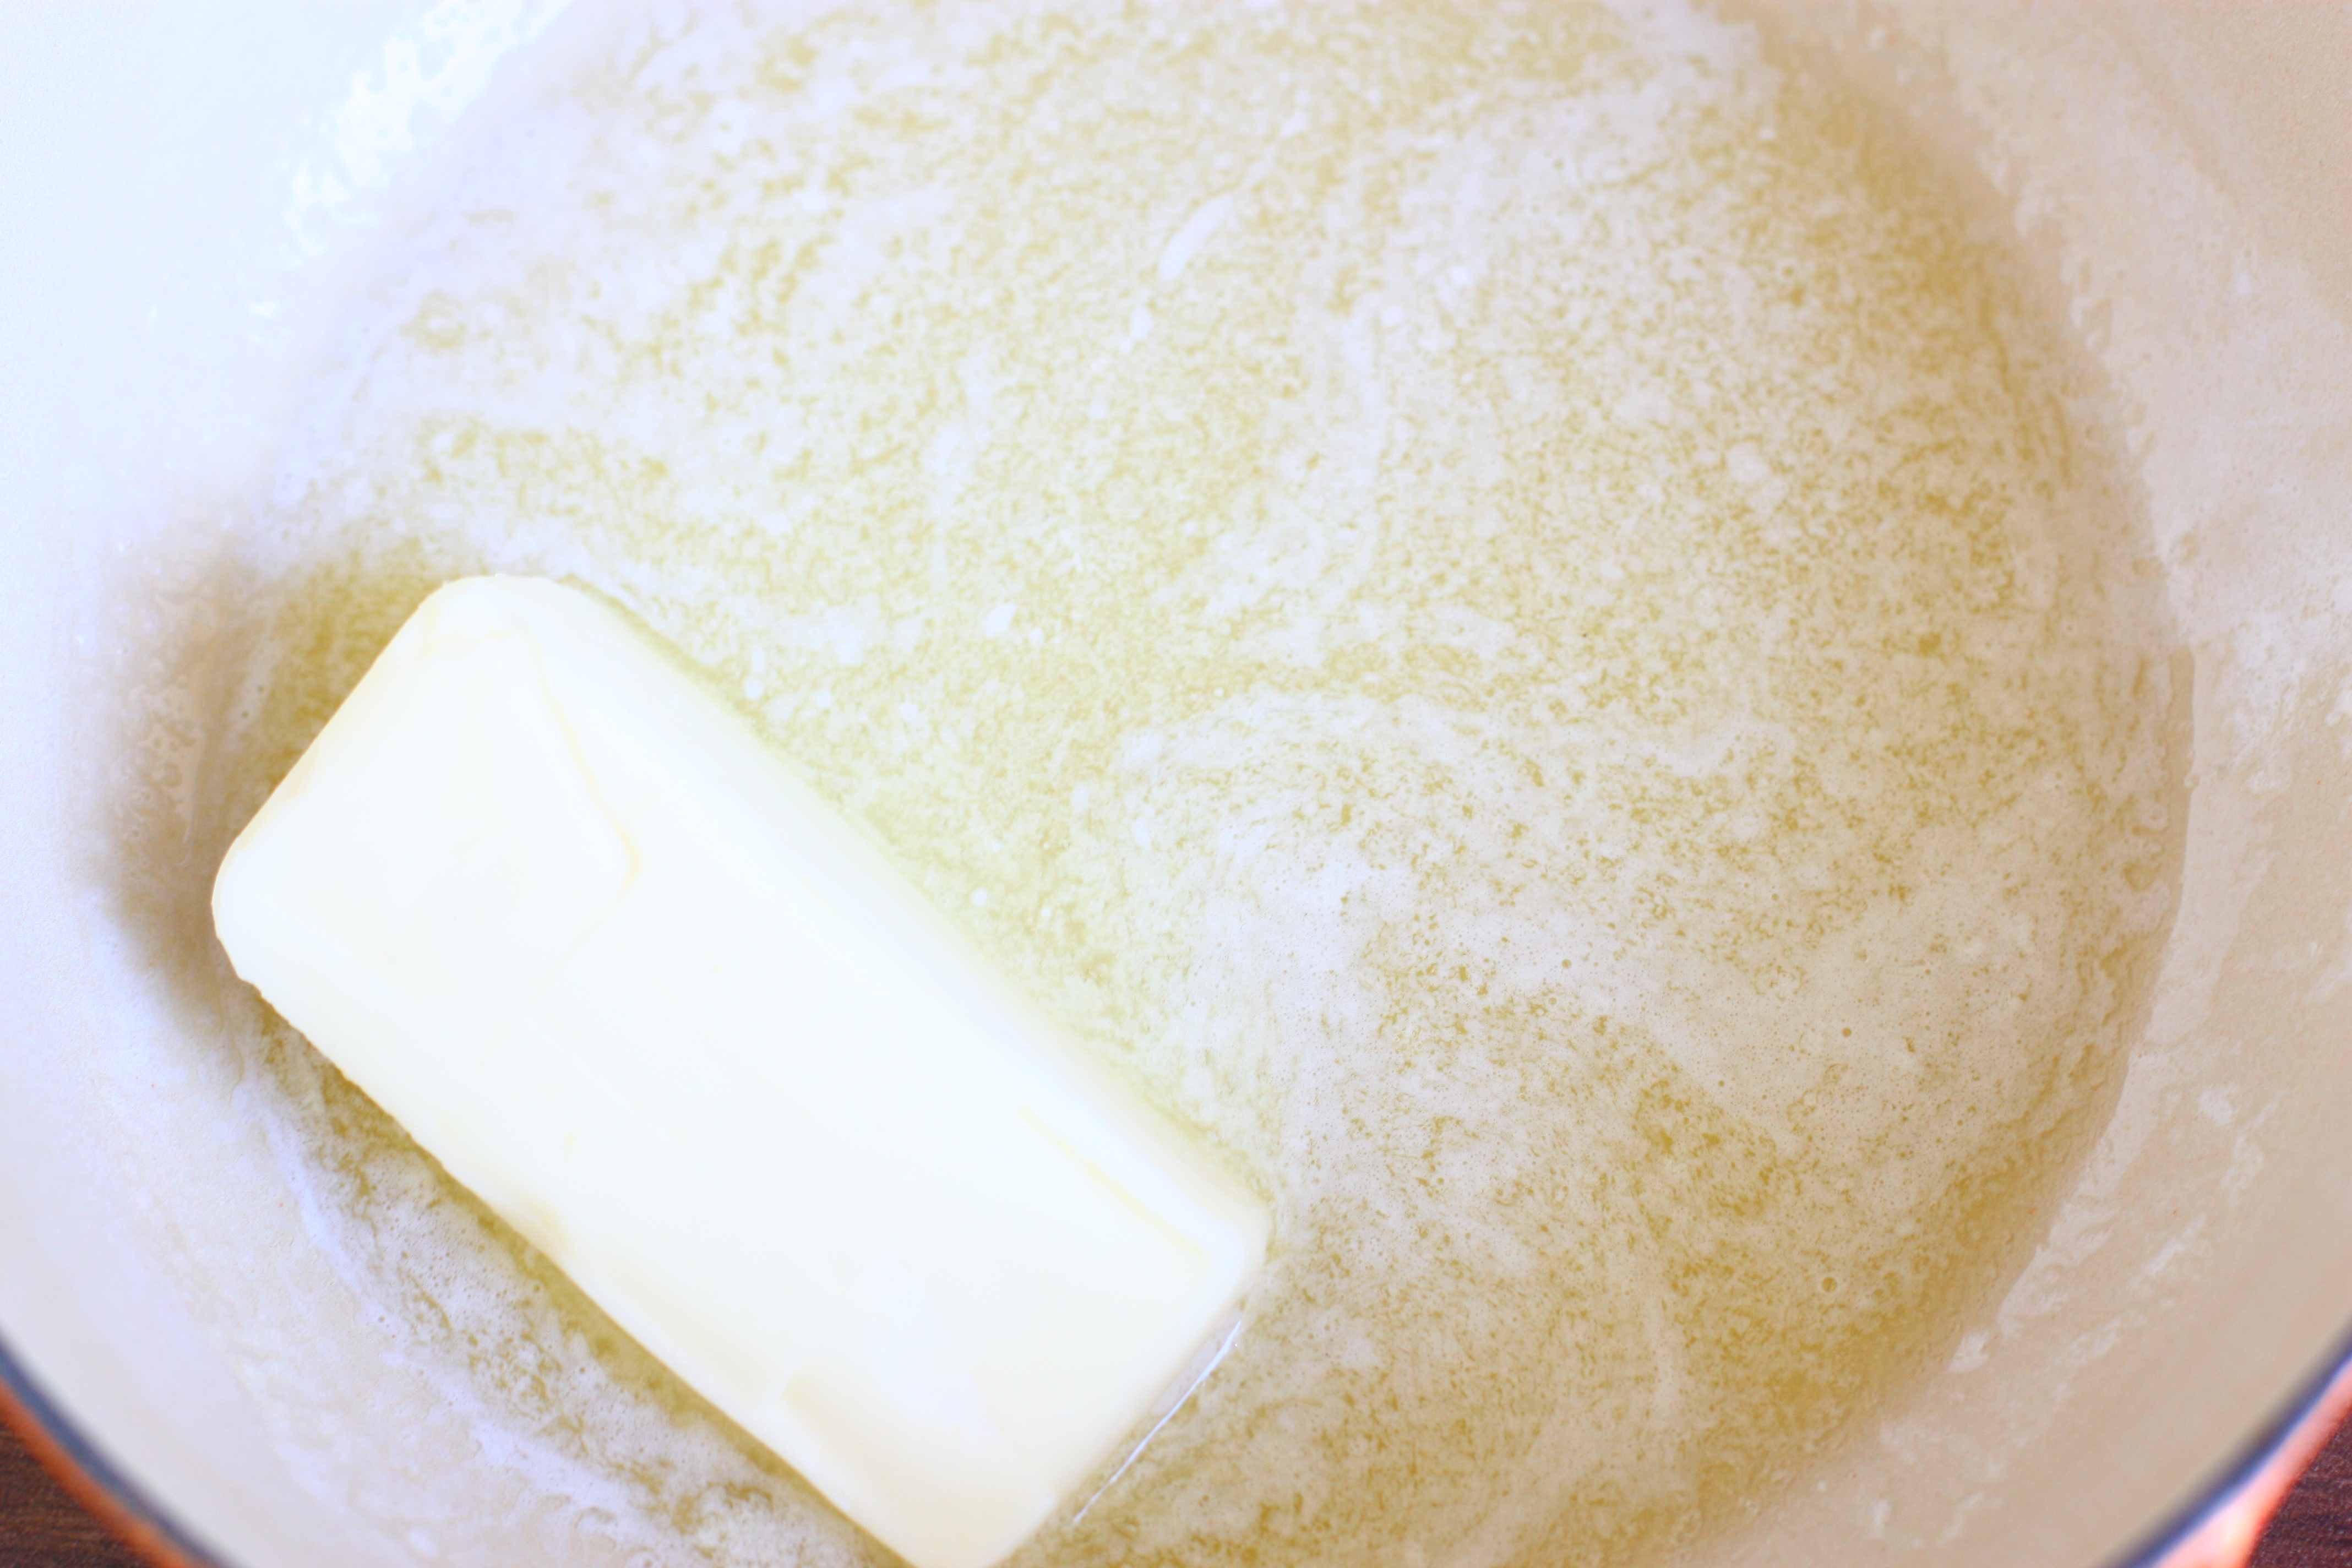
First, melt a stick of butter. You’ll need every bit of this stick for brushing on the fillo dough. This is what will make your strudel so perfectly crisp and golden. After your butter has melted, set it aside.


Tasty Kitchen Blog: Apricot Strudel. Guest post by Jenna Weber of Eat, Live, Run; recipe submitted by Heather of Heather Christ Cooks.

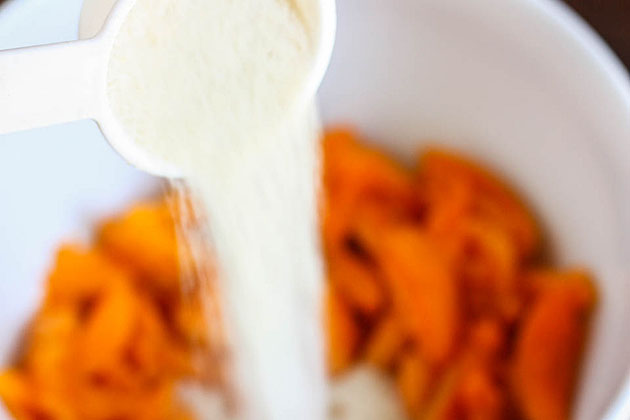
Slice your apricots and toss them into a bowl with 1/4 cup of granulated sugar.


Tasty Kitchen Blog: Apricot Strudel. Guest post by Jenna Weber of Eat, Live, Run; recipe submitted by Heather of Heather Christ Cooks.

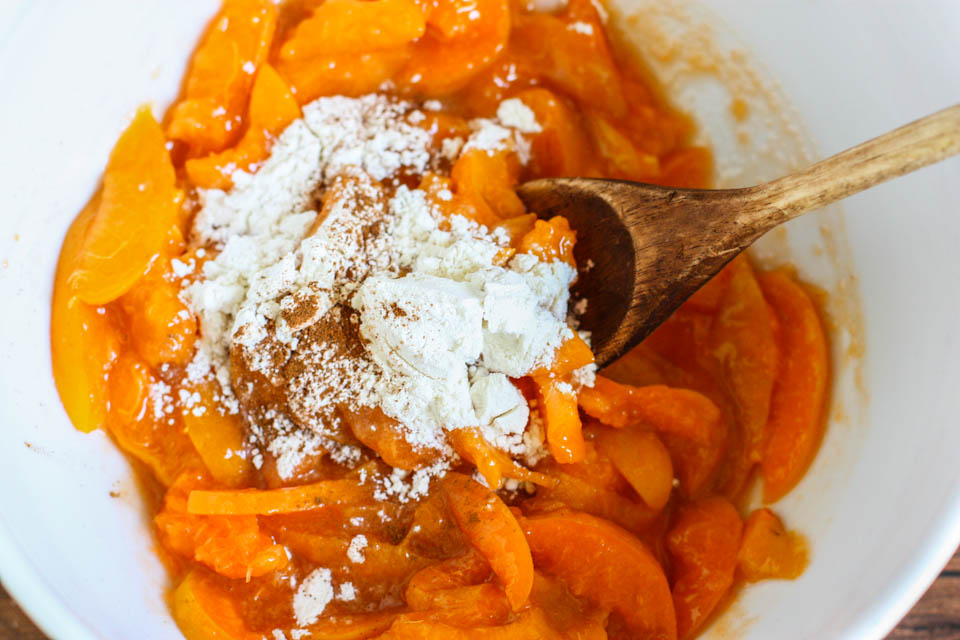
Then add two tablespoons of flour and a pinch of cinnamon. It should look all delicious and juicy—just like a pie filling.


Tasty Kitchen Blog: Apricot Strudel. Guest post by Jenna Weber of Eat, Live, Run; recipe submitted by Heather of Heather Christ Cooks.

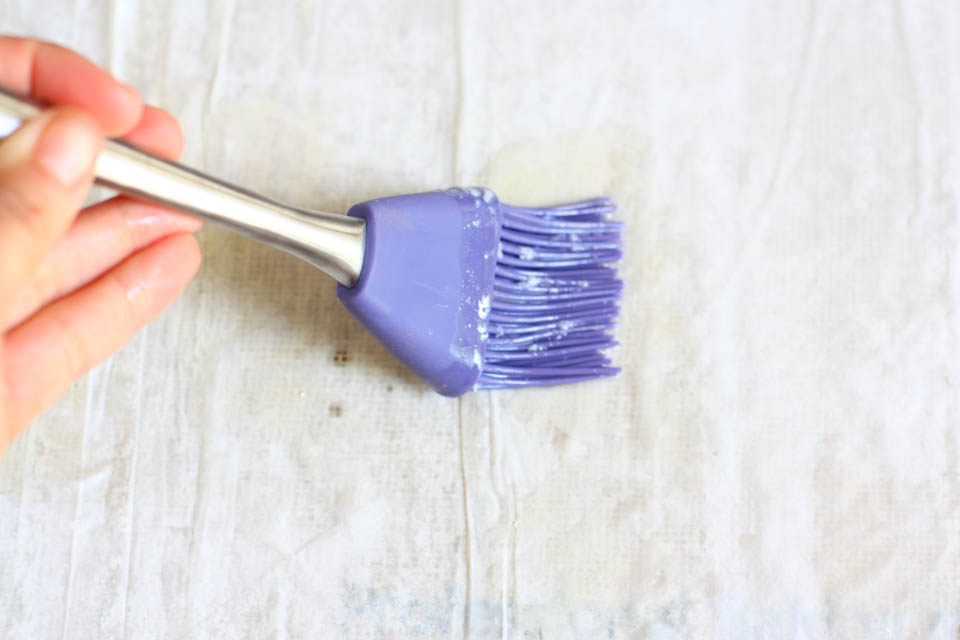
Now here is where things could get a little complicated … but not really. You’ll see! Open your box of defrosted fillo dough and place ONE super-thin sheet on a parchment paper (or Silpat-lined) baking sheet. Brush that sheet well with the melted butter.

A great tip here is to cover the fillo dough with a wet paper towel while you work. This will prevent it from drying out and cracking.


Tasty Kitchen Blog: Apricot Strudel. Guest post by Jenna Weber of Eat, Live, Run; recipe submitted by Heather of Heather Christ Cooks.

After you have brushed the butter on your sheet of fillo, carefully grab two more sheets from the package (remember to cover the remaining up with the wet paper towel!). Place these two sheets on top of the buttery sheet, the opposite way.

Proceed to drench in butter.

Repeat this process (laying one sheet down, brushing with butter, then topping with two sheets going the opposite way) until you have eight buttery fillo layers, or until you use up your box of fillo. I did the latter.


Tasty Kitchen Blog: Apricot Strudel. Guest post by Jenna Weber of Eat, Live, Run; recipe submitted by Heather of Heather Christ Cooks.

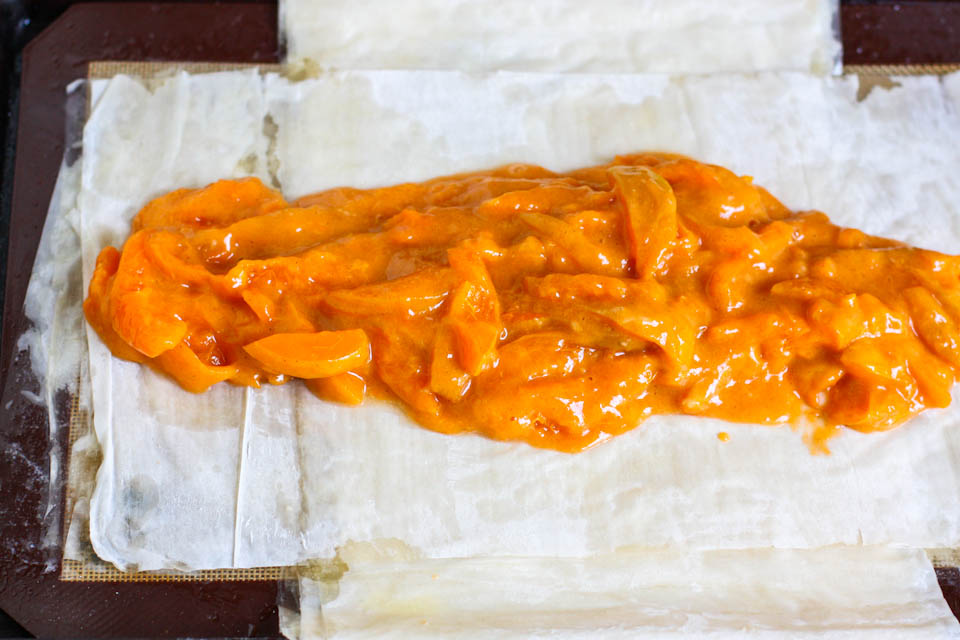
Pour the sugary apricots down the center of the fillo dough in as skinny of a line as you can make.


Tasty Kitchen Blog: Apricot Strudel. Guest post by Jenna Weber of Eat, Live, Run; recipe submitted by Heather of Heather Christ Cooks.

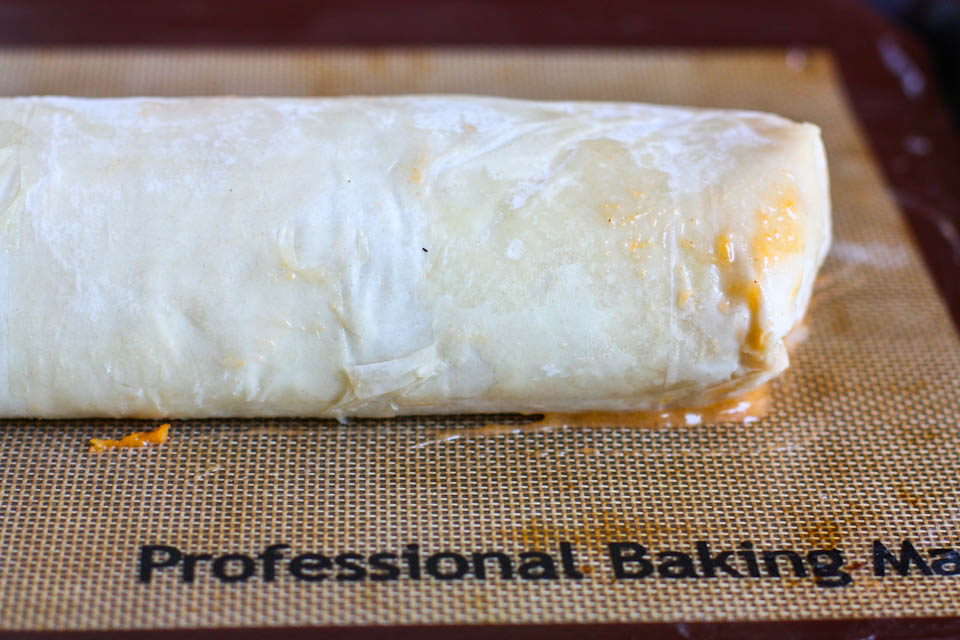
Then, fold the outer “wings” of dough in and start rolling up your strudel like you would roll up an egg roll. You want the ends of the strudel to be as tucked in as you can get so none of that beautiful apricot filling escapes. (See Heather’s blog post for photos of how she did hers!)

Brush your strudel with the remaining melted butter then stick her in a 400ºF oven for half an hour.


Tasty Kitchen Blog: Apricot Strudel. Guest post by Jenna Weber of Eat, Live, Run; recipe submitted by Heather of Heather Christ Cooks.

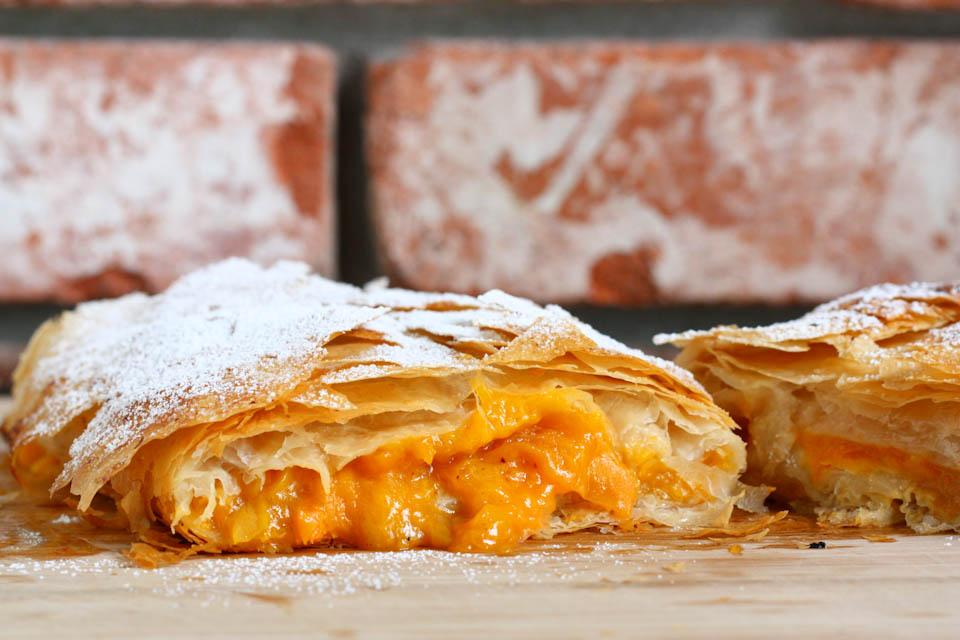
And there ya go! She’s a beauty all right, and you can’t even (really) tell that I tore some of the fillo dough accidently.

Serve this warm with powdered sugar dusted on top of with a scoop of vanilla ice cream.

Thank you, Heather, for this lovely recipe! It’s a keeper, for sure. Check out her blog, Heather Christo Cooks, for more of her great recipes. (You can find the strudel recipe below for printing, so you don’t splatter that melted butter on your laptop like I just did. Oops.)


Printable Recipe

Apricot Strudel

See post on Heather Christo’s site!
0.00 Mitt(s) 0 Rating(s)0 votes, average: 0.00 out of 50 votes, average: 0.00 out of 50 votes, average: 0.00 out of 50 votes, average: 0.00 out of 50 votes, average: 0.00 out of 5

Prep Time:

Cook Time:

Difficulty: Easy

Servings: 8

8
x

Print Options

Page size Letter 3x5 4x6
Text Size Small Medium Large
Content Include description
Include prep time, etc.
Show image

Description

Tender, sweet and tart apricots wrapped in buttery, flaky filo dough make a fast and easy strudel!

Ingredients

  • 1 stick Butter
  • 8  Apricots, Sliced
  • ¼ cups Sugar
  • 2 Tablespoons Flour
  • 1 pinch Cinnamon
  • ½ packages (16 Oz. Size) Filo Dough

Preparation Instructions

1. Preheat the oven to 400ºF. Prepare a sheet pan with a Silpat or parchment paper.
2. In a small pan, melt the butter over low heat. Set aside.
3. Slice the apricots into thin wedges and set them in a bowl.
4. Sprinkle the apricots with sugar, flour and cinnamon. Gently toss everything to coat.
5. Lay a single sheet of filo down in the pan. Brush the sheet with butter.
6. Then lay 2 sheets of filo dough in the opposite direction, overlapping. Brush them with butter.
7. Continue this process of 1 sheet followed by 2 sheets until you have 8 layers of filo dough.
8. Spread the apricots out on the filo dough in a line.
9. Pull the filo dough up and over the apricots and then roll it like a spring roll until the edge of the filo dough is tucked under the strudel.
10. Tuck the ends under. Brush the whole outside of the streudel generously with the rest of the melted butter.
11. Bake the strudel at 400ºF for 30 minutes or until the fruit is soft and the pastry is golden brown.


_______________________________________

Jenna is a food writer who has worked as a pastry chef and bread baker. Her blog Eat, Live, Run has great recipes, travel stories, and the perfect slogan: “Celebrating life, one crumb at a time.”


Profile photo of missamy

Lime Olive Oil Muffins

Posted by in Baking, Step-by-Step Recipes

Tasty Kitchen Blog: Lime Olive Oil Muffins. Guest post by Amy Johnson of She Wears Many Hats, recipe submitted by TK member Rachel of Studio Cuisine.

 
When I saw the recipe for these Lime Olive Oil Muffins from Tasty Kitchen member Rachel, I thought it sounded interesting. Having never baked with olive oil before, I wasn’t quite sure what to expect. But I was pleasantly surprised that there was no hint of olive oil in the taste, and as a bonus, the olive oil helped produce a not-dried-out goody. So if you’re looking for a grain-free, gluten-free or just a healthier option for a morning or snack muffin, look no further. These muffins are tasty and filling, which make for the perfect breakfast muffin in my book. They’re not overly sweet, so they lend themselves well to the addition of jams, jellies, or my favorite, honey. Or for a dessert option, maybe create a coconut lime glaze? Yum.

The cast of characters and process are straightforward.


Tasty Kitchen Blog: Lime Olive Oil Muffins. Guest post by Amy Johnson of She Wears Many Hats, recipe submitted by TK member Rachel of Studio Cuisine.

To get started you’ll need: blanched almond flour, baking soda, salt (not shown), cinnamon, turbinado sugar (I used demerara), eggs, extra virgin olive oil, vanilla, fresh lime juice, and lime zest.


Tasty Kitchen Blog: Lime Olive Oil Muffins. Guest post by Amy Johnson of She Wears Many Hats, recipe submitted by TK member Rachel of Studio Cuisine.

Begin by combining the dry ingredients (almond flour, baking soda, salt, cinnamon, and sugar) together.


Tasty Kitchen Blog: Lime Olive Oil Muffins. Guest post by Amy Johnson of She Wears Many Hats, recipe submitted by TK member Rachel of Studio Cuisine.

In a separate bowl combine the wet ingredients (eggs, olive oil, vanilla, and lime juice) together.


Tasty Kitchen Blog: Lime Olive Oil Muffins. Guest post by Amy Johnson of She Wears Many Hats, recipe submitted by TK member Rachel of Studio Cuisine.

Add the wet mixture into the dry mixture and combine well. Add the lime zest.


Tasty Kitchen Blog: Lime Olive Oil Muffins. Guest post by Amy Johnson of She Wears Many Hats, recipe submitted by TK member Rachel of Studio Cuisine.

Finish the batter by folding in the lime zest.


Tasty Kitchen Blog: Lime Olive Oil Muffins. Guest post by Amy Johnson of She Wears Many Hats, recipe submitted by TK member Rachel of Studio Cuisine.

In a muffin tin coated with cooking spray or lined with paper liners, distribute batter evenly among 6 muffin tins.

Rachel says she used some techniques learned from Sally’s Baking Addiction for baking the muffins. Begin by baking the muffins for a short period of time at 425°F, then the remaining baking time at 350°F. I think this must help create more of a crunchy top on the muffins.


Tasty Kitchen Blog: Lime Olive Oil Muffins. Guest post by Amy Johnson of She Wears Many Hats, recipe submitted by TK member Rachel of Studio Cuisine.

They did turn out perfectly cooked. Moist but firm on the top.


Tasty Kitchen Blog: Lime Olive Oil Muffins. Guest post by Amy Johnson of She Wears Many Hats, recipe submitted by TK member Rachel of Studio Cuisine.

Quite the excellent recipient for a drizzling of honey.

Thanks Rachel for helping me try something new and for sharing a good baking tip, too! For more cooking inspiration from Rachel, be sure to visit her food blog, Studio Cuisine.


Printable Recipe

Lime Olive Oil Muffins

See post on Rachel {Studio Cuisine}’s site!
0.00 Mitt(s) 0 Rating(s)0 votes, average: 0.00 out of 50 votes, average: 0.00 out of 50 votes, average: 0.00 out of 50 votes, average: 0.00 out of 50 votes, average: 0.00 out of 5

Prep Time:

Cook Time:

Difficulty: Easy

Servings: 6

6
x

Print Options

Page size Letter 3x5 4x6
Text Size Small Medium Large
Content Include description
Include prep time, etc.
Show image

Description

A citrusy, puffy muffin. Great for an on-the-go breakfast.

Ingredients

  • 2 cups Blanched Almond Flour
  • 1 teaspoon Baking Soda
  • ½ teaspoons Salt
  • ½ teaspoons Cinnamon
  • ¼ cups Raw Turbinado Sugar
  • 2 whole Eggs
  • 2 Tablespoons Extra Virgin Olive Oil
  • 1 teaspoon Vanilla
  • 2 Tablespoons Fresh Lime Juice (from 1 Lime)
  • 1-½ teaspoon Lime Zest (from 2 Limes)

Preparation Instructions

Preheat oven to 425ºF. Spray muffin tin with cooking spray or line with paper liners.

Combine almond flour, baking soda, salt, cinnamon, and sugar in a large bowl. Set aside.

In a small bowl, combine eggs, olive oil, vanilla, and lime juice.

Add wet ingredients to dry, and stir well. Fold in lime zest.

Distribute mixture evenly between 6 muffin tins, filling each one all the way to the brim.

Bake at 425 for 5 minutes, then turn the oven down to 350ºF and bake for another 15-20 minutes until an inserted toothpick comes out clean.


_______________________________________

Amy Johnson is a blogger who writes about food, travel, the home (both inside and out), and various observations and random musings about anything and everything. Visit her blog She Wears Many Hats for a dose of deliciousness, practicality, hilarity, or just plain fun. She lives in South Carolina with her husband and two children.


Profile photo of Amber {Sprinkled With Flour}

Grilled Peaches with Honey-Ginger Cream Cheese Fluff

Posted by in Step-by-Step Recipes

Tasty Kitchen Blog: Grilled Peaches with Honey Ginger Cream Cheese Fluff. Guest post by Amber Potter of Sprinkled with Flour, recipe submitted by Jessica of A Kitchen Addiction.

 
Living in a house with a 5-year-old, most of our desserts are of the kid-friendly variety. “Grown up” desserts are saved for special occasions, when I feel the need to step away from kiddie land and enjoy something a bit more, well, grown up. 

Don’t get me wrong! I love a good ol’ chocolate chip cookie sundae, but every now and then a girl needs to pamper her palate. When I found Jessica’s recipe for Grilled Peaches with Honey Ginger Cream Cheese Fluff, I knew this recipe would hit the mark.

Besides, who doesn’t love a dessert that has fluff in it? Fluff is very grown up, right?


Tasty Kitchen Blog: Grilled Peaches with Honey Ginger Cream Cheese Fluff. Guest post by Amber Potter of Sprinkled with Flour, recipe submitted by Jessica of A Kitchen Addiction.

This recipe is super simple. You’ll need: peaches, neufchatel cheese, honey, ginger, nutmeg, and Cool Whip. 


Tasty Kitchen Blog: Grilled Peaches with Honey Ginger Cream Cheese Fluff. Guest post by Amber Potter of Sprinkled with Flour, recipe submitted by Jessica of A Kitchen Addiction.

In a bowl, mix together the neufchatel cheese and honey.


Tasty Kitchen Blog: Grilled Peaches with Honey Ginger Cream Cheese Fluff. Guest post by Amber Potter of Sprinkled with Flour, recipe submitted by Jessica of A Kitchen Addiction.

Beat with a mixer until creamy, about 2 minutes.


Tasty Kitchen Blog: Grilled Peaches with Honey Ginger Cream Cheese Fluff. Guest post by Amber Potter of Sprinkled with Flour, recipe submitted by Jessica of A Kitchen Addiction.

Add the ginger and nutmeg. 


Tasty Kitchen Blog: Grilled Peaches with Honey Ginger Cream Cheese Fluff. Guest post by Amber Potter of Sprinkled with Flour, recipe submitted by Jessica of A Kitchen Addiction.

Beat for another 2 minutes, until well combined.


Tasty Kitchen Blog: Grilled Peaches with Honey Ginger Cream Cheese Fluff. Guest post by Amber Potter of Sprinkled with Flour, recipe submitted by Jessica of A Kitchen Addiction.

Gently fold in the Cool Whip with a spoon, just until combined. Refrigerate while you grill the peaches.


Tasty Kitchen Blog: Grilled Peaches with Honey Ginger Cream Cheese Fluff. Guest post by Amber Potter of Sprinkled with Flour, recipe submitted by Jessica of A Kitchen Addiction.

Cover the grate of your grill with foil. Place the peaches, cut side down, on the grill. Grill for 3-6 minutes, or until soft.


Tasty Kitchen Blog: Grilled Peaches with Honey Ginger Cream Cheese Fluff. Guest post by Amber Potter of Sprinkled with Flour, recipe submitted by Jessica of A Kitchen Addiction.

Remove peaches to a platter. Top with the cream cheese fluff, drizzle with honey, and sprinkle with nutmeg.


Tasty Kitchen Blog: Grilled Peaches with Honey Ginger Cream Cheese Fluff. Guest post by Amber Potter of Sprinkled with Flour, recipe submitted by Jessica of A Kitchen Addiction.

I absolutely LOVED these grilled peaches. Even my son loved them, so they’re not just for grown ups! The spiced cream cheese topping went so well with the sweet, juicy peaches. A perfect ending to a summer meal. Thank you Jessica for sharing you’re recipe with us! You can visit Jessica’s blog, A Kitchen Addiction, to find more of her yummy recipes.


Printable Recipe

See post on Jessica@A Kitchen Addiction’s site!
4.50 Mitt(s) 2 Rating(s)2 votes, average: 4.50 out of 52 votes, average: 4.50 out of 52 votes, average: 4.50 out of 52 votes, average: 4.50 out of 52 votes, average: 4.50 out of 5

Prep Time:

Cook Time:

Difficulty: Easy

Servings: 6

6
x

Print Options

Page size Letter 3x5 4x6
Text Size Small Medium Large
Content Include description
Include prep time, etc.
Show image

Description

The cream cheese fluff offers a slight tang to offset the sweetness of the peaches, and the ginger and honey blend beautifully with this delicious treat!

Ingredients

  • 4 ounces, weight 1/3 Of The Fat Neufchatel Cheese, Softened
  • 1-½ Tablespoon Honey
  • ½ teaspoons Ginger
  • ⅛ teaspoons Nutmeg
  • 4 ounces, weight Fat Free Cool Whip, Thawed
  • 1 pound Peaches, Washed And Halved
  • Honey And Nutmeg For Garnish

Preparation Instructions

1. In a small bowl, add neufchatel cheese and honey. Beat with a hand mixer until creamy, about 2 minutes. Add in the ginger and nutmeg. Beat again for another 2 minutes.
2. Gently fold in the Cool Whip with a spoon just until combined. Refrigerate while you grill the peaches.
3. Cover grate of grill with aluminum foil. Place peaches, cut side down, on grill. Grill on low heat for 3-6 minutes, or until soft.
4. Remove peaches to a plate. Top with cream cheese fluff. Drizzle with honey and sprinkle with nutmeg.


_______________________________________

Amber is a stay at home mom who lives in the heart of the Missouri Ozarks. It’s a long way from where she grew up, in Wales (yes, way over in the U.K.). The recipes in her blog Sprinkled with Flour include her original creations as well as her family recipes. Go check them out!


Profile photo of cookincanuck

Roasted Tomato and Goat Cheese Sandwiches

Posted by in Step-by-Step Recipes

Tasty Kitchen Blog: Open-Faced Roasted Tomato & Goat Cheese Sandwiches. Guest post by Dara Michalski of Cookin' Canuck, recipe submitted by TK member Courtney of Bake. Eat. Repeat.

 
Every year, the tomatoes catch me by surprise. One day I’ll head out to peruse the garden for gorgeous produce to pluck from the vine and … nothing. A couple of days later, I swear that the vines are practically drooping with ruby red tomatoes. If I want my share, I have to move fast. My 8-year old son makes a beeline for the garden beds each morning and, if I’m not fast enough, his cheeks will be filled to the brim chipmunk-style before I even step out the door.

With a bounty crop each year, I’m always looking for new ways to use our tomatoes. This Open-Faced Roasted Tomato and Goat Cheese Sandwich recipe from Tasty Kitchen member Courtney came at the perfect time. The tomatoes are drizzled with a garlicky olive oil mixture and roasted until tender. The sweet tomatoes are layered with goat cheese, fresh herbs and golden brown Parmesan bits on top of grilled, crunchy bread. To finish the dish, a simple balsamic glaze is drizzled on top.

Enough chit-chat. Let’s make (and eat!) this amazing sandwich. We’ll also make a balsamic reduction to drizzle on top.


Tasty Kitchen Blog: Open-Faced Roasted Tomato & Goat Cheese Sandwiches. Guest post by Dara Michalski of Cookin' Canuck, recipe submitted by TK member Courtney of Bake. Eat. Repeat.

Preheat the oven to 450ºF. Line a baking sheet with aluminum foil. Cut the tomatoes in ¼-inch thick slices and spread them out on the lined baking sheet.


Tasty Kitchen Blog: Open-Faced Roasted Tomato & Goat Cheese Sandwiches. Guest post by Dara Michalski of Cookin' Canuck, recipe submitted by TK member Courtney of Bake. Eat. Repeat.

In a small bowl, whisk together olive oil, garlic, salt, pepper and sugar. The first time I made this, I found the tomatoes to be too salty (and this is coming from a confessed salt lover), so I used half the amount of salt the next time.


Tasty Kitchen Blog: Open-Faced Roasted Tomato & Goat Cheese Sandwiches. Guest post by Dara Michalski of Cookin' Canuck, recipe submitted by TK member Courtney of Bake. Eat. Repeat.

Pour the mixture evenly over tomatoes.


Tasty Kitchen Blog: Open-Faced Roasted Tomato & Goat Cheese Sandwiches. Guest post by Dara Michalski of Cookin' Canuck, recipe submitted by TK member Courtney of Bake. Eat. Repeat.

Bake until the tomatoes shrink slightly and are soft, 20 to 25 minutes.


Tasty Kitchen Blog: Open-Faced Roasted Tomato & Goat Cheese Sandwiches. Guest post by Dara Michalski of Cookin' Canuck, recipe submitted by TK member Courtney of Bake. Eat. Repeat.

Meanwhile, set a large skillet over medium-high heat. Use a pastry brush to brush melted butter (or olive oil) on both sides of the bread slices.


Tasty Kitchen Blog: Open-Faced Roasted Tomato & Goat Cheese Sandwiches. Guest post by Dara Michalski of Cookin' Canuck, recipe submitted by TK member Courtney of Bake. Eat. Repeat.

Place the bread slices in the skillet and cook until they are evenly browned, turning halfway through. Transfer the bread slices to a plate.


Tasty Kitchen Blog: Open-Faced Roasted Tomato & Goat Cheese Sandwiches. Guest post by Dara Michalski of Cookin' Canuck, recipe submitted by TK member Courtney of Bake. Eat. Repeat.

This is where you get to make crispy, browned cheese. If you can resist eating at least half of it before it even makes it to the sandwiches, you are a better woman/man than me.

Add Parmesan cheese to the hot skillet. Grill until cheese is crispy and browned. When the cheese set, I flipped it over with a small metal spatula to brown it on both sides. Transfer the browned cheese to a plate and break into pieces.


Tasty Kitchen Blog: Open-Faced Roasted Tomato & Goat Cheese Sandwiches. Guest post by Dara Michalski of Cookin' Canuck, recipe submitted by TK member Courtney of Bake. Eat. Repeat.

To assemble, divide the bread slices between two plates. Divide the goat cheese between the bread slices and spread evenly.


Tasty Kitchen Blog: Open-Faced Roasted Tomato & Goat Cheese Sandwiches. Guest post by Dara Michalski of Cookin' Canuck, recipe submitted by TK member Courtney of Bake. Eat. Repeat.

Top each sandwich with 2-3 slices of roasted tomatoes. Sprinkle with chopped fresh herbs. Drizzle evenly with balsamic vinegar reduction (see note below). Top with Parmesan crisps. Serve immediately.

Note: This recipe calls for 3 tablespoons of balsamic reduction to drizzle over the finished sandwiches. That sounds really fancy and intimidating, doesn’t it? Have no fear, the process involves no more than some boiling, stirring and no more than 5 minutes of your time.

To make the balsamic reduction, pour 6 tablespoons of balsamic vinegar in a saucepan set over medium heat. Bring to a boil, stirring frequently. When the vinegar reaches a boil, stir constantly until the vinegar reduces by half. It will have a syrupy consistency and a slightly sweet, decadent flavor.


Tasty Kitchen Blog: Open-Faced Roasted Tomato & Goat Cheese Sandwiches. Guest post by Dara Michalski of Cookin' Canuck, recipe submitted by TK member Courtney of Bake. Eat. Repeat.

Thanks so much to Courtney for this recipe. Be sure to check out Courtney’s blog, Bake. Eat. Repeat. It is full of recipes that feature seasonal ingredients, photos that will leave you licking your lips, and fun stories about daily life.


Printable Recipe

Open-Faced Roasted Tomato and Goat Cheese Sandwiches

See post on Courtney’s site!
5.00 Mitt(s) 1 Rating(s)1 vote, average: 5.00 out of 51 vote, average: 5.00 out of 51 vote, average: 5.00 out of 51 vote, average: 5.00 out of 51 vote, average: 5.00 out of 5

Prep Time:

Cook Time:

Difficulty: Easy

Servings: 2

2
x

Print Options

Page size Letter 3x5 4x6
Text Size Small Medium Large
Content Include description
Include prep time, etc.
Show image

Description

Creamy tangy goat cheese and sweet roasted tomatoes make the perfect summer sandwich. And don’t forget the Parmesan crisps! Fried cheese is always a good idea.

Ingredients

  • 3  Slicer Tomatoes
  • 2 Tablespoons Olive Oil
  • 2 teaspoons Minced Garlic
  • 1 teaspoon Kosher Salt
  • ½ teaspoons Black Pepper
  • 2 pinches Sugar
  • 6  Small Slices Crusty Bread (we Used Our Favorite Cheesy Semolina)
  • 3 Tablespoons Butter, Melted
  • ¼ cups Parmesan Cheese
  • 2 ounces, weight Goat Cheese
  • 2 Tablespoons Chopped Fresh Herbs (we Used Basil, Parsley, And Rosemary)
  • 3 Tablespoons Balsamic Vinegar Reduction Or Balsamic Glaze

Preparation Instructions

1. Preheat the oven to 450 F. Line a baking sheet with aluminum foil. Slice the tomatoes about 1/4 inch thick and spread them out on the baking sheet. In a small bowl, whisk together olive oil, garlic, salt, pepper and sugar. Pour mixture evenly over tomatoes. Bake in the preheated oven for 20-25 minutes or until tomatoes are slightly shrunk and softened.

2. Meanwhile, heat a skillet over medium high heat. Use a pastry brush to brush melted butter on both sides of the bread slices. Place slices in the skillet and grill until evenly browned. Flip bread and continue to grill until both sides are browned. Remove bread to a plate.

3. Add 1/4 cup Parmesan cheese to the hot skillet. Grill until cheese is crispy and browned. Remove to a plate and break into pieces.

3. To assemble, divide bread slices among two plates. Smear one side of the bread with goat cheese. Top with 2-3 slices of roasted tomatoes. Sprinkle with assorted herbs. Drizzle evenly with balsamic vinegar reduction. Top with Parmesan crisps. Serve immediately.


_______________________________________

Dara Michalski is a doll and a sweetheart who clearly knows her way around the kitchen. She blogs at Cookin’ Canuck, where she shares her flavor-packed recipes and fun, engaging writing. The photography’s pretty incredible, too.


Profile photo of A Cozy Kitchen

Lemon Ricotta Stuffed Zucchini Blossoms

Posted by in Step-by-Step Recipes

  The markets are overflowing with summer squash and zucchini right now. With their arrival, you’ll also find their pretty and delicate flower: the squash blossom. I love them on everything from pizzas to inside quesadillas with melty cheese. But my favorite way to consume them, hands down, is fried. While I’ve had them prepared […]

Profile photo of Natalie | Perry's Plate

Melon Salad

Posted by in Step-by-Step Recipes

  My heart goes out to everyone without air conditioning this summer. Being hot is right up there on my list of “most unpleasant sensations” between having a cavity drilled and discovering my husband finished off the Nutella without telling me. The only redeeming quality to hot summers is the abundance of fresh fruit—especially melons.…

Profile photo of EatLiveRun

Tomato, Roasted Pepper and Arugula Pasta

Posted by in Step-by-Step Recipes

  I love a good pasta dish, and this Smoky Tomato, Roasted Red Pepper and Arugula Pasta by Cassie (Tasty Kitchen member BakeYourDay) is just perfect for a delicious late-summer meal! It contains pretty much all my favorite things (besides chocolate). I seriously cannot get enough of this pasta! After you try it, you too, […]

Profile photo of georgiapellegrini

Grilled Hanger Steak with Chimichurri

Posted by in Step-by-Step Recipes

  There’s nothing like a big piece of meat grilled on a summer afternoon, all juicy and salty, with a lovely tangy sauce on the side to complement it. The sauce in this Grilled Hanger Steak with Cilantro Mint Chimichurri recipe from Sommer> (TK member aspicyperspective) was just so wonderful that I would eat it […]