The Pioneer Woman Tasty Kitchen
Profile photo of A Cozy Kitchen

Jalapeno Bacon Stuffed Mushrooms

Posted by in Step-by-Step Recipes

Tasty Kitchen Blog: Stuffed Mushrooms. Guest post by Adrianna Adarme of A Cozy Kitchen, recipe submitted by TK member Kelly of Evil Shenanigans.

 
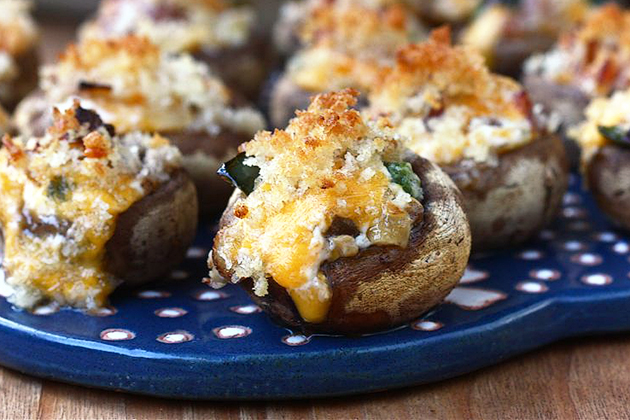
The holiday season is upon us, my friends. Parties, gatherings and festivities galore! I love a good party, and I love a potluck party even more. Stuffed mushrooms are one of my favorite dishes to bring to gatherings. They’re easy to assemble, their bite size shape makes them perfect for guests to eat as they mingle, and who can deny their deliciousness. In particular, these Jalapeno Bacon Stuffed Mushrooms from TK member Kelly of Evil Shenanigans caught my eye. I’ll be honest, the title of the recipe had everything to do with my curiosity. Cheese? Yes. Bacon? Double yes. And spicy, too?! Triple yes.

Let’s get started!


Tasty Kitchen Blog: Stuffed Mushrooms. Guest post by Adrianna Adarme of A Cozy Kitchen, recipe submitted by TK member Kelly of Evil Shenanigans.

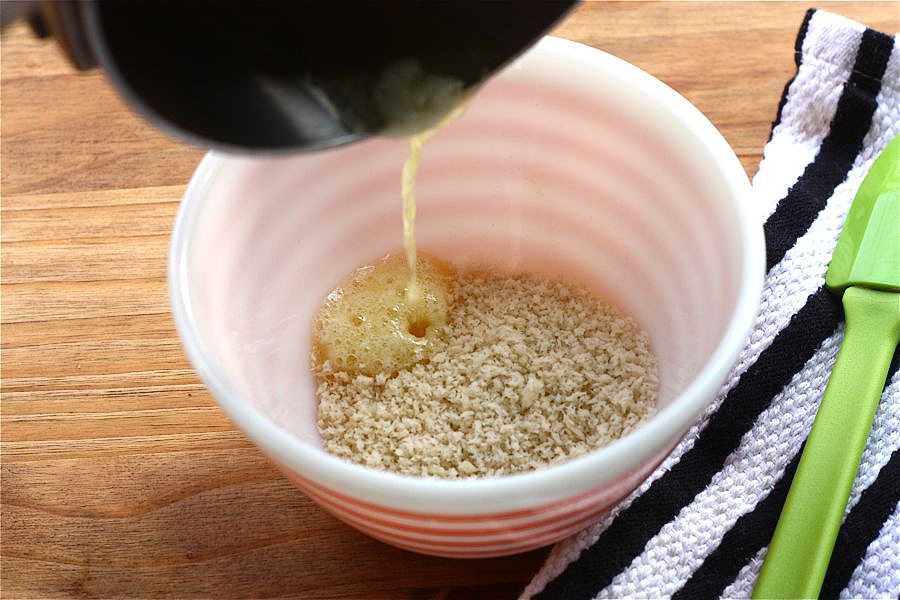
Grab a small bowl and toss the panko bread crumbs with the melted butter.


Tasty Kitchen Blog: Stuffed Mushrooms. Guest post by Adrianna Adarme of A Cozy Kitchen, recipe submitted by TK member Kelly of Evil Shenanigans.

Clean the mushrooms and remove their stems. Go ahead and dice up the stems and set aside. We’re going to use them later!


Tasty Kitchen Blog: Stuffed Mushrooms. Guest post by Adrianna Adarme of A Cozy Kitchen, recipe submitted by TK member Kelly of Evil Shenanigans.

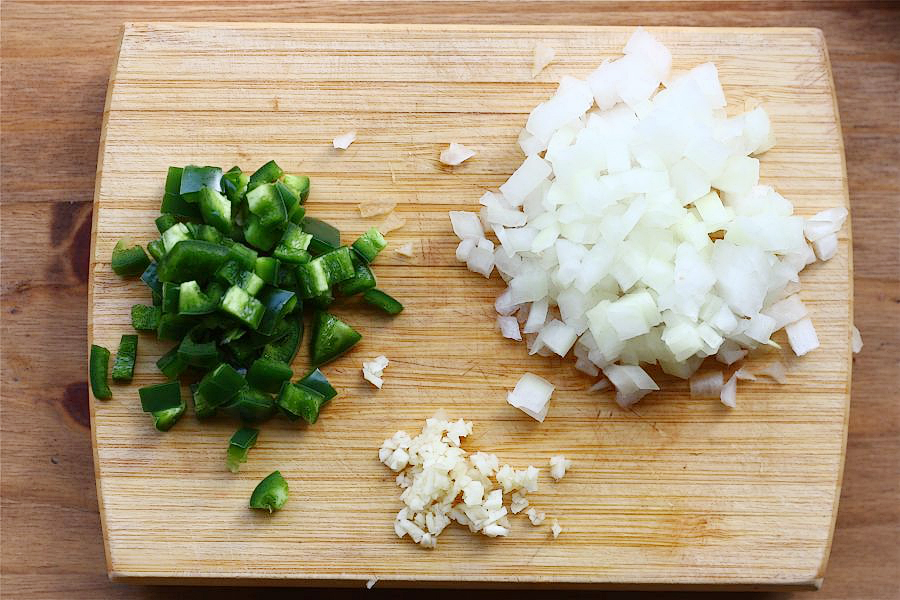
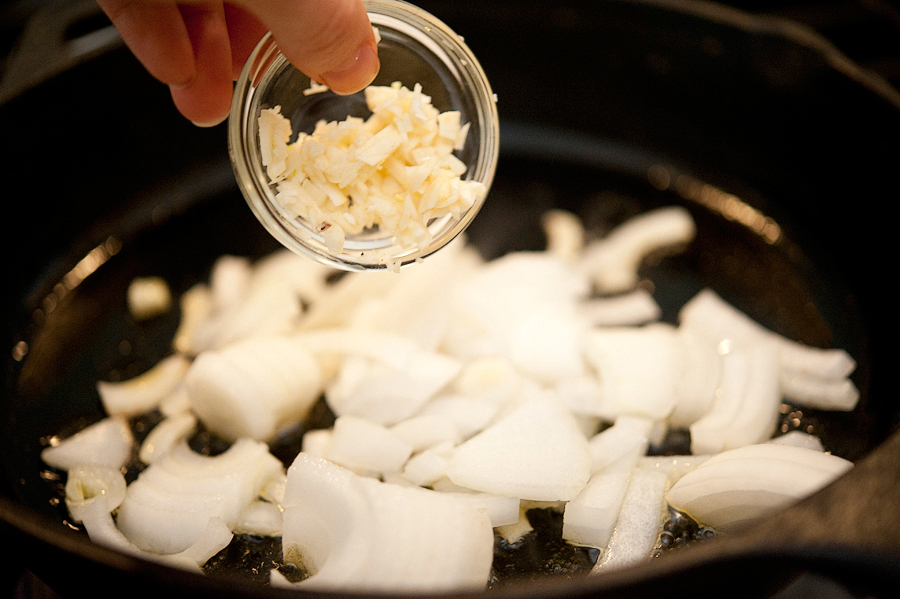
Dice up the jalapeno, yellow onion and garlic. Triple threat!


Tasty Kitchen Blog: Stuffed Mushrooms. Guest post by Adrianna Adarme of A Cozy Kitchen, recipe submitted by TK member Kelly of Evil Shenanigans.

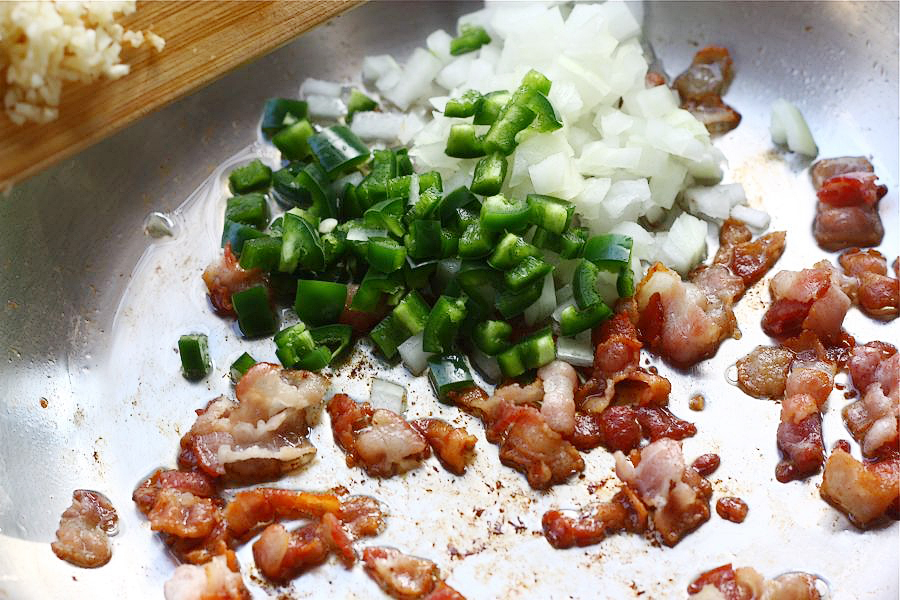
In a saute pan, cook the diced bacon until golden brown and crispy.

Add the jalapenos, onions, garlic …
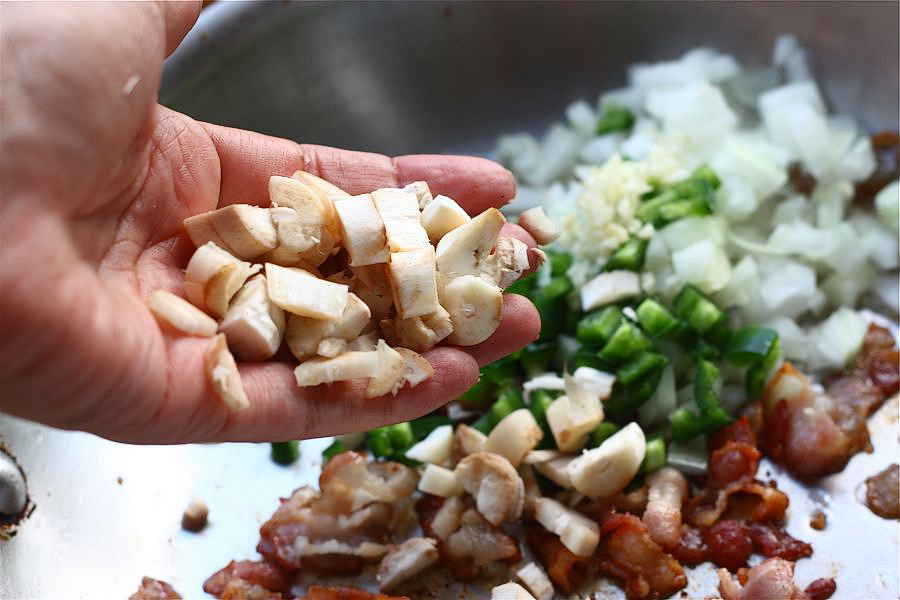


Tasty Kitchen Blog: Stuffed Mushrooms. Guest post by Adrianna Adarme of A Cozy Kitchen, recipe submitted by TK member Kelly of Evil Shenanigans.

… and diced stems.

Cook the mixture for five minutes, or until the vegetables become translucent.


Tasty Kitchen Blog: Stuffed Mushrooms. Guest post by Adrianna Adarme of A Cozy Kitchen, recipe submitted by TK member Kelly of Evil Shenanigans.

This is when the fun starts!

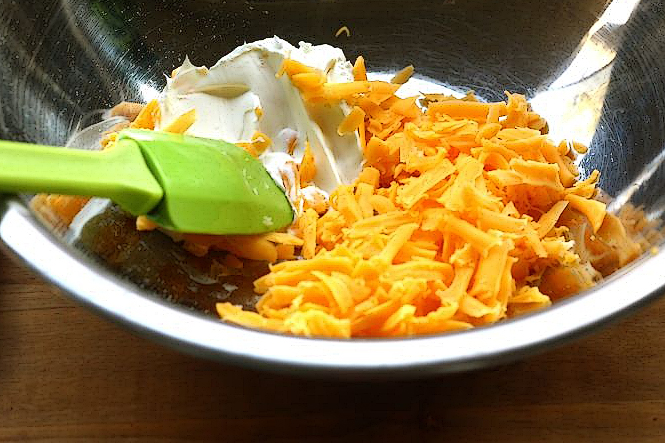
In a medium bowl, mix up the cream cheese and shredded cheddar cheese. Once it’s all mixed, add the warm vegetable/bacon mixture and toss.


Tasty Kitchen Blog: Stuffed Mushrooms. Guest post by Adrianna Adarme of A Cozy Kitchen, recipe submitted by TK member Kelly of Evil Shenanigans.

Place the mushrooms on a lined baking sheet.

Using a tablespoon, scoop the mixture into the mushroom centers.


Tasty Kitchen Blog: Stuffed Mushrooms. Guest post by Adrianna Adarme of A Cozy Kitchen, recipe submitted by TK member Kelly of Evil Shenanigans.

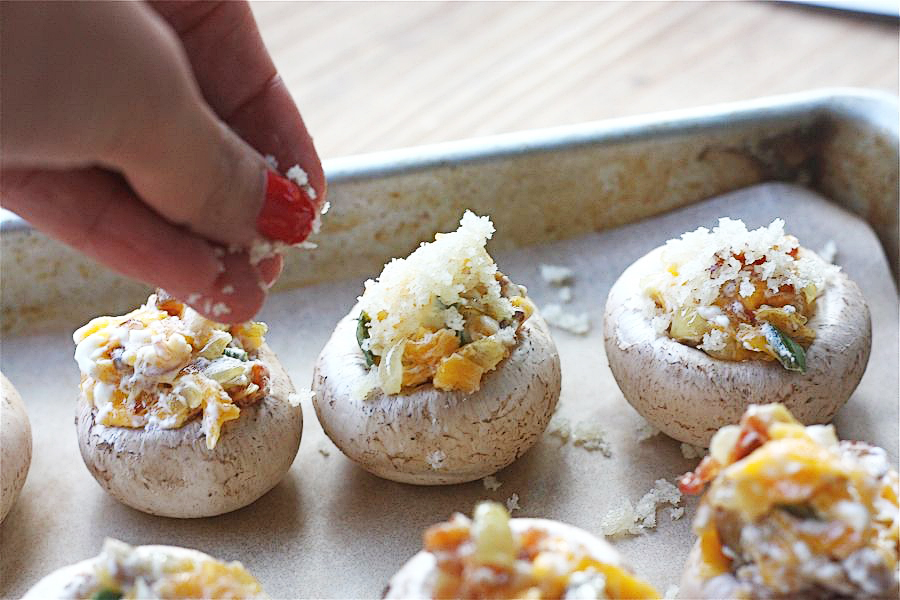
Lastly, top each mushroom with a bit of the buttery panko mixture.


Tasty Kitchen Blog: Stuffed Mushrooms. Guest post by Adrianna Adarme of A Cozy Kitchen, recipe submitted by TK member Kelly of Evil Shenanigans.

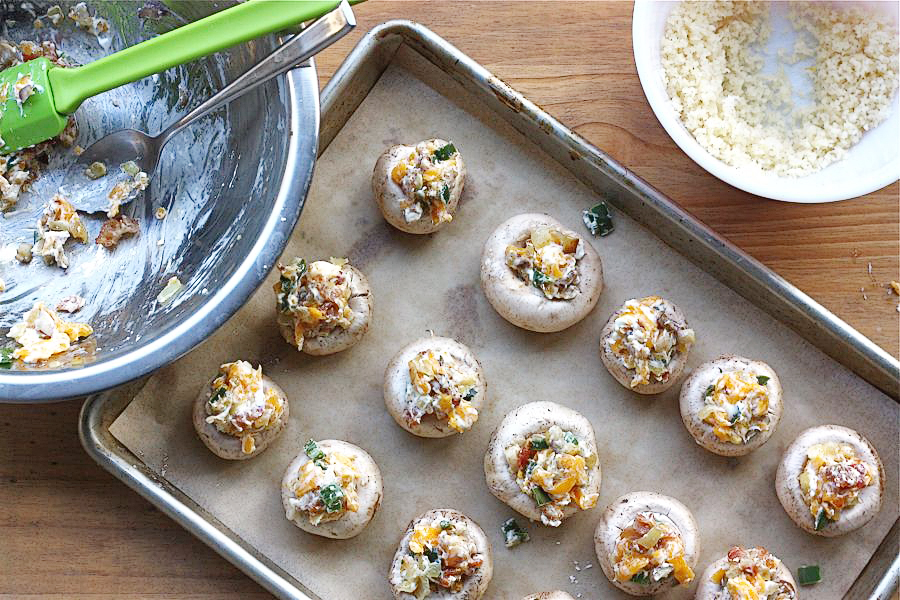
I ended up with a bit more mixture left so I ended up getting fifteen mushrooms out of this recipe. I’m definitely not complaining!


Tasty Kitchen Blog: Stuffed Mushrooms. Guest post by Adrianna Adarme of A Cozy Kitchen, recipe submitted by TK member Kelly of Evil Shenanigans.

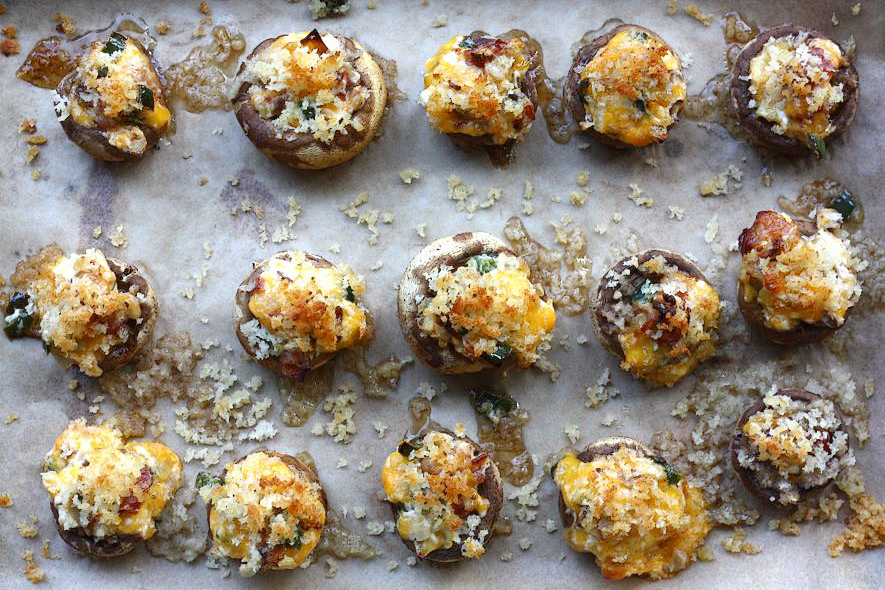
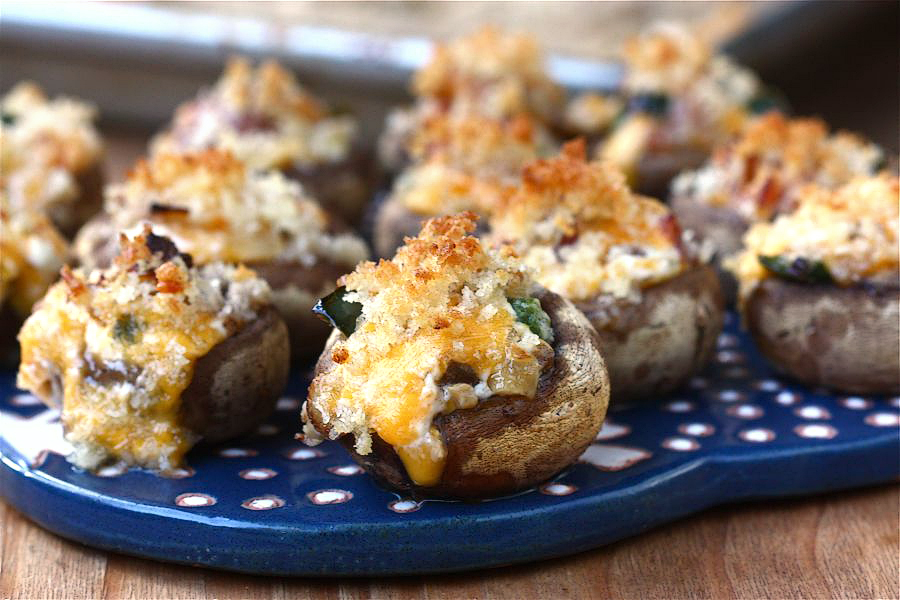
Bake the mushrooms for 20 minutes, or until the tops turn a golden brown and the cheese starts to ooze out the sides.


Tasty Kitchen Blog: Stuffed Mushrooms. Guest post by Adrianna Adarme of A Cozy Kitchen, recipe submitted by TK member Kelly of Evil Shenanigans.

I have big plans for making this again (I’m doubling the recipe next time), taking them to a party and watching as they disappear. This will happen—guaranteed! 

Thank you to TK member Kelly for the easy-breezy, amazing recipe. Also, check out her blog, Evil Shenanigans. It’s filled with delicious, comforting dishes! (And if you want to learn more about her and where her blog gets its name, check out her Tasty Kitchen Blog feature.)


_______________________________________

Adrianna is the lovely lady behind the scrumptious blog A Cozy Kitchen. It’s filled with all kinds of mouthwatering recipes and gorgeous photography. Whether you’re in the mood for something vegetarian or meaty, fancy or pure comfort, light or decadent, there’s sure to be something there for everyone.


Profile photo of whatsgabycooking

Jalapeno Popper Pizza

Posted by in Step-by-Step Recipes

Tasty Kitchen Blog: Jalapeno Popper Pizza. Guest post by Gaby Dalkin of What's Gaby Cooking, recipe submitted by TK member Dax Phillips of Simple Comfort Food.

 
If you’re like me, anything that ends with ‘pizza’ is pretty much the best thing ever. I’m obsessed to say the least! So when I ran across this Jalapeno Popper Pizza from Dax Phillips over on Tasty Kitchen, I knew it was destined to be in my future!

This tastes just like one of those insanely addictive jalapeno poppers, but it’s on a pizza! A pizza, you guys! It’s going to rock your world—and all of your tailgate parties from here on out!


Tasty Kitchen Blog: Jalapeno Popper Pizza. Guest post by Gaby Dalkin of What's Gaby Cooking, recipe submitted by TK member Dax Phillips of Simple Comfort Food.

First you’ll need some pizza dough. You can make your own, or buy some freshly made at the market. I opted for the market.


Tasty Kitchen Blog: Jalapeno Popper Pizza. Guest post by Gaby Dalkin of What's Gaby Cooking, recipe submitted by TK member Dax Phillips of Simple Comfort Food.

Roll out the dough to whatever shape you want.


Tasty Kitchen Blog: Jalapeno Popper Pizza. Guest post by Gaby Dalkin of What's Gaby Cooking, recipe submitted by TK member Dax Phillips of Simple Comfort Food.

Slide the dough into the oven and par-bake it for a few minutes until it starts to puff. Try not to start snacking on it right now. I know it’s hard to resist freshly baked dough!


Tasty Kitchen Blog: Jalapeno Popper Pizza. Guest post by Gaby Dalkin of What's Gaby Cooking, recipe submitted by TK member Dax Phillips of Simple Comfort Food.

Next you’ll need some cream cheese.


Tasty Kitchen Blog: Jalapeno Popper Pizza. Guest post by Gaby Dalkin of What's Gaby Cooking, recipe submitted by TK member Dax Phillips of Simple Comfort Food.

Dot the top of the dough with the cream cheese and let it start to soften.


Tasty Kitchen Blog: Jalapeno Popper Pizza. Guest post by Gaby Dalkin of What's Gaby Cooking, recipe submitted by TK member Dax Phillips of Simple Comfort Food.

Slather the cream cheese all over the dough. You could even jazz things up at this step and use a flavored cream cheese! Chive would be extra delicious, if you ask me.


Tasty Kitchen Blog: Jalapeno Popper Pizza. Guest post by Gaby Dalkin of What's Gaby Cooking, recipe submitted by TK member Dax Phillips of Simple Comfort Food.

Next, let’s grate some cheese. Again, refrain from snacking on all of the cheese like me.


Tasty Kitchen Blog: Jalapeno Popper Pizza. Guest post by Gaby Dalkin of What's Gaby Cooking, recipe submitted by TK member Dax Phillips of Simple Comfort Food.

Pile the cheese on top of the pizza.


Tasty Kitchen Blog: Jalapeno Popper Pizza. Guest post by Gaby Dalkin of What's Gaby Cooking, recipe submitted by TK member Dax Phillips of Simple Comfort Food.

Throw a few jalapenos over an open flame and roast them until the skin is black.


Tasty Kitchen Blog: Jalapeno Popper Pizza. Guest post by Gaby Dalkin of What's Gaby Cooking, recipe submitted by TK member Dax Phillips of Simple Comfort Food.

Remove the blackened skin from the pepper and slice the remaining green parts into rings.


Tasty Kitchen Blog: Jalapeno Popper Pizza. Guest post by Gaby Dalkin of What's Gaby Cooking, recipe submitted by TK member Dax Phillips of Simple Comfort Food.

Arrange the jalapeno rings on top of the cheese and slide the entire thing back into the oven until the cheese is bubbly and melted.


Tasty Kitchen Blog: Jalapeno Popper Pizza. Guest post by Gaby Dalkin of What's Gaby Cooking, recipe submitted by TK member Dax Phillips of Simple Comfort Food.

Pour yourself a cold beverage and enjoy!


Tasty Kitchen Blog: Jalapeno Popper Pizza. Guest post by Gaby Dalkin of What's Gaby Cooking, recipe submitted by TK member Dax Phillips of Simple Comfort Food.

A big thanks to Dax for this killer recipe! I’m 100% hooked. Have you seen his blog Simple Comfort Food? It’s loaded with tons of great recipes like this. Go check it out!


Printable Recipe

Jalapeño Popper Pizza

See post on Dax Phillips’s site!
4.33 Mitt(s) 3 Rating(s)3 votes, average: 4.33 out of 53 votes, average: 4.33 out of 53 votes, average: 4.33 out of 53 votes, average: 4.33 out of 53 votes, average: 4.33 out of 5

Prep Time:

Cook Time:

Difficulty: Easy

Servings: 10

10
x

Print Options

Page size Letter 3x5 4x6
Text Size Small Medium Large
Content Include description
Include prep time, etc.
Show image

Description

Everything you want and expect in a great jalapeño popper, but turned into a pizza.

Ingredients

  • FOR THE PIZZA DOUGH:
  • 3-¾ cups Bread Flour
  • 2-½ teaspoons Active Dry Yeast
  • ¾ teaspoons Table Salt
  • ¾ teaspoons Sugar
  • 1-⅓ cup Room Temperature Water
  • FOR THE PIZZA:
  • 1 whole Pizza Dough, Shaped Into Your Desired Circumference And Thickness
  • 6 ounces, weight Cream Cheese, Room Temperature
  • ½ cups Shredded Cheddar Cheese
  • 1 cup Shredded Mozzarella Cheese
  • 2 whole Jalapeño Peppers, Roasted, Skins Peeled And Discarded, Sliced
  • 1 whole Pizza Stone, Optional

Preparation Instructions

Note: The pizza dough recipe makes enough for 3 large sized pizzas. The toppings in the above list are enough for only one pizza.

For the dough:
In a large bowl combine the flour, yeast, salt, and sugar. Mix. Add the water, and with your wooden spoons, or hands, mix until blended. I use my KitchenAid mixer for this process to keep everything in the bowl during the rising process. Mix for about 30 seconds. The dough should be a bit stiff. Cover the bowl with a towel, and let it sit at room temperature until the dough has doubled in volume, about 2 hours.

Once risen, divide dough into three portions. Add a sprinkling of flour to a large pastry board and put one of the dough portions on top. Start rolling it out into your desired pizza shape. If you are adventurous, try tossing the pizza, to get your desired thickness.

Preheat your oven to 500 F with the pizza stone inside.

When oven is preheated carefully place the shaped pizza dough into the oven on the preheated pizza stone, and bake for about 10 minutes.

Remove the pizza stone from the oven, then smear the cream cheese over the top of the crust, leaving about an inch border. Top with the cheddar cheese and the mozzarella cheese, then arrange the sliced jalapeño peppers over the top.

Place it back into the oven for an additional 15 minutes or until the crust is nice and golden and the cheese is fully melted.

Remove it from the oven and let it cool for about 5 minutes before slicing into it, then dig in.

When you first bite into it, you get that surprise from the cream cheese base, and it has that richness to it. But when you get that paired with the roasted jalapeño peppers, well, then it all comes together. This is a real treat, and one slice will do you just fine. Hope you enjoy.


_______________________________________

Gaby Dalkin is the young lady behind What’s Gaby Cooking, a food blog that’s bursting at the seams with incredible recipes and food photography. She’s a personal chef and professional recipe developer, and if you follow her on Twitter, you’ll soon discover her two-fold obsession: guacamole and cheese. She has small feet, a large heart, and a smile that can light up the whole building. We’re pretty stoked to have her here.


Profile photo of georgiapellegrini

Kale and Feta Egg Bake

Posted by in Step-by-Step Recipes

Tasty Kitchen Blog: Kale and Feta Egg Bake. Guest post by Georgia Pellegrini, recipe submitted by TK member Gina of Running to the Kitchen.

 
I’m an egg person. I eat them almost every morning. But there is only so much scrambled eggs with avocado and hot sauce that a girl can eat before it begins to feel a tad redundant. What intrigued me most about this Kale and Feta Egg Bake from Tasty Kitchen member Gina was that it would work wonderfully for breakfast, lunch or dinner. And it reheats well so that you could really have it again the next day when times are busy. Plus, it is infinitely scalable, so you can make it in small individual ramekins, or you can make a nice large batch in a skillet like I did.


Tasty Kitchen Blog: Kale and Feta Egg Bake. Guest post by Georgia Pellegrini, recipe submitted by TK member Gina of Running to the Kitchen.

Here is what you will need: eggs, olive oil, red pepper flakes, minced garlic, kale (or other leafy greens like collards, Swiss chard, etc.), tomato sauce, onions, feta cheese.


Tasty Kitchen Blog: Kale and Feta Egg Bake. Guest post by Georgia Pellegrini, recipe submitted by TK member Gina of Running to the Kitchen.

Start by adding some olive oil to a sauté pan.


Tasty Kitchen Blog: Kale and Feta Egg Bake. Guest post by Georgia Pellegrini, recipe submitted by TK member Gina of Running to the Kitchen.

Add the onions and garlic and sweat until translucent.


Tasty Kitchen Blog: Kale and Feta Egg Bake. Guest post by Georgia Pellegrini, recipe submitted by TK member Gina of Running to the Kitchen.

Add in your red pepper flakes. I had a Thai red pepper sauce so I opted to use that.


Tasty Kitchen Blog: Kale and Feta Egg Bake. Guest post by Georgia Pellegrini, recipe submitted by TK member Gina of Running to the Kitchen.

Next add your leafy greens. You can be creative here. Kale is wonderful, but I was in the mood for collard greens to opted for those. You could also try spinach, Swiss chart, escarole … the possibilities are endless! Give them a stir and sprinkle with a bit of salt. You can put a lid on it for a few minutes to help them wilt.


Tasty Kitchen Blog: Kale and Feta Egg Bake. Guest post by Georgia Pellegrini, recipe submitted by TK member Gina of Running to the Kitchen.

Add the tomato sauce next. I used some Italian style stewed tomatoes for some chunkiness.


Tasty Kitchen Blog: Kale and Feta Egg Bake. Guest post by Georgia Pellegrini, recipe submitted by TK member Gina of Running to the Kitchen.

Let all of the flavors marry, stirring every so often.


Tasty Kitchen Blog: Kale and Feta Egg Bake. Guest post by Georgia Pellegrini, recipe submitted by TK member Gina of Running to the Kitchen.

Next sprinkle on the cheese. You could use cotija cheese here, too. Something crumbly is best.


Tasty Kitchen Blog: Kale and Feta Egg Bake. Guest post by Georgia Pellegrini, recipe submitted by TK member Gina of Running to the Kitchen.

Next, carefully crack your eggs and distribute them evenly on the surface.


Tasty Kitchen Blog: Kale and Feta Egg Bake. Guest post by Georgia Pellegrini, recipe submitted by TK member Gina of Running to the Kitchen.

Sprinkle the top with a bit more cheese and place the baking dish in the oven.


Tasty Kitchen Blog: Kale and Feta Egg Bake. Guest post by Georgia Pellegrini, recipe submitted by TK member Gina of Running to the Kitchen.

You’ll bake it until the eggs are cooked but still runny, or you can cook the yolks all the way through, depending on how you like them.


Tasty Kitchen Blog: Kale and Feta Egg Bake. Guest post by Georgia Pellegrini, recipe submitted by TK member Gina of Running to the Kitchen.

Scoop out portions onto plates if you’ve made it in a large skillet, or these ingredients can be placed in individual ramekins and cooked separately for some extra charm.


Tasty Kitchen Blog: Kale and Feta Egg Bake. Guest post by Georgia Pellegrini, recipe submitted by TK member Gina of Running to the Kitchen.

This is the perfect brunch dish, and so flexible. It was hearty and healthy and delicious all at once. It has now earned a place in my regular breakfast repertoire. Thanks so much to Gina for sharing it with us! Be sure to check out her website Running to the Kitchen for other delicious recipes.


Printable Recipe

Kale & Feta Egg Bake

See post on Gina (Running to the Kitchen)’s site!
5.00 Mitt(s) 3 Rating(s)3 votes, average: 5.00 out of 53 votes, average: 5.00 out of 53 votes, average: 5.00 out of 53 votes, average: 5.00 out of 53 votes, average: 5.00 out of 5

Prep Time:

Cook Time:

Difficulty: Easy

Servings: 1

1
x

Print Options

Page size Letter 3x5 4x6
Text Size Small Medium Large
Content Include description
Include prep time, etc.
Show image

Description

The perfect single lady dinner.

Ingredients

  • ½  Medium Onion, Chopped
  • 1 clove Garlic, Minced
  • 1 Tablespoon Extra Virgin Olive Oil
  • 6  Large Kale Leaves, Washed, Trimmed And Chopped
  • ¼ teaspoons Red Pepper Flakes
  • Salt And Pepper, to taste
  • 4 Tablespoons Marinara Sauce, Divided
  • ⅓ cups Crumbled Feta, Divided
  • 2  Eggs

Preparation Instructions

Preheat oven to 375ºF.

In a skillet over medium-high heat, saute onions, garlic and olive oil for 3-5 minutes, until softened.

Add kale and red pepper flakes and saute another 2-3 minutes until kale is wilted. Season with salt and pepper to taste.

Spray an oven safe ramekin with cooking spray and spoon half of the sauce into the bottom.

Next, add half the kale and onion mixture, then half the feta, remaining sauce, then the remainder of the kale.

Crack the eggs on the top and sprinkle remaining feta on top of that.

Bake for 12-15 minutes, until eggs are fully cooked but still runny.

Serve warm with crusty bread.


_______________________________________

There’s so much to say about Georgia, we don’t know where to start. Leaving Wall Street for the French Culinary Institute, followed by a stint at the Gramercy Tavern and La Chassagnette in France, her passion for food and food traditions are evident and inspiring. Visit her site at Georgia Pellegrini, where you’ll find more recipes, photos, learn all about her wonderful books Girl Hunter and Food Heroes, and enjoy her latest adventures.


Profile photo of Erika (TK)

Keeping Knives Sharp

Posted by in Kitchen Talk

Tasty Kitchen Blog: Kitchen Talk (Keeping Knives Sharp)

Food processor. Mandoline. Mini chopper. Julienne peeler. Zester. Pizza wheel. Many kitchen countertops and drawers are studded with various little specialty items to make work in the kitchen easier and quicker. But strip those counters clean and whittle down the list of essentials to just a few basics, and one thing can replace a handful of other gadgets and tools: a sharp knife. Few things give me as much joy working in the kitchen as a properly sharpened knife. And few things have caused me as much frustration (and painful injuries) as a dull knife.

So tell us:

How do you keep your knives sharp?

Do you have any knife sharpening suggestions? Things to avoid? Knife storage tips? Or even favorite knives that have served you well throughout the years?

I have a small manual knife sharpener with multiple options for sharpening angles: one for Asian knives and one for European-style knives. It also has a honer, and so far that’s been working well for me.

Now let’s hear from you! Tell us about keeping knives sharp and working the way they were meant to work. We need to do all we can to save our fingers, man!


Profile photo of Erika (TK)

Keeping Things Fresh

Posted by in Kitchen Talk

Do you have any tips for keeping produce fresh longer? Come join the conversation!

Profile photo of Erika (TK)

Keeping Your Stove Clean

Posted by in Kitchen Talk

When you cook almost every meal at home, it's hard to keep things spotless. Gunkless. Splatter-free. We'd love to know how it's done, so tell us:

Do you have any stove or hood cleaning tips?

Any suggestions for getting them clean---or keeping them clean? Come share your tried and tested tips below and let's brainstorm together!

Profile photo of Erika (TK)

Kids in the Kitchen

Posted by in Kitchen Talk

It's almost officially summer! 'Tis the season for pool parties, backyard barbecues, camp, and having kids at home with hours of free time at their disposal. What to do with all that time! Or maybe their reading list is 2 pages long, and they'll need a break now and then from all that summer homework. Whichever the case may be, getting them into the kitchen at a…

Profile photo of Erika (TK)

Kitchen Talk: Food for Flying

Posted by in Kitchen Talk

We'll talk about packing food for the plane this week, then we'll tackle road trips next week. So tell us:

What are your favorite tips for packing food for the plane?