The Pioneer Woman Tasty Kitchen
Profile photo of Erica Lea

Gingerbread Waffles

Posted by in Holidays

Tasty Kitchen Blog: Gingerbread Waffles. Guest post by Erica Kastner of Buttered Side Up, recipe submitted by TK member Emily of One Lovely Life.

“I’m making waffles for lunch. Would you and the kids like to have some?”

I basically knew the answer before my sister replied. Who in their right mind would refuse waffles for lunch?

My sister (who lives in the upstairs portion of our house with her hubby and kiddos) graciously offered to watch my little girl while I cooked. It’s a bit difficult to take photos while your toddler is wiggling your tripod. I whipped up a batch as quickly as I could (it takes a little time when you’re documenting each step) and called my sister and her kids downstairs to taste my creation.

We quickly devoured most of waffles. When I asked the kids if they liked them, they readily agreed.

This Gingerbread Waffle recipe, brought to us by the lovely Emily, is basically an excuse to eat dessert for breakfast (or any meal of the day). And I’m very much okay with that. But they aren’t sickeningly sweet. There’s plenty of wiggle room to customize the sweetness with syrup or powdered sugar.

Let me show you how I made them!


Tasty Kitchen Blog: Gingerbread Waffles. Guest post by Erica Kastner of Buttered Side Up, recipe submitted by TK member Emily of One Lovely Life.

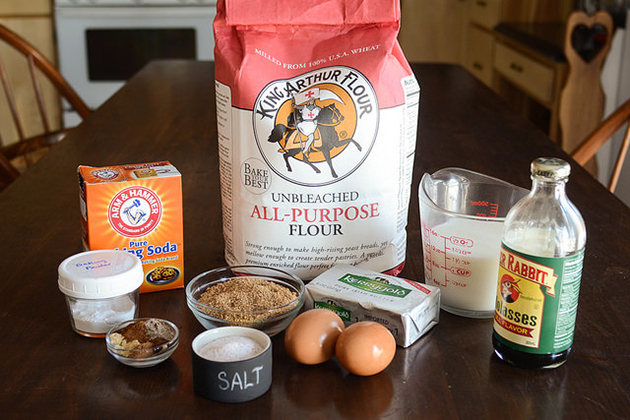
Look at these lovely ingredients: brown sugar (I used Sucanat), eggs, buttermilk (I used milk mixed with vinegar), molasses, butter, flour, baking powder, baking soda, ground ginger, cinnamon, cloves, nutmeg, cardamom, and salt.


Tasty Kitchen Blog: Gingerbread Waffles. Guest post by Erica Kastner of Buttered Side Up, recipe submitted by TK member Emily of One Lovely Life.

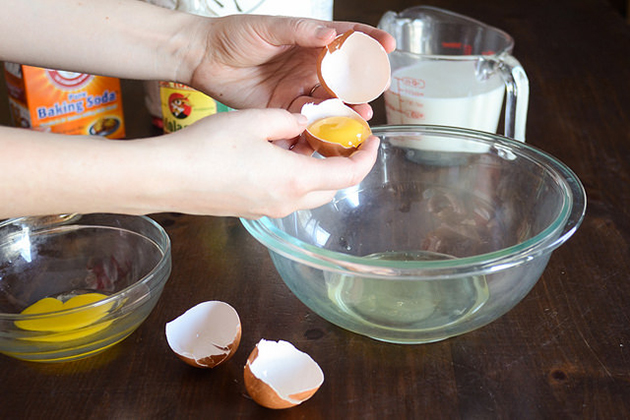
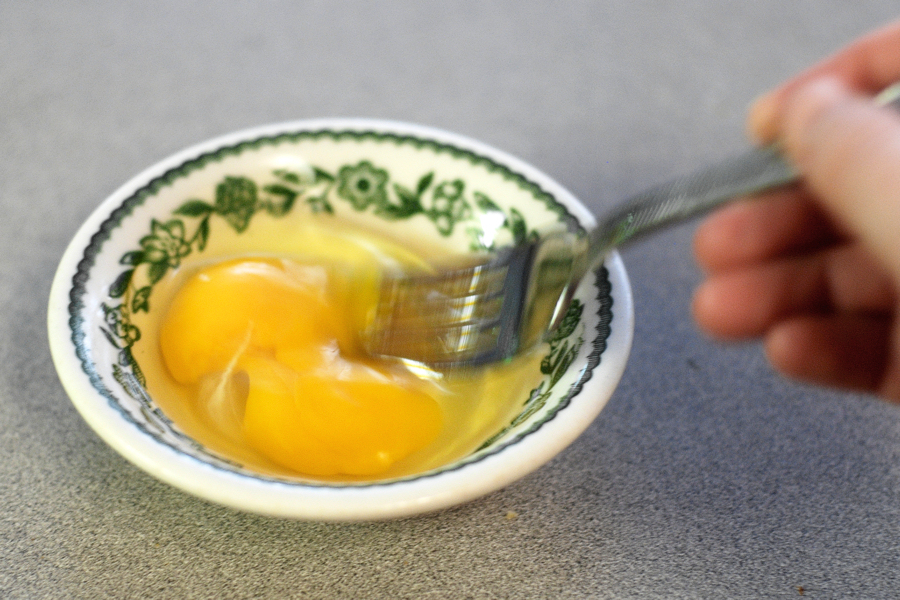
Begin by separating your eggs.


Tasty Kitchen Blog: Gingerbread Waffles. Guest post by Erica Kastner of Buttered Side Up, recipe submitted by TK member Emily of One Lovely Life.

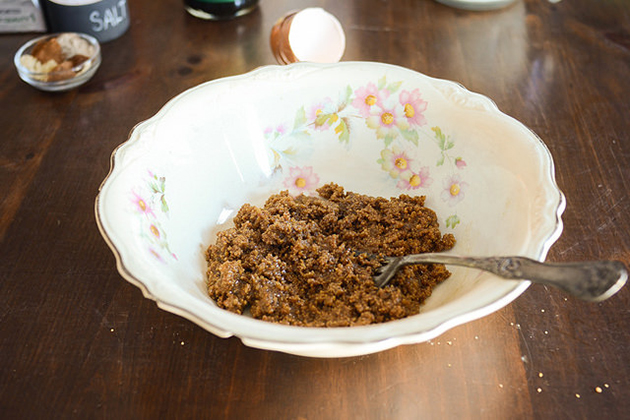
Mix the brown sugar and egg yolks together until smooth. Mine wasn’t very smooth since I used Sucanat.


Tasty Kitchen Blog: Gingerbread Waffles. Guest post by Erica Kastner of Buttered Side Up, recipe submitted by TK member Emily of One Lovely Life.

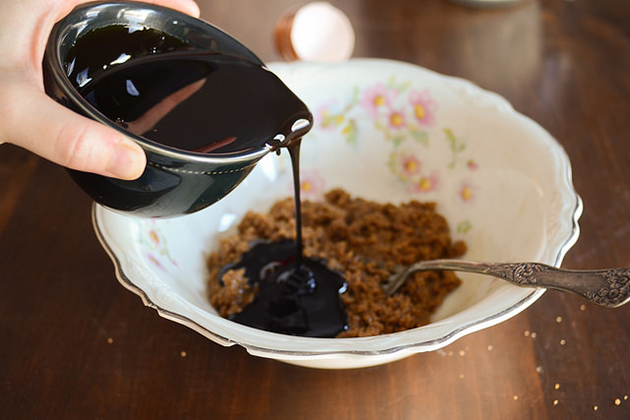
Pour in the molasses …


Tasty Kitchen Blog: Gingerbread Waffles. Guest post by Erica Kastner of Buttered Side Up, recipe submitted by TK member Emily of One Lovely Life.

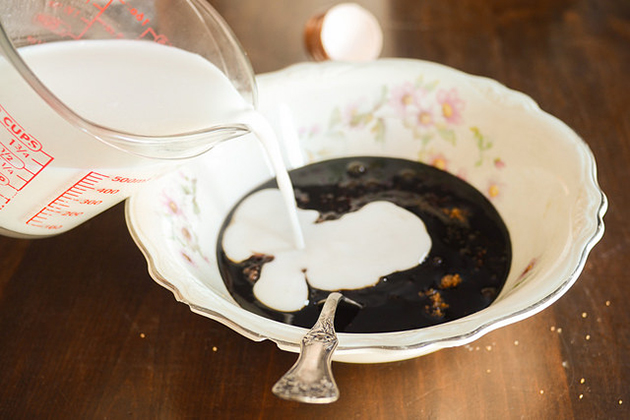
Then the buttermilk …


Tasty Kitchen Blog: Gingerbread Waffles. Guest post by Erica Kastner of Buttered Side Up, recipe submitted by TK member Emily of One Lovely Life.

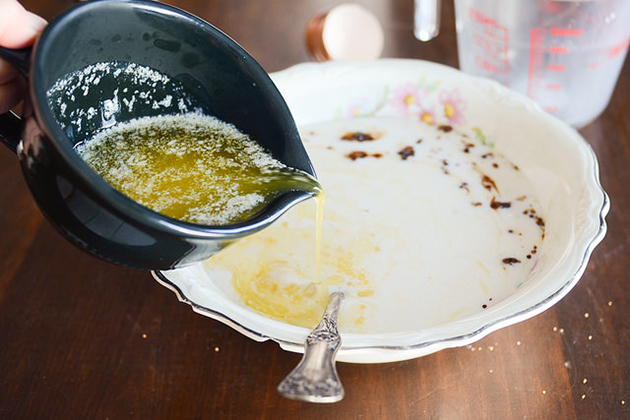
… and finish off with the (melted) butter.


Tasty Kitchen Blog: Gingerbread Waffles. Guest post by Erica Kastner of Buttered Side Up, recipe submitted by TK member Emily of One Lovely Life.

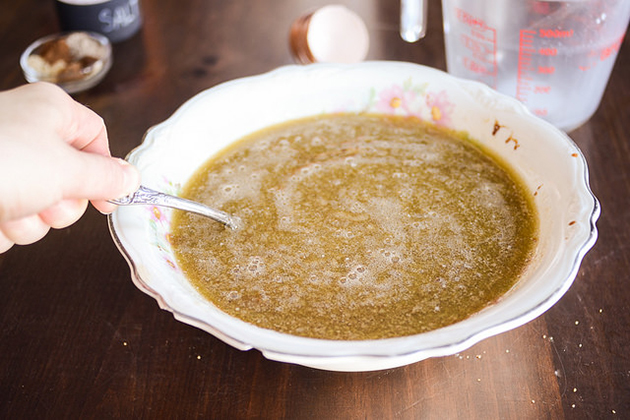
Stir it all together until it’s well combined.


Tasty Kitchen Blog: Gingerbread Waffles. Guest post by Erica Kastner of Buttered Side Up, recipe submitted by TK member Emily of One Lovely Life.

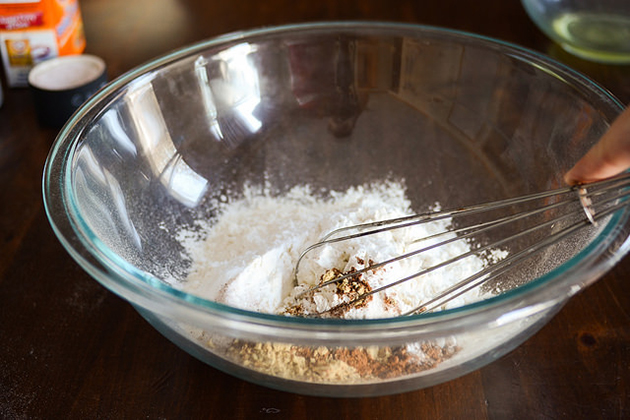
In a large bowl, whisk together the dry ingredients and set aside.


Tasty Kitchen Blog: Gingerbread Waffles. Guest post by Erica Kastner of Buttered Side Up, recipe submitted by TK member Emily of One Lovely Life.

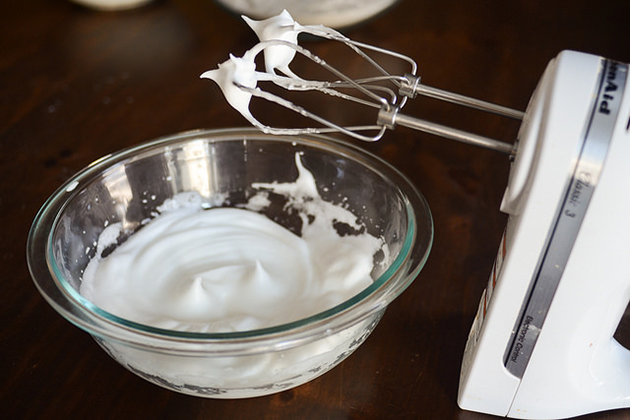
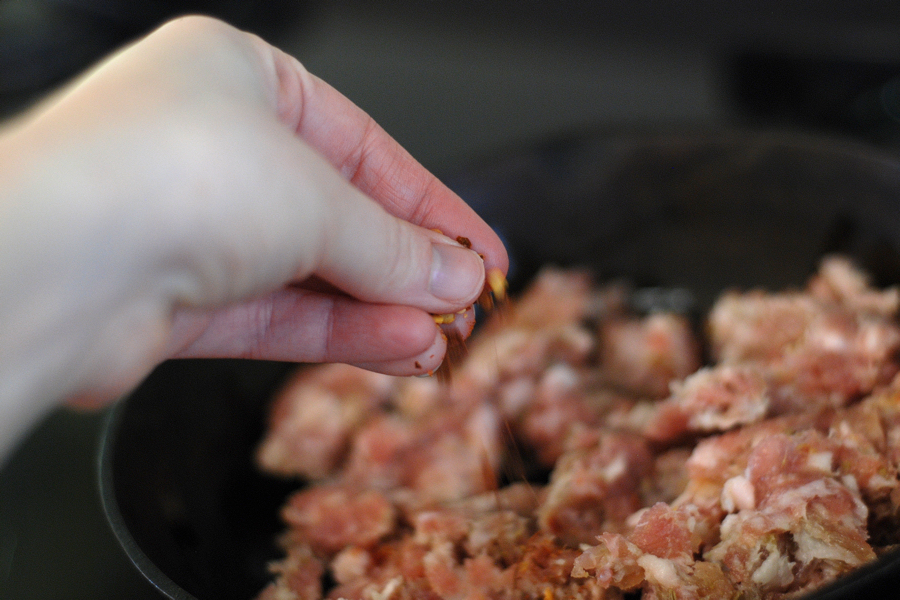
Beat your egg whites until stiff peaks form. I’m pretty sure I went a little too far. I would suggest stopping on the softer side of stiff.


Tasty Kitchen Blog: Gingerbread Waffles. Guest post by Erica Kastner of Buttered Side Up, recipe submitted by TK member Emily of One Lovely Life.

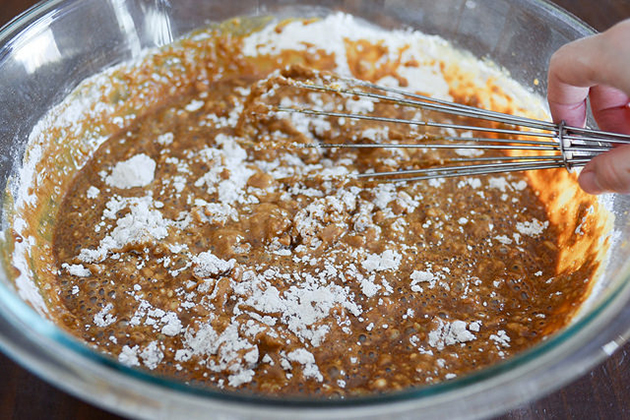
Gently stir the wet ingredients into the dry ingredients.


Tasty Kitchen Blog: Gingerbread Waffles. Guest post by Erica Kastner of Buttered Side Up, recipe submitted by TK member Emily of One Lovely Life.

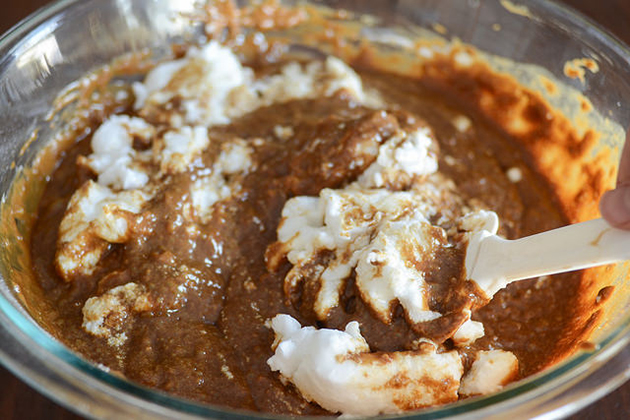
Softly fold the egg whites into the batter.


Tasty Kitchen Blog: Gingerbread Waffles. Guest post by Erica Kastner of Buttered Side Up, recipe submitted by TK member Emily of One Lovely Life.

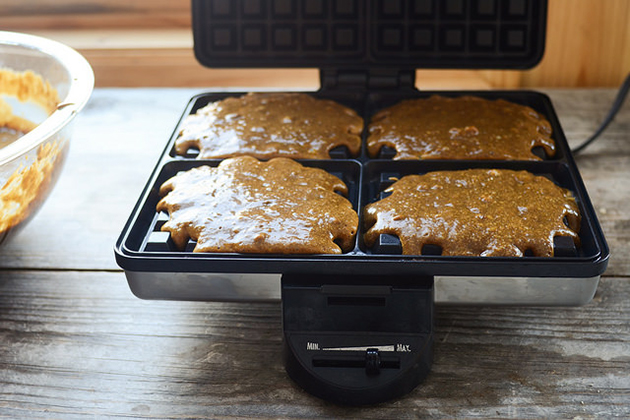
Preheat your waffle iron. Scoop about a third of a cup of batter onto each section (the amount of batter needed will depend on the size of your waffle maker).


Tasty Kitchen Blog: Gingerbread Waffles. Guest post by Erica Kastner of Buttered Side Up, recipe submitted by TK member Emily of One Lovely Life.

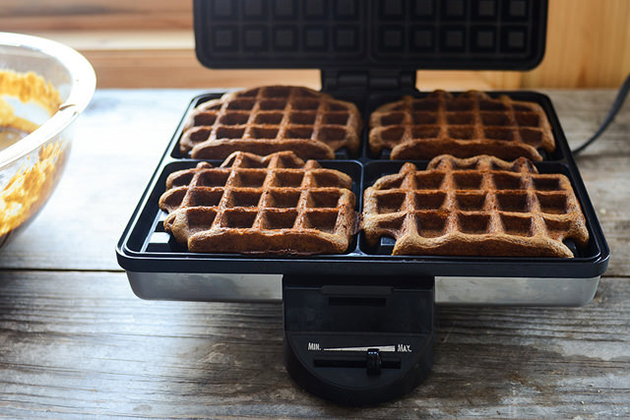
Cook according to the manufacturer’s instructions. It took about 2 1/2 minutes to cook mine.


Tasty Kitchen Blog: Gingerbread Waffles. Guest post by Erica Kastner of Buttered Side Up, recipe submitted by TK member Emily of One Lovely Life.

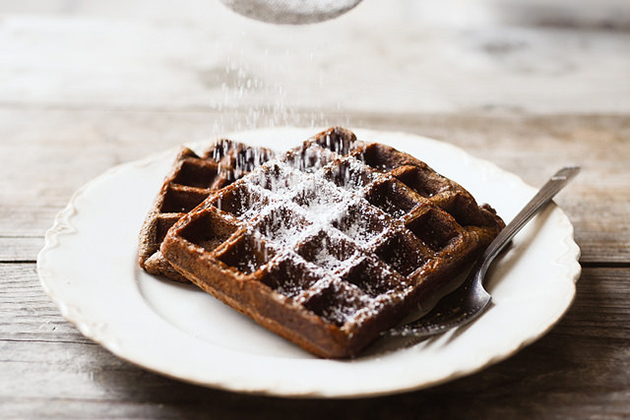
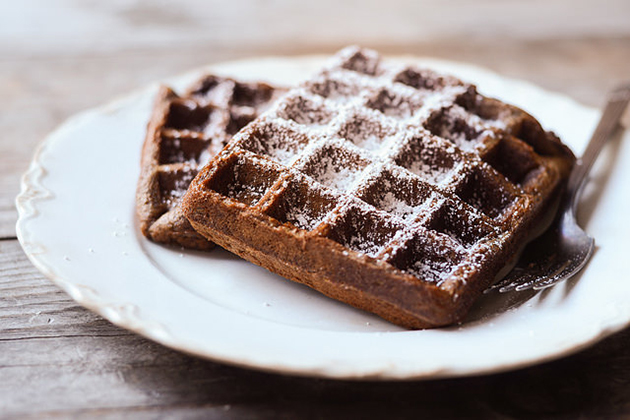
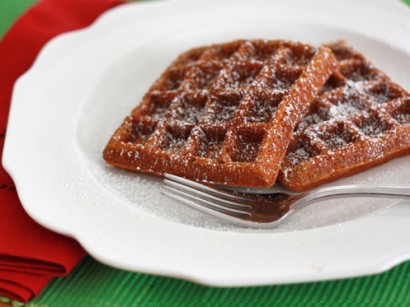
Serve hot with butter (duh) and maple syrup and/or a sprinkling of powdered sugar.

Notes:
1. If there was one thing (slightly) lacking in these waffles, it was the texture. I’m pretty sure it was because I beat the egg whites too long. I would definitely suggest erring on the softer side.
2. The texture and the taste actually improved as these sat. I reheated my waffles in a toaster.
3. I think whipped cream would be a lovely addition. I’m kicking myself for not thinking of it sooner. Oh well, guess I’ll have to make another batch.

Many thanks to Emily for sharing this recipe with us. I have been following her blog, One Lovely Life, for quite some time. There she shares more recipes and bits of her family life. Make sure you check it out!


Printable Recipe

Gingerbread Waffles

See post on emily {onelovelylife}’s site!
4.60 Mitt(s) 5 Rating(s)5 votes, average: 4.60 out of 55 votes, average: 4.60 out of 55 votes, average: 4.60 out of 55 votes, average: 4.60 out of 55 votes, average: 4.60 out of 5

Prep Time:

Cook Time:

Difficulty: Easy

Servings: 8

8
x

Print Options

Page size Letter 3x5 4x6
Text Size Small Medium Large
Content Include description
Include prep time, etc.
Show image

Description

Just like eating Christmas for breakfast. They’re even better with buttermilk syrup.

Ingredients

  • ⅔ cups Brown Sugar
  • 2 whole Large Eggs, Yolks And Whites Separated
  • 1-½ cup Buttermilk (or Regular Milk Plus 1 1/2 Tablespoons Vinegar)
  • ½ cups Molasses
  • 6 Tablespoons Butter
  • 2 cups Flour
  • 3 teaspoons Baking Powder
  • 1 teaspoon Baking Soda
  • 2 teaspoons Ground Ginger
  • 1-½ teaspoon Ground Cinnamon
  • ½ teaspoons Salt
  • ¼ teaspoons Ground Cloves
  • ¼ teaspoons Ground Nutmeg
  • ¼ teaspoons Ground Cardamom (optional, But Recommended)

Preparation Instructions

In a small bowl, mix brown sugar and egg yolks until smooth and creamy. Stir in buttermilk, molasses, and butter.

Into a large bowl, sift together flour, baking powder, baking soda, ginger, cinnamon, salt, cloves, nutmeg, and cardamom.

In a glass or metal bowl, whip egg whites with an electric mixer until stiff peaks have formed.

Add liquid mixture into sifted dry ingredients and stir together. Fold in egg whites.

Cook according to waffle iron instructions.

(In my waffle iron, using 1/3-cup scoops, I made 16 waffles.)


_______________________________________

Erica Kastner has always been one of our most cherished members of the Tasty Kitchen community. She shares her wonderful recipes and amazing food photography on her blog, Buttered Side Up, and she also writes about crafts and posts more of her beautiful photography in her personal blog, Simple Days. There really isn’t much that this amazing young wife and mother can’t do, and we’re thrilled she does some of it here.


Caramel Apple Bread and Butter Pudding

Profile photo of Natalie | Perry's Plate

Gingered Butternut Squash Soup with Beet Slaw

Posted by in Step-by-Step Recipes

Tasty Kitchen Blog: Gingered Butternut Squash Soup. Guest post by Natalie Perry of Perry's Plate, recipe submitted by TK member Julia of The Roasted Root.

 
Friends, this may be the most beautiful soup I’ve ever made. Or photographed. Or eaten. The lovely TK member Julia at The Roasted Root definitely has an eye for color and a wonderful sense for taste. This soup was one of those recipes that grabbed me and wouldn’t let go. 

Luckily, it’s fall. I’d have had a hard time finding a butternut squash in April.


Tasty Kitchen Blog: Gingered Butternut Squash Soup. Guest post by Natalie Perry of Perry's Plate, recipe submitted by TK member Julia of The Roasted Root.

Speaking of butternut squash, if you’ve got one, (carefully) chop it in half. You’ll need a very sharp knife for this. Butternuts don’t give in easily.


Tasty Kitchen Blog: Gingered Butternut Squash Soup. Guest post by Natalie Perry of Perry's Plate, recipe submitted by TK member Julia of The Roasted Root.

Scrape out all of the seeds and slimy stuff.


Tasty Kitchen Blog: Gingered Butternut Squash Soup. Guest post by Natalie Perry of Perry's Plate, recipe submitted by TK member Julia of The Roasted Root.

Drizzle some oil on the insides, and sprinkle it with salt.


Tasty Kitchen Blog: Gingered Butternut Squash Soup. Guest post by Natalie Perry of Perry's Plate, recipe submitted by TK member Julia of The Roasted Root.

Place them face-down in a baking dish and place them in the oven for 40-60 minutes, depending on the size of your squash.


Tasty Kitchen Blog: Gingered Butternut Squash Soup. Guest post by Natalie Perry of Perry's Plate, recipe submitted by TK member Julia of The Roasted Root.

Meanwhile, peel the beets and carrots, cut them into chunks and put them in your food processor.


Tasty Kitchen Blog: Gingered Butternut Squash Soup. Guest post by Natalie Perry of Perry's Plate, recipe submitted by TK member Julia of The Roasted Root.

Buzz them up until the pieces are small and slightly smaller than peas. Transfer to large mixing bowl.

Don’t wash the food processor. (I like how Julia thinks.)


Tasty Kitchen Blog: Gingered Butternut Squash Soup. Guest post by Natalie Perry of Perry's Plate, recipe submitted by TK member Julia of The Roasted Root.

Zest a whole orange.

If you don’t have a Microplane zester, stop what you’re doing and go get one. (Make sure someone is home to watch your roasting squash.) I love mine, and use it all the time!


Tasty Kitchen Blog: Gingered Butternut Squash Soup. Guest post by Natalie Perry of Perry's Plate, recipe submitted by TK member Julia of The Roasted Root.

Add the zest to the beet-carrot mixture.


Tasty Kitchen Blog: Gingered Butternut Squash Soup. Guest post by Natalie Perry of Perry's Plate, recipe submitted by TK member Julia of The Roasted Root.

Cut the apples into large chunks.


Tasty Kitchen Blog: Gingered Butternut Squash Soup. Guest post by Natalie Perry of Perry's Plate, recipe submitted by TK member Julia of The Roasted Root.

Add them to the dirty food processor. (Don’t worry, it’ll all work out in the end.) Also, juice the orange you just zested, right over the apples.

Good grief, I need a manicure. Maybe if I hold out long enough I’ll have pink French tips.


Tasty Kitchen Blog: Gingered Butternut Squash Soup. Guest post by Natalie Perry of Perry's Plate, recipe submitted by TK member Julia of The Roasted Root.

Buzz up the apples an orange juice, and dump it into the bowl with the beets and carrots.

Nope, not time to wash the food processor. Hang tight.


Tasty Kitchen Blog: Gingered Butternut Squash Soup. Guest post by Natalie Perry of Perry's Plate, recipe submitted by TK member Julia of The Roasted Root.

Peel and slice the ginger, and throw the ginger pieces into the food processor with the walnuts.

Process them until you have a chunky, finely chopped mixture.


Tasty Kitchen Blog: Gingered Butternut Squash Soup. Guest post by Natalie Perry of Perry's Plate, recipe submitted by TK member Julia of The Roasted Root.

And … you guessed it. Transfer the mixture into the other bowl, along with some unsweetened coconut.


Tasty Kitchen Blog: Gingered Butternut Squash Soup. Guest post by Natalie Perry of Perry's Plate, recipe submitted by TK member Julia of The Roasted Root.

Over that, add some extra-virgin olive oil, a few pinches of salt, and some toasted sesame seeds.


Tasty Kitchen Blog: Gingered Butternut Squash Soup. Guest post by Natalie Perry of Perry's Plate, recipe submitted by TK member Julia of The Roasted Root.

Mix it all together and you have this incredibly flavorful and vibrant garnish for the soup! I love all of the flavors in this salad.

I think my favorite color is beet, too.


Tasty Kitchen Blog: Gingered Butternut Squash Soup. Guest post by Natalie Perry of Perry's Plate, recipe submitted by TK member Julia of The Roasted Root.

Check on that squash now. You’ll know it’s done when you can easily stick a butter knife into it and the skin starts to turn golden brown.


Tasty Kitchen Blog: Gingered Butternut Squash Soup. Guest post by Natalie Perry of Perry's Plate, recipe submitted by TK member Julia of The Roasted Root.

Scrape out all of that soft, butternutty goodness …


Tasty Kitchen Blog: Gingered Butternut Squash Soup. Guest post by Natalie Perry of Perry's Plate, recipe submitted by TK member Julia of The Roasted Root.

And toss it into your blender. Add some of the chicken stock to help it blend.


Tasty Kitchen Blog: Gingered Butternut Squash Soup. Guest post by Natalie Perry of Perry's Plate, recipe submitted by TK member Julia of The Roasted Root.

Give it a whirl until it’s silky smooth.


Tasty Kitchen Blog: Gingered Butternut Squash Soup. Guest post by Natalie Perry of Perry's Plate, recipe submitted by TK member Julia of The Roasted Root.

Pour it into your favorite soup pot along with a can of coconut milk.


Tasty Kitchen Blog: Gingered Butternut Squash Soup. Guest post by Natalie Perry of Perry's Plate, recipe submitted by TK member Julia of The Roasted Root.

Grate some ginger into the pot. If you still don’t have a Microplane, it’s not too late to get one!


Tasty Kitchen Blog: Gingered Butternut Squash Soup. Guest post by Natalie Perry of Perry's Plate, recipe submitted by TK member Julia of The Roasted Root.

Add the cinnamon and salt. (I think next time I’d halve the cinnamon and double the ginger, but that’s just my taste.)


Tasty Kitchen Blog: Gingered Butternut Squash Soup. Guest post by Natalie Perry of Perry's Plate, recipe submitted by TK member Julia of The Roasted Root.

Add more chicken stock until the soup reaches your desired consistency.


Tasty Kitchen Blog: Gingered Butternut Squash Soup. Guest post by Natalie Perry of Perry's Plate, recipe submitted by TK member Julia of The Roasted Root.

Stir it well and heat it to a low boil.


Tasty Kitchen Blog: Gingered Butternut Squash Soup. Guest post by Natalie Perry of Perry's Plate, recipe submitted by TK member Julia of The Roasted Root.

Ladle this gorgeous soup into some bowls, top with a couple spoonfuls of the salad and a drizzle of coconut milk. (Don’t be like me and photo bomb yourself. Unless you really want to.)


Tasty Kitchen Blog: Gingered Butternut Squash Soup. Guest post by Natalie Perry of Perry's Plate, recipe submitted by TK member Julia of The Roasted Root.

I LOVED this soup. It has such a unique flavor, combined with the salad. Please don’t make this without the salad! I think it really takes the soup to a whole new level. (The recipe for the Beet Slaw can be found in Julia’s site. She credits her friend Jason for finding it on a paleo website.)


Tasty Kitchen Blog: Gingered Butternut Squash Soup. Guest post by Natalie Perry of Perry's Plate, recipe submitted by TK member Julia of The Roasted Root.

Thanks again, Julia (and Jason), for a great cleansing-between-rich-meals recipe for the holidays!

Be sure to check out Julia’s Tasty Kitchen Recipe Box as well as her blog, The Roasted Root, for more tasty, nourishing recipes!


Printable Recipe

Gingered Butternut Squash Soup

See post on Julia {The Roasted Root}’s site!
0.00 Mitt(s) 0 Rating(s)0 votes, average: 0.00 out of 50 votes, average: 0.00 out of 50 votes, average: 0.00 out of 50 votes, average: 0.00 out of 50 votes, average: 0.00 out of 5

Prep Time:

Cook Time:

Difficulty: Easy

Servings: 6

6
x

Print Options

Page size Letter 3x5 4x6
Text Size Small Medium Large
Content Include description
Include prep time, etc.
Show image

Description

Simple roasted butternut squash soup with coconut milk, chicken stock ginger, and cinnamon. Easy, nutritious and dairy-free!

Ingredients

  • 1 whole Butternut Squash, Medium-sized
  • Olive Oil, To Drizzle On Seeds
  • ½ teaspoons Salt, Or To Taste
  • 3 teaspoons Fresh Ginger, Grated
  • ½ teaspoons Ground Cinnamon
  • 2 cups Chicken Or Vegetable Broth
  • 1-½ cup Coconut Milk (full-fat Recommended) Or Almond Milk

Preparation Instructions

Preheat the oven to 375ºF. Cut butternut squash in half lengthwise, scoop out the seeds and lightly drizzle the flesh with olive oil and salt. Place squash in a casserole dish cut-side down and bake for 50 to 60 minutes until flesh is very soft and juices are seeping out.

Allow squash to cool and once cool enough to handle, scoop the flesh out and place it in a blender (discard the skin). Add the remaining ingredients to the blender and blend until completely smooth.

Pour the soup into a pot and heat to a low boil.


_______________________________________

Be sure to check out Natalie’s own beautiful food blog, Perrys’ Plate, where you can see her growing collection of lovely recipes. There’s always something new to see there. Go visit now!


Profile photo of steamykitchen

Globalize Your Pizza

Posted by in Kitchen Talk

Tasty Kitchen Blog: Globalize Your Pizza. Guest post by Jaden Hair of Steamy Kitchen.

 
Restaurant chains like California Pizza Kitchen or Wolfgang Puck’s make a killing out of gourmet pizza creations, and it is pretty fun to explore different flavor combinations that veer off the standard pepperoni and cheese combo. The problem is, most of these gourmet pizza creations are not by the slice. So, if you’ve got a family of four, you’re pretty much stuck with ordering just one or two … and most likely if you’ve got a husband like mine, one of them is bound to be sausage and pepperoni.

Instead of going out to eat pizza, we have pizza parties at home. I know many of you love to make your own pizza dough; sometimes when you’re pinched for time or are lazy (me), another alternative is to buy pre-made flatbreads or naan bread. The naan flatbread is personally my favorite. It’s got that nice satisfying chew similar to pizza crust.

I’ll lay out an entire table full of aspiring pizza toppings, and each person can make their own mini pizza. The kids have a blast assembling their own me!me!mine!domyself! dinner (are your kids in that stage too?).

My husband … well … he’s forced to go all wild and crazy with artisan pepperoni and chicken-apple sausage. What a good sport—he plays along anyway—but I know he’s thinking: “Meat. Woman. Just want plain meat.”

So I wanted to throw out a few global pizza ideas for toppings. All of them start with flatbread brushed with olive oil all over, which is then baked in the oven for 7-10 minutes at 400F.

 
Japanese (photo above)
Sauté a combo of thinly sliced shallots and Japanese mushrooms, like enoki, white beech, shiitake, or king trumpet with a little butter and a touch of soy sauce. Assemble the pizza with a base of shredded cheese and then sauteed mushrooms. Bake and then sprinkle julienned shiso leaf (or a basil/mint combo) on top. Shiso is a Japanese fresh herb also known as perilla.

 
Thai
Saute chicken breast strips with a bit of soy sauce and honey. Assemble the pizza with cheese of choice, then chicken. Bake and top with chopped peanuts, crunchy fresh bean sprouts and fresh cilantro.

 
Moroccan
Brush a thin layer of harissa sauce (a Moroccan red pepper sauce that you can find at gourmet markets) and cheese of choice. Add whole roasted garlic, olives, sliced red bell peppers and maybe sliced dried apricots that have been rehydrated in warm water (and drained). Bake.

 
Argentinean
Hmmm … how about sauté sausage with bell peppers and onions, then assemble the pizza with cheese, followed by the sausage/peppers. Bake and before serving, drizzle just a bit of chimichurri sauce on top.

 
Tell me more! I want to hear your global pizza ideas!

 
Here’s a list of countries. GO!


_______________________________________

Jaden Hair is a food writer, television personality, and food photographer based in Tampa Bay, Florida. Find more of her recipes in her blog, Steamy Kitchen, where you can also read more about Jaden’s new book, The Steamy Kitchen Cookbook, and the rave reviews it’s received!


Profile photo of Erica Lea

Glorious Stuffed Portobello Mushrooms

Posted by in Step-by-Step Recipes

Tasty Kitchen Blog: Glorious Stuffed Portobello Mushrooms. Guest post by Erica Kastner of Cooking for Seven, recipe submitted by TK member Acher.

 
Tender, tasty portobello mushrooms stuffed with flavorful vegetables and spices and sprinkled with cheese. Baked until golden. Hungry yet?

Today’s recipe, brought to us by acher, would be a splendid starter for a dinner or a full course at lunch. The stuffing is hearty and filling, but has a complexity of flavors. White wine, fresh fennel, and Italian sausage all lend lovely notes.

All you need is a few ingredients from the market.


Tasty Kitchen Blog: Glorious Stuffed Portobello Mushrooms. Guest post by Erica Kastner of Cooking for Seven, recipe submitted by TK member Acher.

Portobello mushroom caps, olive oil, white wine or broth, Italian sausage, fennel, onion, bell pepper, celery, garlic, egg, cheese (I used marble jack), sandwich bread (I used homemade), rosemary (I used dried, but you can use fresh), and crushed red pepper flakes.


Tasty Kitchen Blog: Glorious Stuffed Portobello Mushrooms. Guest post by Erica Kastner of Cooking for Seven, recipe submitted by TK member Acher.

Preheat your oven to 450° F. Wipe the mushrooms with a paper towel to remove any dirt.


Tasty Kitchen Blog: Glorious Stuffed Portobello Mushrooms. Guest post by Erica Kastner of Cooking for Seven, recipe submitted by TK member Acher.

Scrape out the gills with a spoon.


Tasty Kitchen Blog: Glorious Stuffed Portobello Mushrooms. Guest post by Erica Kastner of Cooking for Seven, recipe submitted by TK member Acher.

Drizzle some oil in the bottom of a baking dish and place the mushrooms on top. Drizzle a bit of oil on top of the mushrooms. Set aside.


Tasty Kitchen Blog: Glorious Stuffed Portobello Mushrooms. Guest post by Erica Kastner of Cooking for Seven, recipe submitted by TK member Acher.

Brown the sausage over medium-high heat.


Tasty Kitchen Blog: Glorious Stuffed Portobello Mushrooms. Guest post by Erica Kastner of Cooking for Seven, recipe submitted by TK member Acher.

Add a sprinkling of crushed red pepper flakes.


Tasty Kitchen Blog: Glorious Stuffed Portobello Mushrooms. Guest post by Erica Kastner of Cooking for Seven, recipe submitted by TK member Acher.

As the meat is browning, chop up the vegetables: onions …


Tasty Kitchen Blog: Glorious Stuffed Portobello Mushrooms. Guest post by Erica Kastner of Cooking for Seven, recipe submitted by TK member Acher.

Fennel …


Tasty Kitchen Blog: Glorious Stuffed Portobello Mushrooms. Guest post by Erica Kastner of Cooking for Seven, recipe submitted by TK member Acher.

Bell pepper …


Tasty Kitchen Blog: Glorious Stuffed Portobello Mushrooms. Guest post by Erica Kastner of Cooking for Seven, recipe submitted by TK member Acher.

And celery. Whew!


Tasty Kitchen Blog: Glorious Stuffed Portobello Mushrooms. Guest post by Erica Kastner of Cooking for Seven, recipe submitted by TK member Acher.

Slice the garlic very thinly.


Tasty Kitchen Blog: Glorious Stuffed Portobello Mushrooms. Guest post by Erica Kastner of Cooking for Seven, recipe submitted by TK member Acher.

Chop the rosemary finely.


Tasty Kitchen Blog: Glorious Stuffed Portobello Mushrooms. Guest post by Erica Kastner of Cooking for Seven, recipe submitted by TK member Acher.

Add the vegetables and rosemary to the sausage and saute until crisp-tender, about 5-10 minutes.


Tasty Kitchen Blog: Glorious Stuffed Portobello Mushrooms. Guest post by Erica Kastner of Cooking for Seven, recipe submitted by TK member Acher.

Add the wine or broth to deglaze the pan. Cook for about 5 minutes.


Tasty Kitchen Blog: Glorious Stuffed Portobello Mushrooms. Guest post by Erica Kastner of Cooking for Seven, recipe submitted by TK member Acher.

Meanwhile, toast the bread.


Tasty Kitchen Blog: Glorious Stuffed Portobello Mushrooms. Guest post by Erica Kastner of Cooking for Seven, recipe submitted by TK member Acher.

Cut the toasted bread into cubes.


Tasty Kitchen Blog: Glorious Stuffed Portobello Mushrooms. Guest post by Erica Kastner of Cooking for Seven, recipe submitted by TK member Acher.

Stir the bread cubes and cheese into the sausage/veggie mix. The bread will soak up the wine/broth. Taste and add salt and pepper if needed.


Tasty Kitchen Blog: Glorious Stuffed Portobello Mushrooms. Guest post by Erica Kastner of Cooking for Seven, recipe submitted by TK member Acher.

Lightly beat the egg.


Tasty Kitchen Blog: Glorious Stuffed Portobello Mushrooms. Guest post by Erica Kastner of Cooking for Seven, recipe submitted by TK member Acher.

Remove pan from heat and stir in the egg.


Tasty Kitchen Blog: Glorious Stuffed Portobello Mushrooms. Guest post by Erica Kastner of Cooking for Seven, recipe submitted by TK member Acher.

Mound the stuffing mixture into the mushroom caps.


Tasty Kitchen Blog: Glorious Stuffed Portobello Mushrooms. Guest post by Erica Kastner of Cooking for Seven, recipe submitted by TK member Acher.

Sprinkle with a bit of extra cheese.


Tasty Kitchen Blog: Glorious Stuffed Portobello Mushrooms. Guest post by Erica Kastner of Cooking for Seven, recipe submitted by TK member Acher.

Bake in preheated oven for 30-40 minutes or until the mushrooms are tender and the stuffing is browned.


Tasty Kitchen Blog: Glorious Stuffed Portobello Mushrooms. Guest post by Erica Kastner of Cooking for Seven, recipe submitted by TK member Acher.

Glorious.

Notes:

1. There was much more stuffing than could fill two mushroom caps. Thankfully I had some baby bellas on hand to fill.
2. I found that I only needed to cook the mushrooms for around 25 minutes. You should set your timer to 15 minutes and check the mushrooms every so often so they don’t burn.

 
Thank you, acher, for sharing this delicious recipe with us!


Printable Recipe

Glorious Stuffed Portobello Mushrooms

5.00 Mitt(s) 3 Rating(s)3 votes, average: 5.00 out of 53 votes, average: 5.00 out of 53 votes, average: 5.00 out of 53 votes, average: 5.00 out of 53 votes, average: 5.00 out of 5

Prep Time:

Cook Time:

Difficulty: Easy

Servings: 4

4
x

Print Options

Page size Letter 3x5 4x6
Text Size Small Medium Large
Content Include description
Include prep time, etc.
Show image

Description

What to do when you have odds and ends of veggies and two beautiful portobello caps? Make stuffed mushrooms of course! The amount of filling in this recipe will stuff two large portobello caps, and easily feeds 4 with a loaf of crusty bread and a salad.

Ingredients

  • 2 whole Portobello Mushroom Caps
  • Olive Oil
  • ½ pounds Bulk Italian Sausage, Or Links With Casings Removed
  • 2 teaspoons Crushed Red Pepper Flakes
  • 1 whole Onion
  • 1 bulb Fresh Fennel
  • 1 whole Bell Pepper, Any Color
  • 3 stalks Celery, With Leaves
  • 4 cloves Garlic
  • 3 sprigs Rosemary
  • ¾ cups White Wine (can Substitute Stock/broth)
  • ½ cups Shredded Monterey Jack, Plus Extra For Sprinkling
  • 4 slices Good Sandwich Bread, Toasted And Cubed
  • 1 whole Egg, Lightly Beaten

Preparation Instructions

Preheat oven to 450F.

Wipe the portobellos clean with a paper towel and scrape out the gills with a spoon. Drizzle enough olive oil in the bottom of a glass baking dish to coat. Place portobello caps in the baking dish, top down, drizzle with oil, and set aside.

Brown sausage in a large skillet with a little bit of olive oil and the crushed red pepper over medium high heat.

While the sausage is browning, dice the onion, fennel, and bell pepper, chop the celery, and slice the garlic as thin as you can get it.

Remove the rosemary leaves from the stems and finely chop. Add the veggies and garlic and rosemary to the skillet and saute with the sausage until crisp-tender, about 5-7 minutes.

Add the wine to deglaze the pan and allow to cook for another 5 minutes or so.

Stir in the shredded cheese and bread cubes. The bread cubes should soak up whatever wine remains in the pan.

Taste it at this point, and add salt and freshly ground black pepper to taste (or more red pepper!). Stir in the beaten egg. The stuffing mixture should seem a little wet.

Mound stuffing mixture into portobello caps. It’s ok to pack it down a little bit to make sure that it stays in place.

Sprinkle with a little extra shredded cheese. Bake at 450F for 35-40 minutes, or until the portobello is tender and the stuffing is golden brown.


_______________________________________

Erica Berge shares her wonderful recipes and amazing food photography on her blog, Cooking for Seven. She also writes about crafts and posts more of her beautiful photography in her personal blog, EricaLea.com. There really isn’t much that this amazing young lady can’t do, and we’re thrilled she does some of it here.


Profile photo of Natalie | Perry's Plate

Gluten-Free Apple, Ginger and Spice Scones

Posted by in Baking, Step-by-Step Recipes

  As far as gluten-free baked goods go, these are seriously the bomb. We’re not an entirely gluten-free household, but occasionally I like to play with almond meal in baked goods. I love the rich, nutty (but not too nutty) flavor it imparts. And you can’t beat the nutritional benefits of almonds. These Gluten-Free Apple, […]

Profile photo of georgiapellegrini

Gluten-Free Coconut Muffins

Posted by in Baking, Step-by-Step Recipes

  I tend to go for savory foods over sweet ones, but these Gluten Free Coconut Muffins from Tasty Kitchen member Julia really had me going back for more. They’re not too sweet, and filled with healthy coconut and rich olive oil. Eat them for breakfast or on the go, they’re very satisfying.     […]

Profile photo of HowSweetEats

Gooey Butter Cake

Posted by in Baking, Step-by-Step Recipes

Note from Ree: I’m so excited to welcome Jessica from HowSweetEats as a new contributor here on Tasty Kitchen. Jessica’s bulging recipe box (149 recipes, anyone?) is a goldmine of deliciousness, and a testament to Jessica’s love for cooking and baking. For her inaugural post, Jessica brings us the step-by-step instructions for this Gooey Butter…

Profile photo of Erika (TK)

Got Ham?

Posted by in Holidays, The Theme Is...

For the folks who celebrate Easter Sunday, the Monday after usually finds them with a stuffed fridge, often with an entire shelf devoted to housing what’s left of an enormous Easter ham. Easter Ham. Easter eggs. Ham and eggs seem to always make a joint appearance, don’t they? Now, you can always take a cue […]