The Pioneer Woman Tasty Kitchen
Profile photo of Ree | The Pioneer Woman

Tomato Soup Cake!

Posted by in Baking, Step-by-Step Recipes

This cake recipe was submitted to Tasty Kitchen by Tanya Hollas, and the second I saw it I knew I wanted to give it a try someday.

I mean…cake? With tomato soup? How delightfully different and rebellious.

Here’s how it went down.

 
TPW_4114

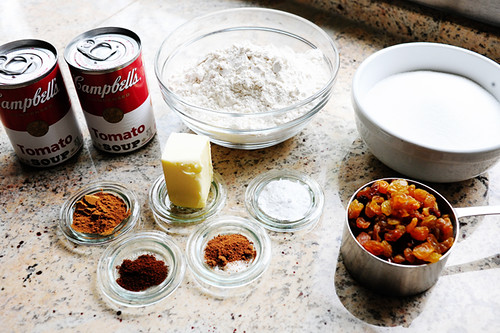
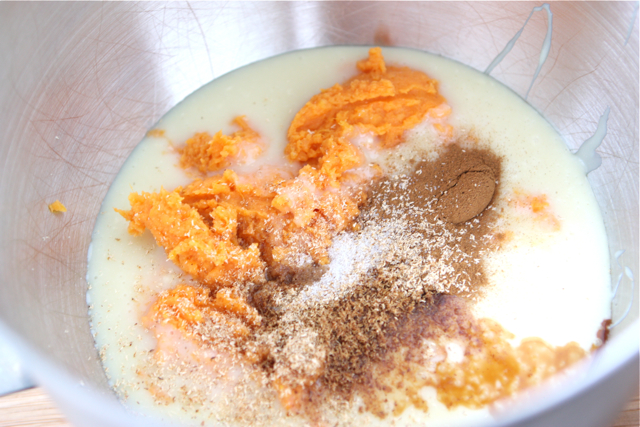
Here’s what you need: Tomato Soup (yes, you heard me), flour, sugar, butter, cinnamon, nutmeg, ground cloves, baking soda, and golden raisins (optional!)


TPW_4117

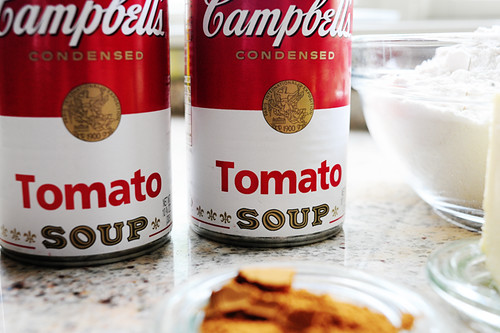
First thing you need to do is dump the tomato soup into a bowl. The world’s gone crazy!


TPW_4121

Add the baking soda to the tomato soup…


TPW_4125

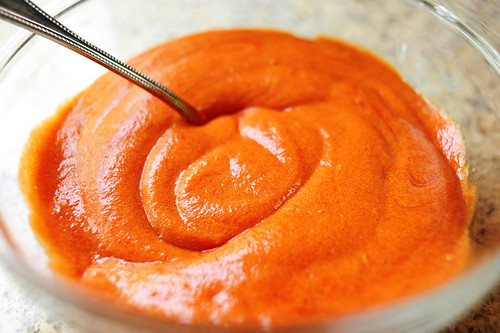
And stir it to combine. It almost becomes foamy right off the bat because of the acid/baking soda mix!


TPW_4127

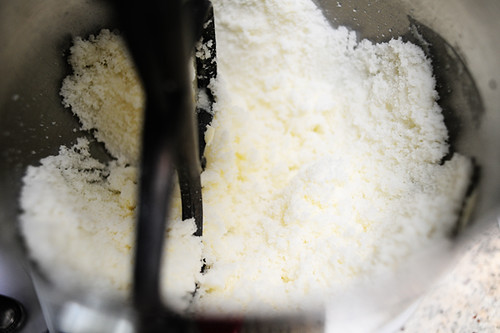
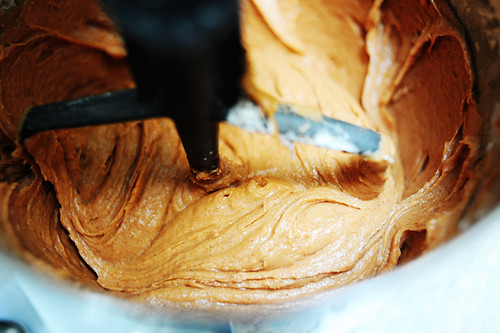
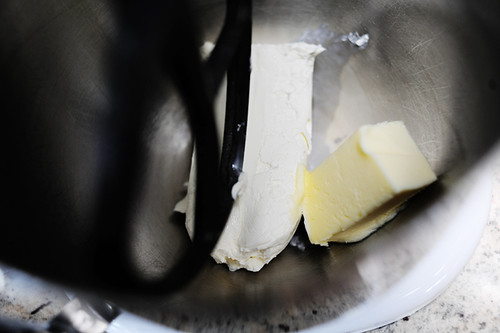
In the bowl of an electric mixer, beat together the butter and sugar. There’s really not much butter in this cake, so it won’t be an overly creamy combination at this point.


TPW_4131

Dump in the tomato soup/baking soda mixture…


TPW_4134

And mix it together, which results in a really freaky-looking mixture.


TPW_4137

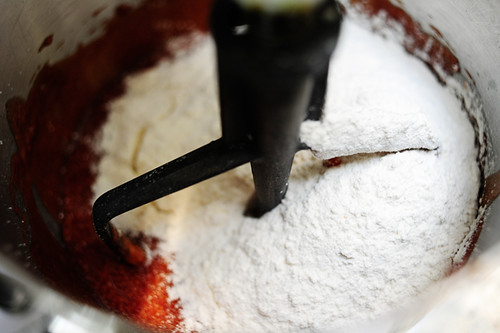
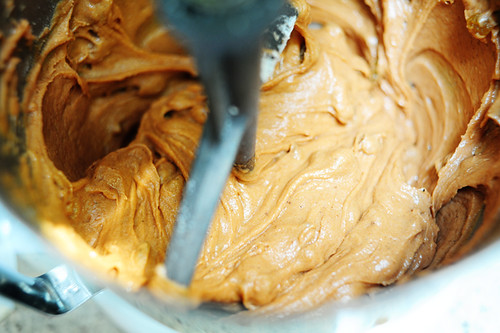
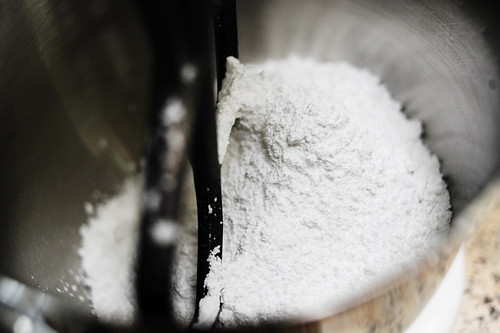
Next, dump in the flour…


TPW_4140

And mix it until just combined.


TPW_4144

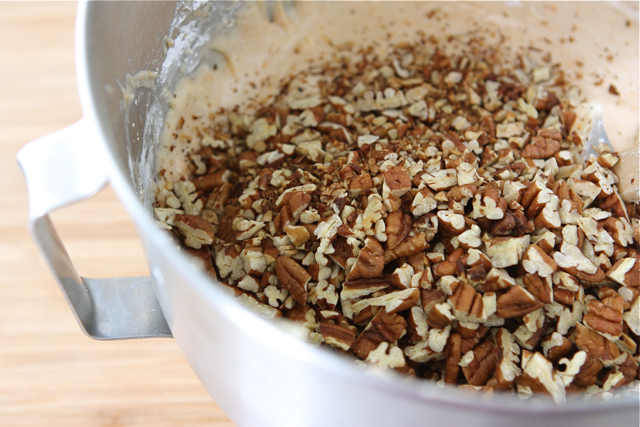
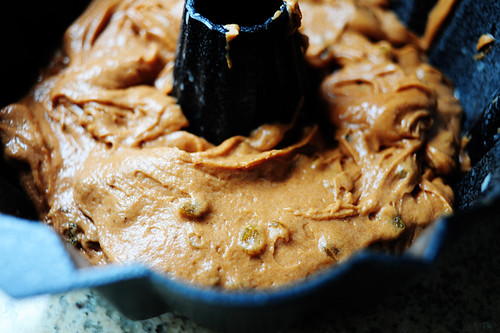
I took the liberty of adding in a cup of golden raisins. I thought it was the right thing to do.


TPW_4148

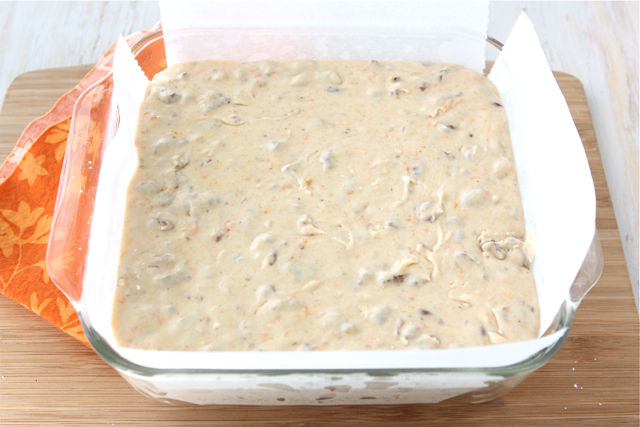
Mix it together until the raisins are evenly distributed…and that’s it! This is a really simple cake—no eggs, very little butter.


TPW_4153

Thoroughly grease a bundt pan. I sprayed the heck out of mine with baking spray—there’s nothing worse than having a cake partially stick to the pan.


TPW_4155

Pour the batter into the bundt pan—it’s a little thick, so you’ll have to spoon it in.


TPW_4160

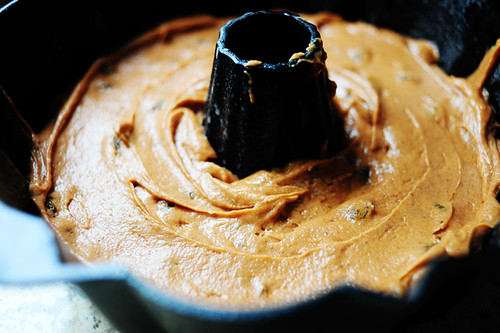
Use a spoon or flat spatula to even out the surface, then pop it in the oven for 45 to 55 minutes, or until no longer jiggly.
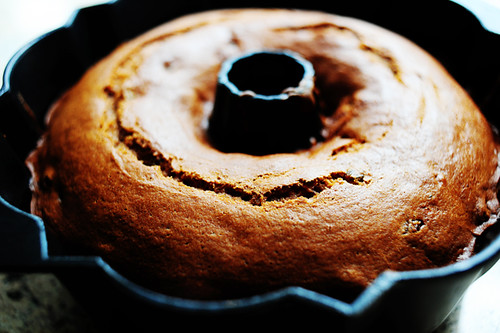


TPW_4162

Pouf! There ’tis!


TPW_4165

Isn’t the color gorgeous?


TPW_4181

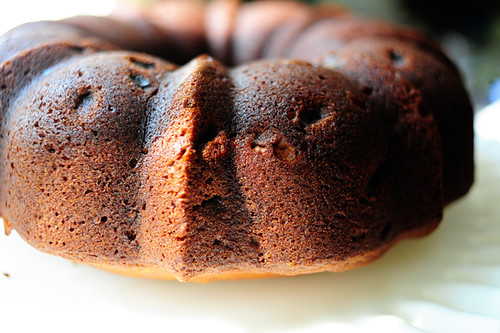
Turn it onto a cake plate or platter and let it cool completely before icing.


TPW_4174

And speaking of icing…

I made my own, but there’s also a cream cheese icing recipe included with the tomato cake recipe. You can’t go wrong—just mix cream cheese and powdered sugar in a bowl and good things will happen.


TPW_4175

I did a package of cream cheese, half a stick of butter, and about a pound and a half of powdered sugar.


TPW_4177

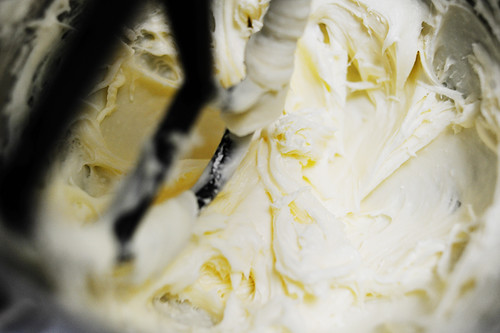
Mix it all together until it’s creamy and smooth.


TPW_4185

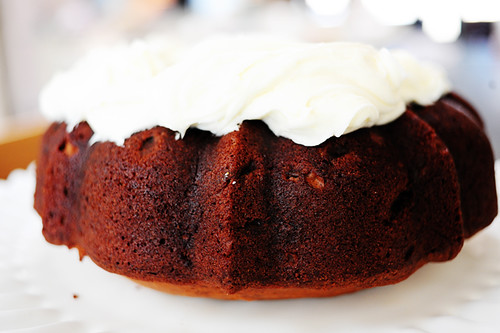
Heap the icing on top of the cooled cake…


TPW_4189

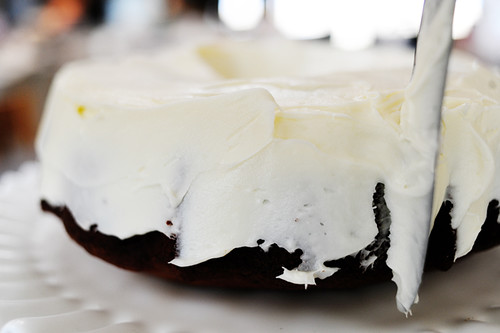
Smear and swipe and smooth until the cake is evenly covered.


TPW_4211

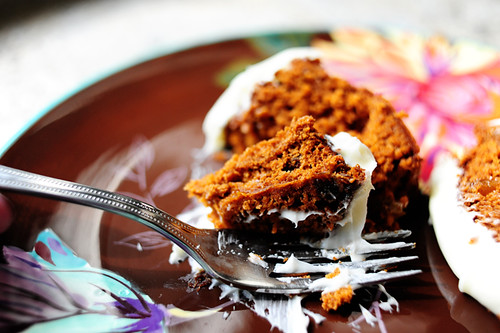
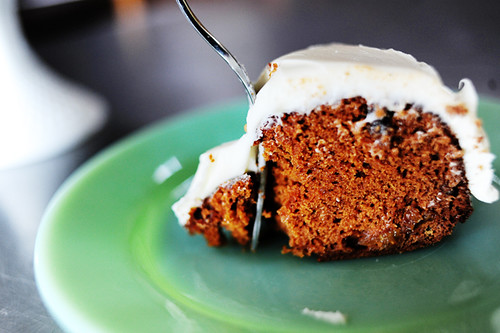
Then cut right into it. No one’s watching!


TPW_4202

Confession: my cake was still a tad warm when I iced it.


TPW_4203

But when it comes to baked goods, I have a problem with patience.


TPW_4221

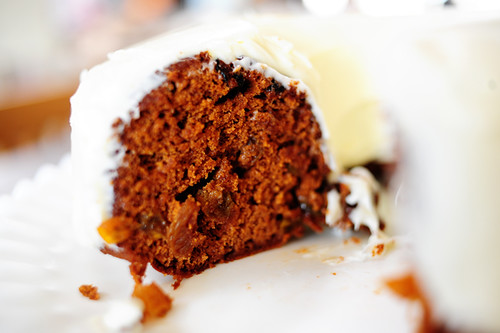
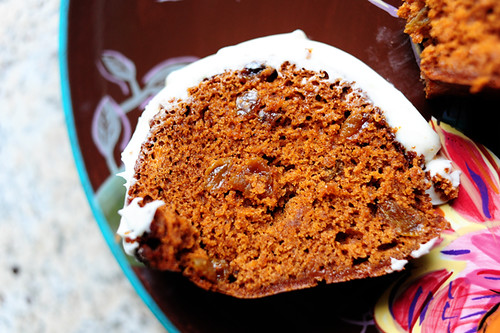
Is this not gorgeous?
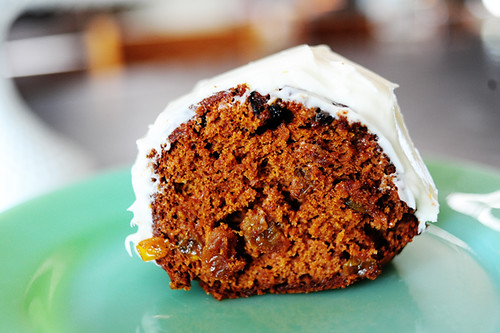


TPW_4226

Is this not lovely?


TPW_4227

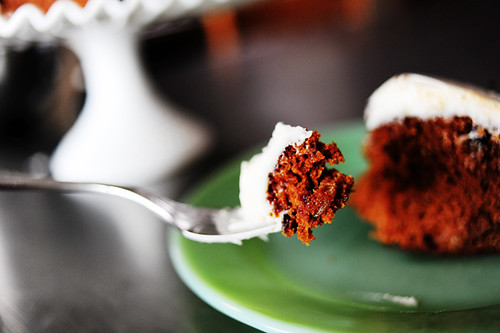
Is this not tempting? Yum.

 
VERDICT: As I suspected it would be, the cake was really delicious. While you can still detect the tomato soup scent in the batter, once the cake is baked the tomato qualities are replaced by the spices…and it really does wind up as a richly colored spice cake. If you’re sensitive to the spices in the cake, you could easily pull back just a bit on quantities—particularly on the ground cloves—as the flavor really was powerful and strong! I loved everything about it, though, and thought the cream cheese icing was the perfect balance. Note that this cake does not contain eggs—perfect for egg-sensitive human-types.

Try it sometime soon—and this is the key: don’t tell anyone what the ingredients are until after they’ve tasted it.

That’s one of my favorite activities!


Here’s the printable recipe for the cake. Note that I substituted butter for Crisco; I think I might try shortening next time.


Tomato Soup Cake with Cream Cheese Frosting

Thank you, Tanya Hollas, for sharing!

Profile photo of Ree | The Pioneer Woman

Individual Scalloped Potatoes with Ham!

Posted by in Step-by-Step Recipes

I first made Tasty Kitchen member The Noshery’s Individual Scalloped Potatoes during a day last year when I had some guests over to cook. We selected two Tasty Kitchen recipes to make together (you can read about the fun here) and wound up loving these nifty little layered potato dish, made in muffin tins. So yesterday, when I had a chunk of ham in my fridge and needed a clever way to use it up, I thought of The Noshery’s recipe.

Here’s how I made it.

 
Tasty Kitchen Blog: Individual Scalloped Potatoes with Ham. Post by Ree Drummond, recipe submitted by TK member Meseidy of The Noshery.

Here’s what you need: ham, potatoes, cheddar cheese, green onions, salt, pepper, green onions, half & half, and butter.


Tasty Kitchen Blog: Individual Scalloped Potatoes with Ham. Post by Ree Drummond, recipe submitted by TK member Meseidy of The Noshery.

First thing you need to do is nuke some russet potatoes for 10 to 15 minutes. They need to be partially cooked but still firm (not mushy and falling apart.)

(Ignore the greenness of my potatoes. Pretend you didn’t see it. I avoided the green parts in the finished dish, and besides that, a 100-pound human would have to eat a fully green potato that weighed 1 pound in order to see any signs of stomach upset—and pounds and pounds of fully green potatoes before more detrimental effects would start to show up. Again: pretend you didn’t see it!)


Tasty Kitchen Blog: Individual Scalloped Potatoes with Ham. Post by Ree Drummond, recipe submitted by TK member Meseidy of The Noshery.

Cut the ham into slices, then cut the slices into strips…


Tasty Kitchen Blog: Individual Scalloped Potatoes with Ham. Post by Ree Drummond, recipe submitted by TK member Meseidy of The Noshery.

Then cut the strips into small cubes.

Small is the key!


Tasty Kitchen Blog: Individual Scalloped Potatoes with Ham. Post by Ree Drummond, recipe submitted by TK member Meseidy of The Noshery.

Then slice up the green onions and grate up the cheese.


Tasty Kitchen Blog: Individual Scalloped Potatoes with Ham. Post by Ree Drummond, recipe submitted by TK member Meseidy of The Noshery.

You want to put half a pat of butter into the bottom of each muffin cup, so cut half a stick of butter into twelve equal “half-pats”.


Tasty Kitchen Blog: Individual Scalloped Potatoes with Ham. Post by Ree Drummond, recipe submitted by TK member Meseidy of The Noshery.

Next, set a slice of nuked potato on top of each half-pat of butter.


Tasty Kitchen Blog: Individual Scalloped Potatoes with Ham. Post by Ree Drummond, recipe submitted by TK member Meseidy of The Noshery.


Tasty Kitchen Blog: Individual Scalloped Potatoes with Ham. Post by Ree Drummond, recipe submitted by TK member Meseidy of The Noshery.

Sprinkle each slice with salt and pepper.


Tasty Kitchen Blog: Individual Scalloped Potatoes with Ham. Post by Ree Drummond, recipe submitted by TK member Meseidy of The Noshery.


Tasty Kitchen Blog: Individual Scalloped Potatoes with Ham. Post by Ree Drummond, recipe submitted by TK member Meseidy of The Noshery.

Sprinkle in the finely diced ham…


Tasty Kitchen Blog: Individual Scalloped Potatoes with Ham. Post by Ree Drummond, recipe submitted by TK member Meseidy of The Noshery.

Green onions…


Tasty Kitchen Blog: Individual Scalloped Potatoes with Ham. Post by Ree Drummond, recipe submitted by TK member Meseidy of The Noshery.


Tasty Kitchen Blog: Individual Scalloped Potatoes with Ham. Post by Ree Drummond, recipe submitted by TK member Meseidy of The Noshery.

And cheese.


Tasty Kitchen Blog: Individual Scalloped Potatoes with Ham. Post by Ree Drummond, recipe submitted by TK member Meseidy of The Noshery.

Then repeat the layers: potato slice…


Tasty Kitchen Blog: Individual Scalloped Potatoes with Ham. Post by Ree Drummond, recipe submitted by TK member Meseidy of The Noshery.

Ham…


Tasty Kitchen Blog: Individual Scalloped Potatoes with Ham. Post by Ree Drummond, recipe submitted by TK member Meseidy of The Noshery.

Scallions and cheese…


Tasty Kitchen Blog: Individual Scalloped Potatoes with Ham. Post by Ree Drummond, recipe submitted by TK member Meseidy of The Noshery.

And another half-pat of butter.

Yes. You heard me.


Tasty Kitchen Blog: Individual Scalloped Potatoes with Ham. Post by Ree Drummond, recipe submitted by TK member Meseidy of The Noshery.

And finally—yes, this is really happening—a teaspoon of half and half over the whole thing.


Tasty Kitchen Blog: Individual Scalloped Potatoes with Ham. Post by Ree Drummond, recipe submitted by TK member Meseidy of The Noshery.

And that’s it, baby! Pop ‘em into the oven for about 20 to 25 minutes.


Tasty Kitchen Blog: Individual Scalloped Potatoes with Ham. Post by Ree Drummond, recipe submitted by TK member Meseidy of The Noshery.

Pull them out when the cheese is nice and bubbly. Then faint right there on the spot.


Tasty Kitchen Blog: Individual Scalloped Potatoes with Ham. Post by Ree Drummond, recipe submitted by TK member Meseidy of The Noshery.

And they’re…delicious! You can serve a couple of them with a big green salad for lunch or dinner, or you can do what I did on the Monday after Easter: served ‘em right next to a big, juicy steak!

Yes. You heard me.

Enjoy these! They’re a fun way to use up your ham and they’re really fun to make.

Thank you to The Noshery for the inspiration!

(Here’s Noshery’s original recipe here on Tasty Kitchen. Just add in the diced ham and follow the rest of the recipe as is: Individual Scalloped Potatoes, by The Noshery – Printable Recipe.)

Profile photo of cookincanuck

Sweet Potato Fudge

Posted by in Step-by-Step Recipes

Tasty Kitchen Blog: Sweet Potato Fudge. Guest post by Dara Michalski of Cookin' Canuck, recipe submitted by TK member Lauren of Lauren's Latest.

 
When I hear “fudge,” I immediately think of the holidays. When cut into bite-sized pieces, it makes the perfect gift to hand out to neighbors or a lovely welcome hostess gift when you arrive at a cocktail or dinner party. It also makes for an addictive little treat that you want to pop into your mouth whenever you pass by the fridge. As much as I try to convince myself that it is calorie-free, the seams on my jeans tell a different story. Ah well, that’s what the holiday are all about—those treats that we get to indulge in once a year.

This recipe for Sweet Potato Fudge is brought to us by Tasty Kitchen member, Lauren’s Latest. The sweet potatoes are mashed and mixed with white chocolate and toasted pecans for a seasonal treat that not only comes together quickly, but will make your family very happy.

Now, let’s get started.


Tasty Kitchen Blog: Sweet Potato Fudge. Guest post by Dara Michalski of Cookin' Canuck, recipe submitted by TK member Lauren of Lauren's Latest.

First, line an 8- by 8-inch square baking pan with waxed or parchment paper. Use extra paper so that there are 2 to 3 extra inches on each side. These “handles” will make it easier to lift the fudge out of the pan later. I like to coat the pan with cooking spray first so the parchment paper lies flat against the pan. It’s not necessary, but it satisfies my need for order in my baking pan. Don’t judge.


Tasty Kitchen Blog: Sweet Potato Fudge. Guest post by Dara Michalski of Cookin' Canuck, recipe submitted by TK member Lauren of Lauren's Latest.

The first thing you will need to do is to boil or steam some sweet potato chunks (peeled) until soft and then mash them with the back of a fork. Set aside to cool.


Tasty Kitchen Blog: Sweet Potato Fudge. Guest post by Dara Michalski of Cookin' Canuck, recipe submitted by TK member Lauren of Lauren's Latest.

While the sweet potato is cooking, place the pecans pieces into a medium frying pan set over medium heat and toast the pecans. Be sure to watch them. Those little suckers like to burn as soon as you turn your back.


Tasty Kitchen Blog: Sweet Potato Fudge. Guest post by Dara Michalski of Cookin' Canuck, recipe submitted by TK member Lauren of Lauren's Latest.

In a medium-sized bowl, combine the white chocolate chips, sweetened condensed milk and butter. Now that sounds like a perfect holiday baking list.

Place the bowl in the microwave and, in 15-second increments, heat the mixture until melted and smooth when stirred. When I am using the microwave to heat chocolate mixtures, I typically use 50% power so that the chocolate doesn’t seize.


Tasty Kitchen Blog: Sweet Potato Fudge. Guest post by Dara Michalski of Cookin' Canuck, recipe submitted by TK member Lauren of Lauren's Latest.

Pour the chocolate mixture into the bowl of a stand mixer. Add the mashed sweet potatoes, vanilla extract, ground cinnamon and salt. As per Lauren’s suggestion under her Recipe Notes, I also added ½ teaspoon of freshly ground nutmeg because it screams “holidays” to me.

Add half of the powdered sugar to the mixer bowl and mix until combined. Scrape the sides with a rubber spatula and mix again.


Tasty Kitchen Blog: Sweet Potato Fudge. Guest post by Dara Michalski of Cookin' Canuck, recipe submitted by TK member Lauren of Lauren's Latest.

With the mixer running, add the remaining powdered sugar, ½ cup at a time, until fully incorporated.


Tasty Kitchen Blog: Sweet Potato Fudge. Guest post by Dara Michalski of Cookin' Canuck, recipe submitted by TK member Lauren of Lauren's Latest.

Remove the bowl from the mixer. Pour in the toasted pecan pieces and mix by hand with a rubber spatula.


Tasty Kitchen Blog: Sweet Potato Fudge. Guest post by Dara Michalski of Cookin' Canuck, recipe submitted by TK member Lauren of Lauren's Latest.

Transfer the fudge mixture to the prepared baking pan, press down until even and smooth the top.

Refrigerate until the fudge has hardened. The recipe calls for the fudge to be chilled for 2 hours, but I left it in my refrigerator overnight to make sure it was fully set.


Tasty Kitchen Blog: Sweet Potato Fudge. Guest post by Dara Michalski of Cookin' Canuck, recipe submitted by TK member Lauren of Lauren's Latest.

Using the waxed or parchment paper “handles” lift the fudge out of the pan and peel off the paper. Use a sharp knife to cut into squares and serve. Store extra pieces in the refrigerator.


Tasty Kitchen Blog: Sweet Potato Fudge. Guest post by Dara Michalski of Cookin' Canuck, recipe submitted by TK member Lauren of Lauren's Latest.

In the recipe, Lauren mentioned that this fudge can also be made using a 9- by 13-inch baking pan to achieve thinner pieces. Next time I make this recipe (and I can assure that there will definitely be a next time), I plan to do this so the fudge pieces are a little smaller.

I am sending a huge “thank you” to Lauren for a recipe that is sure to become a holiday favorite for my family. Be sure to check out Lauren’s large selection of fantastic recipes at her blog, Lauren’s Latest.


Printable Recipe

Sweet Potato Fudge

5.00 Mitt(s) 3 Rating(s)3 votes, average: 5.00 out of 53 votes, average: 5.00 out of 53 votes, average: 5.00 out of 53 votes, average: 5.00 out of 53 votes, average: 5.00 out of 5

Prep Time:

Cook Time:

Difficulty: Easy

Servings: 24

24
x

Print Options

Page size Letter 3x5 4x6
Text Size Small Medium Large
Content Include description
Include prep time, etc.
Show image

Description

Spicy, sweet, crunchy, delicious and a little out of the ordinary. Makes for a fabulous after dinner treat around the holidays.

Ingredients

  • 1 cup White Chocolate Chips
  • ¼ cups Butter
  • 1 can Sweetened Condensed Milk (14 Oz)
  • ¾ cups Mashed Sweet Potato
  • 1 teaspoon Vanilla Extract
  • ¾ teaspoons Cinnamon
  • ⅛ teaspoons Salt
  • 8 cups Powdered Sugar
  • 2 cups Toasted Chopped Pecans

Preparation Instructions

Line an 8×8 glass dish with waxed paper and set aside, if desired.

In a large bowl, melt white chocolate, butter and sweetened condensed milk together until smooth in consistency. (I do this in 15 second increments in the microwave.) Once melted, pour into the bowl of a stand mixer and stir in sweet potato, vanilla, cinnamon, salt and half of the powdered sugar. Scrape the sides and mix again. With the machine on, add in remaining powdered sugar by the 1/2 cup until all is incorporated. Fudge should look very thick but still sticky. Pour in nuts and stir them in by hand. Pour into prepared pan and smooth the top.

Refrigerate until fudge has hardened, about 2 hours. Remove fudge from refrigerator and using the waxed paper edges, remove entire block of fudge. Using a sharp knife, cut into small squares. Serve.

Recipe Notes:
– Feel free to add in any other spices you’d like. Nutmeg and/or cloves would be a nice addition.
-I like a thick fudge, but if you would prefer a thinner piece, pour fudge into a 9×13 pan.


_______________________________________

Dara Michalski is a doll and a sweetheart who clearly knows her way around the kitchen. She blogs at Cookin’ Canuck, where she shares her flavor-packed recipes and fun, engaging writing. The photography’s pretty incredible, too.


Profile photo of georgiapellegrini

Scottish Oat Cakes

Posted by in Baking, Step-by-Step Recipes

Tasty Kitchen Blog: Scottish Oat Cakes. Guest post by Georgia Pellegrini, recipe submitted by TK member Movita Beaucoup.

 
This is my second recipe post here inspired by someone’s grandmother. I just love it, I could cook this way all day long. Before I realized these Scottish Oat Cakes were from Movita’s grammie, I thought to myself, “These remind me so much of my great-aunt’s cookies.” It is simple rolled oats combined with that very simple texture and crunch—the pure, understated oat cookie of that generation. I was so excited to make these.


Tasty Kitchen Blog: Scottish Oat Cakes. Guest post by Georgia Pellegrini, recipe submitted by TK member Movita Beaucoup.

To make these yourself, you’ll need: flour, rolled oats, baking soda, salt, white sugar, brown sugar, and cold butter (or lard! Mmm).


Tasty Kitchen Blog: Scottish Oat Cakes. Guest post by Georgia Pellegrini, recipe submitted by TK member Movita Beaucoup.

Start by combining all of the dry ingredients in a bowl, everything but the butter.


Tasty Kitchen Blog: Scottish Oat Cakes. Guest post by Georgia Pellegrini, recipe submitted by TK member Movita Beaucoup.

Mix it thoroughly with a whisk, or my favorite tool: your hands!


Tasty Kitchen Blog: Scottish Oat Cakes. Guest post by Georgia Pellegrini, recipe submitted by TK member Movita Beaucoup.

Add the butter and incorporate that as well.


Tasty Kitchen Blog: Scottish Oat Cakes. Guest post by Georgia Pellegrini, recipe submitted by TK member Movita Beaucoup.

This is where your hands are especially useful because you want to mix this butter in quickly and create a sandy texture.


Tasty Kitchen Blog: Scottish Oat Cakes. Guest post by Georgia Pellegrini, recipe submitted by TK member Movita Beaucoup.

Once that is nice and sandy, pour in water a little at a time, about 1/2 cup.


Tasty Kitchen Blog: Scottish Oat Cakes. Guest post by Georgia Pellegrini, recipe submitted by TK member Movita Beaucoup.

You just want to moisten it enough until it gathers together and there isn’t any dry matter on the bottom of the bowl straggling behind.


Tasty Kitchen Blog: Scottish Oat Cakes. Guest post by Georgia Pellegrini, recipe submitted by TK member Movita Beaucoup.

Grease a baking sheet with spray or be like me—smear around a big stick of butter. I’m very precise that way.


Tasty Kitchen Blog: Scottish Oat Cakes. Guest post by Georgia Pellegrini, recipe submitted by TK member Movita Beaucoup.

Then on a clean, lightly floured surface, separate the dough into smaller batches.


Tasty Kitchen Blog: Scottish Oat Cakes. Guest post by Georgia Pellegrini, recipe submitted by TK member Movita Beaucoup.

Roll out the dough.


Tasty Kitchen Blog: Scottish Oat Cakes. Guest post by Georgia Pellegrini, recipe submitted by TK member Movita Beaucoup.

Use a ring cutter or the rim of a glass to cut ¼ inch thick circles.


Tasty Kitchen Blog: Scottish Oat Cakes. Guest post by Georgia Pellegrini, recipe submitted by TK member Movita Beaucoup.

Lay them in rows on a baking sheet and pop them in the oven!


Tasty Kitchen Blog: Scottish Oat Cakes. Guest post by Georgia Pellegrini, recipe submitted by TK member Movita Beaucoup.

What is interesting about these is that they don’t change their shape much. They just simply firm up a bit. It’s a fun combination between a true cookie and a scone.


Tasty Kitchen Blog: Scottish Oat Cakes. Guest post by Georgia Pellegrini, recipe submitted by TK member Movita Beaucoup.

In fact, they seemed very British to me … or Scottish. They would be so perfect for a traditional afternoon tea. And they made me want to have a tea party instantly. Thank you to Movita for this wonderful recipe and for making me want to have a tea party! Be sure to check out her website Movita Beaucoup for more inspiration.


Printable Recipe

Elsa’s Scottish Oat Cakes

See post on movita beaucoup’s site!
5.00 Mitt(s) 1 Rating(s)1 vote, average: 5.00 out of 51 vote, average: 5.00 out of 51 vote, average: 5.00 out of 51 vote, average: 5.00 out of 51 vote, average: 5.00 out of 5

Prep Time:

Cook Time:

Difficulty: Easy

Servings: 24

24
x

Print Options

Page size Letter 3x5 4x6
Text Size Small Medium Large
Content Include description
Include prep time, etc.
Show image

Description

A yummy family favourite.

Ingredients

  • 2 cups Flour, All Purpose
  • 3 cups Rolled Oats
  • ¼ cups Brown Sugar
  • ¼ cups White Sugar
  • ½ teaspoons Salt
  • ½ teaspoons Baking Soda
  • ½ cups Lard Or Butter
  • ½ cups Ice Cold Water

Preparation Instructions

Combine dry ingredients in large bowl. Cut in butter with a knife or pastry cutter until coarse, mealy crumbs form. Add the ice cold water and stir vigorously with a fork until dough comes together. (The process is very similar to making biscuits, shortcakes and the like—don’t overwork the dough.) Transfer to a lightly floured surface, and shape dough into a ball. Take about a quarter of the dough from the ball, and roll it out to be 1/4 to 1/2 inch thick. (Grammie emphasized that you don’t want to over-handle the dough, thus she only rolled and cut a quarter of the dough at a time.) Cut into circles with a biscuit/cookie cutter or inverted drinking glass, or cut into strips with a pizza cutter. Place on parchment-lined baking sheets for baking. Repeat with remaining dough.

Bake at 350°F until golden (check at 8 minutes). Makes about 2 dozen.

Adapted from a family recipe handed down to me by Elsa and Christy Hodder.


_______________________________________

There’s so much to say about Georgia, we don’t know where to start. Leaving Wall Street for the French Culinary Institute, followed by a stint at the Gramercy Tavern and La Chassagnette in France, her passion for food and food traditions are evident and inspiring. Visit her site at Georgia Pellegrini, where you’ll find more recipes, photos, learn all about her wonderful book Food Heroes, and enjoy her latest adventures.


Profile photo of Ree | The Pioneer Woman

Mixer Winners – And Pancake Redux

Posted by in Step-by-Step Recipes

Here are the winners of the KitchenAid mixers. I can’t thank you all enough for your great feedback; I’ve been reading and taking notes! Winner #1: Shawn “Tasty Kitchen has been a wonderful resource for finding good recipes to make for our family and for special occasions. It’s very helpful having photos of the recipes […]

Profile photo of missamy

Cracker Pizza

Posted by in Step-by-Step Recipes

  Confession time: I’ve never mastered the pizza dough. Nope. It’s always turned out mushy, doughy, and, well, just wrong. I’ll keep working on it, but in the meantime, I found with this recipe for Cracker Pizza, submitted by Tasty Kitchen member, Mrs. Schwartz, I don’t really have to worry about it right now. Plus, […]

Profile photo of Ree | The Pioneer Woman

That’s STILL the Best Frosting I’ve Ever Had

Posted by in Baking, Step-by-Step Recipes

The mixer giveaway is still going on through noon today and winners will be announced Friday. Meanwhile, I wanted to re-post this recipe again for a slightly controversial frosting that I love so much I just made it again this week. And I realize it’s strange to call frosting controversial, but the comments on the […]

Profile photo of Erika (TK)

Breakfast Eggs in 20 Minutes or Less

Posted by in The Theme Is...

  ‘Tis the season for heading back to school, and you know what that means: waking up early, taking turns in the bathroom, and last-minute “Mom, where are my shoes? I’ll be late!” panicked pleas. The last thing you want to do is spend too much time making the kind of breakfast that’ll see them […]