The Pioneer Woman Tasty Kitchen
Profile photo of missamy

Lazy Chicken

Posted by in Step-by-Step Recipes

Today’s post comes from Amy of She Wears Many Hats and she’s doing a recipe from Tasty Kitchen member sweepea for us. Thanks, ladies!

Tasty Kitchen Blog: Lazy Chicken. Guest post by Amy Johnson of She Wears Many Hats, recipe submitted by TK member swseepea.

 
Strolling through the Tasty Kitchen recipes a few weeks ago, I ran across this recipe titled Lazy Chicken. Of course I had to take a peek. Not that I have a tendency to be lazy or anything. Nah. Not me. Okay, maybe my pile of clean laundry is taller than I’d like to admit, but it’s clean, right?

Anyway, the recipe caught my eye and I thought I’d give it the good ole lazy try. Sweepea, the Tasty Kitchen member who authored this recipe, speaks so highly of the ease of “Lazy Chicken,” I just couldn’t pass it up. And to be able start with frozen chicken?!? How many evenings have I been faced with no dinner plans in the works? Yes, I have good intentions. I do. But we all have those days where time gets away from us, or you’re just too worn out to mess with anything complicated.

Not-to-mention the kazillion times I’ve forgotten to take meat out early enough to thaw for dinner that night. But thanks to Sweepea, now there’s no excuse. “Lazy Chicken” has come to save the day. Or at least dinner.

Here’s what you’ll need:


Tasty Kitchen Blog: Lazy Chicken. Guest post by Amy Johnson of She Wears Many Hats, recipe submitted by TK member swseepea.

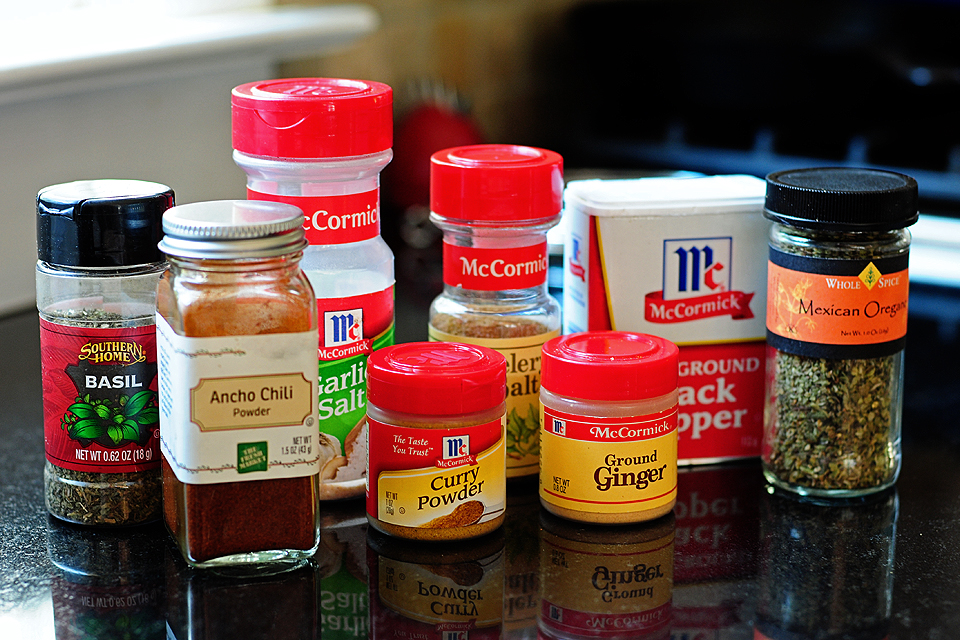
Your favorite dry herbs and seasonings …


Tasty Kitchen Blog: Lazy Chicken. Guest post by Amy Johnson of She Wears Many Hats, recipe submitted by TK member swseepea.

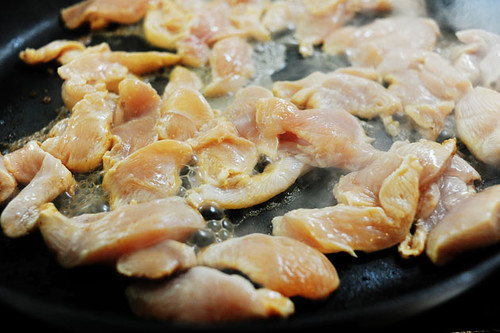
And chicken pieces (frozen or thawed). I started with frozen, and for the record I halved the original recipe since I only had about a pound of chicken on hand and I didn’t feel like driving to the grocery store for more, because, you guessed it, I was being lazy.

 
So let’s get to it. Or not. If you’re too lazy, get your children to handle it for you—it’s that easy. Begin by preheating your oven to 350°F.


Tasty Kitchen Blog: Lazy Chicken. Guest post by Amy Johnson of She Wears Many Hats, recipe submitted by TK member swseepea.

Next line a broiling pan with aluminum foil. Cut slits through the foil and boiler pan.

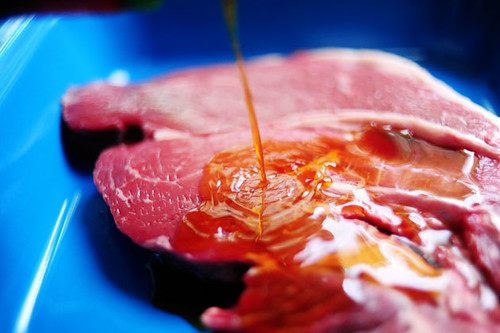
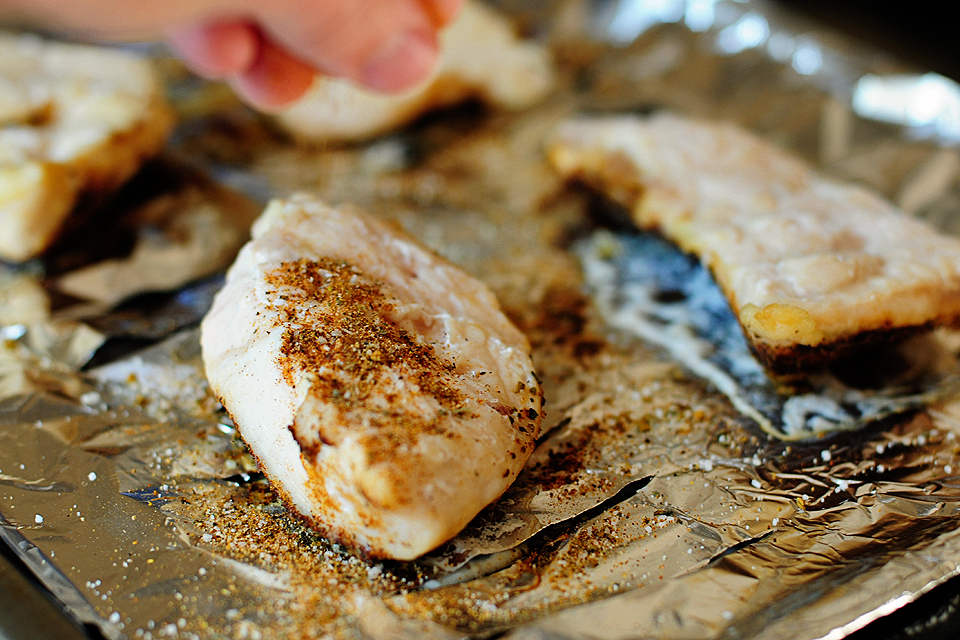
Now you’re ready to prep the food. Start by mixing up your favorite dry herbs and seasonings to total 6 tablespoons (or 3 tablespoons if you’re halving it like me) in a small bowl or measuring cup.


Tasty Kitchen Blog: Lazy Chicken. Guest post by Amy Johnson of She Wears Many Hats, recipe submitted by TK member swseepea.

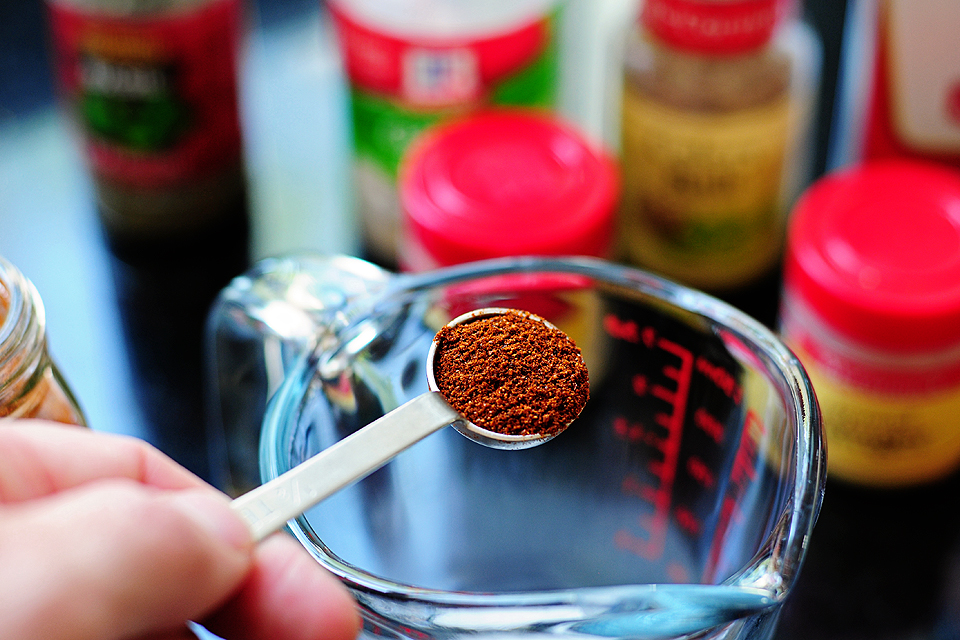
Add a little of this.


Tasty Kitchen Blog: Lazy Chicken. Guest post by Amy Johnson of She Wears Many Hats, recipe submitted by TK member swseepea.

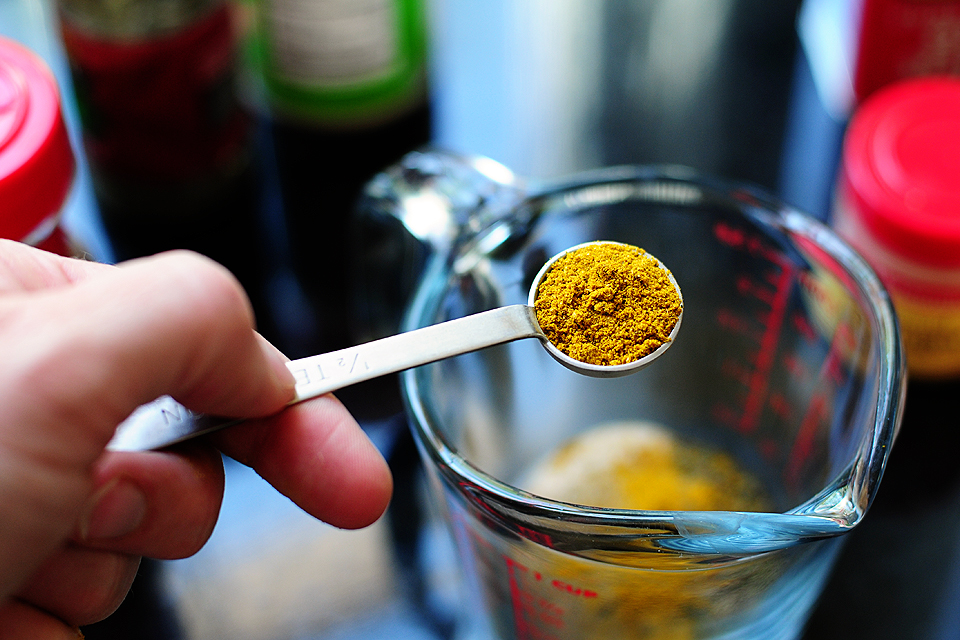
And a little of that. It’s like science class all over again, without the Bunsen burners.

Or if you have plenty of your favorite seasoning, like Lawry’s or Old Bay (sweepea’s favorite), use that by itself. I made a spicy blend using curry powder, ginger, chili powder, garlic salt, celery salt, oregano, basil, salt and pepper. I had no plan in mind. I just grabbed what looked good and went with it. I’ll list the combination and proportions I used below, but be forewarned, it was spicy—good ‘n spicy!


Tasty Kitchen Blog: Lazy Chicken. Guest post by Amy Johnson of She Wears Many Hats, recipe submitted by TK member swseepea.

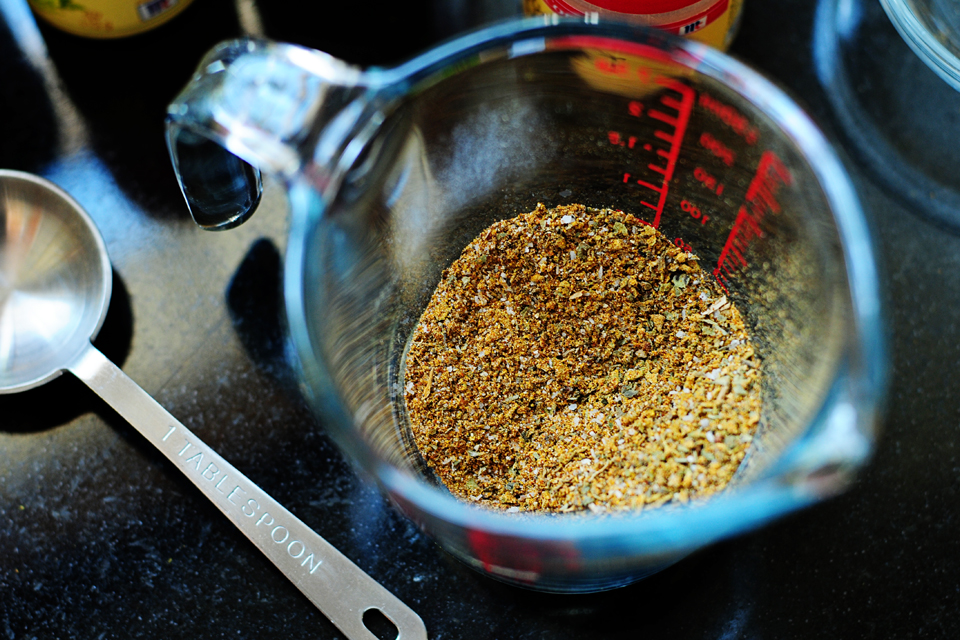
Mix all the seasonings together.


Tasty Kitchen Blog: Lazy Chicken. Guest post by Amy Johnson of She Wears Many Hats, recipe submitted by TK member swseepea.

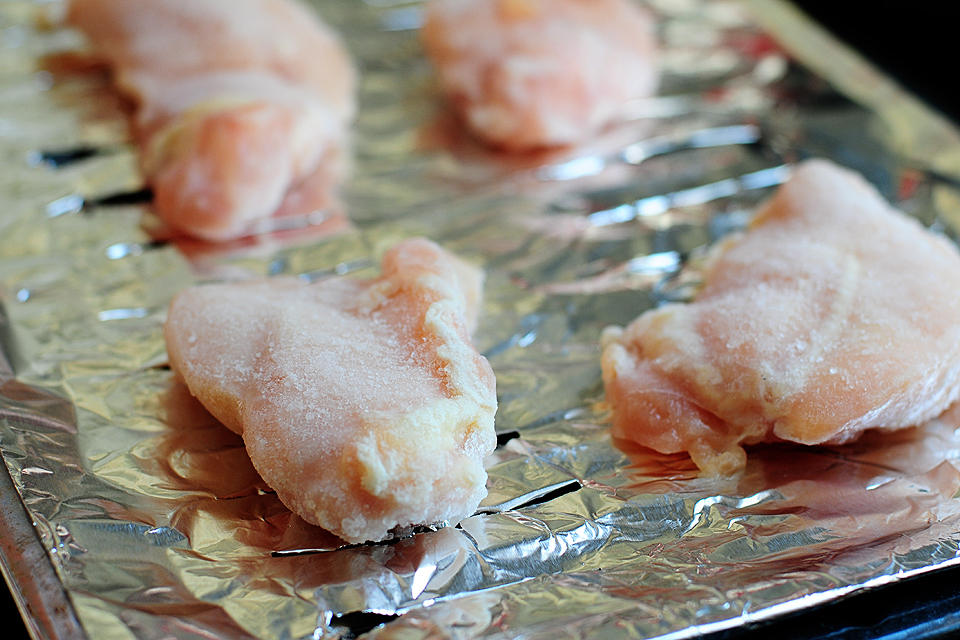
Next, place the frozen chicken (or thawed if you’re not being too lazy), directly on the broiler pan.


Tasty Kitchen Blog: Lazy Chicken. Guest post by Amy Johnson of She Wears Many Hats, recipe submitted by TK member swseepea.

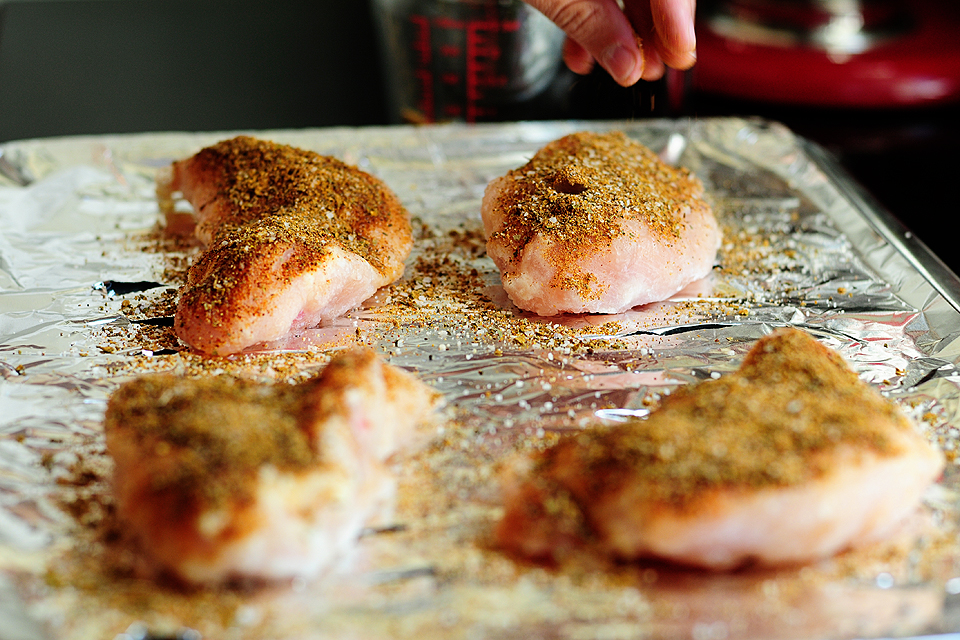
Using about 1/2 of the seasonings, coat the top side of each piece of chicken well. Place broiler pan in the oven on the middle rack and set timer for 30 minutes.


Tasty Kitchen Blog: Lazy Chicken. Guest post by Amy Johnson of She Wears Many Hats, recipe submitted by TK member swseepea.

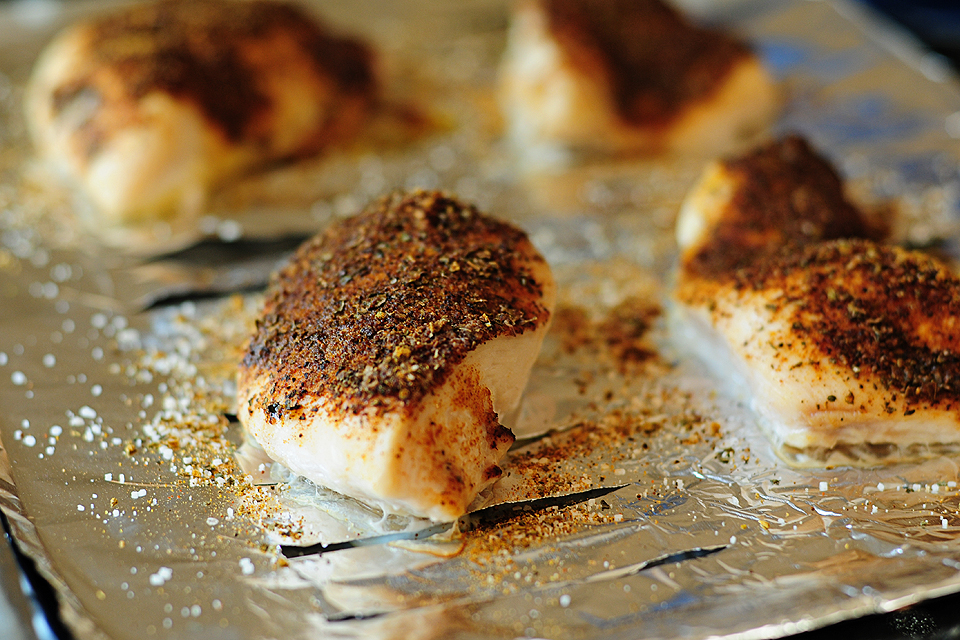
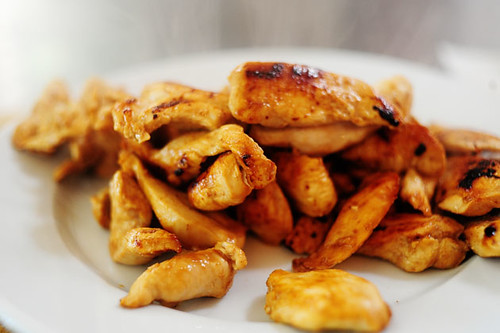
After 30 minutes, remove broiler pan from oven. Yum! It should be smelling tasty about now.


Tasty Kitchen Blog: Lazy Chicken. Guest post by Amy Johnson of She Wears Many Hats, recipe submitted by TK member swseepea.

Gently turn over each piece of chicken.


Tasty Kitchen Blog: Lazy Chicken. Guest post by Amy Johnson of She Wears Many Hats, recipe submitted by TK member swseepea.

Coat the other side with the remaining seasoning mixture.


Tasty Kitchen Blog: Lazy Chicken. Guest post by Amy Johnson of She Wears Many Hats, recipe submitted by TK member swseepea.

Return chicken to oven, and continue cooking for 30 minutes.

Please note, sweepea’s preparation instructions didn’t include flipping the chicken over halfway through cooking to coat the other side, so if you don’t feel like messing with it (it is “Lazy Chicken” after all), use all seasonings when coating the first side and let cook for the full hour without turning the chicken pieces.


Tasty Kitchen Blog: Lazy Chicken. Guest post by Amy Johnson of She Wears Many Hats, recipe submitted by TK member swseepea.

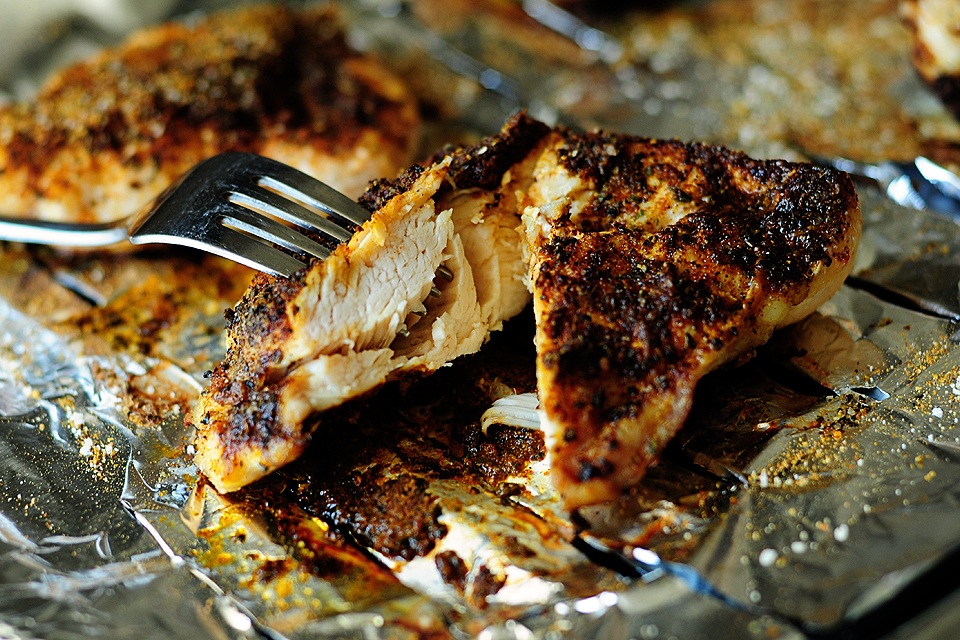
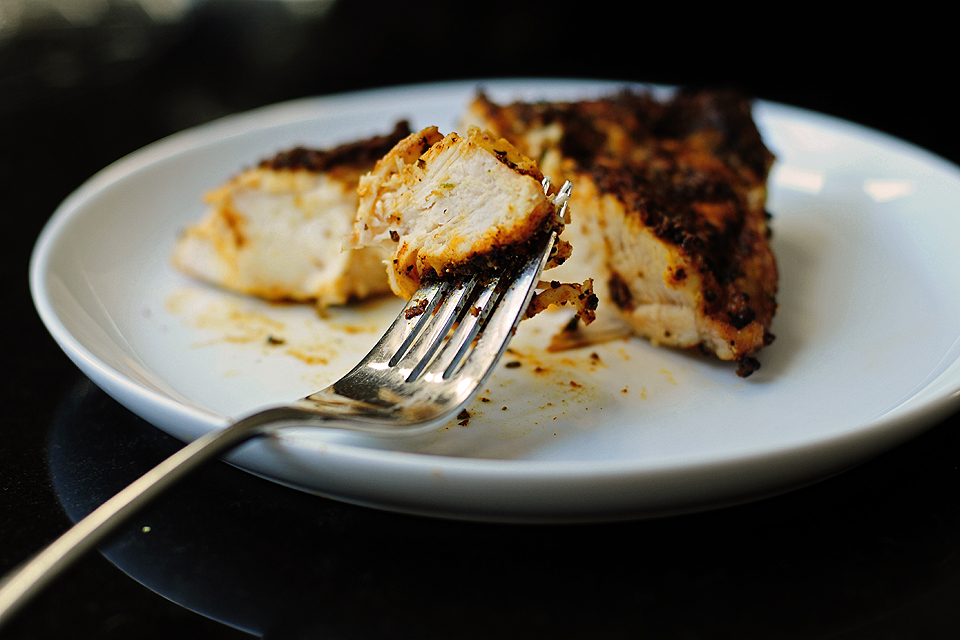
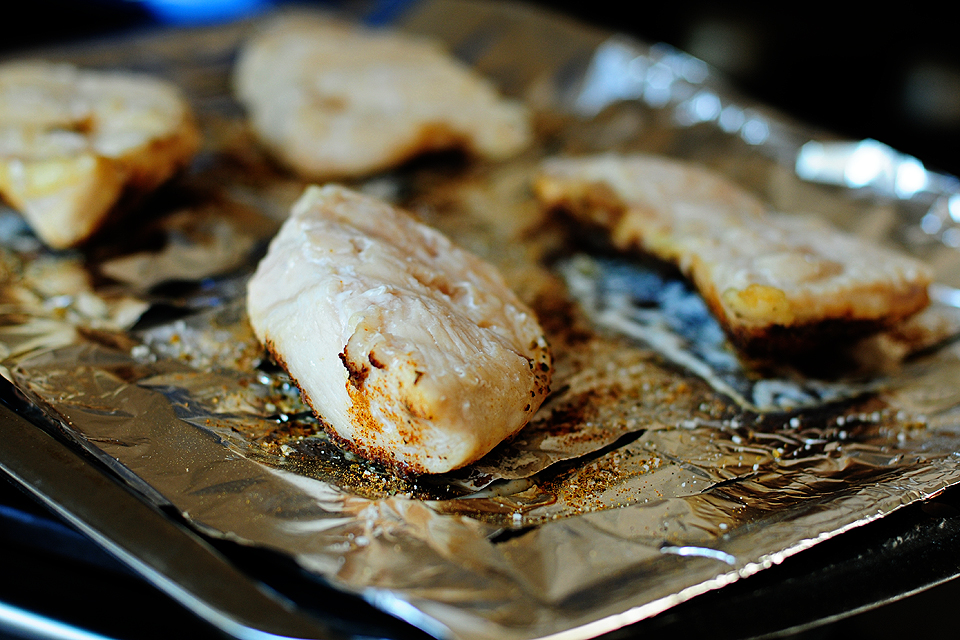
When chicken has cooked for a total of an hour, check it for doneness. Chicken will be done when center is not pink.


Tasty Kitchen Blog: Lazy Chicken. Guest post by Amy Johnson of She Wears Many Hats, recipe submitted by TK member swseepea.

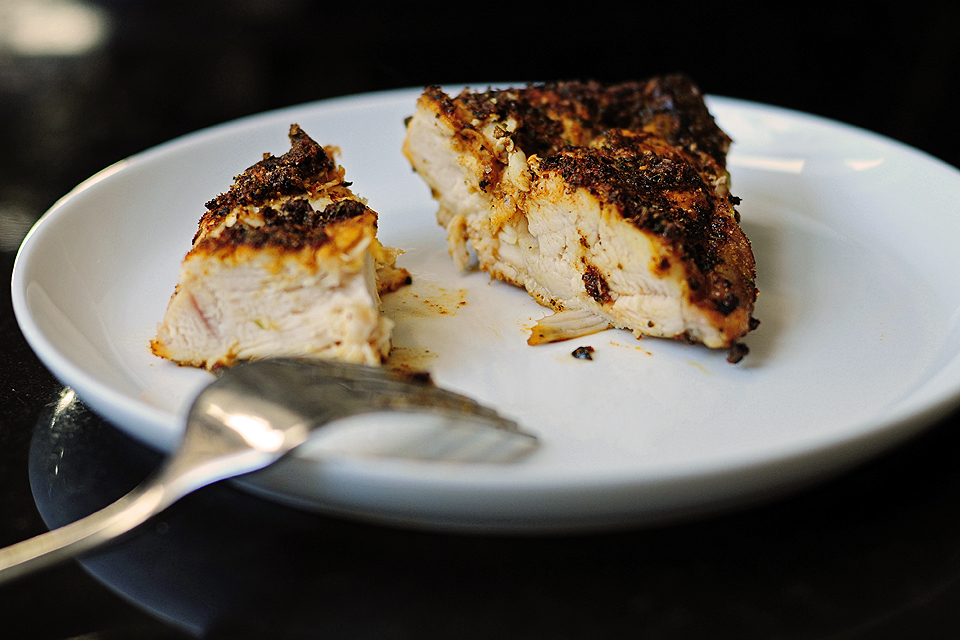
I gotta say, I was little skeptical of starting with frozen chicken. I was. But it worked quite well. The chicken was done, tasty and not dry. And, believe me, I’m a dark meat girl. I don’t like dry meat.


Tasty Kitchen Blog: Lazy Chicken. Guest post by Amy Johnson of She Wears Many Hats, recipe submitted by TK member swseepea.

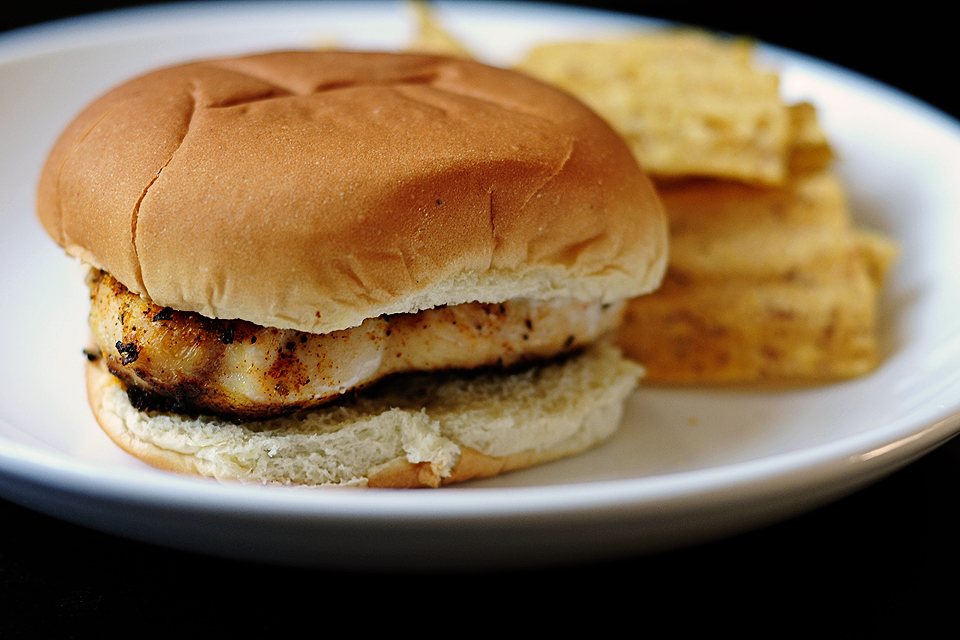
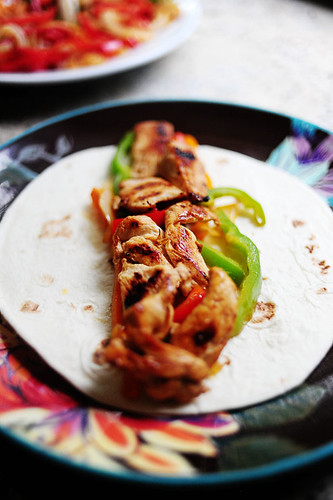
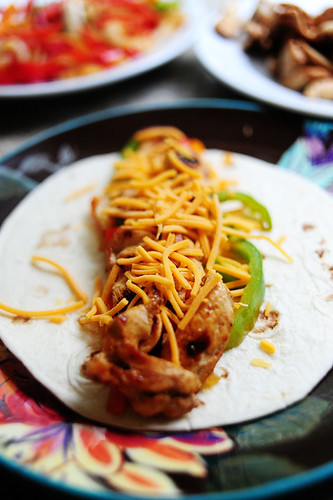
And guess what? I rolled on with the lazy theme and added it to a plain bun (not even toasted or warmed), with a side of chips, and called it a spicy chicken sandwich. The kids need not know that I was being lazy. They never knew.

So give the “Lazy Chicken” a try the next time you’re not up for thinking about dinner. And send a note to sweepea to thank her for looking out for all of us.

Here’s the combination of dry seasonings that I used. Again, this mixture totals about 3 tablespoons as was used for approximately 1 pound of boneless chicken breasts.

1 teaspoon ancho chili powder
1 teaspoon basil
1/2 teaspoon celery salt
1 teaspoon curry powder
1/2 teaspoon garlic salt
1/2 teaspoon ground ginger
1 teaspoon oregano
1 teaspoon pepper
1 teaspoon salt


Printable Recipe

Lazy Chicken

4.87 Mitt(s) 8 Rating(s)8 votes, average: 4.87 out of 58 votes, average: 4.87 out of 58 votes, average: 4.87 out of 58 votes, average: 4.87 out of 58 votes, average: 4.87 out of 5

Prep Time:

Cook Time:

Difficulty: Easy

Servings: 6

6
x

Print Options

Page size Letter 3x5 4x6
Text Size Small Medium Large
Content Include description
Include prep time, etc.
Show image

Description

Thinking not required.

Ingredients

  • 2 pounds Bone-in Chicken, Fresh OR Frozen Raw Pieces, Chef's Choice
  • 6 Tablespoons Spices On Hand

Preparation Instructions

This is the easiest chicken recipe ever. It uses what you have on hand and is foolproof. Try it on a night when thinking is no longer possible!

1. Preheat oven to 350°F. Yawn …
2. Line the top of your broiler pan with foil, and cut slits in the foil to allow fat to drain. This can be cathartic, depending upon your day.
3. Place fresh or frozen chicken pieces on top of the foil, with all parts tucked inside the broiler edges, so that fat doesn’t spill onto the oven floor. That would make more work, and this is lazy chicken.
4. Grab handfuls of spice mixtures or herbs from the shelf and toss a tablespoon on each piece of whatever satisfies your whims. Or is closest to you at that moment. Or which will incite the least amount of complaints. Whatever. (See note below.)
5. Pop the broiler pan in the oven, and chicken will be cooked through in approximately an hour. This is long enough to make side dishes, or: take a nap, sit on the porch swing, or briefly daydream about having the time to do any of the above.
6. After an hour, chicken should have a golden skin. Take a knife and fork and test the middle of the largest piece for done-ness. Pink is too lazy. Food poisoning takes more energy, so cook a wee bit longer, until no longer pink.
7. Eat.

Notes/updates:
– In the interest of TK happiness, I have “researched” alternate methods (in frantic desperation) and added some tips for the laziest and latest of cooking chicken. These techniques work well with very frozen chicken!

First method: It is possible to crank up the oven to 375 F to 380 F if the chicken can be fully encased by an upside down 13 X 9 clear glass oven-safe cake pan, so as to retain as many of the juices and to prevent overheating while steaming the chicken, thereby skipping defrost of chicken. If a crispy skin is desired, uncover it in the last few minutes and broil on high for just a couple of minutes, to prevent drying out the chicken.

Second method: If using the suggested (manufacturer provided) 2 piece broiler pan, pour a cup or so of tap water in the bottom of the pan, cover with the top of the broiler rack, and load and cook the chicken as in the original recipe. The only difference for this method is that you should set oven to 375 F. The steaming action is great, but take care when removing pans from the oven to avoid hot water burns. Ahem.

Third method: If chicken pieces are too large, or too many pieces are crowded on the pan, this may cause the chicken to take longer than an hour to cook. This can happen if trying to make Lazy Chicken into 2 Night Lazy Chicken. Ahem. This makes more work for you, but if you watch the temperature, and when chicken has internal temperature of around 150 F crank the oven to Broil/High, move to a lower rack in the oven and broil for a few minutes until skin is browned to your liking.

Tips: No matter the method, an hour is typically what it takes for safety, at least with bone-in chicken. I always use a meat thermometer, but if it getting close to done, take the chicken out to rest to prevent drying. Often it will reach the right temperature in a few minutes, or if not a quick High/Broil will finish the job.

Always verify with your thermometer! Bone-in (and cheaper) pieces often are the tastiest using this method. Also, smaller pieces, like drumsticks, cook especially fast in a pinch. If small pieces are mixed with other larger cuts, put them in the center of the pan if possible, and bigger bulges of meat towards the outside.

The important thing is that you didn’t have to think too much to make it happen, and picky people have their mouths filled with food and cannot complain much. Yeah, You! Now go take a nap, since I did the work for you so you wouldn’t have to!

Note regarding the spices: Rosemary, thyme, oregano, parsley, paprika or favorite spice blends or flavored salts, like garlic salt (very popular) work well. I tend to make one piece of each spice or blend I choose. My favorite seasoning is Old Bay. And feel free to pack that pan full of pieces for even lazier, 2 Night leftover chicken!

You’re welcome x 2.

(No image available. Lazy Chicken is too lazy for a photography session.)

.


_______________________________________

Amy Johnson is a blogger who writes about food, travel, the home (both inside and out), and various observations and random musings about anything and everything. Visit her blog She Wears Many Hats for a dose of deliciousness, practicality, hilarity, or just plain fun. She lives in South Carolina with her husband and two children.


Profile photo of savorysweetlife

Banana Split Ice Cream Cake

Posted by in Step-by-Step Recipes

Today is a special day because we’re welcoming the brand new PW design. Our little corner here is getting its very own spot in the front page of The Pioneer Woman and if you haven’t been there yet today, check it out! There are tons of new features to play with, and it’s new and familiar at the same time. We thought it’d be be fun to celebrate all this forward movement by going retro here at the Tasty Kitchen Blog, and we’re absolutely thrilled to have our dear friend Alice of Savory Sweet Life help us usher in this new age of Aquarius. Or something like that.

 
Tasty Kitchen Blog: Banana Split Ice Cream Cake. Guest post by Alice Currah of Savory Sweet Life, recipe submitted by TK member Annalise Ree (cuddelsandcomfortfoods) of Sweet Anna's.

 
When it comes to ice cream sundaes, banana splits are the grand daddy of them all. This nostalgic ice cream dessert has been around since the early 1900s and its popularity over the years has never ceased. It is a timeless classic which I have adored since I was a small child and still do today. As the world quickly changes around us, banana splits remain the same today as they did over 100 years ago.

A traditional banana split is made of a banana vertically cut in half and lined on each side of a boat shaped serving bowl. A scoop of vanilla, strawberry, and chocolate ice cream is sandwiched between the two halves of the banana like three peas in a pod. Each scoop of ice cream is then topped off with its own sauce of hot fudge, strawberry, and crushed pineapple. Finally, the sundae is made complete with a crown of whipped cream, a sprinkling of chopped nuts, and a maraschino cherry on top. When I discovered Annalise’s recipe for a Banana Split Ice Cream Cake on Tasty Kitchen, I instantly knew I had to make it! It is the perfect marriage of all things banana split except in a ice cream cake version.

If you love ice cream sundaes, you are in for a fantastic treat. It’s a fun way to enjoy a classic banana split but served as an ice cream cake. This recipe is not difficult but does require time—but it’s so worth it! I’m convinced people who hate bananas (cough … Ree Drummond) will love this dessert. So let’s get started, shall we?


Tasty Kitchen Blog: Banana Split Ice Cream Cake. Guest post by Alice Currah of Savory Sweet Life, recipe submitted by TK member Annalise Ree (cuddelsandcomfortfoods) of Sweet Anna's.

Here is a list of everything you’ll need to get started: Oreo cookies, butter, vanilla and strawberry ice creams, hot fudge sauce, frozen sweetened strawberries, crushed pineapple, and whipped cream. I also opted to add a few chopped almonds and maraschino cherries just for the heck of it. The recipe calls for a springform pan but doesn’t mention which size to use. I used an 8” and would suggest using a springform pan between 8”-10”. The smaller than pan, the taller the ice cream cake will be and vice versa.


Tasty Kitchen Blog: Banana Split Ice Cream Cake. Guest post by Alice Currah of Savory Sweet Life, recipe submitted by TK member Annalise Ree (cuddelsandcomfortfoods) of Sweet Anna's.

This recipe is all about layers and building on top of one another after the previous one has set. The first layer is the Oreo chocolate cookie crust.


Tasty Kitchen Blog: Banana Split Ice Cream Cake. Guest post by Alice Currah of Savory Sweet Life, recipe submitted by TK member Annalise Ree (cuddelsandcomfortfoods) of Sweet Anna's.

Place Oreo cookies in a food processor and pulse until they become fine crumbs resembling rich dark soil. If you don’t have a food processor, you can place the cookies in a Ziploc bag and achieve the same effect by using a rolling pin to crush the cookies.


Tasty Kitchen Blog: Banana Split Ice Cream Cake. Guest post by Alice Currah of Savory Sweet Life, recipe submitted by TK member Annalise Ree (cuddelsandcomfortfoods) of Sweet Anna's.

Add melted butter the food processor and pulse a few more times to make sure the butter is evenly distributed.


Tasty Kitchen Blog: Banana Split Ice Cream Cake. Guest post by Alice Currah of Savory Sweet Life, recipe submitted by TK member Annalise Ree (cuddelsandcomfortfoods) of Sweet Anna's.

Dump mixture into the springform pan. Using the back of a spatula or by using your fingers, press cookie crumb mixture down and firmly to form a uniformed crust on the bottom of the pan.


Tasty Kitchen Blog: Banana Split Ice Cream Cake. Guest post by Alice Currah of Savory Sweet Life, recipe submitted by TK member Annalise Ree (cuddelsandcomfortfoods) of Sweet Anna's.

The recipe calls for cutting four bananas in ½” thick slices but I found I only needed 2.5 bananas. I point this out only to let you know you may or may not need to use as many bananas the recipe calls for. Cut enough banana slices to cover the bottom of the pan in a single layer and then put the springform pan in the freezer for at least 10 minutes.


Tasty Kitchen Blog: Banana Split Ice Cream Cake. Guest post by Alice Currah of Savory Sweet Life, recipe submitted by TK member Annalise Ree (cuddelsandcomfortfoods) of Sweet Anna's.

A note to banana haters (you know who you are): If you dislike bananas because of their texture, the banana slices in this recipe become frozen. This changes the texture from mushy to a frozen piece of fruit that’s more like hard banana ice cream. This may be the recipe which converts your disdain to love. Just saying.


Tasty Kitchen Blog: Banana Split Ice Cream Cake. Guest post by Alice Currah of Savory Sweet Life, recipe submitted by TK member Annalise Ree (cuddelsandcomfortfoods) of Sweet Anna's.

Scoop slightly softened ice cream on top of the banana layer until it is completely covered. Smooth and press down the ice cream layer by using a spatula dipped in hot water. Place cake pan in the freezer for 2 hours.


Tasty Kitchen Blog: Banana Split Ice Cream Cake. Guest post by Alice Currah of Savory Sweet Life, recipe submitted by TK member Annalise Ree (cuddelsandcomfortfoods) of Sweet Anna's.

Note: Although the photo above shows a 1.5 gallon of strawberry ice cream, the recipe actually calls for only a pint. I bought the bigger size because it was actually cheaper than the smaller container. In my opinion you could use either. But if you do go with the bigger size, you’ll want to use approximately 1/3-1/2 of the container.


Tasty Kitchen Blog: Banana Split Ice Cream Cake. Guest post by Alice Currah of Savory Sweet Life, recipe submitted by TK member Annalise Ree (cuddelsandcomfortfoods) of Sweet Anna's.

Warm the hot fudge in the microwave for 30 seconds with the lid removed. Stir the jar so the sauce has a nice spreadable consistency. Empty the entire hot jar of hot fudge sauce on top of the strawberry ice cream layer and smooth it out from edge to edge. Place the cake pan back in the freezer for 30 minutes or until the fudge layer has firmed up.


Tasty Kitchen Blog: Banana Split Ice Cream Cake. Guest post by Alice Currah of Savory Sweet Life, recipe submitted by TK member Annalise Ree (cuddelsandcomfortfoods) of Sweet Anna's.

Grab the vanilla ice cream and repeat the exact same steps as the strawberry ice cream.


Tasty Kitchen Blog: Banana Split Ice Cream Cake. Guest post by Alice Currah of Savory Sweet Life, recipe submitted by TK member Annalise Ree (cuddelsandcomfortfoods) of Sweet Anna's.

Cover the cake pan with plastic wrap and return the ice cream cake to the freezer for at least 6 hours or until very firm. What you’re looking for is for the cake to be completely rock solid frozen. Allowing the ice cream layers to set overnight works beautifully.


Tasty Kitchen Blog: Banana Split Ice Cream Cake. Guest post by Alice Currah of Savory Sweet Life, recipe submitted by TK member Annalise Ree (cuddelsandcomfortfoods) of Sweet Anna's.

Tasty Kitchen Blog: Banana Split Ice Cream Cake. Guest post by Alice Currah of Savory Sweet Life, recipe submitted by TK member Annalise Ree (cuddelsandcomfortfoods) of Sweet Anna's.

When you’re preparing the cake to serve, be sure to make sure the frozen strawberries have thawed. Drain the strawberries and then spread the mixture on top of the frozen ice cream cake. Make sure to leave about a 1” edge around the cake.


Tasty Kitchen Blog: Banana Split Ice Cream Cake. Guest post by Alice Currah of Savory Sweet Life, recipe submitted by TK member Annalise Ree (cuddelsandcomfortfoods) of Sweet Anna's.

To loosen the cake from the pan, take a knife and run it around the inside of the pan.


Tasty Kitchen Blog: Banana Split Ice Cream Cake. Guest post by Alice Currah of Savory Sweet Life, recipe submitted by TK member Annalise Ree (cuddelsandcomfortfoods) of Sweet Anna's.

Unlatch the springform pan from its base.


Tasty Kitchen Blog: Banana Split Ice Cream Cake. Guest post by Alice Currah of Savory Sweet Life, recipe submitted by TK member Annalise Ree (cuddelsandcomfortfoods) of Sweet Anna's.

Tasty Kitchen Blog: Banana Split Ice Cream Cake. Guest post by Alice Currah of Savory Sweet Life, recipe submitted by TK member Annalise Ree (cuddelsandcomfortfoods) of Sweet Anna's.

To finish the ice cream cake off, top the edges off with swirls of whipped cream. For an added touch, sprinkle chopped nuts on top of the cake and add maraschino cherries on top of the whipped cream crowns.


Tasty Kitchen Blog: Banana Split Ice Cream Cake. Guest post by Alice Currah of Savory Sweet Life, recipe submitted by TK member Annalise Ree (cuddelsandcomfortfoods) of Sweet Anna's.

Serve with crushed pineapple on the side.


Tasty Kitchen Blog: Banana Split Ice Cream Cake. Guest post by Alice Currah of Savory Sweet Life, recipe submitted by TK member Annalise Ree (cuddelsandcomfortfoods) of Sweet Anna's.

Final thoughts: I will not lie. As I mentioned in the beginning of this post, this recipe requires time. It is best made at least 1 day ahead but can be stored in the freezer for a couple weeks. This makes a great alternative to serving a traditional cake on any special occasion and best of all … requires NO BAKING. It is nostalgic, whimsical, and fun to eat.

Thanks again to Tasty Kitchen member Annalise Ree of Sweet Anna’s for this creative way of preparing one of my favorite ice cream treats!


Printable Recipe

Banana Split Ice Cream Cake

See post on Sweet Anna's’s site!
4.89 Mitt(s) 9 Rating(s)9 votes, average: 4.89 out of 59 votes, average: 4.89 out of 59 votes, average: 4.89 out of 59 votes, average: 4.89 out of 59 votes, average: 4.89 out of 5

Prep Time:

Cook Time:

Difficulty: Easy

Servings: 12

12
x

Print Options

Page size Letter 3x5 4x6
Text Size Small Medium Large
Content Include description
Include prep time, etc.
Show image

Description

Soo good. Really. That’s all there is to it!

Oh, and don’t let the ‘cake’ part fool you … there’s no cake in this ‘cake’!

Ingredients

  • 20 whole Oreo Cookies
  • 4 Tablespoons Butter, Melted
  • 4 whole Bananas
  • 1 pint Strawberry Ice Cream
  • 1 pint Vanilla Ice Cream
  • 1 jar (about 16 Oz. Jar) Hot Fudge Sauce
  • 1 container (16 Oz. Container) Frozen Sliced Sweetened Strawberries, Thawed And Drained
  • Fresh Whipped Cream, For Serving
  • Crushed Pineapple, For Serving

Preparation Instructions

Take out the strawberry ice cream to thaw. Place the Oreos in a gallon Ziploc bag and crush well with a rolling pin or small frying pan. Pour the melted butter into the Ziploc bag and mix it up. Press this crumb mixture into the bottom of a springform pan.

Slice the bananas into 1/2″ rounds and arrange in a single layer on top of the crust. (Use as many banana slices as needed to fill the layer.) Place the pan into the freezer for about 10 minutes.

Scoop the softened strawberry ice cream in small scoops on top of the frozen banana layer, smoothing it together with a spoon dipped in warm water. Return to the freezer for 1-2 hours, until the ice cream is firm again.

Take the vanilla ice cream out of the freezer to thaw. Warm the hot fudge sauce slightly, just until it is easily spreadable. Pour the fudge over the strawberry ice cream layer, smoothing the top, and place back into the freezer for 15 minutes or so, until the fudge has firmed up again.

Scoop the softened vanilla ice cream in small scoops on top of the fudge layer, again smoothing it together with the back of a spoon dipped in warm water. Cover with plastic wrap and return to the freezer for at least another 4-6 hours until very firm. (At this point the cake could be frozen, well wrapped, for a week or longer!)

Pour the drained sliced sweetened strawberries into a bowl and crush with a pastry blender or a fork until the berries are all mashed up. Store in the fridge until almost ready to serve the cake.

Spread the crushed berries over the top of the cake, to within one-half inch of the edge. Serve with fresh whipped cream and crushed pineapple for those who want it!


_______________________________________

Alice Currah is the force behind Sweet Savory Life and Everyday Alice. She and her husband Rob are the proud parents of three children: Abbi, Mimi, and Elli. Alice is the winner of Saveur’s Cover Contest and is on the Forbes.com list of Eight of The Very Best Food Bloggers. She’s the best-est.


Profile photo of Ree | The Pioneer Woman

Ponzu Beef and Chicken Fajitas

Posted by in Step-by-Step Recipes

This is the second in a two-recipe series for Kikkoman, a sponsor of Tasty Kitchen. The other recipe I posted here was for Panko Mozzarella Sticks (highly recommend!) and I continue to get positive feedback from those of you who’ve made them. For this one, I used a whole different Kikkoman product and made…fajitas!

 
Mmmm, does my house smell yummy. If you walked in right now, you’d drool.

 
Then you’d faint when you saw my laundry pile. But that’s another story!

 
TPW_3867

Grab a sirloin steak and throw it into a dish or a Ziploc bag.


TPW_3865

This is Ponzu sauce!


TPW_3871

Pour it over the beef, add some lime juice, then cover it with plastic wrap (or seal the bag) and refrigerate it for at least a few hours. I like to do this step in the morning and let it marinate all day!)


TPW_3879

Separately, slice two chicken breasts into strips and throw it in a bowl or plastic bag. Pour the ponzu sauce (with lime juice) over the top, cover (or seal) and marinate.

 
Now go…live your life!


TPW_1095

To make the fajitas, wrap a stack of flour tortillas in aluminum foil and warm in the oven. (Though I went for the storebought stuff this time, try making homemade tortillas if you have the time—you won’t regret it!)


TPW_3886

Slice up the veggies. I used onion and three colors of bell peppers because I love color, and because they were in my fridge! But I have made fajitas using sliced mushrooms, zucchini, and summer squash—anything you have on hand.


TPW_3888

Heat some canola oil in a large skillet over high heat. You want to sizzle these veggie, baby!


TPW_3897

Throw in the veggies and pour in a little Ponzu.


TPW_3901

Let them cook over high heat for 4 to 5 minutes, or until they get a little color. You don’t want them to be soggy, though, so taste along the way and remove them while they’re still crisp.


TPW_3914

Remove them to a plate and keep warm.


TPW_3910

Grill up the steak until medium rare, about 1 1/2 to 2 minutes on both sides.


TPW_3913

Remove the steak to a cutting board and let it rest while you cook the chicken.


TPW_3902

Throw the chicken into the same skillet in which you cooked the veggies.


TPW_3916

Flip and cook the chicken until it’s nice and brown (and done), then pour it onto a plate. Remove the tortillas from the oven and get whatever fixins you’d like: sour cream, cilantro, pico de gallo, guacamole (or just sliced avocado), chopped olives—just go for it!


TPW_3922

Throw the veggies on the tortilla…


TPW_3924

Then throw on the chicken.


TPW_3929

Then I threw on some cheddar…


TPW_3930

And sour cream, because I’m a bad, bad girl.


TPW_3918

As for the beef, slice it very thinly. You’ll notice I took two different approaches with the chicken and the beef. For the chicken, I sliced it up, then marinated it, then cooked it. But for the beef, if you slice it before you cook it, you won’t be able to achieve medium rare doneness—it’ll cook too much and too fast. So I like to grill it in one piece, then slice away.


TPW_3940

Pink and beautiful!


TPW_3944

I loved these so much, I’m actually considering serving fajitas for our Fourth of July party. I can do a huge iron skillet on the grill itself, grill several sirloins, then just have a big spread set up with all the fixins.

It’ll be a mess…but a delicious one.

Enjoy! Here’s a link to the printable recipe: Ponzu Beef and Chicken Fajitas

Profile photo of Ree | The Pioneer Woman

Peanut Butter Kiss Cookies

Posted by in Baking, Step-by-Step Recipes

A few weeks ago, my older daughter wanted some cookies. So I said “Well, go find a recipe you like on Tasty Kitchen!”

Then, ever the dutiful mother, I added, “Then march on into the kitchen and make ‘em.”

She looked at me with a puzzled expression.

See that room over there?” I continued. “The one with the stove and the oven and the sink full of dirty dishes? That’s the kitchen. Have fun! Knock yourself out!”

I’m such an awesome mommy.

On her own, my daughter found this version of the classic Peanut Butter – Hershey Kiss cookie, submitted to Tasty Kitchen by Amber the Little Miss Domestic last summer. I have a similar recipe myself, but I didn’t interfere, instead letting her make the cookies herself from start to finish.

The results? Magnificent! Slightly different from the ones I’ve always made, and so easy a twelve-year-old can (and did) make them.

She’s made them several times since then, including yesterday afternoon when…well, when her mother begged her to make them. And her mother took photos this time.

 
TPW_1206

Here’s what you need: peanut butter, flour, sugar, salt, baking soda, brown sugar, egg, milk, vanilla, and shortening. And plenty of Hershey’s Kisses!


TPW_1231

Begin by unwrapping the kisses. You’ll want to have them ready to go when you pull the cookies from the oven.


TPW_1211

Dump the peanut butter, brown sugar, milk, vanilla, and shortening into the bowl of an electric mixer. Mix it until ingredients are smooth.


TPW_1212

Crack an egg into the bowl, and mix it again until everything is smooth.


TPW_1214

Yum. I’d say this is smooth. I could eat this by the spoonful!


TPW_1215

Mix together the flour, baking soda, and salt in a bowl…


TPW_1216

And add it to the mixing bowl, mixing until just barely combined.


TPW_1219

And that’s the dough! Now, my recipe calls for refrigerating the cookie dough until firm, rolling it into neat balls, then rolling the balls in sugar before baking. But this recipe involves more immediate satisfaction.


TPW_1224

Just use a measuring teaspoon, and scoop out rounded spoonfuls. Place them on a cookie sheet.


TPW_1239

Then the recipe says to make a criss-cross design


TPW_1240

…Using the tines of a fork.


TPW_1241

My girl made one pan with the criss-cross pattern…


TPW_1242

And left one pan plain, just to see what the difference would be.

My girl is culinarily curious, like her weird mother.


TPW_1246

We baked them only seven minutes, then removed them from the oven. Here’s the criss-cross batch.


TPW_1249

And here’s the plain batch.

(By the way, this is a yummy peanut butter cookie recipe if you ever just want them without the kiss.)


TPW_1261

Let the cookies stay on the cookie sheet for a minute or two, then lightly press the kisses into the middle of the cookie. Believe it or not, this is the batch that had started with the criss-cross pattern, which baked out to a large degree because we didn’t press it far enough into the cookie. But I have a sneaking suspicion that’s not going to affect the taste.


TPW_1255

Here’s the plain batch.


TPW_1263

And here’s a whole slew of ‘em. For those of you who haven’t had the pleasure of tasting one of these delights right after they’re done, here’s what happens: within a couple of minutes of placing the kiss onto the cookie, the kiss softens to the point that it completely melts in your mouth. I mean completely. And while they’re perfectly delicious the next day, nothing compares to one of these when it’s warm.

My verdict on this particular recipe is this: I actually like them better than the one I’ve used for years. For one thing, you don’t have to refrigerate the dough, which saves lots of time. For another, you don’t have to roll the dough into neat balls and roll them in sugar. Another time saver. But what I liked most about them (well, besides how delicious they were) was the relatively small size: because you measure by rounded teaspoon (which is much less dough per cookie than my recipe calls for), you wind up with much less cookie per kiss. More melted, wonderful milk chocolate per cookie.

And that’s a very, very, very good thing.

Here’s the printable. Thank you to Amber for sharing such a yummy delight!

Printable Recipe: Dianne’s Peanut Butter Sweet Kiss Cookies

Make these for someone you love this week. They’ll love you right back.

Love,
Ree

Profile photo of Erica Lea

Red Curry Coconut Noodles

Posted by in Step-by-Step Recipes

Rounding up our Terrific Threesome of guest posts is Erica Lea, who brings us a yummy dish that she saved in her recipe box as soon as she saw it. If you’ve read the Tasty Kitchen blog post last month when we featured Erica, then you know you’re in for some good food that’s beautifully […]

Profile photo of missamy

My Granny’s Chocolate Cobbler

Posted by in Baking, Step-by-Step Recipes

This week, Ree’s in Orlando, ditching the boots for a pair of flip flops. Right now, she’s either lost in Wally World, hiding in the bathroom, or clutching the bars of some insane ride and crying for her mommy. So we have another special guest filling in for this week’s Tasty Recipe post! Today, missamy […]

Profile photo of A Cozy Kitchen

Jalapeno Bacon Stuffed Mushrooms

Posted by in Step-by-Step Recipes

  The holiday season is upon us, my friends. Parties, gatherings and festivities galore! I love a good party, and I love a potluck party even more. Stuffed mushrooms are one of my favorite dishes to bring to gatherings. They’re easy to assemble, their bite size shape makes them perfect for guests to eat as […]

Profile photo of savorysweetlife

Stuffed French Toast

Posted by in Step-by-Step Recipes

Since Ree is somewhere in D.C. right now with her gushing armpits (sorry for that visual on a cooking blog), we’ve invited a very special guest to host the Tasty Recipe post this week. Quite coincidentally, this lovely lady was also our very first member featured here in the Tasty Kitchen blog. She’s fabulous in […]