The Pioneer Woman Tasty Kitchen
Profile photo of whatsgabycooking

Cheese Crisps

Posted by in Step-by-Step Recipes

Tasty Kitchen Blog: Cheese Crisps. Guest post and recipe from Gaby Dalkin of What's Gaby Cooking.

 
Two words: Cheese Crisps. I’m beyond obsessed. Can I tell you a story? Growing up in Arizona, we ate cheese crisps like it was our JOB. Literally. I was a professional cheese crisp crafter by the age of 8. I could throw them together in no time and I was proud. I started jazzing them up by the time I was 10, and now that I’m in my mid-20s, I still make them like it’s my job. Because, well, they are awesome.

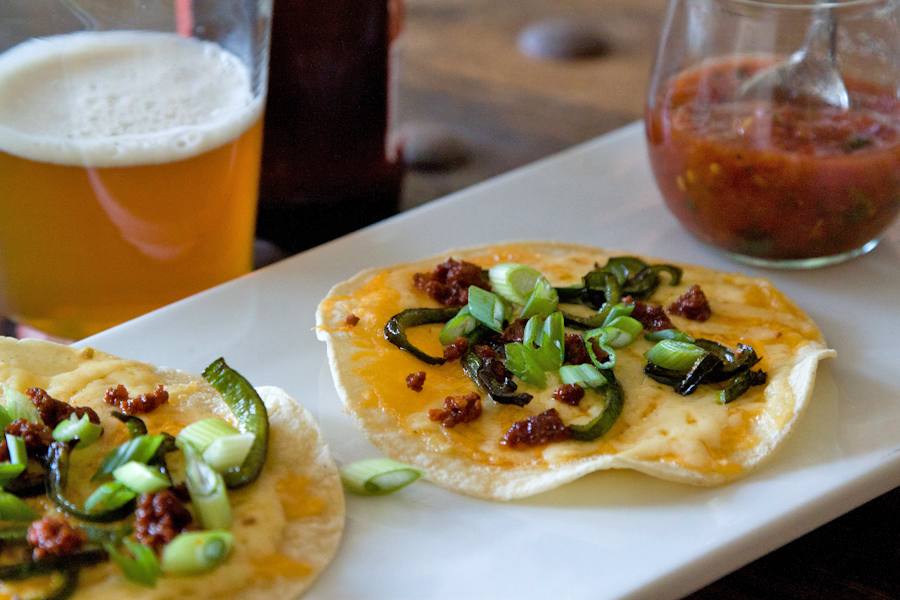
Imagine a baked crisp flour tortilla smothered with 2 kinds of cheeses and topped with whatever kind of toppings you want. Ya, it’s doesn’t get much better than that.

Ready, set, go!


Tasty Kitchen Blog: Cheese Crisps. Guest post and recipe from Gaby Dalkin of What's Gaby Cooking.

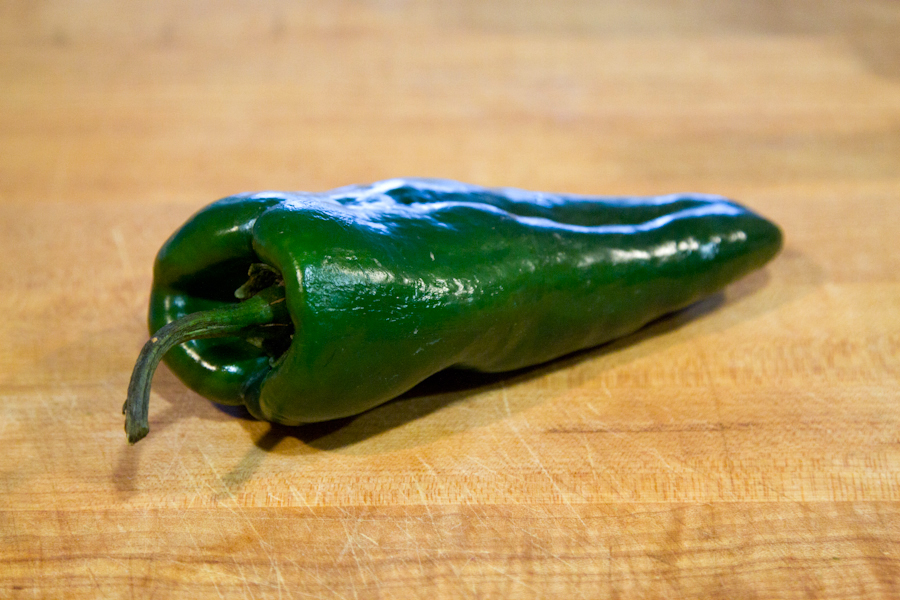
Let’s start with a poblano pepper, shall we?


Tasty Kitchen Blog: Cheese Crisps. Guest post and recipe from Gaby Dalkin of What's Gaby Cooking.

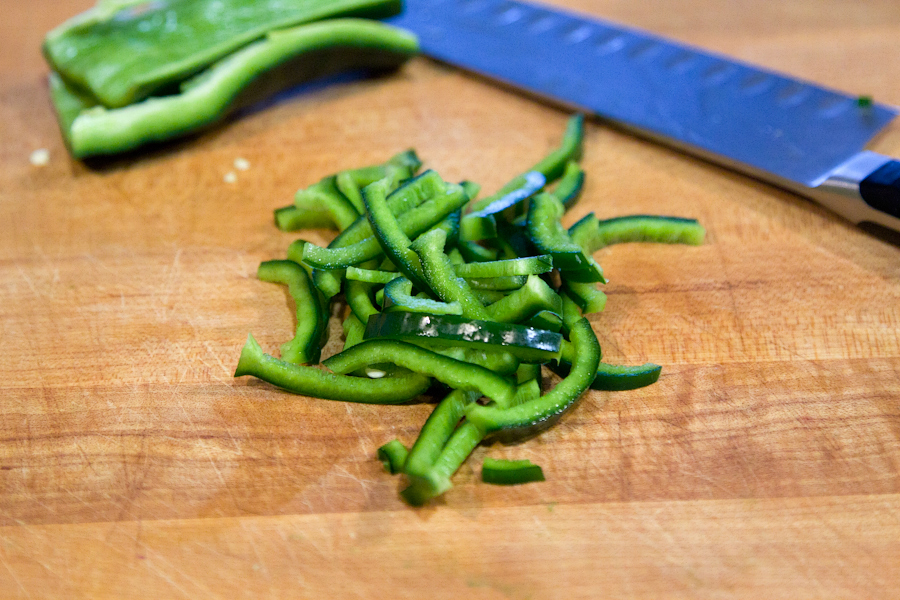
Cut it in half, and then half again, remove the seeds and slice into thin strips.


Tasty Kitchen Blog: Cheese Crisps. Guest post and recipe from Gaby Dalkin of What's Gaby Cooking.

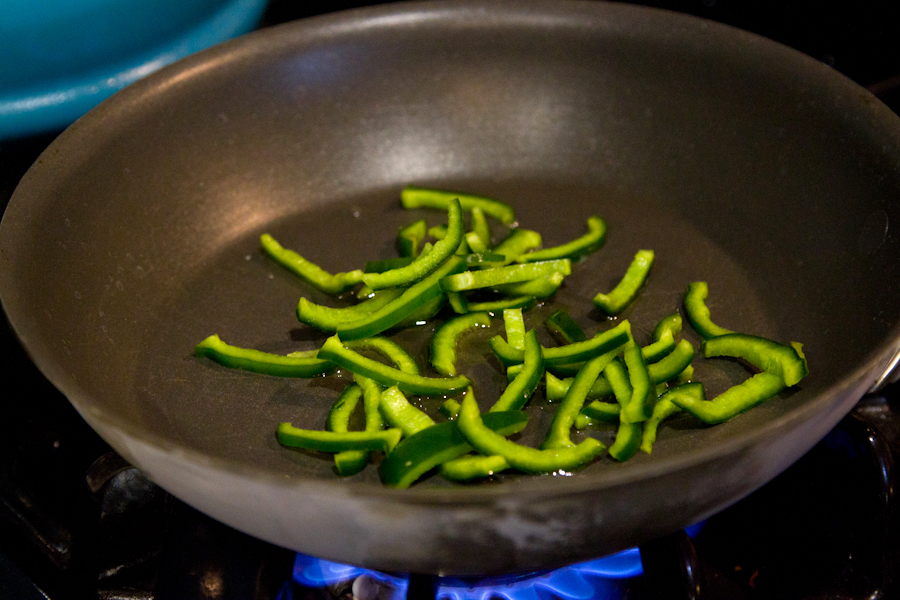
Put the poblano pepper and a touch of olive oil in a skillet and sauté.


Tasty Kitchen Blog: Cheese Crisps. Guest post and recipe from Gaby Dalkin of What's Gaby Cooking.

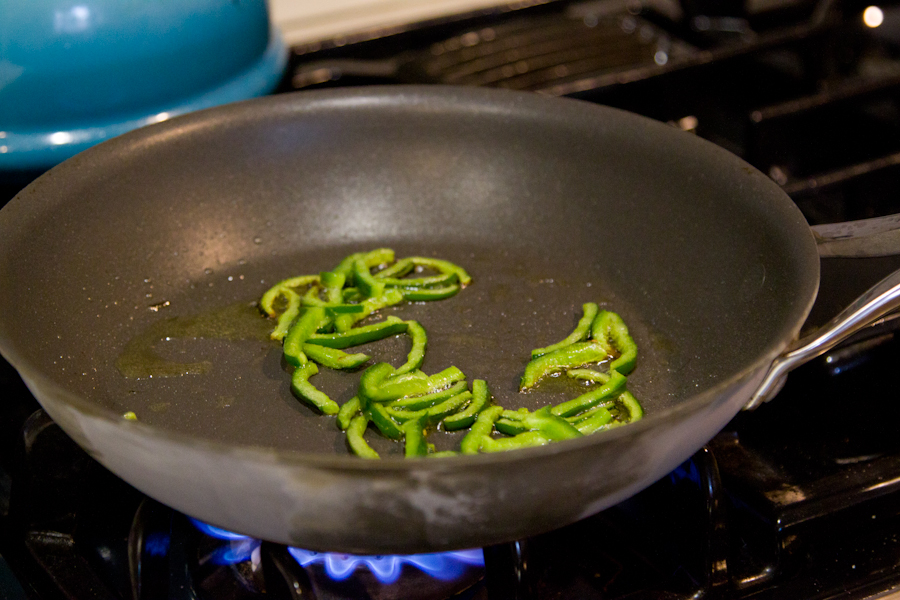
We are going to sauté these until the pepper just begins to turn golden brown.


Tasty Kitchen Blog: Cheese Crisps. Guest post and recipe from Gaby Dalkin of What's Gaby Cooking.

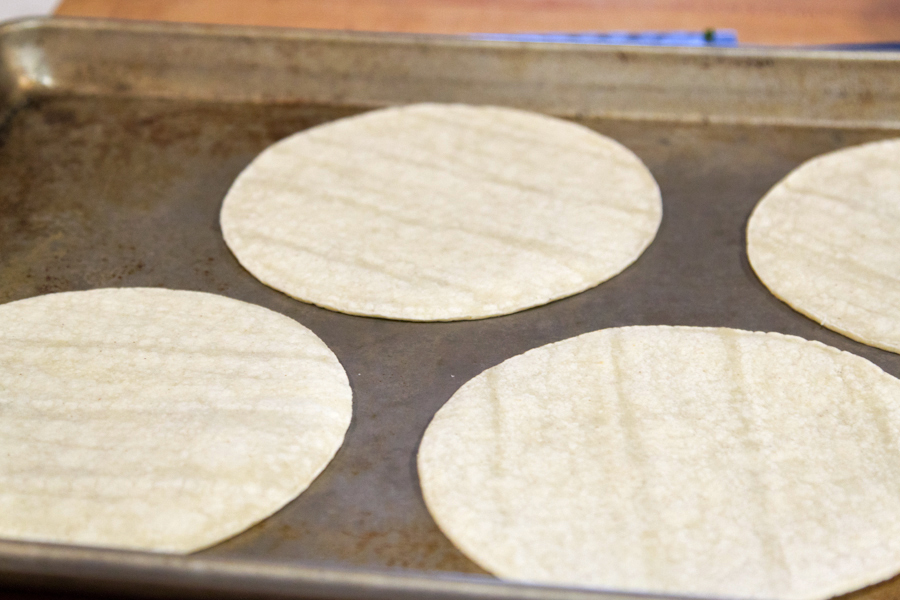
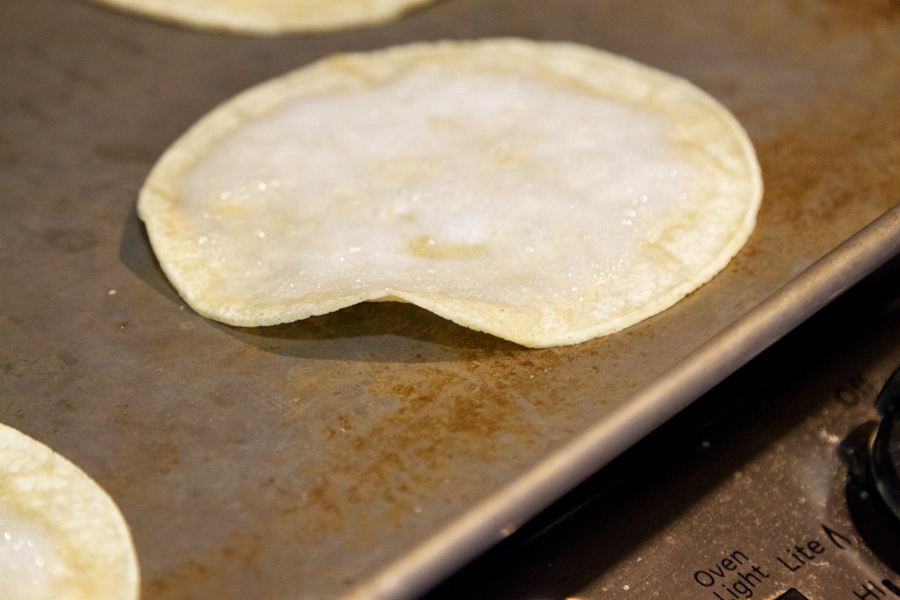
Meanwhile, arrange some tortillas on a baking sheet.


Tasty Kitchen Blog: Cheese Crisps. Guest post and recipe from Gaby Dalkin of What's Gaby Cooking.

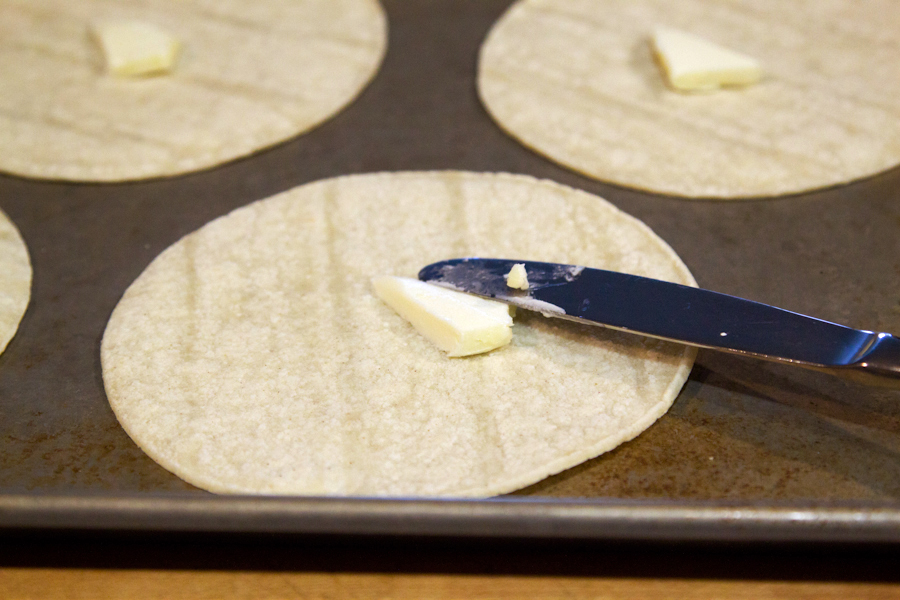
Spread some butter on the tops of the tortillas. It’s the right thing to do.


Tasty Kitchen Blog: Cheese Crisps. Guest post and recipe from Gaby Dalkin of What's Gaby Cooking.

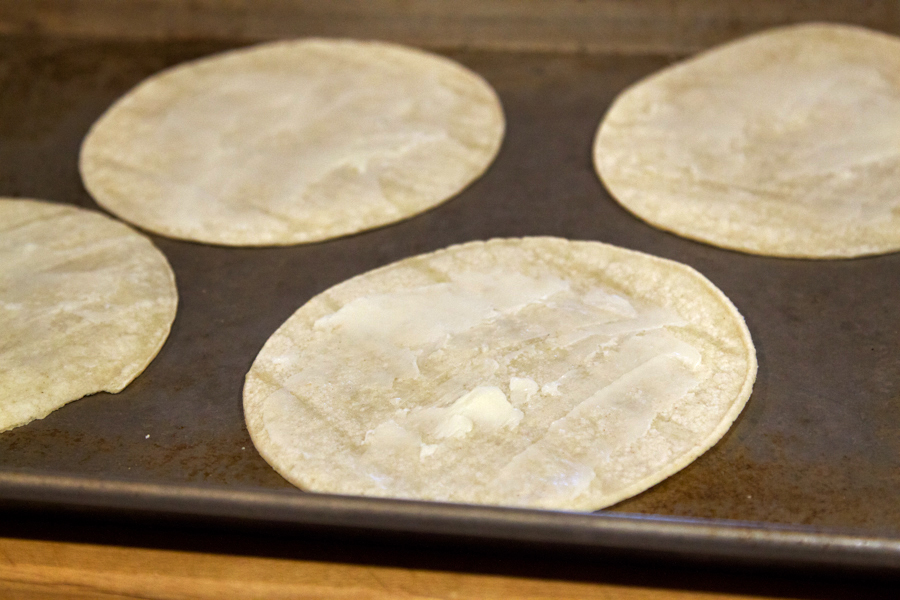
Gorgeous! Pop those babies into the oven for about 5-7 minutes until the edges begin to crisp up.


Tasty Kitchen Blog: Cheese Crisps. Guest post and recipe from Gaby Dalkin of What's Gaby Cooking.

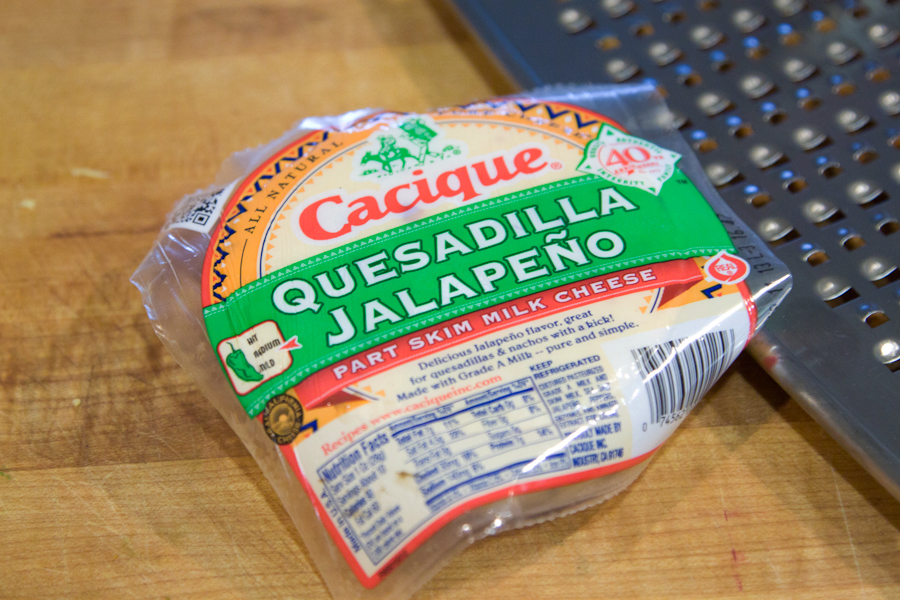
Now let’s get some cheese ready. I like quesadilla cheese. It looks like this. But you can totally use Monterey Jack if that is more readily available.


Tasty Kitchen Blog: Cheese Crisps. Guest post and recipe from Gaby Dalkin of What's Gaby Cooking.

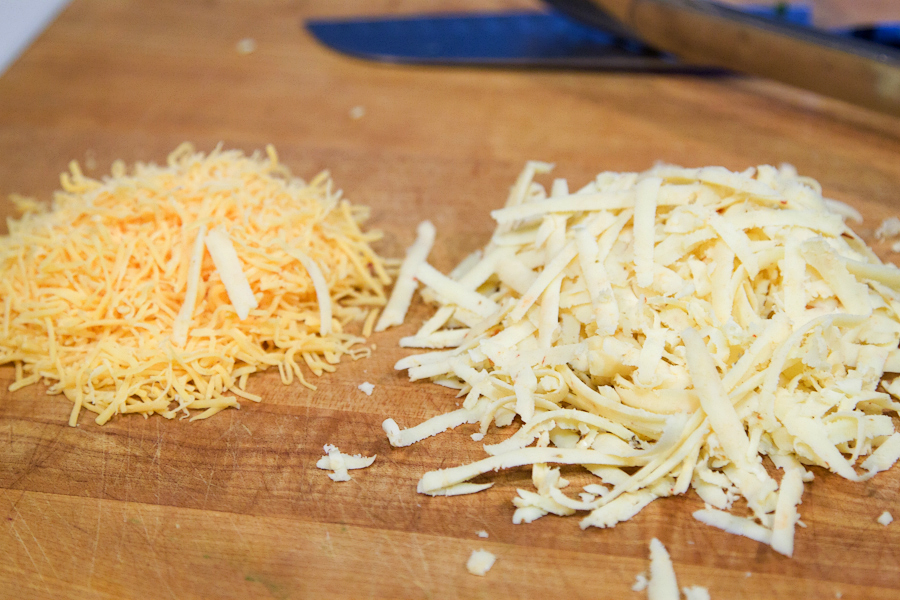
Grate the queso quesadilla and some cheddar cheese.


Tasty Kitchen Blog: Cheese Crisps. Guest post and recipe from Gaby Dalkin of What's Gaby Cooking.

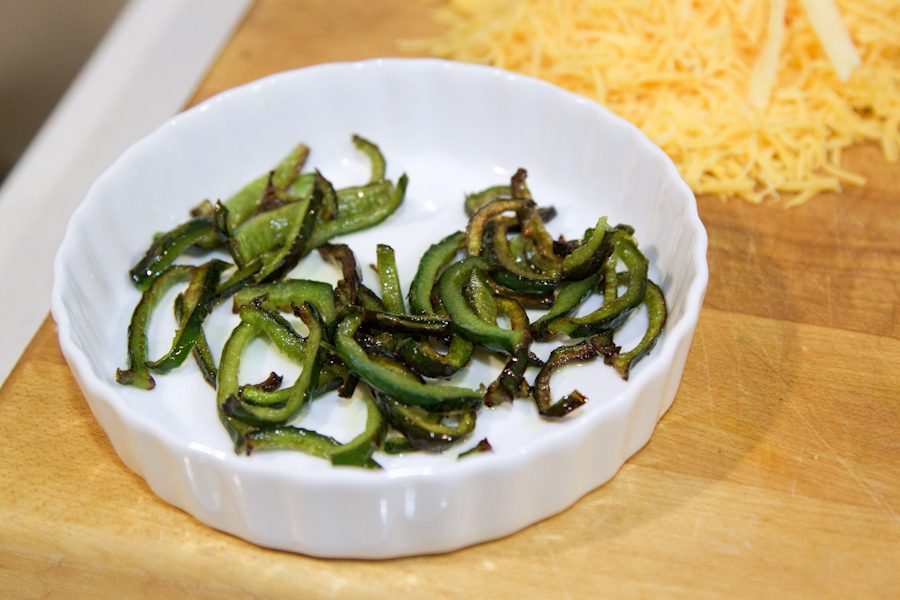
By now you should probably take the poblano peppers off the heat, transfer them to a little bowl and set aside.


Tasty Kitchen Blog: Cheese Crisps. Guest post and recipe from Gaby Dalkin of What's Gaby Cooking.

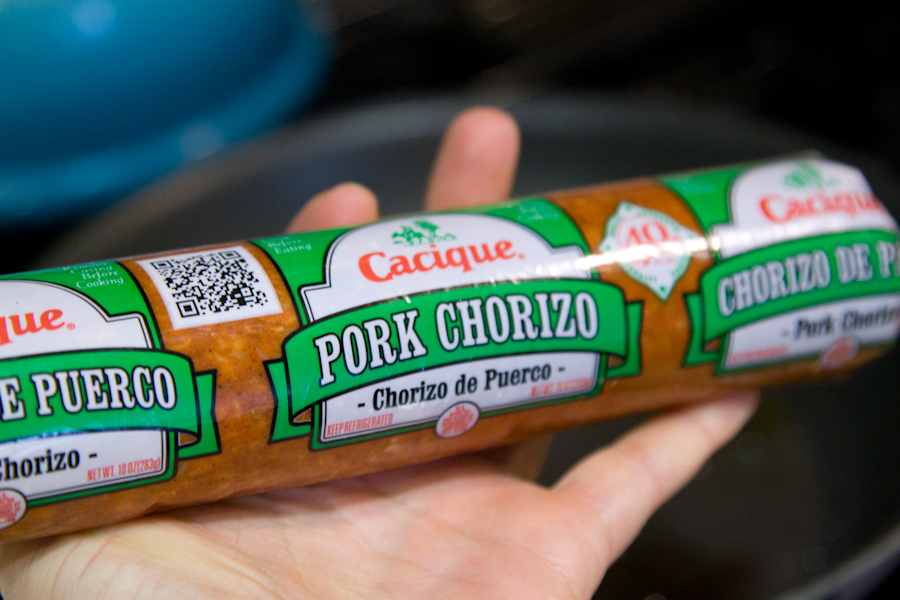
In the same skillet that we did the peppers, we are going to add some pork chorizo.


Tasty Kitchen Blog: Cheese Crisps. Guest post and recipe from Gaby Dalkin of What's Gaby Cooking.

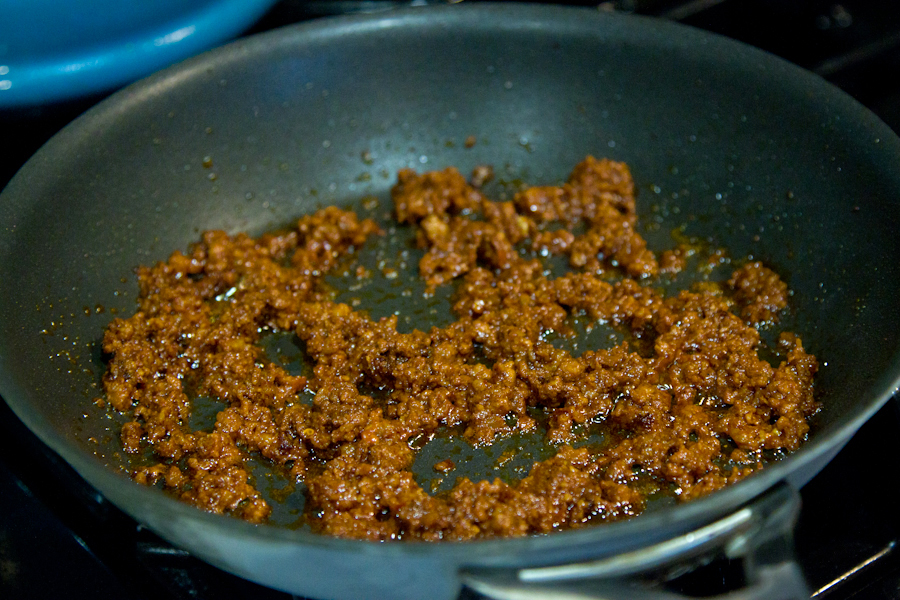
You’ll need to break it up with a wooden spoon and then let it sauté for a few minutes until golden brown and fully cooked.


Tasty Kitchen Blog: Cheese Crisps. Guest post and recipe from Gaby Dalkin of What's Gaby Cooking.

Right about now, your tortillas should start to crisp up. See how the edges curl up a bit? Remove the baking sheet from the oven when that happens.


Tasty Kitchen Blog: Cheese Crisps. Guest post and recipe from Gaby Dalkin of What's Gaby Cooking.

Evenly divide the cheeses amongst the tortillas and then pop them back into the oven.


Tasty Kitchen Blog: Cheese Crisps. Guest post and recipe from Gaby Dalkin of What's Gaby Cooking.

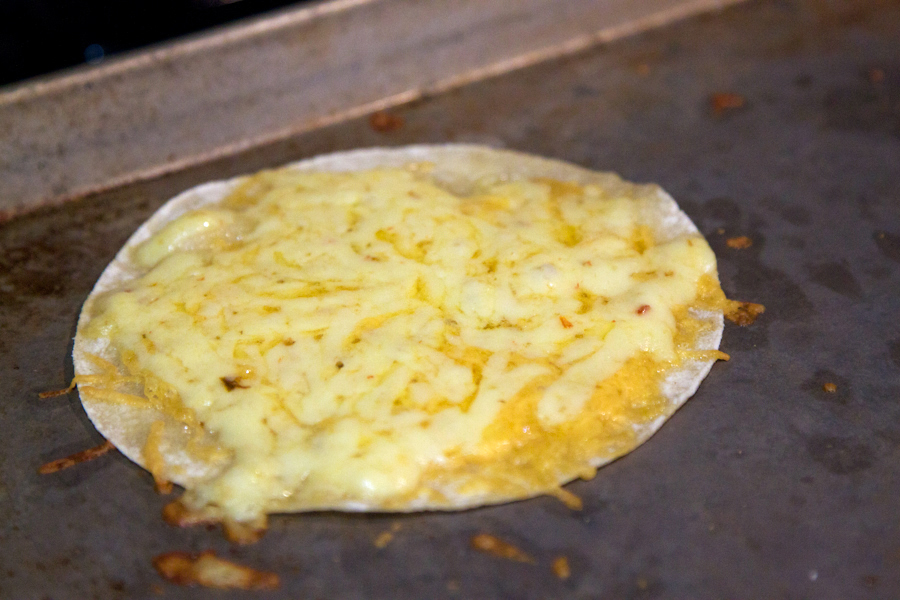
Don’t they look divine once the cheese has melted?


Tasty Kitchen Blog: Cheese Crisps. Guest post and recipe from Gaby Dalkin of What's Gaby Cooking.

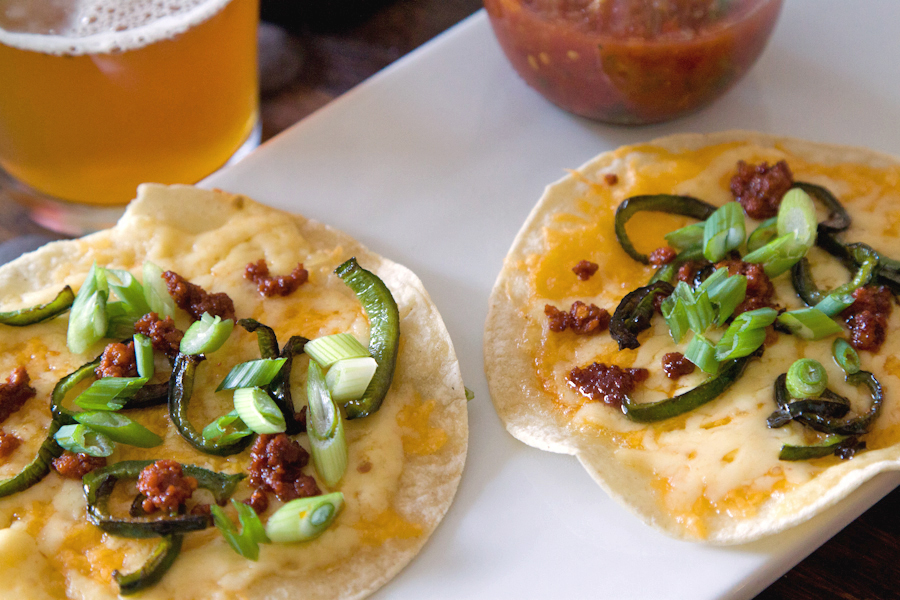
Now, just pile on the toppings! Add some green onions for good measure and serve them up with a side of salsa and an ice cold brew, if that’s your style.

I can’t wait for you guys to be as obsessed with cheese crisps as I am. They are perfect for any football party. Well, really, they are perfect for just about anything!


Printable Recipe

Cheese Crisps

See post on whatsgabycooking’s site!
4.33 Mitt(s) 3 Rating(s)3 votes, average: 4.33 out of 53 votes, average: 4.33 out of 53 votes, average: 4.33 out of 53 votes, average: 4.33 out of 53 votes, average: 4.33 out of 5

Prep Time:

Cook Time:

Difficulty: Easy

Servings: 4

4
x

Print Options

Page size Letter 3x5 4x6
Text Size Small Medium Large
Content Include description
Include prep time, etc.
Show image

Description

A delicious and simple dish from Arizona that will literally rock your world! It’s so good!

Ingredients

  • 1 whole Poblano Pepper
  • 1 teaspoon Olive Oil
  • ½ cups Pork Chorizo
  • 4 whole Small Flour Tortillas
  • 4 teaspoons Butter
  • 1 cup Mexican Cheeses (I Used Cheddar, Queso Quesadilla And Oaxaca)
  • 2 whole Scallions, Thinly Sliced

Preparation Instructions

Preheat oven to 350 degrees F.

Slice the poblano pepper into thin strips.

Heat a skillet over medium high heat with olive oil. Add the sliced poblano and saute for 5 minutes until the skin of the poblano starts to blister. Remove from skillet and set aside.

In the same skillet, add the pork chorizo and saute until fully cooked and browned. Remove and set aside.

Place each of the small tortillas on a baking sheet. Spread 1 teaspoon of butter on each tortilla. Place the baking sheet into the oven and let the tortillas toast. It will take about 5-7 minutes but keep your eyes on them. Once the edges start to turn golden brown, remove from the oven.

Place 1/4 cup of cheese on each of the tortillas and place back into the oven for about 3 minutes until the cheese has melted. Remove from oven.

Top with scallions, poblano peppers and chorizo if desired.


_______________________________________

Gaby Dalkin is the young lady behind What’s Gaby Cooking, a food blog that’s bursting at the seams with incredible recipes and food photography. She’s a personal chef and professional recipe developer, and if you follow her on Twitter, you’ll soon discover her two-fold obsession: guacamole and cheese. She has small feet, a large heart, and a smile that can light up the whole building. We’re pretty stoked to have her here.


Profile photo of missamy

Colorado Fish and Corn Chowder

Posted by in Step-by-Step Recipes

Tasty Kitchen Blog: Colorado Cape Cod Chowder. Guest post by Amy Johnson of She Wears Many Hats, recipe submitted by TK member Kristi of 30 Pounds of Apples.

 
Nothing warms things up on a cold, rainy day like a big bowl of chowder. It’s comfort in a bowl, I say. And this recipe for Colorado Cape Cod Chowder, from TK member Kristi, is no exception. With simple ingredients and quick prep, you can have a whole pot of comfort ready to share in no time.

As far as what makes this chowder Colorado in nature, from what I can tell after reading Kristi’s original post, her family always made it when she lived in Colorado. Just like Kristi mentions, I don’t know what makes a chowder Cape Cod-ish or not either. What I do know is that this version is mighty tasty. So grab some bowls, some spoons, and some comfort-food-seeking friends and chow down on some chowder.

But first you have to make it. It’s easy. Let me show you how.


Tasty Kitchen Blog: Colorado Cape Cod Chowder. Guest post by Amy Johnson of She Wears Many Hats, recipe submitted by TK member Kristi of 30 Pounds of Apples.

The ingredients are pretty basic: onion, potatoes, butter (I used salted), salt, pepper, dried basil, dried bay leaves, water, cod fillet, canned corn and evaporated milk.


Tasty Kitchen Blog: Colorado Cape Cod Chowder. Guest post by Amy Johnson of She Wears Many Hats, recipe submitted by TK member Kristi of 30 Pounds of Apples.

Begin by dicing the onion and peeling the potatoes.


Tasty Kitchen Blog: Colorado Cape Cod Chowder. Guest post by Amy Johnson of She Wears Many Hats, recipe submitted by TK member Kristi of 30 Pounds of Apples.

Melt the butter over medium heat in a stock pot.


Tasty Kitchen Blog: Colorado Cape Cod Chowder. Guest post by Amy Johnson of She Wears Many Hats, recipe submitted by TK member Kristi of 30 Pounds of Apples.

When the butter is all melted, add the onions and sauté for about 5 minutes, until tender.


Tasty Kitchen Blog: Colorado Cape Cod Chowder. Guest post by Amy Johnson of She Wears Many Hats, recipe submitted by TK member Kristi of 30 Pounds of Apples.

While the onions are sautéing, cut the potatoes into about 1″ cubes.


Tasty Kitchen Blog: Colorado Cape Cod Chowder. Guest post by Amy Johnson of She Wears Many Hats, recipe submitted by TK member Kristi of 30 Pounds of Apples.

Once the onions have softened, add the potatoes, salt, pepper, basil, bay leaves and water. This chowder is coming together, y’all.


Tasty Kitchen Blog: Colorado Cape Cod Chowder. Guest post by Amy Johnson of She Wears Many Hats, recipe submitted by TK member Kristi of 30 Pounds of Apples.

Stir it all together. Cover and cook on medium-high heat for about 15 minutes.


Tasty Kitchen Blog: Colorado Cape Cod Chowder. Guest post by Amy Johnson of She Wears Many Hats, recipe submitted by TK member Kristi of 30 Pounds of Apples.

Cod cutting time. Cut it into 1″ pieces.

The cod is ready now. It’s ready for a swim. Well, not a swim—more of a float, really.


Tasty Kitchen Blog: Colorado Cape Cod Chowder. Guest post by Amy Johnson of She Wears Many Hats, recipe submitted by TK member Kristi of 30 Pounds of Apples.

Evenly place the cod on top of the potatoes. See? It’s like a potato float. Don’t stir. Don’t sink the cod. Don’t do anything. Just leave the cod alone. It likes to float. Cover and let cook for another 10 minutes.


Tasty Kitchen Blog: Colorado Cape Cod Chowder. Guest post by Amy Johnson of She Wears Many Hats, recipe submitted by TK member Kristi of 30 Pounds of Apples.

The cod should easily flake at this point.


Tasty Kitchen Blog: Colorado Cape Cod Chowder. Guest post by Amy Johnson of She Wears Many Hats, recipe submitted by TK member Kristi of 30 Pounds of Apples.

Add the corn (with liquid) and the evaporated milk. Stir until combined.

Cover and bring to a boil, then remove from heat.


Tasty Kitchen Blog: Colorado Cape Cod Chowder. Guest post by Amy Johnson of She Wears Many Hats, recipe submitted by TK member Kristi of 30 Pounds of Apples.

Let cool a bit before serving. Crackers, cornbread, or your favorite chowder companion will do just fine with a big bowl of this chowder. Enjoy!

A big thanks to Kristi for sharing her family’s version of this comforting chowder. Be sure to check out other goodies from Kristi at 30 Pounds of Apples. I noticed she’s beginning a new series with kitchen tips, tricks and tutorials called “How To’sdays,” on Tuesdays. She’ll share things like how to “How To Substitute With Whatever Dairy You Have On Hand.” Sounds like pretty handy dandy info, if you ask me. Check her out.


Printable Recipe

Colorado Cape Cod Chowder

See post on Kristi at 30 Pounds of Apples’s site!
5.00 Mitt(s) 4 Rating(s)4 votes, average: 5.00 out of 54 votes, average: 5.00 out of 54 votes, average: 5.00 out of 54 votes, average: 5.00 out of 54 votes, average: 5.00 out of 5

Prep Time:

Cook Time:

Difficulty: Easy

Servings: 10

10
x

Print Options

Page size Letter 3x5 4x6
Text Size Small Medium Large
Content Include description
Include prep time, etc.
Show image

Description

A landlocked take on an East Coast classic. A perfect meal to mend the chilly January blues.

Ingredients

  • 1 whole Large Onion, Diced (should Yield About 2 Cups)
  • 2 pounds Potatoes, Peeled And Cut Into 1" Cubes
  • 3 Tablespoons Unsalted Butter
  • 2 teaspoons Salt
  • ½ teaspoons Black Pepper
  • ½ teaspoons Dried Basil
  • 2 whole Dried Bay Leaves
  • 2 cups Water
  • 12 ounces, weight Fresh Or Frozen Cod Fillet, Cut Into 1" Cubes
  • 2 cans (15 Oz. Size) Corn, With Liquid
  • 12 ounces, fluid Evaporated Milk

Preparation Instructions

Dice onion and peel potatoes. Melt butter over medium heat in a large pot. Add onions and sauté for about 5 minutes until onions are soft.

While the onions are cooking, cut potatoes into 1-inch cubes. After the onions have softened, add potatoes, salt, pepper, basil, bay leaves, and water to the pot and stir well. Cover the pot and increase heat to medium-high. Cook for about 15 minutes.

While the potatoes cook, cut the cod into 1-inch cubes. After 15 minutes, you should be able to easily stab the potatoes with fork, but they should not be totally soft. Place cod on top of the potatoes, not stirring, and re-cover the pot. Cook for an additional 10 minutes until the cod flakes easily with a fork. Add the corn and evaporated milk and stir well. Cover and bring just to boiling.

Remove from heat and remove lid. Allow to cool for about 5 minutes before serving.

Adapted from a family recipe.


_______________________________________

Amy Johnson is a blogger who writes about food, travel, the home (both inside and out), and various observations and random musings about anything and everything. Visit her blog She Wears Many Hats for a dose of deliciousness, practicality, hilarity, or just plain fun. She lives in South Carolina with her husband and two children.


Profile photo of Amber {Sprinkled With Flour}

Secret Cake

Posted by in Baking, Step-by-Step Recipes

Tasty Kitchen Blog: Secret Cake. Guest post by Amber Potter of Sprinkled with Flour, recipe submitted by TK member Patti Roberson.

 
There’s two things that will automatically make a girls day: chocolate and cake. When you put the two together, you have a recipe for the worlds best pick-me-up that rivals those absurdly cute kitty emails.

Yes, that kitty wearing a cowboy outfit while balancing on a tightrope singing Gangnam Style may bring a smile to your face. But one bite of a super moist, decadently rich, frosting slathered piece of chocolate cake wins hands down. Like this recipe from Patti for Secret Cake. I’m not sure why its called secret cake. Maybe because it’s so good you’ll want to keep it a secret. All I know is I’m glad she didn’t keep her recipe a secret from us!


Tasty Kitchen Blog: Secret Cake. Guest post by Amber Potter of Sprinkled with Flour, recipe submitted by TK member Patti Roberson.

You’ll need: buttermilk, baking soda, self-rising flour, sugar, vegetable shortening, butter, water, cocoa, eggs, vanilla, powdered sugar, and walnuts.


Tasty Kitchen Blog: Secret Cake. Guest post by Amber Potter of Sprinkled with Flour, recipe submitted by TK member Patti Roberson.

Preheat oven to 400ºF. Spray a 9 x 13 pan with cooking spray. Pour 1/2 cup buttermilk into a 1 cup measuring cup, add baking soda and stir. Set aside.


Tasty Kitchen Blog: Secret Cake. Guest post by Amber Potter of Sprinkled with Flour, recipe submitted by TK member Patti Roberson.

In a large mixing bowl sift together the flour and sugar and set aside.


Tasty Kitchen Blog: Secret Cake. Guest post by Amber Potter of Sprinkled with Flour, recipe submitted by TK member Patti Roberson.

In a medium saucepan over medium heat, combine the water, vegetable shortening, cocoa, and 1 stick of butter. Stir until combined and the butter and shortening have melted. Cook until this mixture comes to a slight boil. Remove from heat.


Tasty Kitchen Blog: Secret Cake. Guest post by Amber Potter of Sprinkled with Flour, recipe submitted by TK member Patti Roberson.

Pour the cocoa mixture into the dry ingredients and mix until combined. Add the buttermilk/soda mixture and scrape to get all of the mixture into the bowl. 


Tasty Kitchen Blog: Secret Cake. Guest post by Amber Potter of Sprinkled with Flour, recipe submitted by TK member Patti Roberson.

Mix at medium speed using an electric mixer and continue until well combined. 


Tasty Kitchen Blog: Secret Cake. Guest post by Amber Potter of Sprinkled with Flour, recipe submitted by TK member Patti Roberson.

Add eggs, one at a time and mix well after each addition. 


Tasty Kitchen Blog: Secret Cake. Guest post by Amber Potter of Sprinkled with Flour, recipe submitted by TK member Patti Roberson.

Add 1 teaspoon vanilla and mix well. 


Tasty Kitchen Blog: Secret Cake. Guest post by Amber Potter of Sprinkled with Flour, recipe submitted by TK member Patti Roberson.

Pour into prepared pan. 


Tasty Kitchen Blog: Secret Cake. Guest post by Amber Potter of Sprinkled with Flour, recipe submitted by TK member Patti Roberson.

Bake at 400ºF for 20-22 minutes.


Tasty Kitchen Blog: Secret Cake. Guest post by Amber Potter of Sprinkled with Flour, recipe submitted by TK member Patti Roberson.

With about 5 minutes left on the baking time, make the frosting: In a medium saucepan combine 1/3 cup buttermilk, 1/3 cup cocoa and 1 stick of butter over medium low heat and stir as butter melts. Once it’s melted and combined stir constantly while cooking for about 3 minutes longer. Don’t worry if it starts to separate and looks like a curdled mess, it will be fine.


Tasty Kitchen Blog: Secret Cake. Guest post by Amber Potter of Sprinkled with Flour, recipe submitted by TK member Patti Roberson.

Remove pan from heat and add the powdered sugar. Mix well using an electric mixer. Once combined add 1 teaspoon vanilla and chopped nuts, mix well. 


Tasty Kitchen Blog: Secret Cake. Guest post by Amber Potter of Sprinkled with Flour, recipe submitted by TK member Patti Roberson.

Now pour over the hot cake.


Tasty Kitchen Blog: Secret Cake. Guest post by Amber Potter of Sprinkled with Flour, recipe submitted by TK member Patti Roberson.

This cake is really moist and has great flavor, and the frosting is so smooth and as satiny I could eat it by itself.


Tasty Kitchen Blog: Secret Cake. Guest post by Amber Potter of Sprinkled with Flour, recipe submitted by TK member Patti Roberson.

Okay, I did eat it by itself—a lot. Thanks Patti for sharing this recipe with us. It’s an awesome secret!


Printable Recipe

Secret Cake

4.75 Mitt(s) 4 Rating(s)4 votes, average: 4.75 out of 54 votes, average: 4.75 out of 54 votes, average: 4.75 out of 54 votes, average: 4.75 out of 54 votes, average: 4.75 out of 5

Prep Time:

Cook Time:

Difficulty: Easy

Servings: 16

16
x

Print Options

Page size Letter 3x5 4x6
Text Size Small Medium Large
Content Include description
Include prep time, etc.
Show image

Description

The most wonderful chocolate cake. This recipe is a keeper. This recipe was given to me more than 30 years ago by my Mom’s neighbor, Sharon Kelley. I have changed the nuts over the years and have even made it without nuts for my son-in-law and my K-3 class at work. Baking it in the jelly roll pan gives more slices but in a brownie like piece which is easier for kids to handle.

Ingredients

  • FOR THE CAKE:
  • ½ cups Buttermilk
  • 1 teaspoon Baking Soda
  • 2 cups Self-Rising Flour
  • 2 cups Sugar
  • 1 cup Water
  • ½ cups Crisco - Solid Shortening
  • ¼ cups Cocoa Powder
  • 1 stick Butter
  • 3  Eggs
  • 1 teaspoon Vanilla
  • FOR THE FROSTING:
  • ⅓ cups Buttermilk
  • ⅓ cups Cocoa Powder
  • 1 stick Butter
  • 16 ounces, weight Powdered Sugar
  • 1 teaspoon Vanilla
  • 1 cup Chopped Walnuts

Preparation Instructions

Note: All ingredients need to be at room temperature.

Preheat oven to 400 F. Spray a 9 x 13 pan with cooking spray.

Pour 1/2 cup buttermilk into a 1 cup measuring cup, add baking soda and stir. Set aside.

In a large mixing bowl sift together flour and sugar and set aside.

In a medium sauce pan over medium heat combine the following: water, Crisco, 1/4 cup cocoa and 1 stick butter. Stir until combined and butter and crisco are melted. Cook until this mixture comes to a slight boil. Remove from heat and pour into the dry ingredients and mix until combined. Add buttermilk/soda mixture and scrape to get all of the mixture into the bowl. Mix at medium speed using an electric mixer and continue until well combined. Add eggs, one at a time and mix well after each addition. Add 1 teaspoon vanilla and mix well.

Pour into prepared pan and bake at 400 F for 20-22 minutes.

With about 5 minutes left on the baking time make the frosting: In a medium saucepan combine 1/3 cup buttermilk, 1/3 cup cocoa and 1 stick of butter over medium low heat and stir as butter melts. Once melted and combined stir constantly while cooking for about 3 minutes longer. Remove pan from heat and add powdered sugar. Mix well using an electric mixer. Once combined add 1 teaspoon vanilla and chopped nuts, mix well. Pour over the hot cake.

This can also be baked in a jelly roll pan, just reduce baking time to 15 minutes. Do not substitute margarine for butter. You may also use different nuts.


_______________________________________

Amber is a stay at home mom who lives in the heart of the Missouri Ozarks. It’s a long way from where she grew up, in Wales (yes, way over in the U.K.). The recipes in her blog Sprinkled with Flour include her original creations as well as her family recipes. Go check them out!


Profile photo of georgiapellegrini

Guacamole Chicken Salad

Posted by in Step-by-Step Recipes

Tasty Kitchen Blog: Guacamole Chicken Salad. Guest post by Georgia Pellegrini, recipe submitted by TK member Natalie Perry of Perry's Plate.

 
I’m on a salad kick these days, especially because they are a great way to use up leftover ingredients, like a roasted chicken. This Guacamole Chicken Salad from Tasty Kitchen member Natalie Perry looked dreamy. It includes avocado and roasted chicken, two of my favorite things in the universe, plus a whole host of other delicious ingredients. Try this today!


Tasty Kitchen Blog: Guacamole Chicken Salad. Guest post by Georgia Pellegrini, recipe submitted by TK member Natalie Perry of Perry's Plate.

You will need: salsa verde or green chilies, plain Greek yogurt, ground cumin, feta or cotija cheese, avocado, lime juice, cilantro, scallions, and chopped roasted chicken.


Tasty Kitchen Blog: Guacamole Chicken Salad. Guest post by Georgia Pellegrini, recipe submitted by TK member Natalie Perry of Perry's Plate.

In a bowl combine the scallions, chicken and yogurt …


Tasty Kitchen Blog: Guacamole Chicken Salad. Guest post by Georgia Pellegrini, recipe submitted by TK member Natalie Perry of Perry's Plate.

Along with the salsa verde and cilantro.


Tasty Kitchen Blog: Guacamole Chicken Salad. Guest post by Georgia Pellegrini, recipe submitted by TK member Natalie Perry of Perry's Plate.

Sprinkle your cheese on top.


Tasty Kitchen Blog: Guacamole Chicken Salad. Guest post by Georgia Pellegrini, recipe submitted by TK member Natalie Perry of Perry's Plate.

And add the chopped avocado and lime juice.


Tasty Kitchen Blog: Guacamole Chicken Salad. Guest post by Georgia Pellegrini, recipe submitted by TK member Natalie Perry of Perry's Plate.

Next sprinkle with the ground cumin and give it a stir.


Tasty Kitchen Blog: Guacamole Chicken Salad. Guest post by Georgia Pellegrini, recipe submitted by TK member Natalie Perry of Perry's Plate.

Put several big spoonfuls over your favorite lettuce or on a slice of bread and dig in. You can use extra big lettuce leaves and make lettuce wraps or scoop it up with tortilla chips. This was light and delicious, a perfect lunch or picnic dish. Keep it on your list as the months get warmer!

Thank you Natalie for this delicious recipe. Check out her website Perry’s Plate for other fab recipes!


Printable Recipe

Guacamole Chicken Salad

See post on Natalie | Perry's Plate’s site!
5.00 Mitt(s) 2 Rating(s)2 votes, average: 5.00 out of 52 votes, average: 5.00 out of 52 votes, average: 5.00 out of 52 votes, average: 5.00 out of 52 votes, average: 5.00 out of 5

Prep Time:

Cook Time:

Difficulty: Easy

Servings: 3

3
x

Print Options

Page size Letter 3x5 4x6
Text Size Small Medium Large
Content Include description
Include prep time, etc.
Show image

Description

Leftover chicken comes to life smothered in a deconstructed guacamole!

Ingredients

  • 2 cups Leftover Cooked Chicken, Cubed Or Shredded
  • ⅓ cups Whole Plain Greek Yogurt
  • 3 Tablespoons Salsa Verde (or A 4-ounce Can Of Diced Green Chiles)
  • 1 whole Green Onion, Chopped
  • ¼ cups Fresh Chopped Cilantro
  • ¼ cups Crumbed Cotija Or Feta Cheese
  • ½ whole Avocado, Pitted, Peeled, And Diced
  • ½ whole Lime, Juiced
  • 1 pinch Salt To Taste
  • 1 pinch Cumin (a Generous Pinch)

Preparation Instructions

In a medium bowl combine the chicken, yogurt, salsa verde, onion, cilantro, and Cotija cheese. Mix thoroughly. Gently fold in the avocado. Add the lime juice, salt, and cumin and stir again gently. Taste and adjust seasonings if necessary.

Serve wrapped in a tortilla, in a pita, with chips, or over salad greens. Or by itself.


_______________________________________

There’s so much to say about Georgia, we don’t know where to start. Leaving Wall Street for the French Culinary Institute, followed by a stint at the Gramercy Tavern and La Chassagnette in France, her passion for food and food traditions are evident and inspiring. Visit her site at Georgia Pellegrini, where you’ll find more recipes, photos, learn all about her wonderful books Girl Hunter and Food Heroes, and enjoy her latest adventures.


Profile photo of Erika (TK)

Looks Delicious! Meat Lovers’ Black Bean Soup

Posted by in Looks Delicious!

Profile photo of georgiapellegrini

Massaged Kale Salad

Posted by in Step-by-Step Recipes

  I’m a kale fanatic and I like it any which way. This Protein-Packed Massaged Kale Salad recipe from TK member KGracie71 caught my eye because it is totally raw, relying on the acid from the vinaigrette to tenderize the kale. Keeping it raw means it has a great texture and maximum nutrition in each […]

Profile photo of HowSweetEats

Spicy Buffalo Chicken Cannoli

Posted by in Step-by-Step Recipes

  As a lover of all things Buffalo chicken, I am constantly trying to find new ways to use the flavor combination. You could say that I’m a bit of a Buffalo chicken … freak? But that’s okay. The first step is admitting you have a problem, right? Well. I might have a big problem […]

Profile photo of Natalie | Perry's Plate

Oat-Almond Pie Crust

Posted by in Baking, Step-by-Step Recipes

  If I asked you what you disliked about making pie crust, I bet I could guess the top two answers: cutting the butter into the flour and rolling out the dough. I’m right, huh? That’s how I feel, too, which is why I love this recipe so much. The cutting part is much easier […]