The Pioneer Woman Tasty Kitchen
Profile photo of A Cozy Kitchen

Frozen Hot Chocolate!

Posted by in Step-by-Step Recipes

Tasty Kitchen Blog: Frozen Hot Chocolate. Guest post by Adrianna Adarme of A Cozy Kitchen, recipe submitted by TK member Cindi (wehearawho) of Mama Foodie.

Today’s post is from Adrianne and Caroline of A Cozy Kitchen. Their blog is so full of mouthwatering recipes and beautiful photographs, you could spend hours in there trying to figure out what to try first. They picked the perfect warm weather treat to share with us today: Frozen Hot Chocolate Milkshake from TK member MamaFoodie. Take it away, gals!

_______________________________________


Like every other human on planet earth, I, too love a good milkshake. With the summer swiftly approaching, I’ve been on the lookout for a new one to whip up on those hot, sweaty days LA is known for. That’s why when I saw this Frozen Hot Chocolate Milkshake by Tasty Kitchen member MamaFoodie, I knew I’d found my ticket to milkshake heaven. In her blog, Mama Foodie explains that this shake was inspired by the Frozen Hot Chocolate served at a famous NY eatery, Serendipity. I haven’t had the chance to try the original, but if it’s anything like this recipe, then their long lines and extensive history make complete sense.

Most milkshakes involve just a few ingredients thrown together in a blender; admittedly, this involves a few extra steps. Trust me when I say it’s absolutely worth it.

Grab your blender. Let’s get our milkshake on!

Here’s the play-by-play:


Tasty Kitchen Blog: Frozen Hot Chocolate. Guest post by Adrianna Adarme of A Cozy Kitchen, recipe submitted by TK member Cindi (wehearawho) of Mama Foodie.

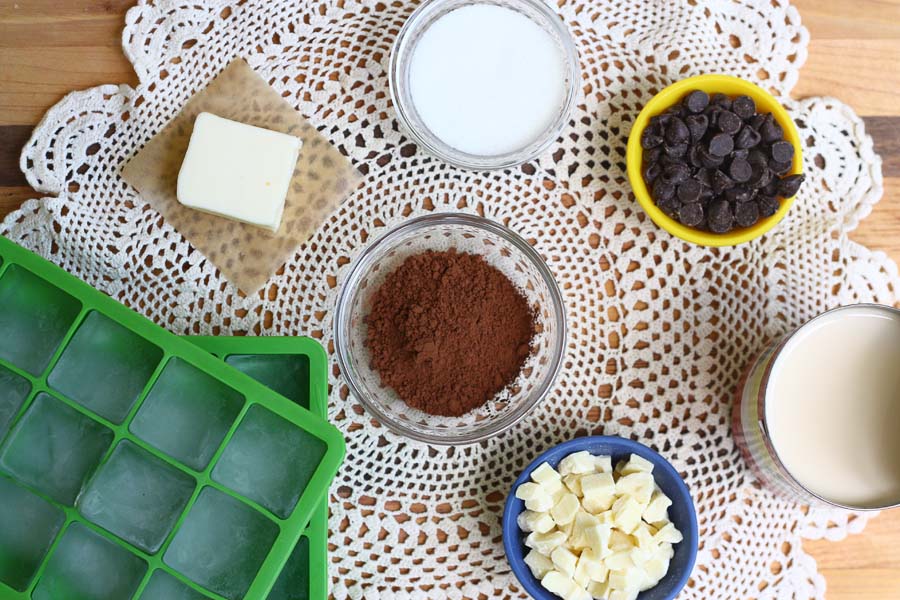
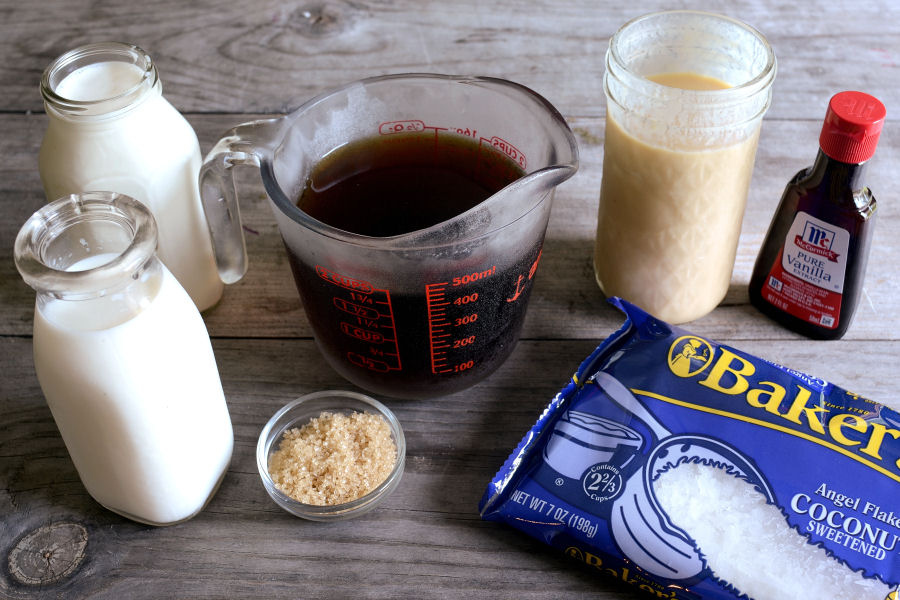
You’ll need to get some ingredients together, most of which you probably already have in your pantry/freezer. The players are: ice, butter, sugar, semi-sweet chocolate chips, hot chocolate mix (or in my case, Dutch processed cocoa powder), evaporated milk and white chocolate chips.


Tasty Kitchen Blog: Frozen Hot Chocolate. Guest post by Adrianna Adarme of A Cozy Kitchen, recipe submitted by TK member Cindi (wehearawho) of Mama Foodie.

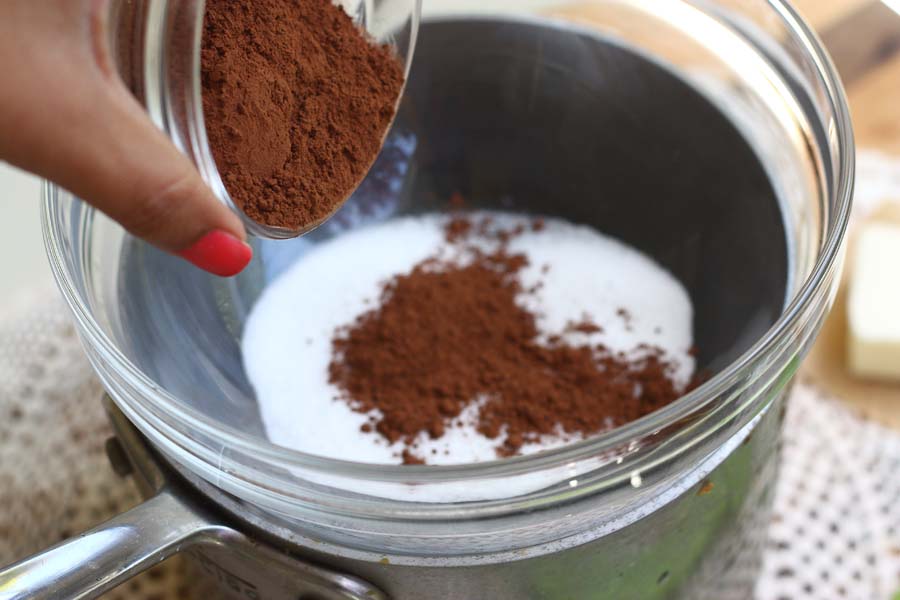
In a double boiler (or a bowl set over a pot with simmering water), add the sugar, hot chocolate mix…


Tasty Kitchen Blog: Frozen Hot Chocolate. Guest post by Adrianna Adarme of A Cozy Kitchen, recipe submitted by TK member Cindi (wehearawho) of Mama Foodie.

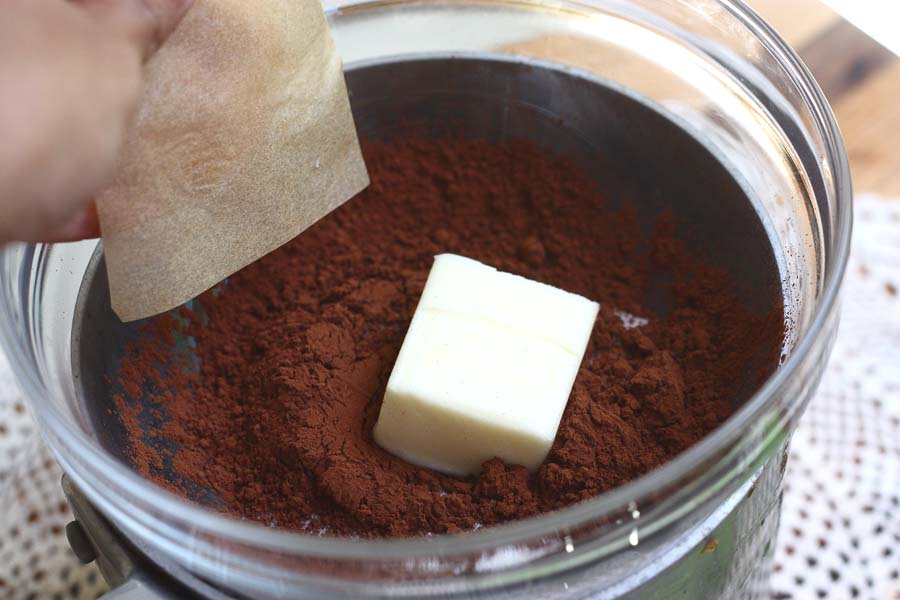
And butter. Place over medium heat and mix until combined.


Tasty Kitchen Blog: Frozen Hot Chocolate. Guest post by Adrianna Adarme of A Cozy Kitchen, recipe submitted by TK member Cindi (wehearawho) of Mama Foodie.

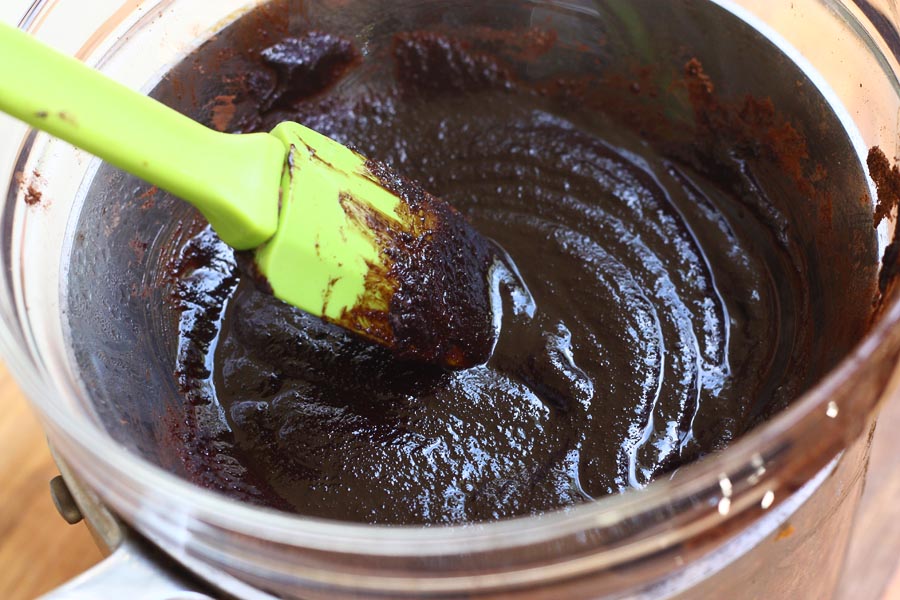
It’ll become a thick chocolate, buttery paste. Try not to eat it.


Tasty Kitchen Blog: Frozen Hot Chocolate. Guest post by Adrianna Adarme of A Cozy Kitchen, recipe submitted by TK member Cindi (wehearawho) of Mama Foodie.

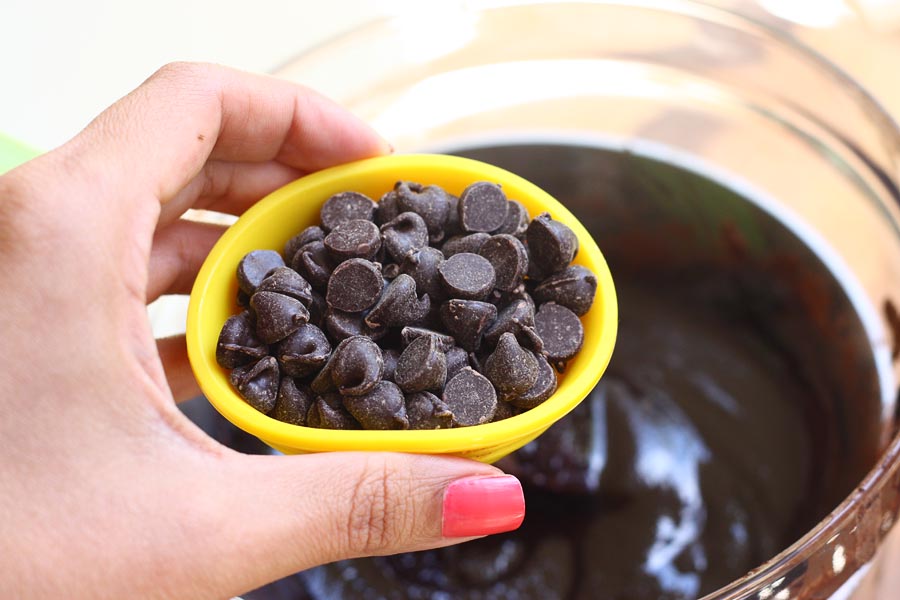
Next add the semi-sweet chocolate chips.


Tasty Kitchen Blog: Frozen Hot Chocolate. Guest post by Adrianna Adarme of A Cozy Kitchen, recipe submitted by TK member Cindi (wehearawho) of Mama Foodie.

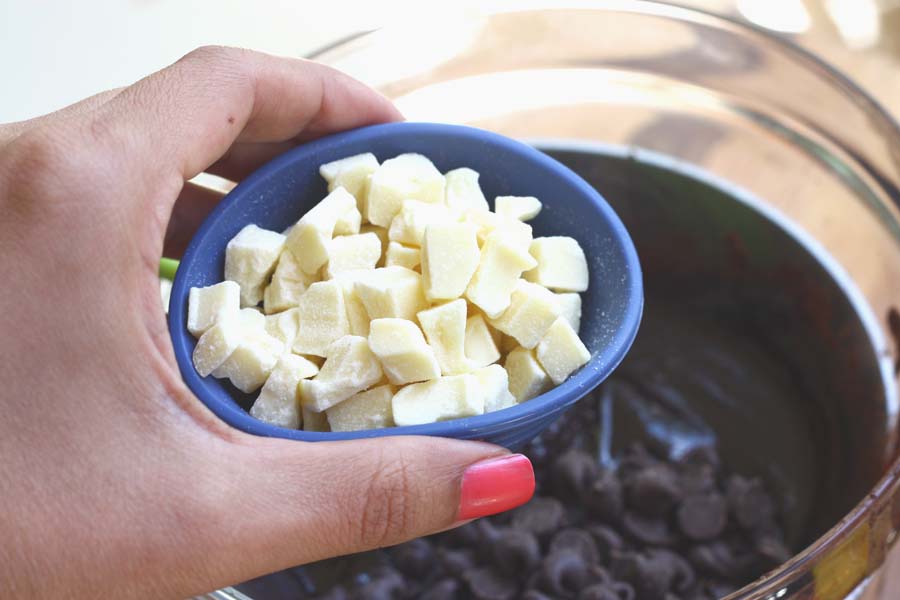
And the white chocolate chips and mix over medium-low heat until they’re melted.


Tasty Kitchen Blog: Frozen Hot Chocolate. Guest post by Adrianna Adarme of A Cozy Kitchen, recipe submitted by TK member Cindi (wehearawho) of Mama Foodie.

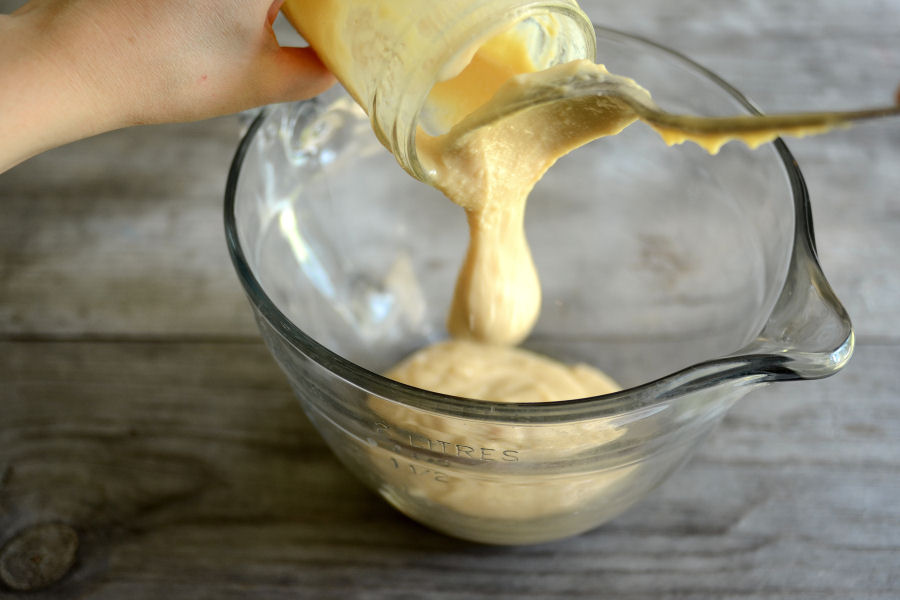
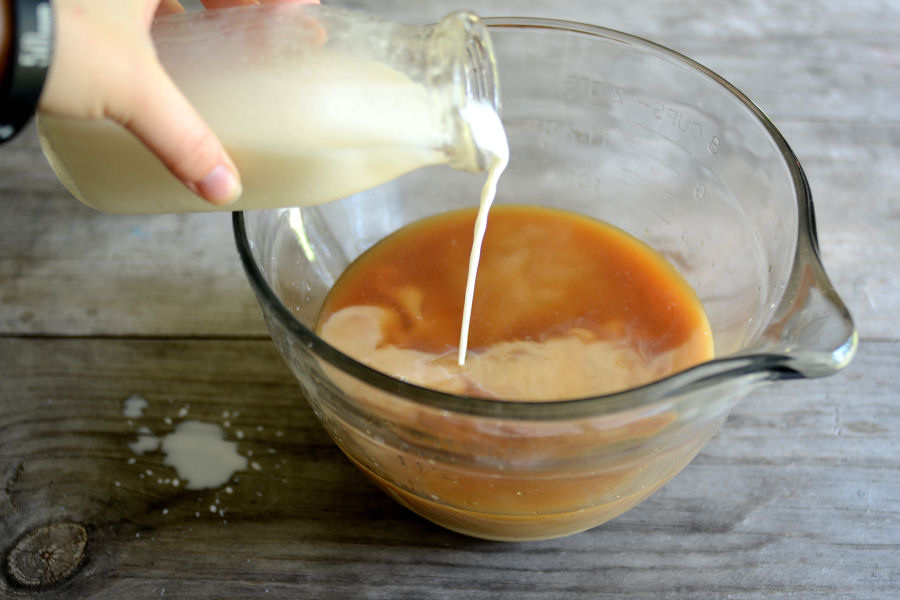
At this point, the mixture will be super thick. Take the pan off of the heat and pour in 1/2 cup of evaporated milk and mix well. The rest of the can will be used in a bit, so keep it close by.


Tasty Kitchen Blog: Frozen Hot Chocolate. Guest post by Adrianna Adarme of A Cozy Kitchen, recipe submitted by TK member Cindi (wehearawho) of Mama Foodie.

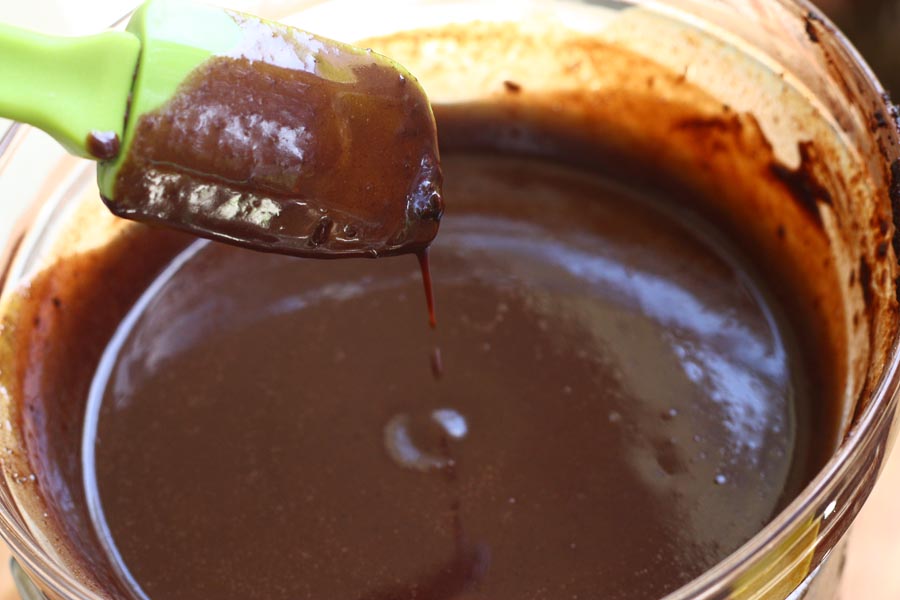
To avoid a watery milkshake, you want to bring the mixture to room temperature. This is the perfect time to wash some dishes, curl your hair or put on some eyeliner.


Tasty Kitchen Blog: Frozen Hot Chocolate. Guest post by Adrianna Adarme of A Cozy Kitchen, recipe submitted by TK member Cindi (wehearawho) of Mama Foodie.

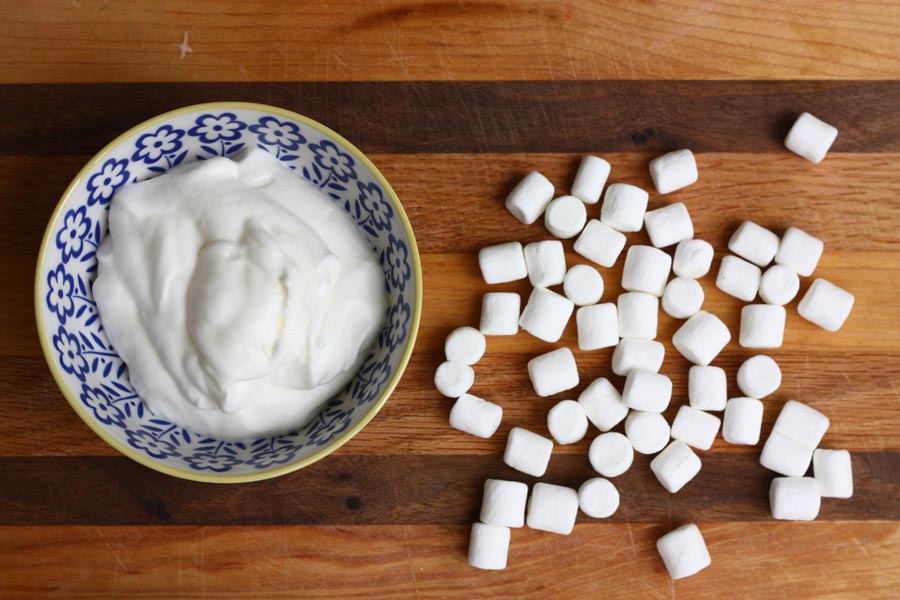
Or better yet, make some homemade whipped cream and grab a few handfuls of marshmallows. Set them aside.


Tasty Kitchen Blog: Frozen Hot Chocolate. Guest post by Adrianna Adarme of A Cozy Kitchen, recipe submitted by TK member Cindi (wehearawho) of Mama Foodie.

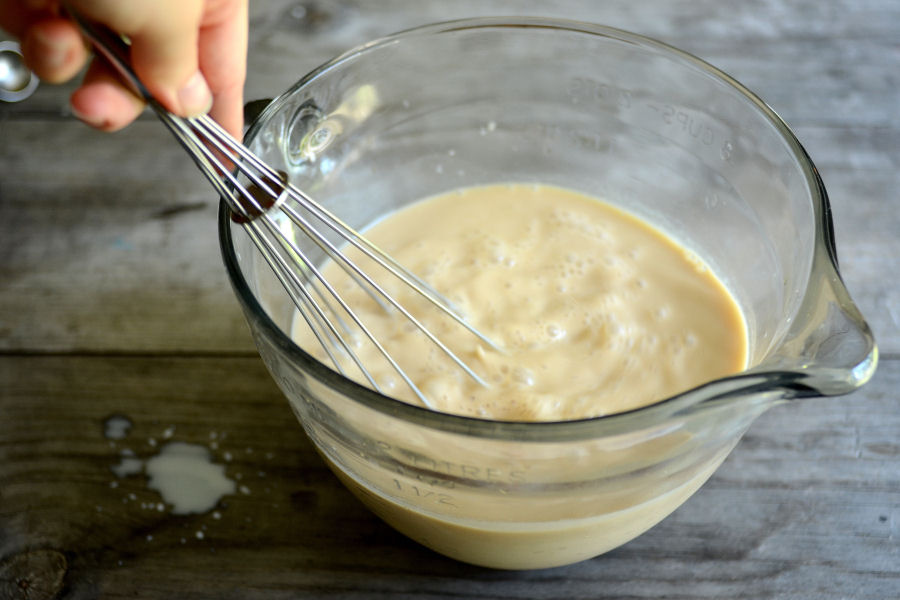
When the mixture is cooled down, grab your blender. When you get to this step, get excited. This means that you’ll be sipping on a milkshake in under 5 minutes.
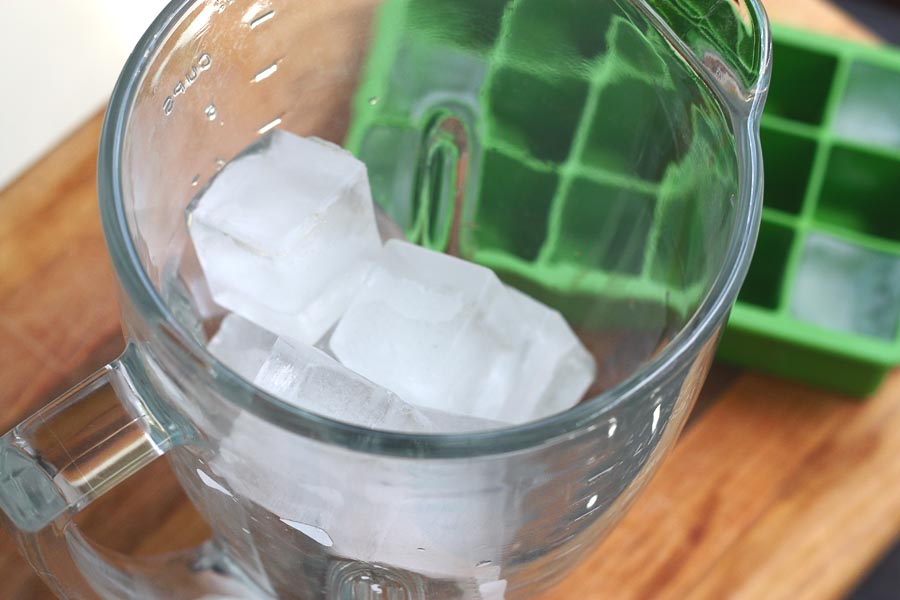
Add the ice cubes.


Tasty Kitchen Blog: Frozen Hot Chocolate. Guest post by Adrianna Adarme of A Cozy Kitchen, recipe submitted by TK member Cindi (wehearawho) of Mama Foodie.

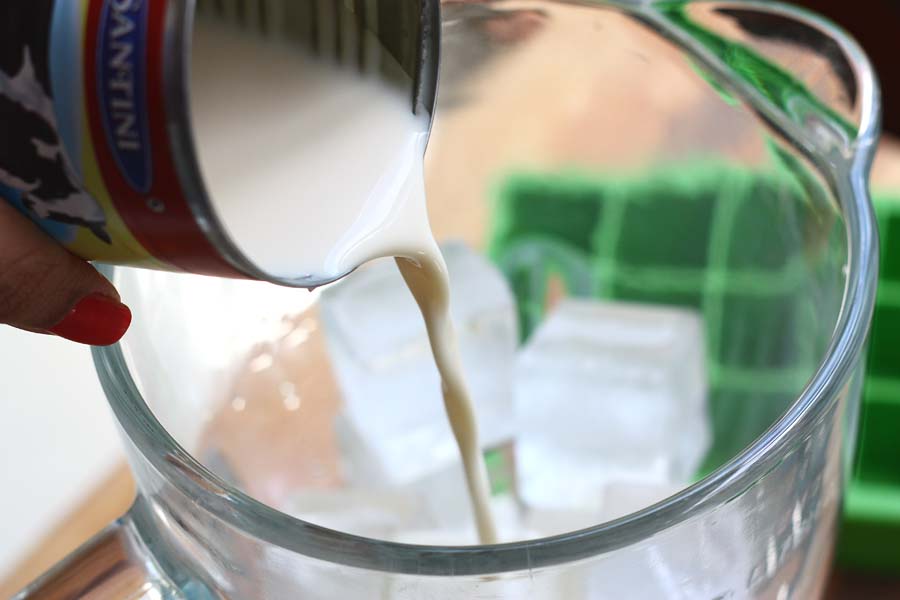
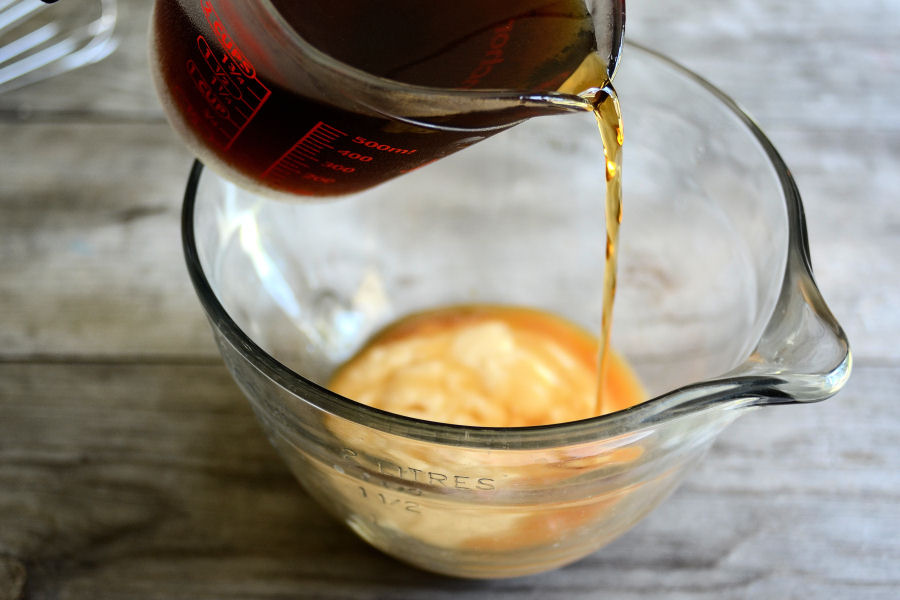
Next, pour in the remaining evaporated milk.


Tasty Kitchen Blog: Frozen Hot Chocolate. Guest post by Adrianna Adarme of A Cozy Kitchen, recipe submitted by TK member Cindi (wehearawho) of Mama Foodie.

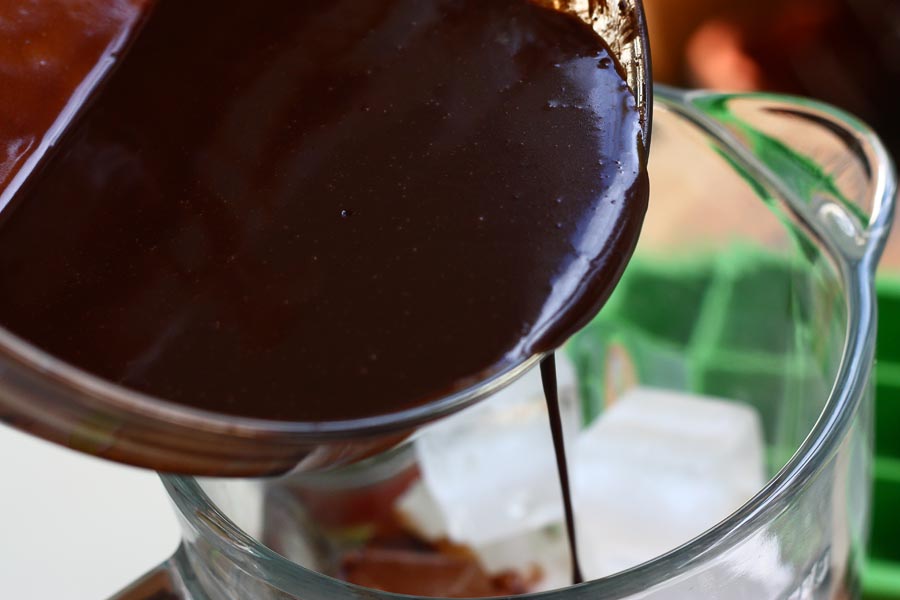
And then add the chocolate mixture. Good heavens!


Tasty Kitchen Blog: Frozen Hot Chocolate. Guest post by Adrianna Adarme of A Cozy Kitchen, recipe submitted by TK member Cindi (wehearawho) of Mama Foodie.

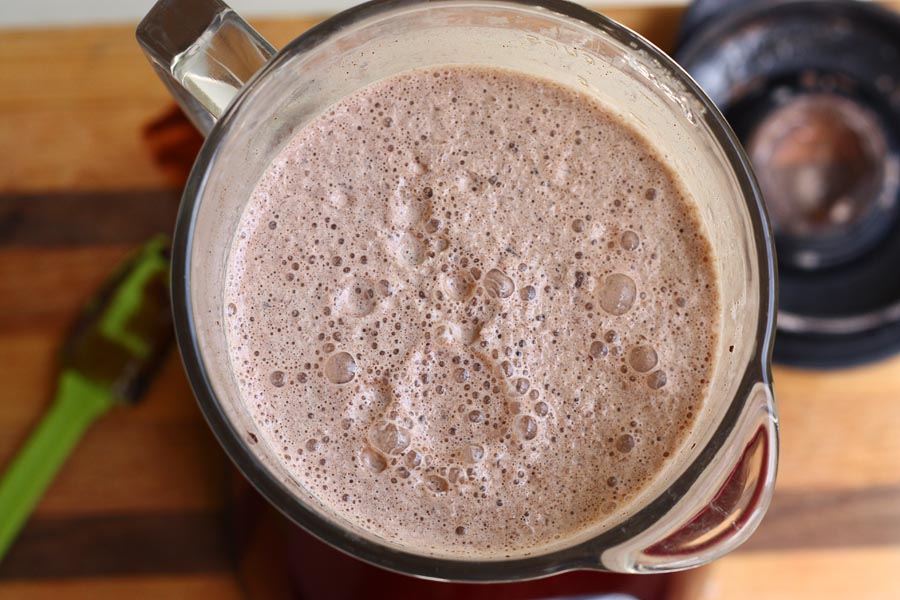
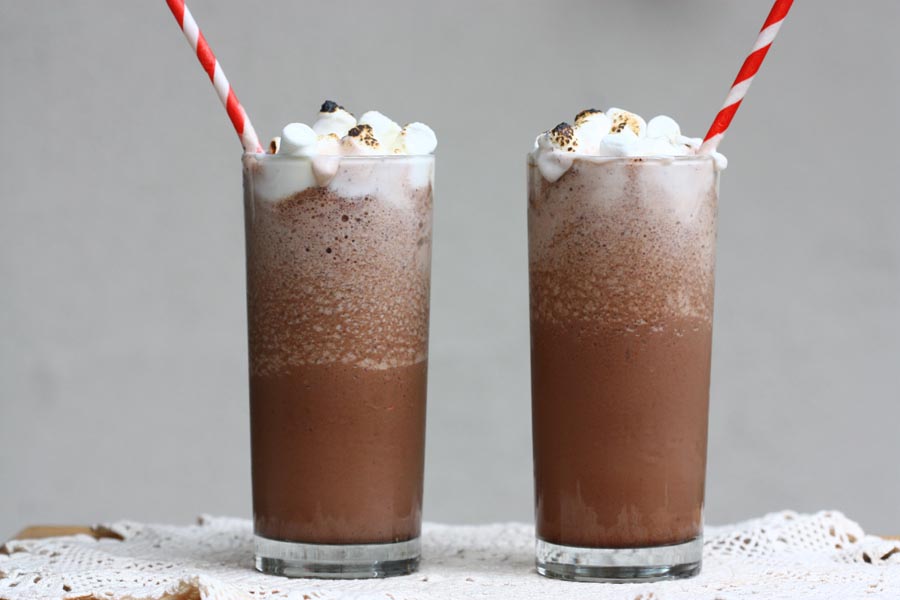
Blend everything together for a minute or so. When you take off the top you’ll be met with this chocolate, icy deliciousness!


Tasty Kitchen Blog: Frozen Hot Chocolate. Guest post by Adrianna Adarme of A Cozy Kitchen, recipe submitted by TK member Cindi (wehearawho) of Mama Foodie.“>

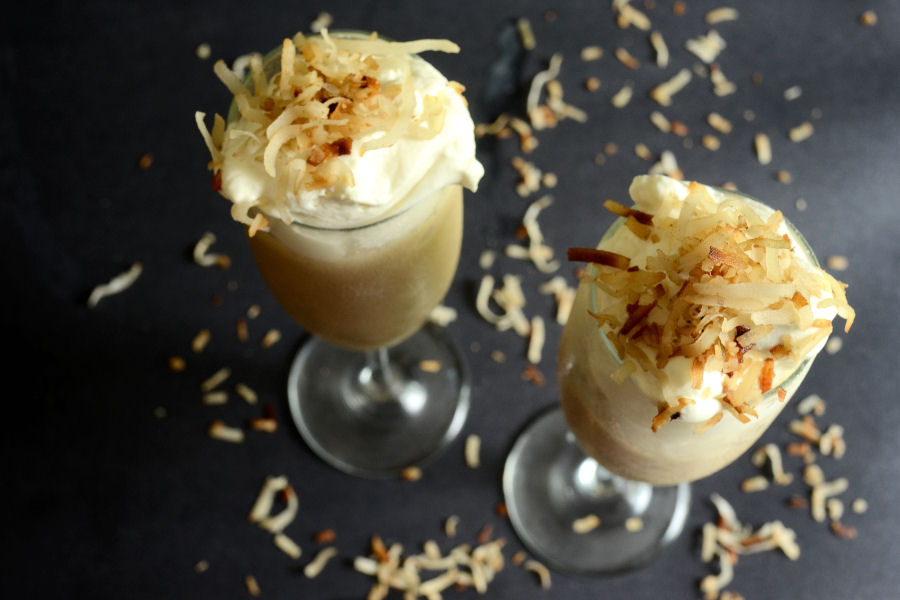
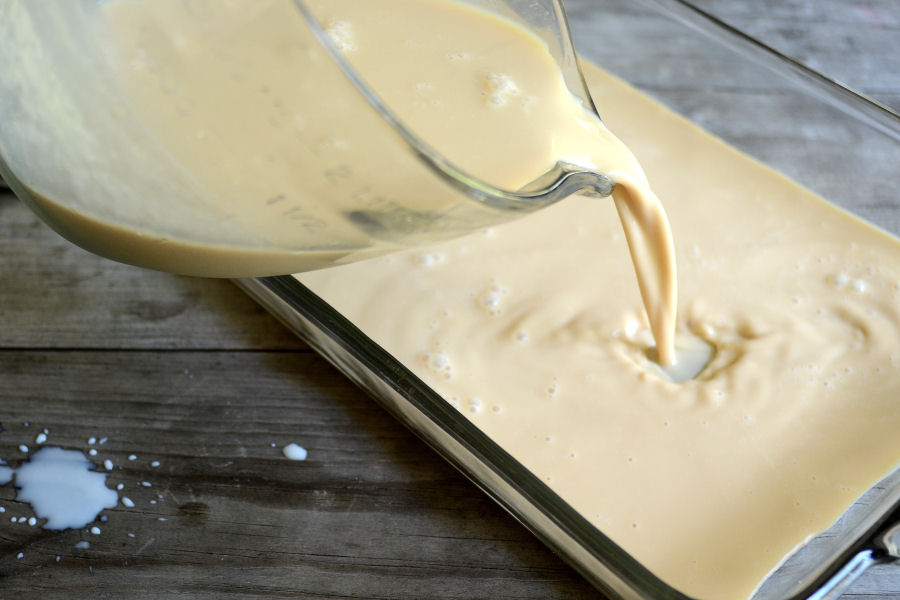
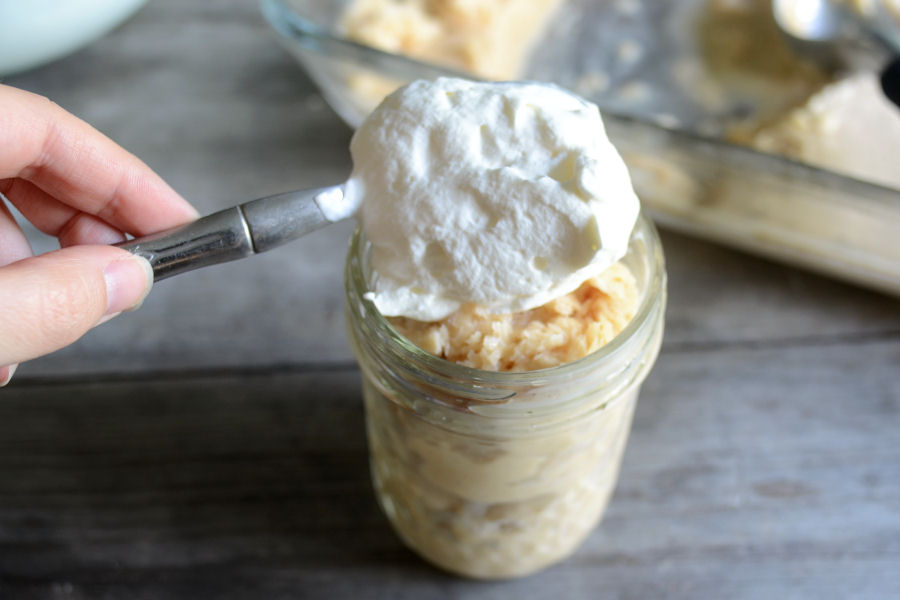
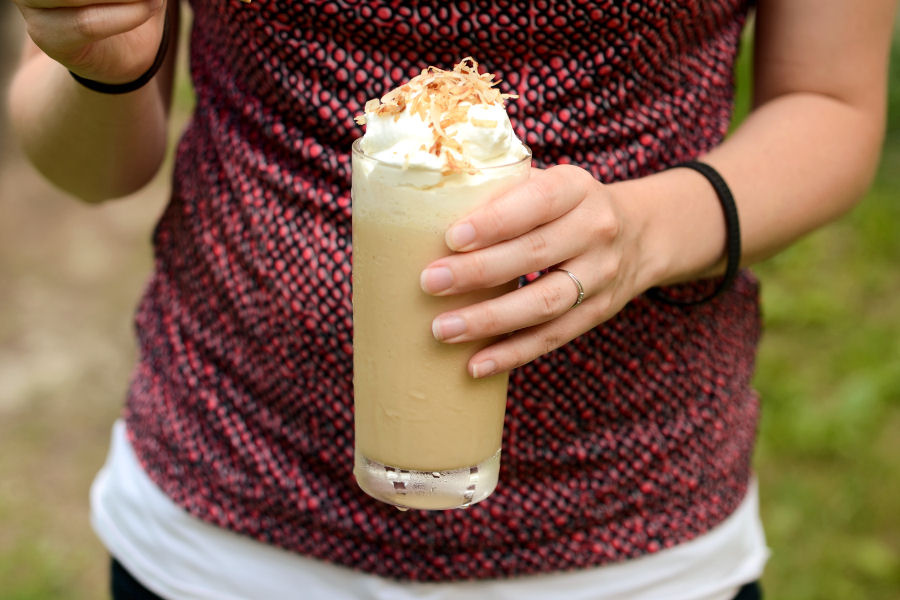
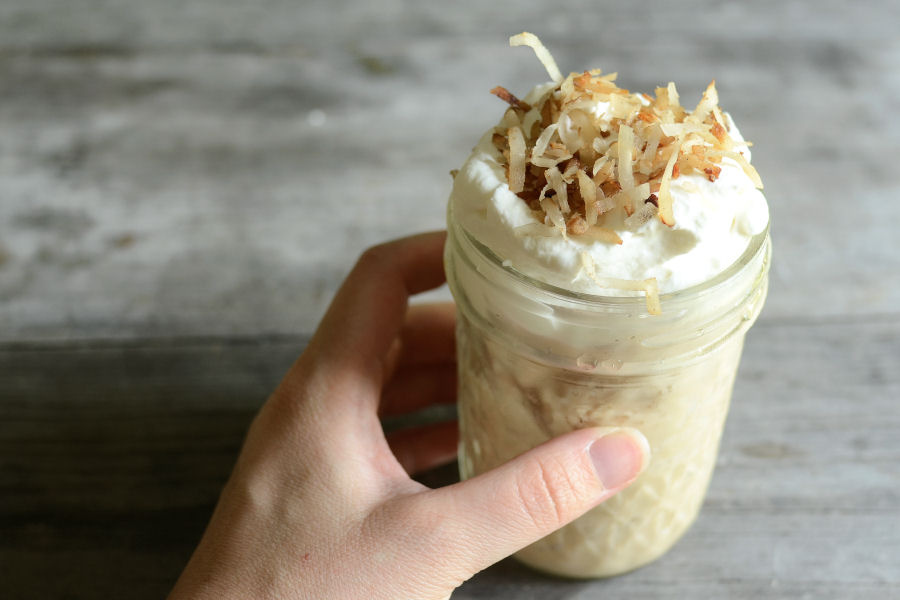
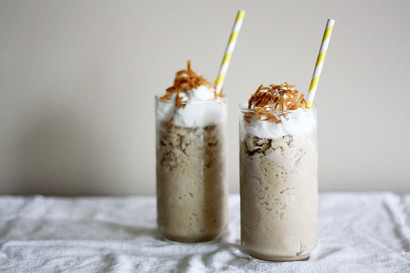
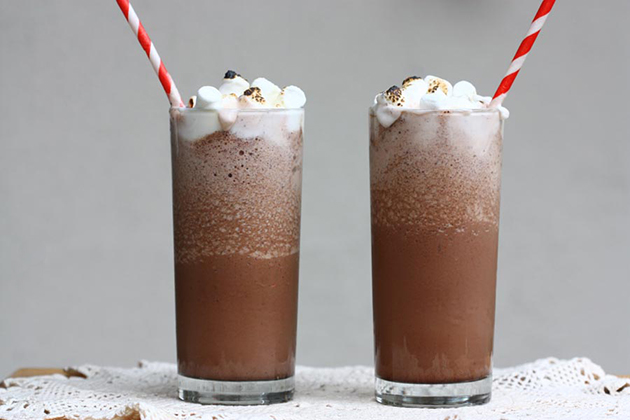
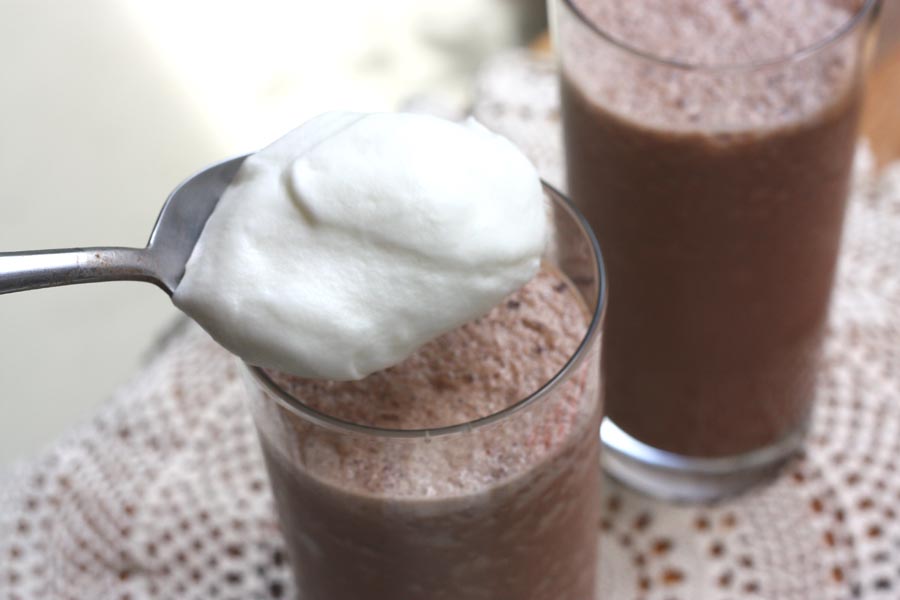
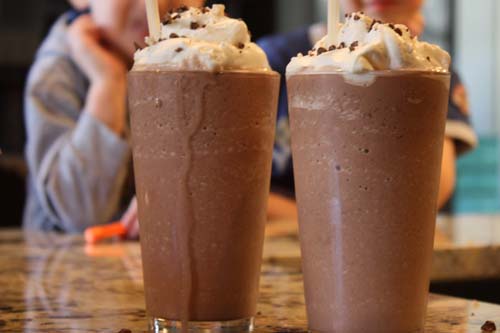
Take a few glasses and fill them up! Top with the whipped cream.


Tasty Kitchen Blog: Frozen Hot Chocolate. Guest post by Adrianna Adarme of A Cozy Kitchen, recipe submitted by TK member Cindi (wehearawho) of Mama Foodie.

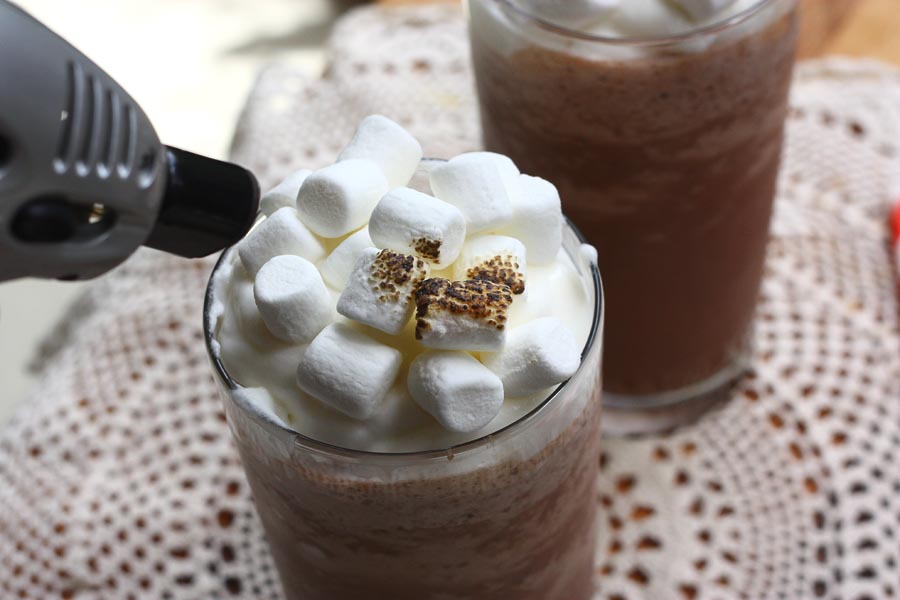
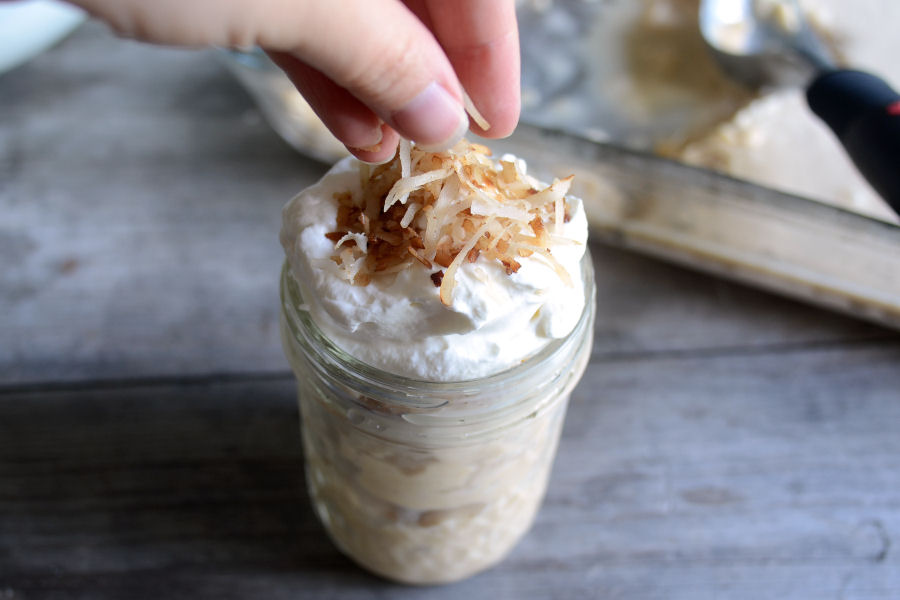
And sprinkle some marshmallows on top. Now if you’re feeling really crazy, grab your torch and toast those suckers.


Tasty Kitchen Blog: Frozen Hot Chocolate. Guest post by Adrianna Adarme of A Cozy Kitchen, recipe submitted by TK member Cindi (wehearawho) of Mama Foodie.

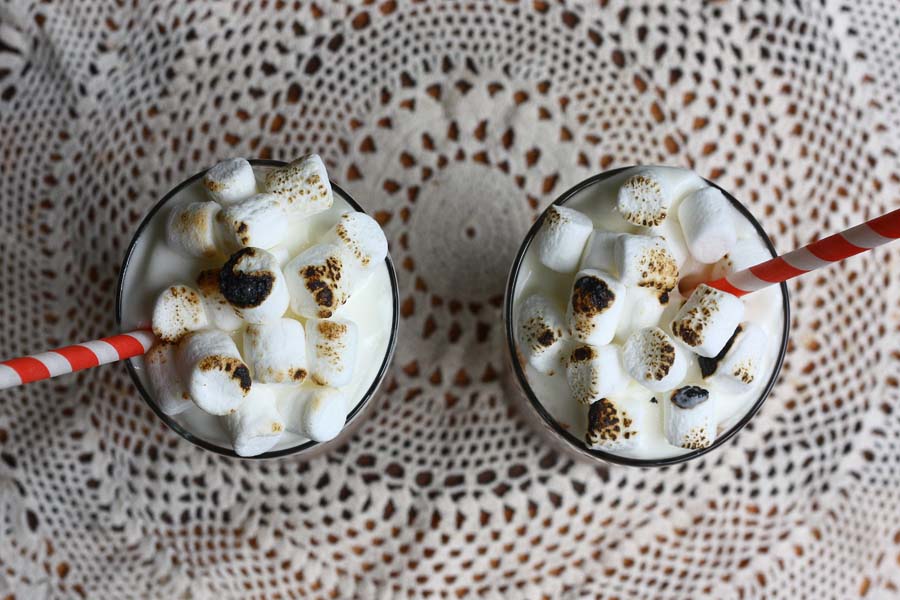
It doesn’t get more delicious than toasted marshmallows over light whipped cream with a frozen chocolate milkshake underneath.


Tasty Kitchen Blog: Frozen Hot Chocolate. Guest post by Adrianna Adarme of A Cozy Kitchen, recipe submitted by TK member Cindi (wehearawho) of Mama Foodie.

As I sat sipping on this chocolate sexiness, I tried to think of ways to improve on it, or provide you all with alternatives, but really there was no use. This recipe is pretty much perfect!

Thanks to Cindi for this yummy recipe! Be sure to check out her blog Mama Foodie for even more deliciousness.


Printable Recipe

Frozen Hot Chocolate

See post on MamaFoodie’s site!
4.85 Mitt(s) 14 Rating(s)14 votes, average: 4.85 out of 514 votes, average: 4.85 out of 514 votes, average: 4.85 out of 514 votes, average: 4.85 out of 514 votes, average: 4.85 out of 5

Prep Time:

Cook Time:

Difficulty: Easy

Servings: 4

4
x

Print Options

Page size Letter 3x5 4x6
Text Size Small Medium Large
Content Include description
Include prep time, etc.
Show image

Description

My take on the famous treat from a NYC restaurant. Hot chocolate flavor served up icy cold!

Ingredients

  • 3 Tablespoons Granulated Sugar
  • 1 package Hot Cocoa Mix (about 3 Tablespoons)
  • 2 Tablespoons Unsalted Butter
  • ⅓ cups Semi-Sweet Chocolate Chips
  • ⅓ cups White Chocolate Chips
  • 12 ounces, fluid Can Evaporated Milk, Divided
  • 4-½ cups Ice
  • Whipped Cream, To Taste
  • Mini Marshmallows, To Taste

Preparation Instructions

Combine sugar, cocoa mix, and butter in the top of a double boiler that is set over gently boiling water. Stir often until melted and a smooth paste forms. Add semi-sweet & white chocolate chips; stir. When chips begin to melt, slowly stir in 1/2 cup of evaporated milk. Stir until smooth. Cool to room temperature.

Combine the chocolate base mixture, the remaining evaporated milk and ice in a blender (you can do this in batches) and cover. Blend until smooth. Pour into frosty glasses. Top each with whipped cream. Sprinkle with additional chopped chocolate chips & mini marshmallows, if desired.


_______________________________________

Adrianna and Caroline are the lovely ladies behind the scrumptious blog A Cozy Kitchen. It’s filled with all kinds of mouthwatering recipes and gorgeous photography. Whether you’re in the mood for something vegetarian or meaty, fancy or pure comfort, light or decadent, there’s sure to be something there for everyone.


Profile photo of Erica Lea

Frozen Thai Iced Coffee

Posted by in Step-by-Step Recipes

Tasty Kitchen Blog: Frozen Thai Iced Coffee. Guest post by Erica Kastner of Cooking for Seven, recipe submitted by TK member Stephanie of Girl Versus Dough.

 
Let’s all take a moment of silence and respect for whoever first invented iced coffee. It’s about the best summertime treat (root beer floats are a close second). In fact, it’s one of my favorite drinks any time of the year.

Today’s recipe—Frozen Thai Iced Coffee—-is brought to us by Stephanie, adapted from King Arthur Flour. It’s an indulgent treat, complete with sweetened condensed milk, toasted coconut, and heavy cream. Oh yes.

Now, before you get all up on your high horse and complain, “That isn’t REAL Thai Iced Coffee,” let me make a concession. This is more of a Thai-inspired or, perhaps more accurately, Vietnamese-inspired iced coffee. Erika informed me that authentic Thai iced coffee is typically made with cardamom-infused coffee and evaporated milk instead of sweetened condensed. 

That sounds lovely, and I may have to try it sometime. But if you’re looking for a straight-up frozen coffee, this is an excellent recipe to try. Let me show you how to make it!


Tasty Kitchen Blog: Frozen Thai Iced Coffee. Guest post by Erica Kastner of Cooking for Seven, recipe submitted by TK member Stephanie of Girl Versus Dough.

Here’s what you’ll need: strong coffee (I cold-brewed mine), sweetened condensed milk (I made mine from scratch), milk, vanilla, heavy cream, sugar (I used demerara), and coconut flakes.


Tasty Kitchen Blog: Frozen Thai Iced Coffee. Guest post by Erica Kastner of Cooking for Seven, recipe submitted by TK member Stephanie of Girl Versus Dough.

Scoop the sweetened condensed milk into a large bowl.


Tasty Kitchen Blog: Frozen Thai Iced Coffee. Guest post by Erica Kastner of Cooking for Seven, recipe submitted by TK member Stephanie of Girl Versus Dough.

Pour in the coffee …


Tasty Kitchen Blog: Frozen Thai Iced Coffee. Guest post by Erica Kastner of Cooking for Seven, recipe submitted by TK member Stephanie of Girl Versus Dough.

The milk …


Tasty Kitchen Blog: Frozen Thai Iced Coffee. Guest post by Erica Kastner of Cooking for Seven, recipe submitted by TK member Stephanie of Girl Versus Dough.

And the vanilla extract.


Tasty Kitchen Blog: Frozen Thai Iced Coffee. Guest post by Erica Kastner of Cooking for Seven, recipe submitted by TK member Stephanie of Girl Versus Dough.

Whisk it all together until it’s nice and smooth. If you used hot coffee, you’ll need to chill this mixture in the refrigerator for 8 hours.


Tasty Kitchen Blog: Frozen Thai Iced Coffee. Guest post by Erica Kastner of Cooking for Seven, recipe submitted by TK member Stephanie of Girl Versus Dough.

Pour into a shallow pan (I used a 13×9-inch glass dish) and place in the freezer until solid, about 4 hours.


Tasty Kitchen Blog: Frozen Thai Iced Coffee. Guest post by Erica Kastner of Cooking for Seven, recipe submitted by TK member Stephanie of Girl Versus Dough.

Meanwhile, get your coconut nice and toasted. You can do this in the oven as well. I just prefer not having to preheat the oven.


Tasty Kitchen Blog: Frozen Thai Iced Coffee. Guest post by Erica Kastner of Cooking for Seven, recipe submitted by TK member Stephanie of Girl Versus Dough.

Whip the cream with the sugar. 


Tasty Kitchen Blog: Frozen Thai Iced Coffee. Guest post by Erica Kastner of Cooking for Seven, recipe submitted by TK member Stephanie of Girl Versus Dough.

Once the coffee mixture is solid, it’s ready to serve!


Tasty Kitchen Blog: Frozen Thai Iced Coffee. Guest post by Erica Kastner of Cooking for Seven, recipe submitted by TK member Stephanie of Girl Versus Dough.

Scoop some into a cup.


Tasty Kitchen Blog: Frozen Thai Iced Coffee. Guest post by Erica Kastner of Cooking for Seven, recipe submitted by TK member Stephanie of Girl Versus Dough.

Top with whipped cream.


Tasty Kitchen Blog: Frozen Thai Iced Coffee. Guest post by Erica Kastner of Cooking for Seven, recipe submitted by TK member Stephanie of Girl Versus Dough.

Finish off with a sprinkle of toasted coconut.


Tasty Kitchen Blog: Frozen Thai Iced Coffee. Guest post by Erica Kastner of Cooking for Seven, recipe submitted by TK member Stephanie of Girl Versus Dough.

Now go and enjoy!


Tasty Kitchen Blog: Frozen Thai Iced Coffee. Guest post by Erica Kastner of Cooking for Seven, recipe submitted by TK member Stephanie of Girl Versus Dough.

Thank you so much, Stephanie, for sharing this amazing drink with us! Make sure you check out her blog, Girl Versus Dough. Her recipes have me salivating, especially this Thai Shrimp Fried Rice.


Printable Recipe

Frozen Thai Iced Coffee

See post on Stephanie | Girl Versus Dough’s site!
0.00 Mitt(s) 0 Rating(s)0 votes, average: 0.00 out of 50 votes, average: 0.00 out of 50 votes, average: 0.00 out of 50 votes, average: 0.00 out of 50 votes, average: 0.00 out of 5

Prep Time:

Cook Time:

Difficulty: Easy

Servings: 4

4
x

Print Options

Page size Letter 3x5 4x6
Text Size Small Medium Large
Content Include description
Include prep time, etc.
Show image

Description

Thai iced coffee turned into a frozen drink of wonderfulness.

Ingredients

  • 2 cups Strong Hot Coffee
  • 1 can (14 Oz. Size) Sweetened Condensed Milk
  • 1 cup Milk, 2-Percent Or Whole Milk
  • 1 teaspoon Vanilla
  • 1 cup Heavy Whipping Cream
  • 1 Tablespoon Granulated Sugar
  • ½ cups Sweetened Coconut Flakes

Preparation Instructions

In a large bowl or heatproof pitcher, stir hot coffee, condensed milk, milk and vanilla. Cover and chill at least 8 hours or overnight.

Pour chilled mixture into a shallow pan (I used a 13-by-9-inch baking pan). Freeze until solid, about 4 hours.

Meanwhile, make the whipped cream: Beat cream and sugar on high speed until stiff peaks form, about 2 to 3 minutes. Chill until ready to use.

Toast the coconut: Heat oven to 350ºF. Spread coconut flakes on a baking sheet; toast in oven, stirring occasionally, until golden brown, about 7 to 10 minutes.

Scoop frozen coffee mixture into serving glasses. Top with whipped cream and toasted coconut.

Adapted from King Arthur Flour.


_______________________________________

Newly-married Erica Kastner shares her wonderful recipes and amazing food photography on her blog, Buttered Side Up. She also writes about crafts and posts more of her beautiful photography in her personal blog, Simple Days. There really isn’t much that this amazing young lady can’t do, and we’re thrilled she does some of it here.


Profile photo of Natalie | Perry's Plate

Fruit Christmas Tree

Posted by in Holidays, Step-by-Step Recipes

Tasty Kitchen Blog: Fruit Christmas Tree. Guest post by Natalie Perry of Perry's Plate, recipe submitted by TK member Vegan Momma of Live. Learn. Love. Eat.

 
If you’re looking for a healthy alternative to sugary gingerbread houses or just want something fun to do with your kids on a snowy afternoon, you have to try this. I had two five-year-olds and an 18-month-old entertained for at least an hour. They were also completely filled with fruit when it was over.

My kids can probably eat MY weight in fruit, so I knew they would love this Fruit Christmas Tree submitted by TK member Vegan Momma. As much fun as my girls have baking sweets, I was happy to find a healthy food-related activity that they would get just as excited about.

It’s super easy, too. Watch.


Tasty Kitchen Blog: Fruit Christmas Tree. Guest post by Natalie Perry of Perry's Plate, recipe submitted by TK member Vegan Momma of Live. Learn. Love. Eat.

You’ll definitely need a pineapple and a pear. The rest is up to you. There isn’t a lot of winter fruit that will work for this, so pick up what you can find. I had my doubts about those berries, but they were surprisingly good!

You’ll also need a bunch of toothpicks, a small wooden skewer, and a star-shaped cookie cutter.


Tasty Kitchen Blog: Fruit Christmas Tree. Guest post by Natalie Perry of Perry's Plate, recipe submitted by TK member Vegan Momma of Live. Learn. Love. Eat.

First prep the pineapple by cutting the ends off.


Tasty Kitchen Blog: Fruit Christmas Tree. Guest post by Natalie Perry of Perry's Plate, recipe submitted by TK member Vegan Momma of Live. Learn. Love. Eat.

Slice the skin off, too. But turn it upright when you slice off the skin. I’m not sure why I decided to lay the pineapple down like it was sleeping. Maybe because I had a baby next to me the entire time trying to steal fruit off my table.


Tasty Kitchen Blog: Fruit Christmas Tree. Guest post by Natalie Perry of Perry's Plate, recipe submitted by TK member Vegan Momma of Live. Learn. Love. Eat.

She’s a sneaky one.


Tasty Kitchen Blog: Fruit Christmas Tree. Guest post by Natalie Perry of Perry's Plate, recipe submitted by TK member Vegan Momma of Live. Learn. Love. Eat.

Anyway …

Cut off about 1/2 inch off the fat end of the pineapple and cut out a star. When I said “star-shaped cookie cutter” up there, I should have specified a metal cutter. My plastic one was pretty weak, and I ended up having to finish it off with my knife. We survived, though.


Tasty Kitchen Blog: Fruit Christmas Tree. Guest post by Natalie Perry of Perry's Plate, recipe submitted by TK member Vegan Momma of Live. Learn. Love. Eat.

Put the pineapple on the cutting board fat-side down and trim off some of the top to make it more tapered. Reserve those bits and pieces to attach to the tree later.


Tasty Kitchen Blog: Fruit Christmas Tree. Guest post by Natalie Perry of Perry's Plate, recipe submitted by TK member Vegan Momma of Live. Learn. Love. Eat.

Trim off the bottom the pear and pull the stem out.


Tasty Kitchen Blog: Fruit Christmas Tree. Guest post by Natalie Perry of Perry's Plate, recipe submitted by TK member Vegan Momma of Live. Learn. Love. Eat.

Attach the pear to the pineapple by driving the wooden skewer through the top of the pear. If you need a little help getting it all the way in, place the flat side of a wide knife over the skewer and tap it gently with your fist.


Tasty Kitchen Blog: Fruit Christmas Tree. Guest post by Natalie Perry of Perry's Plate, recipe submitted by TK member Vegan Momma of Live. Learn. Love. Eat.

Attach the star to the top of the pear by inserting two toothpicks into the sides, pressing downward.

Also, cover the whole thing in toothpicks. Make sure more than half of the toothpick is in the pineapple/pear so you don’t have a bunch of pointy ends sticking out of the “ornaments” later.


Tasty Kitchen Blog: Fruit Christmas Tree. Guest post by Natalie Perry of Perry's Plate, recipe submitted by TK member Vegan Momma of Live. Learn. Love. Eat.

Wash the fruit and peel/dice any fruit that need it. You’ll want them cut into 1-inch pieces for good coverage.


Tasty Kitchen Blog: Fruit Christmas Tree. Guest post by Natalie Perry of Perry's Plate, recipe submitted by TK member Vegan Momma of Live. Learn. Love. Eat.

Here’s the fun part! Set out the fruit and let your kids loose!


Tasty Kitchen Blog: Fruit Christmas Tree. Guest post by Natalie Perry of Perry's Plate, recipe submitted by TK member Vegan Momma of Live. Learn. Love. Eat.

Depending on the age of your kids, they may eat more than what they stick on the tree, so plan to have a little extra.

If you find you have a lot of space between the fruit, just add more toothpicks!


Tasty Kitchen Blog: Fruit Christmas Tree. Guest post by Natalie Perry of Perry's Plate, recipe submitted by TK member Vegan Momma of Live. Learn. Love. Eat.

It turned out incredibly cute, thanks to my little helpers! And it disappeared a few hours later just as fast as it appeared. (Kind of like the ornaments on the bottom half of our Christmas tree. Toddlers are the best, aren’t they?)

Such a fun morning we had! Thank you, Vegan Momma, for a creative activity, beautiful centerpiece, and wholesome snack all rolled into one!

Take a look at Vegan Momma’s TK Recipe Box when you can, as well as her blog, Live.Learn.Love.Eat. for more family-friendly vegan ideas!


Printable Recipe

Fruit Christmas Tree

See post on Vegan Momma’s site!
0.00 Mitt(s) 0 Rating(s)0 votes, average: 0.00 out of 50 votes, average: 0.00 out of 50 votes, average: 0.00 out of 50 votes, average: 0.00 out of 50 votes, average: 0.00 out of 5

Prep Time:

Cook Time:

Difficulty: Easy

Servings: 5

5
x

Print Options

Page size Letter 3x5 4x6
Text Size Small Medium Large
Content Include description
Include prep time, etc.
Show image

Description

A delicious, colorful and healthy alternative to candy gingerbread houses. A great edible craft for kids or to take to any Christmas party!

Ingredients

  • 1 whole Ripe Pineapple
  • 1 whole Ripe Pear
  • 2 cups Ripe Strawberries, Stems Removed
  • 6 ounces, weight Fresh Raspberries
  • 6 ounces, weight Fresh Blackberries
  • 2 whole Kiwi, Peeled And Chopped
  • 2 whole Mandarin Oranges, Peeled And Sectioned
  • 1 cup Red Seedless Grapes
  • ½ cups Chopped Watermelon

Preparation Instructions

For this recipe, you will also need 1 large star-shaped cookie cutter.

1. Begin by cutting the top and bottom off of your pineapple. Save a 1-inch-thick slice of your pineapple as well for the star. Cut all of the skin off of the outside of the pineapple so that only the edible portion remains. Slice the top of your pineapple as well to give it a slightly pointed shape at the top. Save the edible pineapple scraps to decorate the tree with later.
2. Cut the bottom off of your pear and remove the stem. Use a toothpick to place the pear on top of the prepared pineapple. This is your tree.
3. Use a large star-shaped cookie cutter to cut out a star for the top of the tree from the reserved slice of pineapple. Place the star on top of the Christmas tree with a wooden toothpick.
4. Insert many wooden toothpicks all over the pineapple and pear, fairly deep in so that they won’t show through the fruit once you have placed it on.
5. Decorate! Stick the prepared fruit onto the toothpicks all over the tree.
6. Eat!


_______________________________________

Be sure to check out Natalie’s own beautiful food blog, Perrys’ Plate, where you can see her growing collection of lovely recipes. There’s always something new to see there. Go visit now!


Profile photo of Erica Lea

Fruit on the Bottom Baked Oatmeal

Posted by in Baking, Step-by-Step Recipes

Tasty Kitchen Blog: Fruit on the Bottom Baked Oatmeal. Guest post and recipe from Erica Kastner of Cooking for Seven.

 
This recipe was one of those lucky, spur-of-the-moment creations. We had some very ripe peaches that desperately needed to be used. However, there weren’t nearly enough to go into a pie or a crisp. Thus, Fruit-on-the-Bottom Baked Oatmeal was born of necessity.

In all honesty, I did not expect it to turn out. I shoved the pan into the oven and wondered if the fruit would finish cooking by the time the oatmeal was golden. To my surprise, I had created something utterly scrumptious. Warm fruit on the bottom, sweet, hearty oatmeal in the middle, crunchy almonds on top. The perfect breakfast treat for a chilly fall or cold winter morning. Served with good vanilla ice cream, this could easily be a dessert.


Tasty Kitchen Blog: Fruit on the Bottom Baked Oatmeal. Guest post and recipe from Erica Kastner of Cooking for Seven.

Here’s what you’ll need: fruit of choice (apples, pears, and peaches are good choices), whole milk, maple syrup, eggs, vanilla extract, butter, rolled oats, baking powder, baking soda, salt, sweetener of choice (I like maple sugar or demerara), and sliced almonds.


Tasty Kitchen Blog: Fruit on the Bottom Baked Oatmeal. Guest post and recipe from Erica Kastner of Cooking for Seven.

Peel and slice your fruit. I love perfectly ripe peaches. Pour 1/4 cup butter into the bottom of a square baking dish. Arrange the fruit on the bottom. Sprinkle with a couple tablespoons of sugar. Set aside.


Tasty Kitchen Blog: Fruit on the Bottom Baked Oatmeal. Guest post and recipe from Erica Kastner of Cooking for Seven.

In a medium bowl, mix together milk, maple syrup, eggs, remaining butter and vanilla extract. In a large bowl, whisk together oats, baking powder, baking soda and salt. Add the wet ingredients to the dry and mix very well. Pour over the fruit and smooth the top.


Tasty Kitchen Blog: Fruit on the Bottom Baked Oatmeal. Guest post and recipe from Erica Kastner of Cooking for Seven.

Sprinkle some almonds on top.


Tasty Kitchen Blog: Fruit on the Bottom Baked Oatmeal. Guest post and recipe from Erica Kastner of Cooking for Seven.

Sprinkle the almonds with a couple tablespoons of sugar.


Tasty Kitchen Blog: Fruit on the Bottom Baked Oatmeal. Guest post and recipe from Erica Kastner of Cooking for Seven.

Bake at 350°F for 40-50 minutes or until the top is golden and the fruit is bubbly. Let cool for a few minutes before serving.


Tasty Kitchen Blog: Fruit on the Bottom Baked Oatmeal. Guest post and recipe from Erica Kastner of Cooking for Seven.

Don’t you want to dig in? But wait. It gets better:


Tasty Kitchen Blog: Fruit on the Bottom Baked Oatmeal. Guest post and recipe from Erica Kastner of Cooking for Seven.

Serve with heavy whipping cream, milk, or (my personal favorite) a vanilla sauce.


Tasty Kitchen Blog: Fruit on the Bottom Baked Oatmeal. Guest post and recipe from Erica Kastner of Cooking for Seven.

Delicious.


Tasty Kitchen Blog: Fruit on the Bottom Baked Oatmeal. Guest post and recipe from Erica Kastner of Cooking for Seven.

Notes: You can customize this recipe in many ways. Use pecans or walnuts instead of almonds. Use almond extract instead of vanilla. Switch up the fruit. Pears are wonderful. If using apples, make sure to slice them very thinly or they will be crunchy. I have never tried berries, but I’m sure they’d be splendid.


Printable Recipe

Fruit-on-the-Bottom Baked Oatmeal

See post on Erica Lea’s site!
4.80 Mitt(s) 15 Rating(s)15 votes, average: 4.80 out of 515 votes, average: 4.80 out of 515 votes, average: 4.80 out of 515 votes, average: 4.80 out of 515 votes, average: 4.80 out of 5

Prep Time:

Cook Time:

Difficulty: Easy

Servings: 7

7
x

Print Options

Page size Letter 3x5 4x6
Text Size Small Medium Large
Content Include description
Include prep time, etc.
Show image

Description

A delicious breakfast treat composed of fruit on the bottom, oatmeal in the middle, and crunchy nuts on top.

Ingredients

  • ¾ cups Butter, Divided
  • 1-½ cup Thinly Sliced Fruit
  • 4 Tablespoons Demerara Sugar Or Sucanat, Divided
  • ½ cups Whole Milk
  • ⅔ cups Pure Maple Syrup
  • 2 whole Large Eggs
  • 1 teaspoon Vanilla Extract
  • 2 cups Old Fashioned Rolled Oats
  • 2-½ teaspoons Baking Powder
  • ¼ teaspoons Baking Soda
  • ½ teaspoons Salt
  • ⅓ cups Sliced Almonds

Preparation Instructions

*Peaches, pears and apples are good choices. If using apples, make sure to slice them thinly or they will be crunchy.

1. Preheat oven to 350° F. Melt butter; pour 1/4 cup into the bottom of a 9-inch square baking dish. Arrange sliced fruit on top of the butter and sprinkle with 2 tablespoons demerara. Set aside.
2. In a medium bowl, mix together milk, maple syrup, eggs, remaining 1/2 cup butter and vanilla.
3. In a large bowl, whisk together oats, baking powder, baking soda and salt. Stir the wet ingredients into the dry ingredients and mix well. Pour over the fruit and smooth the top. Sprinkle with almonds and remaining 2 tablespoons demerara.
4. Bake at 350°F for 40 to 50 minutes, or until browned on top and fruit is bubbly. Allow to cool slightly. Serve with milk, cream or vanilla sauce.


_______________________________________

Erica Berge shares her wonderful recipes and amazing food photography on her blog, Cooking for Seven. She also writes about crafts and posts more of her beautiful photography in her personal blog, EricaLea.com. There really isn’t much that this amazing young lady can’t do, and we’re thrilled she does some of it here.


Profile photo of DessertForTwo

Fudgy Black Bean Brownies

Posted by in Baking

Yes, we’re really making brownies with black beans. Embrace it. They’re good for you!

Profile photo of whatsgabycooking

Fully Loaded Baked Potato Soup

Posted by in Step-by-Step Recipes

  Hi! Oh my goodness, I’ve missed you guys over here on Tasty Kitchen! The last few months have been a whirlwind, with getting married and finishing a super fun project that’s due out next month. I’m so jazzed to be back and I’m kicking things off with basically the most amazing soup to ever […]

Profile photo of twopeasandtheirpod

Funfetti Cookies

Posted by in Baking, Step-by-Step Recipes

  If I am asked to bring a food item to a party, I always sign up for dessert. I usually choose to make cookies, because they are my life and everyone likes cookies. When I saw these Funfetti Cookies (recipe adapted from Yammie’s Noshery’s Funfetti Whoopie Pies) pop up on Tasty Kitchen from member […]

Profile photo of Ree | The Pioneer Woman

Funnel Cakes!

Posted by in Step-by-Step Recipes

Republished from May 2010. Mmm…funnel cakes. There’s nothing like them in the world. And when I found this funnel cake recipe (submitted by HeatherD) on Tasty Kitchen not long ago, I immediately printed it out and put it on the top of the stack of Tasty Kitchen recipes to try before I croak. It’s becoming […]