The Pioneer Woman Tasty Kitchen
Profile photo of A Cozy Kitchen

Baked Eggs in Spicy Tomato Sauce

Posted by in Step-by-Step Recipes

Tasty Kitchen Blog: Baked Eggs in Spicy Tomato Sauce. Guest post by Adrianna Adarme of A Cozy Kitchen, recipe submitted by TK member Erica of Apricosa.

I’m a firm believer that a runny egg goes with everything. Whether it’s a bowl of pasta, atop a piece of toast, or accompanied by a drizzle of Hollandaise sauce, it’s simply perfect. Is there anything more attractive than a runny egg? I think not. 

That’s why when I saw this Baked Eggs in Spicy Tomato Sauce with Goat Cheese from TK member Apricosa (Erica), I couldn’t resist.

Goat cheese? Check. Tomato sauce? Check. And lastly, a runny egg? Triple check. 


Tasty Kitchen Blog: Baked Eggs in Spicy Tomato Sauce. Guest post by Adrianna Adarme of A Cozy Kitchen, recipe submitted by TK member Erica of Apricosa.

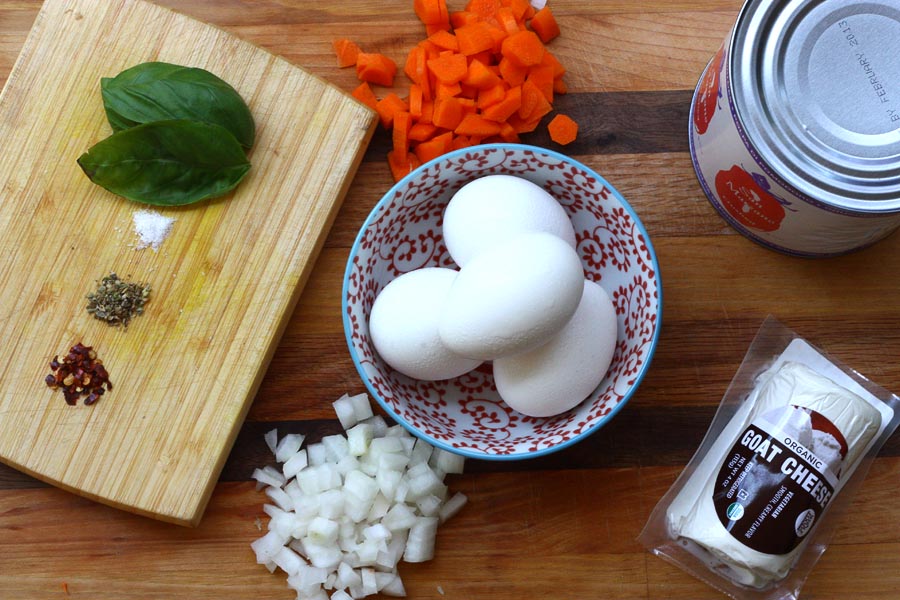
Here’s what you’ll need: a can of crushed tomatoes (I’m a personal fan of San Marzano), goat cheese, eggs, diced carrots, diced onions, garlic, a few leaves of basil and some spices.  


Tasty Kitchen Blog: Baked Eggs in Spicy Tomato Sauce. Guest post by Adrianna Adarme of A Cozy Kitchen, recipe submitted by TK member Erica of Apricosa.

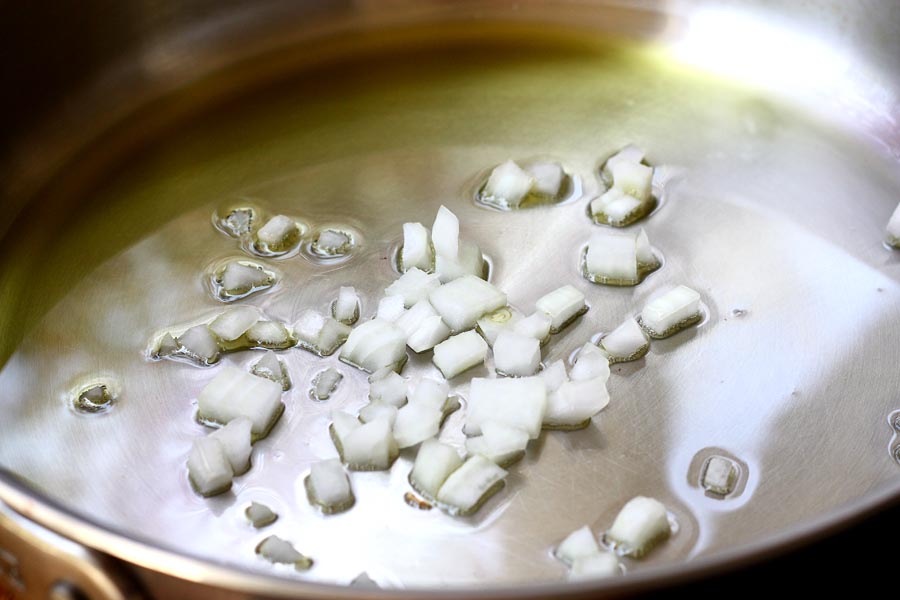
Start with heating up some olive oil in a medium-sized saucepan. When it’s hot, add the diced onions…
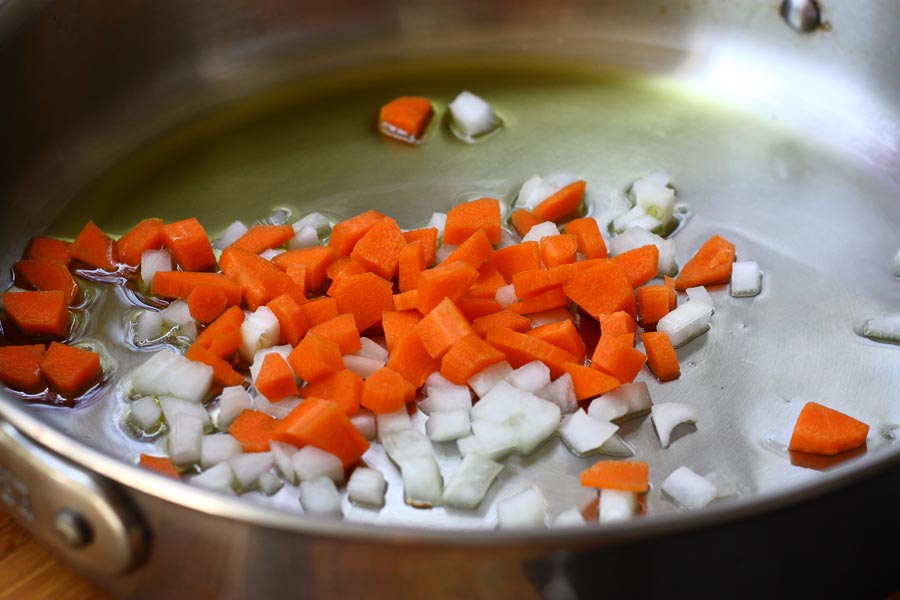


Tasty Kitchen Blog: Baked Eggs in Spicy Tomato Sauce. Guest post by Adrianna Adarme of A Cozy Kitchen, recipe submitted by TK member Erica of Apricosa.

The carrots…


Tasty Kitchen Blog: Baked Eggs in Spicy Tomato Sauce. Guest post by Adrianna Adarme of A Cozy Kitchen, recipe submitted by TK member Erica of Apricosa.

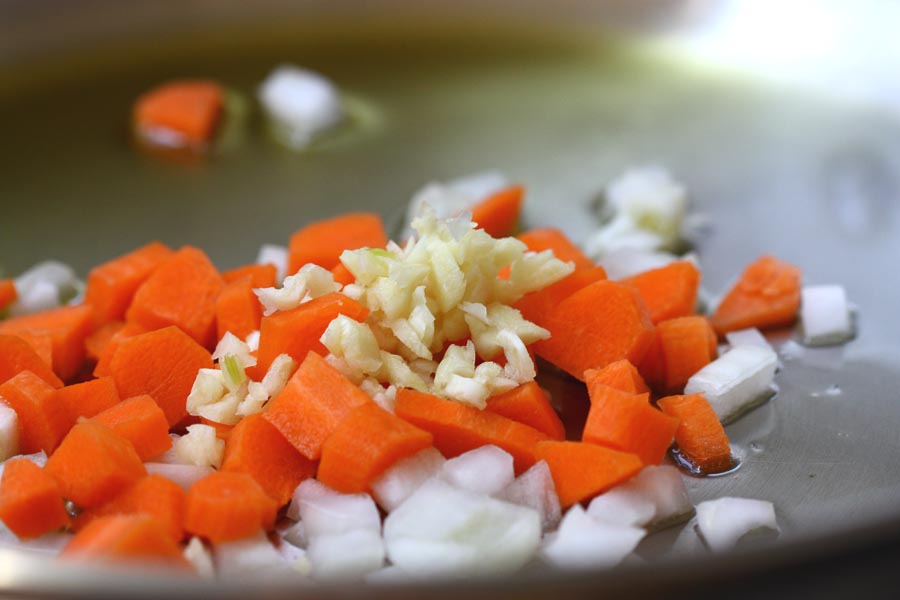
And lastly, the garlic. Cook for 5-7 minutes, or until the onions are translucent and the carrots are soft. 


Tasty Kitchen Blog: Baked Eggs in Spicy Tomato Sauce. Guest post by Adrianna Adarme of A Cozy Kitchen, recipe submitted by TK member Erica of Apricosa.

Open your can of crushed tomatoes and add them to the onion mixture. 


Tasty Kitchen Blog: Baked Eggs in Spicy Tomato Sauce. Guest post by Adrianna Adarme of A Cozy Kitchen, recipe submitted by TK member Erica of Apricosa.

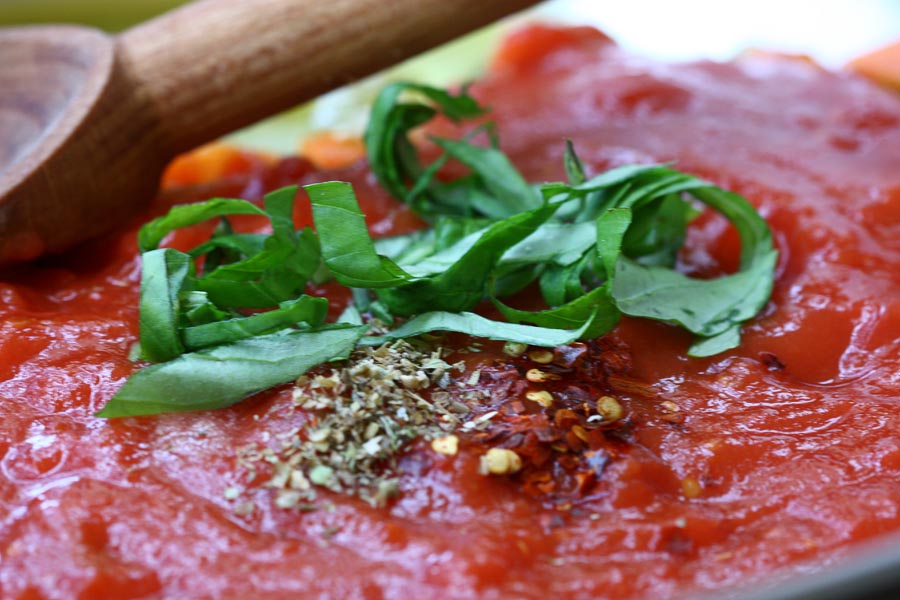
Add the basil and spices, which include oregano, crushed red pepper, salt and pepper. Since I’m a heat lover, I added a little extra crushed red pepper. Delicious. 


Tasty Kitchen Blog: Baked Eggs in Spicy Tomato Sauce. Guest post by Adrianna Adarme of A Cozy Kitchen, recipe submitted by TK member Erica of Apricosa.

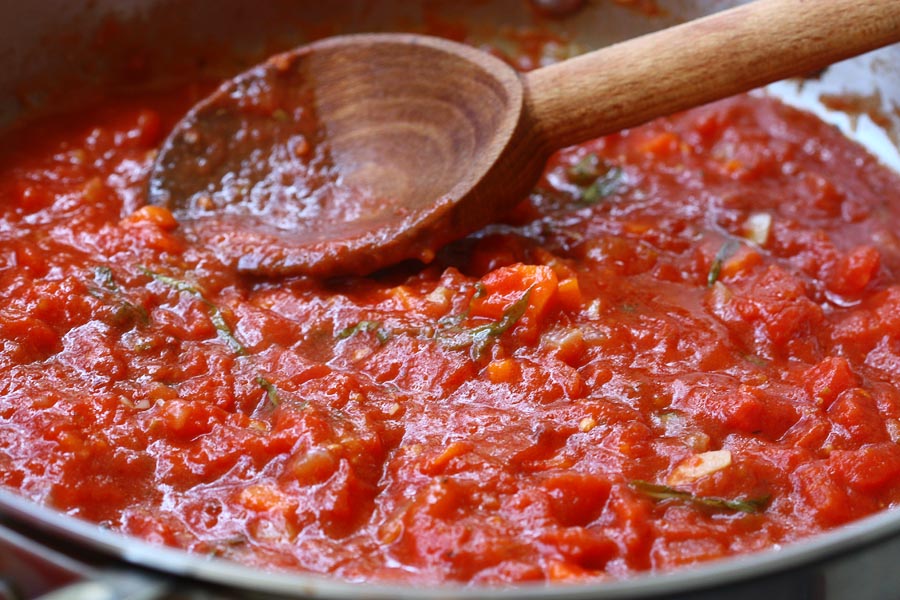
Stir the tomato mixture and let it simmer over medium-low heat for 20 minutes. The sauce will reduce, the carrots will soften even more and your entire house will smell incredible. All very good things. 


Tasty Kitchen Blog: Baked Eggs in Spicy Tomato Sauce. Guest post by Adrianna Adarme of A Cozy Kitchen, recipe submitted by TK member Erica of Apricosa.

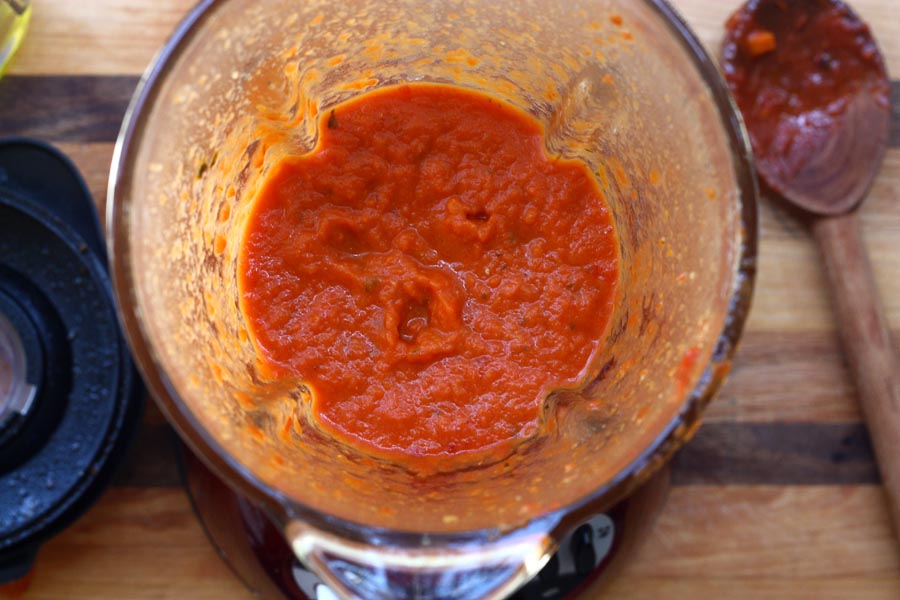
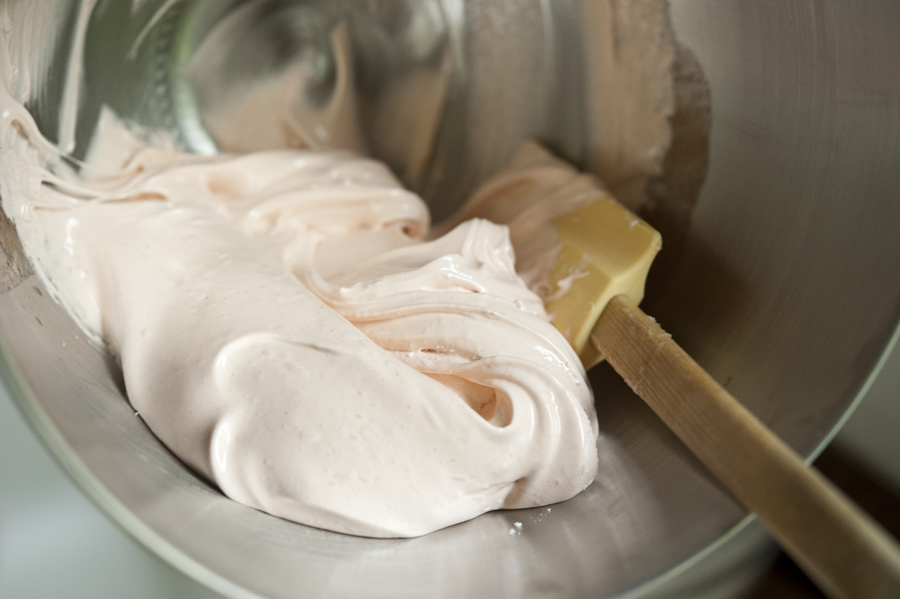
If you have an immersion blender, you can simply blend the tomato sauce in the pan. If you don’t, then transfer the sauce (in batches) to a blender. Warning: blending hot stuff can be a little dangerous (read: explosions anyone?).

Doing it in a few batches and allowing the hot air to escape will prevent it this from happening. 


Tasty Kitchen Blog: Baked Eggs in Spicy Tomato Sauce. Guest post by Adrianna Adarme of A Cozy Kitchen, recipe submitted by TK member Erica of Apricosa.

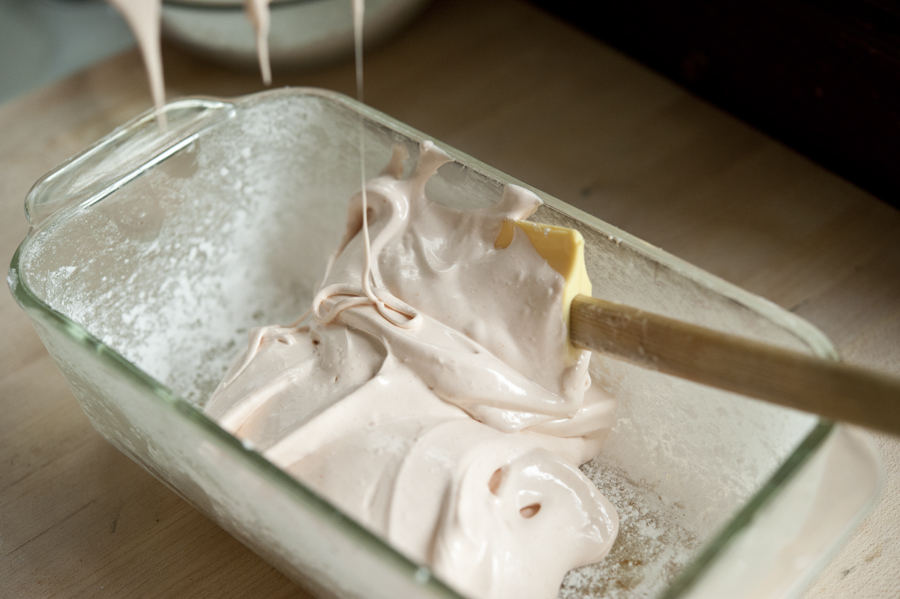
Grab eight ramekins (I halved this recipe so I did four) and fill them about 3/4 of the way with tomato sauce.


Tasty Kitchen Blog: Baked Eggs in Spicy Tomato Sauce. Guest post by Adrianna Adarme of A Cozy Kitchen, recipe submitted by TK member Erica of Apricosa.

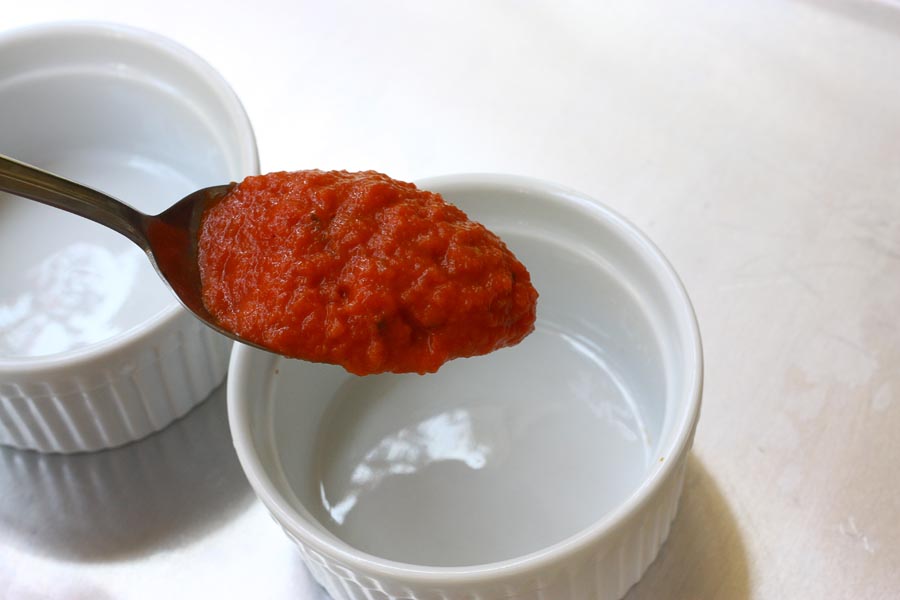
I had no extra sauce! I love it when a recipe’s measurements are exactamundo, don’t you? 


Tasty Kitchen Blog: Baked Eggs in Spicy Tomato Sauce. Guest post by Adrianna Adarme of A Cozy Kitchen, recipe submitted by TK member Erica of Apricosa.

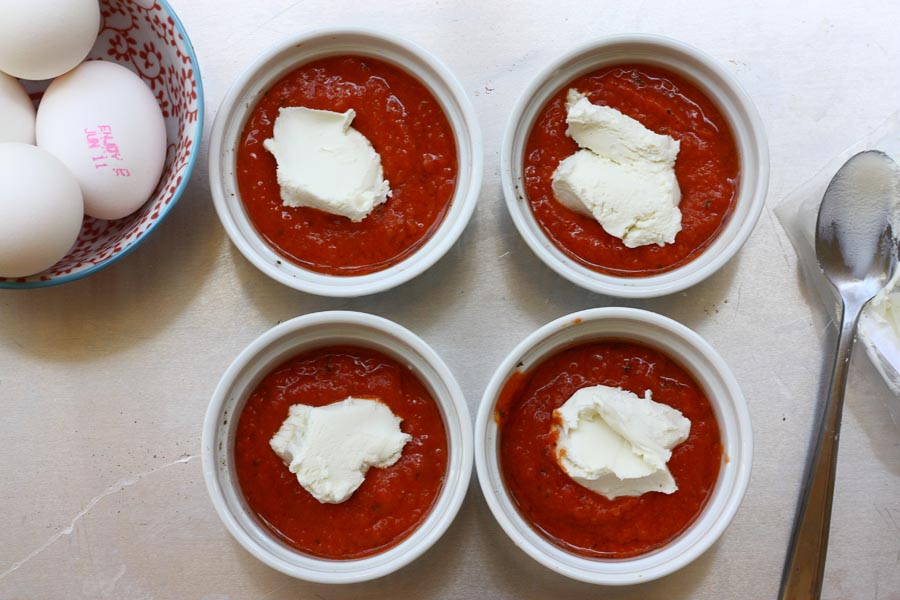
Next add the goat cheese. 


Tasty Kitchen Blog: Baked Eggs in Spicy Tomato Sauce. Guest post by Adrianna Adarme of A Cozy Kitchen, recipe submitted by TK member Erica of Apricosa.

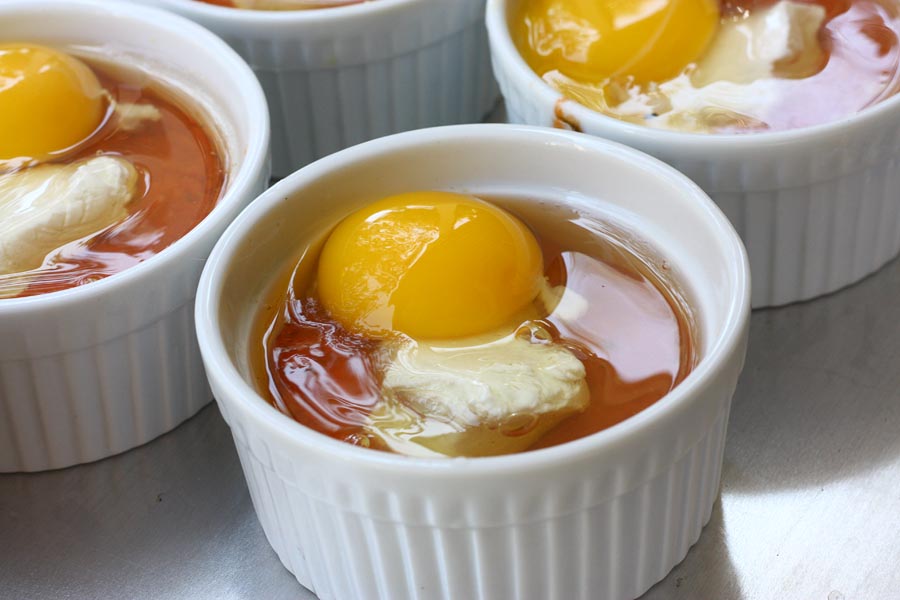
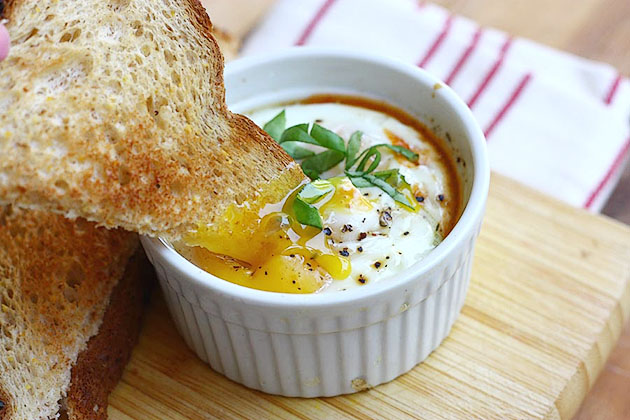
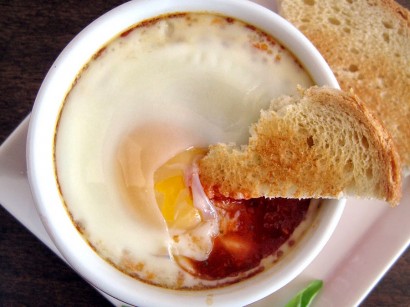
And then add one egg to each of the ramekins. Top with some salt and pepper and bake for 20-30 minutes, or until the white part has completely set. 


Tasty Kitchen Blog: Baked Eggs in Spicy Tomato Sauce. Guest post by Adrianna Adarme of A Cozy Kitchen, recipe submitted by TK member Erica of Apricosa.

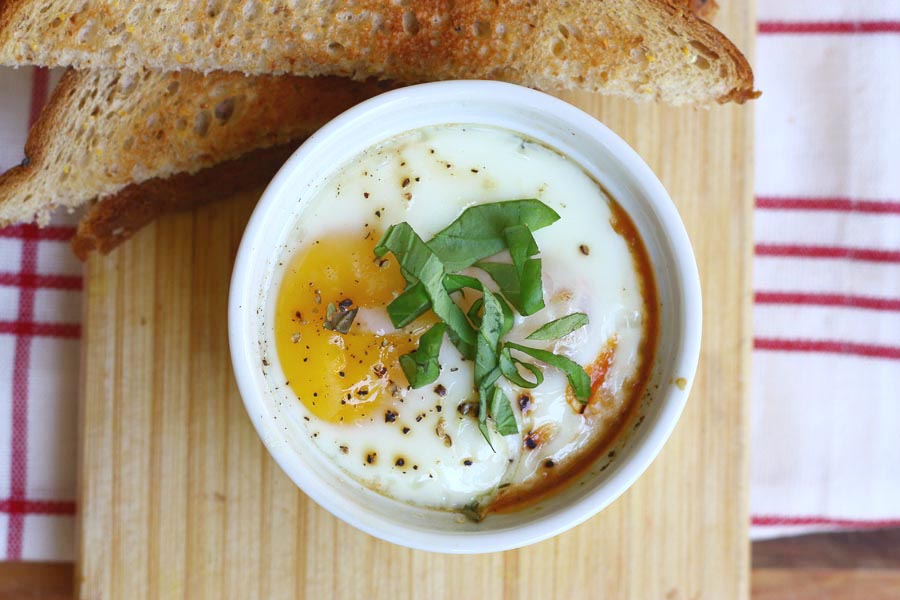
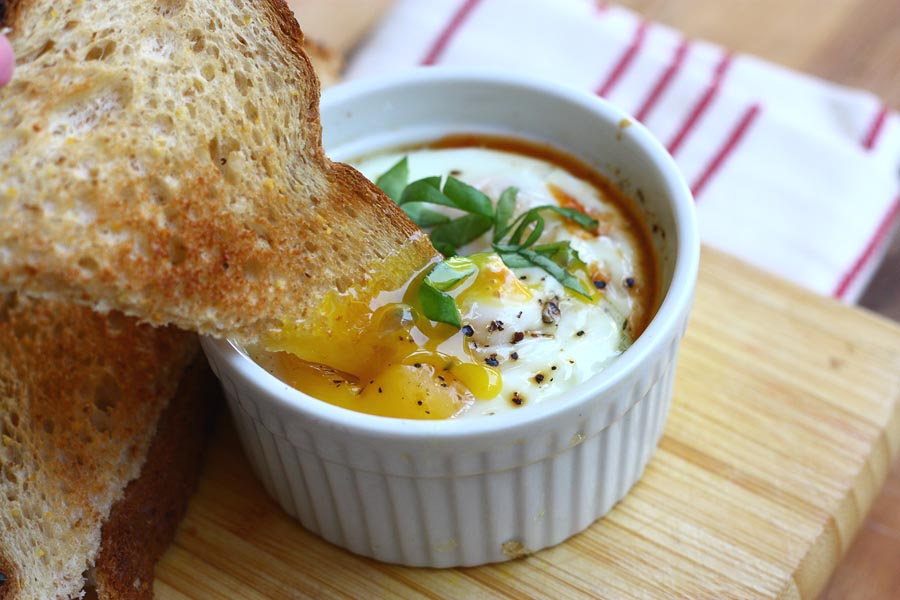
Top with a few pieces of basil and serve with toast. 


Tasty Kitchen Blog: Baked Eggs in Spicy Tomato Sauce. Guest post by Adrianna Adarme of A Cozy Kitchen, recipe submitted by TK member Erica of Apricosa.

What I also love about this recipe (besides its deliciousness), is how it’s so versatile. This dish would make for a great breakfast, lunch or dinner. Also, did I mention there’s a runny egg involved? 

A big thank you to Erica for sharing this lovely recipe! Check out her blog, Apricosa, for a bunch of equally yumalicious meals.  


Printable Recipe

Baked Eggs in Spicy Tomato Sauce with Goat Cheese and Toast

See post on Apricosa (Erica)’s site!
5.00 Mitt(s) 3 Rating(s)3 votes, average: 5.00 out of 53 votes, average: 5.00 out of 53 votes, average: 5.00 out of 53 votes, average: 5.00 out of 53 votes, average: 5.00 out of 5

Prep Time:

Cook Time:

Difficulty: Easy

Servings: 8

8
x

Print Options

Page size Letter 3x5 4x6
Text Size Small Medium Large
Content Include description
Include prep time, etc.
Show image

Description

A perfect make-ahead brunch dish!

Ingredients

  • 1 Tablespoon Olive Oil
  • ½ cups Diced Onion
  • ¼ cups Carrot, Diced
  • 2 cloves Garlic, Crushed And Chopped
  • ⅛ teaspoons (or More) Red Pepper Flakes
  • 28 ounces, weight Crushed Tomatoes
  • ¼ teaspoons Dried Oregano
  • ¼ cups (packed) Fresh Basil Leaves, Torn Into Pieces, Plus More For Garnish
  • ½ cups Goat Cheese Crumbled
  • 8 whole Eggs At Room Temperature
  • Salt And Pepper, to taste
  • 8 slices Toast Bread, Toasted Golden Brown And Cut Into Triangles
  • Toast Points, To Serve

Preparation Instructions

To make the sauce, heat olive oil in a small pot over medium-high heat and saute the chopped onion, carrots, and garlic for a few minutes until slightly softened. Add red pepper flakes, crushed tomatoes, oregano, and basil, and stir to combine. Cover and bring just to a boil, then reduce heat to low and simmer 20 minutes, stirring occasionally to prevent the bottom from burning. Remove from heat and let cool slightly, then blend well with an immersion stick blender. (Do ahead: sauce can be made up to a week ahead of time. Reheat before continuing.)

Spoon 1/4 cup of warm sauce into each of 8 ramekins (use leftover sauce for another use), then dot each ramekin with about 2 teaspoons crumbled goat cheese. (Do ahead: ramekins can be prepared with sauce and cheese the day before, then covered and refrigerated overnight. Heat in the preheating oven until ramekins and sauce are warm, not hot, and continue with the recipe.)

Crack an egg into each ramekin, sprinkle with salt, and bake in a preheated oven at 425F for 15-20 minutes, until whites have set but yolk is still soft.

Garnish with fresh basil chiffonade, if desired, and serve immediately with toast points for dipping into the yolk and sauce.


_______________________________________

Adrianna and Caroline are the lovely ladies behind the scrumptious blog A Cozy Kitchen. It’s filled with all kinds of mouthwatering recipes and gorgeous photography. Whether you’re in the mood for something vegetarian or meaty, fancy or pure comfort, light or decadent, there’s sure to be something there for everyone.


Profile photo of callimakesdo

Strawberry Rhubarb Pie with Streusel Topping

Posted by in Baking, Step-by-Step Recipes

Tasty Kitchen Blog: Strawberry Rhubarb Pie with Streusel Topping. Guest post by Calli Taylor of Make It Do, recipe submitted by TK member Mel of Mel's Kitchen Cafe.

Growing up, I had a next-door neighbor named Laverne. She was a grandmother, a wonderful cook, and kept a large backyard garden. Every year in late spring, Laverne would call over the fence and invite me for a slice of her fresh baked rhubarb pie, topped with melting vanilla ice cream.

The rhubarb was fresh from her garden; the crust was made from scratch. I’m not sure who was more delighted, me with my slice of pie, or Laverne, knowing how much I loved it.

Despite my early love affair, I had never tried to make rhubarb pie, until I saw the recipe for Strawberry Rhubarb Pie with Streusel Topping from Melanie of Mel’s Kitchen Cafe on Tasty Kitchen. Seeing the recipe evoked warm memories of Laverne’s kitchen and the lovely sweet tartness of her pie. As soon as I could find fresh rhubarb this spring, I made Melanie’s pie.

Was it good? Did it live up to my fond memories? Good doesn’t begin to describe it. This pie is heavenly! It’s right up there among my favorite pies of all time.

It’s also easy. Easy as pie, really. So if you love the combination of sweet and tart, here’s how to make Melanie’s pie:


Tasty Kitchen Blog: Strawberry Rhubarb Pie with Streusel Topping. Guest post by Calli Taylor of Make It Do, recipe submitted by TK member Mel of Mel's Kitchen Cafe.

Start with your favorite uncooked 9″ to 9.5″ pie crust. You can pick one up in the freezer section at the store, or better yet, make your own from scratch. It’s not hard once you’ve had a little practice. My homemade crust never looks perfect, but store bought just can’t match the flaky goodness of homemade.

Once you’ve rolled out your crust, pop it in the refrigerator until you’re ready to fill and bake.


Tasty Kitchen Blog: Strawberry Rhubarb Pie with Streusel Topping. Guest post by Calli Taylor of Make It Do, recipe submitted by TK member Mel of Mel's Kitchen Cafe.

Chop up your rhubarb, just like celery.


Tasty Kitchen Blog: Strawberry Rhubarb Pie with Streusel Topping. Guest post by Calli Taylor of Make It Do, recipe submitted by TK member Mel of Mel's Kitchen Cafe.

Slice your strawberries.


Tasty Kitchen Blog: Strawberry Rhubarb Pie with Streusel Topping. Guest post by Calli Taylor of Make It Do, recipe submitted by TK member Mel of Mel's Kitchen Cafe.

Add the rhubarb and strawberries into a mixing bowl, along with sugar and cornstarch. The cornstarch is the reason this pie is so pretty when cut and served. Many delicious pie recipes taste amazing, but are messy to serve. Not this pie; it holds together nicely.

Stir together until it looks thick and syrupy. The sauce that forms is a lovely shade of pink.


Tasty Kitchen Blog: Strawberry Rhubarb Pie with Streusel Topping. Guest post by Calli Taylor of Make It Do, recipe submitted by TK member Mel of Mel's Kitchen Cafe.

Pour the fruit mixture evenly into your unbaked pie shell.


Tasty Kitchen Blog: Strawberry Rhubarb Pie with Streusel Topping. Guest post by Calli Taylor of Make It Do, recipe submitted by TK member Mel of Mel's Kitchen Cafe.

For the streusel top, add one cube of butter, flour and brown sugar into a mixing bowl. Why does everything I love have a cube of butter?

Cut the butter into the flour and sugar using a pastry cutter. You could make do with two knives. But do yourself a little favor and pick up a pastry cutter at the grocery store for a few dollars. It’ll be worth its weight in pie.


Tasty Kitchen Blog: Strawberry Rhubarb Pie with Streusel Topping. Guest post by Calli Taylor of Make It Do, recipe submitted by TK member Mel of Mel's Kitchen Cafe.

Cut in the butter until it has the consistency of coarse crumbs.


Tasty Kitchen Blog: Strawberry Rhubarb Pie with Streusel Topping. Guest post by Calli Taylor of Make It Do, recipe submitted by TK member Mel of Mel's Kitchen Cafe.

Sprinkle the streusel evenly over the top of the pie.

I took Melanie’s advice and cooked my pie on a baking sheet with a rolled edge. (I’ve cleaned burnt fruit from the bottom of my oven before—not fun!)


Tasty Kitchen Blog: Strawberry Rhubarb Pie with Streusel Topping. Guest post by Calli Taylor of Make It Do, recipe submitted by TK member Mel of Mel's Kitchen Cafe.

Halfway through cooking, wrap the edge of your crust with foil to keep it from over browning.


Tasty Kitchen Blog: Strawberry Rhubarb Pie with Streusel Topping. Guest post by Calli Taylor of Make It Do, recipe submitted by TK member Mel of Mel's Kitchen Cafe.

It’s a hard thing to do, but let your pie cool before serving. A watched pot never boils and a watched pie never seems to cool. Especially when you can hardly wait for a bite.


Tasty Kitchen Blog: Strawberry Rhubarb Pie with Streusel Topping. Guest post by Calli Taylor of Make It Do, recipe submitted by TK member Mel of Mel's Kitchen Cafe.

We served our pie with whipped cream like Melanie suggested. Next time we’ll give vanilla ice cream a try, in homage to Laverne.

Thank you Melanie for sharing this treasured pie recipe. It was a lovely stroll down memory lane and I know it will be one of our favorites for years to come. Be sure to check out Melanie’s blog Mel’s Kitchen Cafe. She makes the kind of food I love to cook—on the healthy side, not super fussy, fresh and made from scratch. And she has four of the cutest sous chefs you’ll ever see.


Printable Recipe

Strawberry Rhubarb Pie with Streusel Topping

See post on Melanie - Mel's Kitchen Cafe’s site!
4.92 Mitt(s) 25 Rating(s)25 votes, average: 4.92 out of 525 votes, average: 4.92 out of 525 votes, average: 4.92 out of 525 votes, average: 4.92 out of 525 votes, average: 4.92 out of 5

Prep Time:

Cook Time:

Difficulty: Easy

Servings: 8

8
x

Print Options

Page size Letter 3x5 4x6
Text Size Small Medium Large
Content Include description
Include prep time, etc.
Show image

Description

This pie is filled to brimming with juicy, sweet strawberries, tart rhubarb and a healthy amount of sugar to help lessen the rhubarb’s puckery flavor. Topped with a delicious and buttery streusel topping, this pie is worth the wait for fresh rhubarb.

Ingredients

  • FOR THE FILLING:
  • 2-¾ cups Sliced Fresh Rhubarb, About 5-6 Medium Stalks
  • 2 cups Sliced Strawberries
  • ⅔ cups Sugar
  • 3 Tablespoons Cornstarch
  • _____
  • FOR THE STREUSEL TOPPING:
  • 1 cup Flour
  • ½ cups Brown Sugar
  • ½ cups Butter (1 Stick), Cold And Cut Into Small Pieces
  • 1 Unbaked Single Pie Crust (store Bought Or Your Favorite Recipe)

Preparation Instructions

In a medium-large bowl, combine the rhubarb, strawberries, sugar and cornstarch. Mix well. The mixture should be thick and syrupy after being stirred well.

Roll out pie crust according to recipe or package instructions and place in a 9- or 9.5-inch pie plate. Pour the strawberry/rhubarb mixture into the crust, using a large spoon to fill evenly.

For the topping: In a small bowl, combine the flour and brown sugar. Cut the butter into pieces and using a pastry cutter or two knives, cut the butter into the flour/sugar mixture until it has the consistency of coarse crumbs. Sprinkle the streusel topping evenly over the top of the pie.

Place the pie on a rimmed baking sheet and bake at 400 degrees for 50-55 minutes, covering the pie crust edges with foil halfway through in order to prevent over-browning.

Let the pie cool completely before cutting into pieces. Serve with a dollop of freshly whipped cream, if desired.


_______________________________________

Calli is truly a woman of many talents, from cooking, sewing, crafts, beautiful photography and gardening. Her blog, Make it Do is a treasure trove of recipes, household tips, crafts projects, sewing patterns … you name it. It’s also peppered with photos of her beautiful kids. Go visit her site, and visit it often. There’s always something new to learn there!


Profile photo of georgiapellegrini

Homemade Marshmallows

Posted by in Step-by-Step Recipes

Tasty Kitchen Blog: Homemade Marshmallows Carrot-Flavored. Guest post by Georgia Pellegrini, recipe submitted by Calamity Anne's Adventures.

 
During my restaurant days, I used to make marshmallows from time to time. It was a rather complicated affair, with complicated ingredients like “inverted sugar.” I was delighted to see several recipes for marshmallows here on Tasty Kitchen that were much simpler. This one is by TK member Calamity Anne, and is originally for plain homemade marshmallows. I decided to add my own twist to it just like the olden days and make them flavored. Can you guess which flavor?


Tasty Kitchen Blog: Homemade Marshmallows Carrot-Flavored. Guest post by Georgia Pellegrini, recipe submitted by Calamity Anne's Adventures.

The ingredients that you need are sugar, light corn syrup, salt, vanilla, a mixture of cornstarch and powdered sugar, gelatin mixed with … water or your flavoring liquid—in this case, carrot juice!


Tasty Kitchen Blog: Homemade Marshmallows Carrot-Flavored. Guest post by Georgia Pellegrini, recipe submitted by Calamity Anne's Adventures.

You can really use any sized dish with sides. It just serves as a mold out of which you will cut your marshmallows. You’ll need to coat the dish with a bit of oil.


Tasty Kitchen Blog: Homemade Marshmallows Carrot-Flavored. Guest post by Georgia Pellegrini, recipe submitted by Calamity Anne's Adventures.

Then add a few tablespoons of the powdered sugar and cornstarch mixture.


Tasty Kitchen Blog: Homemade Marshmallows Carrot-Flavored. Guest post by Georgia Pellegrini, recipe submitted by Calamity Anne's Adventures.

Shake the mixture around the pan until it is well coated. You can leave the excess mixture in the bottom of the dish.


Tasty Kitchen Blog: Homemade Marshmallows Carrot-Flavored. Guest post by Georgia Pellegrini, recipe submitted by Calamity Anne's Adventures.

Next, let the gelatin and carrot juice mixture dissolve in a saucepan.


Tasty Kitchen Blog: Homemade Marshmallows Carrot-Flavored. Guest post by Georgia Pellegrini, recipe submitted by Calamity Anne's Adventures.

To that, add your granulated sugar.


Tasty Kitchen Blog: Homemade Marshmallows Carrot-Flavored. Guest post by Georgia Pellegrini, recipe submitted by Calamity Anne's Adventures.

Give it a stir and let it dissolve completely, then turn off the heat.


Tasty Kitchen Blog: Homemade Marshmallows Carrot-Flavored. Guest post by Georgia Pellegrini, recipe submitted by Calamity Anne's Adventures.

Pour the mixture into a mixing bowl that will fit to an electric mixer with a whisk attachment. You’ll need to scrape the liquid out of the saucepan since it’s very sticky.


Tasty Kitchen Blog: Homemade Marshmallows Carrot-Flavored. Guest post by Georgia Pellegrini, recipe submitted by Calamity Anne's Adventures.

To the bowl, add the corn syrup.


Tasty Kitchen Blog: Homemade Marshmallows Carrot-Flavored. Guest post by Georgia Pellegrini, recipe submitted by Calamity Anne's Adventures.

And the salt.


Tasty Kitchen Blog: Homemade Marshmallows Carrot-Flavored. Guest post by Georgia Pellegrini, recipe submitted by Calamity Anne's Adventures.

And the vanilla.


Tasty Kitchen Blog: Homemade Marshmallows Carrot-Flavored. Guest post by Georgia Pellegrini, recipe submitted by Calamity Anne's Adventures.

Whisk away for a while, and watch the mixture completely transform itself!


Tasty Kitchen Blog: Homemade Marshmallows Carrot-Flavored. Guest post by Georgia Pellegrini, recipe submitted by Calamity Anne's Adventures.

In about 15 minutes, it will be light and fluffy like, well, marshmallow fluff.


Tasty Kitchen Blog: Homemade Marshmallows Carrot-Flavored. Guest post by Georgia Pellegrini, recipe submitted by Calamity Anne's Adventures.

With a spatula, coax it out of the bowl. This is a sticky situation as well.


Tasty Kitchen Blog: Homemade Marshmallows Carrot-Flavored. Guest post by Georgia Pellegrini, recipe submitted by Calamity Anne's Adventures.

Spoon it into your coated baking dish…


Tasty Kitchen Blog: Homemade Marshmallows Carrot-Flavored. Guest post by Georgia Pellegrini, recipe submitted by Calamity Anne's Adventures.

And smooth it out with a spatula.

Now let it sit for about 2 hours so that it sets.


Tasty Kitchen Blog: Homemade Marshmallows Carrot-Flavored. Guest post by Georgia Pellegrini, recipe submitted by Calamity Anne's Adventures.

Once it is set, wet a knife and loosen the outsides of the marshmallow from the sides of dish.


Tasty Kitchen Blog: Homemade Marshmallows Carrot-Flavored. Guest post by Georgia Pellegrini, recipe submitted by Calamity Anne's Adventures.

Then you can cut them into any shape you please, wetting your knife every so often to make smooth cuts.


Tasty Kitchen Blog: Homemade Marshmallows Carrot-Flavored. Guest post by Georgia Pellegrini, recipe submitted by Calamity Anne's Adventures.

I went for the square look, but you could even use a cookie cutter if you’re feeling adventurous.


Tasty Kitchen Blog: Homemade Marshmallows Carrot-Flavored. Guest post by Georgia Pellegrini, recipe submitted by Calamity Anne's Adventures.

Toss each cube into the rest of your cornstarch and sugar mixture.


Tasty Kitchen Blog: Homemade Marshmallows Carrot-Flavored. Guest post by Georgia Pellegrini, recipe submitted by Calamity Anne's Adventures.

Pull them out one by one and give them a shake to remove any excess powder.


Tasty Kitchen Blog: Homemade Marshmallows Carrot-Flavored. Guest post by Georgia Pellegrini, recipe submitted by Calamity Anne's Adventures.

Set them on a wire rack, set over paper towels. This will help the outer skin dry out.


Tasty Kitchen Blog: Homemade Marshmallows Carrot-Flavored. Guest post by Georgia Pellegrini, recipe submitted by Calamity Anne's Adventures.

Then cover the whole affair with a paper towel and let them sit for up to 24 hours. If you’re feeling impatient you could skip this part, but it will help them store well and prevent them from sticking together.


Tasty Kitchen Blog: Homemade Marshmallows Carrot-Flavored. Guest post by Georgia Pellegrini, recipe submitted by Calamity Anne's Adventures.

Give these a try sometime! They’re a fun treat for a party or holiday. And think about the flavoring possibilities—they are endless! I’ve also tried lime juice and grapefruit juice, among others. Thanks to Calamity Anne for this great recipe! (Also check out this other marshmallow recipe from katydid.)


Tasty Kitchen Blog: Homemade Marshmallows Carrot-Flavored. Guest post by Georgia Pellegrini, recipe submitted by Calamity Anne's Adventures.

Visit Calamity Anne’s blog for her own step-by-step instructions and photos for these homemade marshmallows.


_______________________________________

There’s so much to say about Georgia, we don’t know where to start. Leaving Wall Street for the French Culinary Institute, followed by a stint at the Gramercy Tavern and La Chassagnette in France, her passion for food and food traditions are evident and inspiring. Visit her site at Georgia Pellegrini, where you’ll find more recipes, photos, learn all about her wonderful book Food Heroes, and enjoy her latest adventures.


Profile photo of HowSweetEats

Grilled Breakfast Pizza

Posted by in Step-by-Step Recipes

Tasty Kitchen Blog: Grilled Breakfast Pizza. Guest post by Jessica Merchant of How Sweet It Is, recipe submitted by TK member Adrianna Adarme of A Cozy Kitchen.

Grilling pizza has been on my bucket list, right smack in between eating baklava on a beach in Greece and owning more shoes than Imelda Marcos. It’s been intimidating, perhaps because I’m often afraid of lighting up the grill on my own and sending my immediate surroundings into flames. But then I spied this Grilled Breakfast Pizza from A Cozy Kitchen and my mouth started to water. It seemed easy … and delicious … and not scary … and cheesy … and delicious. Cheese was bought. Bacon was fried. Dough was made. Scallions were sliced. It’s quite possible I may never be able to eat pizza again without the signature char marks of a great grilling experience. Fabulous doesn’t even begin to describe it.

To begin, I made a batch of whole wheat pizza dough from Sunshine Mom. You can use any pizza dough —make your own or buy it at the store, just make sure you love it.


Tasty Kitchen Blog: Grilled Breakfast Pizza. Guest post by Jessica Merchant of How Sweet It Is, recipe submitted by TK member Adrianna Adarme of A Cozy Kitchen.

Along with your pizza dough, you need mozzarella cheese, parmesan cheese, fried bacon, eggs, scallions, fresh parsley, chives, olive, kosher salt and black pepper. The perfect breakfast ingredients, right?


Tasty Kitchen Blog: Grilled Breakfast Pizza. Guest post by Jessica Merchant of How Sweet It Is, recipe submitted by TK member Adrianna Adarme of A Cozy Kitchen.

To make it easy on yourself, begin by slicing you greenery and bacon. Set it aside. Make sure to fry an extra piece of bacon because you will easily eat too much. Or maybe that’s just me?


Tasty Kitchen Blog: Grilled Breakfast Pizza. Guest post by Jessica Merchant of How Sweet It Is, recipe submitted by TK member Adrianna Adarme of A Cozy Kitchen.

Also grate your cheese. I recommend buying the cheese in the brick and grating it yourself. It is so much better. And you get an arm workout. Makes up for the extra slice of bacon.


Tasty Kitchen Blog: Grilled Breakfast Pizza. Guest post by Jessica Merchant of How Sweet It Is, recipe submitted by TK member Adrianna Adarme of A Cozy Kitchen.

Lay your pizza dough on a floured surface and grab your rolling pin. If you don’t have a pin, a great bottle of wine works too.


Tasty Kitchen Blog: Grilled Breakfast Pizza. Guest post by Jessica Merchant of How Sweet It Is, recipe submitted by TK member Adrianna Adarme of A Cozy Kitchen.

Roll it out to 1/4-inch thickness. This is important! If it is too thick, it won’t cook properly.


Tasty Kitchen Blog: Grilled Breakfast Pizza. Guest post by Jessica Merchant of How Sweet It Is, recipe submitted by TK member Adrianna Adarme of A Cozy Kitchen.

Drizzle it with olive oil …


Tasty Kitchen Blog: Grilled Breakfast Pizza. Guest post by Jessica Merchant of How Sweet It Is, recipe submitted by TK member Adrianna Adarme of A Cozy Kitchen.

And brush it all around.


Tasty Kitchen Blog: Grilled Breakfast Pizza. Guest post by Jessica Merchant of How Sweet It Is, recipe submitted by TK member Adrianna Adarme of A Cozy Kitchen.

Preheat your grill to the highest setting.


Tasty Kitchen Blog: Grilled Breakfast Pizza. Guest post by Jessica Merchant of How Sweet It Is, recipe submitted by TK member Adrianna Adarme of A Cozy Kitchen.

Lay your pizza dough on a large round pizza sheet (I found this easier than a plate) and carry your ingredients to the grill.


Tasty Kitchen Blog: Grilled Breakfast Pizza. Guest post by Jessica Merchant of How Sweet It Is, recipe submitted by TK member Adrianna Adarme of A Cozy Kitchen.

Using a pair of kitchen tongs, place your dough directly over the heat. I found using a large spatula in conjunction with the tongs helped.


Tasty Kitchen Blog: Grilled Breakfast Pizza. Guest post by Jessica Merchant of How Sweet It Is, recipe submitted by TK member Adrianna Adarme of A Cozy Kitchen.

Grill the dough for about 30 seconds, just until char marks appear.


Tasty Kitchen Blog: Grilled Breakfast Pizza. Guest post by Jessica Merchant of How Sweet It Is, recipe submitted by TK member Adrianna Adarme of A Cozy Kitchen.

Then flip it over and place it on a side of the grill without direct heat.


Tasty Kitchen Blog: Grilled Breakfast Pizza. Guest post by Jessica Merchant of How Sweet It Is, recipe submitted by TK member Adrianna Adarme of A Cozy Kitchen.

Crack your eggs into a bowl to make sure no shells get mixed in and gently drop each egg onto the dough. Before doing this, make sure that your grill is on a level surface! I may have had 4 eggs take a ride on the slip and slide pizza dough and drop inside the grill. Oops.


Tasty Kitchen Blog: Grilled Breakfast Pizza. Guest post by Jessica Merchant of How Sweet It Is, recipe submitted by TK member Adrianna Adarme of A Cozy Kitchen.

After cracking the eggs, close the lid and cook for 5-6 minutes, or just until the eggs are almost set.


Tasty Kitchen Blog: Grilled Breakfast Pizza. Guest post by Jessica Merchant of How Sweet It Is, recipe submitted by TK member Adrianna Adarme of A Cozy Kitchen.

Once set, cover the pizza with cheese.


Tasty Kitchen Blog: Grilled Breakfast Pizza. Guest post by Jessica Merchant of How Sweet It Is, recipe submitted by TK member Adrianna Adarme of A Cozy Kitchen.

Then add your bacon and close the lid for another 2-3 minutes.


Tasty Kitchen Blog: Grilled Breakfast Pizza. Guest post by Jessica Merchant of How Sweet It Is, recipe submitted by TK member Adrianna Adarme of A Cozy Kitchen.

By this point the crust should be crispy and the pizza is done. Gently lift it again with a pair of kitchen tongs and a spatula and place it back on the pizza sheet. Top it with your greenery: chives, scallions and parsley!


Tasty Kitchen Blog: Grilled Breakfast Pizza. Guest post by Jessica Merchant of How Sweet It Is, recipe submitted by TK member Adrianna Adarme of A Cozy Kitchen.

Cut yourself a big ole’ slice. I love a little runny egg, but if that’s not your thing, just let the pizza cook a big longer right after you crack the eggs.


Tasty Kitchen Blog: Grilled Breakfast Pizza. Guest post by Jessica Merchant of How Sweet It Is, recipe submitted by TK member Adrianna Adarme of A Cozy Kitchen.

Breakfast is served!

This was a fabulous way to spice up our weekend breakfast. It was a nice change of pace and kept us full for hours. You can experiment with your own toppings and different cheeses. And who says this is only for breakfast? I think it makes for a fantastic dinner, too. Thanks so much Adrianna and Caroline for the recipe—it was definitely a winner. Be sure to check out the girls’ blog A Cozy Kitchen for more delicious recipes. My favorites are their fabulous cocktails. I wonder if I could pass one of those off for breakfast?


Printable Recipe

Grilled Breakfast Pizza

See post on A Cozy Kitchen’s site!
5.00 Mitt(s) 4 Rating(s)4 votes, average: 5.00 out of 54 votes, average: 5.00 out of 54 votes, average: 5.00 out of 54 votes, average: 5.00 out of 54 votes, average: 5.00 out of 5

Prep Time:

Cook Time:

Difficulty: Intermediate

Servings: 2

2
x

Print Options

Page size Letter 3x5 4x6
Text Size Small Medium Large
Content Include description
Include prep time, etc.
Show image

Description

Grill some pizza dough, crack three eggs on top, add some bacon and cheese and voila! Grilled Breakfast Pizza. (Check the related blog post for step-by-step pictures.)

Ingredients

  • 12 ounces, weight Prepared Pizza Dough
  • Olive Oil, For Drizzling On Pizza Dough
  • 3 whole Eggs
  • 3 strips Cooked Bacon, Cut Up In Pieces
  • 1 cup Grated Mozzarella
  • ¼ cups Grated Parmesan
  • 1 pinch Kosher Salt
  • 1 pinch Freshly Cracked Pepper
  • 1 Tablespoon Minced Flat-leaf Parsley
  • 1 Tablespoon Minced Chives
  • 1 whole Scallion, Trimmed And Thinly Sliced

Preparation Instructions

Adapted from The Big Sur Bakery Cookbook.

Generously dust the surface of your kitchen counter with flour and roll pizza dough to a 1/4-inch thickness. Drizzle both sides of dough with olive oil and set aside on a plate. Gather all the toppings and dough and move outside next to the grill.

Once your grill is nice and hot, place the pizza dough on the hottest part of the grill, making sure to check it every 30 seconds or so to ensure proper cooking. Once grill marks appear, flip it and move the dough to a place on the grill that does not have direct heat. Crack the three eggs onto the dough and cover for 2-3 minutes. Once the eggs are just about set, sprinkle the cheeses, bacon and salt and pepper. Cover for an additional 1-2 minutes, or until cheese is melted. Move promptly to a plate and sprinkle with parsley, chives and scallions.

Note: If you’re not in the mood to spark up the grill, then here’s the way to cook it in the oven. My advice is to get yourself a “pizza stone” from Lowes or Home Depot. Simply pre-heat your oven to 450F, roll out the dough, crack the eggs on top, sprinkle with mozzarella and parmesan cheese, then add the pieces of bacon and salt and pepper. Cook in the oven for 8 to 12 minutes, checking on it after 5 minutes and rotating it if necessary. When the crust is golden, the cheese is melted and the eggs yolks are cooked to medium, remove from the oven.


_______________________________________

Jessica Merchant is a personal trainer turned food writer and blogger. Her blog, How Sweet Eats, is where she proclaims her love for all things sweet, all things bacon, and everything else in between. She works her magic in her Pittsburgh kitchen, which she shares with her husband of 2 years.


Profile photo of Erika (TK)

Red, White and Blue

Posted by in Holidays, The Theme Is...

  Here’s a quickie 4th of July post for you. You probably already have your themed dish for the holiday but we wanted to showcase some really pretty, yummy, and show-stopping red, white and blue recipes. (TK members are just … they’re just awesome. So much talent and creativity, and I’m amazed everyday.) You can […]