The Pioneer Woman Tasty Kitchen
Profile photo of georgiapellegrini

Grilled Hanger Steak with Chimichurri

Posted by in Step-by-Step Recipes

Tasty Kitchen Blog: Grilled Hanger Steak with Cilantro Mint Chimichurri. Guest post by Georgia Pellegrini, recipe submitted by TK member Sommer of A Spicy Perspective.

 
There’s nothing like a big piece of meat grilled on a summer afternoon, all juicy and salty, with a lovely tangy sauce on the side to complement it. The sauce in this Grilled Hanger Steak with Cilantro Mint Chimichurri recipe from Sommer> (TK member aspicyperspective) was just so wonderful that I would eat it with any meat I put on the grill. And it’s such a wonderful thing to make in advance and have on hand; it will dress any dish up.


Tasty Kitchen Blog: Grilled Hanger Steak with Cilantro Mint Chimichurri. Guest post by Georgia Pellegrini, recipe submitted by TK member Sommer of A Spicy Perspective.

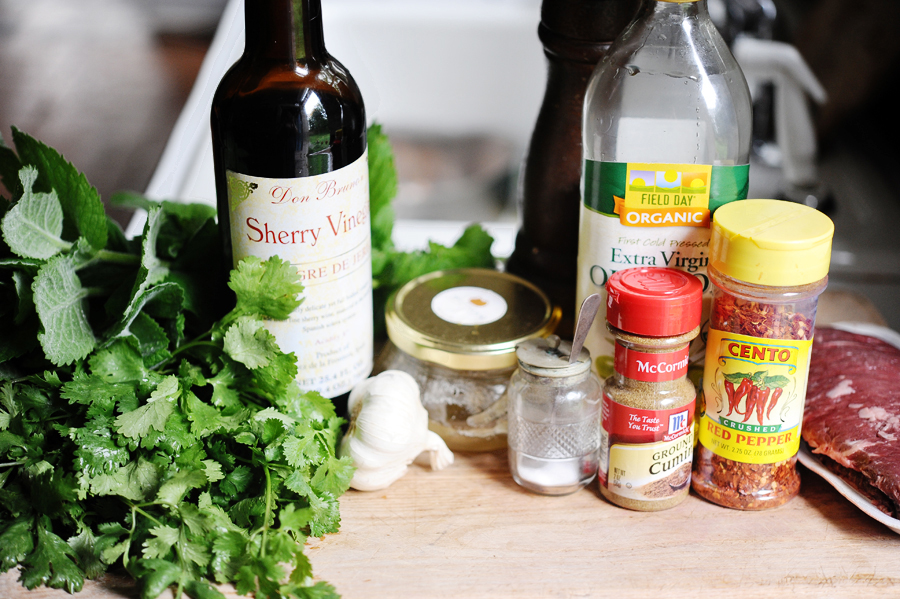
You will need: hanger steak, salt and pepper, fresh cilantro, fresh mint, garlic, red wine vinegar (I used sherry vinegar and it was great), ground cumin, honey, crushed red pepper, and olive oil.


Tasty Kitchen Blog: Grilled Hanger Steak with Cilantro Mint Chimichurri. Guest post by Georgia Pellegrini, recipe submitted by TK member Sommer of A Spicy Perspective.

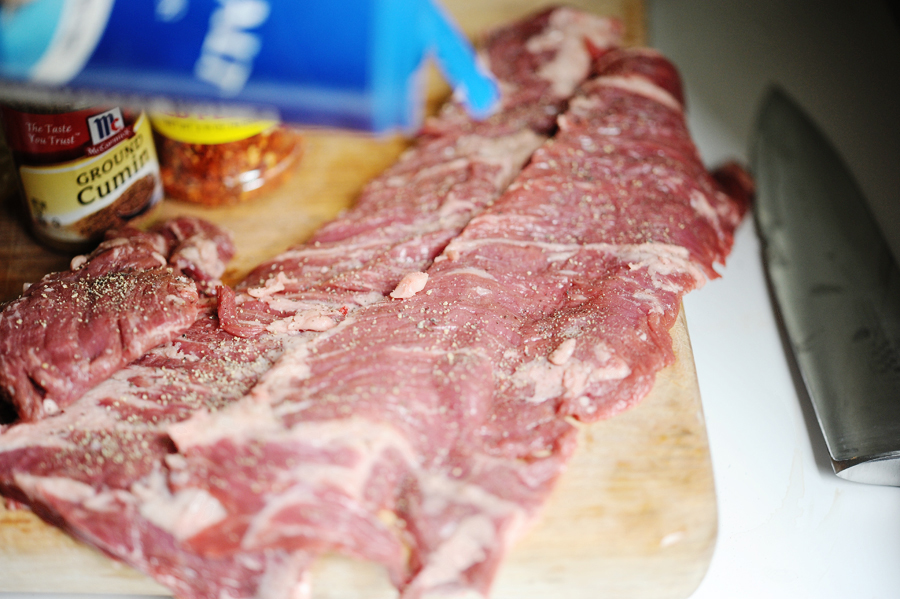
Get the grill nice and hot. With a thin steak you’re only going to give it a quick sear so the grill will need to be sizzling. Season the steaks with salt and pepper on both sides.


Tasty Kitchen Blog: Grilled Hanger Steak with Cilantro Mint Chimichurri. Guest post by Georgia Pellegrini, recipe submitted by TK member Sommer of A Spicy Perspective.

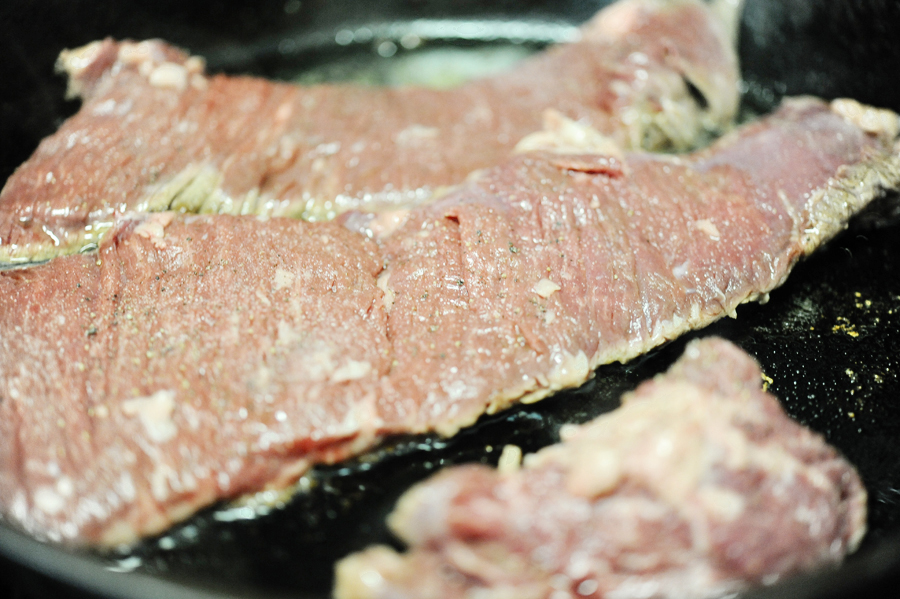
Sear them on both sides, about 2-minutes on each for medium rare. And by the way, you can use a skillet instead of a grill if that’s what you have. It will still be delicious!


Tasty Kitchen Blog: Grilled Hanger Steak with Cilantro Mint Chimichurri. Guest post by Georgia Pellegrini, recipe submitted by TK member Sommer of A Spicy Perspective.

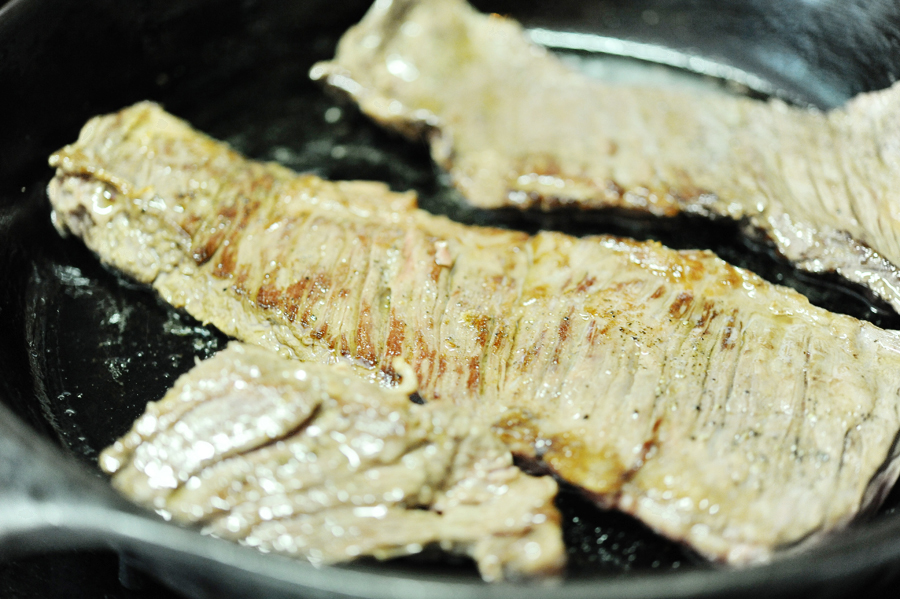
Once you give them a quick sear on both sides, remove from the heat and cover with foil to rest for 5-10 minutes so the juiciness stays within the meat.


Tasty Kitchen Blog: Grilled Hanger Steak with Cilantro Mint Chimichurri. Guest post by Georgia Pellegrini, recipe submitted by TK member Sommer of A Spicy Perspective.

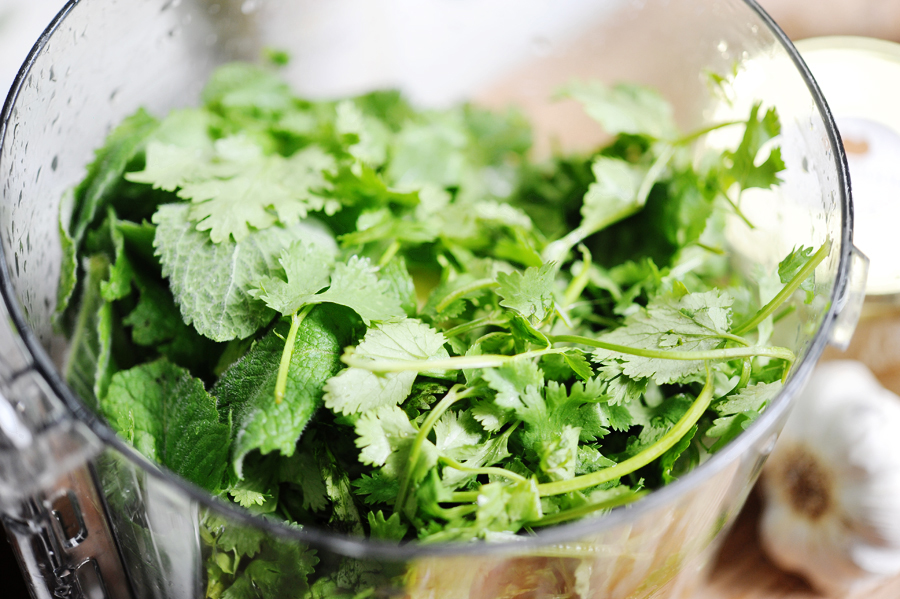
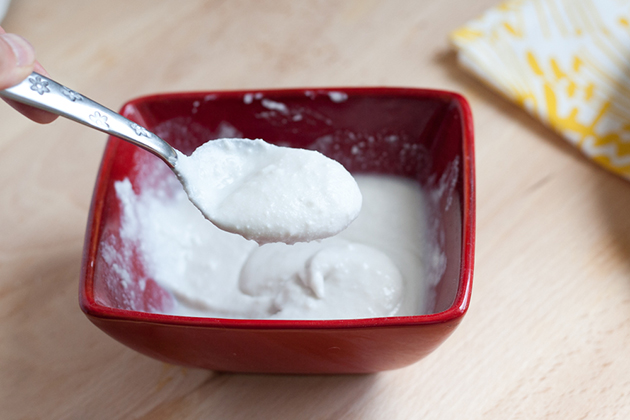
Meanwhile, get your sauce ready by combining all of the ingredients in a food processor. First the cilantro and mint …
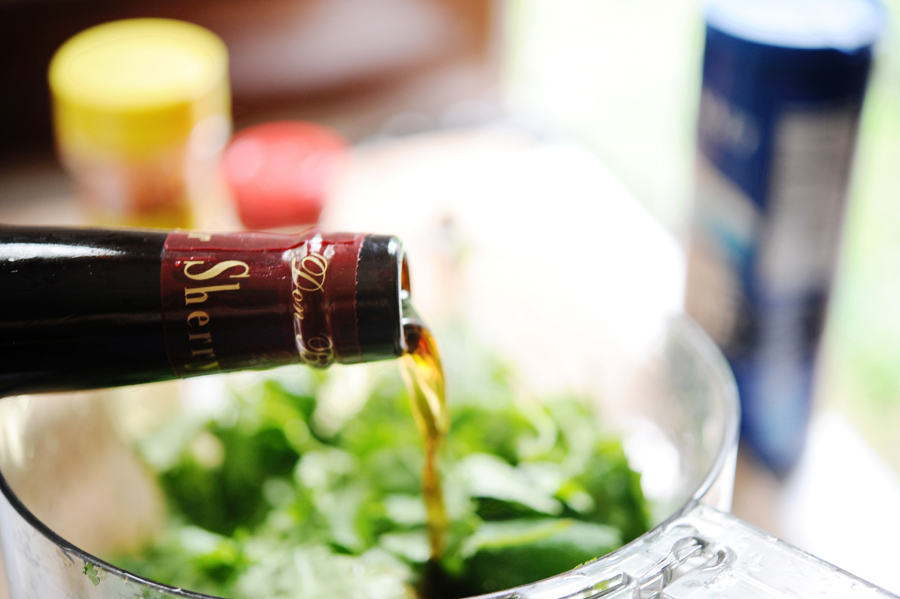
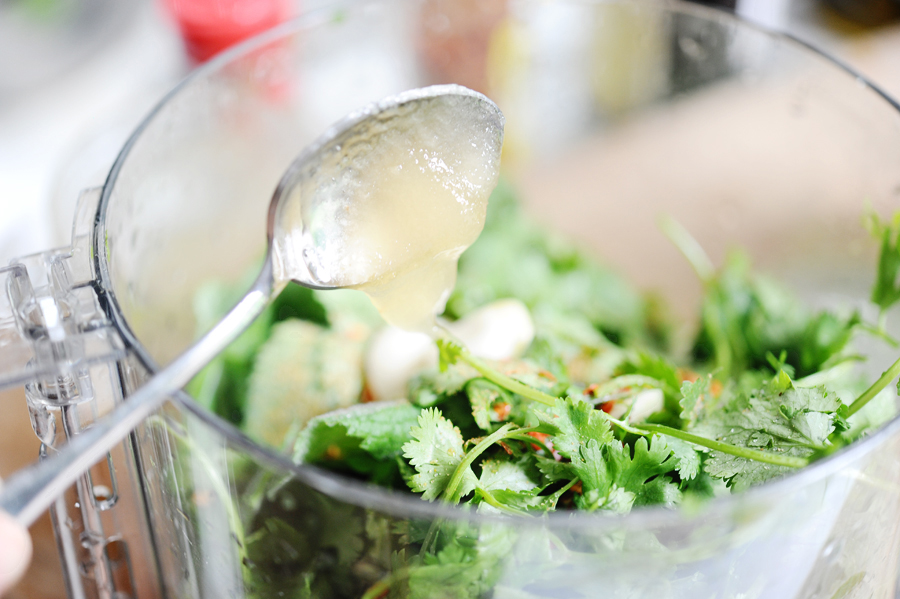


Tasty Kitchen Blog: Grilled Hanger Steak with Cilantro Mint Chimichurri. Guest post by Georgia Pellegrini, recipe submitted by TK member Sommer of A Spicy Perspective.

Then the vinegar …


Tasty Kitchen Blog: Grilled Hanger Steak with Cilantro Mint Chimichurri. Guest post by Georgia Pellegrini, recipe submitted by TK member Sommer of A Spicy Perspective.

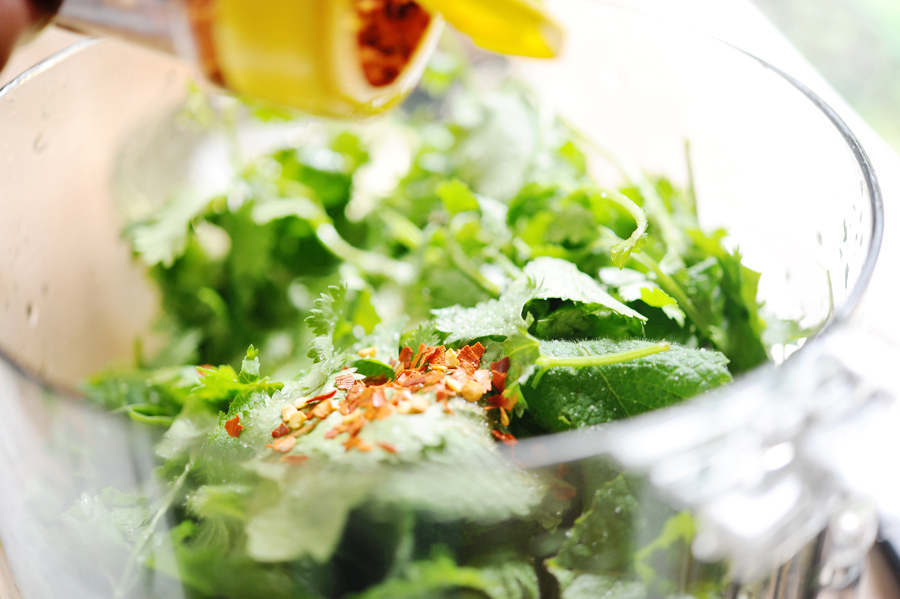
Red pepper flakes for some spice …


Tasty Kitchen Blog: Grilled Hanger Steak with Cilantro Mint Chimichurri. Guest post by Georgia Pellegrini, recipe submitted by TK member Sommer of A Spicy Perspective.

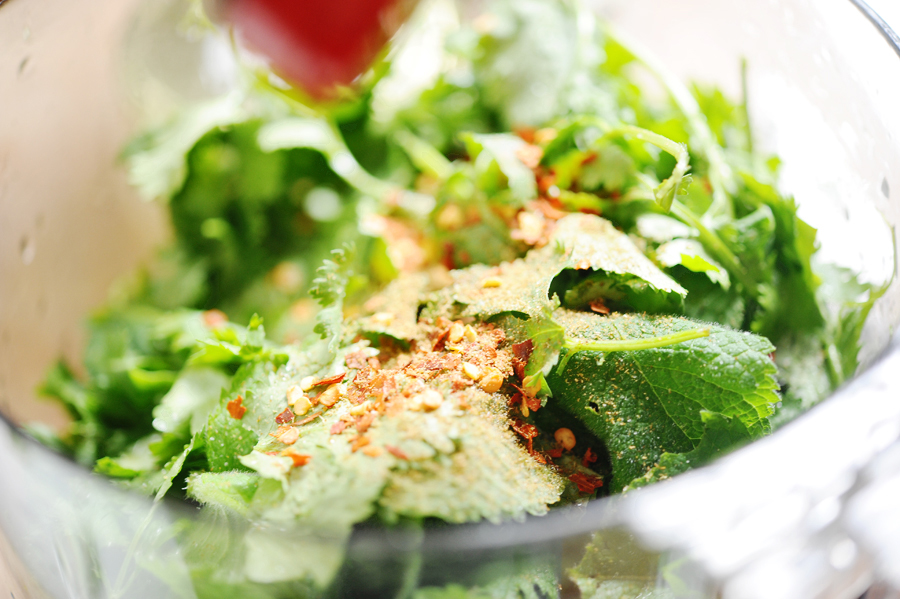
Cumin for some earthiness …


Tasty Kitchen Blog: Grilled Hanger Steak with Cilantro Mint Chimichurri. Guest post by Georgia Pellegrini, recipe submitted by TK member Sommer of A Spicy Perspective.

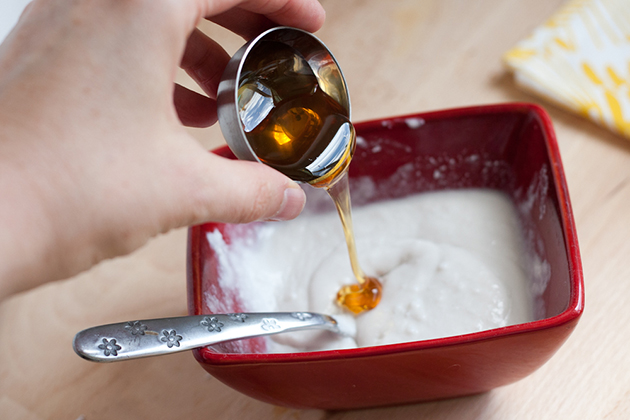
Honey for some sweetness …


Tasty Kitchen Blog: Grilled Hanger Steak with Cilantro Mint Chimichurri. Guest post by Georgia Pellegrini, recipe submitted by TK member Sommer of A Spicy Perspective.

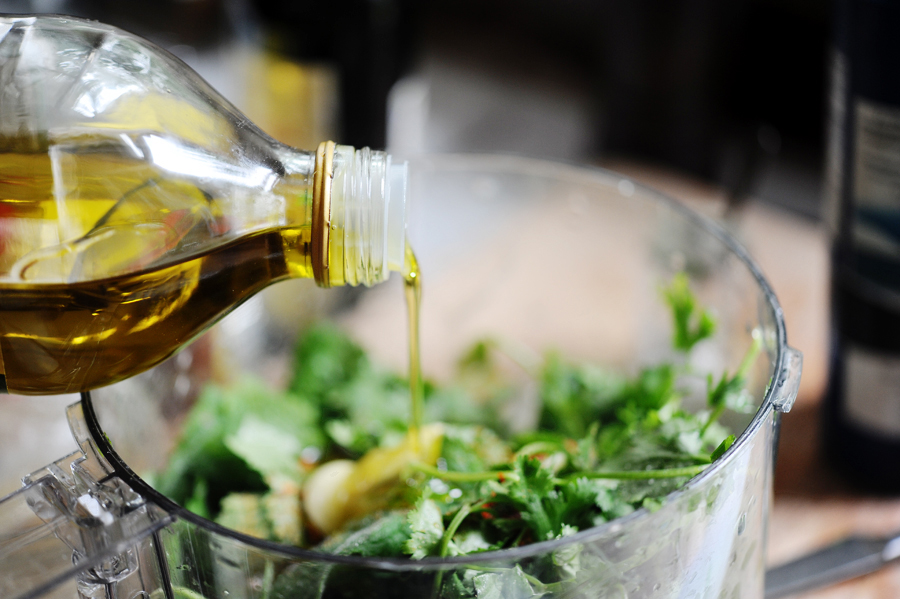
And some olive oil to make it all smooth and luscious.


Tasty Kitchen Blog: Grilled Hanger Steak with Cilantro Mint Chimichurri. Guest post by Georgia Pellegrini, recipe submitted by TK member Sommer of A Spicy Perspective.

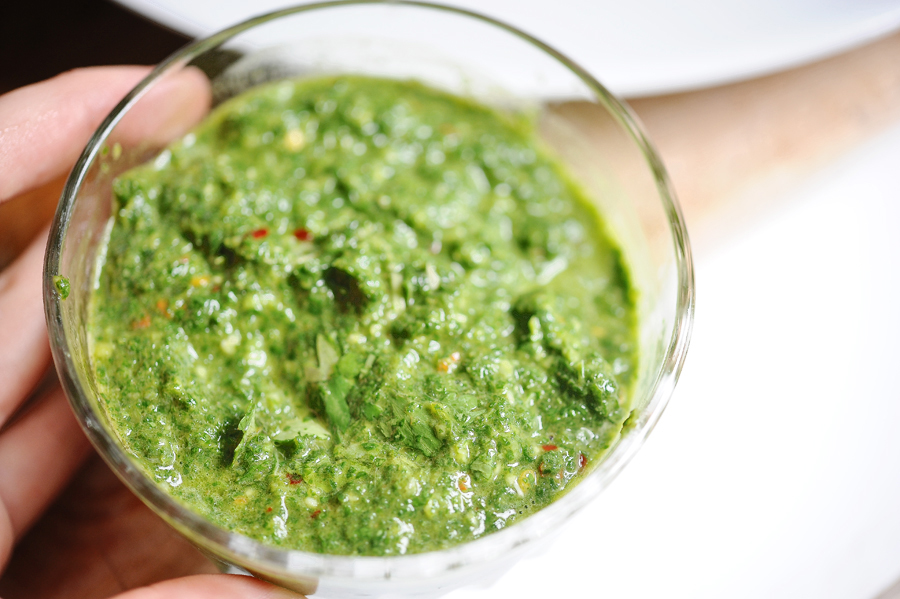
Puree it until mostly smooth, but still full of lumps, herbs and flavor.


Tasty Kitchen Blog: Grilled Hanger Steak with Cilantro Mint Chimichurri. Guest post by Georgia Pellegrini, recipe submitted by TK member Sommer of A Spicy Perspective.

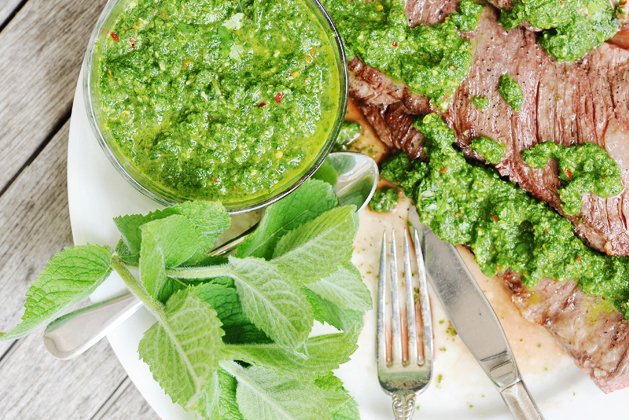
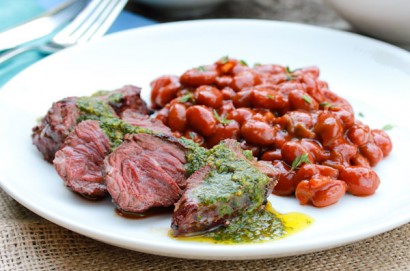
Slice the hanger steak or serve it in big strips with a good dose of this amazing sauce.

Thank you to Sommer for this killer sauce! Take a peek at her website A Spicy Perspective for more deliciousness.


Printable Recipe

Grilled Hanger Steak with Cilantro Mint Chimichurri

See post on aspicyperspective’s site!
4.00 Mitt(s) 2 Rating(s)2 votes, average: 4.00 out of 52 votes, average: 4.00 out of 52 votes, average: 4.00 out of 52 votes, average: 4.00 out of 52 votes, average: 4.00 out of 5

Prep Time:

Cook Time:

Difficulty: Easy

Servings: 4

4
x

Print Options

Page size Letter 3x5 4x6
Text Size Small Medium Large
Content Include description
Include prep time, etc.
Show image

Description

Charred juicy hanger steak with a bold and tangy sauce!

Ingredients

  • FOR THE HANGER STEAK:
  • 2 pounds Hanger Steak
  • Salt And Pepper
  • FOR THE CHIMICHURRI:
  • 1 bunch Fresh Cilantro
  • 1 bunch Fresh Mint
  • 3 cloves Garlic, Peeled
  • 3 Tablespoons Red Wine Vinegar
  • 1 Tablespoon Ground Cumin
  • 1 teaspoon Honey
  • 1 teaspoon Salt
  • ½ teaspoons Crushed Red Pepper
  • ¾ cups Olive Oil

Preparation Instructions

Preheat the grill to high heat.

Sprinkle the hanger steaks with salt and pepper on all sides. Grill the steaks for 2-3 minutes per side for medium-rare, just over 3 minutes per side for medium.

Remove the steak from the heat and cover with foil to rest. (Never cut into to a steak before it’s had time to rest 5-10 minutes to redistribute all the juices.)

Meanwhile, place all the ingredients for the chimichurri in the food processor. Puree until mostly smooth.

Slice the hanger steak into 1/2 inch pieces and serve warm with chimichurri sauce drizzled over the top with side of Bush’s Texas Ranchero Grillin’ Beans.


_______________________________________

There’s so much to say about Georgia, we don’t know where to start. Leaving Wall Street for the French Culinary Institute, followed by a stint at the Gramercy Tavern and La Chassagnette in France, her passion for food and food traditions are evident and inspiring. Visit her site at Georgia Pellegrini, where you’ll find more recipes, photos, learn all about her wonderful books Girl Hunter and Food Heroes, and enjoy her latest adventures.


Profile photo of Natalie | Perry's Plate

Grilled Macadamia-Crusted Pineapple with Coconut Cream

Posted by in Step-by-Step Recipes

Tasty Kitchen Blog: Grilled Macadamia-Crusted Pineapple with Coconut Cream. Guest post by Natalie Perry of Perry's Plate, recipe submitted by TK member Taylor Kiser of Food Faith Fitness.

I big puffy heart love grilled pineapple. To me, it’s right up there with corn on the cob, watermelon, and drippy popsicles on my favorite summer food list. Cover it in crushed macadamia nuts and coconut cream, though? It’ll seem like you’re indulging, but it’s actually a pretty healthy treat!

I’ve been eyeing Taylor Kiser’s recipes for a while and her Grilled Macadamia-Crusted Pineapple with Coconut Cream caught my eye. Naturally.

Let’s make some!


Tasty Kitchen Blog: Grilled Macadamia-Crusted Pineapple with Coconut Cream. Guest post by Natalie Perry of Perry's Plate, recipe submitted by TK member Taylor Kiser of Food Faith Fitness.

You’ll need coconut milk, pineapple rings,macadamia nuts, honey, coconut oil, coconut sugar, and an egg.

Yes, I went with canned pineapple rings. I don’t have one of those nifty pineapple slicers. Plus, I had a 4-month-old baby strapped to my chest.

You’ll need to put the coconut milk in the fridge for several hours—preferably 24 hours.


Tasty Kitchen Blog: Grilled Macadamia-Crusted Pineapple with Coconut Cream. Guest post by Natalie Perry of Perry's Plate, recipe submitted by TK member Taylor Kiser of Food Faith Fitness.

Sprinkle some coconut sugar on the pineapple rings.


Tasty Kitchen Blog: Grilled Macadamia-Crusted Pineapple with Coconut Cream. Guest post by Natalie Perry of Perry's Plate, recipe submitted by TK member Taylor Kiser of Food Faith Fitness.

Flip them over and do the same on the other side.


Tasty Kitchen Blog: Grilled Macadamia-Crusted Pineapple with Coconut Cream. Guest post by Natalie Perry of Perry's Plate, recipe submitted by TK member Taylor Kiser of Food Faith Fitness.

Brush them with coconut oil.


Tasty Kitchen Blog: Grilled Macadamia-Crusted Pineapple with Coconut Cream. Guest post by Natalie Perry of Perry's Plate, recipe submitted by TK member Taylor Kiser of Food Faith Fitness.

Is your grill hot? You mean you don’t just leave it on all summer and constantly throw stuff on it? Party pooper.

Okay, grill those rings. You don’t have to make distinct grill marks, just get them golden brown and heated through. Flip them once, let them grill a little longer, then pull them off and set them aside.


Tasty Kitchen Blog: Grilled Macadamia-Crusted Pineapple with Coconut Cream. Guest post by Natalie Perry of Perry's Plate, recipe submitted by TK member Taylor Kiser of Food Faith Fitness.

Crush the nuts in a food processor or if your processor bowl happens to be in the dishwasher, use your blender. But be careful not to make macadamia nut butter. Not that that’s a bad thing, but in this case you might not want it.

Transfer the nuts to a shallow bowl.


Tasty Kitchen Blog: Grilled Macadamia-Crusted Pineapple with Coconut Cream. Guest post by Natalie Perry of Perry's Plate, recipe submitted by TK member Taylor Kiser of Food Faith Fitness.

Put your egg white into another shallow bowl.


Tasty Kitchen Blog: Grilled Macadamia-Crusted Pineapple with Coconut Cream. Guest post by Natalie Perry of Perry's Plate, recipe submitted by TK member Taylor Kiser of Food Faith Fitness.

Dip each ring into the egg white.


Tasty Kitchen Blog: Grilled Macadamia-Crusted Pineapple with Coconut Cream. Guest post by Natalie Perry of Perry's Plate, recipe submitted by TK member Taylor Kiser of Food Faith Fitness.

Then coat with the crushed nuts.


Tasty Kitchen Blog: Grilled Macadamia-Crusted Pineapple with Coconut Cream. Guest post by Natalie Perry of Perry's Plate, recipe submitted by TK member Taylor Kiser of Food Faith Fitness.

Throw the pineapple back on the grill for a few minutes until the nuts are lightly toasted. They burn easy, so keep an eye on them. I wouldn’t try to flip them or you’ll lose the coating.


Tasty Kitchen Blog: Grilled Macadamia-Crusted Pineapple with Coconut Cream. Guest post by Natalie Perry of Perry's Plate, recipe submitted by TK member Taylor Kiser of Food Faith Fitness.

Pull the coconut milk out of the fridge. Turn it upside down and open it from the bottom. Pour out the watery coconut milk and scrape out the cream at the bottom of the can. This is the coconut cream. Pretty cool, huh?


Tasty Kitchen Blog: Grilled Macadamia-Crusted Pineapple with Coconut Cream. Guest post by Natalie Perry of Perry's Plate, recipe submitted by TK member Taylor Kiser of Food Faith Fitness.

Stir in the honey, to taste.


Tasty Kitchen Blog: Grilled Macadamia-Crusted Pineapple with Coconut Cream. Guest post by Natalie Perry of Perry's Plate, recipe submitted by TK member Taylor Kiser of Food Faith Fitness.

Stack a few of those grilled, toasty pineapple rings …


Tasty Kitchen Blog: Grilled Macadamia-Crusted Pineapple with Coconut Cream. Guest post by Natalie Perry of Perry's Plate, recipe submitted by TK member Taylor Kiser of Food Faith Fitness.

And drizzle some cream on top. You could also put the cream in the fridge for several hours so it thickens up. I can’t wait that long. (Nor plan ahead these days.)


Tasty Kitchen Blog: Grilled Macadamia-Crusted Pineapple with Coconut Cream. Guest post by Natalie Perry of Perry's Plate, recipe submitted by TK member Taylor Kiser of Food Faith Fitness.

Eat up, friends.

Many thanks to Taylor Kiser for a delicious, light (paleo-friendly!) dessert! Go check out her blog Food Faith Fitness and her TK recipe box, which are both overflowing with great recipes.


Printable Recipe

Grilled Macadamia-Crusted Pineapple with Coconut Cream

See post on Taylor Kiser’s site!
0.00 Mitt(s) 0 Rating(s)0 votes, average: 0.00 out of 50 votes, average: 0.00 out of 50 votes, average: 0.00 out of 50 votes, average: 0.00 out of 50 votes, average: 0.00 out of 5

Prep Time:

Cook Time:

Difficulty: Easy

Servings: 4

4
x

Print Options

Page size Letter 3x5 4x6
Text Size Small Medium Large
Content Include description
Include prep time, etc.
Show image

Description

Smokey-sweet grilled pineapple is crusted with macadamia nuts and then layered with coconut whipped cream for an easy, healthy, paleo-friendly summer dessert!

Ingredients

  • FOR THE PINEAPPLE:
  • 12  Pineapple Rings
  • 5-½ Tablespoons Coconut Sugar, Divided
  • 1-¼ cup Dry Roasted Macadamia Nut Pieces
  • 2  Large Egg Whites
  • Coconut Oil, Melted (for Grilling)
  • FOR THE COCONUT CREAM:
  • 13 ounces, weight Canned Full-fat Coconut Milk, Chilled At Least 24 Hours
  • 2 Tablespoons Honey
  • Mint, For Garnish

Preparation Instructions

Note: I like to whip my coconut cream a few hours in advance and then cover and refrigerate it. This way it hardens up and doesn’t melt as quickly one sandwiched between the warm pineapple. If you want to do this, do step 7 first.

1. Rub your grill generously with coconut oil and preheat to medium/high heat.
2. Lightly pat the pineapple rings dry and place them into a large bowl. Toss with 3 tablespoons of the coconut sugar until evenly coated.
3. Place the pineapple onto the preheated grill and cook until lightly charred and caramelized, about 2 minutes. Flip and repeat again. Place grilled pineapple on a plate and set aside. Turn your grill down to medium heat.
4. While the pineapple cools, place macadamia pieces into a small food processor (mine is 3 cups size) and process until large crumbs form. Spread the crumbs into a large, sided plate. Place the egg whites into a medium bowl.
5. Take one pineapple ring and dunk it into the egg whites, shaking off the excess. Then, place the pineapple into the macadamia pieces, using your opposite hand, and gently press both sides into the nut pieces. You’ll need to lightly press the nuts on to adhere them to the pineapple. Place onto a separate plate and repeat with remaining pieces.
6. Brush a little more coconut oil on the grill and place the pineapple back on it. Cook until the macadamia pieces are just beginning to look charred and the egg appears to set, about 1-2 minutes per side. Watch carefully so you don’t burn them. Transfer to a plate and let them cool while you make the coconut cream.
7. Turn your can of chilled coconut milk upside down and open. Pour out the liquid that has risen to the top (save it for a smoothie later) and scoop the thick cream from the bottom of the can into a large bowl. Add in the honey and beat with an electric hand mixer until light and fluffy (see note).
8. Place one ring of pineapple down on your serving plate and spoon (or pipe, like I did) some coconut cream (about a heaping 1 ½ tablespoons) onto the center. Top with another ring and repeat. Finish with one more piece of pineapple and a squeeze of coconut cream. Repeat with remaining rings.
9. Garnish with mint, if desired, and devour immediately!


_______________________________________

Be sure to check out Natalie’s own beautiful food blog, Perrys’ Plate, where you can see her growing collection of lovely recipes. There’s always something new to see there. Go visit now!


Profile photo of cookincanuck

Grilled Pasta Packets

Posted by in Step-by-Step Recipes

Tasty Kitchen Blog: Grilled Pasta Packets. Guest post by Dara Michalski of Cookin' Canuck, recipe submitted by TK member Lindsay of Eath 80/20.

 
As soon as summertime hits, my boys want to know one thing: When are we going camping? The local mountains and lakes are filled with campsites, tucked away amongst the trees, offering endless hours of exploration for curious minds and a reprieve from the valley heat for everyone.

Cooking around a campfire is always an adventure, and we try to come up with novel ways to prepare old favorites to keep things interesting. When I stumbled across Tasty Kitchen member Eat 80/20 Dietitian’s recipe for Grilled Pasta Packets, I knew I had to try it out on our backyard grill. The result? Easy, packed with flavor, and fun to eat. The beauty of this recipe is that you can make the spaghetti ahead of time and pack it in to your campsite. Just assemble and warm it in foil over a camping stove, or on a grate over a smoldering campfire. This will certainly become a new family favorite!

Let’s get cooking.


Tasty Kitchen Blog: Grilled Pasta Packets. Guest post by Dara Michalski of Cookin' Canuck, recipe submitted by TK member Lindsay of Eath 80/20.

Here’s everything you’re going to need for this recipe. Quick and easy!


Tasty Kitchen Blog: Grilled Pasta Packets. Guest post by Dara Michalski of Cookin' Canuck, recipe submitted by TK member Lindsay of Eath 80/20.

Cut foil into twelve 8- by 12 –inch pieces of foil. You will use two piece of foil for each packet.


Tasty Kitchen Blog: Grilled Pasta Packets. Guest post by Dara Michalski of Cookin' Canuck, recipe submitted by TK member Lindsay of Eath 80/20.

Cook the spaghetti until it is undercooked by a couple of minutes. Rinse with cold water and store it in a resealable plastic bag until you’re ready to use, preferably when you’re bundled up together around a campfire.

When you’re ready to go, preheat the grill to medium heat.


Tasty Kitchen Blog: Grilled Pasta Packets. Guest post by Dara Michalski of Cookin' Canuck, recipe submitted by TK member Lindsay of Eath 80/20.

Toss the spaghetti, olive oil, chopped tomatoes, garlic and basil in a large bowl.


Tasty Kitchen Blog: Grilled Pasta Packets. Guest post by Dara Michalski of Cookin' Canuck, recipe submitted by TK member Lindsay of Eath 80/20.

Divide the spaghetti mixture between the 6 double-layered pieces of foil (about 1 ¼ cups per packet). Squeeze 1 lemon wedge over each each portion of spaghetti and lay the lemon wedge on top of the spaghetti.


Tasty Kitchen Blog: Grilled Pasta Packets. Guest post by Dara Michalski of Cookin' Canuck, recipe submitted by TK member Lindsay of Eath 80/20.

Dollop each portion with a few teaspoons of goat cheese.


Tasty Kitchen Blog: Grilled Pasta Packets. Guest post by Dara Michalski of Cookin' Canuck, recipe submitted by TK member Lindsay of Eath 80/20.

Starting with the long sides, fold the foil to form a package. Fold over the ends. Avoid squeezing out all of the air from the packages.


Tasty Kitchen Blog: Grilled Pasta Packets. Guest post by Dara Michalski of Cookin' Canuck, recipe submitted by TK member Lindsay of Eath 80/20.

Lower the heat of the grill to low heat (or find a cool-ish part of your campfire). Heat the packets until the spaghetti is heated through and the goat cheese is melted, about 10 to 12 minutes, shaking partway through.


Tasty Kitchen Blog: Grilled Pasta Packets. Guest post by Dara Michalski of Cookin' Canuck, recipe submitted by TK member Lindsay of Eath 80/20.

Remove from the heat and serve.

Thanks so much to Lindsay for this recipe. Be sure to check out her blog, Eighty Twenty. Lindsay follows the principle of eating healthy foods 80 percent of the time so that you can eat less healthy things 20 percent of the time. I like her already!


Printable Recipe

Grilled Pasta Packets

See post on Lindsay {Eighty Twenty Dietitian}’s site!
0.00 Mitt(s) 0 Rating(s)0 votes, average: 0.00 out of 50 votes, average: 0.00 out of 50 votes, average: 0.00 out of 50 votes, average: 0.00 out of 50 votes, average: 0.00 out of 5

Prep Time:

Cook Time:

Difficulty: Easy

Servings: 6

6
x

Print Options

Page size Letter 3x5 4x6
Text Size Small Medium Large
Content Include description
Include prep time, etc.
Show image

Description

This is a camping dinner that is so easy to throw together, and it does not include processed meats. Hooray! Cook your pasta before your camping trip and save it in a Ziploc bag. Then let everyone build their own pasta and toss it on the grill to heat!

Ingredients

  • 1 pound Whole Grain Spaghetti Noodles, Cooked For About 6 Minutes, Or Slightly Less Than Al Dente Per Package Instructions
  • 6 whole Roma Tomatoes Seeded And Chopped
  • 1 cup Fresh Basil Leaves, Coarsely Chopped
  • ½ teaspoons Salt
  • ¼ teaspoons Fresh Ground Black Pepper
  • 3 cloves Garlic, Finely Chopped
  • 3 Tablespoons Olive Oil
  • 1 whole Lemon, Cut Into 6 Wedges
  • 4 ounces, weight Goat Cheese

Preparation Instructions

Preheat grill to medium heat.

Cut one dozen 8×12″ pieces of aluminum foil. Layer foil so that you are using 2 per packet. In a bowl, toss together pasta, chopped tomato, basil, salt, pepper, garlic and olive oil. Spoon one serving of pasta mixture (about 1 1/4 cups) into the center of each packet. Squeeze lemon wedge over pasta before adding the lemon to the packet. Spoon a few teaspoons of goat cheese into packet.

Bring long edges of foil together, then roll it up to secure it. Roll edges of packet to form a closed space (do not squeeze out all of the air).

Reduce grill heat to low, then place packets on grill. Cook for 10-12 minutes, shaking packets halfway through cooking.

Remove from grill and serve immediately.

Nutrition Information per 1 packet as shown above: 224 calories, 11 g fat, 8 g protein, 20 g carbohydrates, 4.5 g fiber


_______________________________________

Dara Michalski is a doll and a sweetheart who clearly knows her way around the kitchen. She blogs at Cookin’ Canuck, where she shares her flavor-packed recipes and fun, engaging writing. The photography’s pretty incredible, too.


Profile photo of Amber {Sprinkled With Flour}

Grilled Peaches with Honey-Ginger Cream Cheese Fluff

Posted by in Step-by-Step Recipes

Tasty Kitchen Blog: Grilled Peaches with Honey Ginger Cream Cheese Fluff. Guest post by Amber Potter of Sprinkled with Flour, recipe submitted by Jessica of A Kitchen Addiction.

 
Living in a house with a 5-year-old, most of our desserts are of the kid-friendly variety. “Grown up” desserts are saved for special occasions, when I feel the need to step away from kiddie land and enjoy something a bit more, well, grown up. 

Don’t get me wrong! I love a good ol’ chocolate chip cookie sundae, but every now and then a girl needs to pamper her palate. When I found Jessica’s recipe for Grilled Peaches with Honey Ginger Cream Cheese Fluff, I knew this recipe would hit the mark.

Besides, who doesn’t love a dessert that has fluff in it? Fluff is very grown up, right?


Tasty Kitchen Blog: Grilled Peaches with Honey Ginger Cream Cheese Fluff. Guest post by Amber Potter of Sprinkled with Flour, recipe submitted by Jessica of A Kitchen Addiction.

This recipe is super simple. You’ll need: peaches, neufchatel cheese, honey, ginger, nutmeg, and Cool Whip. 


Tasty Kitchen Blog: Grilled Peaches with Honey Ginger Cream Cheese Fluff. Guest post by Amber Potter of Sprinkled with Flour, recipe submitted by Jessica of A Kitchen Addiction.

In a bowl, mix together the neufchatel cheese and honey.


Tasty Kitchen Blog: Grilled Peaches with Honey Ginger Cream Cheese Fluff. Guest post by Amber Potter of Sprinkled with Flour, recipe submitted by Jessica of A Kitchen Addiction.

Beat with a mixer until creamy, about 2 minutes.


Tasty Kitchen Blog: Grilled Peaches with Honey Ginger Cream Cheese Fluff. Guest post by Amber Potter of Sprinkled with Flour, recipe submitted by Jessica of A Kitchen Addiction.

Add the ginger and nutmeg. 


Tasty Kitchen Blog: Grilled Peaches with Honey Ginger Cream Cheese Fluff. Guest post by Amber Potter of Sprinkled with Flour, recipe submitted by Jessica of A Kitchen Addiction.

Beat for another 2 minutes, until well combined.


Tasty Kitchen Blog: Grilled Peaches with Honey Ginger Cream Cheese Fluff. Guest post by Amber Potter of Sprinkled with Flour, recipe submitted by Jessica of A Kitchen Addiction.

Gently fold in the Cool Whip with a spoon, just until combined. Refrigerate while you grill the peaches.


Tasty Kitchen Blog: Grilled Peaches with Honey Ginger Cream Cheese Fluff. Guest post by Amber Potter of Sprinkled with Flour, recipe submitted by Jessica of A Kitchen Addiction.

Cover the grate of your grill with foil. Place the peaches, cut side down, on the grill. Grill for 3-6 minutes, or until soft.


Tasty Kitchen Blog: Grilled Peaches with Honey Ginger Cream Cheese Fluff. Guest post by Amber Potter of Sprinkled with Flour, recipe submitted by Jessica of A Kitchen Addiction.

Remove peaches to a platter. Top with the cream cheese fluff, drizzle with honey, and sprinkle with nutmeg.


Tasty Kitchen Blog: Grilled Peaches with Honey Ginger Cream Cheese Fluff. Guest post by Amber Potter of Sprinkled with Flour, recipe submitted by Jessica of A Kitchen Addiction.

I absolutely LOVED these grilled peaches. Even my son loved them, so they’re not just for grown ups! The spiced cream cheese topping went so well with the sweet, juicy peaches. A perfect ending to a summer meal. Thank you Jessica for sharing you’re recipe with us! You can visit Jessica’s blog, A Kitchen Addiction, to find more of her yummy recipes.


Printable Recipe

See post on Jessica@A Kitchen Addiction’s site!
4.50 Mitt(s) 2 Rating(s)2 votes, average: 4.50 out of 52 votes, average: 4.50 out of 52 votes, average: 4.50 out of 52 votes, average: 4.50 out of 52 votes, average: 4.50 out of 5

Prep Time:

Cook Time:

Difficulty: Easy

Servings: 6

6
x

Print Options

Page size Letter 3x5 4x6
Text Size Small Medium Large
Content Include description
Include prep time, etc.
Show image

Description

The cream cheese fluff offers a slight tang to offset the sweetness of the peaches, and the ginger and honey blend beautifully with this delicious treat!

Ingredients

  • 4 ounces, weight 1/3 Of The Fat Neufchatel Cheese, Softened
  • 1-½ Tablespoon Honey
  • ½ teaspoons Ginger
  • ⅛ teaspoons Nutmeg
  • 4 ounces, weight Fat Free Cool Whip, Thawed
  • 1 pound Peaches, Washed And Halved
  • Honey And Nutmeg For Garnish

Preparation Instructions

1. In a small bowl, add neufchatel cheese and honey. Beat with a hand mixer until creamy, about 2 minutes. Add in the ginger and nutmeg. Beat again for another 2 minutes.
2. Gently fold in the Cool Whip with a spoon just until combined. Refrigerate while you grill the peaches.
3. Cover grate of grill with aluminum foil. Place peaches, cut side down, on grill. Grill on low heat for 3-6 minutes, or until soft.
4. Remove peaches to a plate. Top with cream cheese fluff. Drizzle with honey and sprinkle with nutmeg.


_______________________________________

Amber is a stay at home mom who lives in the heart of the Missouri Ozarks. It’s a long way from where she grew up, in Wales (yes, way over in the U.K.). The recipes in her blog Sprinkled with Flour include her original creations as well as her family recipes. Go check them out!


Profile photo of callimakesdo

Grilled Salad with Strawberry Balsamic Reduction

Posted by in Step-by-Step Recipes

We’re so happy to welcome Calli to the Tasty Kitchen Blog. We love her and her blog Make it Do. It’s pretty, it’s yummy, and it has so many handy tips for making things around the house a little bit easier. (I’m waiting for her to invent automated laundry.) And what a gorgeous salad to […]

Profile photo of Megan {Country Cleaver}

Grilled Turkey Meatball Gyros

Posted by in Step-by-Step Recipes

It’s only a little embarrassing when you find yourself going to the same restaurant every Friday night, the guys behind the counter greeting you by name with your order memorized. Beef and lamb gyros with rice and hummus with a baklava for dessert, of course! But I realized I needed to take a break from […]

Profile photo of Erika (TK)

Growing Herbs

Posted by in Kitchen Talk

The birds are chirping, mornings come a little bit earlier each day, and that tickle in my throat is telling me that pollen is floating around in the air, bringing with it the promise of new life. Spring is finally here! Many winter-weary folks have started flocking to garden centers, eager to begin work on […]

Profile photo of Erika (TK)

Growing Vegetables

Posted by in Kitchen Talk

Do you have any tips for growing vegetables? Favorite veggies you like to plant each year? Any particular challenges planting specific varieties? Any questions that other gardeners here may be able to answer?