The Pioneer Woman Tasty Kitchen
Profile photo of missamy

Cracker Pizza

Posted by in Step-by-Step Recipes

Tasty Kitchen Blog: Cracker Pizza. Guest post by Amy Johnson of She Wears Many Hats, recipe submitted by TK member Mrs. Schwartz of Mrs. Schwartz's Kitchen.

 
Confession time: I’ve never mastered the pizza dough. Nope. It’s always turned out mushy, doughy, and, well, just wrong. I’ll keep working on it, but in the meantime, I found with this recipe for Cracker Pizza, submitted by Tasty Kitchen member, Mrs. Schwartz, I don’t really have to worry about it right now. Plus, I’ve grown quite fond of a crispy, crunchy pizza. It’s good eating if you ask me. And this recipe is as simple as it gets. I’m guessing a quick 15 minutes from start to that first crunchy bite.

This Cracker Pizza recipe would be great to use for a pizza party, especially with teenagers. Prepare a pizza bar with a bunch of toppings and let everyone fix their own favorite combo. Fun!

Let me show you how easy it is.


Tasty Kitchen Blog: Cracker Pizza. Guest post by Amy Johnson of She Wears Many Hats, recipe submitted by TK member Mrs. Schwartz of Mrs. Schwartz's Kitchen.

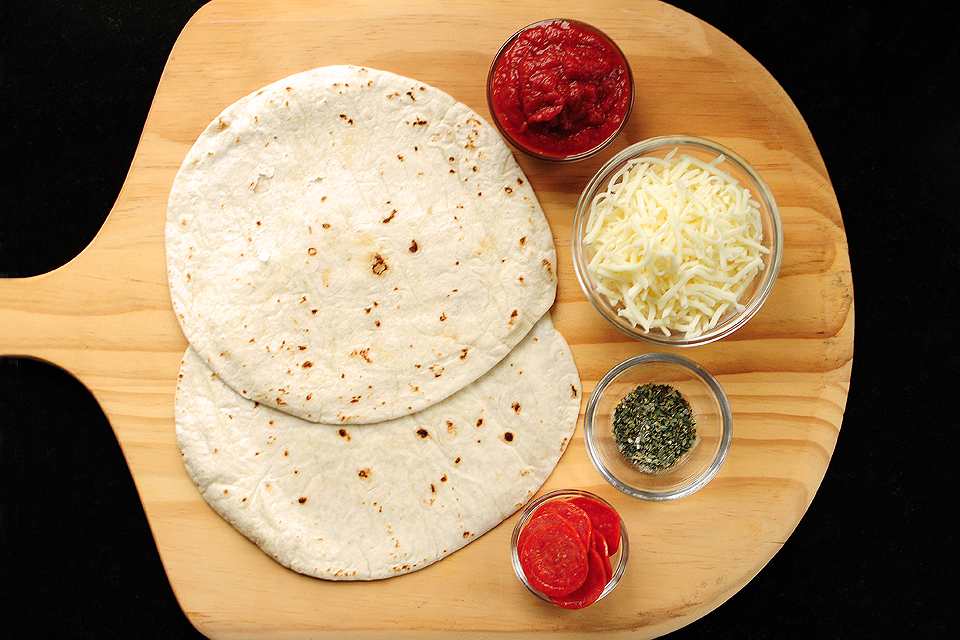
To get started you’ll need: tortillas, pizza sauce, mozzarella cheese, pepperoni or your favorite toppings, and pizza seasoning (or create your own; I used basil, oregano, garlic powder, and black pepper).


Tasty Kitchen Blog: Cracker Pizza. Guest post by Amy Johnson of She Wears Many Hats, recipe submitted by TK member Mrs. Schwartz of Mrs. Schwartz's Kitchen.

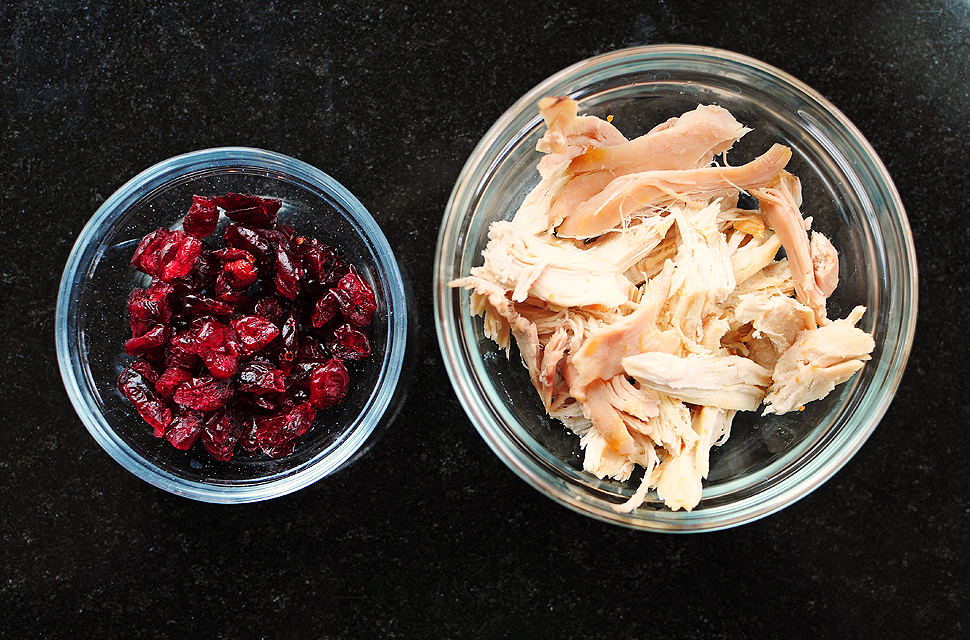
In addition to the pepperoni, I used some leftover chicken with dried cranberries for a holiday-inspired pizza. That leftover turkey would be veddy, veddy good here too.


Tasty Kitchen Blog: Cracker Pizza. Guest post by Amy Johnson of She Wears Many Hats, recipe submitted by TK member Mrs. Schwartz of Mrs. Schwartz's Kitchen.

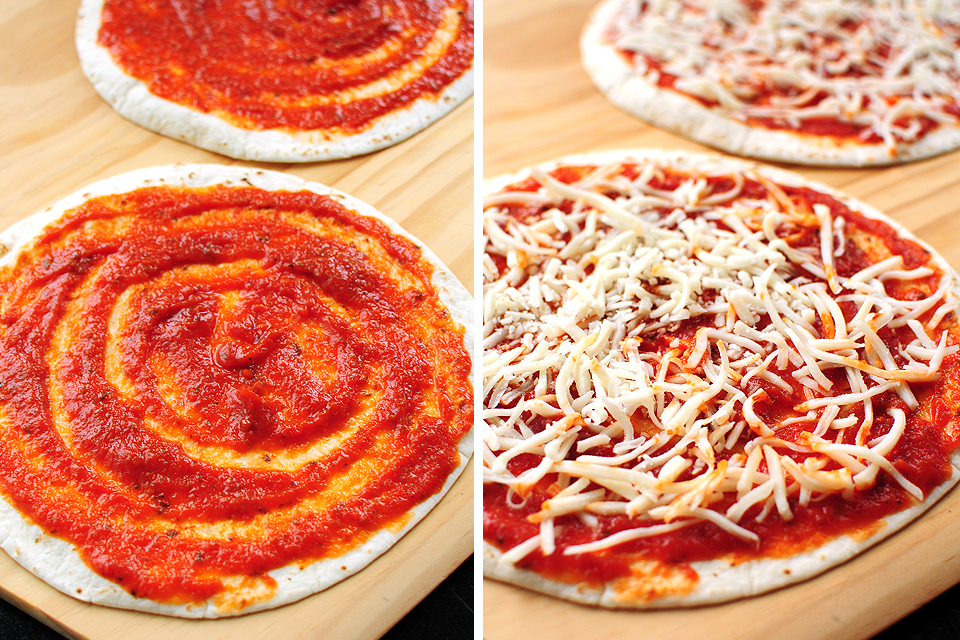
Evenly spread the pizza sauce over the tortilla, and then the cheese, please.


Tasty Kitchen Blog: Cracker Pizza. Guest post by Amy Johnson of She Wears Many Hats, recipe submitted by TK member Mrs. Schwartz of Mrs. Schwartz's Kitchen.

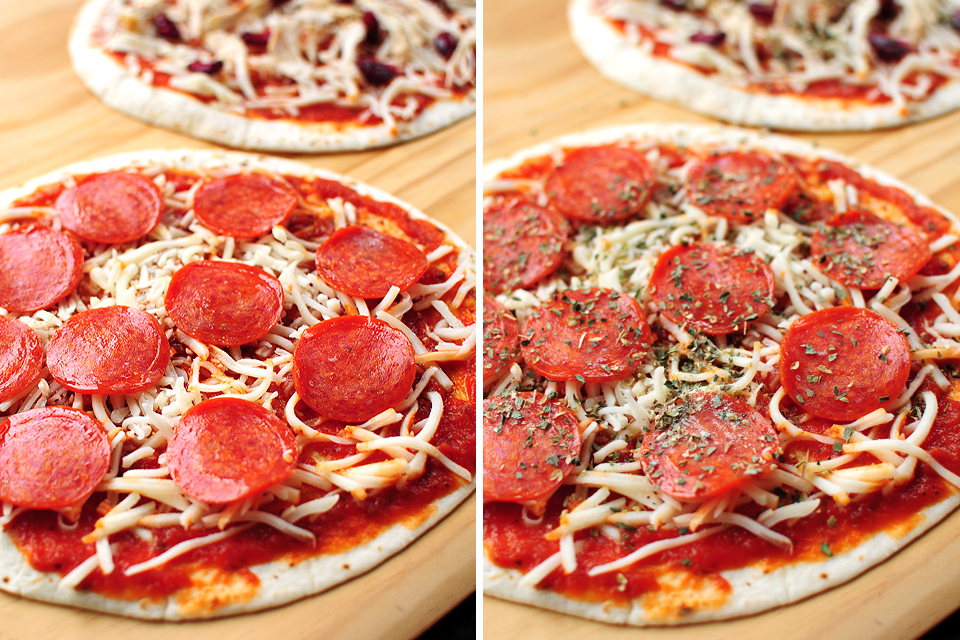
Add your favorite toppings, and evenly sprinkle the pizza with seasonings.


Tasty Kitchen Blog: Cracker Pizza. Guest post by Amy Johnson of She Wears Many Hats, recipe submitted by TK member Mrs. Schwartz of Mrs. Schwartz's Kitchen.

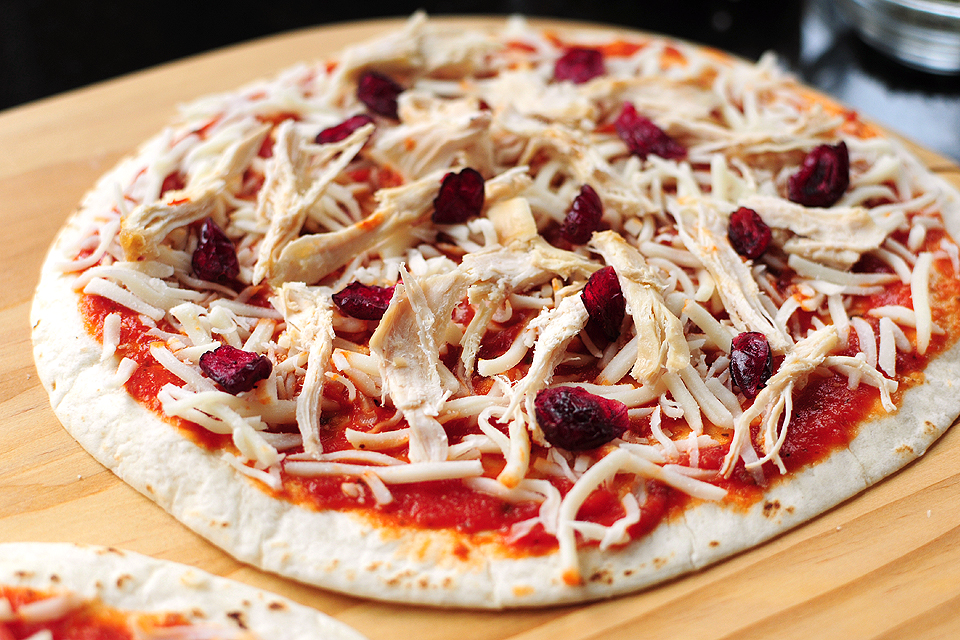
The chicken and cranberry pizza is looking good.

Now it’s time to bake, for about 10 minutes. Be sure to watch carefully to avoid burning the crust.


Tasty Kitchen Blog: Cracker Pizza. Guest post by Amy Johnson of She Wears Many Hats, recipe submitted by TK member Mrs. Schwartz of Mrs. Schwartz's Kitchen.

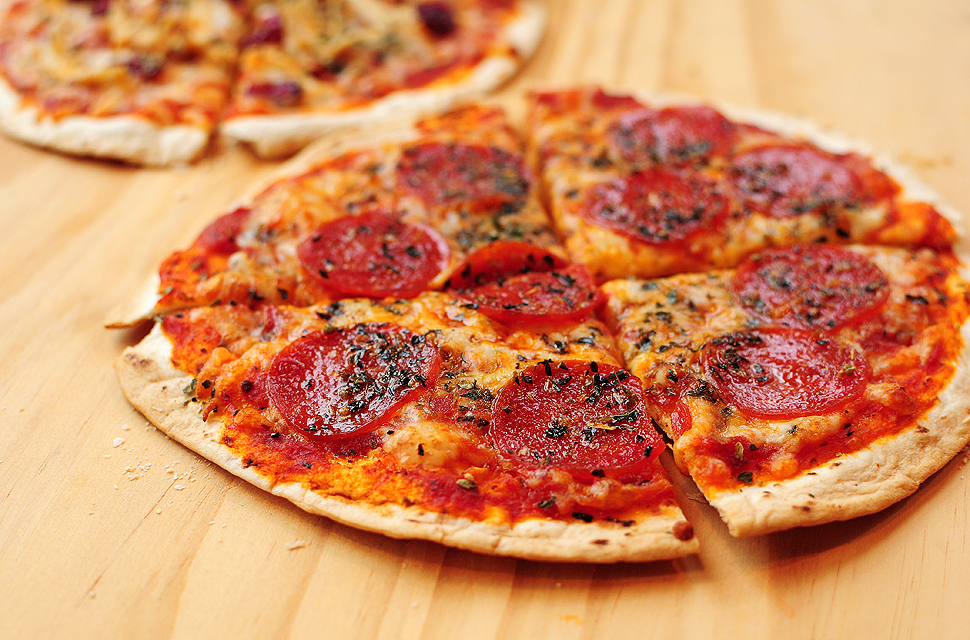
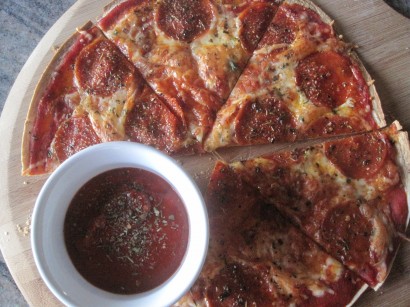
Yum! Melty cheese on top of a crunchy cracker-style crust.


Tasty Kitchen Blog: Cracker Pizza. Guest post by Amy Johnson of She Wears Many Hats, recipe submitted by TK member Mrs. Schwartz of Mrs. Schwartz's Kitchen.

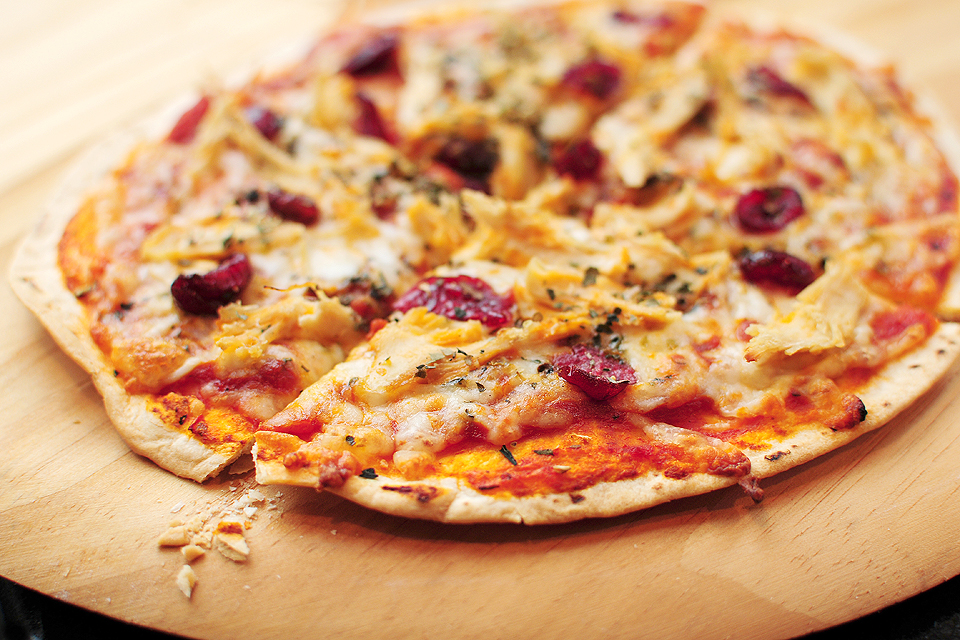
And the chicken cranberry combo turned out very nice. The crust is so crispy! It’s hard to believe it only takes 10 minutes for a plain, boring flour tortilla to turn into such deliciousness.

I’m thinking I may serve a few different combinations of these for appetizers at our next gathering. So simple, and the ingredients are basic enough to keep on hand for snacks, or last-minute appetizers.

Dear Mrs. Schwartz,

The recipe for Cracker Pizza is most certainly a keeper. And now I can make pizza any time I want even though I’m stinking up the pizza dough.

Thanks for sharing it with all of us!

Sincerely,
Pizza Dough Challenged Mrs. Johnson


Printable Recipe

Cracker Pizza

See post on Krysten Schwartz ’s site!
5.00 Mitt(s) 9 Rating(s)9 votes, average: 5.00 out of 59 votes, average: 5.00 out of 59 votes, average: 5.00 out of 59 votes, average: 5.00 out of 59 votes, average: 5.00 out of 5

Prep Time:

Cook Time:

Difficulty: Easy

Servings: 1

1
x

Print Options

Page size Letter 3x5 4x6
Text Size Small Medium Large
Content Include description
Include prep time, etc.
Show image

Description

Quick, easy and healthy(er) fix to that pizza craving!

Ingredients

  • 1 whole Large Tortilla
  • 3 Tablespoons Pizza Sauce (or Additional Depending On Your Preference)
  • ¼ cups Mozzarella Cheese
  • 10 slices Pepperoni
  • 3 dashes Pizza Seasoning

Preparation Instructions

Preheat your oven to 415ºF. You want it very hot so the “crust” (tortilla) gets nice and crispy.

Spoon the pizza sauce onto the tortilla, spread it out almost to the edges, evenly.

Top with cheese and pepperoni. Sprinkle with pizza seasoning.

Bake for about 10 minutes. This will brown fast so pay close attention while it is in the oven.

You can modify this with any type of pizza toppings you prefer!

Enjoy!


_______________________________________

Amy Johnson is a blogger who writes about food, travel, the home (both inside and out), and various observations and random musings about anything and everything. Visit her blog She Wears Many Hats for a dose of deliciousness, practicality, hilarity, or just plain fun. She lives in South Carolina with her husband and two children.


Profile photo of Natalie | Perry's Plate

Cranberry Butter

Posted by in Holidays, Step-by-Step Recipes

Grab an extra bag of cranberries this week and make this incredibly simple and ridiculously delicious Cranberry Butter. It’s great to have on hand, especially when you need an quick and easy breakfast treat—or midday snack!–after a long day of cooking. It also makes the perfect hostess gift. We’re bringing back this old favorite so you can make a batch or two, or six!

 
Tasty Kitchen Blog: Cranberry Butter. Guest post by Natalie Perry of Perry's Plate, recipe submitted by TK member MissyDew.

 
Need a quick, edible, last-minute gift? Have a few extra cranberries lying around? You’ve got to try this Cranberry Butter, a recipe from MissyDew (the woman who also blessed us with That’s the Best Frosting I’ve Ever Had). I swear it’s magical. Even more magical than butter is on its own.


Tasty Kitchen Blog: Cranberry Butter. Guest post by Natalie Perry of Perry's Plate, recipe submitted by TK member MissyDew.

You only need four things: fresh cranberries, honey, an orange, and a pound of softened butter. Because you probably haven’t used enough butter this month.


Tasty Kitchen Blog: Cranberry Butter. Guest post by Natalie Perry of Perry's Plate, recipe submitted by TK member MissyDew.

First give the cranberries a chop.


Tasty Kitchen Blog: Cranberry Butter. Guest post by Natalie Perry of Perry's Plate, recipe submitted by TK member MissyDew.

Stick them in a bowl with the butter.


Tasty Kitchen Blog: Cranberry Butter. Guest post by Natalie Perry of Perry's Plate, recipe submitted by TK member MissyDew.

Add the honey.


Tasty Kitchen Blog: Cranberry Butter. Guest post by Natalie Perry of Perry's Plate, recipe submitted by TK member MissyDew.

Get out your trusty zester and get all the zest you can off that orange. Don’t have a zester? It’s probably not too late to ask Santa for one. Although you might want to spell out “Microplane” for him, just so he can get it right. He’s getting old, you know.


Tasty Kitchen Blog: Cranberry Butter. Guest post by Natalie Perry of Perry's Plate, recipe submitted by TK member MissyDew.

There. Everything’s in the bowl. That took, what, 5 minutes?


Tasty Kitchen Blog: Cranberry Butter. Guest post by Natalie Perry of Perry's Plate, recipe submitted by TK member MissyDew.

Give it a good stir.

(Or more realistically, stir until you realize your butter isn’t as soft as you thought. Dump it into a larger bowl, buzz it with an electric mixer, and return it to the smaller, prettier bowl like nothing happened.)

Now, please don’t make the mistake that I made. Once I made this, I was dying to schmear it on something, but I realized, with actual horror, that I didn’t have a single thing to spread it on in my house. We were even out of bread that day. I almost put it on a tortilla because I was desperate, but I did the same thing that any of you might have done—I put a big glob of it on my finger and popped it in my mouth. Talk about a burst of sweet, citrus-y, buttery goodness.


Tasty Kitchen Blog: Cranberry Butter. Guest post by Natalie Perry of Perry's Plate, recipe submitted by TK member MissyDew.

When I came to my senses and actually bought some bread, I discovered this Cranberry Butter will turn even the humblest piece of toast into an $8 piece of room service toast at a four-star hotel. You could also put it on pancakes, waffles, muffins, scones, chubby baby cheeks, and even popcorn,.

C’mon, I know I’m not the only one who has cannablistic tendencies toward cute babies.

By the way, I’ve had it melted over popcorn. It’s divine.


Tasty Kitchen Blog: Cranberry Butter. Guest post by Natalie Perry of Perry's Plate, recipe submitted by TK member MissyDew.


This spread would be great on so many baked goods here at Tasty Kitchen, but here are a few that caught my eye. And may keep me from eating the whole bowl with my fingers.

Tasty Kitchen Blog: Cranberry Butter. Guest post by Natalie Perry of Perry's Plate.Clockwise from top left: Whole Wheat Sweet Potato Muffins from HowSweetEats, Gingerbread Waffles from emily {onelovelylife}, White Chocolate Cranberry Scones from crobbins (there is a slew of cranberry scone recipes on TK!), Carrot Cake Pancakes from multiplydelicious, and Double Ginger Scones from angpritch.


Thanks MissyDew for a fantastic recipe!


Printable Recipe

Cranberry Butter

4.93 Mitt(s) 15 Rating(s)15 votes, average: 4.93 out of 515 votes, average: 4.93 out of 515 votes, average: 4.93 out of 515 votes, average: 4.93 out of 515 votes, average: 4.93 out of 5

Prep Time:

Cook Time:

Difficulty: Easy

Servings: 20

20
x

Print Options

Page size Letter 3x5 4x6
Text Size Small Medium Large
Content Include description
Include prep time, etc.
Show image

Description

I love this during the holidays. I first received some as a gift in a jar and enjoyed every bit of it, especially on toast or on homemade rolls or lefse. Make some for yourself and some to share with others.

Ingredients

  • 1 pound Butter, Softened To Room Temperature
  • ½ cups Chopped Fresh Cranberries
  • ½ cups Honey
  • 1 whole Orange (just The Zest)

Preparation Instructions

Such an easy recipe, it’s easy to adjust the ingredients to your personal taste. Want more orange flavor? Zest another orange! Want it less sweet? Reduce the amount of honey. Make it your own!

Combine softened butter, chopped fresh cranberries, honey to taste (about 1/2 cup) and the ZEST ONLY of one orange. Mix until well blended.

You’ll need to store this in the refrigerator.


_______________________________________

Be sure to check out Natalie’s own beautiful food blog, Perrys’ Plate, where you can see her growing collection of lovely recipes. There’s always something new to see there. Go visit now!


Profile photo of Amber {Sprinkled With Flour}

Cranberry Orange Bars

Posted by in Baking, Step-by-Step Recipes

Tasty Kitchen Blog: Cranberry Orange Bars, guest post by Amber Potter of Sprinkled with Flour, recipe submitted by Stephanie of Eat. Drink. Love.

 
I love simple desserts. I especially love simple desserts that taste great, and it’s these type of recipes that I like to have on hand during the busy holiday season. When you’re trying to orchestrate a culinary feast—one that includes a giant turkey the size of a small child, along with an endless list of sides—sometimes you need an easy dessert.

These Cranberry Orange Bars, shared by Stephanie, fit the bill perfectly. I love cranberry sauce, and these bars are the perfect combination of a sweetly tart cranberry sauce, sandwiched between a tasty cobbler-type crust and topping. Using just a few easy ingredients, you can have these bars whipped up in no time. 

This is a great way to use up any leftover cranberry sauce from your Thanksgiving meal too!


Tasty Kitchen Blog: Cranberry Orange Bars, guest post by Amber Potter of Sprinkled with Flour, recipe submitted by Stephanie of Eat. Drink. Love.

You’ll need: water, sugar, fresh squeezed orange juice and orange zest, fresh cranberries, yellow cake mix, oats, cinnamon, butter, and eggs.


Tasty Kitchen Blog: Cranberry Orange Bars, guest post by Amber Potter of Sprinkled with Flour, recipe submitted by Stephanie of Eat. Drink. Love.

Rinse your cranberries so they’re nice and clean.


Tasty Kitchen Blog: Cranberry Orange Bars, guest post by Amber Potter of Sprinkled with Flour, recipe submitted by Stephanie of Eat. Drink. Love.

Remove the zest from an orange, and squeeze out all of the juicy goodness. Set aside.


Tasty Kitchen Blog: Cranberry Orange Bars, guest post by Amber Potter of Sprinkled with Flour, recipe submitted by Stephanie of Eat. Drink. Love.

In a saucepan, add the water and sugar. Stir until the sugar is absorbed. 


Tasty Kitchen Blog: Cranberry Orange Bars, guest post by Amber Potter of Sprinkled with Flour, recipe submitted by Stephanie of Eat. Drink. Love.

Add the rinsed cranberries …


Tasty Kitchen Blog: Cranberry Orange Bars, guest post by Amber Potter of Sprinkled with Flour, recipe submitted by Stephanie of Eat. Drink. Love.

Along with the orange juice …


Tasty Kitchen Blog: Cranberry Orange Bars, guest post by Amber Potter of Sprinkled with Flour, recipe submitted by Stephanie of Eat. Drink. Love.

And the zest. Simmer over medium heat for about 10-15 minutes until the cranberries pop and the mixture begins to thicken.


Tasty Kitchen Blog: Cranberry Orange Bars, guest post by Amber Potter of Sprinkled with Flour, recipe submitted by Stephanie of Eat. Drink. Love.

Pour into a bowl and let cool completely (at least 1 hour).


Tasty Kitchen Blog: Cranberry Orange Bars, guest post by Amber Potter of Sprinkled with Flour, recipe submitted by Stephanie of Eat. Drink. Love.

Preheat the oven to 375ºF. In a large bowl, combine the cake mix, oats, and cinnamon.


Tasty Kitchen Blog: Cranberry Orange Bars, guest post by Amber Potter of Sprinkled with Flour, recipe submitted by Stephanie of Eat. Drink. Love.

Add the melted butter and the eggs.


Tasty Kitchen Blog: Cranberry Orange Bars, guest post by Amber Potter of Sprinkled with Flour, recipe submitted by Stephanie of Eat. Drink. Love.

Mix until everything is well-combined. Set aside about 1 1/2 cups of the mixture.


Tasty Kitchen Blog: Cranberry Orange Bars, guest post by Amber Potter of Sprinkled with Flour, recipe submitted by Stephanie of Eat. Drink. Love.

Spray a 9×13 baking dish with nonstick spray. Spread the remaining batter and push down into the pan, forming a crust.


Tasty Kitchen Blog: Cranberry Orange Bars, guest post by Amber Potter of Sprinkled with Flour, recipe submitted by Stephanie of Eat. Drink. Love.

Spread the cooled cranberry sauce evenly over the crust. 


Tasty Kitchen Blog: Cranberry Orange Bars, guest post by Amber Potter of Sprinkled with Flour, recipe submitted by Stephanie of Eat. Drink. Love.

Then drop the reserved 1 1/2 cups of batter by the spoonful evenly over the mixture. With a fork or spoon, gently try to push down and spread some of each spoonful so it’s not as thick. You do not need to cover all of the cranberries; try to avoid pushing the batter down into the cranberry sauce.


Tasty Kitchen Blog: Cranberry Orange Bars, guest post by Amber Potter of Sprinkled with Flour, recipe submitted by Stephanie of Eat. Drink. Love.

Bake for approximately 30-35 minutes or until the top is golden brown. Allow to cool for at least 2 hours before cutting into bars.

Recipe note: You may not need to bake these for the full 35 minutes, depending on your oven. Start checking them at about 25-30 minutes.


Tasty Kitchen Blog: Cranberry Orange Bars, guest post by Amber Potter of Sprinkled with Flour, recipe submitted by Stephanie of Eat. Drink. Love.

These are delicious on their own, and just as tasty with a dollop of whipped cream or ice cream! Perfect to go with any holiday meal.


Tasty Kitchen Blog: Cranberry Orange Bars, guest post by Amber Potter of Sprinkled with Flour, recipe submitted by Stephanie of Eat. Drink. Love.

Thank you Stephanie for sharing these goodies with us! You can check out more of her delicious looking recipes on her blog Eat. Drink. Love.


Printable Recipe

Cranberry Orange Bars

See post on Stephanie { Eat. Drink. Love.}’s site!
5.00 Mitt(s) 1 Rating(s)1 vote, average: 5.00 out of 51 vote, average: 5.00 out of 51 vote, average: 5.00 out of 51 vote, average: 5.00 out of 51 vote, average: 5.00 out of 5

Prep Time:

Cook Time:

Difficulty: Easy

Servings: 24

24
x

Print Options

Page size Letter 3x5 4x6
Text Size Small Medium Large
Content Include description
Include prep time, etc.
Show image

Description

Cranberry Orange Bars—a perfect blend of sweet and tangy! Perfect for the holidays!

Ingredients

  • ¾ cups Water
  • 1 cup Sugar
  • 1 bag (12 Oz. Size) Fresh Cranberries
  • 1 whole Orange, Zest And Juice
  • 1 box (18.25 Oz. Size) Yellow Cake Mix
  • 1 cup Rolled Oats
  • ¾ cups Butter, Melted
  • 2 whole Eggs
  • 1 teaspoon Cinnamon

Preparation Instructions

1. You’re basically going to start off by making cranberry sauce! In a saucepan, add the water and sugar. Stir until the sugar is absorbed. Add the rinsed cranberries, along with the orange juice and zest. Simmer for about 10-15 minutes until the cranberries pop and the mixture begins to thicken. Pour into a bowl and let cool completely (at least 1 hour).

2. Preheat the oven to 375ºF. In a large bowl, add the cake mix, oats, melted butter, eggs, and cinnamon. Mix until everything is well-combined. Set aside about 1 1/2 cups of the mixture. In a 9×13 baking dish, spray with nonstick spray. With the remaining batter, spread and push down into the pan, forming a crust.

3. Spread the cooled cranberry sauce evenly over the “crust”. Then, with the 1 1/2 cups of batter you reserved, drop it by the spoonful evenly over the mixture. Then, with a knife or spoon, gently try to push down and spread some of each spoonful so it’s not as thick. You do not need to cover all of the cranberries, and try to avoid pushing the batter down into the cranberry sauce. Bake for approximately 35 minutes or until the top is golden brown. Let the bars cool for at least 2 hours before cutting into bars (trust me on that one!)!


_______________________________________

Amber is a stay at home mom who lives in the heart of the Missouri Ozarks. It’s a long way from where she grew up, in Wales (yes, way over in the U.K.). The recipes in her blog Sprinkled with Flour include her original creations as well as her family recipes. Go check them out!


Profile photo of Erika (TK)

Crazy (Cake) Talk

Posted by in Kitchen Talk

Tasty Kitchen Blog: Kitchen Talk (Crazy Cake)

Good morning, friends! How are you this morning? Depending on where you’re waking up today, it’s either 30 degrees above your usual January temperature or it’s 30 degrees below and you’re digging yourself out from who knows how many inches—or feet!—of snow.

Which brings me to our topic for this week: Crazy Cake. No, not just because crazy climes call for crazy cake, but also because it’s perfectly suited for any kind of weather. Feels like spring where you are? This cake can be prepped in about 10 minutes, which means you get to go outside and enjoy the sun sooner. Snowed in? What better way to spend the day indoors than baking a cake that only calls for ingredients you most likely already have in your pantry?

I did a bit of research online, and learned that Crazy Cake, also known as Wacky Cake or Depression Era Cake, grew in popularity in the 1970s. But that’s not when it got its start. Some say it has its origins in the Great Depression, while others say it was World War II. It was a way to bake without eggs, milk, and butter, which were rationed and scarce during those times. The lift comes from the combination of vinegar and baking soda, and the flour provides most of the structure. Any way you slice it, it’s simple, inexpensive, and even requires minimal cleanup because it’s a one-dish recipe. If you have any special dietary needs, you’ll be happy to know that this cake in its classic form is vegan, egg-free, and dairy-free. More importantly, it’s moist and light and so easy, the kids will love making it themselves. Anything that gets kids involved in the kitchen scores major points in my book.

So let’s talk about crazy cake today! Tell us:

Have you tried crazy cake? Do you have any interesting variations on the classic chocolate version, or tips on how to experiment with different flavors?

Wacky Cake was one of the first cakes I ever successfully baked, back when I thought I would concentrate on becoming a better cook and leave baking to the experts. Baking intimidated me, and all my previous cake and cookie attempts yielded mostly mediocre results. Until I found an old recipe for Wacky Cake, and on a whim, since I had all the ingredients on hand, I decided to give it a go. The cake turned out surprisingly moist and delicious, it helped me take that first step toward finally making peace with the oven.

I haven’t thought about Crazy-Wacky Cake in a while and I now want to start experimenting with it again. I’ve seen some wonderful versions online, like apple, red velvet, pumpkin spice, and lemon vanilla. I’ve also seen them made into whoopie pies. Crazy whoopie!

Now it’s time for you to join in. Crazy Cake dates way back, and many have childhood memories associated with this cake. Share your stories, tips, tricks, and let’s bring back the crazy!

The photo above shows the classic Chocolate Crazy Cake, shared by TK member Krysten Schwartz. Click on the photo to get the printable.


Profile photo of georgiapellegrini

Cream of Broccoli Soup

Posted by in Step-by-Step Recipes

   I had oceans of frozen broccoli in my freezer recently, and I was looking for new ways to cook it up into something delicious. There’s only so many times a girl can eat broccoli with melted cheese. Well, maybe not, but still this Cream of Broccoli Soup from Rebecca caught my eye as […]

Profile photo of Megan {Country Cleaver}

Creamy Chicken and Sun-dried Tomato Fettucine

Posted by in Step-by-Step Recipes

I love finding new inspiration on Tasty Kitchen. There is always new stuff to find and try. When I joined TK, I kept filling my Recipe Box with so many great community recipes that I just “had to try” but it dawned on me that I hadn’t actually made any of them! Tragedy! The first […]

Profile photo of Laurie - Simply Scratch

Creamy Penne with Blue Cheese Sauce

Posted by in Step-by-Step Recipes

  I was on the hunt for a recipe. I was having a good friend over for lunch and it had to be a recipe that didn’t take long to whip up. Bev Weidner’s (Tasty Kitchen member Bev Cooks) recipe for Creamy Penne with Blue Cheese, Arugula and Toasted Walnuts just about stopped me in […]

Profile photo of georgiapellegrini

Crepes, Easy as 1-2-3

Posted by in Step-by-Step Recipes

  Crepes are one of those things that I love so much, but rarely make for myself at home. Michelle Robin inspired me to try them at home with her quick and easy 1-2-3 Crepe Batter that definitely convinced me that I could make crepes for myself regularly and it wouldn’t be a production. These […]