The Pioneer Woman Tasty Kitchen
Profile photo of cookincanuck

Shrimp Martini Appetizers

Posted by in Step-by-Step Recipes

Tasty Kitchen Blog Shrimp Martini Appetizers

 
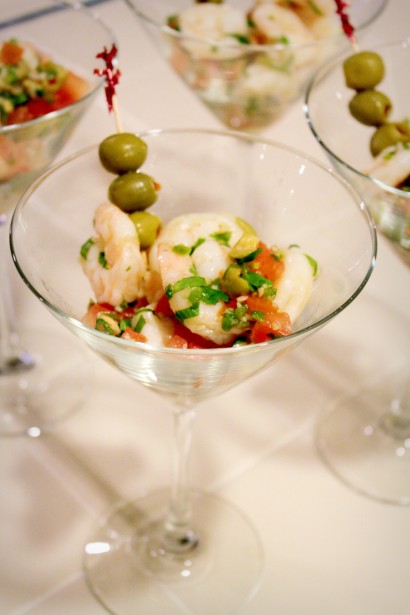
You know when you make a recipe that immediately makes you say, “I have to make this at least once a week”? Well, this is one of those recipes. If you are a fan of shrimp, then this simple Shrimp Martini Appetizer recipe by Tasty Kitchen member 4littlefergusons is a must-try. Not only does it taste good and look pretty (who doesn’t love appetizers presented in martini glasses?), but it’s really easy to put together. Toss the shrimp with cilantro, stuffed olives, tomatoes, garlic, jalapeno and lemon juice, and you’re done. Ba-da-bing, ba-da-boom (I like to pretend I still live in New York).

Now, let’s get started.


Tasty Kitchen Blog Shrimp Martini Appetizers

Here’s everything you will need for this recipe: shrimp, cilantro, tomatoes, pimento-stuffed olives (the little guys), a jalapeno pepper, garlic, salt and lemon juice.


Tasty Kitchen Blog Shrimp Martini Appetizers

Set a medium saucepan of water over high heat and bring the water to a boil. Add shrimp and cook until shrimp is cooked through, about 1 minute.

Do everything in your power to avoid overcooking the shrimp. Overcooking + shrimp = rubbery mess. Not good.


Tasty Kitchen Blog Shrimp Martini Appetizers

Drain the shrimp.


Tasty Kitchen Blog Shrimp Martini Appetizers

Immediately plunge the shrimp into ice water to stop it from cooking. Aren’t they pretty in pink?


Tasty Kitchen Blog Shrimp Martini Appetizers

In a medium-sized bowl, combine chopped cilantro …


Tasty Kitchen Blog Shrimp Martini Appetizers

Seeded and diced tomatoes …


Tasty Kitchen Blog Shrimp Martini Appetizers

Chopped stuffed olives (the little ones) …


Tasty Kitchen Blog Shrimp Martini Appetizers

Seeded and chopped jalapeno pepper …


Tasty Kitchen Blog Shrimp Martini Appetizers

Garlic and salt.


Tasty Kitchen Blog Shrimp Martini Appetizers

Squeeze in fresh lemon juice. You’re almost there.


Tasty Kitchen Blog Shrimp Martini Appetizers

Add the cooked shrimp and give everything a gentle stir.


Tasty Kitchen Blog Shrimp Martini Appetizers

Garnish with extra olives, serve and dive in.

Thanks so much to 4littlefergusons for this great recipe. I will be making this for a quick lunch or serving it to guests as an impressive but easy appetizer. Be sure to check out the blog 4 Little Fergusons, where adorable Tonya talks about her life with four little ones and posts recipes as tempting as this one.


Printable Recipe

Shrimp Martini Appetizers

0.00 Mitt(s) 0 Rating(s)0 votes, average: 0.00 out of 50 votes, average: 0.00 out of 50 votes, average: 0.00 out of 50 votes, average: 0.00 out of 50 votes, average: 0.00 out of 5

Prep Time:

Cook Time:

Difficulty: Easy

Servings: 4

4
x

Print Options

Page size Letter 3x5 4x6
Text Size Small Medium Large
Content Include description
Include prep time, etc.
Show image

Description

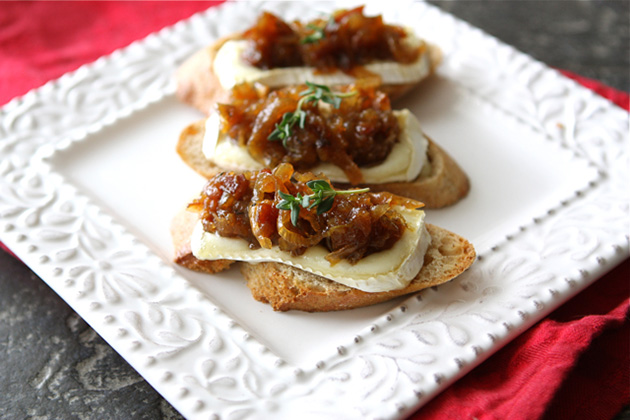
These appetizers are DIVINE and just gorgeous to look at!

Ingredients

  • ½ pounds Shrimp, Peeled
  • 1 Tablespoon Chopped Fresh Cilantro
  • 2 whole Plum Tomatoes, Seeded And Chopped
  • 8 whole Pimento-stuffed Spanish Olives, Coarsely Chopped, Plus More Left Whole For Garnish
  • 1 whole Jalapeno Pepper, Seeded And Minced
  • 1 clove Garlic, Minced
  • ¼ teaspoons Salt
  • 1 Tablespoon Fresh Lemon Juice (from About 1/2 Lemon)

Preparation Instructions

Cook shrimp in boiling water until it turns pink. Drain. Place shrimp in ice water until chilled; drain again.

In a small bowl combine cilantro, tomatoes, olives, jalapeno, garlic and salt. Squeeze lemon juice over all and stir.

Add shrimp and toss gently. Serve immediately or refrigerate until serving time. Spoon shrimp mixture into 4 martini glasses, garnish with a toothpick of Spanish olives.


_______________________________________

Dara Michalski is a doll and a sweetheart who clearly knows her way around the kitchen. She blogs at Cookin’ Canuck, where she shares her flavor-packed recipes and fun, engaging writing. The photography’s pretty incredible, too.


Profile photo of cookincanuck

Onion and Bacon Marmalade

Posted by in Step-by-Step Recipes

Tasty Kitchen Blog: Onion Bacon Marmalade. Guest post by Dara Michalski of Cookin' Canuck, recipe submitted by TK member John Dawson of Patio Daddio BBQ.

 
New Year’s Eve is always a time of celebration. For one, it is the “last hurrah” of the holiday season, one last chance to pull out the finery and raise our glasses to family and friends. Well, it’s also about the food. I would be lying if I said otherwise. New Year’s Eve celebrations are a time to pull out all of the hors d’oeuvres recipes in my recipe box and get to work preparing little tastes of multiple flavors. We are always looking for new recipes to shake things up a bit and, as soon as I saw this Onion and Bacon Marmalade by Tasty Kitchen member patiodaddio, I knew it would hit the mark. That would be an understatement.

If you watch the daily featured recipes regularly on Tasty Kitchen, you have likely seen John’s recipes flash across the screen. And you know what? Every single one of them looks good. Really good. This recipe mixes the saltiness of thick cut bacon and the brightness of fresh thyme with the sweetness of onions slowly caramelized in apple cider, sherry vinegar and brown sugar. The beauty of this recipe is that it can take on many forms. I served it on toasted baguette pieces with melted brie, while John suggests pairing it with goat cheese or mixing it into a bowl of grilled brussels sprouts. Really, you can’t go wrong any way you choose to serve this wonderful mixture.

Now, let’s get started.


Tasty Kitchen Blog: Onion Bacon Marmalade. Guest post by Dara Michalski of Cookin' Canuck, recipe submitted by TK member John Dawson of Patio Daddio BBQ.

Place the bacon in a large saucepan set over medium-high heat. Cook until the bacon is just crisp. Remove from the pan, drain on a piece of paper towel and set aside. Do not discard the rendered fat in the pan.


Tasty Kitchen Blog: Onion Bacon Marmalade. Guest post by Dara Michalski of Cookin' Canuck, recipe submitted by TK member John Dawson of Patio Daddio BBQ.

This recipe uses 4 pounds of onions. That may seem like a lot but they will cook down significantly. And, believe me, you are going to want as much of this marmalade as you can get your hands on.


Tasty Kitchen Blog: Onion Bacon Marmalade. Guest post by Dara Michalski of Cookin' Canuck, recipe submitted by TK member John Dawson of Patio Daddio BBQ.

Cut the onions in half, peel them and cut into ¼-inch slices. Keep a tissue nearby for the inevitable running-of-the-mascara and burning eyes. Ahh, but it is worth every tear.


Tasty Kitchen Blog: Onion Bacon Marmalade. Guest post by Dara Michalski of Cookin' Canuck, recipe submitted by TK member John Dawson of Patio Daddio BBQ.

Add the onions and salt to the fat in the pan. Reduce the heat to medium, cover the pan, and cook until the onions are soft, about 15 minutes.


Tasty Kitchen Blog: Onion Bacon Marmalade. Guest post by Dara Michalski of Cookin' Canuck, recipe submitted by TK member John Dawson of Patio Daddio BBQ.

Chop the bacon finely and add it to the pan.


Tasty Kitchen Blog: Onion Bacon Marmalade. Guest post by Dara Michalski of Cookin' Canuck, recipe submitted by TK member John Dawson of Patio Daddio BBQ.

Add the apple cider …


Tasty Kitchen Blog: Onion Bacon Marmalade. Guest post by Dara Michalski of Cookin' Canuck, recipe submitted by TK member John Dawson of Patio Daddio BBQ.

Brown sugar …


Tasty Kitchen Blog: Onion Bacon Marmalade. Guest post by Dara Michalski of Cookin' Canuck, recipe submitted by TK member John Dawson of Patio Daddio BBQ.

Fresh thyme and black pepper.

Stir well and cook, uncovered, until the liquid is almost completely reduced, stirring occasionally, about 1 hour.


Tasty Kitchen Blog: Onion Bacon Marmalade. Guest post by Dara Michalski of Cookin' Canuck, recipe submitted by TK member John Dawson of Patio Daddio BBQ.

Reduce the heat to low and continue to cook, stirring frequently, until the onions are a deep brown color, about 10 minutes. If the mixture begins to looks dry, add water, ¼ cup at a time.

Remove the pan from the heat and allow the mixture to cool. Serve on crostini, in sandwiches, on pizzas or mixed in with roasted veggies.


Tasty Kitchen Blog: Onion Bacon Marmalade. Guest post by Dara Michalski of Cookin' Canuck, recipe submitted by TK member John Dawson of Patio Daddio BBQ.

Thank you so much to patiodaddio for this amazing recipe. Besides serving the onion marmalade as crostini with brie cheese, we have also layered them into sandwiches and eaten them straight off a fork. Yes, they are that good. Be sure to check out his blog, Patio Daddio BBQ for more of his mouthwatering recipes. Want to read even more about him? Head over to his Tasty Kitchen Blog feature!


Printable Recipe

Onion & Bacon Marmalade

See post on patiodaddio’s site!
4.00 Mitt(s) 6 Rating(s)6 votes, average: 4.00 out of 56 votes, average: 4.00 out of 56 votes, average: 4.00 out of 56 votes, average: 4.00 out of 56 votes, average: 4.00 out of 5

Prep Time:

Cook Time:

Difficulty: Easy

Servings: 36

36
x

Print Options

Page size Letter 3x5 4x6
Text Size Small Medium Large
Content Include description
Include prep time, etc.
Show image

Description

This marmalade is very versatile, and it’s also just this side of addictive. It’s amazing on a warm slice of baguette with some goat cheese, as you see pictured here, but with the addition of some thinly-sliced leftover steak. It’s also wonderful tossed into roasted potatoes.

This takes a while to make, but your patience will be richly rewarded.

Ingredients

  • 4 slices Thick Bacon
  • 4 pounds Yellow Onions, Halved And Sliced To 1/4"
  • 1 Tablespoon Kosher Salt
  • 2 cups Apple Cider
  • ¼ cups Sherry Vinegar (white Wine Vinegar Is Fine)
  • ¼ cups Brown Sugar
  • 10 sprigs Thyme, Leaves Stripped From The Stem (about 2 Tablespoons)
  • 2 teaspoons Black Pepper

Preparation Instructions

Heat a Dutch oven or large heavy sauce pan over medium-high heat.

Cook the bacon until it’s just crisp, then remove the slices and set aside, leaving all of the rendered fat in the pan.

Add the onions and salt to the pan, reduce the heat to medium, cover the pan, and cook until the onions soften (about 15 minutes).

Chop the bacon fine and add it and the remaining ingredients to the pan. Cook uncovered until the liquid is reduced to almost nothing, stirring occasionally (about an hour).

Reduce the heat to low and continue cooking until the onions are a rich medium brown color, stirring frequently (about 10 minutes). If it starts looking too dry, add water 1/4 cup at a time.

Remove from the heat, set aside, and let cool.


_______________________________________

Dara Michalski is a doll and a sweetheart who clearly knows her way around the kitchen. She blogs at Cookin’ Canuck, where she shares her flavor-packed recipes and fun, engaging writing. The photography’s pretty incredible, too.


Profile photo of cookincanuck

Sweet Potato Fudge

Posted by in Step-by-Step Recipes

Tasty Kitchen Blog: Sweet Potato Fudge. Guest post by Dara Michalski of Cookin' Canuck, recipe submitted by TK member Lauren of Lauren's Latest.

 
When I hear “fudge,” I immediately think of the holidays. When cut into bite-sized pieces, it makes the perfect gift to hand out to neighbors or a lovely welcome hostess gift when you arrive at a cocktail or dinner party. It also makes for an addictive little treat that you want to pop into your mouth whenever you pass by the fridge. As much as I try to convince myself that it is calorie-free, the seams on my jeans tell a different story. Ah well, that’s what the holiday are all about—those treats that we get to indulge in once a year.

This recipe for Sweet Potato Fudge is brought to us by Tasty Kitchen member, Lauren’s Latest. The sweet potatoes are mashed and mixed with white chocolate and toasted pecans for a seasonal treat that not only comes together quickly, but will make your family very happy.

Now, let’s get started.


Tasty Kitchen Blog: Sweet Potato Fudge. Guest post by Dara Michalski of Cookin' Canuck, recipe submitted by TK member Lauren of Lauren's Latest.

First, line an 8- by 8-inch square baking pan with waxed or parchment paper. Use extra paper so that there are 2 to 3 extra inches on each side. These “handles” will make it easier to lift the fudge out of the pan later. I like to coat the pan with cooking spray first so the parchment paper lies flat against the pan. It’s not necessary, but it satisfies my need for order in my baking pan. Don’t judge.


Tasty Kitchen Blog: Sweet Potato Fudge. Guest post by Dara Michalski of Cookin' Canuck, recipe submitted by TK member Lauren of Lauren's Latest.

The first thing you will need to do is to boil or steam some sweet potato chunks (peeled) until soft and then mash them with the back of a fork. Set aside to cool.


Tasty Kitchen Blog: Sweet Potato Fudge. Guest post by Dara Michalski of Cookin' Canuck, recipe submitted by TK member Lauren of Lauren's Latest.

While the sweet potato is cooking, place the pecans pieces into a medium frying pan set over medium heat and toast the pecans. Be sure to watch them. Those little suckers like to burn as soon as you turn your back.


Tasty Kitchen Blog: Sweet Potato Fudge. Guest post by Dara Michalski of Cookin' Canuck, recipe submitted by TK member Lauren of Lauren's Latest.

In a medium-sized bowl, combine the white chocolate chips, sweetened condensed milk and butter. Now that sounds like a perfect holiday baking list.

Place the bowl in the microwave and, in 15-second increments, heat the mixture until melted and smooth when stirred. When I am using the microwave to heat chocolate mixtures, I typically use 50% power so that the chocolate doesn’t seize.


Tasty Kitchen Blog: Sweet Potato Fudge. Guest post by Dara Michalski of Cookin' Canuck, recipe submitted by TK member Lauren of Lauren's Latest.

Pour the chocolate mixture into the bowl of a stand mixer. Add the mashed sweet potatoes, vanilla extract, ground cinnamon and salt. As per Lauren’s suggestion under her Recipe Notes, I also added ½ teaspoon of freshly ground nutmeg because it screams “holidays” to me.

Add half of the powdered sugar to the mixer bowl and mix until combined. Scrape the sides with a rubber spatula and mix again.


Tasty Kitchen Blog: Sweet Potato Fudge. Guest post by Dara Michalski of Cookin' Canuck, recipe submitted by TK member Lauren of Lauren's Latest.

With the mixer running, add the remaining powdered sugar, ½ cup at a time, until fully incorporated.


Tasty Kitchen Blog: Sweet Potato Fudge. Guest post by Dara Michalski of Cookin' Canuck, recipe submitted by TK member Lauren of Lauren's Latest.

Remove the bowl from the mixer. Pour in the toasted pecan pieces and mix by hand with a rubber spatula.


Tasty Kitchen Blog: Sweet Potato Fudge. Guest post by Dara Michalski of Cookin' Canuck, recipe submitted by TK member Lauren of Lauren's Latest.

Transfer the fudge mixture to the prepared baking pan, press down until even and smooth the top.

Refrigerate until the fudge has hardened. The recipe calls for the fudge to be chilled for 2 hours, but I left it in my refrigerator overnight to make sure it was fully set.


Tasty Kitchen Blog: Sweet Potato Fudge. Guest post by Dara Michalski of Cookin' Canuck, recipe submitted by TK member Lauren of Lauren's Latest.

Using the waxed or parchment paper “handles” lift the fudge out of the pan and peel off the paper. Use a sharp knife to cut into squares and serve. Store extra pieces in the refrigerator.


Tasty Kitchen Blog: Sweet Potato Fudge. Guest post by Dara Michalski of Cookin' Canuck, recipe submitted by TK member Lauren of Lauren's Latest.

In the recipe, Lauren mentioned that this fudge can also be made using a 9- by 13-inch baking pan to achieve thinner pieces. Next time I make this recipe (and I can assure that there will definitely be a next time), I plan to do this so the fudge pieces are a little smaller.

I am sending a huge “thank you” to Lauren for a recipe that is sure to become a holiday favorite for my family. Be sure to check out Lauren’s large selection of fantastic recipes at her blog, Lauren’s Latest.


Printable Recipe

Sweet Potato Fudge

5.00 Mitt(s) 3 Rating(s)3 votes, average: 5.00 out of 53 votes, average: 5.00 out of 53 votes, average: 5.00 out of 53 votes, average: 5.00 out of 53 votes, average: 5.00 out of 5

Prep Time:

Cook Time:

Difficulty: Easy

Servings: 24

24
x

Print Options

Page size Letter 3x5 4x6
Text Size Small Medium Large
Content Include description
Include prep time, etc.
Show image

Description

Spicy, sweet, crunchy, delicious and a little out of the ordinary. Makes for a fabulous after dinner treat around the holidays.

Ingredients

  • 1 cup White Chocolate Chips
  • ¼ cups Butter
  • 1 can Sweetened Condensed Milk (14 Oz)
  • ¾ cups Mashed Sweet Potato
  • 1 teaspoon Vanilla Extract
  • ¾ teaspoons Cinnamon
  • ⅛ teaspoons Salt
  • 8 cups Powdered Sugar
  • 2 cups Toasted Chopped Pecans

Preparation Instructions

Line an 8×8 glass dish with waxed paper and set aside, if desired.

In a large bowl, melt white chocolate, butter and sweetened condensed milk together until smooth in consistency. (I do this in 15 second increments in the microwave.) Once melted, pour into the bowl of a stand mixer and stir in sweet potato, vanilla, cinnamon, salt and half of the powdered sugar. Scrape the sides and mix again. With the machine on, add in remaining powdered sugar by the 1/2 cup until all is incorporated. Fudge should look very thick but still sticky. Pour in nuts and stir them in by hand. Pour into prepared pan and smooth the top.

Refrigerate until fudge has hardened, about 2 hours. Remove fudge from refrigerator and using the waxed paper edges, remove entire block of fudge. Using a sharp knife, cut into small squares. Serve.

Recipe Notes:
– Feel free to add in any other spices you’d like. Nutmeg and/or cloves would be a nice addition.
-I like a thick fudge, but if you would prefer a thinner piece, pour fudge into a 9×13 pan.


_______________________________________

Dara Michalski is a doll and a sweetheart who clearly knows her way around the kitchen. She blogs at Cookin’ Canuck, where she shares her flavor-packed recipes and fun, engaging writing. The photography’s pretty incredible, too.


Profile photo of cookincanuck

Zuppa di Gnocchi e Pesto

Posted by in Step-by-Step Recipes

Tasty Kitchen Blog: Zuppa di Gnocchi e Pesto. Guest post by Dara Michalski of Cookin' Canuck, recipe submitted by TK member Melanie of The Coupon Goddess.

 
If I had an Italian grandmother, I am sure this is the chicken soup she would make for my seven brothers and sisters and me. Okay, I don’t actually have seven siblings. In fact, I’m an only child. However, I always imagine Italian meals as large family affairs, so I have to conjure up some additional characters to set the scene. My pleasantly plump nonna would be standing by the stove, ladling out the steaming soup into large earthenware bowls, exclaiming “Mangia, mangia!” (Incidentally, “Nonna” is what my kids call my mum. We obviously have a deep-seated yearning for some Italian blood in our veins. And yet, nary a drop.)

When I spotted this recipe by Tasty Kitchen member Melanie, I knew it was likely to become a family favorite. The broth is rich with the taste of roasted onions and garlic, pesto and chicken broth pureed together (be sure to read about my broth mishap below and learn from my mistake so you can avoid green-colored blinds and carpet). The gnocchi is gently boiled in the broth until tender and plump and the savory mixture is ladled over simply roasted, shredded chicken. It is comfort in a bowl. I swear I can feel my fictitious nonna’s hug as I take each bite.


Tasty Kitchen Blog: Zuppa di Gnocchi e Pesto. Guest post by Dara Michalski of Cookin' Canuck, recipe submitted by TK member Melanie of The Coupon Goddess.

Here are the ingredients you’ll need to get started. Roasting chicken breasts can sound intimidating, but it’s one of the easiest things to do. Stay with me here.

Preheat oven to 350 degrees F.


Tasty Kitchen Blog: Zuppa di Gnocchi e Pesto. Guest post by Dara Michalski of Cookin' Canuck, recipe submitted by TK member Melanie of The Coupon Goddess.

Place the chicken breasts—skin, bones and all—into a roasting pan. Separate the onion quarters and scatter the pieces, along with the unpeeled garlic cloves, over and around the chicken breasts.


Tasty Kitchen Blog: Zuppa di Gnocchi e Pesto. Guest post by Dara Michalski of Cookin' Canuck, recipe submitted by TK member Melanie of The Coupon Goddess.

Drizzle over some olive oil. I promise it’s not going to get any harder than this.


Tasty Kitchen Blog: Zuppa di Gnocchi e Pesto. Guest post by Dara Michalski of Cookin' Canuck, recipe submitted by TK member Melanie of The Coupon Goddess.

Season with salt and pepper and slide those babies into the oven. You’re well on your way.

Roast the chicken for 35 to 45 minutes, or until it is cooked through.


Tasty Kitchen Blog: Zuppa di Gnocchi e Pesto. Guest post by Dara Michalski of Cookin' Canuck, recipe submitted by TK member Melanie of The Coupon Goddess.

Transfer the chicken breasts to a cutting board to cool. Remove the onion and garlic and peel the garlic. The cloves will be soft and buttery.


Tasty Kitchen Blog: Zuppa di Gnocchi e Pesto. Guest post by Dara Michalski of Cookin' Canuck, recipe submitted by TK member Melanie of The Coupon Goddess.

In the bowl of a food processor or a blender, combine the chicken broth, roasted onion pieces and peeled, roasted garlic. Add 3 tablespoons of pesto and pulse until smooth.

Now, let me give you a little tip here to save you some cleanup time. Do not—I repeat, DO NOT—try to do this all in one batch. I was feeling a little over-confident in my blender’s ability to hold mass quantities of liquid. Since I take all of my food photos in the living room (for the best light), that is where the blending took place. That is also where the combination of chicken broth, pesto, onions and garlic blew out the side of the blender lid and all over my carpet, blinds and furniture. It’s a good thing my kids weren’t home at the time or they would have learned some unsavory words to add to their vocabularies. Moral of the story: puree the mixture in two batches—in the kitchen!


Tasty Kitchen Blog: Zuppa di Gnocchi e Pesto. Guest post by Dara Michalski of Cookin' Canuck, recipe submitted by TK member Melanie of The Coupon Goddess.

Once the chicken is cool enough to handle, shred it into bite-sized pieces, removing and discarding the skin and bones. I like to use my hands to do this, but two forks would work well, too.


Tasty Kitchen Blog: Zuppa di Gnocchi e Pesto. Guest post by Dara Michalski of Cookin' Canuck, recipe submitted by TK member Melanie of The Coupon Goddess.

Transfer the chicken to a bowl and stir in the rest of the pesto until the chicken is coated.


Tasty Kitchen Blog: Zuppa di Gnocchi e Pesto. Guest post by Dara Michalski of Cookin' Canuck, recipe submitted by TK member Melanie of The Coupon Goddess.

Transfer the chicken broth mixture to a large saucepan and bring to a boil. Add the gnocchi and cook until the little guys pop up to the surface.


Tasty Kitchen Blog: Zuppa di Gnocchi e Pesto. Guest post by Dara Michalski of Cookin' Canuck, recipe submitted by TK member Melanie of The Coupon Goddess.

Place some of the chicken in each bowl and ladle over the broth and gnocchi.


Tasty Kitchen Blog: Zuppa di Gnocchi e Pesto. Guest post by Dara Michalski of Cookin' Canuck, recipe submitted by TK member Melanie of The Coupon Goddess.

Garnish with chopped Roma tomatoes and serve. “Mangia, mangia!”

Thank you, Melanie, for sharing your incredible recipe. Melanie’s site The Coupon Goddess is not only filled with tips on saving money at the grocery store, but has loads of mouthwatering recipes. Be sure to check it out.


Printable Recipe

Zuppa di Gnocchi e Pesto

See post on A Beautiful Bite’s site!
4.60 Mitt(s) 5 Rating(s)5 votes, average: 4.60 out of 55 votes, average: 4.60 out of 55 votes, average: 4.60 out of 55 votes, average: 4.60 out of 55 votes, average: 4.60 out of 5

Prep Time:

Cook Time:

Difficulty: Easy

Servings: 8

8
x

Print Options

Page size Letter 3x5 4x6
Text Size Small Medium Large
Content Include description
Include prep time, etc.
Show image

Description

A quick and delicious soup made from pantry and freezer staples that will have your guests thinking that your Nonna passed the recipe down to you!

Ingredients

  • 3  Chicken Breasts, On The Bone
  • 1 whole Yellow Onion, Quartered
  • 8 cloves Garlic, In Skins
  • 3 Tablespoons Olive Oil
  • 3 pinches Salt
  • 3 pinches Black Pepper
  • 2 cartons Chicken Broth, 32 Ounces Each
  • 1 jar Pesto 8oz
  • 1 package Gnocchi, 16 Ounce
  • 3 whole Roma Tomatoes Seeded And Chopped

Preparation Instructions

Preheat oven to 350F. Place chicken breasts in a roasting pan. Break apart quartered onion and scatter around and on top of breasts. Toss garlic, skins and all, around the chicken. The garlic will not flavor the chicken at this point. We are merely roasting them and will add them to the broth in a bit. Drizzle olive oil on chicken. Salt and pepper to taste and roast for 35-45 minutes or until the center is white and no longer pink.

Once cooked, allow the chicken to cool so that it can be shredded by hand. Scoop out roasted onion and garlic to use in broth. While the chicken is cooling, pour broth into a Cuisinart or blender along with the onions and roasted garlic (skins removed after roasting of course) and three tablespoons of the pesto. Pulse until there are no large chunks of garlic left. About 3 five second pulses should do the trick. The roasted garlic will give the soup a velvety feel in your mouth. Definitely don’t skip this step. It’s so worth it.

Back to the chicken. After shredding it, mix in the rest of the pesto. Stir well and set aside.

In a large pot, bring the broth/garlic/pesto mixture to a boil. Add gnocchi and cook until they float. In soup bowls, place a pile of chicken in the center. Ladle the hot broth over the chicken and garnish with chopped tomatoes. Mangia bene (eat well)!


_______________________________________

Dara Michalski is a doll and a sweetheart who clearly knows her way around the kitchen. She blogs at Cookin’ Canuck, where she shares her flavor-packed recipes and fun, engaging writing. The photography’s pretty incredible, too.


Profile photo of cookincanuck

Blueberry Streusel Scones

Posted by in Baking, Step-by-Step Recipes

  Up until a few years ago, I didn’t consider myself a scone gal. I don’t want to point any fingers, but my lack of enthusiasm for the traditional breakfast bread likely had something to do with a decidedly dry specimen my 9th-grade friends and I made in our Home Economics class. Of course, that […]

Profile photo of cookincanuck

Mocha Brandy Frappe

Posted by in Step-by-Step Recipes

When I was in my early twenties and my waistline could handle this sort of thing, I made daily trips to one of the many coffee houses in my hometown. You’d be hard-pressed to walk two blocks in Vancouver without finding some sort of specialty coffee store. Yes, we are a highly caffeinated, but friendly […]

Profile photo of cookincanuck

Chicken Spinach Salad

Posted by in Step-by-Step Recipes

Over the course of the summer, I typically receive five or six phone calls from friends inquiring about my well-being. Their voices fraught with concern, they ask, “How are you doing in this heat, Dara? You’re drinking lots of water, right?” After years of watching me practically melt in the summertime heat, they know better […]

Profile photo of cookincanuck

Oatmeal Butter Tart Squares

Posted by in Baking, Step-by-Step Recipes

There are some recipes, tastes and aromas that evoke strong memories. Memories of childhood dinners with extended family, memories of special occasions. Each Christmas, my grandmother made a batch of her butter tarts to serve alongside the flambéed plum pudding at the end of the meal. The crust was flaky and the filling was sweet, […]