The Pioneer Woman Tasty Kitchen
Profile photo of cookincanuck

Easy Asian Beef and Noodle Soup

Posted by in Step-by-Step Recipes

Tasty Kitchen Blog: Easy Asian Beef and Noodle Soup. Guest post by Dara Michalski of Cookin' Canuck, recipe submitted by TK member Mary Helen (mhorama) of Mary Makes Dinner.

 
When I headed off for college (which may or may not have been more than 15 years ago), friends and family members regaled me with tales of inedible cafeteria food and the legendary “Freshman Fifteen”. To a certain extent, they were right about the cafeteria food choices. By the end of the first month, I was decidedly sick of chili and chicken noodle soup (not the kind grandma made). The sandwich bar, with its choice of whole wheat bread and fresh veggies, became my solace.

I wasn’t much of a cook at that time. Just ask my parents and they will confirm that whenever it was my turn to cook at home, I made baked potatoes with various toppings. Every time. Well, they say that necessity is the mother of invention, and my taste buds deemed it necessary for me to learn to cook a few dishes to ward off complete food boredom. Before leaving Vancouver and heading to Colorado for college, I bought a beautiful Japanese bowl. I’m not sure what possessed me to do so, but that bowl became the inspiration for many hearty noodle soups that I learned to cook in the dormitory kitchen.


Tasty Kitchen Blog: Easy Asian Beef and Noodle Soup. Guest post by Dara Michalski of Cookin' Canuck, recipe submitted by TK member Mary Helen (mhorama) of Mary Makes Dinner.

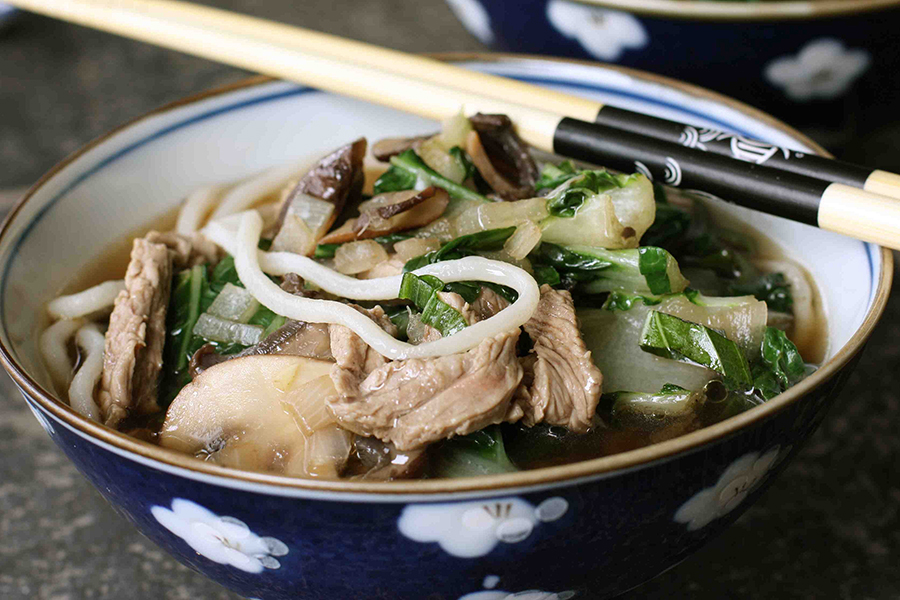
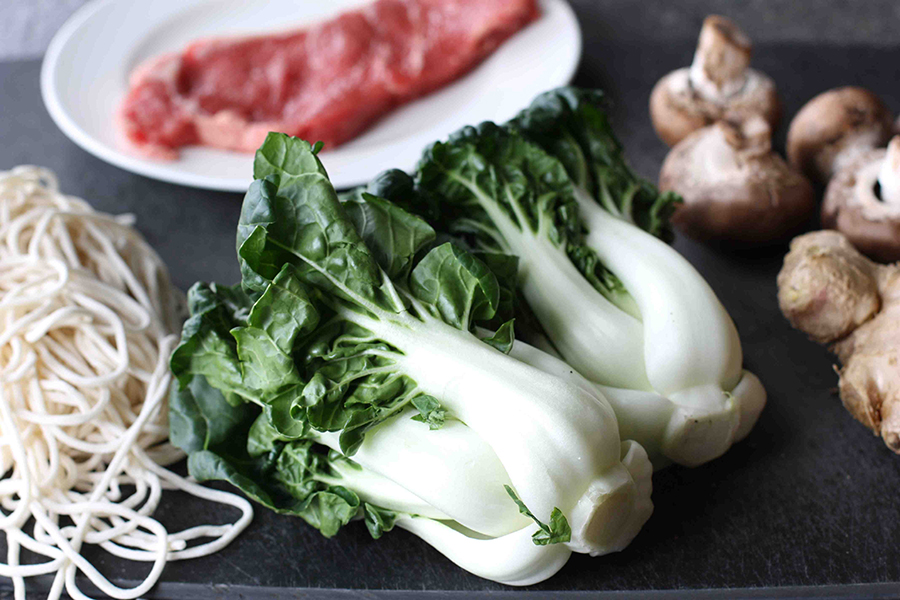
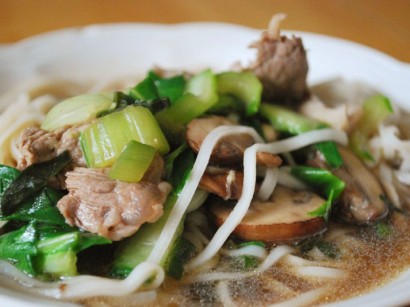
This quick and easy soup is from Tasty Kitchen member, Mary Helen, who also blogs at Mary Makes Dinner. It takes me back to the nourishing soups I made in college and still make today for my family. The New York strip steak, which is cut paper thin, cooks quickly in the savory broth. Rounded out with Chinese noodles, mushrooms, and baby bok choy, this soup is a full meal in a single bowl.


Tasty Kitchen Blog: Easy Asian Beef and Noodle Soup. Guest post by Dara Michalski of Cookin' Canuck, recipe submitted by TK member Mary Helen (mhorama) of Mary Makes Dinner.

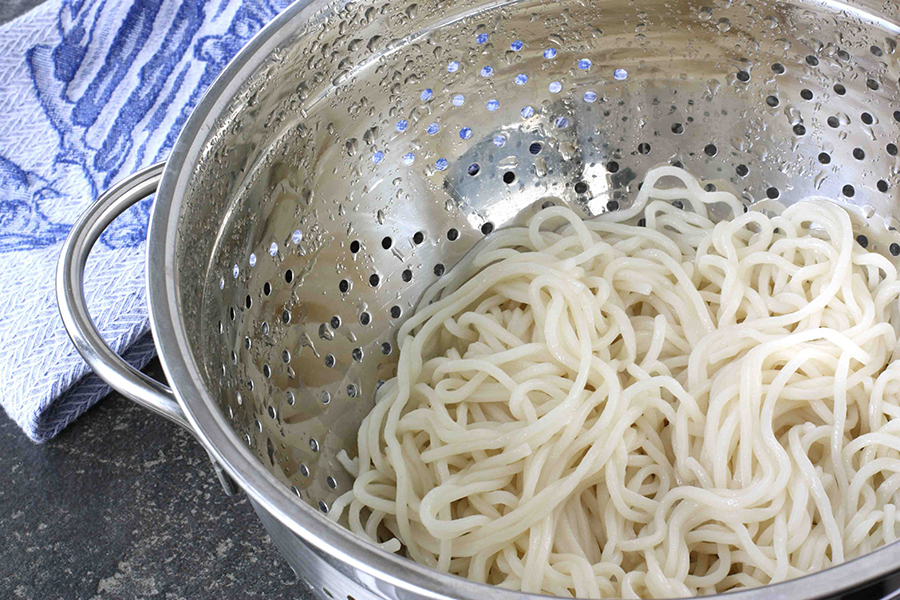
Cook Chinese noodles or thin pasta according to package instructions. Drain and shock with cold water. This will stop the noodles from cooking further and becoming too soft. Set aside.

In a large saucepan, combine beef broth, soy sauce and fresh grated ginger. Bring to a low simmer.


Tasty Kitchen Blog: Easy Asian Beef and Noodle Soup. Guest post by Dara Michalski of Cookin' Canuck, recipe submitted by TK member Mary Helen (mhorama) of Mary Makes Dinner.

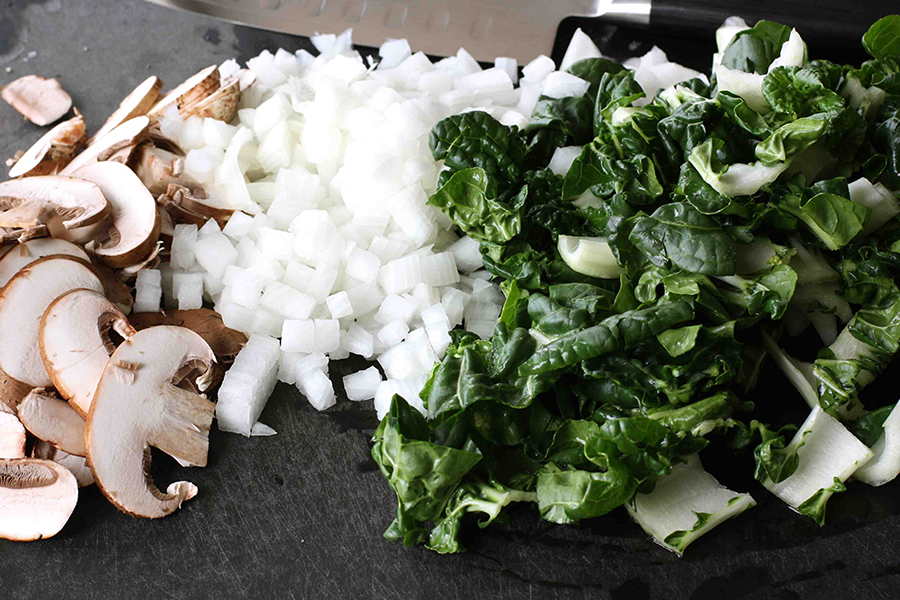
Chop a white onion and two heads baby bok choy (white and green parts). Slice mushrooms. I used crimini mushrooms because the selection of portobello and shiitake mushrooms at my grocery store was pitiful. The crimini worked well, but the shiitake would really put this soup over the top.


Tasty Kitchen Blog: Easy Asian Beef and Noodle Soup. Guest post by Dara Michalski of Cookin' Canuck, recipe submitted by TK member Mary Helen (mhorama) of Mary Makes Dinner.

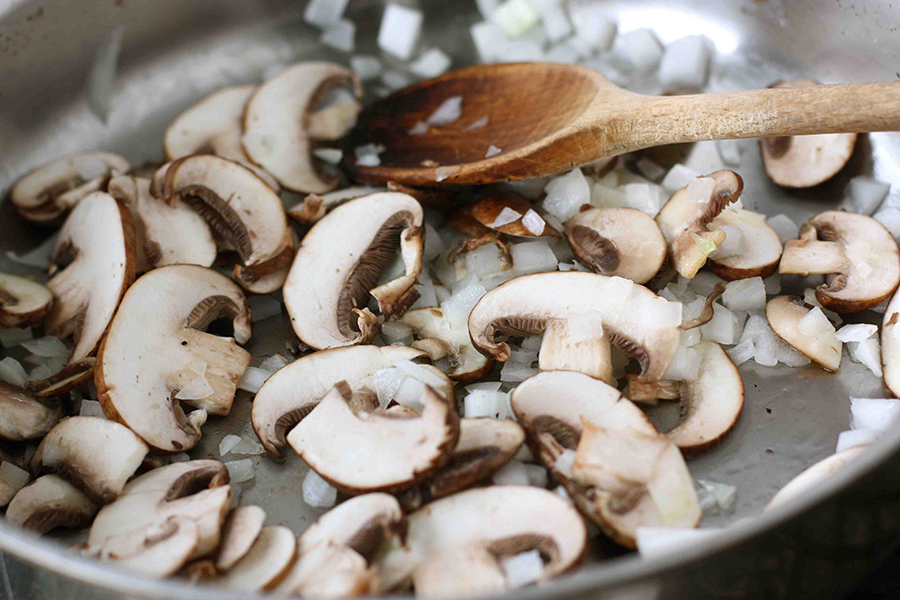
Heat half of the canola oil in a large sauté pan set over medium-high heat (Mary Helen didn’t actually specify what level of heat to use, but medium-high worked well to brown the mushrooms). Add the mushrooms and half of the chopped onion, and cook the mushrooms until lightly browned. Add the mushroom and onion mixture to the broth.


Tasty Kitchen Blog: Easy Asian Beef and Noodle Soup. Guest post by Dara Michalski of Cookin' Canuck, recipe submitted by TK member Mary Helen (mhorama) of Mary Makes Dinner.

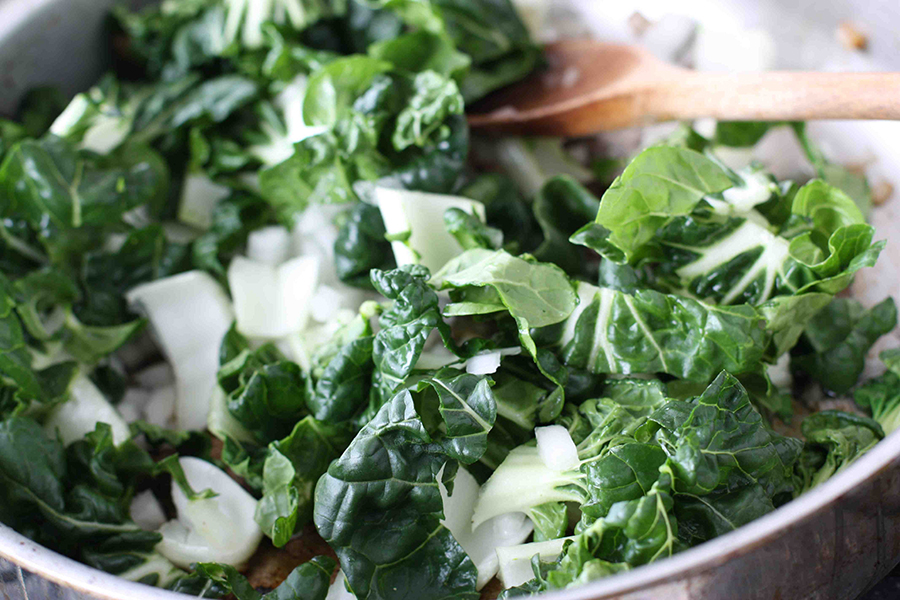
Add the rest of the canola oil and add the chopped bok choy. Cook until the greens are slightly wilted, which won’t take more than 1 to 2 minutes.


Tasty Kitchen Blog: Easy Asian Beef and Noodle Soup. Guest post by Dara Michalski of Cookin' Canuck, recipe submitted by TK member Mary Helen (mhorama) of Mary Makes Dinner.

Add to the broth mixture.


Tasty Kitchen Blog: Easy Asian Beef and Noodle Soup. Guest post by Dara Michalski of Cookin' Canuck, recipe submitted by TK member Mary Helen (mhorama) of Mary Makes Dinner.

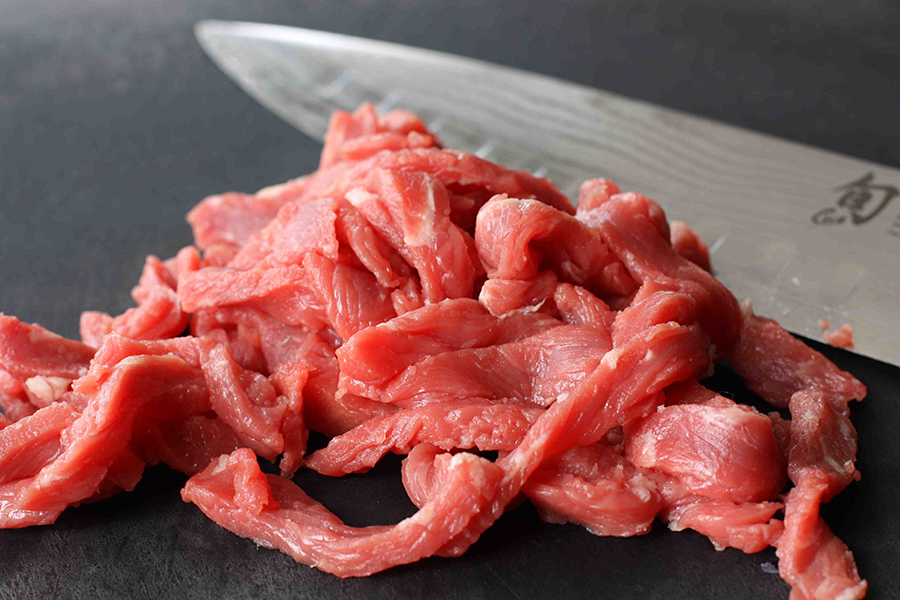
Slice the boneless New York strip steaks very thinly. Make sure to use a sharp knife. This well help you keep all ten fingers intact. Very important.

If you let the meat sit in the freezer for 10 minutes before slicing, it will cut very easily.

Add the meat strips to the soup and simmer until the meat is just cooked through. Given that the meat is cut very thinly, this won’t take more than a couple of minutes.


Tasty Kitchen Blog: Easy Asian Beef and Noodle Soup. Guest post by Dara Michalski of Cookin' Canuck, recipe submitted by TK member Mary Helen (mhorama) of Mary Makes Dinner.

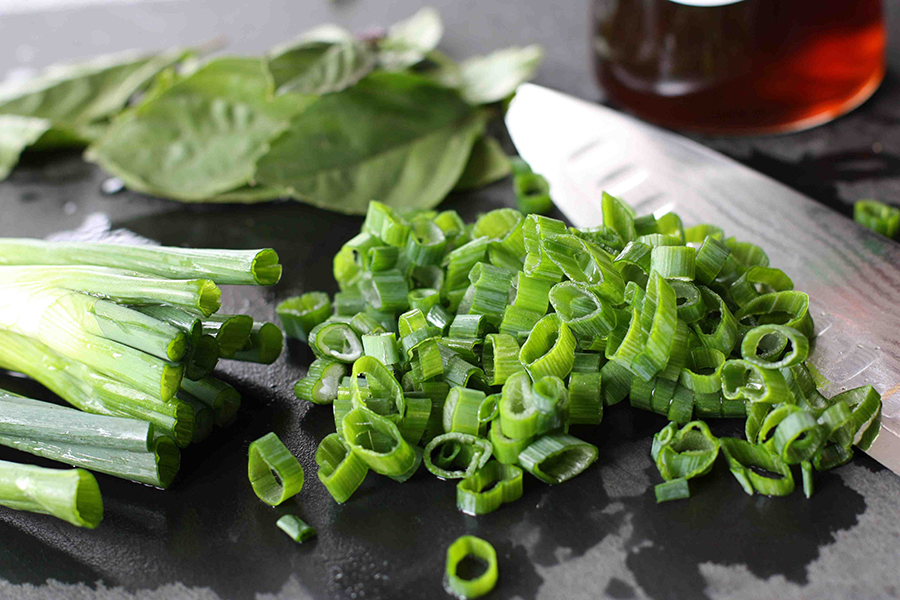
Remove the saucepan from the heat. Stir in chopped scallions, sliced fresh basil, and sesame oil. Season to taste with salt and pepper.

Divide the noodles between four bowls and ladle the soup over top. Serve.

Mary Helen suggests add some crushed red pepper flakes or sriracha sauce for a little kick. I concur.


Tasty Kitchen Blog: Easy Asian Beef and Noodle Soup. Guest post by Dara Michalski of Cookin' Canuck, recipe submitted by TK member Mary Helen (mhorama) of Mary Makes Dinner.

 
Thank you, Mary Helen, for a soup that will take a regular place in our dinner rotation. Visit her blog, Mary Makes Dinner, for more of her delicious recipes!


Printable Recipe

Easy Asian Beef & Noodle Soup

See post on Mary Helen’s site!
4.60 Mitt(s) 5 Rating(s)5 votes, average: 4.60 out of 55 votes, average: 4.60 out of 55 votes, average: 4.60 out of 55 votes, average: 4.60 out of 55 votes, average: 4.60 out of 5

Prep Time:

Cook Time:

Difficulty: Easy

Servings: 4

4
x

Print Options

Page size Letter 3x5 4x6
Text Size Small Medium Large
Content Include description
Include prep time, etc.
Show image

Description

A pho-inspired Noodle Soup made quick, tasty and simple.

Ingredients

  • 8 ounces, weight Chinese Noodles Or Thin Pasta
  • 1 quart Light Beef Stock
  • 2 Tablespoons Soy Sauce
  • ½ teaspoons Ginger, grated
  • 2 Tablespoons Vegetable Oil, For Frying
  • 4 ounces, weight Mushrooms, Sliced (White, Shitake, Or Portobello)
  • 1 whole Small White Onion, Minced
  • 2 whole Baby Bok Choy, Chopped
  • 8 ounces, weight Boneless NY Strip Steak, Sliced Very Thin
  • 1 bunch Scallions Sliced Thin
  • 1 Tablespoon Toasted Sesame Oil
  • ¼ cups Basil, Chiffonade/Shredded
  • 1 pinch Salt And Pepper, to taste

Preparation Instructions

Cook noodles according to package instructions, then shock with cold water and set aside. In a large soup pot, combine stock, soy sauce, and ginger. Bring to a low simmer. Warm vegetable oil in a fry pan and saute the mushrooms along with half of the minced onion until browned. Add the mushroom mixture to the soup, then repeat with the bok choy and the remaining onions.

Slice the steak as thinly as possible and add the strips to the soup. Allow the meat to cook through, then remove the pot from the heat. Add the scallions, sesame oil, and basil, and salt and pepper as needed. The noodles can either be added to the pot, or to soup bowls. Ladle soup into each bowl over or along with the noodles. You can enjoy the noodles as is, or you can add a little crushed red pepper or Siracha Sauce if you’d like them hot n’ spicy.


_______________________________________

Dara Michalski is a doll and a sweetheart who clearly knows her way around the kitchen. She blogs at Cookin’ Canuck, where she shares her flavor-packed recipes and fun, engaging writing. The photography’s pretty incredible, too.


Profile photo of cookincanuck

Red Quinoa and Black Bean Salad

Posted by in Step-by-Step Recipes

Tasty Kitchen Blog: Red Quinoa and Black Bean Salad. Guest post by Dara Michalski of Cookin' Canuck, recipe submitted by TK member Kay Heritage of The Church Cook.

 
It was many years ago when my mum first set a bowl of quinoa (pronounced keen-wah) in front of me. It didn’t look like rice. To my teenaged self, it resembled something straight out of a hippie-infested Woodstock-ian field. Quinoa is, in fact, a grain that originated in South America and was once known as “the gold of the Incas”. It became a sustaining grain for the people of the Andean region about 6000 years before Jerry Garcia and Janis Joplin performed for the long-tressed flower-carrying children of the sixties.

Quinoa can be found in well-stocked supermarkets or health food stores, sold in boxes or in bulk. It is either sold as regular quinoa, which is tan in color, or in this pretty red version. If you are trying to clean up your diet, quinoa is a virtual powerhouse of protein, fiber and folate. I figure I can eat about four slices of bacon for every cup of quinoa I consume. Somehow I don’t think you will find that recommendation sanctioned by any national health organizations, but I can guarantee it will keep that feeling of deprivation in check.

This Red Quinoa and Black Bean Salad by The Church Cook is packed with colorful vegetables, black beans, and a complementary lime-cumin dressing. My husband and I were immediately enamored with the taste and texture of this salad, and proceeded to eat several helpings, either by itself or combined with cooked chicken breast in whole-wheat wraps.

Now, I have a little confession to make. I typically use the lazy cook’s way of preparing quinoa. I simply combine one part quinoa with two parts water in a medium saucepan, bring the mixture to a bowl, cover and reduce the heat to low, and simmer until the quinoa absorbs all of the water, about 20 minutes—just like cooking rice.

However, when I read Kay’s slightly more complicated method, I was up for the challenge. This is the method I am presenting to you in the following photos. Now, a cook that is not as messy as me probably will not spill the quinoa (and end up with a good quantity in her hair) when transferring the quinoa from the cheesecloth to the bowl. By the time I was done, it looked as though a tornado had blown throw my kitchen, leaving a very happy dog (licking the floor) in its wake.

For my own sanity and time considerations on busy weeknights, I will stick with my boil and simmer method. Whichever route you choose, I guarantee that you will be smitten by the tangy dressing, fresh vegetables, tender pop of the quinoa, and the promise of healthy protein and fiber.

Let’s start with the dressing.


Tasty Kitchen Blog: Red Quinoa and Black Bean Salad. Guest post by Dara Michalski of Cookin' Canuck, recipe submitted by TK member Kay Heritage of The Church Cook.

You’ll need fresh lime juice, salt, garlic, cilantro, cumin, and olive oil. You’ll want some freshly ground pepper, too.


Tasty Kitchen Blog: Red Quinoa and Black Bean Salad. Guest post by Dara Michalski of Cookin' Canuck, recipe submitted by TK member Kay Heritage of The Church Cook.

In a small bowl, whisk together lime juice, salt, minced garlic, chopped cilantro, and cumin.


Tasty Kitchen Blog: Red Quinoa and Black Bean Salad. Guest post by Dara Michalski of Cookin' Canuck, recipe submitted by TK member Kay Heritage of The Church Cook.

Whisking constantly, slowly add olive oil in a thin stream until combined.

Season with pepper, to taste. Set aside.

Now let’s tackle the quinoa.


Tasty Kitchen Blog: Red Quinoa and Black Bean Salad. Guest post by Dara Michalski of Cookin' Canuck, recipe submitted by TK member Kay Heritage of The Church Cook.

There is a natural coating on quinoa called saponin, which can have a bitter taste. In nature, the saponin helps to repel birds and insects. You have to love a grain that can fend for itself.


Tasty Kitchen Blog: Red Quinoa and Black Bean Salad. Guest post by Dara Michalski of Cookin' Canuck, recipe submitted by TK member Kay Heritage of The Church Cook.

To remove any bitter taste, rinse the quinoa in several changes of cold water. Each time, let most of the quinoa sink to bottom of the bowl, then pour off the water.


Tasty Kitchen Blog: Red Quinoa and Black Bean Salad. Guest post by Dara Michalski of Cookin' Canuck, recipe submitted by TK member Kay Heritage of The Church Cook.

Strain the quinoa in a large fine mesh sieve.

Bring 1 ½ quarts (about 6 cups) water to a boil in a medium saucepan and add some salt. Pour in the quinoa and boil for 10 minutes.

Meanwhile prepare a colander by lining it with cheesecloth. I used the steamer insert for my double-boiler.


Tasty Kitchen Blog: Red Quinoa and Black Bean Salad. Guest post by Dara Michalski of Cookin' Canuck, recipe submitted by TK member Kay Heritage of The Church Cook.

You can also use this time to prepare the other ingredients that go into this salad.


Tasty Kitchen Blog: Red Quinoa and Black Bean Salad. Guest post by Dara Michalski of Cookin' Canuck, recipe submitted by TK member Kay Heritage of The Church Cook.

Drain the quinoa into the cheesecloth.

Add 2 inches of water to the bottom of the pot and bring the water to a boil. Set the steamer insert (with cheesecloth and quinoa) over the boiling water and cover. Be certain that the quinoa is not touching the water. Steam for 10 minutes.

Fluff the quinoa with a fork and cool.


Tasty Kitchen Blog: Red Quinoa and Black Bean Salad. Guest post by Dara Michalski of Cookin' Canuck, recipe submitted by TK member Kay Heritage of The Church Cook.

In a large bowl, combine the quinoa, black beans, corn, chopped red and orange bell peppers, jalapeno pepper, cilantro, and green onions.


Tasty Kitchen Blog: Red Quinoa and Black Bean Salad. Guest post by Dara Michalski of Cookin' Canuck, recipe submitted by TK member Kay Heritage of The Church Cook.

Toss gently with the dressing and serve at room temperature.

Thank you to Kay for this salad that quickly earned a place in our regular lunch and dinner line-ups. Be sure to check out her blog The Church Cook for many other innovative, tasty recipes.


Printable Recipe

Red Quinoa and Black Bean Salad

See post on The Church Cook (Kay Heritage)’s site!
4.81 Mitt(s) 22 Rating(s)22 votes, average: 4.81 out of 522 votes, average: 4.81 out of 522 votes, average: 4.81 out of 522 votes, average: 4.81 out of 522 votes, average: 4.81 out of 5

Prep Time:

Cook Time:

Difficulty: Intermediate

Servings: 6

6
x

Print Options

Page size Letter 3x5 4x6
Text Size Small Medium Large
Content Include description
Include prep time, etc.
Show image

Description

Healthy, delicious Red Quinoa and Black Bean Salad. Great as a side with fish tacos or as a vegetarian meal.

Ingredients

  • FOR THE DRESSING:
  • 5 Tablespoons Fresh Lime Juice
  • 1 teaspoon Salt
  • 1 whole Garlic Clove, Finely Mined
  • ¼ cups Finely Chopped Fresh Cilantro
  • 1 teaspoon Ground Cumin, Or To Taste
  • ⅓ cups Olive Oil
  • ½ teaspoons Freshly Ground Pepper, to taste
  • _____
  • FOR THE SALAD:
  • 1-½ cup Red Quinoa (sold In Health Food Stores)
  • 1 Tablespoon Table Salt, Add When Boiling Quinoa
  • 1 can (14 Oz. Can) Black Beans, Drained, Rinsed
  • 1-½ cup Corn Kernels, Fresh (cut From About 2 Large Ears)
  • 1 cup Finely Chopped Colored Sweet Bell Peppers
  • 1 whole Jalapeño Chilies, Seeded And Minced (wear Rubber Gloves)
  • ¼ cups Finely Chopped Fresh Cilantro
  • ¼ cups Finely Chopped Green Onions

Preparation Instructions

For the dressing:
In a small bowl whisk together lime juice, salt, minced garlic, chopped cilantro, and cumin and add oil in a stream, whisking. Add pepper to taste. Set aside.

For the salad:
In a large bowl wash quinoa in at least 5 changes of cold water, rubbing grains and letting them settle before pouring off most of water, until water runs clear. Drain in a large fine sieve.

In a medium size pot, add the table salt to 1-1/2 quarts of boiling water and cook quinoa 10 minutes. Prepare a colander with cheese cloth over it and drain the cooked quinoa into cheese cloth.

Add 2 inches of water into the pot and bring water to boil. Place the quinoa (still in the colander or another small pan, so you have a double boiler effect), cover cooked quinoa with the cheesecloth and put a lid on your pot. Steam for an additional 10 minutes. Do not let quinoa touch the water. Fluff quinoa with a fork and cool.

Combine in a large mixing bowl the beans, corn, remaining vegetables, herbs, and cooled quinoa. Toss gently with the dressing. Can be prepared a day ahead for flavors to combine. Serve at room temperature.


_______________________________________

Dara Michalski is a doll and a sweetheart who clearly knows her way around the kitchen. She blogs at Cookin’ Canuck, where she shares her flavor-packed recipes and fun, engaging writing. The photography’s pretty incredible, too.


Profile photo of cookincanuck

Graham Cracker Cookie Bars

Posted by in Baking, Step-by-Step Recipes

Tasty Kitchen Blog: Graham Cracker Cookie Bars. Guest post by Dara Michalski of Cookin' Canuck, recipe submitted by TK member margaretha.

 
Every year at this time, I grapple with the decision of what holiday treat to give my neighbors. The first year we were married—you know, when I was young, ambitious, and naïve—I made a loaf of our favorite zucchini bread for every neighbor. About ten hours into the process and pounds of zucchini later, my holiday spirit was sucked dry and the joyful Christmas carols I had been singing were replaced by depressing 80s pop songs (think “Everybody Hurts” by REM). It was a scene straight out of The Grinch. My heart was at least four sizes too small.

The candy cane-striped lining of this dark snow cloud was that I learned that it is truly the thought that counts. Plus, simplicity is key. Every year since then, I have sought out recipes that take little time and effort, and do not cost a fortune to make. That is where these treats by marathea come in. Drenched in rich caramel and a layer of chocolate, these Graham Cracker Cookie Bars come together in a flash, and are filled with all the flavors of the holidays. I am happy to report that my heart grew five sizes once I tasted these.


Tasty Kitchen Blog: Graham Cracker Cookie Bars. Guest post by Dara Michalski of Cookin' Canuck, recipe submitted by TK member margaretha.

In the recipe posted on Tasty Kitchen, marathea tops these treats with slivered almonds. I decided to experiment with candy cane pieces as well. Really, the possibilities are endless. You could try hazelnuts, pistachios, pretzel bits (for that salty-sweet combo), or even dried fruit. Whatever you try, I guarantee that you will not be disappointed.


Tasty Kitchen Blog: Graham Cracker Cookie Bars. Guest post by Dara Michalski of Cookin' Canuck, recipe submitted by TK member margaretha.

Preheat oven to 350 degrees F.

Line a 11- by 15-inch cookie sheet with graham crackers. There will be a little bit of space left at the end of the pan. That space will later be filled with runaway caramel, which you can peel off and eat in privacy. Or is that just me?


Tasty Kitchen Blog: Graham Cracker Cookie Bars. Guest post by Dara Michalski of Cookin' Canuck, recipe submitted by TK member margaretha.

In a medium saucepan set over medium-low heat, combine brown sugar and butter.


Tasty Kitchen Blog: Graham Cracker Cookie Bars. Guest post by Dara Michalski of Cookin' Canuck, recipe submitted by TK member margaretha.

Melt, stirring constantly, and bring to a gentle boil. Turn the heat to low and cook for 5 minutes, stirring constantly. If bubbles are not coming to the surface, increase the heat slightly.

Oh yeah, now that’s what holiday baking is all about.


Tasty Kitchen Blog: Graham Cracker Cookie Bars. Guest post by Dara Michalski of Cookin' Canuck, recipe submitted by TK member margaretha.

Pour the mixture over the graham crackers. Be careful—this is hot caramel and, believe me, pouring it on any part of your skin will ruin your holiday spirit faster than you can say, “Humbug.”


Tasty Kitchen Blog: Graham Cracker Cookie Bars. Guest post by Dara Michalski of Cookin' Canuck, recipe submitted by TK member margaretha.

Spread the mixture evenly over the graham crackers.

Bake for 7 minutes. Don’t worry if the mixture is bubbling up while baking. That just means you are developing a richer caramel flavor. That is all good.


Tasty Kitchen Blog: Graham Cracker Cookie Bars. Guest post by Dara Michalski of Cookin' Canuck, recipe submitted by TK member margaretha.

While the graham crackers are baking, put 4 mini candy canes in a small resealable plastic bag and smash with a mallet or rolling pin. Get out all of that aggression so you can avoid the holiday road rage later. Your family will thank you.


Tasty Kitchen Blog: Graham Cracker Cookie Bars. Guest post by Dara Michalski of Cookin' Canuck, recipe submitted by TK member margaretha.

Sprinkle chocolate chips over the hot caramel and let sit for 1 minute to allow the chocolate chips to melt slightly.


Tasty Kitchen Blog: Graham Cracker Cookie Bars. Guest post by Dara Michalski of Cookin' Canuck, recipe submitted by TK member margaretha.

Using an offset or rubber spatula, spread the soft chocolate chips over the caramel layer.


Tasty Kitchen Blog: Graham Cracker Cookie Bars. Guest post by Dara Michalski of Cookin' Canuck, recipe submitted by TK member margaretha.

Sprinkle nuts or candy canes over the chocolate. Or you could do half and half. Or you could sprinkle pretzels over top. The possibilities are endless.

Place the cookie sheet in the fridge and cool for about 20 minutes. If the cookie sheet is still hot, place it on a rack in the fridge. Break into pieces and serve or store in an airtight container.


Tasty Kitchen Blog: Graham Cracker Cookie Bars. Guest post by Dara Michalski of Cookin' Canuck, recipe submitted by TK member margaretha.

Thank you to margaretha for this wonderful holiday treat.


Printable Recipe

Graham Cracker Cookie Bars

4.42 Mitt(s) 7 Rating(s)7 votes, average: 4.42 out of 57 votes, average: 4.42 out of 57 votes, average: 4.42 out of 57 votes, average: 4.42 out of 57 votes, average: 4.42 out of 5

Prep Time:

Cook Time:

Difficulty: Easy

Servings: 8

8
x

Print Options

Page size Letter 3x5 4x6
Text Size Small Medium Large
Content Include description
Include prep time, etc.
Show image

Description

Super easy, super yummy bars. Perfect to wrap up in a cellophane bundle and hand out as little treats. Great with a cup of coffee. And so quick to make.

Ingredients

  • 1 package (10 To 12 Pieces In A Package) Graham Crackers
  • 2 sticks Butter
  • 1 cup Brown Sugar
  • 1 cup Chocolate Chips
  • ½ cups Slivered Or Sliced Almonds

Preparation Instructions

Line an 11×15 inch cookie sheet with whole crackers. It will fill up pretty much the whole space. Use as many whole crackers as you need to fill the space.

Mix butter and brown sugar in a pan to boil. Stir for 5 minutes while boiling on low.

Spread the butter/sugar mixture over the crackers and bake at 350 degrees for 7 minutes. Sprinkle with chocolate chips and nuts when it comes out of the oven. Cool for 10-20 minutes in the fridge.

Break into pieces.

Alternative: After sprinkling with chocolate chips, let the chocolate melt for a minute, then spread it out over the caramel, then sprinkle the nuts. This is what I did on the ones photographed.


_______________________________________

Dara Michalski is a doll and a sweetheart who clearly knows her way around the kitchen. She blogs at Cookin’ Canuck, where she shares her flavor-packed recipes and fun, engaging writing. The photography’s pretty incredible, too.


Profile photo of cookincanuck

Perfect Pumpkin Cheesecake

Posted by in Baking, Step-by-Step Recipes

Tasty Kitchen Blog: Perfect Pumpkin Cheesecake. Guest post by Dara Michalski of Cookin' Canuck, recipe submitted by TK member Brenda of A Farmgirl's Dabbles.

 
While living in New York City, I made every effort to stay hush-hush about my apathy for cheesecake. Getting a decent apartment in Manhattan was difficult enough. I certainly wasn’t going to ‘fess up to my dessert inadequacies when it came to one of the pride and joys of my adopted city. To compensate for my shortcoming, I made a big show of folding my slice of pizza in half, honking the car horn at least once every 3 blocks, and talking about walking my dawg while drinking my cawffee. I had them fooled, right up until the point when I told someone to “Take off, eh?”

My Canadian roots gave me away every time.

It wasn’t until I moved west again that my acceptance, and eventual affection, for cheesecake blossomed. As much as I came to appreciate the silky, tangy filling that defines this dessert, there was nary a homemade cheesecake to be found in my kitchen. To be honest, I was intimidated as heck to make one. So I started with the easy stuff: cheesecake bars. They turned out to be some of my family’s favorite desserts.

When I saw this recipe for Perfectly Perfect Pumpkin Cheesecake by Tasty Kitchen member Brenda (afarmgirldabbles), I knew it was time to step out of my comfort zone for the sake of some serious Thanksgiving indulgence. Did it turn out as beautifully as the one in afarmgirlsdabbles’ photo? Nope. Was it irresistibly creamy and worthy of a place in my holiday feast? Heck yeah. I strongly encourage you to give this recipe a shot because if a Canuck can do it, then so can you.


Tasty Kitchen Blog: Perfect Pumpkin Cheesecake. Guest post by Dara Michalski of Cookin' Canuck, recipe submitted by TK member Brenda of A Farmgirl's Dabbles.

First, let’s make the crust.

Preheat oven to 350 degrees F. Prepare a 9″ springform pan by lightly spraying with cooking spray.


Tasty Kitchen Blog: Perfect Pumpkin Cheesecake. Guest post by Dara Michalski of Cookin' Canuck, recipe submitted by TK member Brenda of A Farmgirl's Dabbles.

Place gingersnap cookies in the bowl of a food processor and pulse until the crumbs are uniform.


Tasty Kitchen Blog: Perfect Pumpkin Cheesecake. Guest post by Dara Michalski of Cookin' Canuck, recipe submitted by TK member Brenda of A Farmgirl's Dabbles.

Add brown sugar, cinnamon, and salt. Pulse to combine.


Tasty Kitchen Blog: Perfect Pumpkin Cheesecake. Guest post by Dara Michalski of Cookin' Canuck, recipe submitted by TK member Brenda of A Farmgirl's Dabbles.

Pour the crumbs into a medium bowl and toss with melted butter.


Tasty Kitchen Blog: Perfect Pumpkin Cheesecake. Guest post by Dara Michalski of Cookin' Canuck, recipe submitted by TK member Brenda of A Farmgirl's Dabbles.

Toss until the mixture is evenly moist and clumps together when squeezed between your fingers. It is dry as the Sahara where I live, so I had to add 2 additional tablespoons of melted butter to coax the crumbs to stick together.


Tasty Kitchen Blog: Perfect Pumpkin Cheesecake. Guest post by Dara Michalski of Cookin' Canuck, recipe submitted by TK member Brenda of A Farmgirl's Dabbles.

Press the crumbs into the bottom and slightly up the sides of the springform pan. Chill for 5 minutes, then bake for 10 minutes. Cool completely on a wire rack.

While the crust is cooling, prepare a water bath. Bring a pot of water to a gentle boil and have a large baking or roasting pan ready to place the springform pan in when it is time.

When the crust is cooled, place the springform pan on a double thickness of heavy duty aluminum foil and wrap the foil around the outside of the pan.

Now let’s make the filling.


Tasty Kitchen Blog: Perfect Pumpkin Cheesecake. Guest post by Dara Michalski of Cookin' Canuck, recipe submitted by TK member Brenda of A Farmgirl's Dabbles.

In a large bowl, or the bowl of a mixer, beat the cream cheese until light and smooth.


Tasty Kitchen Blog: Perfect Pumpkin Cheesecake. Guest post by Dara Michalski of Cookin' Canuck, recipe submitted by TK member Brenda of A Farmgirl's Dabbles.

Add pumpkin puree and beat to combine. Is everyone as messy as I am when baking? I could have wiped off the mixer blade for the photo, but I was going for the au naturel look. That’s the story I’m sticking to.

Add eggs and egg yolk, one a time, beating and scraping down the sides between each addition.


Tasty Kitchen Blog: Perfect Pumpkin Cheesecake. Guest post by Dara Michalski of Cookin' Canuck, recipe submitted by TK member Brenda of A Farmgirl's Dabbles.

Add sour cream and beat to combine.


Tasty Kitchen Blog: Perfect Pumpkin Cheesecake. Guest post by Dara Michalski of Cookin' Canuck, recipe submitted by TK member Brenda of A Farmgirl's Dabbles.

Add sugar, cinnamon, ginger, nutmeg, cloves, salt, and flour. Beat until just combined, then mix in the vanilla.

Scrape the filling into the cooled crust. Do not miss any of this creamy goodness.


Tasty Kitchen Blog: Perfect Pumpkin Cheesecake. Guest post by Dara Michalski of Cookin' Canuck, recipe submitted by TK member Brenda of A Farmgirl's Dabbles.

Place the springform pan into the roasting pan and pour hot water into the pan until it reaches halfway up the sides of the springform pan.

Bake until the top of the cheesecake is a deep golden brown and the center is set, about 1 hour 30 minutes to 1 hour 40 minutes. I don’t know if my oven was having issues on this day, but it took an additional 30 minutes to reach this stage. So, focus on the consistency of the filling, rather than the cooking time.

As afarmgirlsdabbles reminds us in the recipe, it is okay if there is still a slight jiggle to the filling. The lady knows what she’s talking about.

Remove the cheesecake from the water bath and run a small, sharp knife between the cheesecake and the pan to avoid cracking. Okay, so I will admit that I had cracking problems while the cheesecake was baking. Cut this first-timer some slack!


Tasty Kitchen Blog: Perfect Pumpkin Cheesecake. Guest post by Dara Michalski of Cookin' Canuck, recipe submitted by TK member Brenda of A Farmgirl's Dabbles.

Let the cheesecake cool in the pan, set on a wire rack. Cover and chill for at least 4 hours or overnight. Do not skip this step. It is torture to wait, but delayed gratification can be a very good thing.


Tasty Kitchen Blog: Perfect Pumpkin Cheesecake. Guest post by Dara Michalski of Cookin' Canuck, recipe submitted by TK member Brenda of A Farmgirl's Dabbles.

Perfect indeed.

Thank you to Brenda (who blogs at A Farmgirl’s Dabbles) for this truly addictive cheesecake. It will certainly be gracing my Thanksgiving table this year.


Printable Recipe

Perfectly Perfect Pumpkin Cheesecake

See post on afarmgirlsdabbles’s site!
4.90 Mitt(s) 22 Rating(s)22 votes, average: 4.90 out of 522 votes, average: 4.90 out of 522 votes, average: 4.90 out of 522 votes, average: 4.90 out of 522 votes, average: 4.90 out of 5

Prep Time:

Cook Time:

Difficulty: Intermediate

Servings: 16

16
x

Print Options

Page size Letter 3x5 4x6
Text Size Small Medium Large
Content Include description
Include prep time, etc.
Show image

Description

With a crisp gingersnap crust and a creamy pumpkin spice filling, this pumpkin cheesecake is perfectly perfect!

Ingredients

  • FOR THE CRUST:
  • 1-¾ cup Gingersnap Cookie Crumbs (from About 40 Gingersnap Wafers)
  • 3 Tablespoons Brown Sugar
  • ½ teaspoons Ground Cinnamon
  • ½ teaspoons Salt
  • 4 Tablespoons Unsalted Butter, Melted And Slightly Cooled Down
  • _____
  • FOR THE FILLING:
  • 24 ounces, weight Regular Cream Cheese (not Low Fat Or Nonfat), At Room Temperature
  • 15 ounces, weight Pureed Pumpkin (not Pumpkin Pie Filling)
  • 3 whole Large Eggs
  • 1 whole Egg Yolk
  • ¼ cups Sour Cream
  • 1-½ cup Sugar
  • 1 teaspoon Ground Cinnamon
  • ½ teaspoons Ground Ginger
  • ⅛ teaspoons Ground Nutmeg
  • ⅛ teaspoons Ground Cloves
  • ¼ teaspoons Salt
  • 2 Tablespoons All-purpose Flour
  • 1 teaspoon Vanilla

Preparation Instructions

Preheat oven to 350°. Prepare a 9″ springform pan by lightly spraying with cooking spray.

For the crust, pulse the cookies in a food processor until the crumbs are uniform. Add the brown sugar, cinnamon, and salt and pulse to combine. Transfer to a medium bowl and add the melted butter. Combine thoroughly with a fork. When the mixture is evenly moist, crumbly, and holds together when you squeeze a handful, it’s ready. Press the mixture evenly over the bottom, and very slightly up the sides, of your springform pan. Chill for 5 minutes, then bake for 10 minutes. Let cool completely.

Prepare a water bath while the crust cools. Heat a kettle or pan of water to a soft boil. Have a larger baking dish or roasting pan ready to set the springform pan inside it. Once the crust is cooled, set the springform pan on a double layer of heavy duty aluminum foil and wrap the foil up around the outside of the pan.

For the filling, beat the cream cheese until smooth. Add the pumpkin puree and combine. Add the eggs and egg yolk, one at a time, incorporating each egg thoroughly before adding the next, and scraping down the sides of the bowl after each one. Beat in the sour cream. Then add the sugar, cinnamon, ginger, nutmeg, cloves, salt, and flour. Beat just until combined, then beat in the vanilla.

Scrape the filling into the cooled crust and spread evenly. Set the springform pan in the larger roasting pan and add enough hot water from the kettle to come about halfway up the sides of the springform pan.

Bake until the top of the cheesecake is a deep golden color and the center is set, about 1 hour 30 minutes to 1 hour 40 minutes. It’s ok if there is a slight jiggle to the filling. Remove the cheesecake from the oven and run a thin-bladed knife between the crust and the pan sides, to prevent the cake from cracking as it cools. Let the cheesecake cool to room temperature in the pan on a wire rack. Cover and chill for at least four hours or overnight before serving. Top individual slices with fresh whipped cream.


_______________________________________

Dara Michalski is a doll and a sweetheart who clearly knows her way around the kitchen. She blogs at Cookin’ Canuck, where she shares her flavor-packed recipes and fun, engaging writing. The photography’s pretty incredible, too.


Profile photo of cookincanuck

White Chocolate Walnut Blondies with Maple Butter Sauce

Posted by in Baking, Step-by-Step Recipes

I’m so excited to welcome Dara, also known as prolific Tasty Kitchen contributor Cookin’ Canuck, as a new contributor to the Tasty Kitchen Blog. I’ve been loving Dara’s recipes, both on Tasty Kitchen and on her own food blog, Cookin’ Canuck, for quite some time, so meeting her in person recently was a real treat […]