The Pioneer Woman Tasty Kitchen
Profile photo of georgiapellegrini

Spicy Moroccan Chickpeas

Posted by in Step-by-Step Recipes

Tasty Kitchen Blog: Spicy Moroccan Chickpeas. Guest post by Georgia Pellegrini, recipe submitted by TK member Nika of I'm Not Quite Sure What You Are Saying ...

 
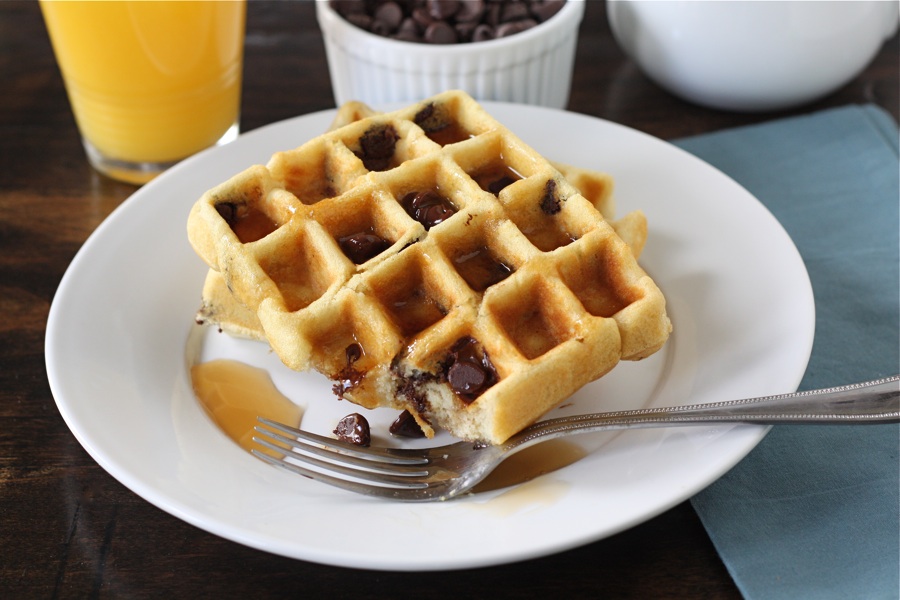
I just love chickpeas. Or is it garbanzo beans? Well, I love them either way. Sometimes, when I’m in a rush, I just empty a can of them into a bowl, add some of my favorite dressing and any herbs I can find and it’s a meal. They are so versatile. I’ve noticed that people are finding yet another great way to make them at home by turning them into a crispy snack. This spicy Moroccan style by Nika really caught my eye. Spicy, crispy, Moroccan chickpea-garbanzo beans? I’m sold.


Tasty Kitchen Blog: Spicy Moroccan Chickpeas. Guest post by Georgia Pellegrini, recipe submitted by TK member Nika of I'm Not Quite Sure What You Are Saying ...

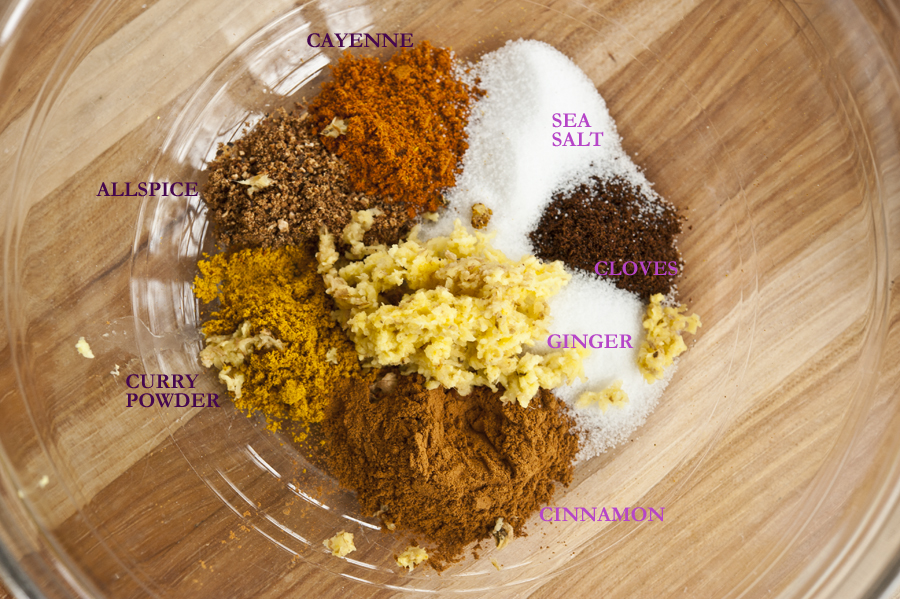
You begin by combining all of these wonderful and aromatic spices into a bowl. The fresh ginger is particularly wonderful in the way it smells. Close your eyes for a moment, inhale, and imagine yourself in the spice stalls of Morocco …


Tasty Kitchen Blog: Spicy Moroccan Chickpeas. Guest post by Georgia Pellegrini, recipe submitted by TK member Nika of I'm Not Quite Sure What You Are Saying ...

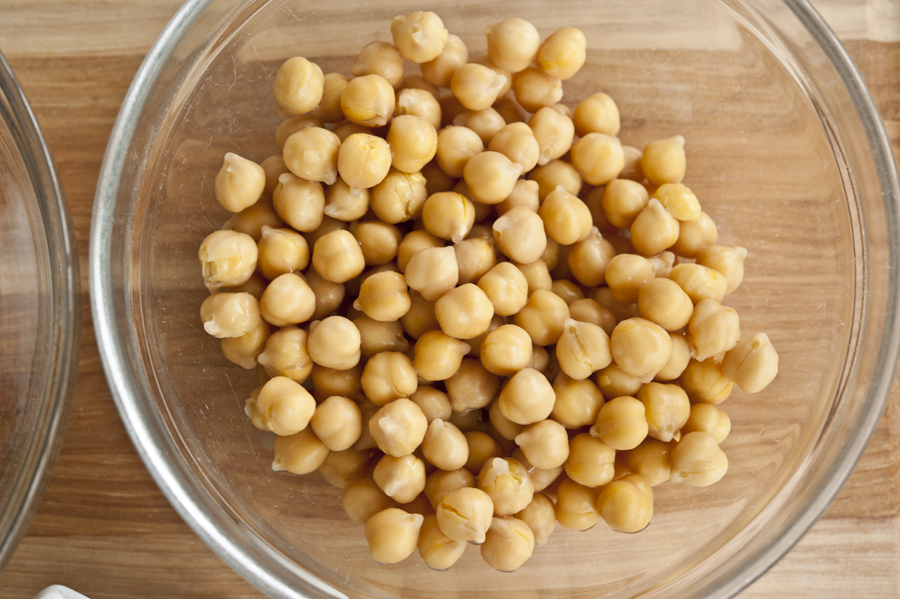
Okay, open your eyes. In a separate bowl you’ll need a can of chickpeas.


Tasty Kitchen Blog: Spicy Moroccan Chickpeas. Guest post by Georgia Pellegrini, recipe submitted by TK member Nika of I'm Not Quite Sure What You Are Saying ...

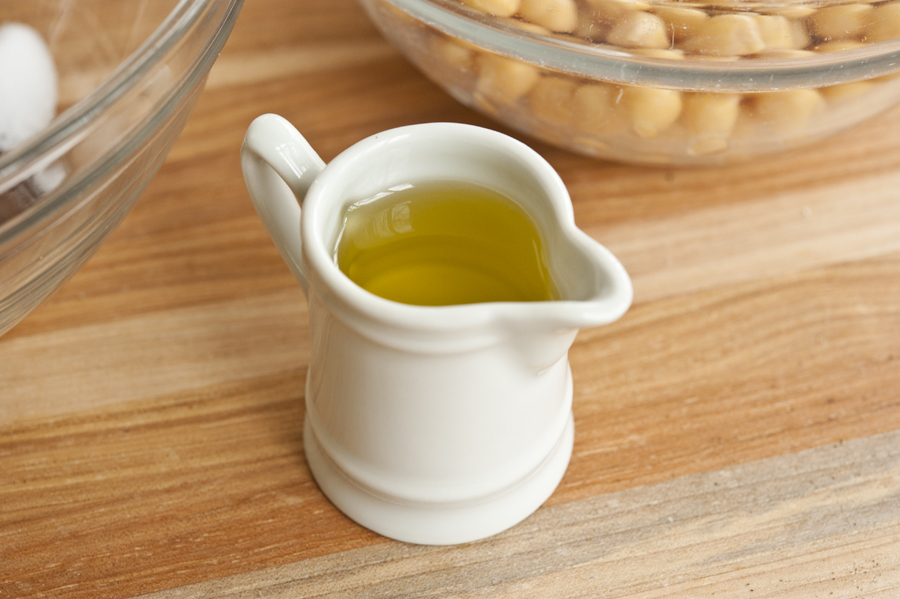
You’ll also need a bit of olive oil to help you coat the mixture onto the beans thoroughly.


Tasty Kitchen Blog: Spicy Moroccan Chickpeas. Guest post by Georgia Pellegrini, recipe submitted by TK member Nika of I'm Not Quite Sure What You Are Saying ...

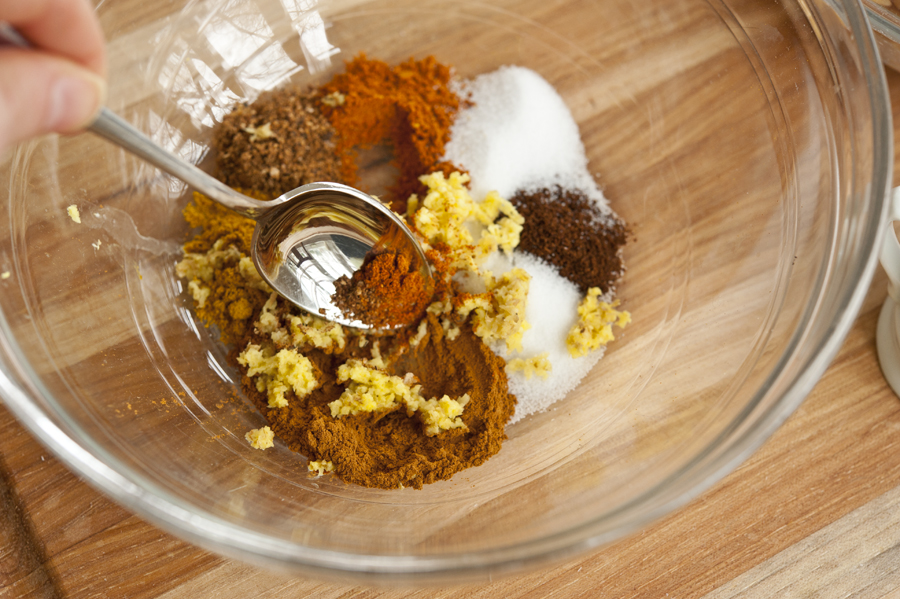
Give your spices a mix.


Tasty Kitchen Blog: Spicy Moroccan Chickpeas. Guest post by Georgia Pellegrini, recipe submitted by TK member Nika of I'm Not Quite Sure What You Are Saying ...

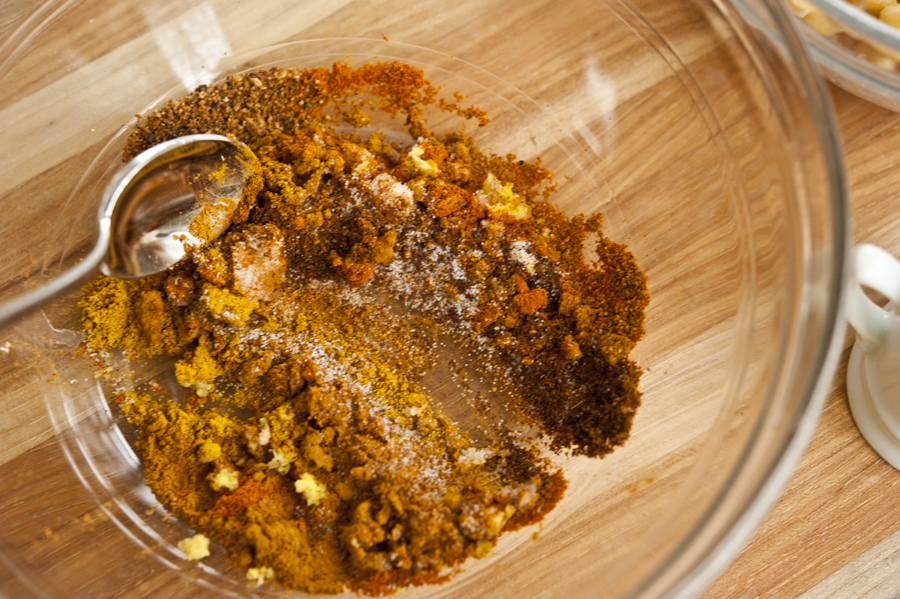
It looks a bit like a work of art, all of that color.


Tasty Kitchen Blog: Spicy Moroccan Chickpeas. Guest post by Georgia Pellegrini, recipe submitted by TK member Nika of I'm Not Quite Sure What You Are Saying ...

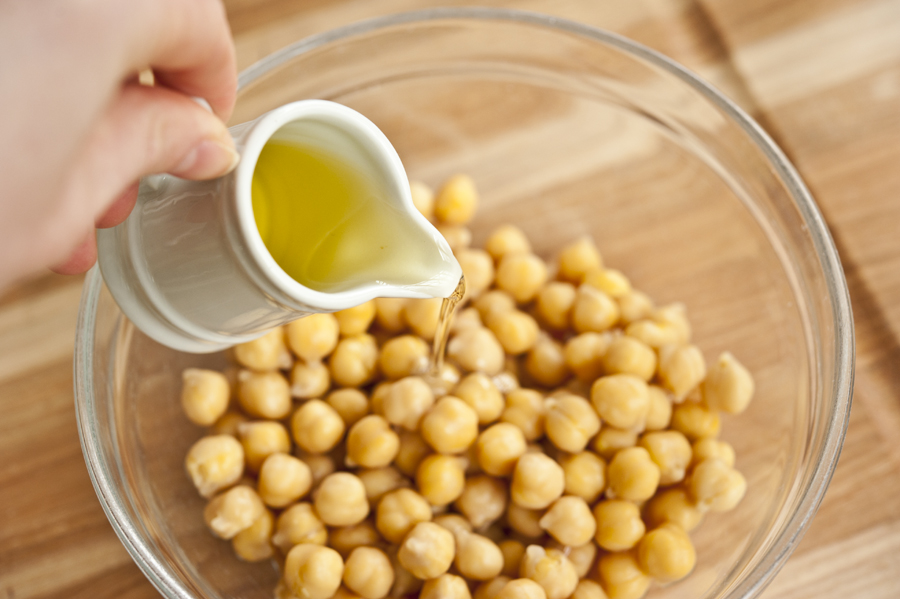
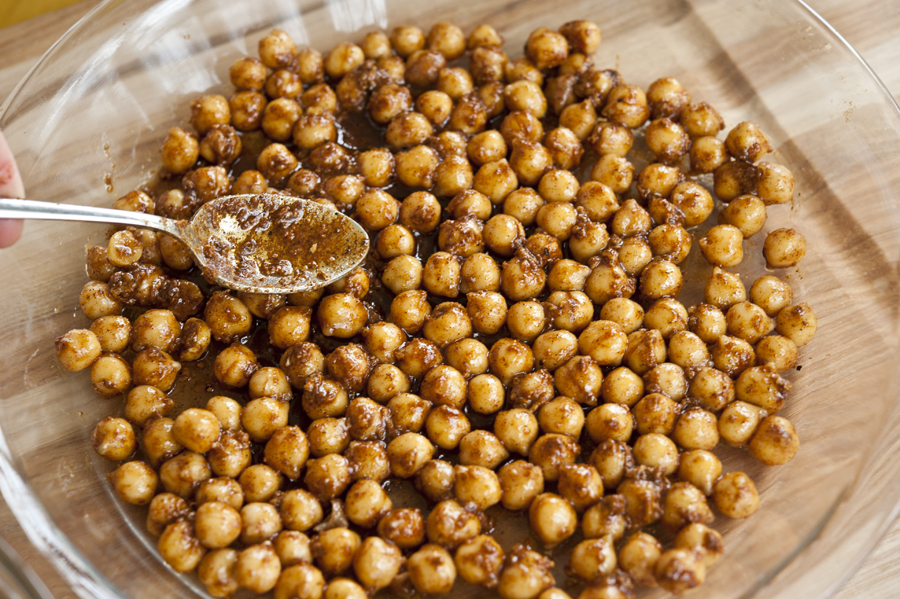
Pour the olive oil into the chickpeas and toss with a spoon.


Tasty Kitchen Blog: Spicy Moroccan Chickpeas. Guest post by Georgia Pellegrini, recipe submitted by TK member Nika of I'm Not Quite Sure What You Are Saying ...

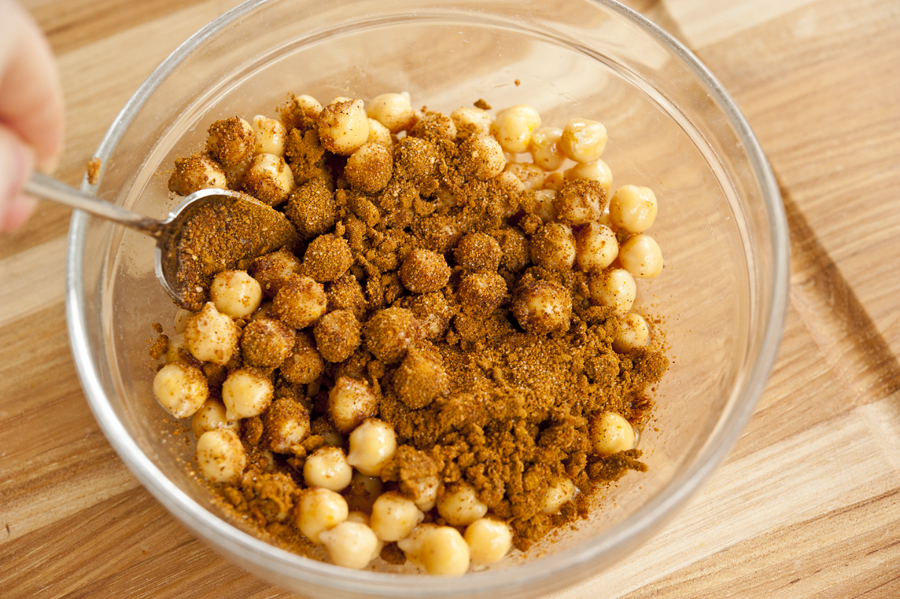
Add the spice mixture and stir it well.


Tasty Kitchen Blog: Spicy Moroccan Chickpeas. Guest post by Georgia Pellegrini, recipe submitted by TK member Nika of I'm Not Quite Sure What You Are Saying ...

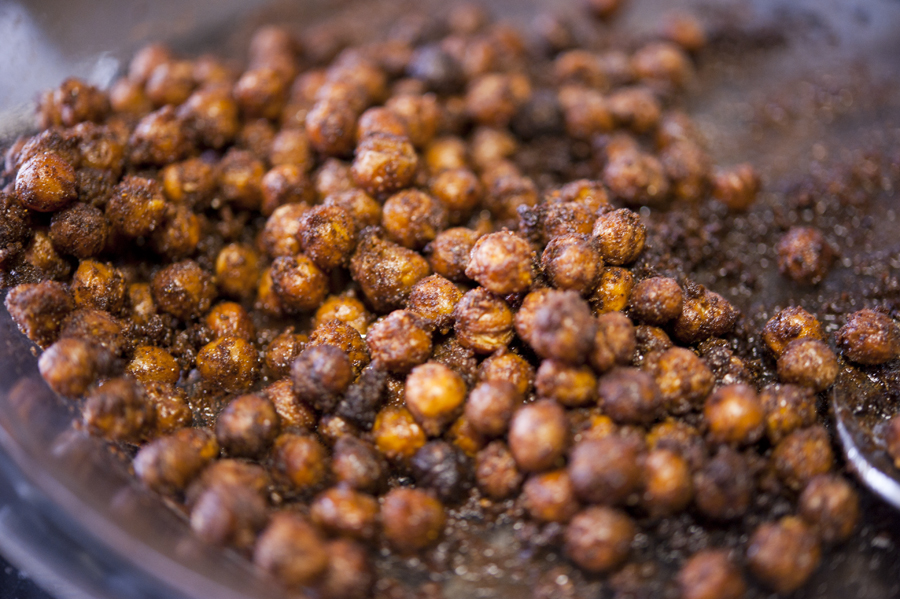
As you mix, the ingredients will go from dry to a spicy syrup and begin to coat the chickpeas evenly.


Tasty Kitchen Blog: Spicy Moroccan Chickpeas. Guest post by Georgia Pellegrini, recipe submitted by TK member Nika of I'm Not Quite Sure What You Are Saying ...

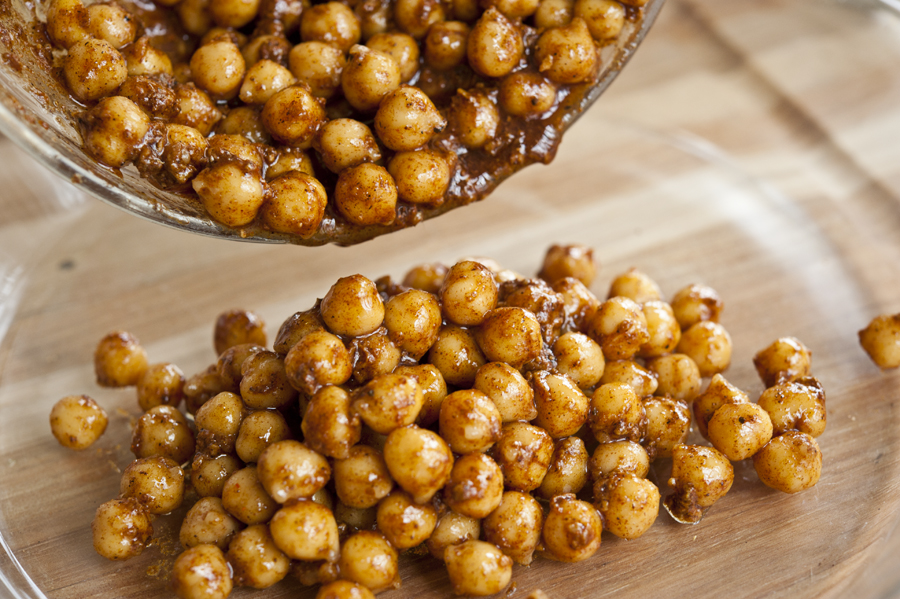
When they look well-coated, pour them all into a baking dish.


Tasty Kitchen Blog: Spicy Moroccan Chickpeas. Guest post by Georgia Pellegrini, recipe submitted by TK member Nika of I'm Not Quite Sure What You Are Saying ...

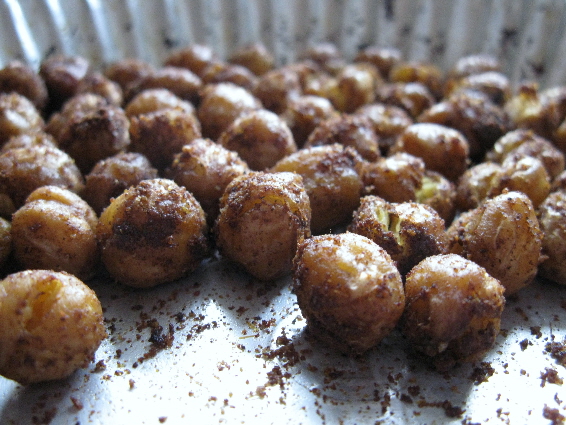
Spread them evenly with a spoon, and pop them into the oven.


Tasty Kitchen Blog: Spicy Moroccan Chickpeas. Guest post by Georgia Pellegrini, recipe submitted by TK member Nika of I'm Not Quite Sure What You Are Saying ...

When they are ready, they will be golden brown with a vaguely soft inside, which should dry out and become crisp as they cool. If that doesn’t happen, you can pop them back in for a bit longer. I found that mine needed about 45 minutes total rather than 30. I also would suggest cutting the salt amount in half. You can always add more later, when they’re done.


Tasty Kitchen Blog: Spicy Moroccan Chickpeas. Guest post by Georgia Pellegrini, recipe submitted by TK member Nika of I'm Not Quite Sure What You Are Saying ...

They’re quite a delicious snack to have sitting at your fingertips. You could also try other favorite beans. I had toasted black-eyed peas not long ago and they were great as well.

Give these a try! And thanks to Nika (who blogs at I’m Not Quite Sure What You Are Saying) for contributing them to Tasty Kitchen.

 
Here are some other wonderful roasted chickpea recipes from TK members:


Printable Recipe

Spicy Moroccan Roasted Chickpeas

5.00 Mitt(s) 2 Rating(s)2 votes, average: 5.00 out of 52 votes, average: 5.00 out of 52 votes, average: 5.00 out of 52 votes, average: 5.00 out of 52 votes, average: 5.00 out of 5

Prep Time:

Cook Time:

Difficulty: Easy

Servings: 4

4
x

Print Options

Page size Letter 3x5 4x6
Text Size Small Medium Large
Content Include description
Include prep time, etc.
Show image

Description

This is a delicious and healthy alternative to the usual “I’m watching (insert favourite show) and need a really tasty snack.” It can be made with a combination of your favourite herbs and spices. This recipe is just one example.

Ingredients

  • 1 can (15 Oz. Can) Chickpeas
  • ¼ cups Olive Oil
  • ½ teaspoons Curry Powder
  • ½ teaspoons Allspice
  • ½ teaspoons Ground Cloves
  • ½ teaspoons Pumpkin Pie Spice (optional... If You Have It In Your Spice Rack, Use It!)
  • 2 teaspoons Cinnamon
  • ½ teaspoons Cayenne Powder (or More... If You Are The Spicy Type!)
  • 2 teaspoons Fresh Grated Ginger
  • 2 teaspoons Sea Salt

Preparation Instructions

Preheat the oven to 400ºF.

Toss the chickpeas in oil, then put them into a bowl. Combine all the spices in a separate little bowl for your spice blend. Give it a good mix, then sprinkle over the chickpeas, and toss to coat evenly.

Put the chickpeas onto a baking sheet and into the oven for about 30 minutes. About halfway through, give them a bit of a shake. At the end of the 30 minutes, taste! If they are still soft, back in they go! You want them to have just a little bit of a soft center. When they cool, they will crisp up more.


_______________________________________

There’s so much to say about Georgia, we don’t know where to start. Leaving Wall Street for the French Culinary Institute, followed by a stint at the Gramercy Tavern and La Chassagnette in France, her passion for food and food traditions are evident and inspiring. Visit her site at Georgia Pellegrini, where you’ll find more recipes, photos, learn all about her wonderful book Food Heroes, and enjoy her latest adventures.


Profile photo of twopeasandtheirpod

Chocolate Chip Waffles

Posted by in Step-by-Step Recipes

Tasty Kitchen Blog: Chocolate Chip Waffles. Guest post by Maria Lichty of Two Peas and Their Pod, recipe submitted by TK member Robyn Stone of Add A Pinch.

 
Our breakfasts are usually simple during the week: oatmeal, toast, cereal, or yogurt and fruit. On the weekends, we like to splurge and make a special breakfast meal. We usually rotate pancakes, French toast, omelets, and waffles. When it is Josh’s turn to choose, he almost always picks waffles. He recently asked if we could make Chocolate Chip Waffles for breakfast and of course I said yes. Chocolate for breakfast? Count me in!

We searched Tasty Kitchen for a recipe and found Tasty Kitchen member Add a Pinch’s recipe for Chocolate Chip Waffles. I love Robyn’s blog, so I knew these waffles were going to be good. 


Tasty Kitchen Blog: Chocolate Chip Waffles. Guest post by Maria Lichty of Two Peas and Their Pod, recipe submitted by TK member Robyn Stone of Add A Pinch.

To make the waffles, you will need flour, salt, sugar, baking soda, chocolate chips, buttermilk, eggs, butter, and vanilla extract. Note: we halved the recipe because there are only two of us. 


Tasty Kitchen Blog: Chocolate Chip Waffles. Guest post by Maria Lichty of Two Peas and Their Pod, recipe submitted by TK member Robyn Stone of Add A Pinch.

In a large bowl, whisk together flour, salt, sugar, and baking soda. 


Tasty Kitchen Blog: Chocolate Chip Waffles. Guest post by Maria Lichty of Two Peas and Their Pod, recipe submitted by TK member Robyn Stone of Add A Pinch.

Add in the chocolate chips and coat well with the flour mixture. 


Tasty Kitchen Blog: Chocolate Chip Waffles. Guest post by Maria Lichty of Two Peas and Their Pod, recipe submitted by TK member Robyn Stone of Add A Pinch.

In a small bowl or glass measuring cup, mix together buttermilk, eggs, butter, and vanilla extract. 


Tasty Kitchen Blog: Chocolate Chip Waffles. Guest post by Maria Lichty of Two Peas and Their Pod, recipe submitted by TK member Robyn Stone of Add A Pinch.

Pour liquid ingredients over dry ingredients. 


Tasty Kitchen Blog: Chocolate Chip Waffles. Guest post by Maria Lichty of Two Peas and Their Pod, recipe submitted by TK member Robyn Stone of Add A Pinch.

Mix until just combined. 


Tasty Kitchen Blog: Chocolate Chip Waffles. Guest post by Maria Lichty of Two Peas and Their Pod, recipe submitted by TK member Robyn Stone of Add A Pinch.

Pour batter onto a hot waffle iron.


Tasty Kitchen Blog: Chocolate Chip Waffles. Guest post by Maria Lichty of Two Peas and Their Pod, recipe submitted by TK member Robyn Stone of Add A Pinch.

Cook according to manufacturer’s instructions. 


Tasty Kitchen Blog: Chocolate Chip Waffles. Guest post by Maria Lichty of Two Peas and Their Pod, recipe submitted by TK member Robyn Stone of Add A Pinch.

Serve warm with your favorite syrup and toppings. 


Tasty Kitchen Blog: Chocolate Chip Waffles. Guest post by Maria Lichty of Two Peas and Their Pod, recipe submitted by TK member Robyn Stone of Add A Pinch.

 
The waffles made our kitchen smell like chocolate chip cookies. The waffles are light, fluffy, and dotted with chocolate chips. We both devoured our plate of waffles. Next time, I am going to make them for dessert. I think they would be delicious with a scoop of vanilla ice cream on top. Mmmm!

Thanks Robyn for a fantastic recipe! Chocolate Chip Waffles are the perfect breakfast treat. Visit her blog, Add A Pinch, for more of her great recipes and photography!


Printable Recipe

Chocolate Chip Waffles

See post on addapinch | Robyn Stone’s site!
5.00 Mitt(s) 5 Rating(s)5 votes, average: 5.00 out of 55 votes, average: 5.00 out of 55 votes, average: 5.00 out of 55 votes, average: 5.00 out of 55 votes, average: 5.00 out of 5

Prep Time:

Cook Time:

Difficulty: Easy

Servings: 8

8
x

Print Options

Page size Letter 3x5 4x6
Text Size Small Medium Large
Content Include description
Include prep time, etc.
Show image

Description

America’s favorite cookie comes to breakfast!

Ingredients

  • 4 cups Flour, All Purpose
  • 1 teaspoon Salt
  • 3 Tablespoons Sugar
  • 3 teaspoons Baking Soda
  • 1-½ cup Chocolate Chips
  • 4 cups Buttermilk
  • 4 whole Eggs
  • 1 stick Butter, Melted
  • 1 teaspoon Vanilla

Preparation Instructions

1. Whisk together flour, salt, sugar, and baking soda. Toss in chocolate chips and coat well with flour mixture.

2. Mix together buttermilk, eggs, butter, and vanilla. Pour into dry mixture and stir together just until combined. Pour batter into a waffle iron and cook to your iron’s instructions.

3. Serve immediately with your favorite syrup.


_______________________________________

Maria and her husband Josh (who she affectionately refers to as her “dough boy”) blog at Two Peas and Their Pod. They’ve been featured on Saveur, Eatocracy, Gourmet Live, Glamour, and the Los Angeles Times, to name just a few. We’re so glad to have them here!


Profile photo of missamy

Brie and Bacon Quiche

Posted by in Step-by-Step Recipes

Tasty Kitchen Blog: Brie and Bacon Quiche. Guest post by Amy Johnson of She Wears Many Hats, recipe submitted by TK member Nancy (nancyinnewmexico).

 
Quiche may be considered the quintessential fare for Mother’s Day, a bridal luncheon, or any event centered around food and women. But my husband was quite swept away by this Brie and Bacon Quiche from Tasty Kitchen member Nancy in New Mexico. And, yes, he’s a real man, apparently a real man who recognizes an excellent quiche when he tastes it.

Quiche is so flexible. Over the years I’ve prepared many combinations, except this one. After one bite it seemed so obvious. Brie and bacon. Bacon and brie. Why hadn’t I thought of the duo before? They certainly make for a good marriage. But you just need to see for yourself. Wanna see how?


Tasty Kitchen Blog: Brie and Bacon Quiche. Guest post by Amy Johnson of She Wears Many Hats, recipe submitted by TK member Nancy (nancyinnewmexico).

To get started you’ll need a deep dish pie crust (I used a 9″), Brie cheese, Swiss cheese, cooked and crumbled bacon, eggs, whipping cream, sour cream, Worcestershire sauce, nutmeg, salt and pepper.


Tasty Kitchen Blog: Brie and Bacon Quiche. Guest post by Amy Johnson of She Wears Many Hats, recipe submitted by TK member Nancy (nancyinnewmexico).

Begin by crumbling the cheese (or shredding, or cutting) and placing it in the bottom of the pie shell. I did not pre-bake my pie shell, because the, yep, frozen one from the grocery store didn’t instruct me to do so. I’m sure many of you have a fabulous pie crust you can whip up and use just as easily.

And just curious, while on the subject, what’s the rule for pre-baking or not pre-baking a pie crust? That always stumps me.

Moving right along …


Tasty Kitchen Blog: Brie and Bacon Quiche. Guest post by Amy Johnson of She Wears Many Hats, recipe submitted by TK member Nancy (nancyinnewmexico).

Next, top the cheese with the crumbled bacon.


Tasty Kitchen Blog: Brie and Bacon Quiche. Guest post by Amy Johnson of She Wears Many Hats, recipe submitted by TK member Nancy (nancyinnewmexico).

Now for some light mixing. In a bowl, beat the eggs, then add the nutmeg, salt, pepper, Worcestershire, whipping cream, and sour cream.


Tasty Kitchen Blog: Brie and Bacon Quiche. Guest post by Amy Johnson of She Wears Many Hats, recipe submitted by TK member Nancy (nancyinnewmexico).

Mix it all up real good.


Tasty Kitchen Blog: Brie and Bacon Quiche. Guest post by Amy Johnson of She Wears Many Hats, recipe submitted by TK member Nancy (nancyinnewmexico).

Pour the egg mixture over the cheese- and bacon-filled pie shell, then bake according to recipe directions (the link to the entire printable recipe is at the bottom of this post).


Tasty Kitchen Blog: Brie and Bacon Quiche. Guest post by Amy Johnson of She Wears Many Hats, recipe submitted by TK member Nancy (nancyinnewmexico).

Golden perfection. No runny quiche here. Perfect proportions for this recipe.


Tasty Kitchen Blog: Brie and Bacon Quiche. Guest post by Amy Johnson of She Wears Many Hats, recipe submitted by TK member Nancy (nancyinnewmexico).

 
Beautiful and tasty. Thanks Nancy in New Mexico for sharing this yummy recipe. I think real men all over the world will be very pleased, and, of course, us ladies too.

And here’s one final quick tip: make two.

Happy cooking!


Printable Recipe

Brie and Bacon Quiche

See post on Nancy in New Mexico’s site!
4.71 Mitt(s) 14 Rating(s)14 votes, average: 4.71 out of 514 votes, average: 4.71 out of 514 votes, average: 4.71 out of 514 votes, average: 4.71 out of 514 votes, average: 4.71 out of 5

Prep Time:

Cook Time:

Difficulty: Easy

Servings: 6

6
x

Print Options

Page size Letter 3x5 4x6
Text Size Small Medium Large
Content Include description
Include prep time, etc.
Show image

Description

Delicious recipe that incorporates creamy Brie cheese, Swiss cheese, and crispy bacon.

Ingredients

  • 1 package Deep Dish Pie Crust, Pre-baked If Instructed
  • 4 ounces, weight Brie Cheese (rind Removed If Preferred)
  • 4 ounces, weight Swiss Cheese, Diced
  • 10 slices Bacon, Cooked Crisp, Drained, Crumbled
  • 6 whole Large Eggs
  • ½ cups Whipping Cream
  • ½ cups Sour Cream
  • 1 teaspoon Worcestershire Sauce
  • 1 dash Each Nutmeg, Salt, Pepper

Preparation Instructions

Crumble cheeses in the bottom of the pie. Spread crumbled bacon on top. Mix all remaining ingredients thoroughly and pour into the pie pan.

Bake in a preheated 375 degree F oven for about 45 minutes, until a pick inserted in the center comes out clean. Cool slightly before serving.


_______________________________________

Amy Johnson is a blogger who writes about food, travel, the home (both inside and out), and various observations and random musings about anything and everything. Visit her blog She Wears Many Hats for a dose of deliciousness, practicality, hilarity, or just plain fun. She lives in South Carolina with her husband and two children.


Profile photo of Erica Lea

Rosemary and Thyme Spread

Posted by in Step-by-Step Recipes

Tasty Kitchen Blog: Rosemary and Thyme Spread. Guest post and recipe from Erica Kastner of Cooking for Seven.

 
Five. Simple. Ingredients. Seriously! That’s all that goes into this ultra-simple yet super-yummy dip. You’ll weep when you realize how easily it comes together. Okay, maybe you won’t have quite that emotional reaction, but you’re sure to be pleased at how quickly you’ll have it on the table.

Let me show you how!


Tasty Kitchen Blog: Rosemary and Thyme Spread. Guest post and recipe from Erica Kastner of Cooking for Seven.

Here are the five simple ingredients: cream cheese, dried rosemary, dried thyme, garlic powder, and freshly ground black pepper.


Tasty Kitchen Blog: Rosemary and Thyme Spread. Guest post and recipe from Erica Kastner of Cooking for Seven.

Place the cream cheese in a bowl and mash it around a bit with a fork.


Tasty Kitchen Blog: Rosemary and Thyme Spread. Guest post and recipe from Erica Kastner of Cooking for Seven.

Add 1 teaspoon of dried rosemary …


Tasty Kitchen Blog: Rosemary and Thyme Spread. Guest post and recipe from Erica Kastner of Cooking for Seven.

1/2 teaspoon dried thyme …


Tasty Kitchen Blog: Rosemary and Thyme Spread. Guest post and recipe from Erica Kastner of Cooking for Seven.

And 1/4 teaspoon of garlic powder.


Tasty Kitchen Blog: Rosemary and Thyme Spread. Guest post and recipe from Erica Kastner of Cooking for Seven.

Grind in some black pepper.


Tasty Kitchen Blog: Rosemary and Thyme Spread. Guest post and recipe from Erica Kastner of Cooking for Seven.

Here are your five ingredients in all their glory.


Tasty Kitchen Blog: Rosemary and Thyme Spread. Guest post and recipe from Erica Kastner of Cooking for Seven.

Mash it around with your fork until well mixed.


Tasty Kitchen Blog: Rosemary and Thyme Spread. Guest post and recipe from Erica Kastner of Cooking for Seven.

All mixed up.


Tasty Kitchen Blog: Rosemary and Thyme Spread. Guest post and recipe from Erica Kastner of Cooking for Seven.

Spread on your favorite crackers. Enjoy!


Tasty Kitchen Blog: Rosemary and Thyme Spread. Guest post and recipe from Erica Kastner of Cooking for Seven.

 
Notes:
 
1. This spread is best if you allow it to come to room temperature. This really allows you to taste the flavors.

2. It’s best to choose crackers without a lot of extra flavor so they don’t overpower the dip.

3. If you wish, you could try using fresh ingredients instead of dry. However, you will need to increase the amounts since dried herbs are more “concentrated.”


Printable Recipe

Rosemary & Thyme Spread

See post on Erica Lea’s site!
5.00 Mitt(s) 4 Rating(s)4 votes, average: 5.00 out of 54 votes, average: 5.00 out of 54 votes, average: 5.00 out of 54 votes, average: 5.00 out of 54 votes, average: 5.00 out of 5

Prep Time:

Cook Time:

Difficulty: Easy

Servings: 8

8
x

Print Options

Page size Letter 3x5 4x6
Text Size Small Medium Large
Content Include description
Include prep time, etc.
Show image

Description

A delicious blend of spices and cream cheese.

Ingredients

  • 8 ounces, weight Cream Cheese
  • 1 teaspoon Dried Rosemary
  • ½ teaspoons Dried Thyme
  • ¼ teaspoons Garlic Powder
  • ¼ teaspoons Ground Black Pepper

Preparation Instructions

Mix all ingredients together thoroughly. Taste and adjust seasonings if needed. Serve with crackers, toast, or crostini.


_______________________________________

Erica Berge shares her wonderful recipes and amazing food photography on her blog, Cooking for Seven. She also writes about crafts and posts more of her beautiful photography in her personal blog, EricaLea.com. There really isn’t much that this amazing young lady can’t do, and we’re thrilled she does some of it here.


Profile photo of Natalie | Perry's Plate

Lamb Tostadas

Posted by in Step-by-Step Recipes

  Ah, lamb. I must admit, I haven’t eaten a lot of lamb in my life. My grandpa was a sheep farmer before he passed away, and my parents ate quite a bit of mutton meals in their home during the early years of marriage. My mom always thought mutton (and lamb) smelled funny, so […]

Profile photo of EatLiveRun

Hawaiian BBQ Pulled Chicken Sandwiches

Posted by in Step-by-Step Recipes

  A couple months back, I finally caved and bought my first slow cooker. It was only twenty dollars at Target and I couldn’t wait to get home and start making delicious barbecue and one-pot meals with it that I didn’t have to worry about during the day. Well, typical me only made one meal […]

Profile photo of ThreeManyCooks

Old-Fashioned Oatmeal Cake

Posted by in Baking, Step-by-Step Recipes

  This Old-fashioned Oatmeal Cake with Broiled Topping called out to me because I love simple, no fuss cakes that can be thrown together quickly and aren’t overly sweet. But more than the cake, I love the headnote Tasty Kitchen member Brandi N wrote. She found the hand-written recipe for this cake in her grandmother’s old tin […]

Profile photo of missamy

French Coconut Pie

Posted by in Baking, Step-by-Step Recipes

  I think when you hear “easy as pie” it’s in reference to this pie—this very pie, French Coconut Pie, submitted by eastmemphismama. This pie is as easy as is it gets, and mighty, mighty good too. I mean real, real, good. Like “slap your pappy, call the news, hide in the closet to eat […]