The Pioneer Woman Tasty Kitchen
Profile photo of missamy

Zhong-Xi Breakfast

Posted by in Step-by-Step Recipes

Tasty Kitchen Blog: Zhong-Xi Breakfast. Guest post by Amy Johnson of She Wears Many Hats, recipe submitted by TK member Dani of Expat Cucina.

 
Most mornings around here begin with an egg of some form. I’m pretty spoiled with a husband who cooks a mean omelet. It’s not something I take for granted. It’s a mighty nice way to start the day. We’re always trying to mix things up by trying different cheeses and toppings. Omelets are flexible that way. So my interest was piqued when I ran across this recipe for Zhong-Xi Breakfast here from Tasty Kitchen member Dani a few weeks ago. I actually made it for lunch to try out before introducing it into our breakfast mix. It’s a simple mix of ingredients which honestly I didn’t expect much from, but the flavor created by the ginger and garlic, combined with the oh-my-word-tasty cooking oil is quite satisfying. The hubby will be pleased when I surprise him with breakfast for a change with this one. It’s quick and easy. Let me show you how.


Tasty Kitchen Blog: Zhong-Xi Breakfast. Guest post by Amy Johnson of She Wears Many Hats, recipe submitted by TK member Dani of Expat Cucina.

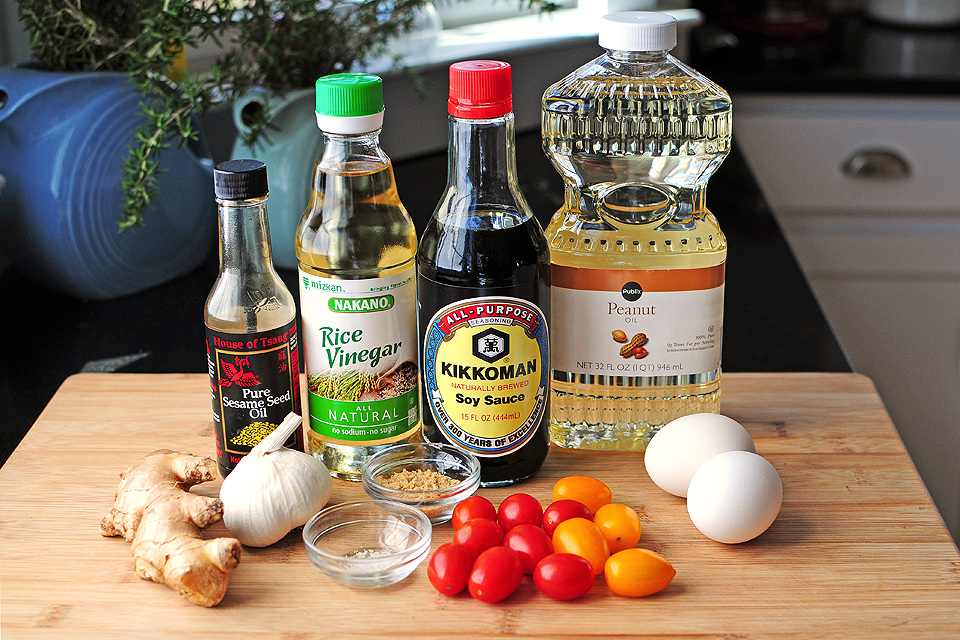
You’ll need eggs, salt, peanut oil, chopped garlic and ginger, brown sugar, red and yellow cherry tomatoes, soy sauce, rice vinegar, sesame oil, and chopped parsley (not shown—oops!).


Tasty Kitchen Blog: Zhong-Xi Breakfast. Guest post by Amy Johnson of She Wears Many Hats, recipe submitted by TK member Dani of Expat Cucina.

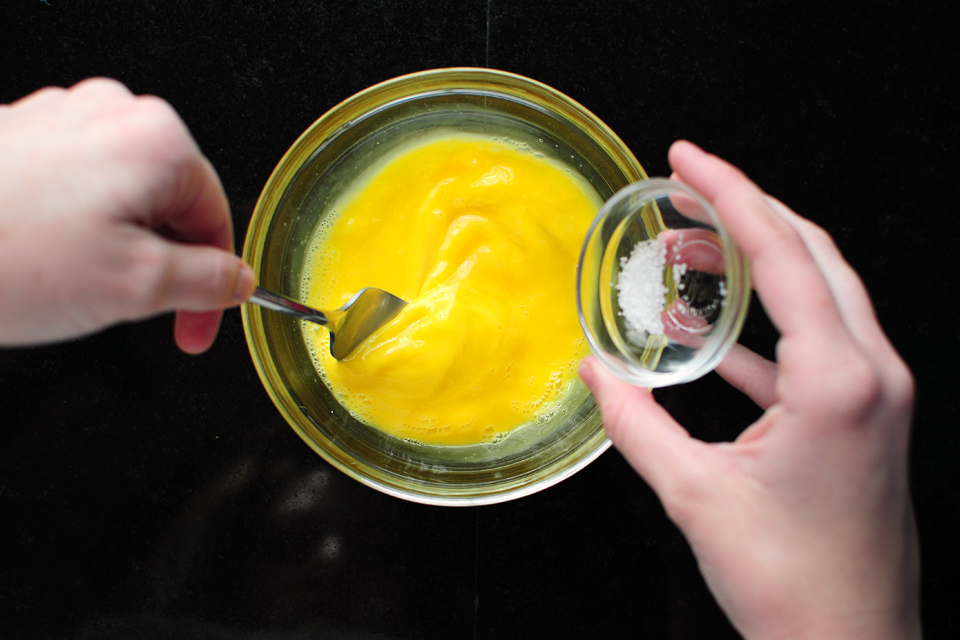
Begin by beating the eggs with the salt.


Tasty Kitchen Blog: Zhong-Xi Breakfast. Guest post by Amy Johnson of She Wears Many Hats, recipe submitted by TK member Dani of Expat Cucina.

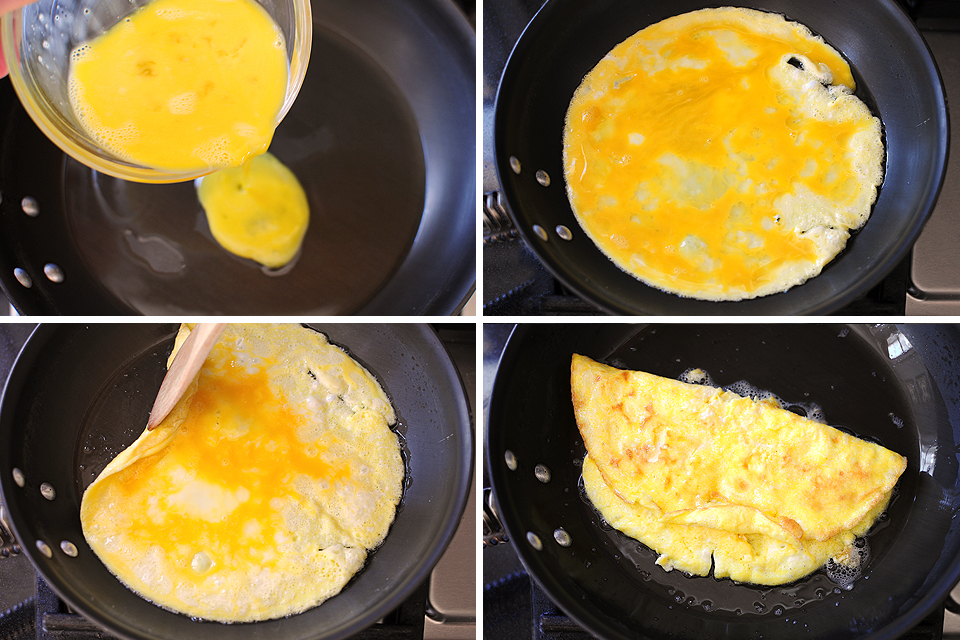
The omelet portion moves really quick. Heat a portion of the peanut oil in a skillet. Once the oil is hot, pour in the beaten eggs. Let cook for about a minute (see note below). Pull one edge of the omelet to the side so the uncooked eggs can reach the pan. When eggs are almost cooked but center is still soft, fold omelet in half and place on a plate to wait for the yummy toppings.

(Note: My favorite egg-cooking skillet cooks quickly so I should’ve let it go less than a minute. Adjust the cooking time for your stove and skillet.)


Tasty Kitchen Blog: Zhong-Xi Breakfast. Guest post by Amy Johnson of She Wears Many Hats, recipe submitted by TK member Dani of Expat Cucina.

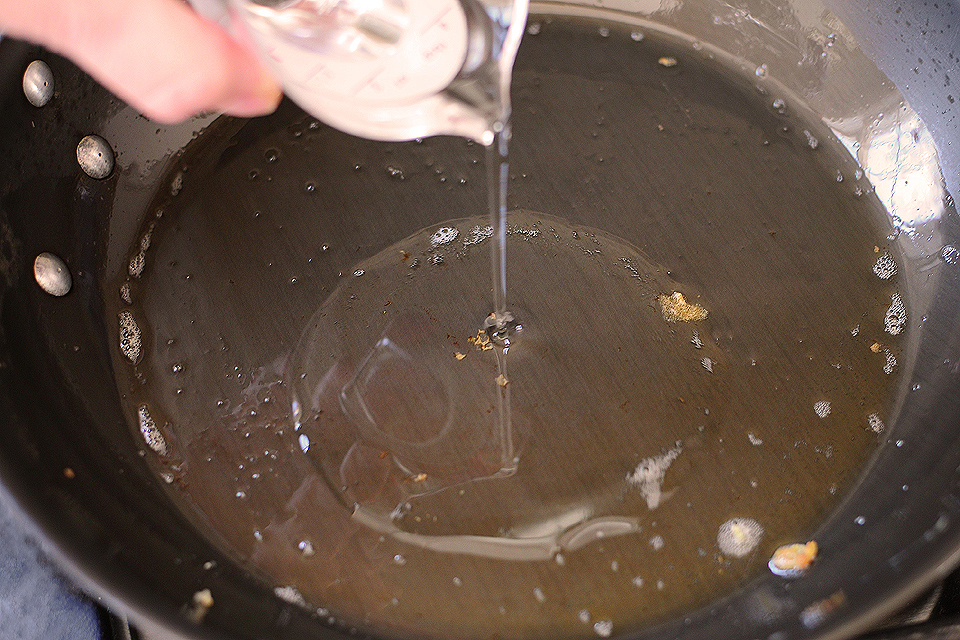
Don’t wash that skillet just yet! Add the remaining peanut oil and heat until hot.


Tasty Kitchen Blog: Zhong-Xi Breakfast. Guest post by Amy Johnson of She Wears Many Hats, recipe submitted by TK member Dani of Expat Cucina.

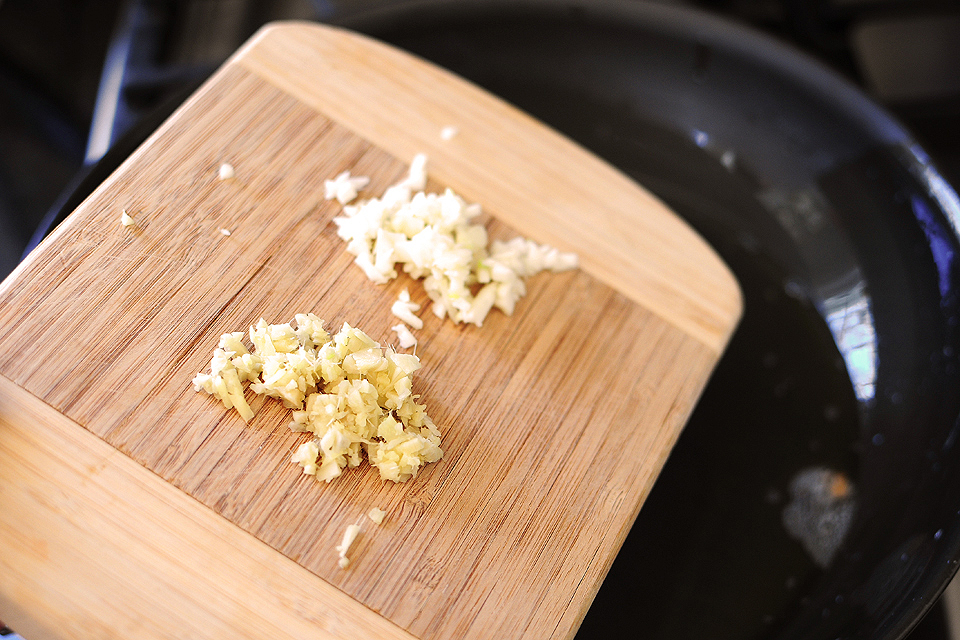
Add in the garlic and ginger and sauté for about a minute, stirring constantly.


Tasty Kitchen Blog: Zhong-Xi Breakfast. Guest post by Amy Johnson of She Wears Many Hats, recipe submitted by TK member Dani of Expat Cucina.

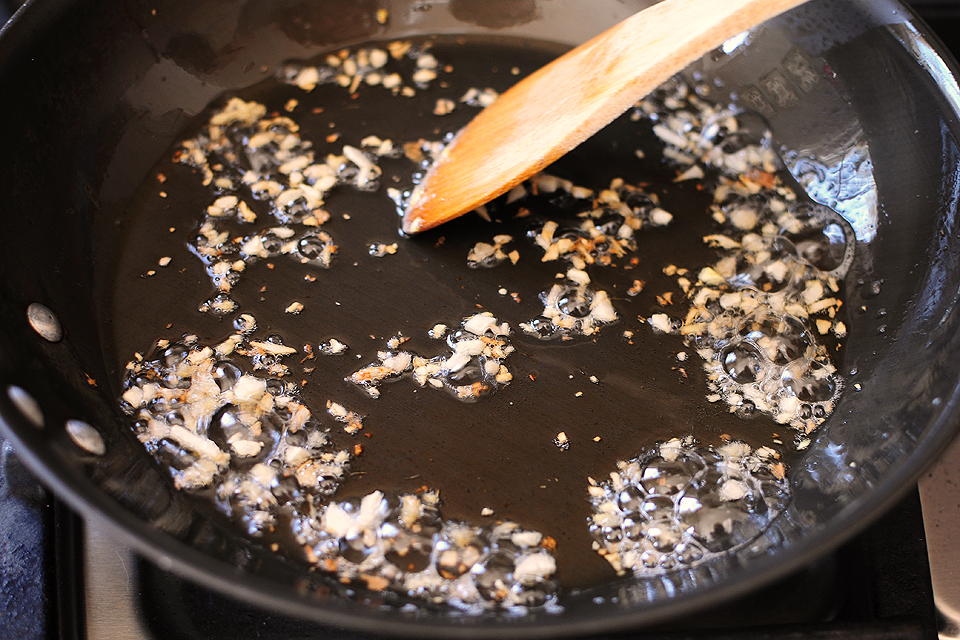
Garlic can burn very quickly at high heat, so be careful to watch for the garlic burning. Mine got a bit on the dark side, but it was still nice.


Tasty Kitchen Blog: Zhong-Xi Breakfast. Guest post by Amy Johnson of She Wears Many Hats, recipe submitted by TK member Dani of Expat Cucina.

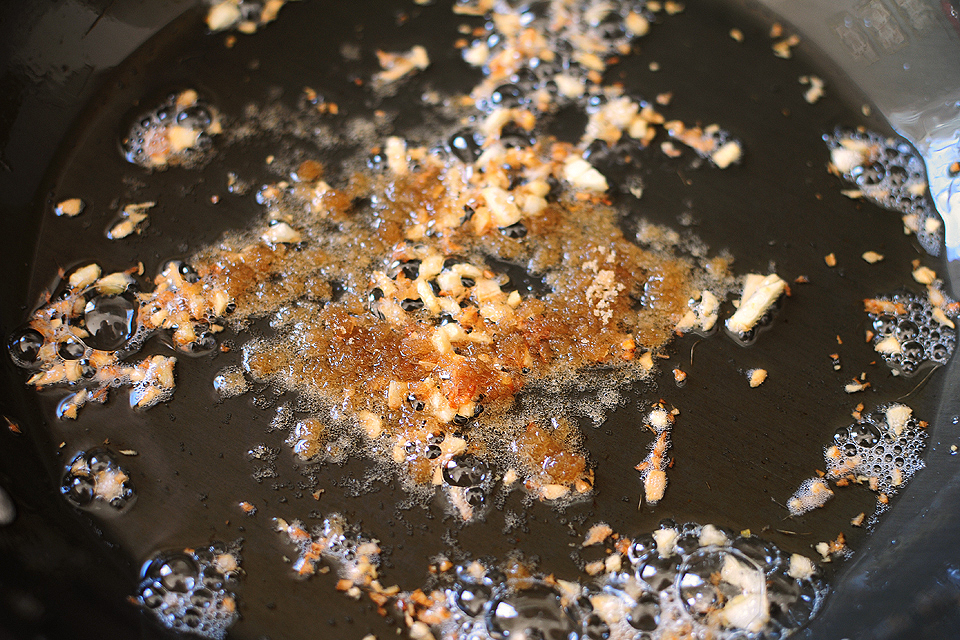
The brown sugar goes in next. Mix together.


Tasty Kitchen Blog: Zhong-Xi Breakfast. Guest post by Amy Johnson of She Wears Many Hats, recipe submitted by TK member Dani of Expat Cucina.

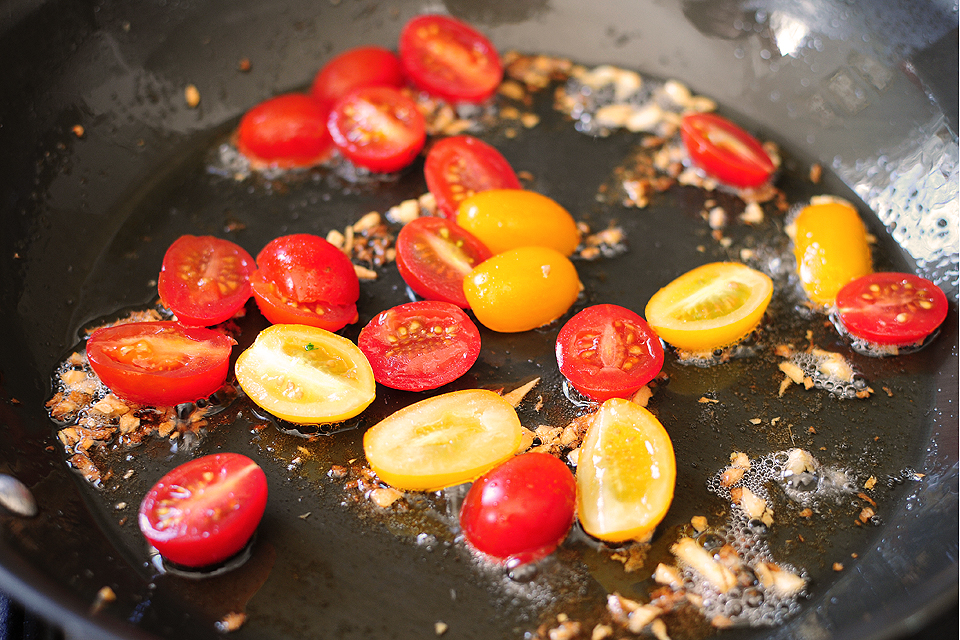
Next, the tomatoes. So much happy color to start the day with! Cook the tomatoes for about a minute or so, until they start getting soft.


Tasty Kitchen Blog: Zhong-Xi Breakfast. Guest post by Amy Johnson of She Wears Many Hats, recipe submitted by TK member Dani of Expat Cucina.

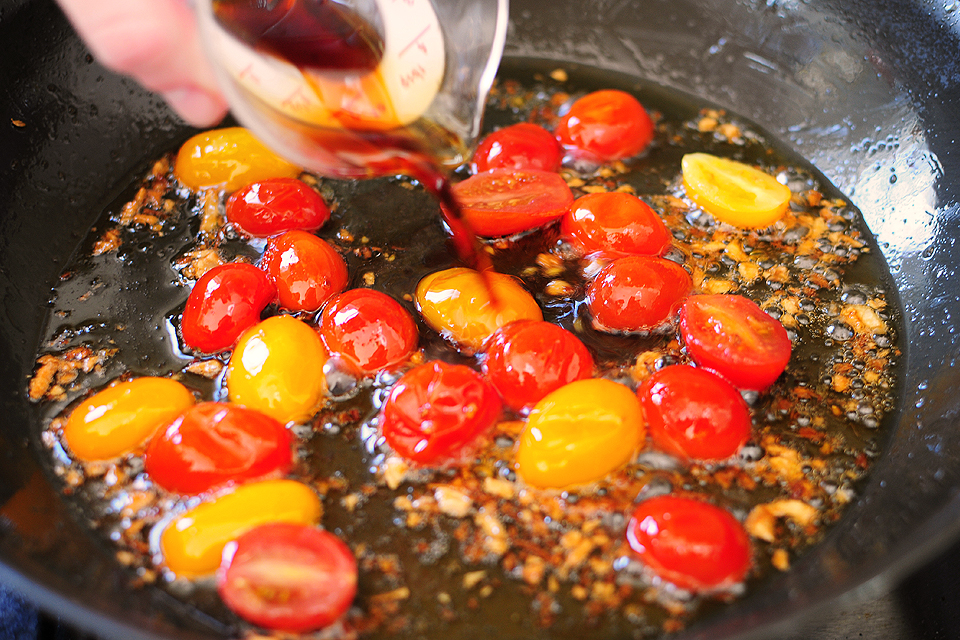
Now pull it altogether with the soy sauce, rice vinegar, and sesame oil. Can you smell it? Oh my. Stir all together.


Tasty Kitchen Blog: Zhong-Xi Breakfast. Guest post by Amy Johnson of She Wears Many Hats, recipe submitted by TK member Dani of Expat Cucina.

Remove from heat and pour the tomatoes with the cooking oil on top of the patiently waiting omelet. Garnish with freshly chopped parsley and enjoy!

If you prep the ingredients the night before, chopping the garlic and ginger and tomatoes, you can have this omelet done in no time. Such a great way to dress up a simple omelet.

Many thanks to Dani of the blog Expat Cucina for sharing this flavorful way to start the day.


Printable Recipe

Zhong-Xi Breakfast

5.00 Mitt(s) 1 Rating(s)1 vote, average: 5.00 out of 51 vote, average: 5.00 out of 51 vote, average: 5.00 out of 51 vote, average: 5.00 out of 51 vote, average: 5.00 out of 5

Prep Time:

Cook Time:

Difficulty: Easy

Servings: 1

1
x

Print Options

Page size Letter 3x5 4x6
Text Size Small Medium Large
Content Include description
Include prep time, etc.
Show image

Description

Zhong-Xi in Chinese means East-West. This recipe takes a bit from the East (in the soy sauce, sesame oil and ginger) and a bit from the West. Try these eggs tomorrow for breakfast!

Ingredients

  • 2 whole Eggs
  • 1 pinch Salt
  • 3 Tablespoons Peanut Oil
  • 1 clove Garlic, Finely Chopped
  • 1 teaspoon Finely Chopped Ginger
  • 1 teaspoon Brown Sugar
  • 3 whole Red Cherry Tomatoes, Washed And Cut In Half
  • 1 teaspoon Soy Sauce
  • 1 teaspoon Rice Vinegar
  • 1 teaspoon Sesame Oil
  • 4 whole Yellow Cherry Tomatoes
  • 1 Tablespoon Chopped Parsley

Preparation Instructions

In a bowl, lightly beat eggs with a pinch of salt.

In a skillet, heat 1 tablespoon of peanut oil. When hot, pour in the eggs.Let cook for a minute or so, till the eggs start solidifying. Then with a wooden spoon, push the edge in so that the soggy, uncooked eggs can touch the pan. When the eggs are almost cooked but the center is still soft, fold your omelet in half and place it on a plate.

In the same skillet (don’t wash it), add the remaining 2 tablespoons of peanut oil and heat till really hot. Throw in chopped garlic and ginger, stir for a minute or so. Then add the sugar and let it caramelize. Add in the tomatoes and cook till they start getting soft (about 1 minute). Pour in soy sauce, rice vinegar and sesame oil; stir all the ingredients together. Remove from heat and pour the tomatoes with its cooking oil on top of your omelet.

Garnish with freshly chopped parsley.


_______________________________________

Amy Johnson is a blogger who writes about food, travel, the home (both inside and out), and various observations and random musings about anything and everything. Visit her blog She Wears Many Hats for a dose of deliciousness, practicality, hilarity, or just plain fun. She lives in South Carolina with her husband and two children.


Profile photo of missamy

Dark Chocolate Banana Bread (with Coconut)

Posted by in Baking, Step-by-Step Recipes

Tasty Kitchen Blog: Dark Chocolate Banana Bread (with Coconut). Guest post by Amy Johnson of She Wears Many Hats, recipe submitted by TK members Chrissy and Lauren of Little Yellow Kitchen.

 
Combinations of chocolate and coconut hardly go unnoticed around here, so when I saw this recipe for Dark Chocolate Banana Bread (with Coconut) from Tasty Kitchen members Chrissy and Lauren, I just had to try it. I had to. The line between “need” and “want” gets kind of blurred when chocolate is involved. And dark chocolate in moderation can be a healthy thing, don’t cha know?


Tasty Kitchen Blog: Dark Chocolate Banana Bread (with Coconut). Guest post by Amy Johnson of She Wears Many Hats, recipe submitted by TK members Chrissy and Lauren of Little Yellow Kitchen.

Overall this bread may look sinful, but considering the list of ingredients, it’s on the healthier side: dark chocolate, flour, cocoa powder, baking powder, baking soda, salt, cinnamon, eggs, brown sugar, Greek yogurt, coconut oil, overripe bananas, shredded coconut, and a little turbinado sugar.

(Just so you know, I made a couple of substitutions using what I had on hand: all-purpose white flour instead of whole wheat, and sweetened shredded coconut for the unsweetened coconut.)

Begin by preheating your oven to 350°F and preparing a 9x5x3″ (or thereabouts) baking pan.


Tasty Kitchen Blog: Dark Chocolate Banana Bread (with Coconut). Guest post by Amy Johnson of She Wears Many Hats, recipe submitted by TK members Chrissy and Lauren of Little Yellow Kitchen.

Chop the dark chocolate. Don’t eat any! The cake needs it.


Tasty Kitchen Blog: Dark Chocolate Banana Bread (with Coconut). Guest post by Amy Johnson of She Wears Many Hats, recipe submitted by TK members Chrissy and Lauren of Little Yellow Kitchen.

In a double boiler or in the microwave, melt the dark chocolate and set aside.


Tasty Kitchen Blog: Dark Chocolate Banana Bread (with Coconut). Guest post by Amy Johnson of She Wears Many Hats, recipe submitted by TK members Chrissy and Lauren of Little Yellow Kitchen.

Sift together the flour, cocoa powder, baking powder, baking soda, salt and cinnamon. Set aside. (Shhh … don’t tell anyone, but I just whisked mine altogether. My sifter is wonky and leaks all over the place. Whisking worked just lovely for me.)


Tasty Kitchen Blog: Dark Chocolate Banana Bread (with Coconut). Guest post by Amy Johnson of She Wears Many Hats, recipe submitted by TK members Chrissy and Lauren of Little Yellow Kitchen.

Add the eggs and brown sugar to a large mixing bowl, and beat them together on medium speed.


Tasty Kitchen Blog: Dark Chocolate Banana Bread (with Coconut). Guest post by Amy Johnson of She Wears Many Hats, recipe submitted by TK members Chrissy and Lauren of Little Yellow Kitchen.

Look, an action shot! Beat for about 30 seconds.


Tasty Kitchen Blog: Dark Chocolate Banana Bread (with Coconut). Guest post by Amy Johnson of She Wears Many Hats, recipe submitted by TK members Chrissy and Lauren of Little Yellow Kitchen.

The Greek yogurt, coconut oil, and mashed bananas go in next for a little mixing.


Tasty Kitchen Blog: Dark Chocolate Banana Bread (with Coconut). Guest post by Amy Johnson of She Wears Many Hats, recipe submitted by TK members Chrissy and Lauren of Little Yellow Kitchen.

More action! Mix until well combined.


Tasty Kitchen Blog: Dark Chocolate Banana Bread (with Coconut). Guest post by Amy Johnson of She Wears Many Hats, recipe submitted by TK members Chrissy and Lauren of Little Yellow Kitchen.

On a low setting, gradually add in the flour mixture.


Tasty Kitchen Blog: Dark Chocolate Banana Bread (with Coconut). Guest post by Amy Johnson of She Wears Many Hats, recipe submitted by TK members Chrissy and Lauren of Little Yellow Kitchen.

Mix until just incorporated. Nice.


Tasty Kitchen Blog: Dark Chocolate Banana Bread (with Coconut). Guest post by Amy Johnson of She Wears Many Hats, recipe submitted by TK members Chrissy and Lauren of Little Yellow Kitchen.

Fold in the shredded coconut.

(Again, I used sweetened shredded coconut instead of the unsweetened called for in the recipe. I liked it with the added sweetness and didn’t feel it was overly sweet.)


Tasty Kitchen Blog: Dark Chocolate Banana Bread (with Coconut). Guest post by Amy Johnson of She Wears Many Hats, recipe submitted by TK members Chrissy and Lauren of Little Yellow Kitchen.

Evenly spread the batter in the prepared baking pan.


Tasty Kitchen Blog: Dark Chocolate Banana Bread (with Coconut). Guest post by Amy Johnson of She Wears Many Hats, recipe submitted by TK members Chrissy and Lauren of Little Yellow Kitchen.

Now for the healthy melted dark chocolate. Pour the melted chocolate over the batter.


Tasty Kitchen Blog: Dark Chocolate Banana Bread (with Coconut). Guest post by Amy Johnson of She Wears Many Hats, recipe submitted by TK members Chrissy and Lauren of Little Yellow Kitchen.

To swirl in the melted chocolate, drag a knife back and forth several times through the batter. Can you say “yum?”


Tasty Kitchen Blog: Dark Chocolate Banana Bread (with Coconut). Guest post by Amy Johnson of She Wears Many Hats, recipe submitted by TK members Chrissy and Lauren of Little Yellow Kitchen.

Sprinkle the top with more shredded coconut and the turbinado sugar.


Tasty Kitchen Blog: Dark Chocolate Banana Bread (with Coconut). Guest post by Amy Johnson of She Wears Many Hats, recipe submitted by TK members Chrissy and Lauren of Little Yellow Kitchen.

Bake until done (see recipe below for bake times). Notice the toasted coconut? Toasted coconut is one of the most delectable things ever. I could eat it as a snack. It’s lovely on this bread, but be careful to avoid burning the coconut while baking. If needed, loosely cover the top with foil the slow the toasting.


Tasty Kitchen Blog: Dark Chocolate Banana Bread (with Coconut). Guest post by Amy Johnson of She Wears Many Hats, recipe submitted by TK members Chrissy and Lauren of Little Yellow Kitchen.

This bread turned out wonderfully. It was so gorgeous I hated to cut it. But I did anyway.

I’ll be making this one again soon. Maybe in muffin form next time.

Thank you so much to the Chrissy and Lauren for sharing this new favorite with me and my family. Check out other wonderfulness over at their site: From the Little Yellow Kitchen.


Printable Recipe

Dark Chocolate Banana Bread (with Coconut)

See post on LittleYellowKitchen’s site!
5.00 Mitt(s) 2 Rating(s)2 votes, average: 5.00 out of 52 votes, average: 5.00 out of 52 votes, average: 5.00 out of 52 votes, average: 5.00 out of 52 votes, average: 5.00 out of 5

Prep Time:

Cook Time:

Difficulty: Easy

Servings: 12

12
x

Print Options

Page size Letter 3x5 4x6
Text Size Small Medium Large
Content Include description
Include prep time, etc.
Show image

Description

The best version of banana bread out there! The dark chocolate swirls and yummy coconut flavor make for the perfect complements to a classic.

Ingredients

  • 3 ounces, weight Dark Chocolate
  • 1-¾ cup White Whole Wheat Flour
  • ½ cups Cocoa Powder, Unsweetened
  • 1 teaspoon Baking Powder
  • ¾ teaspoons Baking Soda
  • ¼ teaspoons Salt
  • ½ teaspoons Cinnamon
  • 2 whole Large Eggs
  • ½ cups Packed Brown Sugar
  • ⅓ cups Greek Yogurt
  • ⅓ cups Coconut Oil, Melted/liquid
  • 3 whole Medium Overripe Bananas, Peeled And Mashed (3 Should Yield About 1 1/2 Cups)
  • ¾ cups Shredded Coconut, Unsweetened, Plus 3 Tablespoons More For The Top
  • 1 Tablespoon Turbinado Sugar, For The Top

Preparation Instructions

Preheat oven to 350 F. Lightly grease a 9x5x3 pan.

Finely chop the chocolate and melt it in the top of a double-boiler or in the microwave in 30 second increments, stirring in between each increment and continuing until melted. Set the melted chocolate aside.

In a medium bowl, sift the flour, cocoa powder, baking powder, baking soda, salt, and cinnamon; set aside.

In the bowl of your stand mixer, beat the eggs and sugar on medium speed for about 30 seconds. Add the yogurt, coconut oil and mashed bananas and mix until well combined. While mixing on low, slowly add the flour mixture until it’s just incorporated. Fold in the coconut.

Pour the batter into the greased pan and spread evenly. Pour the melted dark chocolate over the top, dragging a knife back and forth several times, until the chocolate is swirled throughout the entire loaf. Sprinkle the top with some shredded coconut and turbinado sugar.

Bake for about 50-60 minutes or until a toothpick inserted into the center of the loaf comes out clean. If the coconut on top looks like it is browning quickly, loosely place a piece a foil over the top to slow the toasting.

Remove pan from oven when done, and set it on a cooling rack. Let bread cool for 10 minutes in the pan. Then carefully remove it from pan and transfer to a wire rack to finish cooling before cutting into the loaf.


_______________________________________

Amy Johnson is a blogger who writes about food, travel, the home (both inside and out), and various observations and random musings about anything and everything. Visit her blog She Wears Many Hats for a dose of deliciousness, practicality, hilarity, or just plain fun. She lives in South Carolina with her husband and two children.


Profile photo of missamy

Healthy Black Bean Tostadas with Cilantro Sauce

Posted by in Step-by-Step Recipes

Tasty Kitchen Blog: Healthy Black Bean Tostadas with Cilantro Sauce. Guest post by Amy Johnson of She Wears Many Hats, recipe submitted by TK member Lindsay of Pinch of Yum.

 
Finding healthy go-to meal options that are quick without sacrificing flavor can sometimes be a challenge. Honestly, sometimes what I throw together for a meal isn’t always the best for you. This recipe from Tasty Kitchen member, Lindsay for Healthy Black Bean Tostadas with Cilantro Sauce can change all of that. This recipe can be totally prepped ahead and refrigerated to be able to put together later in under 10 minutes. And although I’ve made black bean tostadas before, the cilantro sauce in this recipe makes this recipe over the top in flavor. The sauce alone will be something that I make jars of to keep on hand for a salad dressing. Made with only plain Greek yogurt, garlic, cilantro and salt, it’s crazy low in calories. And it’s crazy good. And crazy easy. I’m not kidding. Crazy.


Tasty Kitchen Blog: Healthy Black Bean Tostadas with Cilantro Sauce. Guest post by Amy Johnson of She Wears Many Hats, recipe submitted by TK member Lindsay of Pinch of Yum.

To get started you’ll need: black beans, chili powder, cumin, cayenne pepper, water, cilantro leaves (not shown), plain Greek yogurt, garlic, salt, flour tortillas, diced tomatoes, avocado, and shredded lettuce.


Tasty Kitchen Blog: Healthy Black Bean Tostadas with Cilantro Sauce. Guest post by Amy Johnson of She Wears Many Hats, recipe submitted by TK member Lindsay of Pinch of Yum.

Whoops, forgot the cilantro leaves in the above photo. Use fresh cilantro for this recipe. Dried cilantro just won’t make for the same tasty sauce.

Other toppings could be added if desired. Lindsay suggests cheese, lime wedges, salsa, roasted corn and peppers.


Tasty Kitchen Blog: Healthy Black Bean Tostadas with Cilantro Sauce. Guest post by Amy Johnson of She Wears Many Hats, recipe submitted by TK member Lindsay of Pinch of Yum.

Begin by preheating the broiler, and draining the beans.


Tasty Kitchen Blog: Healthy Black Bean Tostadas with Cilantro Sauce. Guest post by Amy Johnson of She Wears Many Hats, recipe submitted by TK member Lindsay of Pinch of Yum.

In a blender or food processor (or with a little mashing and mixing by hand), puree the black beans, chili powder, cumin and cayenne pepper. Add a little of the water as needed to help blend the ingredients together. Blend for about a minute or so. You’ll see a little texture was left in the mixture. Cover and set aside.


Tasty Kitchen Blog: Healthy Black Bean Tostadas with Cilantro Sauce. Guest post by Amy Johnson of She Wears Many Hats, recipe submitted by TK member Lindsay of Pinch of Yum.

To create the sauce, blend together the cilantro, yogurt, garlic and salt in a blender or food processor until combined. Adjust seasonings to your taste.

Both the black bean mixture and cilantro sauce can be prepared ahead and refrigerated, making this a quick healthy go-to meal or snack.


Tasty Kitchen Blog: Healthy Black Bean Tostadas with Cilantro Sauce. Guest post by Amy Johnson of She Wears Many Hats, recipe submitted by TK member Lindsay of Pinch of Yum.

In the preheated oven, place tortillas directly on the oven rack and broil each side for about 3-5 minutes or until browned and crispy.


Tasty Kitchen Blog: Healthy Black Bean Tostadas with Cilantro Sauce. Guest post by Amy Johnson of She Wears Many Hats, recipe submitted by TK member Lindsay of Pinch of Yum.

I set out all the ingredients and let everyone fix their own. It was a tostadas bar, y’all. I should’ve made more cilantro sauce. It disappeared quickly.


Tasty Kitchen Blog: Healthy Black Bean Tostadas with Cilantro Sauce. Guest post by Amy Johnson of She Wears Many Hats, recipe submitted by TK member Lindsay of Pinch of Yum.

Begin building the tostada by topping a tortilla with the black bean mixture.


Tasty Kitchen Blog: Healthy Black Bean Tostadas with Cilantro Sauce. Guest post by Amy Johnson of She Wears Many Hats, recipe submitted by TK member Lindsay of Pinch of Yum.

Next add tomatoes, lettuce and avocado.


Tasty Kitchen Blog: Healthy Black Bean Tostadas with Cilantro Sauce. Guest post by Amy Johnson of She Wears Many Hats, recipe submitted by TK member Lindsay of Pinch of Yum.

Then the pièce de résistance: the cilantro sauce. (I guess that should be the Spanish equivalent for pièce de résistance instead?)

Oh my. Delish!

Thanks to Lindsay for this healthy, but very tasty option. Check out Lindsay and her husband Bjork’s other offerings over at Pinch of Yum.


Printable Recipe

Healthy Black Bean Tostadas with Cilantro Sauce

See post on Lindsay’s site!
4.75 Mitt(s) 4 Rating(s)4 votes, average: 4.75 out of 54 votes, average: 4.75 out of 54 votes, average: 4.75 out of 54 votes, average: 4.75 out of 54 votes, average: 4.75 out of 5

Prep Time:

Cook Time:

Difficulty: Easy

Servings: 4

4
x

Print Options

Page size Letter 3x5 4x6
Text Size Small Medium Large
Content Include description
Include prep time, etc.
Show image

Description

A crispy baked tortilla loaded with good stuff.

Ingredients

  • 2 cans (15 Oz. Size) Black Beans
  • 1 teaspoon Chili Powder
  • 1 teaspoon Cumin
  • ¼ teaspoons Cayenne Pepper
  • ¼ cups Water (optional)
  • ½ cups Packed Cilantro Leaves
  • ⅔ cups Plain Greek Yogurt
  • 3 cloves Garlic
  • 1 teaspoon Salt
  • 4 whole Flour Tortillas
  • 4 whole Tomatoes, Chopped
  • 1 whole Avocado, Cubed
  • 2 cups Shredded Lettuce

Preparation Instructions

Preheat the broiler. Rinse and drain the beans. Puree the black beans, chili powder, cumin, and cayenne in a blender or food processor, adding a tablespoon of water at a time to help the mixture move, if necessary. I ended up using about 2 tablespoons water and pureed for a minute or two but still left some texture.

In a food processor or blender, puree the cilantro, yogurt, garlic, and salt, adjusting the seasoning with more cilantro/salt/yogurt to your taste.

Place tortillas in the oven directly on the rack, taking care that the edges are all supported by the rack (otherwise they will bend through the cracks and it will be bent in a funny shape). Let the tortillas bake for 3-5 minutes on both sides until they are browned and crispy.

Top the crispy tortillas with black beans, tomatoes, avocados, and lettuce. Drizzle with cilantro sauce.

Notes:
Holding the tostadas while you spread the bean mixture helps them not to break apart.
Other topping ideas include cotija cheese, lime wedges, salsa, ranch dressing, or roasted corn or peppers.


_______________________________________

Amy Johnson is a blogger who writes about food, travel, the home (both inside and out), and various observations and random musings about anything and everything. Visit her blog She Wears Many Hats for a dose of deliciousness, practicality, hilarity, or just plain fun. She lives in South Carolina with her husband and two children.


Profile photo of missamy

Thick and Chewy Chocolate Chip Peanut Butter Cookies

Posted by in Baking, Step-by-Step Recipes

Tasty Kitchen Blog: Thick and Chewy Chocolate Chip Peanut Butter Cookies. Guest post by Amy Johnson of She Wears Many Hats, recipe submitted by TK member Anna of Crunchy Creamy Sweet, adapted from Joy the Baker.

 
It’s cookie time around here, folks. And is there a better way to enjoy cookies than a peanut butter and chocolate combo? I think not.

This gem of a cookie recipe, Thick and Chewy Chocolate Chip Peanut Butter Cookies, from Tasty Kitchen member Anna, caught my eye because it contains 6 ingredients and no flour. Plus it’s adapted from Joy the Baker, and if you know Joy, there’s always goodness flowing from her neck of the internet kitchens. This cookie came together with ease and resulted in a scrumptious treat that totally satisfied our sweet cravings. I think you’ll be very pleased. Very pleased, indeed.


Tasty Kitchen Blog: Thick and Chewy Chocolate Chip Peanut Butter Cookies. Guest post by Amy Johnson of She Wears Many Hats, recipe submitted by TK member Anna of Crunchy Creamy Sweet, adapted from Joy the Baker.

To get started you’ll need 6 ingredients: creamy peanut butter (I used a natural peanut butter), dark brown sugar, baking soda, an egg, cocoa powder (unsweetened), and semi-sweet chocolate chips.

As always, the full recipe is listed below with exact ingredient amounts.

A few notes:
– The recipe calls for chill time in the refrigerator, so make sure your cravings can hold off long enough for that.
– I only had mini semi-sweet chocolate chips on hand so that’s what I used (we keep them stocked for perfect chocolate chip pancakes), and only used half of what was listed in the recipe below.
– I used unsweetened dark cocoa powder which accounts for the super dark color of these compared to Anna’s lovely cookies. Regular unsweetened cocoa powder will work just fine, but if you’re a dark chocolate fan, look for the unsweetened dark cocoa powder.


Tasty Kitchen Blog: Thick and Chewy Chocolate Chip Peanut Butter Cookies. Guest post by Amy Johnson of She Wears Many Hats, recipe submitted by TK member Anna of Crunchy Creamy Sweet, adapted from Joy the Baker.

Begin by placing all the ingredients, except for the chocolate chips, into a large mixing bowl.

I used a stand mixer, but if you have a hand mixer, you may want to take it slowly because this dough is mighty thick and dense. Of course, you can get a little workout and mix it by hand. If you plan on mixing by hand, I’d beat the egg slightly first before adding it to the rest of the ingredients so it will incorporate more evenly throughout the dough.


Tasty Kitchen Blog: Thick and Chewy Chocolate Chip Peanut Butter Cookies. Guest post by Amy Johnson of She Wears Many Hats, recipe submitted by TK member Anna of Crunchy Creamy Sweet, adapted from Joy the Baker.

Mix together until combined well. Shouldn’t take very long at all.

At this point, chill the dough for at least an hour. I chilled my overnight, as was recommended.


Tasty Kitchen Blog: Thick and Chewy Chocolate Chip Peanut Butter Cookies. Guest post by Amy Johnson of She Wears Many Hats, recipe submitted by TK member Anna of Crunchy Creamy Sweet, adapted from Joy the Baker.

When chilled, scoop dough on a lined baking sheet. I scooped about 1-tablespoon-sized mounds, which worked out perfectly for 2 dozen cookies.


Tasty Kitchen Blog: Thick and Chewy Chocolate Chip Peanut Butter Cookies. Guest post by Amy Johnson of She Wears Many Hats, recipe submitted by TK member Anna of Crunchy Creamy Sweet, adapted from Joy the Baker.

Flatten each cookie.

The recipe calls for flattening each cookie to 1/2″ thick, but I’d say mine were more like 1/4″ thick, and were still pretty substantial. I’ll certainly try different thicknesses and overall cookie sizes with the next batch of these that I make.


Tasty Kitchen Blog: Thick and Chewy Chocolate Chip Peanut Butter Cookies. Guest post by Amy Johnson of She Wears Many Hats, recipe submitted by TK member Anna of Crunchy Creamy Sweet, adapted from Joy the Baker.

Press chocolate chips into each cookies.

As I mentioned before, I used mini semi-sweet chocolate chips, and used only about 1/4 cup.


Tasty Kitchen Blog: Thick and Chewy Chocolate Chip Peanut Butter Cookies. Guest post by Amy Johnson of She Wears Many Hats, recipe submitted by TK member Anna of Crunchy Creamy Sweet, adapted from Joy the Baker.

Bake according to recipe below. Let cool on baking sheet for about 30 seconds, then transfer to a wire rack to finish cooling. Or snag a warm one like I did. Oh my!


Tasty Kitchen Blog: Thick and Chewy Chocolate Chip Peanut Butter Cookies. Guest post by Amy Johnson of She Wears Many Hats, recipe submitted by TK member Anna of Crunchy Creamy Sweet, adapted from Joy the Baker.

Grab a glass of milk and get to dunking.

Yep, this one is a keeper. It’ll will certainly make reappearances around here very soon and often. As I chewed on the third one, I began thinking how this cookie is thick and chewy enough to stand up to ice cream sandwich makings. Uh huh … now we’re talking.

Thank you Anna for sharing this delightful recipe with us all. I thank you, my husband thanks you, and our kids thank you.


Printable Recipe

Thick and Chewy Chocolate Chip Peanut Butter Cookies

See post on Anna’s site!
3.66 Mitt(s) 3 Rating(s)3 votes, average: 3.66 out of 53 votes, average: 3.66 out of 53 votes, average: 3.66 out of 53 votes, average: 3.66 out of 53 votes, average: 3.66 out of 5

Prep Time:

Cook Time:

Difficulty: Easy

Servings: 24

24
x

Print Options

Page size Letter 3x5 4x6
Text Size Small Medium Large
Content Include description
Include prep time, etc.
Show image

Description

These flourless thick and chewy cookies are the perfect combination of peanut butter and chocolate.

Ingredients

  • 1 cup Creamy Peanut Butter
  • 1 cup Packed Dark Brown Sugar
  • 1 teaspoon Baking Soda
  • 1 whole Large Egg
  • 3 Tablespoons Unsweetened Cocoa Powder
  • ½ cups Semi-Sweet Chocolate Chips

Preparation Instructions

Place all ingredients, except chocolate chips, in a large mixing bowl of the stand mixer and mix together until combined. Chill the dough for at least 1 hour, preferably overnight.

When ready to bake, preheat the oven to 350ºF.

Scoop the dough onto a parchment paper or Silpat silicone baking mat lined sheet. Flatten each scoop into 1/2″ thick disks. Place few chocolate chips on top of each cookie.

Bake 8 minutes. Let cool on sheet for 30 seconds, then transfer to a wire rack to cool completely.

Recipe slightly adapted from Joy the Baker.


_______________________________________

Amy Johnson is a blogger who writes about food, travel, the home (both inside and out), and various observations and random musings about anything and everything. Visit her blog She Wears Many Hats for a dose of deliciousness, practicality, hilarity, or just plain fun. She lives in South Carolina with her husband and two children.


Profile photo of missamy

Colorado Fish and Corn Chowder

Posted by in Step-by-Step Recipes

  Nothing warms things up on a cold, rainy day like a big bowl of chowder. It’s comfort in a bowl, I say. And this recipe for Colorado Cape Cod Chowder, from TK member Kristi, is no exception. With simple ingredients and quick prep, you can have a whole pot of comfort ready to share […]

Profile photo of missamy

The Ultimate Mexican Hot Chocolate

Posted by in Step-by-Step Recipes

  Last summer, I ran across this recipe for The Ultimate Mexican Hot Chocolate from member Sharon and filed it away in my Tasty Kitchen recipe box waiting for cooler, hot chocolate weather. Anything with “ultimate” and “chocolate” in the title is a must-do on my list. I like me some chocolate, man. At first […]

Profile photo of missamy

Chocolate Hazelnut Cake

Posted by in Baking, Step-by-Step Recipes

Note: I’ve been doing a bit of housecleaning here at the Tasty Kitchen Blog and haven’t been able to stop thinking about this post from the step-by-step archives. It has chocolate. And hazelnuts. In cake form. I’m just as smitten now as I was before. And rumor has it there’s some kind of romantic holiday […]

Profile photo of missamy

Oatmeal Chocolate Chip Banana Pancakes (Gluten-Free and Vegan!)

Posted by in Step-by-Step Recipes

Looking for a healthy change of pace in your breakfast routine? These Oatmeal Chocolate Chip Banana Pancakes are just the ticket. Packed with healthy oats, bananas, and sprinkled with a few chocolate chips. they are sure to set your day on the right track.