The Pioneer Woman Tasty Kitchen
Profile photo of missamy

Quick and Easy: Wasabi Spread

Posted by in Step-by-Step Recipes

Tasty Kitchen Blog: Wasabi Spread. Guest post by Amy Johnson of She Wears Many Hats, recipe submitted by TK member Sheila Johnson of Eat2Gather.

 
The holidays are here and while I’m always full of thanks for the time to spend with family and friends (and the tasty food), by the time I’ve had my third leftover turkey or ham sandwich, I’m bored and ready for a change of pace. So when I found this recipe for Wasabi Sandwich Spread from Tasty Kitchen member, Sheila Johnson, I was intrigued. A sandwich spread to add some oomph to the leftover turkey or ham sandwich? I gave it a go and was happy that I did. It’s a simple way to change things up enough to turn an ordinary turkey sandwich into an extraordinary turkey sandwich.

And don’t be scared of the wasabi. Wasabi is your friend. Your mouth will not be on fire. Not at all. The wasabi adds a little spice but is balanced with mayo, honey and soy. A tasty combination that will leave you wishing you’d roasted another turkey. And it’s simple, too. So simple I almost didn’t post it, but then decided it was too good not to mention.


Tasty Kitchen Blog: Wasabi Spread. Guest post by Amy Johnson of She Wears Many Hats, recipe submitted by TK member Sheila Johnson of Eat2Gather.

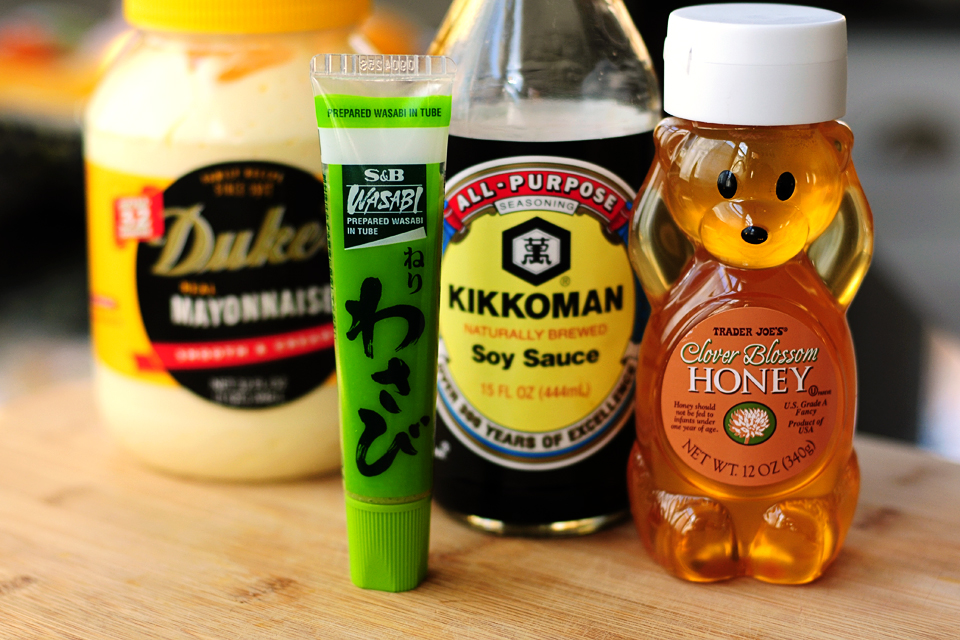
All you’ll need is mayo, wasabi paste (it comes in a cute little tube for only a few dollars), soy sauce and honey. This recipe makes a bunch and can be stored in the fridge to last through the whole holiday season. You can find the full recipe here.


Tasty Kitchen Blog: Wasabi Spread. Guest post by Amy Johnson of She Wears Many Hats, recipe submitted by TK member Sheila Johnson of Eat2Gather.

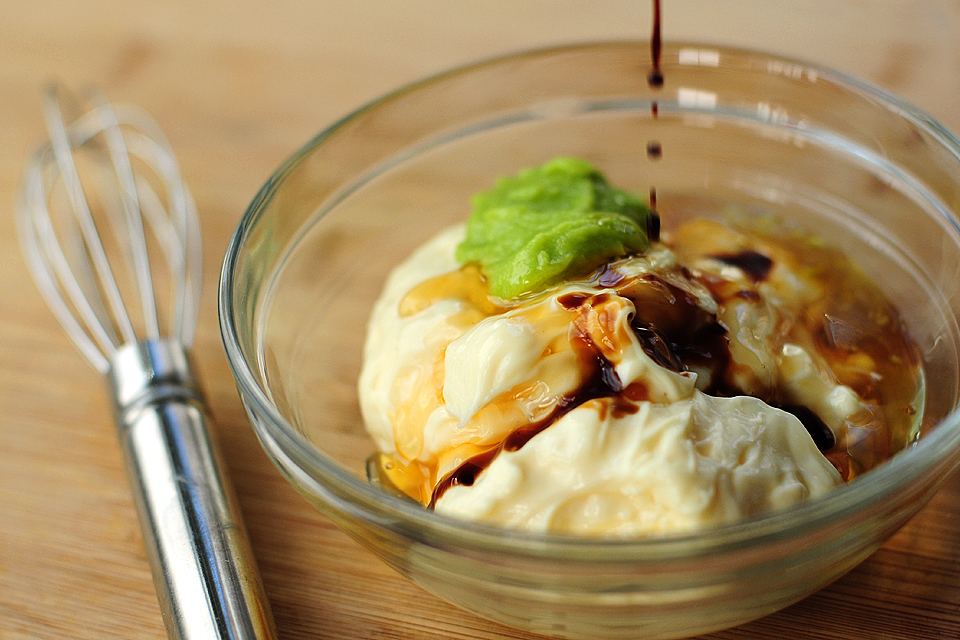
In a small bowl combine all ingredients.


Tasty Kitchen Blog: Wasabi Spread. Guest post by Amy Johnson of She Wears Many Hats, recipe submitted by TK member Sheila Johnson of Eat2Gather.

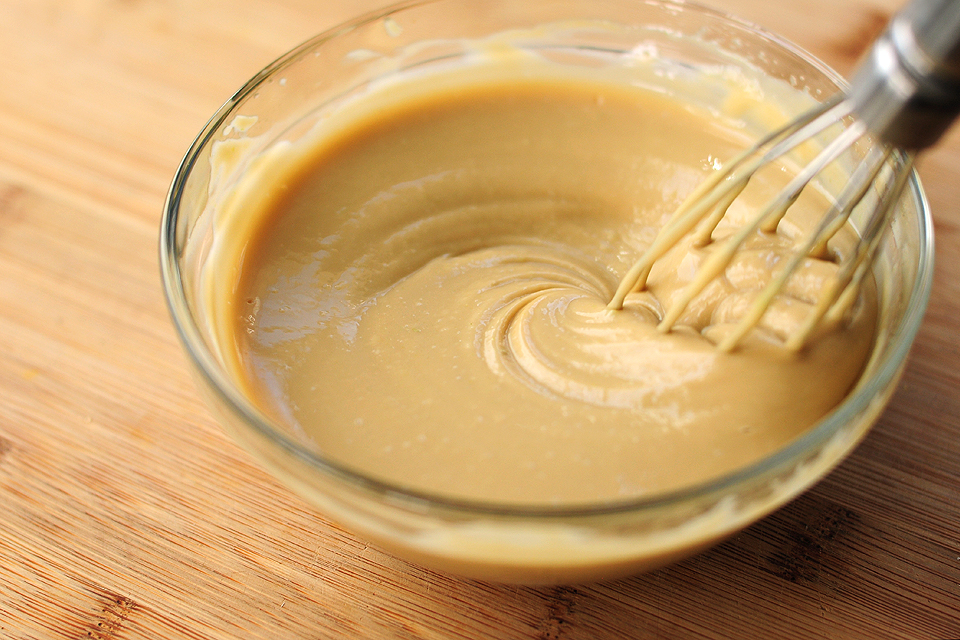
Mix together until smooth.

It certainly makes a plain sandwich come alive. We tried it on one of our favorite sandwich combos. It was a total success! Here’s how I used it.


Tasty Kitchen Blog: Wasabi Spread. Guest post by Amy Johnson of She Wears Many Hats, recipe submitted by TK member Sheila Johnson of Eat2Gather.

Start with some roasted turkey. We also like using avocado and purple onion, sliced thinly on our favorite sandwich bread, toasted.


Tasty Kitchen Blog: Wasabi Spread. Guest post by Amy Johnson of She Wears Many Hats, recipe submitted by TK member Sheila Johnson of Eat2Gather.

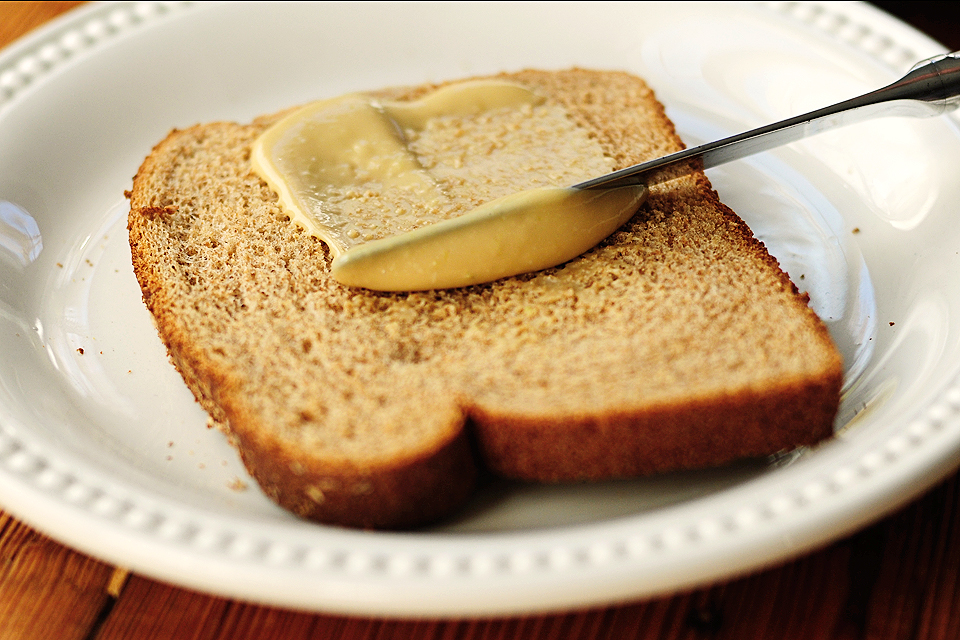
Begin building your sandwich with the wasabi spread going on first. Make sure you don’t skimp on the spread. You won’t need mustard or any other condiment with this spread.


Tasty Kitchen Blog: Wasabi Spread. Guest post by Amy Johnson of She Wears Many Hats, recipe submitted by TK member Sheila Johnson of Eat2Gather.

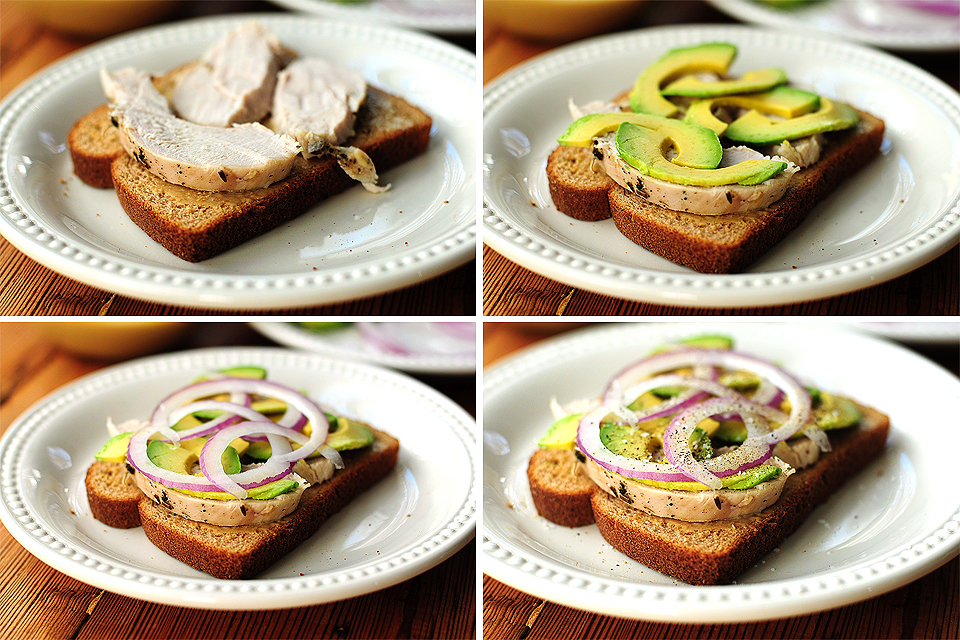
Next add the turkey, the avocado, purple onion, and salt and pepper of course.


Tasty Kitchen Blog: Wasabi Spread. Guest post by Amy Johnson of She Wears Many Hats, recipe submitted by TK member Sheila Johnson of Eat2Gather.

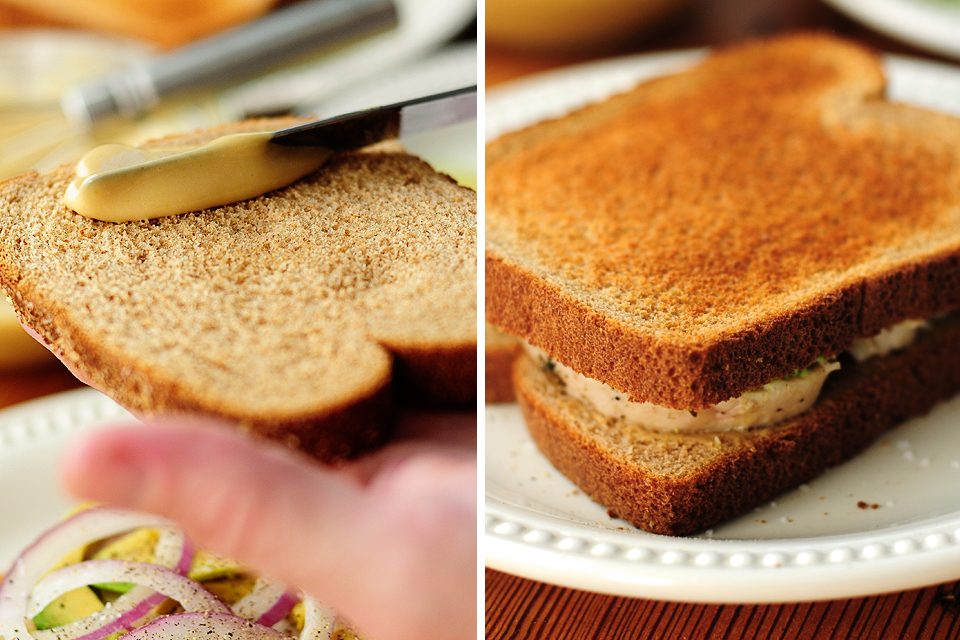
Then top it off with another layer of wasabi spread.


Tasty Kitchen Blog: Wasabi Spread. Guest post by Amy Johnson of She Wears Many Hats, recipe submitted by TK member Sheila Johnson of Eat2Gather.

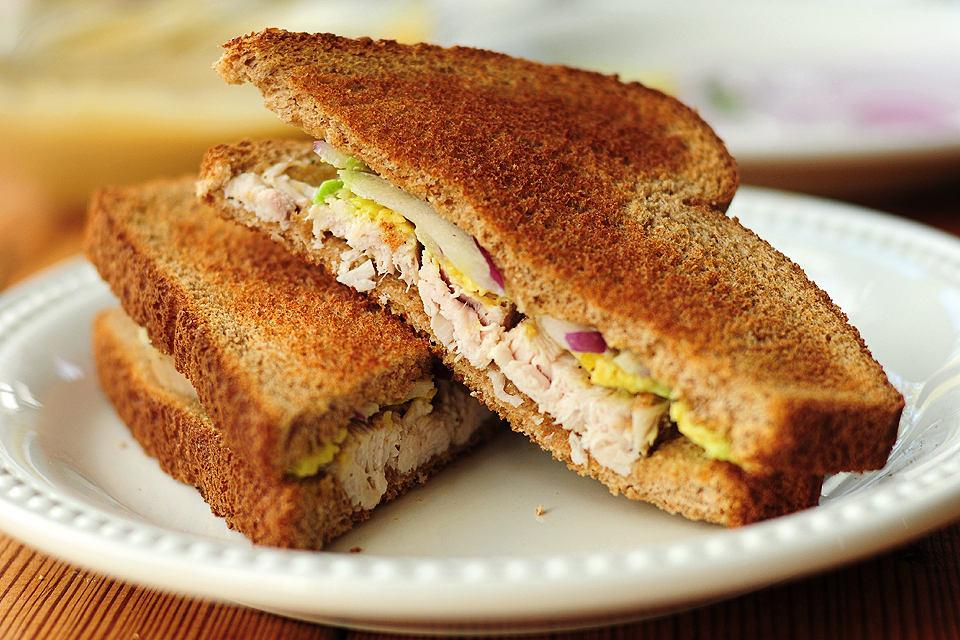
You’re looking at a not-so-run-of-the-mill leftover turkey sandwich, folks.

Try it. I think you’ll like it.

And thanks to Sheila Johnson, I’m looking forward to those leftovers. Wishing you the best this holiday season! Hope your kitchen is full of much love and tasty grub! (Speaking of tasty grub, check out Sheila’s blog, Eat2Gather. It’s filled with all kinds of yumminess.)


Printable Recipe

Wasabi Sandwich Spread

See post on Eat 2gather’s site!
5.00 Mitt(s) 4 Rating(s)4 votes, average: 5.00 out of 54 votes, average: 5.00 out of 54 votes, average: 5.00 out of 54 votes, average: 5.00 out of 54 votes, average: 5.00 out of 5

Prep Time:

Cook Time:

Difficulty: Easy

Servings: 10

10
x

Print Options

Page size Letter 3x5 4x6
Text Size Small Medium Large
Content Include description
Include prep time, etc.
Show image

Description

This spread is perfect to spice up any sandwich. I personally love it on turkey. Add it to some shredded cabbage and it’s great on fish tacos.

Ingredients

  • ¾ cups Hellman's Mayonnaise
  • 1 Tablespoon Wasabi Paste
  • 1 Tablespoon Soy Sauce
  • 1 Tablespoon Honey (heaping)

Preparation Instructions

Whisk your ingredients together. Use as a sandwich spread or toss with some shredded cabbage and it’s super on fish tacos!


_______________________________________

Amy Johnson is a blogger who writes about food, travel, the home (both inside and out), and various observations and random musings about anything and everything. Visit her blog She Wears Many Hats for a dose of deliciousness, practicality, hilarity, or just plain fun. She lives in South Carolina with her husband and two children.


Profile photo of Erica Lea

Bacon and Parmesan Pasta

Posted by in Step-by-Step Recipes

Tasty Kitchen Blog: Bacon and Parmesan Pasta. Guest post by Erica Kastner of Cooking for Seven, recipe submitted by TK member Trish Boese.

 
Bacon. Parmesan cheese. Cream cheese. Heavy cream. Oh yes. This stuff is good. This recipe, brought to us by Trish Boese, brings together some of the most enticing ingredients known to man into an easy, irresistible dish.

It was hard to keep my fork out of the pot before serving the pasta. Even my little brother, who dislikes bacon, loved it. Let me show you how it’s done:


Tasty Kitchen Blog: Bacon and Parmesan Pasta. Guest post by Erica Kastner of Cooking for Seven, recipe submitted by TK member Trish Boese.

Here’s what you’ll need: bacon (yes, a whole pound) crushed red pepper flakes, penne pasta (I used whole wheat), heavy cream, cream cheese, grated Parmesan, eggs, and freshly ground black pepper.


Tasty Kitchen Blog: Bacon and Parmesan Pasta. Guest post by Erica Kastner of Cooking for Seven, recipe submitted by TK member Trish Boese.

Begin by frying the bacon. Sprinkle with the crushed red pepper flakes. When the bacon is cooked (I like mine just on this side of crispy), roughly chop and set aside.


Tasty Kitchen Blog: Bacon and Parmesan Pasta. Guest post by Erica Kastner of Cooking for Seven, recipe submitted by TK member Trish Boese.

Bring a pot of water to boil. Salt the water.


Tasty Kitchen Blog: Bacon and Parmesan Pasta. Guest post by Erica Kastner of Cooking for Seven, recipe submitted by TK member Trish Boese.

Add the pasta and cook until done (it took about 12 minutes for the whole wheat Penne to cook to al dente).


Tasty Kitchen Blog: Bacon and Parmesan Pasta. Guest post by Erica Kastner of Cooking for Seven, recipe submitted by TK member Trish Boese.

Meanwhile, place the cream cheese and cream in a small saucepan.


Tasty Kitchen Blog: Bacon and Parmesan Pasta. Guest post by Erica Kastner of Cooking for Seven, recipe submitted by TK member Trish Boese.

Heat over low until the cream cheese is melted. Whisk until smooth.


Tasty Kitchen Blog: Bacon and Parmesan Pasta. Guest post by Erica Kastner of Cooking for Seven, recipe submitted by TK member Trish Boese.

Remove from heat. Add the parmesan, eggs, and pepper. Whisk.


Tasty Kitchen Blog: Bacon and Parmesan Pasta. Guest post by Erica Kastner of Cooking for Seven, recipe submitted by TK member Trish Boese.

Drain the pasta and reserve 1/2 cup of the water. Place pasta in a large bowl (or return to the pot). Immediately add the white sauce and toss. The hot pasta will cook the eggs. Add the bacon and toss. Add a little pasta water, if needed, to loosen the sauce.


Tasty Kitchen Blog: Bacon and Parmesan Pasta. Guest post by Erica Kastner of Cooking for Seven, recipe submitted by TK member Trish Boese.

Serve with extra Parmesan cheese and freshly ground black pepper.


Tasty Kitchen Blog: Bacon and Parmesan Pasta. Guest post by Erica Kastner of Cooking for Seven, recipe submitted by TK member Trish Boese.

Notes: The flavors in this recipe were excellent and even improved the next day. Next time I will probably make more sauce. I didn’t serve the pasta immediately, so it soaked up quite a bit of the sauce. Also, I thought it could use a tad more salt.


Tasty Kitchen Blog: Bacon and Parmesan Pasta. Guest post by Erica Kastner of Cooking for Seven, recipe submitted by TK member Trish Boese.

Thank you, Trish, for sharing this delicious recipe.


Printable Recipe

Bacon and Parmesan Pasta

4.56 Mitt(s) 30 Rating(s)30 votes, average: 4.56 out of 530 votes, average: 4.56 out of 530 votes, average: 4.56 out of 530 votes, average: 4.56 out of 530 votes, average: 4.56 out of 5

Prep Time:

Cook Time:

Difficulty: Easy

Servings: 4

4
x

Print Options

Page size Letter 3x5 4x6
Text Size Small Medium Large
Content Include description
Include prep time, etc.
Show image

Description

A break from the standard tomato or creamy white sauce – ingredients can be added depending on what you have in the kitchen.

Ingredients

  • 1 pound Bacon
  • ¼ teaspoons Crushed Red Pepper Flakes
  • 1 pound Rigatoni Or Penne Pasta
  • ½ cups Heavy Cream
  • ¼ cups Cream Cheese
  • ¼ cups Grated Parmesan Cheese
  • 2 whole Eggs
  • ¼ teaspoons Freshly Ground Black Pepper

Preparation Instructions

In a skillet, fry the bacon. Sprinkle with red pepper flakes. When done, remove bacon until cool enough to handle and roughly chop.

Meanwhile, cook the pasta in boiling salted water until done (according to package instructions).

Place cream and cream cheese in a small saucepan. Heat over low until cream cheese is melted, and whisk until smooth. Remove from heat. Add the parmesan cheese, eggs, and pepper and whisk until blended.

Drain pasta (reserving 1/2 cup of hot water) and return to pot. Immediately add the white sauce and toss to coat. The hot pasta will cook the eggs. Stir in the bacon, and add some reserved pasta water if needed to loosen the sauce.


_______________________________________

Erica Berge shares her wonderful recipes and amazing food photography on her blog, Cooking for Seven. She also writes about crafts and posts more of her beautiful photography in her personal blog, EricaLea.com. There really isn’t much that this amazing young lady can’t do, and we’re thrilled she does some of it here.


Profile photo of Natalie | Perry's Plate

Burnt Sugar Almonds

Posted by in Holidays, Step-by-Step Recipes

Tasty Kitchen Blog: Burnt Sugar Almonds. Guest post by Natalie Perry of Perry's Plate, recipe submitted by TK member Birgit Kerr of Scrapalicious Bytes.

 
These Burnt Sugar Almonds (Gebrannte Mandeln), in my opinion, are the only redeeming quality of a crowded shopping mall during the holidays. Luckily, they’re a cinch to make at home and will put all of your scented candles to shame. This recipe was submitted by Tasty Kitchen member Birgit Kerr, who is originally from Germany. These almonds are found roasting at the Christmas markets in Germany as well as Austria, where I spent about 18 months (a long time ago). I about fell out of my chair when I saw this recipe.

There are other variations of these almonds which use beaten egg whites, but I really liked this non-fussy approach. Plus, I didn’t have to turn on my oven.


Tasty Kitchen Blog: Burnt Sugar Almonds. Guest post by Natalie Perry of Perry's Plate, recipe submitted by TK member Birgit Kerr of Scrapalicious Bytes.

Five ingredients is all you need: raw almonds, sugar, cinnamon, vanilla, and water. For real.


Tasty Kitchen Blog: Burnt Sugar Almonds. Guest post by Natalie Perry of Perry's Plate, recipe submitted by TK member Birgit Kerr of Scrapalicious Bytes.

To start, grab a medium-sized pot (not non-stick) and a big wooden spoon. Add the water, cinnamon, and 1 cup of sugar. Bring to a boil over medium heat.


Tasty Kitchen Blog: Burnt Sugar Almonds. Guest post by Natalie Perry of Perry's Plate, recipe submitted by TK member Birgit Kerr of Scrapalicious Bytes.

Add the almonds, crank up the heat, then stir. And stir. And stir. And . . . stir. Don’t stop stirring. Especially to take pictures.


Tasty Kitchen Blog: Burnt Sugar Almonds. Guest post by Natalie Perry of Perry's Plate, recipe submitted by TK member Birgit Kerr of Scrapalicious Bytes.

After about 5-7 minutes of constant stirring, the water will have begun to noticeably evaporate. It’ll start to look like the almonds are swimming in syrup, and when you drag your spoon across the bottom, you’ll be able to see the bottom of your pot. When it looks like this . . .


Tasty Kitchen Blog: Burnt Sugar Almonds. Guest post by Natalie Perry of Perry's Plate, recipe submitted by TK member Birgit Kerr of Scrapalicious Bytes.

Lower the heat, then add the vanilla and the remaining sugar. Because, despite what you may think, there isn’t enough sugar.


Tasty Kitchen Blog: Burnt Sugar Almonds. Guest post by Natalie Perry of Perry's Plate, recipe submitted by TK member Birgit Kerr of Scrapalicious Bytes.

Stir it around to get it incorporated. Yep, keep stirring.


Tasty Kitchen Blog: Burnt Sugar Almonds. Guest post by Natalie Perry of Perry's Plate, recipe submitted by TK member Birgit Kerr of Scrapalicious Bytes.

After a minute or so, the almonds will be coated in a sandy-looking sugar mixture and the pot will appear very dry.


Tasty Kitchen Blog: Burnt Sugar Almonds. Guest post by Natalie Perry of Perry's Plate, recipe submitted by TK member Birgit Kerr of Scrapalicious Bytes.

After three batches of these nuts, I can testify to you that now is the time to remove them from the pot. If you stir any longer, the sugar clumps will fall off the almonds and there may be some tears involved. We need that sugar.


Tasty Kitchen Blog: Burnt Sugar Almonds. Guest post by Natalie Perry of Perry's Plate, recipe submitted by TK member Birgit Kerr of Scrapalicious Bytes.

Spread the almonds out on a cookie sheet and let them cool. Chances are they’ll cool just long enough for you to pop one in your mouth and only wince slightly.


Tasty Kitchen Blog: Burnt Sugar Almonds. Guest post by Natalie Perry of Perry's Plate, recipe submitted by TK member Birgit Kerr of Scrapalicious Bytes.

They taste even better than they smell (especially while they’re still warm!), and you’ll soon be surrounded by snitching fingers and whining children and/or husbands.


Tasty Kitchen Blog: Burnt Sugar Almonds. Guest post by Natalie Perry of Perry's Plate, recipe submitted by TK member Birgit Kerr of Scrapalicious Bytes.

If you happen to have a few leftover (or if you were smart and made a triple batch), wrap some up and give them away. You’ll make some new friends. Maybe even a few best friends. Perhaps a stalker or two, but they may be peeking in your windows just to get a better whiff.

Many thanks to Birgit Kerr (who blogs at Scrapalicious Bytes) for a wonderful recipe!

Recipe notes: I used this recipe as a starting point and reduced the amount of sugar to 1 1/3 cups. I also added the remaining sugar into the almonds when the mixture looked syrupy instead of dry, and I only cooked it for another minute or two before I spread them out to cool.


Printable Recipe

Burnt Sugar Almonds (Gebrannte Mandeln)

4.97 Mitt(s) 42 Rating(s)42 votes, average: 4.97 out of 542 votes, average: 4.97 out of 542 votes, average: 4.97 out of 542 votes, average: 4.97 out of 542 votes, average: 4.97 out of 5

Prep Time:

Cook Time:

Difficulty: Intermediate

Servings: 4

4
x

Print Options

Page size Letter 3x5 4x6
Text Size Small Medium Large
Content Include description
Include prep time, etc.
Show image

Description

There are many things I associated with Advent/Christmas time growing up in Germany. But none more than the deliciously enticing smell of fresh “burnt” almonds walking through a Christkindlmarkt (German Christmas markets). They are actually quite easy to make at home, and presented in cute little cellophane or paper cone bags, they make lovely favors or hostess gifts around this time of year, too!

Ingredients

  • ⅓ cups Water, Plus 2 Tablespoons
  • 1-⅓ cup Sugar, Divided
  • 1 teaspoon Cinnamon, Ground
  • 2 cups Raw Almonds
  • 1 teaspoon Vanilla Extract

Preparation Instructions

Use a heavy saucepan (NOT the nonstick kind) and a wooden spoon.

First add the water, 1 cup of sugar and the cinnamon and stir. Bring it to a boil over medium heat. Add the almonds to the mix, raise the temperature to high heat and stir CONSTANTLY until the water is boiled away.

The sugar will dry out a little but start to stick to the almonds. Keep stirring them around, so that the almonds don’t burn on the bottom of the pan.

Turn the heat under the pan to medium-low, to keep the sugar from browning too fast. Keep stirring until the almonds start having an even shiny coat.

Don’t be distracted by the heavenly aroma that is enveloping your kitchen—you need your full concentration on the task!

Now dump in the rest of your sugar. Keep stirring, and add your vanilla. At this point, I like to mention that if you have vanilla sugar or a powdered type of vanilla flavoring, do feel free to use that over the liquid kind. It tends to work better. If you do, mix it with the 1/3 of a cup of sugar you are using for the second lot of sugar.

At this point, there might be quite some noise ensuing from your pan. Some crackling and popping, but hopefully no snapping. It depends on how fresh your almonds were. Really fresh almonds will make a popping noise and the coat may start to crack. That’s the water in the almonds escaping. If the almonds are older, there won’t be as much of that!

Keep stirring until the almonds are fairly shiny, but still a bit lumpy. You don’t want them completely smooth. The best ones are the ones that are shiny in some areas with some delicious lumps of cinnamon sugar on other parts of the almond.

As soon as you see that happening, take them off the heat and transfer the almonds to a sheet of parchment paper. Spread them apart as much as you can, but don’t worry about some of them sticking together initially. BE CAREFUL, however. These are extremely hot, so only use a spoon. These babies can really burn you!

While they are cooling down, keep on breaking them apart with your spoon(s) until they are all separated. Fair warning: these are totally divine when they are still ever-so-slightly warm. There, you’ve been warned!

Once they are cooled, hide (ahem, I meant store) them in a dry, closed container. Theoretically, they keep for several weeks. I’ve never had an opportunity to test that theory.


_______________________________________

Be sure to check out Natalie’s own beautiful food blog, Perrys’ Plate, where you can see her growing collection of lovely recipes. There’s always something new to see there. Go visit now!


Profile photo of Ree | The Pioneer Woman

Mystery Mocha!

Posted by in Baking, Step-by-Step Recipes

Note: Since Valentine’s Day is just around the corner, I’m bringing up this chocolate wonder from the step-by-step archives. Serve this with your V-Day dinner! I absolutely loved it. –Ree

 
Tasty Kitchen Blog: Mystery Mocha. Post by Ree Drummond, recipe submitted by TK member Larry.

 
The second I read the name of this recipe, I just knew I had to make it. First of all, I love any recipe with either “mystery” or “surprise” in the title. Second, I love any recipe with “mocha” in the title. It means good things will happen.

So “Mystery Mocha?” Count me in!

I thought it was funny that halfway through the printable recipe, the submitter (thanks, Larry!) warns us that “this will look TERRIBLE”. You’ve got to love the honesty!

But no matter what it looks like halfway through, the end result is all that I wanted it to be…and more. It turns out a little bit like a lava cake or baked fudge, but with a lovely coffee undertone. I served mine with freshly whipped cream and absolutely loved every bite. This is a treasure!

Here’s how you make it.


Tasty Kitchen Blog: Mystery Mocha. Post by Ree Drummond, recipe submitted by TK member Larry.

Melt butter and unsweetened chocolate in the microwave for about 45 seconds.


Tasty Kitchen Blog: Mystery Mocha. Post by Ree Drummond, recipe submitted by TK member Larry.

Stir it until the mixture is totally melted and smooth.


Tasty Kitchen Blog: Mystery Mocha. Post by Ree Drummond, recipe submitted by TK member Larry.

Sift together sugar, flour, baking powder, and salt. In a separate container, mix together the milk and vanilla. Set aside.


Tasty Kitchen Blog: Mystery Mocha. Post by Ree Drummond, recipe submitted by TK member Larry.

Mix together the sifted mixture, the chocolate mixture, and the milk/vanilla mixture.


Tasty Kitchen Blog: Mystery Mocha. Post by Ree Drummond, recipe submitted by TK member Larry.

Stir it together until all combined, then spread in a thoroughly greased square pan. Mine was about 6 1/2 x 6 1/2, but 8 x 8 would work fine.


Tasty Kitchen Blog: Mystery Mocha. Post by Ree Drummond, recipe submitted by TK member Larry.

Now, this is where it starts getting weird. In a separate bowl, mix together sugar, brown sugar, and cocoa powder.


Tasty Kitchen Blog: Mystery Mocha. Post by Ree Drummond, recipe submitted by TK member Larry.

Stir it to combine…


Tasty Kitchen Blog: Mystery Mocha. Post by Ree Drummond, recipe submitted by TK member Larry.

Then sprinkle the mixture evenly over the top of the cake batter.


Tasty Kitchen Blog: Mystery Mocha. Post by Ree Drummond, recipe submitted by TK member Larry.

Interesting! What does it all mean?


Tasty Kitchen Blog: Mystery Mocha. Post by Ree Drummond, recipe submitted by TK member Larry.

After that mixture is evenly sprinkled and distributed, pour cold coffee all over the top. I didn’t have any coffee made, so I mixed instant coffee crystals in a cup of water. And I made it very strong: two heaping tablespoons of coffee! We’ll see how it turns out.


Tasty Kitchen Blog: Mystery Mocha. Post by Ree Drummond, recipe submitted by TK member Larry.

This would definitely be the part in the recipe where Larry warns “it will look terrible!” I don’t think it looks terrible at all, though…just curious!

Bake for 40 minutes on 350 degrees, then remove from the oven.


Tasty Kitchen Blog: Mystery Mocha. Post by Ree Drummond, recipe submitted by TK member Larry.

And this…THIS is what it looks like!


Tasty Kitchen Blog: Mystery Mocha. Post by Ree Drummond, recipe submitted by TK member Larry.

Oh my word. Oh my.


Tasty Kitchen Blog: Mystery Mocha. Post by Ree Drummond, recipe submitted by TK member Larry.

It’s funny—until I scooped into it, I didn’t realize this would be a lava-type cake. It was a nice surprise!


Tasty Kitchen Blog: Mystery Mocha. Post by Ree Drummond, recipe submitted by TK member Larry.

Gorgeous! And it smells so, so good.


Tasty Kitchen Blog: Mystery Mocha. Post by Ree Drummond, recipe submitted by TK member Larry.

I whipped some cream and plopped it on top.


Tasty Kitchen Blog: Mystery Mocha. Post by Ree Drummond, recipe submitted by TK member Larry.

And this turned out to be a very good move.


Tasty Kitchen Blog: Mystery Mocha. Post by Ree Drummond, recipe submitted by TK member Larry.

The Verdict: This was absolutely delicious. If you use very strong coffee, the flavor will really come through and result in a very rich mocha flavor. This would be perfect for company—so easy to make!

Thank you, Larry, for sharing such a yummy recipe.


Printable Recipe

Mystery Mocha

4.78 Mitt(s) 32 Rating(s)32 votes, average: 4.78 out of 532 votes, average: 4.78 out of 532 votes, average: 4.78 out of 532 votes, average: 4.78 out of 532 votes, average: 4.78 out of 5

Prep Time:

Cook Time:

Difficulty: Easy

Servings: 8

8
x

Print Options

Page size Letter 3x5 4x6
Text Size Small Medium Large
Content Include description
Include prep time, etc.
Show image

Description

My mother’s secret recipe, no longer secret! Decadent chocolate cake with mocha pudding inside. For chocolate lovers, this is a ten.

Ingredients

  • ¾ cups Granulated Sugar
  • 1 cup Sifted All-Purpose Flour
  • 2 teaspoons Baking Powder
  • ⅛ teaspoons Salt
  • 1 piece Unsweetend Chocolate (1 Square)
  • 2 Tablespoons Butter
  • ½ cups Whole Milk
  • 1 teaspoon Vanilla Extract
  • ½ cups Brown Sugar
  • ½ cups Granulated Sugar (additional)
  • 4 Tablespoons Powdered Cocoa (Not Drink Mix)
  • 1 cup Cold Strong Coffee

Preparation Instructions

Sift together 3/4 cup sugar, flour, baking powder, and salt. Set aside.

Melt square of unsweetened chocolate and butter in the microwave. Add to dry ingredients alternately with the milk and vanilla. Blend. Pour into a greased 8×8 pan.

Combine brown sugar, the 1/2 cup additional granulated sugar and cocoa powder. Sprinkle over the cake batter. Pour the one cup COLD coffee on top. This will look TERRIBLE. Bake 350 degrees for 40 minutes.

Serve warm with ice cream or sweetened whip cream or whipped topping. This will serve 8. In a 9×9 square pan, you can cut 9 pieces. Best served warm.


Profile photo of Ree | The Pioneer Woman

Butter Chicken

Posted by in Step-by-Step Recipes

Note: By popular demand, we’re featuring this recipe again. Great reports across the board! I originally loved the looks of this recipe, submitted by Tasty Kitchen member lillieknits, because I knew I had almost all the ingredients in my kitchen (important, since I don’t live around the corner from a grocery store)…and because the sauce […]

Profile photo of Erica Lea

Fruit on the Bottom Baked Oatmeal

Posted by in Baking, Step-by-Step Recipes

  This recipe was one of those lucky, spur-of-the-moment creations. We had some very ripe peaches that desperately needed to be used. However, there weren’t nearly enough to go into a pie or a crisp. Thus, Fruit-on-the-Bottom Baked Oatmeal was born of necessity. In all honesty, I did not expect it to turn out. I […]

Profile photo of ThreeManyCooks

Amaretti Semifreddo with Chocolate and Toasted Almonds

Posted by in Step-by-Step Recipes

Help me welcome our new guest contributor,

Profile photo of Erica Lea

Zand Gebak

Posted by in Baking, Step-by-Step Recipes

Today, Erica Lea will share with us this incredible Tasty Kitchen recipe she found. The name may sound funny and strange to some of you, but oh my. It’s absolutely beautiful. Let’s watch as Erica walks us through it!     I know what you’re thinking, because I thought it as well: “Zand what?!” Then […]