The Pioneer Woman Tasty Kitchen
Profile photo of Natalie | Perry's Plate

Shaved Asparagus Pizza

Posted by in Step-by-Step Recipes

Tasty Kitchen Blog: Shaved Asparagus Pizza. Guest post by Natalie Perry of Perry's Plate, recipe submitted by TK member keeperrox.

 
Asparagus and I haven’t had the best relationship over the years. I think it was mostly a misunderstanding on my part. Because I really wanted to like asparagus, I did what I usually do with foods I’m trying to get used to: combine it with a food that I absolutely adore. In this case, I buried it in a pizza.

Peaches are also on my list, but I think I’ll have to take a different approach with that one.

When I saw this Shaved Asparagus Pizza submitted by TK member keeperrox, I hoped it would be my entrance into the asparagus-lover’s club. And I believe it was.


Tasty Kitchen Blog: Shaved Asparagus Pizza. Guest post by Natalie Perry of Perry's Plate, recipe submitted by TK member keeperrox.

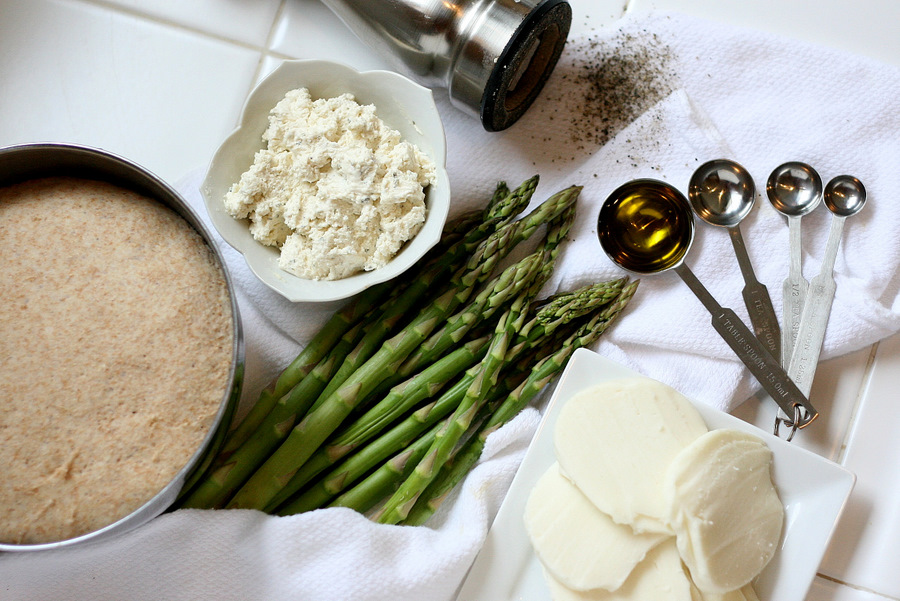
You only need six ingredients for this recipe: enough pizza dough for one 12-16 inch pizza, one bunch of asparagus, some fresh mozzarella (although regular, grated mozzarella would be just fine), olive oil, freshly ground black pepper, and some garlic and herb cheese spread. The recipe specified Boursin cheese, but any brand would do. You could even use garlic and herb flavored cream cheese.


Tasty Kitchen Blog: Shaved Asparagus Pizza. Guest post by Natalie Perry of Perry's Plate, recipe submitted by TK member keeperrox.

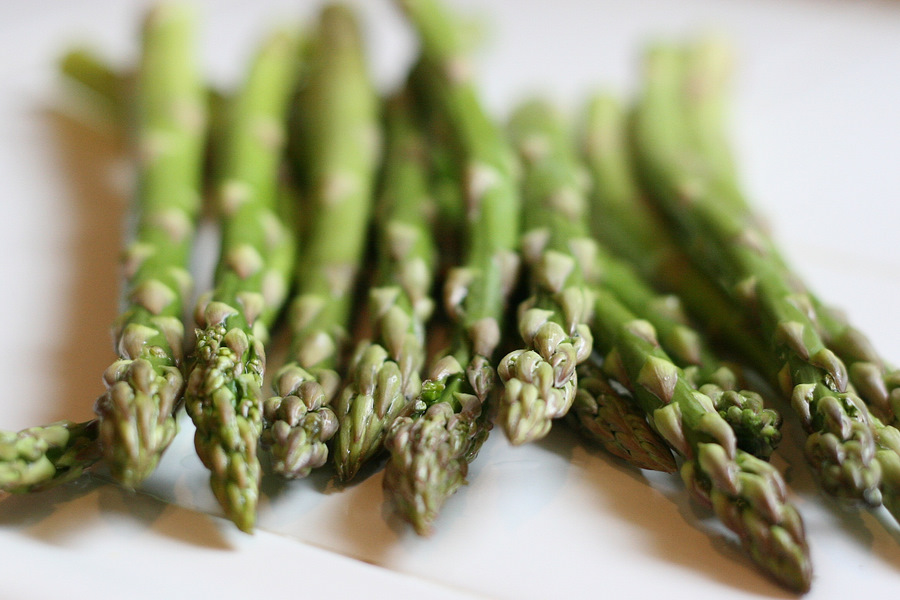
I learned a lot about asparagus lately. Look for stalks that are thinner, no bigger than a dime’s width. Treat them like flowers when you get them home, cutting off a 1/2-inch from the bottom and putting them upright in an inch or so of water. And as with any vegetable, make sure they aren’t bruised, wrinkled, or limp.


Tasty Kitchen Blog: Shaved Asparagus Pizza. Guest post by Natalie Perry of Perry's Plate, recipe submitted by TK member keeperrox.

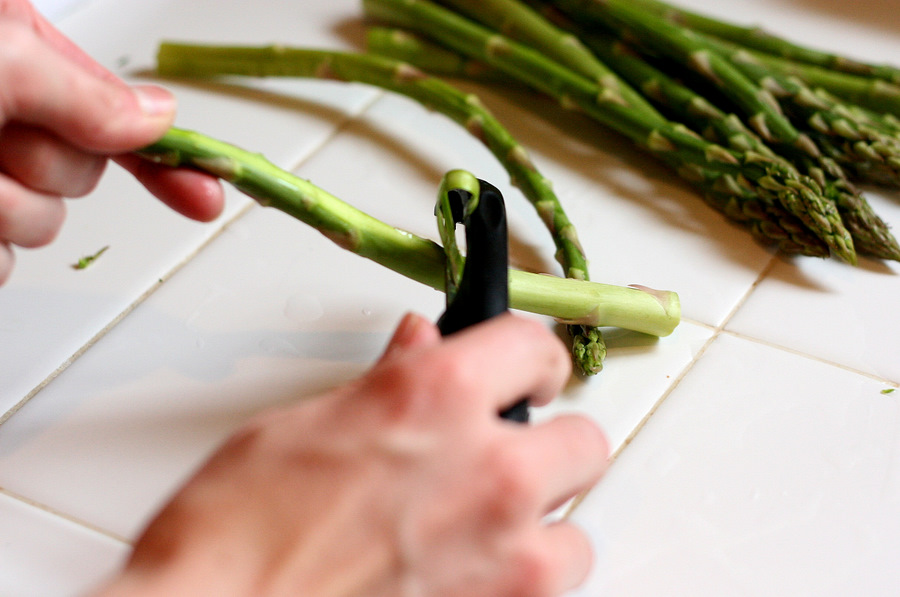
When you’re ready to prep the stalks, bend each one until it breaks. Discard the bottom part that breaks off. That’s the stalk’s way of telling you where the tender section ends and the woody, tough section begins. Pretty smart vegetable.

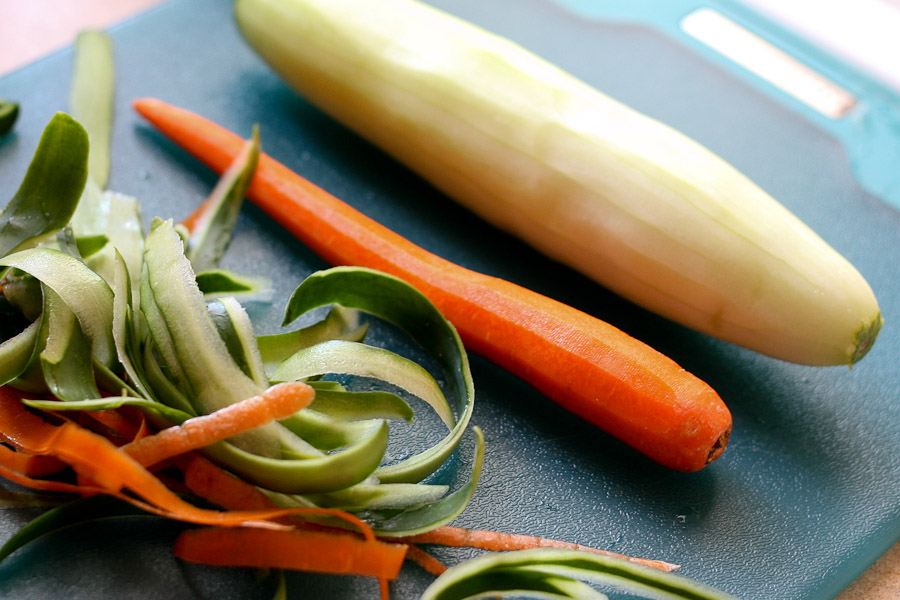
Then take a vegetable peeler and peel off the outer-most edges and leaves. Discard those. Then keep peeling until you have nothing left but the tip.


Tasty Kitchen Blog: Shaved Asparagus Pizza. Guest post by Natalie Perry of Perry's Plate, recipe submitted by TK member keeperrox.

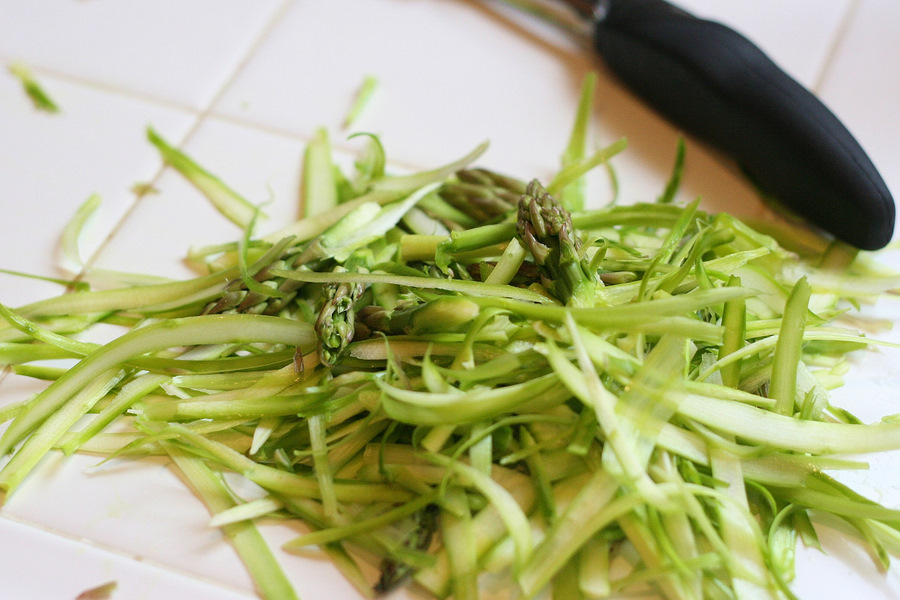
Put the shavings and tips together in a pile and set them aside.


Tasty Kitchen Blog: Shaved Asparagus Pizza. Guest post by Natalie Perry of Perry's Plate, recipe submitted by TK member keeperrox.

Time to get the pizza dough dressed! As far as pizza baking is concerned, if you have a favorite pan, stone, or method that works for you, by all means, carry on. I’ll show you the way I like to do it. I used to have a pizza stone, but it tragically broke a few weeks ago. (Moment of silence.) I’ve tweaked my method a bit and it seems to do a great job.

First preheat your oven to 450 degrees F and place an upside down rimmed baking sheet (or a flat one) inside.

Turn another rimmed cookie sheet upside down (or use a flat one if you have it) on the countertop or workspace . Place a piece of parchment on top, just large enough to cover the surface without a lot of extra hanging over. Wouldn’t want to start a fire in that screaming hot oven. Stretch out the dough and place it on the paper.


Tasty Kitchen Blog: Shaved Asparagus Pizza. Guest post by Natalie Perry of Perry's Plate, recipe submitted by TK member keeperrox.

Drizzle a tablespoonful of olive oil over the dough.


Tasty Kitchen Blog: Shaved Asparagus Pizza. Guest post by Natalie Perry of Perry's Plate, recipe submitted by TK member keeperrox.

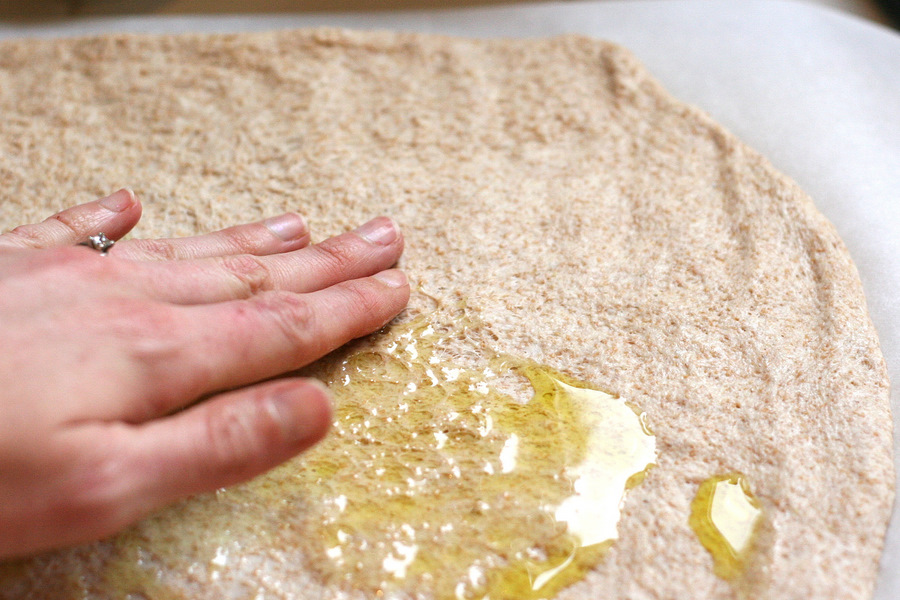
Smear it around with your hands. Enjoy soft cuticles for the next few hours.


Tasty Kitchen Blog: Shaved Asparagus Pizza. Guest post by Natalie Perry of Perry's Plate, recipe submitted by TK member keeperrox.

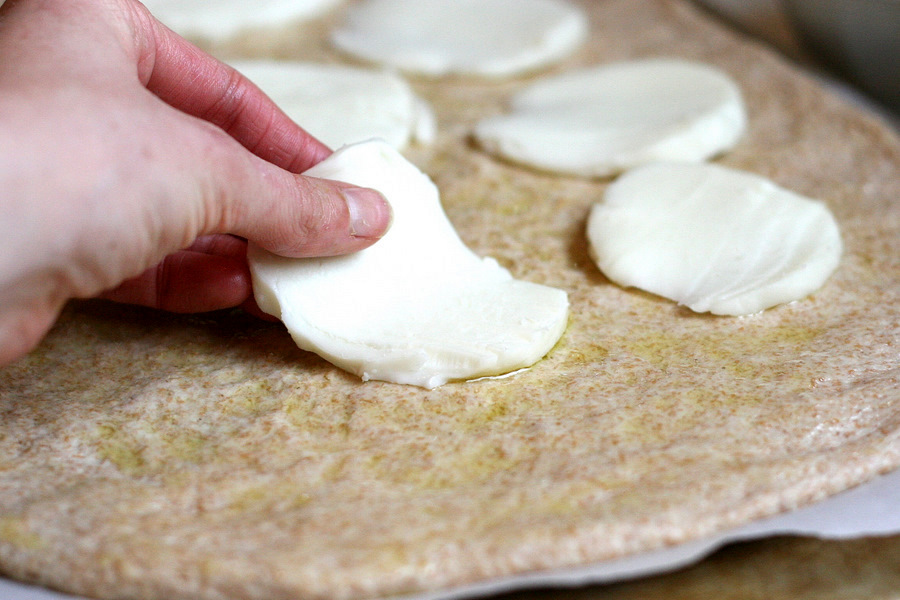
Take the sliced, fresh mozzarella and spread them around evenly on the dough. I obviously didn’t slice mine thin enough, but it melted well and turned out all right in the end.


Tasty Kitchen Blog: Shaved Asparagus Pizza. Guest post by Natalie Perry of Perry's Plate, recipe submitted by TK member keeperrox.

Spread the asparagus shavings evenly over the cheese.


Tasty Kitchen Blog: Shaved Asparagus Pizza. Guest post by Natalie Perry of Perry's Plate, recipe submitted by TK member keeperrox.

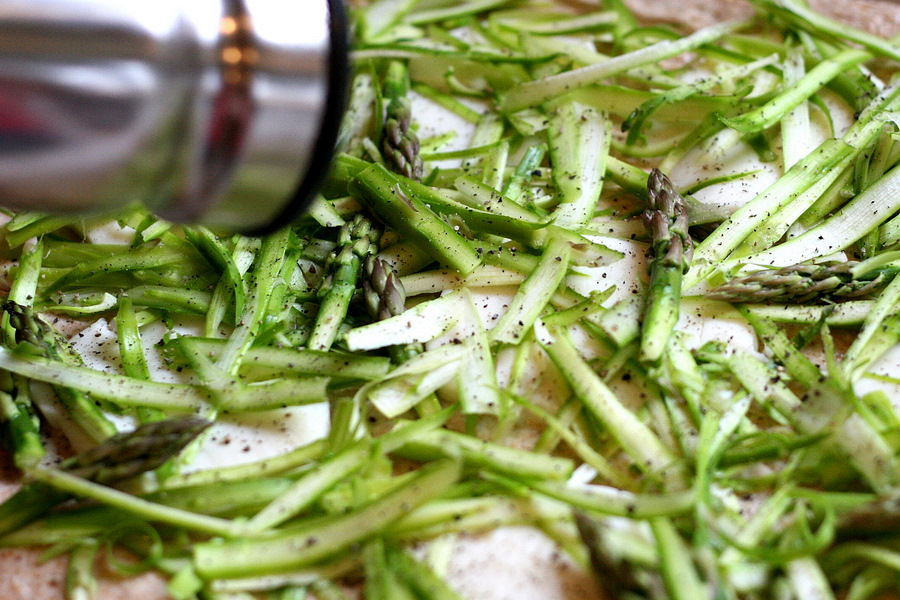
Crank a generous amount of black pepper over the shavings. You’ll love it in the end.


Tasty Kitchen Blog: Shaved Asparagus Pizza. Guest post by Natalie Perry of Perry's Plate, recipe submitted by TK member keeperrox.

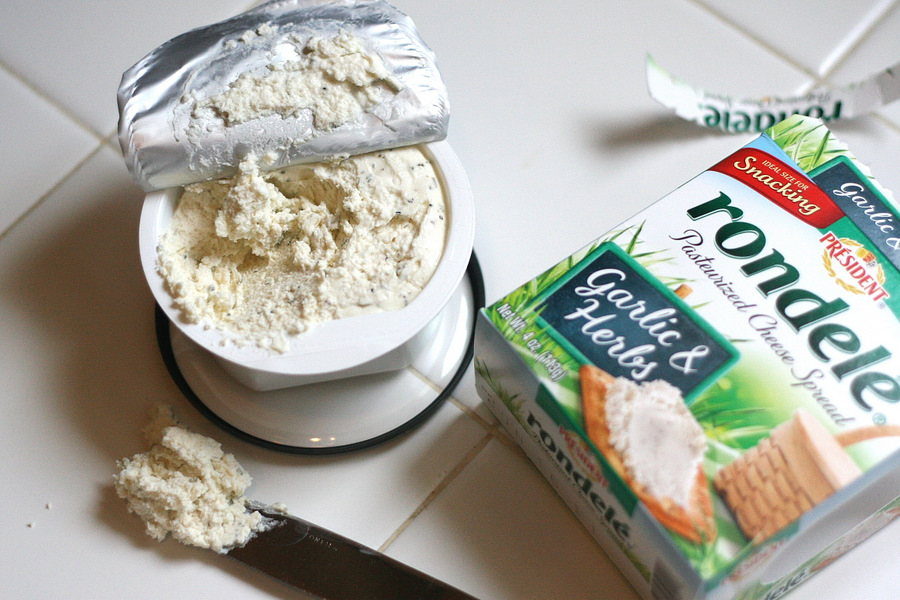
Now for the garlic and herb cheese spread. Here’s the brand I used. I thought it might help for you to see the packaging in case you weren’t sure what it was. This stuff is so packed with flavor. It was all I could do to keep my fingers out of it.


Tasty Kitchen Blog: Shaved Asparagus Pizza. Guest post by Natalie Perry of Perry's Plate, recipe submitted by TK member keeperrox.

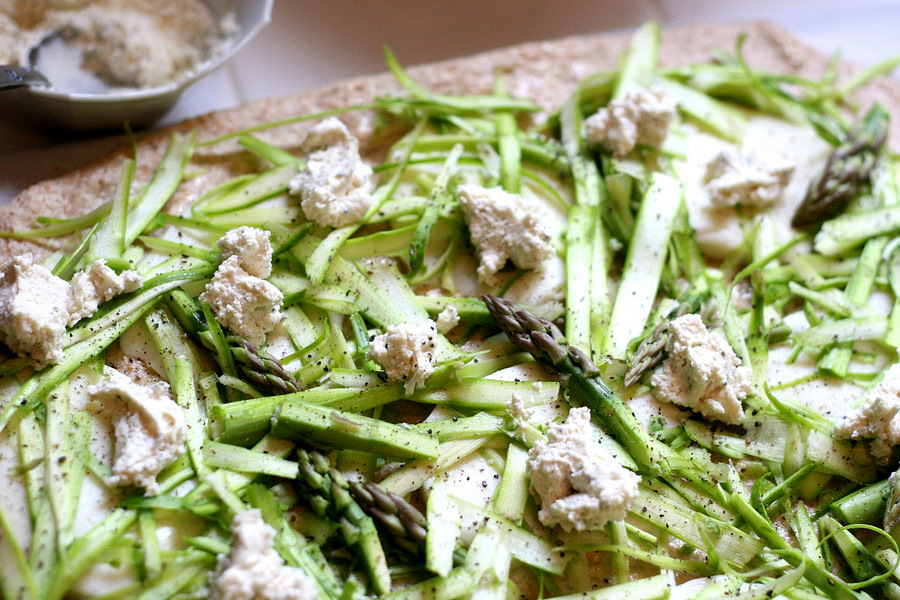
Dot the pizza with the cheese. My cheese came in a 4-ounce package, and I used almost all of it.

Take the pan holding the pizza over to the oven and slide the pizza (with the parchment) onto the preheated pan inside the oven. Bake for around 15–20 minutes until the cheese is melted and the crust is as browned as you like. To get the bottom crispier, remove the parchment about 5 minutes before the pizza is done.


Tasty Kitchen Blog: Shaved Asparagus Pizza. Guest post by Natalie Perry of Perry's Plate, recipe submitted by TK member keeperrox.

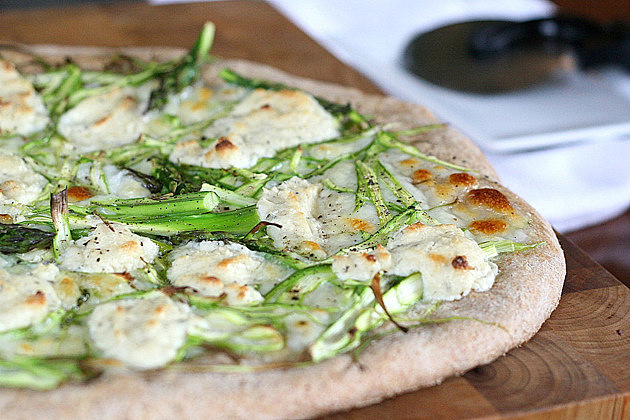
Gorgeous, isn’t it? I love the browned spots on the cheese and the singed edges of the asparagus.


Tasty Kitchen Blog: Shaved Asparagus Pizza. Guest post by Natalie Perry of Perry's Plate, recipe submitted by TK member keeperrox.

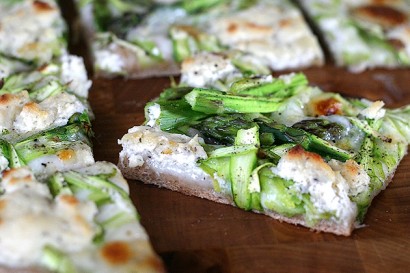
Once you cut it, it will begin to disappear. In my case, the culprits had extremely small hands.


Tasty Kitchen Blog: Shaved Asparagus Pizza. Guest post by Natalie Perry of Perry's Plate, recipe submitted by TK member keeperrox.

My two little girls and I nearly ate this whole pizza ourselves—greens and all. Although the asparagus was encased in bread and cheese, its taste was still distinct and fresh. The tingly bite from the black pepper and that garlic and herb cheese? Swoon.

Asparagus and I have been reconciled.

Thanks so much keeperrox for an easy and delicious pizza recipe! Her recipe box is loaded with unique recipes. Go check it out!


Printable Recipe

Shaved Asparagus Pizza

4.87 Mitt(s) 8 Rating(s)8 votes, average: 4.87 out of 58 votes, average: 4.87 out of 58 votes, average: 4.87 out of 58 votes, average: 4.87 out of 58 votes, average: 4.87 out of 5

Prep Time:

Cook Time:

Difficulty: Easy

Servings: 8

8
x

Print Options

Page size Letter 3x5 4x6
Text Size Small Medium Large
Content Include description
Include prep time, etc.
Show image

Description

This was born out of necessity. I needed something to eat and I used what was in my fridge: some no-knead dough, some asparagus, some fresh mozzarella, and Boursin cheese (it was on sale). The result? Deliciousness.

Ingredients

  • 1 whole Batch Of Pizza Dough - Enough For 1 12-16 Inch Pizza
  • Extra Virgin Olive Oil, For Drizzling The Dough
  • 8 ounces, weight Fresh Mozzarella
  • 1 bunch Asparagus
  • 5-¼ ounces, weight Boursin Cheese (or Similar Herb And Garlic Spreadable Cheese)
  • Fresh Cracked Black Pepper

Preparation Instructions

Preheat oven to 450 F.

If not already shaped, stretch your pizza dough into a large circle 12-16 inches in diameter and place on your pizza pan or stone. Drizzle dough with a thin stream of olive oil.

Slice fresh mozzarella as thinly as possible and arrange in a single layer over dough.

Using a vegetable peeler shave your asparagus into thin ribbons. Use the entire bunch, as you might only get 3 or 4 good ribbons from each spear. Pile asparagus shavings on top of the mozzarella. The asparagus WILL cook down so you want to use more than you think is necessary.

Top asparagus with several cranks of black pepper and dot generously with Boursin cheese. (I tend to use 1/4-1/2 a package per pizza.)

Bake on pizza stone or baking sheet for 15-20 minutes or until crust is golden brown. Let cool for 2-3 minutes before slicing and serving.


_______________________________________

Be sure to check out Natalie’s own beautiful food blog, Perrys’ Plate, where you can see her growing collection of lovely recipes. There’s always something new to see there. Go visit now!


Profile photo of Natalie | Perry's Plate

Singapore Noodles (Singapore Mei Fun)

Posted by in Step-by-Step Recipes

Tasty Kitchen Blog: Singapore Noodles (Singapore Mei Fun). Guest post by Natalie Perry of Perry's Plate, recipe submitted by TK member Sarah of The Woks of Life.

As much as I love eating out, I can’t help but mentally calculate the meal I could have prepared at home for the cost of the meal in the restaurant. That meal in my head is usually much larger and consists of higher quality food. Often it ends up tasting better and costing less. Plus, it’s almost always healthier when made at home.

That being said, I don’t miss having someone else do the work and clean up the mess when it’s all over. I suppose that’s what we pay for when we eat out. Not having a toddler clinging to my legs is sometimes worth the extra cost.

Having small children definitely helps with the temptation to eat out frequently. So does finding popular restaurant or take out recipes to prepare at home. Enter: Singapore Noodles (Singapore Mei Fun) from Tasty Kitchen member Sarah

You’ll be glad you stayed home for this. I promise.

Let’s get started!


Tasty Kitchen Blog: Singapore Noodles (Singapore Mei Fun). Guest post by Natalie Perry of Perry's Plate, recipe submitted by TK member Sarah of The Woks of Life.

First you’ll need a bunch of stuff. Nothing too hard to find, though. You’ll need medium uncooked shrimp (peeled, tail-on), Napa cabbage, a red onion, soy sauce (or tamari), sesame seed oil, rice noodles (I used Maifun rice sticks), coconut oil (or any other heat-safe oil), curry powder, eggs, salt, carrots, and green onions. The recipe also calls for Chinese sausage. I don’t recall ever seeing Chinese sausage in a store in Northern Nevada and taking small children on a hunt around town is about as fun as taking them to a nice restaurant. So, I used smoked deli ham like Sarah suggested. 


Tasty Kitchen Blog: Singapore Noodles (Singapore Mei Fun). Guest post by Natalie Perry of Perry's Plate, recipe submitted by TK member Sarah of The Woks of Life.

If your shrimp is frozen (like mine was), put them in a sieve and run tepid water over them for a minute or so until they soften. I left mine sitting in the sink for several minutes while I gathered the rest of the ingredients. 


Tasty Kitchen Blog: Singapore Noodles (Singapore Mei Fun). Guest post by Natalie Perry of Perry's Plate, recipe submitted by TK member Sarah of The Woks of Life.

Once the shrimp is fully thawed, pull the tails off. Then, run the tip of your knife along the inside curve of each shrimp to remove the intestinal tract. (Yep, that’s what that is. Gross, huh?) This really doesn’t take long. 


Tasty Kitchen Blog: Singapore Noodles (Singapore Mei Fun). Guest post by Natalie Perry of Perry's Plate, recipe submitted by TK member Sarah of The Woks of Life.

Now we start prepping the vegetables. This recipe is rather heavy on the chopping, but the cooking time is super quick and easy. It all balances out!

Slice the Napa cabbage into skinny ribbons.


Tasty Kitchen Blog: Singapore Noodles (Singapore Mei Fun). Guest post by Natalie Perry of Perry's Plate, recipe submitted by TK member Sarah of The Woks of Life.

Shred the carrots and slice the green onions thinly.


Tasty Kitchen Blog: Singapore Noodles (Singapore Mei Fun). Guest post by Natalie Perry of Perry's Plate, recipe submitted by TK member Sarah of The Woks of Life.

Trim, peel, and slice the red onion. 


Tasty Kitchen Blog: Singapore Noodles (Singapore Mei Fun). Guest post by Natalie Perry of Perry's Plate, recipe submitted by TK member Sarah of The Woks of Life.

Slice up that deli ham, too. 

Chopping is over! We survived!


Tasty Kitchen Blog: Singapore Noodles (Singapore Mei Fun). Guest post by Natalie Perry of Perry's Plate, recipe submitted by TK member Sarah of The Woks of Life.

Now crack the eggs into a bowl and give them a good whisk. Pour them into a small nonstick skillet, and cook until eggs are done, flipping halfway through. You want to make an omelet-like form instead of a scramble, so don’t move them around while they cook. 

Transfer them to a cutting board and … oh. I guess we do have a little chopping left. But it’s super quick. Cut the eggs into ribbons.


Tasty Kitchen Blog: Singapore Noodles (Singapore Mei Fun). Guest post by Natalie Perry of Perry's Plate, recipe submitted by TK member Sarah of The Woks of Life.

Place the rice noodles in a bowl of hot water. Let them sit for 5 minutes or until they become pliable but still too crunchy to eat. If you leave them in too long, they’ll turn to mush when you cook them. 


Tasty Kitchen Blog: Singapore Noodles (Singapore Mei Fun). Guest post by Natalie Perry of Perry's Plate, recipe submitted by TK member Sarah of The Woks of Life.

Alrighty. We’ve got our ingredients prepped and ready to go. You could actually do this the night before and keep them refrigerated until you need them. That would be handy on a busy night and you’d have dinner on the table in less than 15 minutes.

Your family will think you’re a rockstar. 


Tasty Kitchen Blog: Singapore Noodles (Singapore Mei Fun). Guest post by Natalie Perry of Perry's Plate, recipe submitted by TK member Sarah of The Woks of Life.

Grab your wok. Or large saute pan with high sides. Or some kind of deep skillet to keep everything in.

Bring the coconut oil to medium-high heat, then add the shrimp.


Tasty Kitchen Blog: Singapore Noodles (Singapore Mei Fun). Guest post by Natalie Perry of Perry's Plate, recipe submitted by TK member Sarah of The Woks of Life.

Add the ham. Stir them around and keep things moving as you add the other ingredients.


Tasty Kitchen Blog: Singapore Noodles (Singapore Mei Fun). Guest post by Natalie Perry of Perry's Plate, recipe submitted by TK member Sarah of The Woks of Life.

Now throw in the cabbage, red onion, and shredded carrots. 

I have to tell you. Trying to photograph a stir-fry step-by-step is an adventure. Seriously. Tossing vegetables into a screaming hot skillet and keeping them from burning while trying to get decent sort-of-in-focus photos through all the steam is wild. I like to live on the edge. 


Tasty Kitchen Blog: Singapore Noodles (Singapore Mei Fun). Guest post by Natalie Perry of Perry's Plate, recipe submitted by TK member Sarah of The Woks of Life.

Once you get it all mixed together, add the curry. And stir again. 

There’s a reason why this is a stir-fry. 


Tasty Kitchen Blog: Singapore Noodles (Singapore Mei Fun). Guest post by Natalie Perry of Perry's Plate, recipe submitted by TK member Sarah of The Woks of Life.

Add the rice noodles, breaking them apart as you put them in. Using your tongs, try to combine the rice noodles with the rest of the contents of the pan. 


Tasty Kitchen Blog: Singapore Noodles (Singapore Mei Fun). Guest post by Natalie Perry of Perry's Plate, recipe submitted by TK member Sarah of The Woks of Life.

If you spill, I won’t judge.


Tasty Kitchen Blog: Singapore Noodles (Singapore Mei Fun). Guest post by Natalie Perry of Perry's Plate, recipe submitted by TK member Sarah of The Woks of Life.

We’re almost to the finish line! Add the soy sauce and sesame oil.


Tasty Kitchen Blog: Singapore Noodles (Singapore Mei Fun). Guest post by Natalie Perry of Perry's Plate, recipe submitted by TK member Sarah of The Woks of Life.

Add the green onions, salt, pepper, and egg ribbons. Stir those in gently. 


Tasty Kitchen Blog: Singapore Noodles (Singapore Mei Fun). Guest post by Natalie Perry of Perry's Plate, recipe submitted by TK member Sarah of The Woks of Life.

Dump it all onto a platter and serve it up!

I have to say, this exceeded my expectations. I ADORE this meal. It was fun to make, and I love the bright colors from the spices and vegetables. It’s also light, but filling. You could even replace some noodles with more vegetables to add more of those vitamin things. If you don’t like shrimp, thinly sliced chicken or beef would also be good.


Tasty Kitchen Blog: Singapore Noodles (Singapore Mei Fun). Guest post by Natalie Perry of Perry's Plate, recipe submitted by TK member Sarah of The Woks of Life.

Thank you, Sarah, for giving me another reason to make a meal at home! 

Be sure to visit Sarah’s TK recipe box and her blog, The Woks of Life (I love that name) for more Chinese recipes!
 
Notes:
1. This recipe called for dried chiles which I initially omitted because my kids freak out when food has the slightest amount of heat. However, I added them anyway at the last minute, and I’m glad I did! Three peppers gave it just the right amount of tingle.
2. I doubled this recipe to feed our family of five and ended up with a lot of food. Enough for 6 adult servings. 


Printable Recipe

Singapore Noodles (Singapore Mei Fun)

See post on Sarah @ The Woks of Life’s site!
5.00 Mitt(s) 2 Rating(s)2 votes, average: 5.00 out of 52 votes, average: 5.00 out of 52 votes, average: 5.00 out of 52 votes, average: 5.00 out of 52 votes, average: 5.00 out of 5

Prep Time:

Cook Time:

Difficulty: Easy

Servings: 2

2
x

Print Options

Page size Letter 3x5 4x6
Text Size Small Medium Large
Content Include description
Include prep time, etc.
Show image

Description

You’ll find it on every takeout menu in America but it’s actually really easy to make at home! Try my dad’s authentic recipe.

Ingredients

  • 12 whole Shrimps, Peeled, Deveined, And Butterflied
  • 2 cups Soaked Rice Noodles
  • 2 whole Eggs (optional)
  • 3 cups Shredded Napa Cabbage
  • 1 whole Carrot
  • 1 whole Scallion
  • ½ whole Red Onion
  • 3 whole Dried Red Chiles (optional)
  • ⅓ cups Thinly Sliced Roast Pork, Ham, Or Chinese Sausage
  • 1 Tablespoon Oil
  • 1-½ Tablespoon Curry Powder
  • 2 teaspoons Salt
  • 1 Tablespoon Shaoxing Wine
  • ½ teaspoons Sesame Oil
  • ½ Tablespoons Soy Sauce
  • ¼ teaspoons White Pepper

Preparation Instructions

Rinse the shrimp and pat dry. Soak the rice noodles in cold water for 20 minutes. Drain the noodles just before you’re ready cook.

If you decide to use eggs in this, beat them in a bowl and make a thin omelet by cooking eggs in a hot oiled wok or nonstick skillet. Transfer to the cutting board and cut the omelet into thin strips about 2 to 3 inches long and set aside. Julienne the napa cabbage, carrot, and scallion. Thinly slice the red onion and set aside along with the dried chili peppers. Cut the Chinese sausage (or ham or pork) into thin pieces similar to the size of the carrots.

Heat the wok on the highest setting and add oil, sausage and shrimp and stir-fry for about 10 seconds. Add the dried chili peppers, carrot, napa cabbage and onion and stir-fry for about 30 seconds and then sprinkle the curry powder evenly over the mixture.

Add the rice noodles and while doing so, make sure you rip them into manageable 7- to 8-inch lengths for easy eating later. Add the salt and wine and mix well (about 1 to 2 minutes), making sure you firmly scrape the bottom of the wok with your spatula to prevent the noodles from sticking. A hot wok is a must to prevent sticking but ensuring that you scrape the bottom of the wok as you mix is an important technique.

The noodles should be taking on the rich color of the curry powder. Add the sesame oil, soy sauce, white pepper, scallions and the cooked egg if you decided to include it. Mix thoroughly again for another minute, plate and serve immediately!


_______________________________________

Be sure to check out Natalie’s own beautiful food blog, Perrys’ Plate, where you can see her growing collection of lovely recipes. There’s always something new to see there. Go visit now!

Profile photo of Natalie | Perry's Plate

Slow Cooker Korean Short Rib Tacos

Posted by in Step-by-Step Recipes

Tasty Kitchen Blog: Slow Cooker Korean Short Rib Tacos. Guest post by Natalie Perry of Perry's Plate, recipe submitted by TK member Shelbi Keith of Look Who's Cookin' Now.

 
We recently bought half of an organic, grass-fed cow. That’s, like, a whole freezer full of meat, and my mind is reeling at all of the unfamiliar cuts. (My meat selection growing up was limited to ground beef, steak, roasts, and boneless, skinless chicken breasts. I’ve come a long way!) Beef short ribs is one of those cuts, so I wandered around Tasty Kitchen looking for recipes. When I saw TK member Shelbi Keith’s recipe for Crockpot Korean Short Rib Tacos, I knew it was going to be a winner.

Why?

1. Unfamiliar cuts of meat + slow cooker = deliciousness
2. Tacos make my world go round. I love them almost as much as my children.

Let’s start!


Tasty Kitchen Blog: Slow Cooker Korean Short Rib Tacos. Guest post by Natalie Perry of Perry's Plate, recipe submitted by TK member Shelbi Keith of Look Who's Cookin' Now.

Gather up the ingredients for the sauce that goes in the slow cooker with the short ribs: soy sauce (I used tamari), rice vinegar, sesame oil, crushed red pepper flakes, garlic, ginger, and brown sugar (I reduced it to 1/3 cup).


Tasty Kitchen Blog: Slow Cooker Korean Short Rib Tacos. Guest post by Natalie Perry of Perry's Plate, recipe submitted by TK member Shelbi Keith of Look Who's Cookin' Now.

Peel the garlic and ginger and roughly chop them both. For the ginger, I just cut the skin off with a sharp knife. Yes, you may lose some ginger in the process, but the thought of scraping it off with the back of a spoon makes me crazy. So, I slice it off.


Tasty Kitchen Blog: Slow Cooker Korean Short Rib Tacos. Guest post by Natalie Perry of Perry's Plate, recipe submitted by TK member Shelbi Keith of Look Who's Cookin' Now.

Put the garlic and ginger in a food processor and give it a few pulses until it’s nice and minced. You could also mince it really well with a knife. Or use a Microplane grater.


Tasty Kitchen Blog: Slow Cooker Korean Short Rib Tacos. Guest post by Natalie Perry of Perry's Plate, recipe submitted by TK member Shelbi Keith of Look Who's Cookin' Now.

Transfer to a medium-ish bowl. Preferably one with polka dots.


Tasty Kitchen Blog: Slow Cooker Korean Short Rib Tacos. Guest post by Natalie Perry of Perry's Plate, recipe submitted by TK member Shelbi Keith of Look Who's Cookin' Now.

Add the soy sauce …


Tasty Kitchen Blog: Slow Cooker Korean Short Rib Tacos. Guest post by Natalie Perry of Perry's Plate, recipe submitted by TK member Shelbi Keith of Look Who's Cookin' Now.

And the rest of the ingredients: brown sugar, rice vinegar, sesame oil, and crushed red pepper.


Tasty Kitchen Blog: Slow Cooker Korean Short Rib Tacos. Guest post by Natalie Perry of Perry's Plate, recipe submitted by TK member Shelbi Keith of Look Who's Cookin' Now.

Give it a stir. You can make this sauce ahead and keep it in the fridge for several days.


Tasty Kitchen Blog: Slow Cooker Korean Short Rib Tacos. Guest post by Natalie Perry of Perry's Plate, recipe submitted by TK member Shelbi Keith of Look Who's Cookin' Now.

Unwrap your beef short ribs.


Tasty Kitchen Blog: Slow Cooker Korean Short Rib Tacos. Guest post by Natalie Perry of Perry's Plate, recipe submitted by TK member Shelbi Keith of Look Who's Cookin' Now.

Grab the slow cooker your mom used when you were a kid. (Those are the best kind! The newer ones cook way too hot.) Place the ribs inside. I used a 4-quart slow cooker, and it did wonderfully.


Tasty Kitchen Blog: Slow Cooker Korean Short Rib Tacos. Guest post by Natalie Perry of Perry's Plate, recipe submitted by TK member Shelbi Keith of Look Who's Cookin' Now.

Pour that sauce over the ribs, put the lid on, and walk away.

For about 10-12 hours. It took my ribs 11 hours to loosen up and start falling off the bones. It was a lot longer than I anticipated.


Tasty Kitchen Blog: Slow Cooker Korean Short Rib Tacos. Guest post by Natalie Perry of Perry's Plate, recipe submitted by TK member Shelbi Keith of Look Who's Cookin' Now.

So, instead of having these for dinner, I took the meat off the bones, poured the sauce into a container, and went to bed. That’s why the fat is so hard in the photo above. It was nice, though, to be able to remove so much of it. And it made for a nice, quick Saturday lunch the next day!


Tasty Kitchen Blog: Slow Cooker Korean Short Rib Tacos. Guest post by Natalie Perry of Perry's Plate, recipe submitted by TK member Shelbi Keith of Look Who's Cookin' Now.

I had to show you this. This is what the sauce looked like when I removed the fat, after it had sat in the fridge all night. Sort of like a beef broth-soy sauce gelatin. *shudder*


Tasty Kitchen Blog: Slow Cooker Korean Short Rib Tacos. Guest post by Natalie Perry of Perry's Plate, recipe submitted by TK member Shelbi Keith of Look Who's Cookin' Now.

No need to fear, though. I threw the meat into a skillet with about half of the gelatin-ized sauce and after a few minutes it got all juicy-like. Meat’s ready!


Tasty Kitchen Blog: Slow Cooker Korean Short Rib Tacos. Guest post by Natalie Perry of Perry's Plate, recipe submitted by TK member Shelbi Keith of Look Who's Cookin' Now.

Now let’s make the carrot-cucumber slaw to go on top. Don’t slack on this. This taco needs this slaw.

Peel a carrot and a cucumber. (I made more slaw than the recipe suggested and used every bit.)


Tasty Kitchen Blog: Slow Cooker Korean Short Rib Tacos. Guest post by Natalie Perry of Perry's Plate, recipe submitted by TK member Shelbi Keith of Look Who's Cookin' Now.

Julienne them both and place them in a bowl. You can do it by hand or use a julienne blade on a mandoline slicer. I really, really love my mandoline. It’s a dangerous thing for me to have, given my track record with sharp objects, but it makes thin, beautiful, uniform cuts. Totally worth the risk.


Tasty Kitchen Blog: Slow Cooker Korean Short Rib Tacos. Guest post by Natalie Perry of Perry's Plate, recipe submitted by TK member Shelbi Keith of Look Who's Cookin' Now.

The dressing for the slaw is simple: just rice vinegar, sugar, salt, and some crushed red pepper flakes. Combine them in a bowl …


Tasty Kitchen Blog: Slow Cooker Korean Short Rib Tacos. Guest post by Natalie Perry of Perry's Plate, recipe submitted by TK member Shelbi Keith of Look Who's Cookin' Now.

And pour it over the carrots and cucumber. You can do this a couple of hours ahead of time, but if you do it earlier, the cucumbers might get soggy. Toss it around, and it’s ready!


Tasty Kitchen Blog: Slow Cooker Korean Short Rib Tacos. Guest post by Natalie Perry of Perry's Plate, recipe submitted by TK member Shelbi Keith of Look Who's Cookin' Now.

Grab some tortillas and assemble the tacos, placing some slaw over the shredded meat. Top it with some chopped fresh cilantro and you are in business, my friends.


Tasty Kitchen Blog: Slow Cooker Korean Short Rib Tacos. Guest post by Natalie Perry of Perry's Plate, recipe submitted by TK member Shelbi Keith of Look Who's Cookin' Now.

Thank you, thank you, Shelbi for making these tacos a part of my life! They were fantastic and every solid-food-eating member of my family loved them!

Be sure to check out Shelbi’s Tasty Kitchen Recipe Box and her blog, Look Who’s Cookin’ Now for more great recipes! (Her Lime Grilled Steak with Smoky Cilantro Butter is calling my name.)


Printable Recipe

Crockpot Korean Short Rib Tacos

See post on Shelbi Keith’s site!
5.00 Mitt(s) 15 Rating(s)15 votes, average: 5.00 out of 515 votes, average: 5.00 out of 515 votes, average: 5.00 out of 515 votes, average: 5.00 out of 515 votes, average: 5.00 out of 5

Prep Time:

Cook Time:

Difficulty: Easy

Servings: 3

3
x

Print Options

Page size Letter 3x5 4x6
Text Size Small Medium Large
Content Include description
Include prep time, etc.
Show image

Description

After taking one bite, my husband proclaimed this his new favorite meal!

Ingredients

  • FOR THE KOREAN SHORT RIBS:
  • 5 cloves Garlic
  • 1-½ whole Inches Of Ginger, Peeled
  • ¾ cups Soy Sauce
  • ½ cups Plus 3 Tablespoons Brown Sugar
  • 6 Tablespoons Rice Vinegar
  • 2 Tablespoons Sesame Oil
  • 1 teaspoon Red Pepper Flakes
  • 3 pounds Beef Short Ribs
  • FOR THE CUCUMBER SLAW:
  • ½ whole Hot House Cucumber
  • ½ whole Carrot
  • 4 teaspoons Rice Vinegar
  • 1 teaspoon Sugar
  • 2 pinches Salt
  • 1 pinch Red Pepper Flakes
  • FOR SERVING:
  • 4 whole Tortillas
  • 2 Tablespoons Cilantro For Garnish

Preparation Instructions

For the Korean short ribs:

In a mini food processor, blend garlic and ginger until minced. Mix with soy sauce, brown sugar, rice vinegar, sesame oil, and red pepper flakes.

Place short ribs in crockpot and pour sauce over ribs. Turn crock pot on low heat. Cover with a lid and cook for 6-8 hours.
Remove meat from pot, discard bones. Place in the fridge to chill to touch.

Meanwhile, skim fat off the top of the sauce. Place in a sauce pan and simmer until thickened.

Once meat is cool to touch, pull apart with your fingers. Pour about 1/2 cup of the sauce back into the meat. You may serve the extra sauce on the side or discard it.

For the cucumber slaw:

Peel cucumber and chop into matchsticks. Peel carrot and shred.

Mix carrot and cucumber with rice vinegar, sugar, salt and red pepper flakes.

Serve meat on a warm tortilla topped with slaw and cilantro.


_______________________________________

Be sure to check out Natalie’s own beautiful food blog, Perrys’ Plate, where you can see her growing collection of lovely recipes. There’s always something new to see there. Go visit now!


Profile photo of Natalie | Perry's Plate

Spiced Sweet Potato Muffins

Posted by in Baking

Tasty Kitchen Blog: Paleo-friendly Cauliflower Fried Rice. Guest post by Natalie Perry of Perry's Plate, recipe submitted by TK member Dani of Expat Cucina.

We’re huge fans of sweet potatoes at our house. And muffins. And Indian food.

When I saw this muffin recipe and noticed it had garam masala in it, I made a weird face. That’s the honest truth.

If you’re not familiar with Indian spices, garam masala is a spice blend commonly used in curries and other Indian dishes. Not something you’d find in a muffin, that’s for sure.

It sounded odd to me, but I really, really wanted to try it. (Story of my cooking life, much to my kids’ dismay.)

I won over all three of my picky little girls with these muffins, though! Spiced Sweet Potato Muffins, submitted by Tasty Kitchen member Kristin, are an exotic spin on a simple sweet potato muffin. They’re not only gluten-free, but they’re grain-free as well and easily made dairy-free!

And they have chocolate chips. Maybe that’s why they liked them so much?


Tasty Kitchen Blog: Paleo-friendly Cauliflower Fried Rice. Guest post by Natalie Perry of Perry's Plate, recipe submitted by TK member Dani of Expat Cucina.

OK, let’s gather ingredients. You’ll need cold, mashed sweet potatoes, almond flour, real maple syrup, nut butter (I used almond), chocolate chips, cinnamon, cocoa powder, garam masala, baking powder, baking soda, salt, and vanilla extract.


Tasty Kitchen Blog: Paleo-friendly Cauliflower Fried Rice. Guest post by Natalie Perry of Perry's Plate, recipe submitted by TK member Dani of Expat Cucina.

Here’s my garam masala. You can find it in most grocery stores nowadays in the spice section. I ordered mine online a while back and have been refilling this bottle with a homemade blend.


Tasty Kitchen Blog: Paleo-friendly Cauliflower Fried Rice. Guest post by Natalie Perry of Perry's Plate, recipe submitted by TK member Dani of Expat Cucina.

First crack the eggs into a large mixing bowl and loosen them up with a fork.


Tasty Kitchen Blog: Paleo-friendly Cauliflower Fried Rice. Guest post by Natalie Perry of Perry's Plate, recipe submitted by TK member Dani of Expat Cucina.

Add the sweet potatoes, nut butter, and maple syrup.


Tasty Kitchen Blog: Paleo-friendly Cauliflower Fried Rice. Guest post by Natalie Perry of Perry's Plate, recipe submitted by TK member Dani of Expat Cucina.

Mix it up until you get something that resembles pumpkin pie filling. Speaking of pumpkin, you could totally use canned pumpkin in place of sweet potatoes in this! Just add an extra splash or two of maple syrup.


Tasty Kitchen Blog: Paleo-friendly Cauliflower Fried Rice. Guest post by Natalie Perry of Perry's Plate, recipe submitted by TK member Dani of Expat Cucina.

Add the almond flour and the rest of the dry ingredients.


Tasty Kitchen Blog: Paleo-friendly Cauliflower Fried Rice. Guest post by Natalie Perry of Perry's Plate, recipe submitted by TK member Dani of Expat Cucina.

Mix it well, and then fold the chocolate chips into the batter. The nice thing about not using wheat flour is that you don’t have to worry as much about over-mixing and ending up with cone-head muffins!


Tasty Kitchen Blog: Paleo-friendly Cauliflower Fried Rice. Guest post by Natalie Perry of Perry's Plate, recipe submitted by TK member Dani of Expat Cucina.

Scoop the batter into muffin molds. I used a silicone muffin pan, but you can use any type you like. I would recommend using paper liners if you don’t use a silicone pan so they come out easier. And in one piece.

Throw them in the oven …


Tasty Kitchen Blog: Paleo-friendly Cauliflower Fried Rice. Guest post by Natalie Perry of Perry's Plate, recipe submitted by TK member Dani of Expat Cucina.

… and out they come! I’ve consistently gotten 11 muffins out of this batch, and I’ve also double and tripled this recipe before with success. They also freeze and reheat nicely!


Tasty Kitchen Blog: Paleo-friendly Cauliflower Fried Rice. Guest post by Natalie Perry of Perry's Plate, recipe submitted by TK member Dani of Expat Cucina.

These tasty little grain-free morsels have become a staple in our muffin collection! I thought the spices blended beautifully with the sweet potatoes. And the chocolate chips were a nice touch. (They usually are.)


Tasty Kitchen Blog: Paleo-friendly Cauliflower Fried Rice. Guest post by Natalie Perry of Perry's Plate, recipe submitted by TK member Dani of Expat Cucina.

Before you go, stop by Kristin’s TK Recipe Box as well as her blog, Tastefully Gluten Free, for more delicious recipes!

Notes:
1. I omitted the yogurt to make them dairy free. Because it was only one tablespoon, I didn’t think it would make a big difference if I left it out.
2. Garam masala is a potent blend, and after making this recipe several times, I decided to cut the amount down by two-thirds. Any more than a 1/2 teaspoon gave the muffins a strange, “am I eating curry or a muffin” flavor. Perhaps my spice blend is more potent because I make it myself? Try it and see what you think!


Printable Recipe

Spiced Sweet Potato Muffins

See post on Kristin @ Tastefully GF’s site!
4.67 Mitt(s) 3 Rating(s)3 votes, average: 4.67 out of 53 votes, average: 4.67 out of 53 votes, average: 4.67 out of 53 votes, average: 4.67 out of 53 votes, average: 4.67 out of 5

Prep Time:

Cook Time:

Difficulty: Easy

Servings: 12

12
x

Print Options

Page size Letter 3x5 4x6
Text Size Small Medium Large
Content Include description
Include prep time, etc.
Show image

Description

A healthy and gluten free baked good that’s perfect for fall.

Ingredients

  • 2 whole Eggs
  • 1 cup Sweet Potato Puree (fresh Is Best, Or Canned)
  • ¼ cups Creamy Peanut Butter
  • 1 Tablespoon Plain Greek Yogurt
  • 3 Tablespoons Pure Maple Syrup
  • 1 cup Almond Meal
  • 2 teaspoons Baking Soda
  • ½ teaspoons Baking Powder
  • 2 teaspoons Cinnamon
  • 1-½ teaspoon Garam Masala
  • 1 teaspoon Cocoa Powder
  • 1 teaspoon Salt
  • 1 teaspoon Vanilla Extract
  • ½ cups Chocolate Chips Or Cacao Chips

Preparation Instructions

1. Preheat oven to 350°F.

2. In a large bowl, whisk the two eggs with a fork until they are a bit frothy.

3. Stir in sweet potato puree, peanut butter, yogurt and maple syrup.

4. Add all of the remaining ingredients except the chocolate/cacao chips. Once all the dry ingredients are combined stir in the chips.

5. Line a 12-count standard size muffin pan with muffin liners (I used silicone muffin liners, which I love), and fill each muffin tin. These muffins expand some, but not a lot, so you can fill them almost to the top.

6. Bake for 20-25 minutes, or until a toothpick comes out clean. I rotate the pan once, halfway through the cooking. Remove pan from oven and set on a rack.

7. Let muffins cool in the pan before serving.


_______________________________________

Be sure to check out Natalie’s own beautiful food blog, Perrys’ Plate, where you can see her growing collection of lovely recipes. There’s always something new to see there. Go visit now!


Profile photo of Natalie | Perry's Plate

Stuffed Acorn Squash with Cranberry Cornbread Stuffing

Posted by in Step-by-Step Recipes

We’re so excited to have a growing group of fantastic contributors here on Tasty Kitchen. Today I’d like to welcome Natalie (Perry’s Plate), who has contributed nearly sixty scrumptious dishes to Tasty Kitchen over the past year. We’ve featured so many of Natalie’s recipes on Tasty Kitchen, many of them are permanently committed to my…

Profile photo of Natalie | Perry's Plate

Tropical Thai Chicken Curry

Posted by in Step-by-Step Recipes

You know what's great? Easy, approachable ethnic recipes to make during the holidays. I can only eat so much bread, potatoes, and heavy cream, you know? I need recipes that are quick and different from the typically rich meals of the season. 

Profile photo of Natalie | Perry's Plate

Vegetarian Tamales

Posted by in Step-by-Step Recipes

  Everything you’ve heard about tamales is true, folks. Yes, these Mexican culinary wonders are a lot of work, and they take a lot of time. On the bright side, the work isn’t difficult and boy, is it worth it in the end. Eating one tamale after the other (after the other) makes you forget […]