The Pioneer Woman Tasty Kitchen
Profile photo of EatLiveRun

Spicy Tequila Lime Chicken Marinade

Posted by in Step-by-Step Recipes

Tasty Kitchen Blog: Spicy Tequila Lime Chicken. Guest post by Jenna Weber of Eat, Live, Run; recipe submitted by TK member Kimberly of Eats, Sweets, and Treats!

 
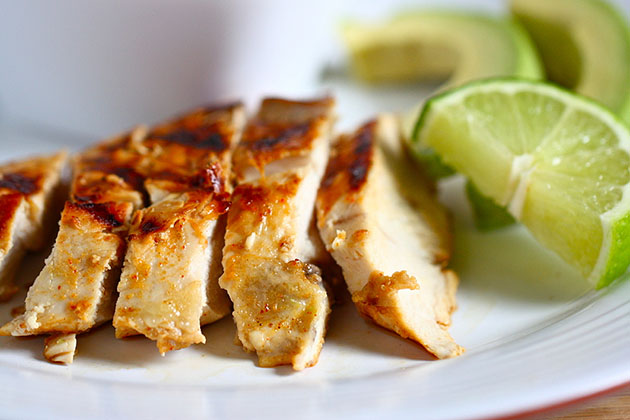
I don’t know about you, but I’m always on the lookout for a new chicken marinade recipe. It seems like throwing a marinade together would be easy, but for some reason the idea of creating my own stresses me out. Which is why I was so excited when I found this recipe for Spicy Tequila-Lime Marinated Chicken from EatsSweetsTreats!

I love spicy food and this sure fits the bill. I’m sure it would be fabulous in a burrito, but we enjoyed our grilled marinated chicken with a side of Cuban black beans, rice, guacamole and margaritas. Extra salt, please!

Let’s be honest, I really just wanted a reason to bust out the tequila.


Tasty Kitchen Blog: Spicy Tequila Lime Chicken. Guest post by Jenna Weber of Eat, Live, Run; recipe submitted by TK member Kimberly of Eats, Sweets, and Treats!

All I ask is can you not make a margarita while making this recipe?! Like I said, this marinade produces some pretty spicy chicken. To cut down on the spice, use a jalapeno pepper instead of a serrano and/or remove the seeds first.

To make the marinade, just process all ingredients (except the chicken, of course!) in either a food processor or high-speed blender.


Tasty Kitchen Blog: Spicy Tequila Lime Chicken. Guest post by Jenna Weber of Eat, Live, Run; recipe submitted by TK member Kimberly of Eats, Sweets, and Treats!

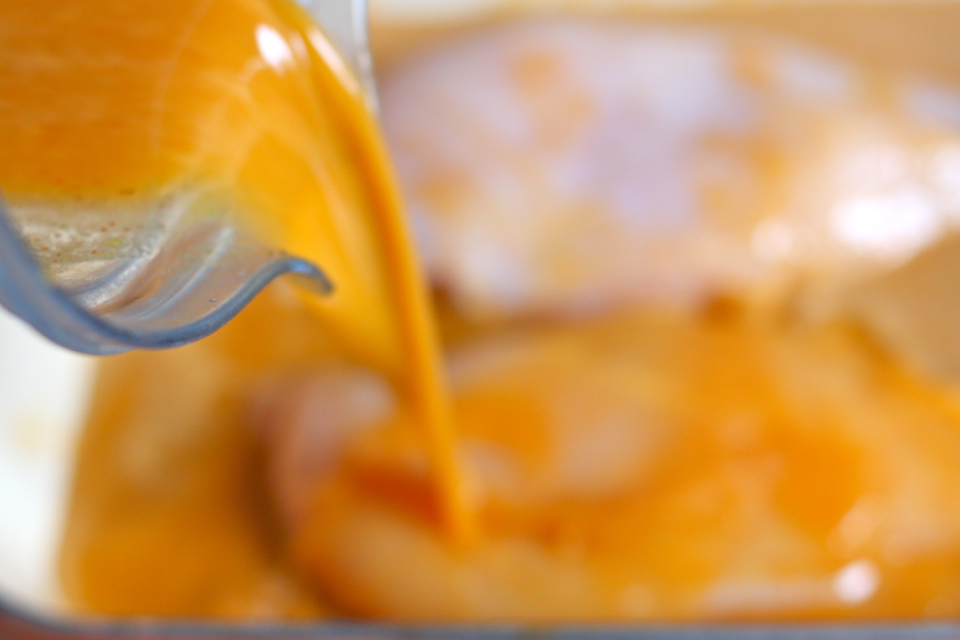
Then just pour the marinade over the chicken breasts, cover and stick in the fridge for a couple hours. You’ll want to turn the chicken over halfway through to ensure even marination.


Tasty Kitchen Blog: Spicy Tequila Lime Chicken. Guest post by Jenna Weber of Eat, Live, Run; recipe submitted by TK member Kimberly of Eats, Sweets, and Treats!

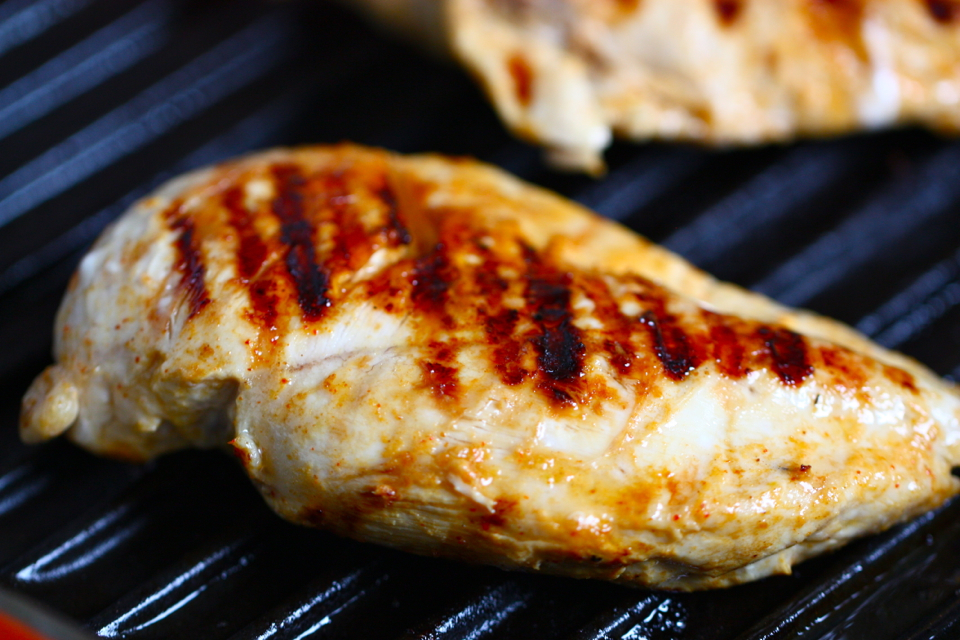
After your chicken is done marinating, you can either sear it in a cast iron skillet on the stove, grill it outside or do what I did and use your handy dandy grill pan! I love my grill pan.


Tasty Kitchen Blog: Spicy Tequila Lime Chicken. Guest post by Jenna Weber of Eat, Live, Run; recipe submitted by TK member Kimberly of Eats, Sweets, and Treats!

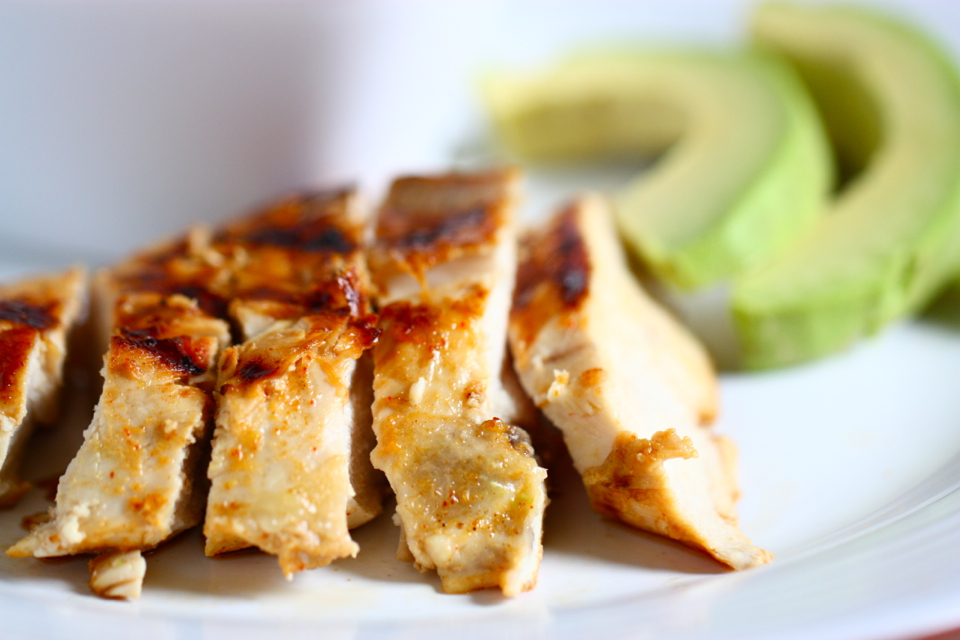
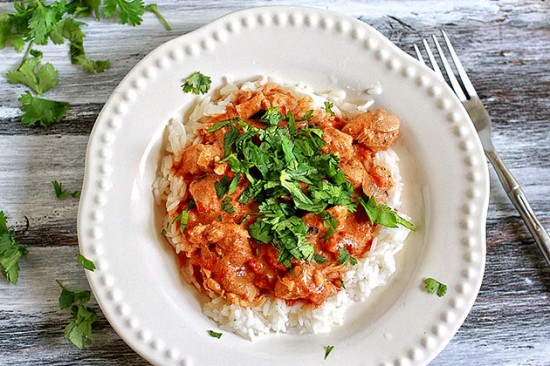
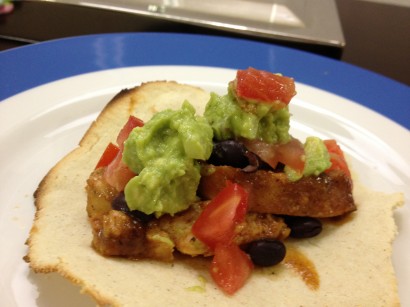
And there ya have it! So easy, delicious and perfect for slicing up and stuffing in burritos, tacos, you name it. After cooking, I squeezed a little more lime on my chicken and sprinkled some sea salt on top—it was spicy perfection!

Thank you Kimberly for such an easy recipe to kick off grilling season, and just in time for Cinco de Mayo. Visit the blog Eats, Sweets, and Treats! for more recipes and Texas restaurant write-ups.


Printable Recipe

Spicy Tequila-Lime Marinated Chicken

See post on Kimberly's Treats’s site!
4.50 Mitt(s) 2 Rating(s)2 votes, average: 4.50 out of 52 votes, average: 4.50 out of 52 votes, average: 4.50 out of 52 votes, average: 4.50 out of 52 votes, average: 4.50 out of 5

Prep Time:

Cook Time:

Difficulty: Easy

Servings: 3

3
x

Print Options

Page size Letter 3x5 4x6
Text Size Small Medium Large
Content Include description
Include prep time, etc.
Show image

Description

Perfect topping for homemade corn tortillas! Quick and easy for a weeknight meal.
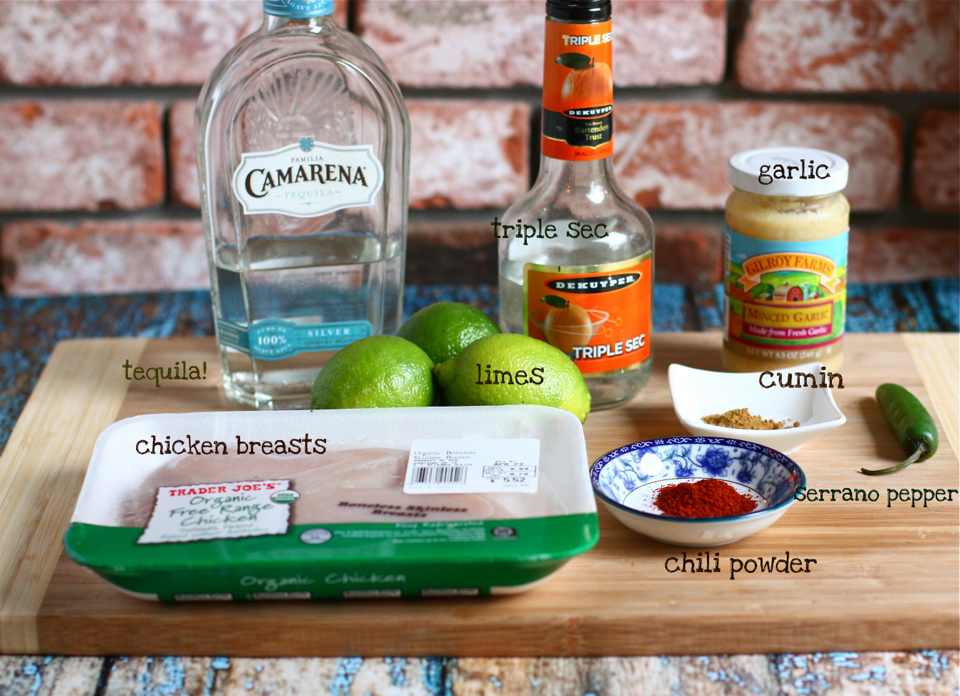
Ingredients

  • ½ cups Fresh Squeezed Lime Juice (for 1/2 Cup You'll Need About 2 Limes)
  • ¼ cups Tequila
  • 1 ounce, fluid Triple Sec
  • ½ Tablespoons Olive Oil
  • ¼ teaspoons Cumin
  • ½ teaspoons Chili Powder
  • 2 cloves Garlic
  • 1  Serrano Pepper, Stem (and Seeds, Optional) Removed
  • 1 whole Boneless Skinless Chicken Breast

Preparation Instructions

Combine all ingredients listed (except chicken) in the bowl of a food processor. Pulse until all ingredients are finely chopped and mixture is smooth.

Pour marinade into a shallow dish and place chicken in dish to marinate for 1-2 hours. Flip the chicken breasts once about halfway through the marinade time.

Place a pan over medium high heat and sear the chicken breasts on each side. It should take about 4-5 minutes per side. Reserve excess marinade.

After both sides are golden brown, reduce heat to medium low and remove chicken from pan. Put chicken onto a cutting board and slice chicken into strips, about 1/2 inch thick.

Return chicken to pan and add the excess marinade. Stir everything to combine and let simmer for another 3-4 minutes, or until chicken is cooked all the way through.

Remove from heat and use chicken anyway you see fit! My favorite way is to use the chicken for tacos and top with caramelized onions, guacamole, chopped tomatoes, and lettuce!


_______________________________________

Jenna is a food writer who has worked as a pastry chef and bread baker. Her blog Eat, Live, Run has great recipes, travel stories, and the perfect slogan: “Celebrating life, one crumb at a time.”


Profile photo of EatLiveRun

Birthday Cake Batter Popcorn

Posted by in Step-by-Step Recipes

Tasty Kitchen Blog: Birthday Cake Batter Popcorn. Guest post by Jenna Weber of Eat, Live, Run; recipe submitted by TK member Mrs. Schwartz's Kitchen.

 
When I was saw this recipe by Mrs. Schwatz a few weeks ago, I knew I had to stop everything and make it immediately. Birthday Cake Batter Popcorn? Yes, please. As a lover of anything salty and sweet, I knew it would be a winner. Plus, it involved rainbow sprinkles. Enough said.
 
I made this the day before going on vacation, and had grand plans to take it with me in little plastic baggies for the flight.
 
Let’s just say it never made it that far.
 
Between munching all day while I worked and going back for “just one more kernel”, all I had left to fill my plastic baggies were popcorn seeds. Oops.
 
Here’s what ya need!


Tasty Kitchen Blog: Birthday Cake Batter Popcorn. Guest post by Jenna Weber of Eat, Live, Run; recipe submitted by TK member Mrs. Schwartz's Kitchen.

Simple yellow cake mix, some popcorn (I just popped one bag in the microwave), vegetable shortening, white chocolate chips and sprinkles. Five ingredients—it doesn’t get better than that!


Tasty Kitchen Blog: Birthday Cake Batter Popcorn. Guest post by Jenna Weber of Eat, Live, Run; recipe submitted by TK member Mrs. Schwartz's Kitchen.

The first step is melting your white chocolate. I just zapped this in the microwave in short thirty-second intervals until it was all melted. I think it took a minute and a half total.


Tasty Kitchen Blog: Birthday Cake Batter Popcorn. Guest post by Jenna Weber of Eat, Live, Run; recipe submitted by TK member Mrs. Schwartz's Kitchen.

Then, stir in your vegetable shortening to the melted white chocolate …


Tasty Kitchen Blog: Birthday Cake Batter Popcorn. Guest post by Jenna Weber of Eat, Live, Run; recipe submitted by TK member Mrs. Schwartz's Kitchen.

And add cake mix! How fun is that? I would never in a million years think to add dry cake mix to melted chocolate. The recipe says to add 1 – 1 ½ cups cake mix, but I would err on the lesser side because it makes the chocolate mixture really, really thick.


Tasty Kitchen Blog: Birthday Cake Batter Popcorn. Guest post by Jenna Weber of Eat, Live, Run; recipe submitted by TK member Mrs. Schwartz's Kitchen.

Add this to the popcorn and use your hands to toss everything together—watch out, it’s gonna get messy! Don’t worry if you don’t get all the white chocolate cake batter clumps perfectly mixed in with the popcorn. It will harden anyway and work out just fine.


Tasty Kitchen Blog: Birthday Cake Batter Popcorn. Guest post by Jenna Weber of Eat, Live, Run; recipe submitted by TK member Mrs. Schwartz's Kitchen.

Now comes my favorite part: sprinkles! I love rainbow sprinkles and add them to anything and everything.


Tasty Kitchen Blog: Birthday Cake Batter Popcorn. Guest post by Jenna Weber of Eat, Live, Run; recipe submitted by TK member Mrs. Schwartz's Kitchen.

Let the popcorn cool and set to harden up a bit—if you can stand it to wait, that is.


Tasty Kitchen Blog: Birthday Cake Batter Popcorn. Guest post by Jenna Weber of Eat, Live, Run; recipe submitted by TK member Mrs. Schwartz's Kitchen.

Ta-dah! How fun and festive is that?
 
I love taking a perfectly healthy snack like natural popcorn and dumping chocolate and cake mix on it, don’t you?


Tasty Kitchen Blog: Birthday Cake Batter Popcorn. Guest post by Jenna Weber of Eat, Live, Run; recipe submitted by TK member Mrs. Schwartz's Kitchen.

If you want to be sneaky, you can put this in a bag, hide it in the bottom of your largest purse and hit up the movies with your girlfriends. You didn’t hear that from me though.
 
Thank you, Mrs. Schwartz, for such a fun easy recipe! Head over to her blog Mrs. Schwartz’s Kitchen to find more of her recipes.


Printable Recipe

Birthday Cake Batter Popcorn

See post on Krysten Schwartz ’s site!
4.56 Mitt(s) 9 Rating(s)9 votes, average: 4.56 out of 59 votes, average: 4.56 out of 59 votes, average: 4.56 out of 59 votes, average: 4.56 out of 59 votes, average: 4.56 out of 5

Prep Time:

Cook Time:

Difficulty: Easy

Servings: 6

6
x

Print Options

Page size Letter 3x5 4x6
Text Size Small Medium Large
Content Include description
Include prep time, etc.
Show image

Description

Salty, sweet, crunchy and colorful! What else would you want in a snack or dessert?

Ingredients

  • 1-½ cup Melted Almond Bark Or White Chocolate
  • ¼ cups Vegetable Shortening
  • 1-½ cup White Or Yellow Cake Mix
  • 6 cups Popcorn (popped)
  • ¼ cups Sprinkles

Preparation Instructions

Melt the almond bark/chocolate in the microwave. I put it in the microwave in 30-second intervals, stirring between each 30 seconds until it is fully melted.

Add the vegetable shortening to the almond bark/chocolate and stir until it is melted. I usually don’t have to put it back in the microwave to completely melt it but you can if you have to.

Then add the cake mix to the almond bark/chocolate.

Pour the coating onto the popcorn and coat evenly. I use 2 spoons and toss it almost like a salad.

Pour the popcorn out onto cookie sheets to cool/harden. Sprinkle immediately with your choice of sprinkles.

Wait until fully hardened (if you can) and enjoy!


_______________________________________

Jenna is a food writer who has worked as a pastry chef and bread baker. Her blog Eat, Live, Run has great recipes, travel stories, and the perfect slogan: “Celebrating life, one crumb at a time.”


Profile photo of EatLiveRun

Cowboy Potato Chowder

Posted by in Step-by-Step Recipes

Tasty Kitchen Blog: Cowboy Potato Chowder. Guest post by Jenna Weber of Eat, Live, Run; recipe submitted by TK member Kelly (kellykitchen).

 
I love a good old-fashioned potato soup.

It has to be thick though! None of that watery broth with potato pieces floating around for me. I like my potato soup rustic and hearty, and perfect for dipping big chunks of warm bread. I have a potato soup recipe that I use fairly often, but was interested in changing it up a bit. So I decided to try this Cowboy Potato Chowder by kellykitchen.

It turned out fabulous! Thick and rich, with bright bits of fresh thyme and dill. I made a big batch of it and brought it over to a friend who just had mouth surgery and could only have soft food. They loved it as well. I have a feeling it would freeze well, too, so that’s all the more reason to make extra.

Here’s what ya need!


Tasty Kitchen Blog: Cowboy Potato Chowder. Guest post by Jenna Weber of Eat, Live, Run; recipe submitted by TK member Kelly (kellykitchen).

I used a spicy jalapeno chicken sausage instead of the regular sausage that the original recipe called for. I also used bacon grease instead of olive oil to sauté my veggies. Why not? It was delicious!

Let’s get started!


Tasty Kitchen Blog: Cowboy Potato Chowder. Guest post by Jenna Weber of Eat, Live, Run; recipe submitted by TK member Kelly (kellykitchen).

First, chop your onion and garlic and sauté both in olive oil (or bacon grease!). You just want them to be tender, not totally soft, so this should take about five minutes.


Tasty Kitchen Blog: Cowboy Potato Chowder. Guest post by Jenna Weber of Eat, Live, Run; recipe submitted by TK member Kelly (kellykitchen).

After that, add the sausage, fresh dill and fresh thyme. Like I said, I opted for a spicy chicken sausage because that’s what I currently had on hand. Any sausage would do though!


Tasty Kitchen Blog: Cowboy Potato Chowder. Guest post by Jenna Weber of Eat, Live, Run; recipe submitted by TK member Kelly (kellykitchen).

Pour in a quart of chicken broth (I used low-sodium) and add your peeled, chopped potatoes. Bring the mixture to a boil, then cover and reduce heat to a simmer. Let simmer for about 20 minutes, or until potato chunks are quite tender.


Tasty Kitchen Blog: Cowboy Potato Chowder. Guest post by Jenna Weber of Eat, Live, Run; recipe submitted by TK member Kelly (kellykitchen).

Once the potatoes are tender, slowly drizzle in the milk. Reduce heat to the lowest setting and stir well.

Now, we’re going to make the roux to thicken the chowder up!


Tasty Kitchen Blog: Cowboy Potato Chowder. Guest post by Jenna Weber of Eat, Live, Run; recipe submitted by TK member Kelly (kellykitchen).

Heat up a couple tablespoons of olive oil in a large skillet and add flour.


Tasty Kitchen Blog: Cowboy Potato Chowder. Guest post by Jenna Weber of Eat, Live, Run; recipe submitted by TK member Kelly (kellykitchen).

Whisk together over medium high heat and keep on whisking until the mixture begins to turn golden brown and smell very nutty. You’ll know when it’s done but watch out! You don’t want to scorch the roux.

Carefully (you do not want to splatter roux on your arm!) scoop out the roux into the bubbling chowder and stir well. The soup should thicken up almost immediately. Remember: the more roux you add, the thicker your soup will be.


Tasty Kitchen Blog: Cowboy Potato Chowder. Guest post by Jenna Weber of Eat, Live, Run; recipe submitted by TK member Kelly (kellykitchen).

There ya have it! I served my soup with cheddar cheese and bacon bits, and it was divine—-probably the best homemade potato soup I’ve had and perfect for cold, dreary winter days!

Make this soon, guys. You’re gonna love it! And a big thanks to kellykitchen for providing such a tummy warming recipe.


Printable Recipe

Cowboy Potato Chowder

4.57 Mitt(s) 7 Rating(s)7 votes, average: 4.57 out of 57 votes, average: 4.57 out of 57 votes, average: 4.57 out of 57 votes, average: 4.57 out of 57 votes, average: 4.57 out of 5

Prep Time:

Cook Time:

Difficulty: Easy

Servings: 6

6
x

Print Options

Page size Letter 3x5 4x6
Text Size Small Medium Large
Content Include description
Include prep time, etc.
Show image

Description

A hearty chowder perfect for wintry days.

Ingredients

  • ½ cups Olive Oil, Divided
  • 1 whole Yellow Onion, Diced
  • 2 cloves Garlic (peeled And Diced)
  • 3 Tablespoons Fresh Thyme (or 1 Tablespoon Dried)
  • 3 Tablespoons Fresh Dill (or 1 Tablespoon Dried)
  • 14 ounces, weight Sausage, Crumbled
  • 4 cups Chicken Broth
  • 6 whole Yukon Gold Potatoes, Peeled And Chopped
  • 2 cups Milk
  • ¼ cups White Flour
  • Salt And Pepper
  • Optional Toppings: Grated Cheese, Bacon Bits, And Chopped Green Onions

Preparation Instructions

1. Heat 1/4 cup olive oil in a stockpot over medium heat. Add onion and garlic. Saute until tender, about 5 minutes.
2. Stir in thyme, dill and sausage; cook, stirring about 5 minutes until sausage is brown.
3. Add broth and potatoes, bring to a boil. Reduce heat to medium, cover and simmer about 20 minutes or until potatoes are tender.
4. Slowly add milk and bring soup back to a boil, simmer 2-3 minutes.
5. To thicken soup, heat remaining 1/4 cup olive oil in a saute pan over medium heat. Stir in the flour, cook stirring until mixture is smooth and light golden brown, about 2 minutes. Be careful not to scorch the roux mixture. Stir this roux into the soup until the soup thickens. Remove from heat, add salt and pepper to taste.

Optional: top with grated cheese, bacon bits, and chopped green onions.

Keeps well refrigerated for 2-3 days. Reheat on low heat, slowly stir Add 1 cup of milk if too thick.


_______________________________________

Jenna is a food writer who has worked as a pastry chef and bread baker. Her blog Eat, Live, Run has great recipes, travel stories, and the perfect slogan: “Celebrating life, one crumb at a time.”


Profile photo of EatLiveRun

Homemade Chicken and Dumplings

Posted by in Step-by-Step Recipes

Tasty Kitchen Blog: Homemade Chicken and Dumplings. Guest post by Jenna Weber of Eat, Live, Run; recipe submitted by TK member Tiffany of Eat at Home.

 
Homemade chicken and dumplings. Or, chicken n’ dumplins’ rather, as we like to say in the South. I had been eagerly searching for a recipe like the kind I enjoyed so much growing up and this one, from TIffany (TK member Eat at Home), nailed it.

There are many different versions of chicken and dumplings and this is definitely the one that reminds me of home. For this version, the dumplings are rolled out thin and sliced, rather than dropped biscuit-style into the bubbling chicken stock. The result is a creamy, thick chicken stew that is just perfect for chilly nights! Try it and be converted to a dumplin’ lover forever.


Tasty Kitchen Blog: Homemade Chicken and Dumplings. Guest post by Jenna Weber of Eat, Live, Run; recipe submitted by TK member Tiffany of Eat at Home.

Another reason I love this dish so much? Look how simple it is! You don’t need anything fancy—just cooked chicken, flour, milk, butter, salt, baking powder and broth. The recipe said to use cooked chicken and I had just finished roasting one, so it turned out perfect! I highly recommend using a roast chicken (either roasted at home or rotisserie for this!).


Tasty Kitchen Blog: Homemade Chicken and Dumplings. Guest post by Jenna Weber of Eat, Live, Run; recipe submitted by TK member Tiffany of Eat at Home.

To make the dumplings, in a large bowl measure out 2 cups of flour …


Tasty Kitchen Blog: Homemade Chicken and Dumplings. Guest post by Jenna Weber of Eat, Live, Run; recipe submitted by TK member Tiffany of Eat at Home.

A half teaspoon of baking powder …


Tasty Kitchen Blog: Homemade Chicken and Dumplings. Guest post by Jenna Weber of Eat, Live, Run; recipe submitted by TK member Tiffany of Eat at Home.


And some butter! Cut this in with your fingers and mix until the dough looks crumbly, sort of like making pie dough!


Tasty Kitchen Blog: Homemade Chicken and Dumplings. Guest post by Jenna Weber of Eat, Live, Run; recipe submitted by TK member Tiffany of Eat at Home.

Then add a little less than a cup of milk and a pinch of salt.


Tasty Kitchen Blog: Homemade Chicken and Dumplings. Guest post by Jenna Weber of Eat, Live, Run; recipe submitted by TK member Tiffany of Eat at Home.

Mix the dough together and then roll out on a heavily floured surface. You definitely don’t want to go easy on the flour—using a lot of flour here is what will make the broth thicken later!


Tasty Kitchen Blog: Homemade Chicken and Dumplings. Guest post by Jenna Weber of Eat, Live, Run; recipe submitted by TK member Tiffany of Eat at Home.

Once you have the dough rolled out, make long slices either using a pizza cutter, a pastry cutter or just a plain ol’ knife.


Tasty Kitchen Blog: Homemade Chicken and Dumplings. Guest post by Jenna Weber of Eat, Live, Run; recipe submitted by TK member Tiffany of Eat at Home.

Then make criss-crosses so you have lots of cute little dumpling squares. Remember to keep everything covered in flour!


Tasty Kitchen Blog: Homemade Chicken and Dumplings. Guest post by Jenna Weber of Eat, Live, Run; recipe submitted by TK member Tiffany of Eat at Home.

Bring your broth or stock to a boil and drop the dumplings in, along with any extra flour on the table. Gently stir but be careful not to mash them.


Tasty Kitchen Blog: Homemade Chicken and Dumplings. Guest post by Jenna Weber of Eat, Live, Run; recipe submitted by TK member Tiffany of Eat at Home.

Finally, add your cooked chicken to the pot and serve. So, so, so easy! When I served this to my boyfriend for dinner, I slyly asked him how long he thought I spent making it. He guessed four hours (four hours, people!) and couldn’t believe it when I told him it took me only 30 minutes. Amazing.

You’ll want to make this recipe, asap. Thank you so much Tiffany for such a nostalgic treat! Be sure to check out her blog Eat at Home for more of her delicious recipes.


Printable Recipe

Homemade Chicken and Dumplings

See post on Eat at Home’s site!
4.95 Mitt(s) 44 Rating(s)44 votes, average: 4.95 out of 544 votes, average: 4.95 out of 544 votes, average: 4.95 out of 544 votes, average: 4.95 out of 544 votes, average: 4.95 out of 5

Prep Time:

Cook Time:

Difficulty: Easy

Servings: 8

8
x

Print Options

Page size Letter 3x5 4x6
Text Size Small Medium Large
Content Include description
Include prep time, etc.
Show image

Description

A bowl of chicken and dumplings. A glass of sweet tea. It’s a meal any Kentuckian would be proud to fix and danged happy to sit down to. And it’s not hard to make. Come on, I’ll show you how.

Ingredients

  • 2 cups Flour
  • ½ teaspoons Baking Powder
  • 1 pinch Salt
  • 2 Tablespoons Butter
  • 1 cup Milk, A Bit Less Than A Full Cup
  • 2 quarts Chicken Broth
  • 3 cups Cooked Chicken

Preparation Instructions

In a bowl, combine the flour, baking powder and salt. Cut the butter into the dry ingredients with a fork or pastry blender. Stir in the milk, mixing with a fork until the dough forms a ball.

Heavily flour a work surface. You’ll need a rolling pin and something to cut the dumplings with. I like to use a pizza cutter. I also like to use a small spatula to lift the dumplings off the cutting surface.

Roll the dough out thin with a heavily floured rolling pin. Dip your cutter in flour and cut the dumplings in squares about 2″x2″. It’s okay for them not to be exact. Just eye ball it. Some will be bigger, some smaller, some shaped funny.

Use the floured spatula to put them on a heavily floured plate. Just keep flouring between the layers of dumplings.

To cook them, bring the broth to a boil. Drop the dumplings in one at a time, stirring while you add them. The extra flour on them will help thicken the broth. Cook them for about 15-20 minutes or until they not doughy tasting. Add the cooked chicken to the pot and you’re done!

For more pictures and instructions, see the related link above!


_______________________________________

Jenna is a food writer who has worked as a pastry chef and bread baker. Her blog Eat, Live, Run has great recipes, travel stories, and the perfect slogan: “Celebrating life, one crumb at a time.”


Profile photo of EatLiveRun

Slow-Cooker Chicken Tikka Masala

Posted by in Step-by-Step Recipes

  Indian food is total comfort for me. There’s just something about the spicy heat, the simple side of white basmati rice and the chewy garlic naan that soaks it all up perfectly. And as much as I love hitting up my local Indian restaurant for take-out, I also really love making my own Indian […]

Profile photo of EatLiveRun

The Yummiest Peach Cobbler

Posted by in Baking, Step-by-Step Recipes

I may be a chocolate girl, but peaches will always have my heart. They bring me back to my true Southern roots! And though I love a good slice of gooey chocolate cake like the rest of them, if given the choice I will always choose peach cobbler for dessert. Sweet, juicy peaches topped with sweet biscuits and served with vanilla ice cream. It doesn’t really get…

Profile photo of EatLiveRun

Sweet Zucchini Pancakes

Posted by in Step-by-Step Recipes

  If you’re like me, you have a plethora of zucchini on your hands right now and have already made all the breads, muffins and pastas that you can with it. So when I found PinchofYum’s simple recipe for Sweet Zucchini Pancakes I decided to give it a go. I loved the idea of zucchini […]

Profile photo of EatLiveRun

Butterscotch Meringue Bars

Posted by in Baking, Step-by-Step Recipes

If there’s anything I love more than chocolate chip cookies, it’s meringue. And so when I saw The Church Cook’s recipe for Butterscotch Meringue Bars, I knew I had to give it a go! I’m blessed to know Kay in real life and let me tell you, she has a knack for creating mouthwatering dishes! […]