The Pioneer Woman Tasty Kitchen
Profile photo of HowSweetEats

Cauliflower Crust Pizza

Posted by in Step-by-Step Recipes

Tasty Kitchen Blog: Cauliflower Crust Pizza. Guest post by Jessica Merchant of How Sweet It Is, recipe submitted by TK member Michelle of The Lucky Penny.

 
Oh cauliflower pizza crust, I have been skeptical of you for so long. So, so long. The first time I attempted a cauliflower crust was back in the day, long before Pinterest existed or I knew what a blog was, after getting a recipe from someone in my local gym. I didn’t love cauliflower at the time but I didn’t loathe it either. Plus, it came loaded with lots of cheese, so it had to be a win. Right?

Wrong. It was pretty terrible. So terrible in fact that, until I found this recipe—this recipe for The Best Cauliflower Crust Pizza ever—I vowed that I wouldn’t succumb to the trend once again.

Now, I’m so glad that I did. Michelle is one smart cookie.

Not only is the crust simple, it is FAST. That’s the key for me. Now, let me say that I don’t think I will ever replace my favorite pizza crust. I make a mean whole-wheat dough and love it all up. But this is an awesome recipe for when you want pizza and you are short on time, or when you want pizza but are willing to draw outside the lines a bit, or when you want pizza but need to stay away from gluten. Or maybe you’re trying to sneak in some extra veg. Story of my life.

This gets even better with an array of toppings. I am boring in my pizza choices so I kept it simple with some cheese and sauce. But now, all I’m envisioning is buffalo chicken, grilled vegetables, cheeseburger pizza, and other endless options. So excited. Let’s get started!


Tasty Kitchen Blog: Cauliflower Crust Pizza. Guest post by Jessica Merchant of How Sweet It Is, recipe submitted by TK member Michelle of The Lucky Penny.

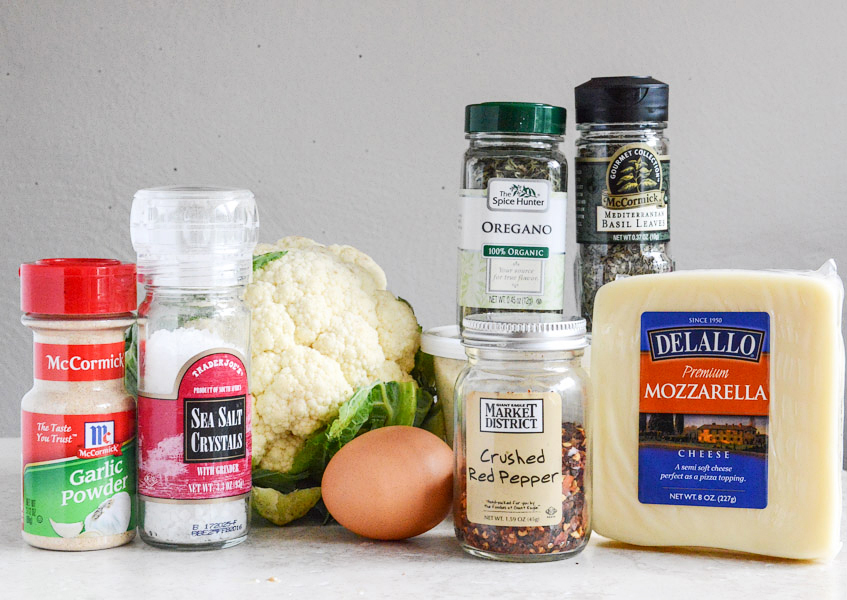
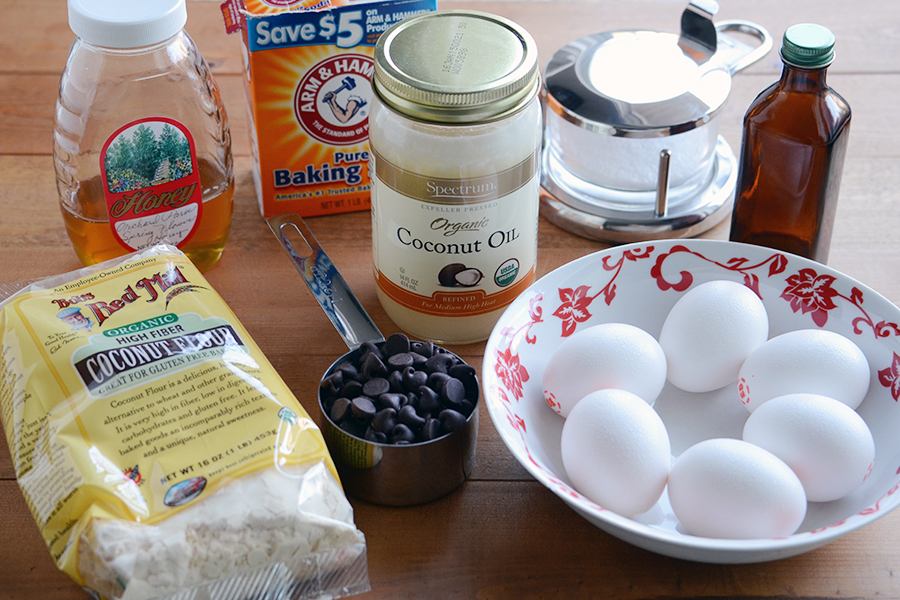
This is all you need for your crust: a small (emphasis on small!) head of cauliflower, one egg, some mozzarella and Parmesan cheese, salt, pepper, garlic powder, oregano, basil and crushed red pepper flakes. That’s it! Plus, whatever toppings you choose.

This specific method uses a pizza stone or baking sheet. Begin by adding the stone or sheet to the oven and preheating your oven. Having a pizza peel is ideal, but if you have another object (like a cutting board) that you can flour, it will work too.


Tasty Kitchen Blog: Cauliflower Crust Pizza. Guest post by Jessica Merchant of How Sweet It Is, recipe submitted by TK member Michelle of The Lucky Penny.

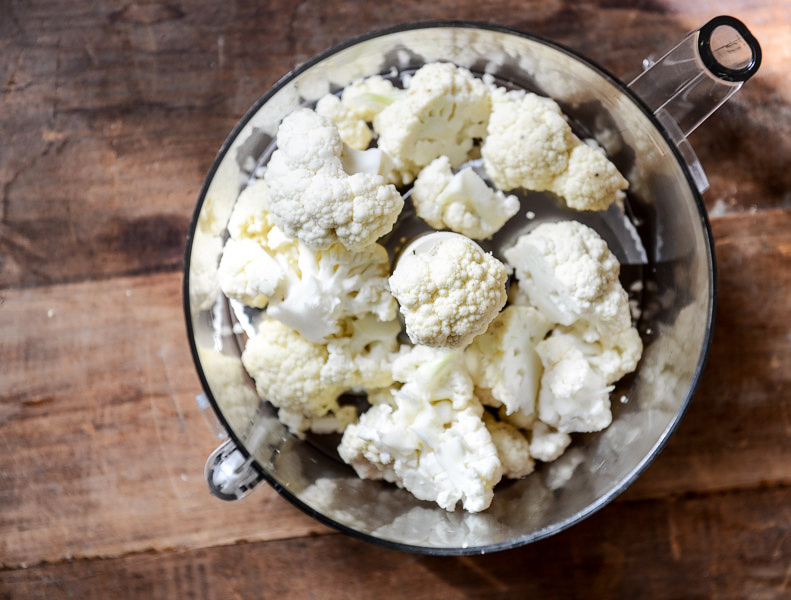
First up, add the cauliflower to your food processor and pulse.


Tasty Kitchen Blog: Cauliflower Crust Pizza. Guest post by Jessica Merchant of How Sweet It Is, recipe submitted by TK member Michelle of The Lucky Penny.

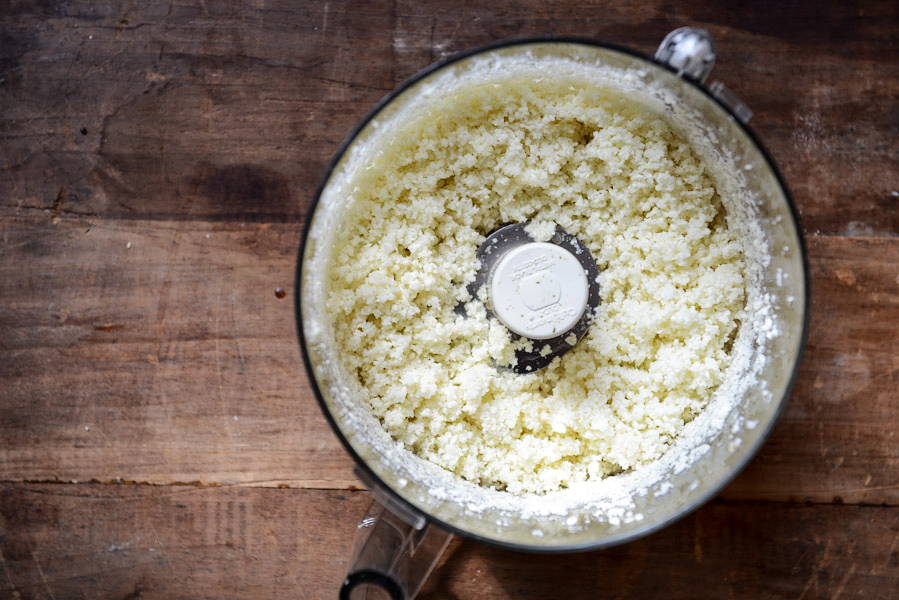
You want it to look like cauliflower “snow.” That expression made me so happy.


Tasty Kitchen Blog: Cauliflower Crust Pizza. Guest post by Jessica Merchant of How Sweet It Is, recipe submitted by TK member Michelle of The Lucky Penny.

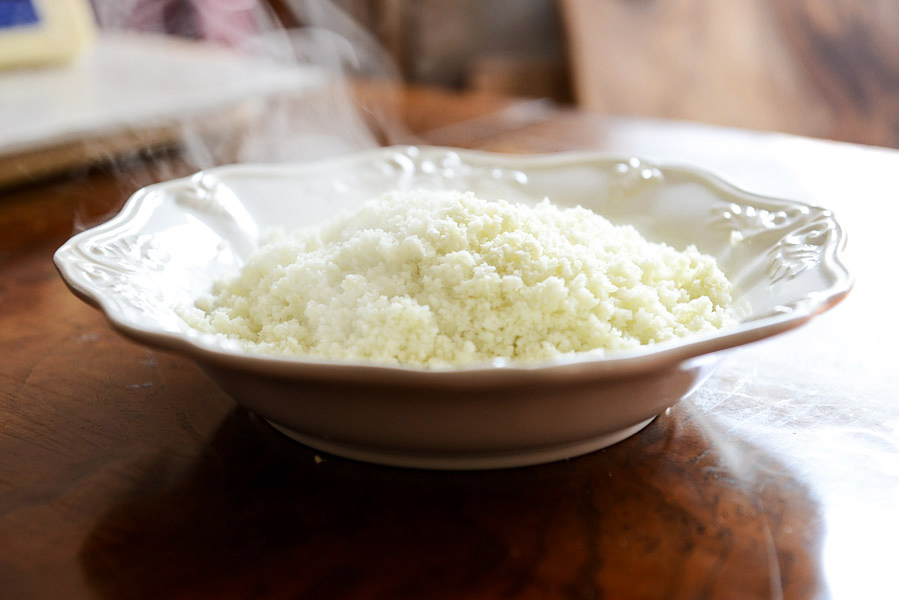
Once your cauliflower is pulsed into tiny crumbs, you want to microwave it. Let it cool completely or else you’ll burn the heck out of your hands.


Tasty Kitchen Blog: Cauliflower Crust Pizza. Guest post by Jessica Merchant of How Sweet It Is, recipe submitted by TK member Michelle of The Lucky Penny.

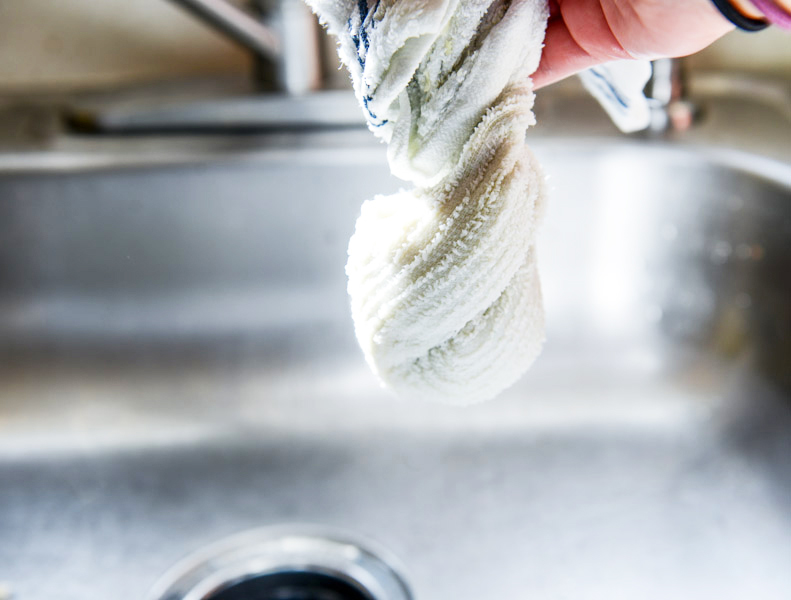
After the cauliflower has cooled, place it in a towel and ring the heck out of it to remove as much liquid as possible.


Tasty Kitchen Blog: Cauliflower Crust Pizza. Guest post by Jessica Merchant of How Sweet It Is, recipe submitted by TK member Michelle of The Lucky Penny.

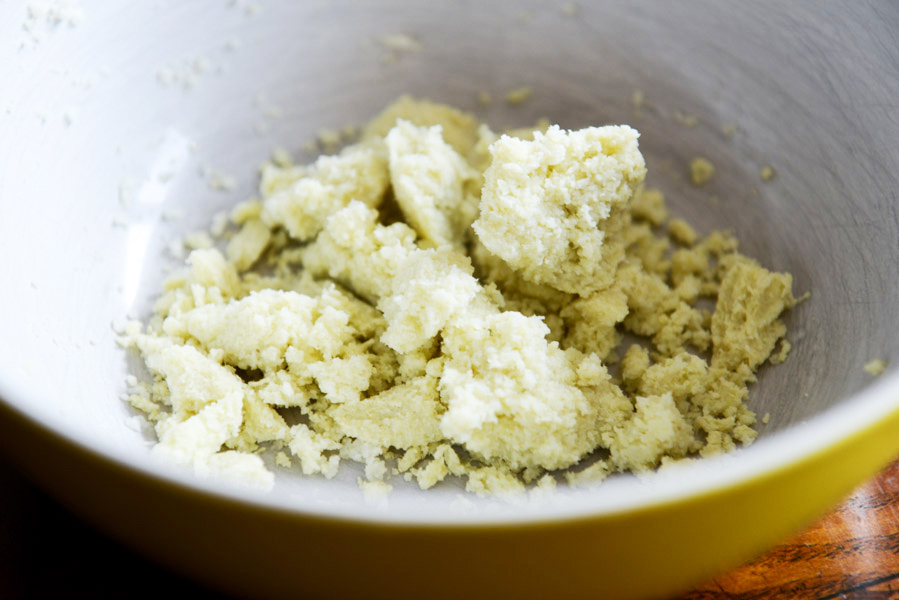
You will be left with something like this—a sort of cauliflower “pulp,” if you will.


Tasty Kitchen Blog: Cauliflower Crust Pizza. Guest post by Jessica Merchant of How Sweet It Is, recipe submitted by TK member Michelle of The Lucky Penny.

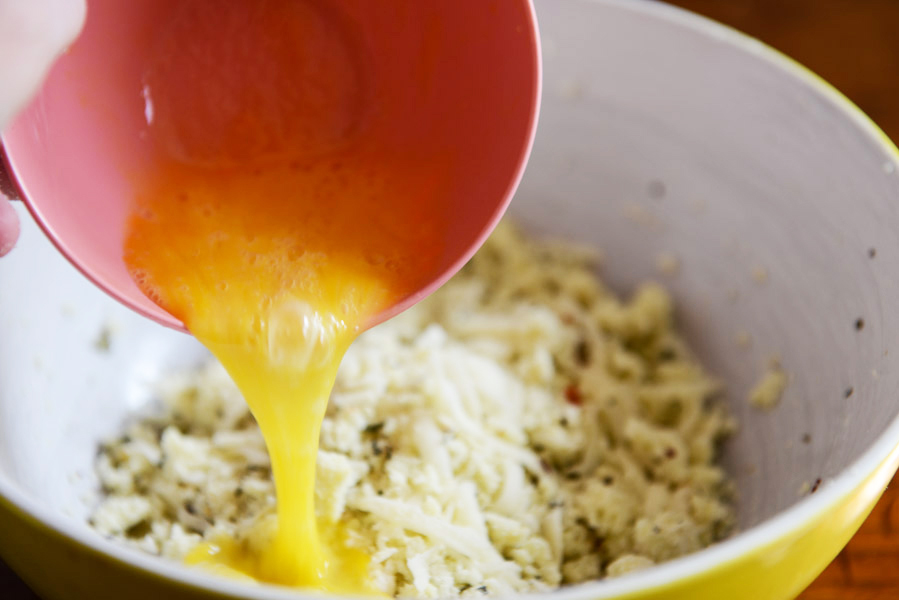
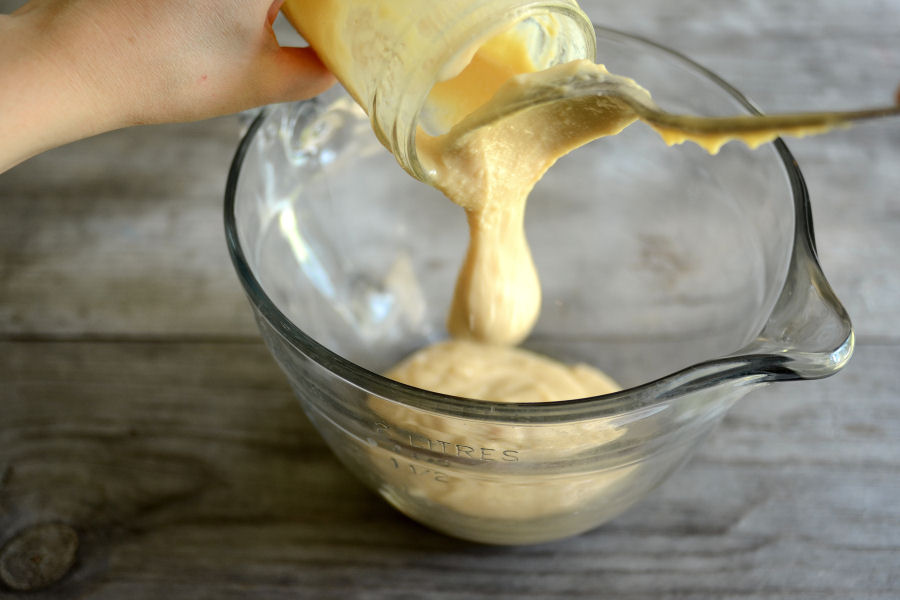
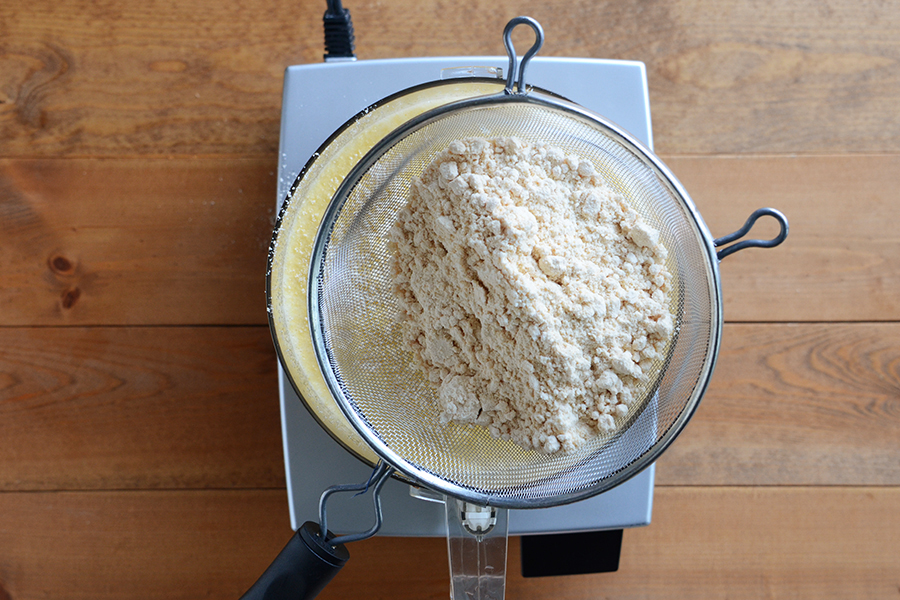
Add in the cheeses and the spices and mix the mixture until combined. Then add in your egg.


Tasty Kitchen Blog: Cauliflower Crust Pizza. Guest post by Jessica Merchant of How Sweet It Is, recipe submitted by TK member Michelle of The Lucky Penny.

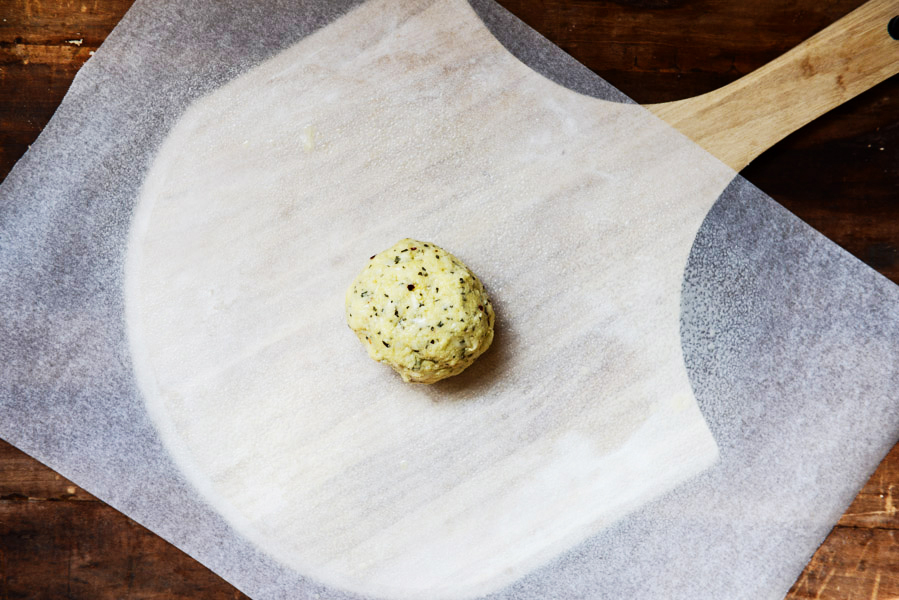
Using your hands to bring the dough together is necessary, and it happens easily. Form the dough into a ball. Spray a sheet of parchment paper with nonstick spray and place it on top of a pizza peel. Add the dough ball on top.


Tasty Kitchen Blog: Cauliflower Crust Pizza. Guest post by Jessica Merchant of How Sweet It Is, recipe submitted by TK member Michelle of The Lucky Penny.

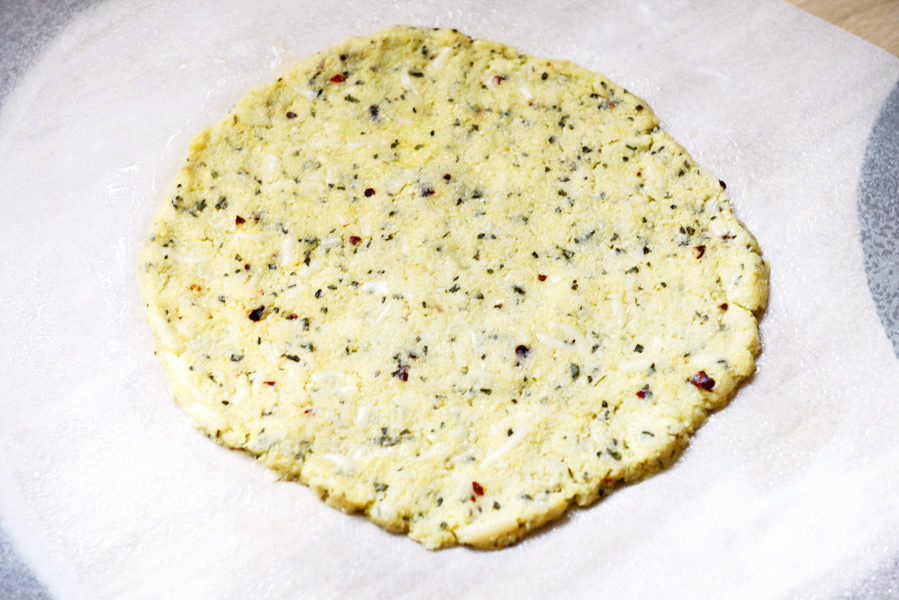
Form the dough into a thin circle and bake it for a few minutes until golden.


Tasty Kitchen Blog: Cauliflower Crust Pizza. Guest post by Jessica Merchant of How Sweet It Is, recipe submitted by TK member Michelle of The Lucky Penny.

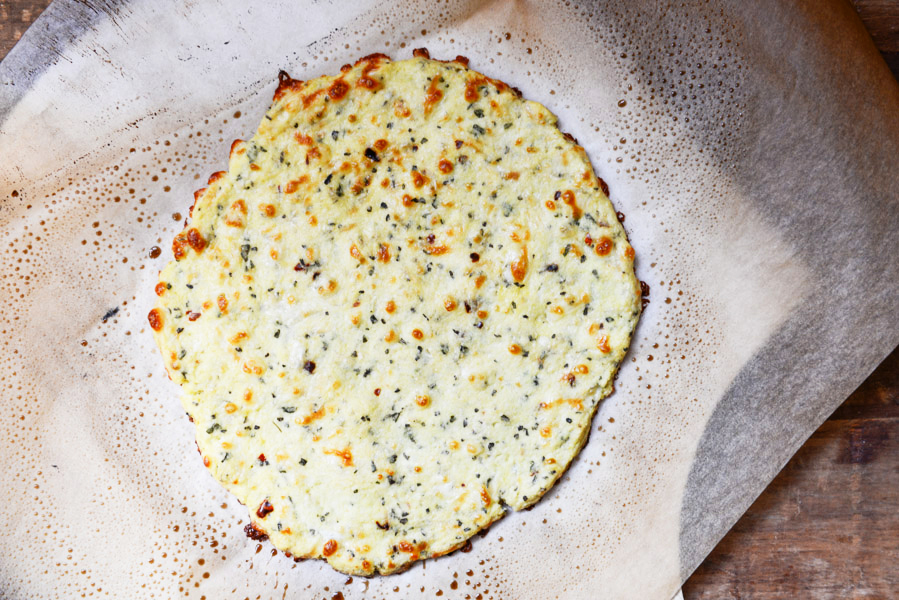
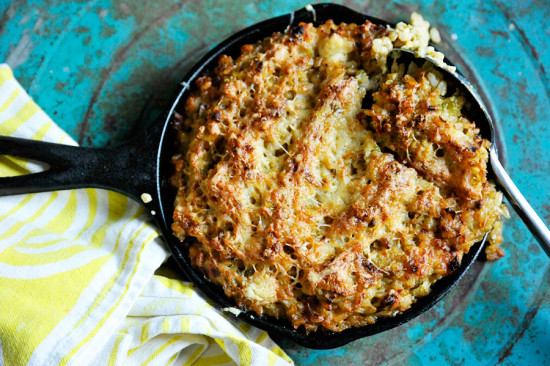
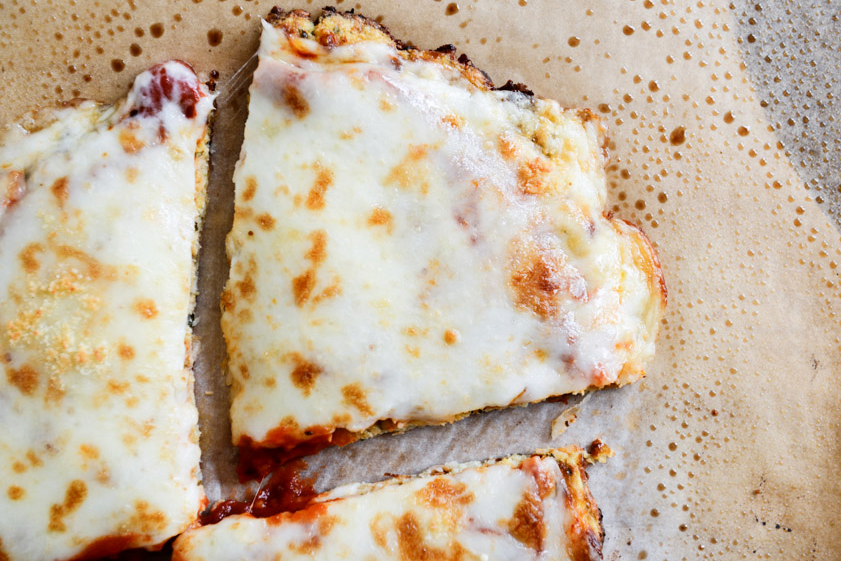
It will look like this! At this point, it smells freaking delicious. Definitely good enough to eat. So much cheeeeeeese.


Tasty Kitchen Blog: Cauliflower Crust Pizza. Guest post by Jessica Merchant of How Sweet It Is, recipe submitted by TK member Michelle of The Lucky Penny.

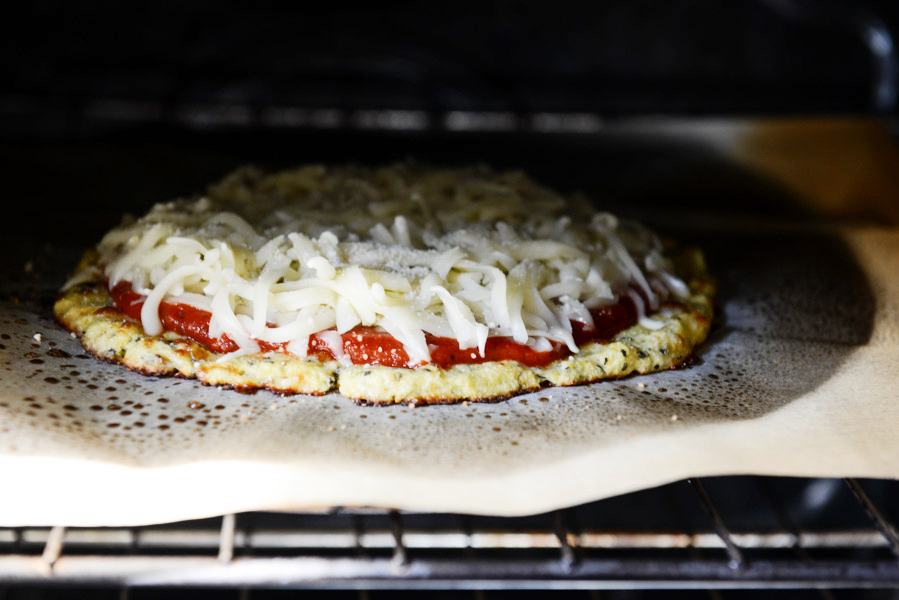
But clearly not enough cheese, as you add your toppings and bake it a bit longer. Uh huh.


Tasty Kitchen Blog: Cauliflower Crust Pizza. Guest post by Jessica Merchant of How Sweet It Is, recipe submitted by TK member Michelle of The Lucky Penny.

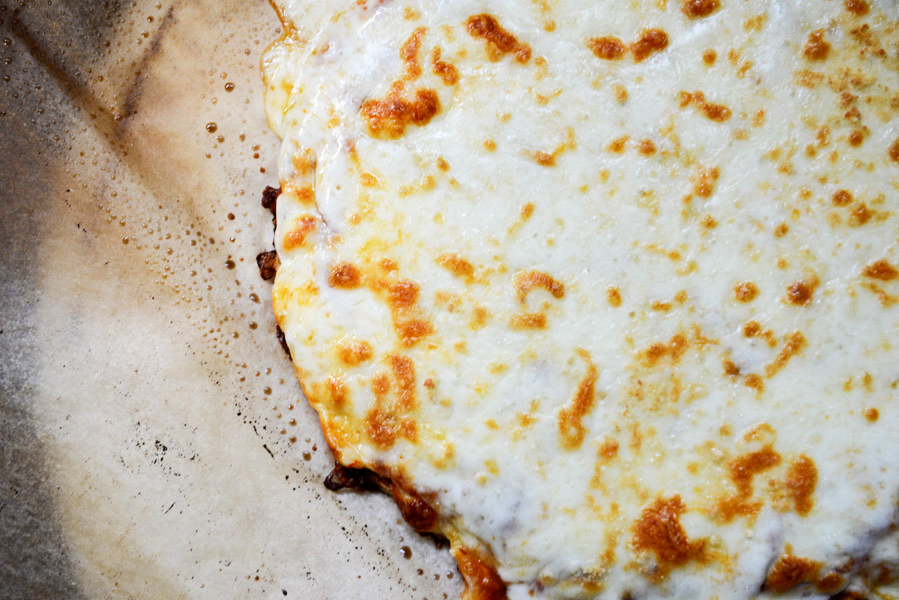
Cheesy goodness. All the way.


Tasty Kitchen Blog: Cauliflower Crust Pizza. Guest post by Jessica Merchant of How Sweet It Is, recipe submitted by TK member Michelle of The Lucky Penny.

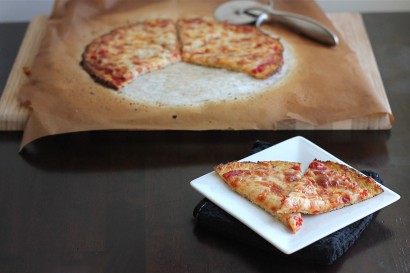
Let the pizza cool slightly before cutting. By doing this, the crust remains intact.


Tasty Kitchen Blog: Cauliflower Crust Pizza. Guest post by Jessica Merchant of How Sweet It Is, recipe submitted by TK member Michelle of The Lucky Penny.

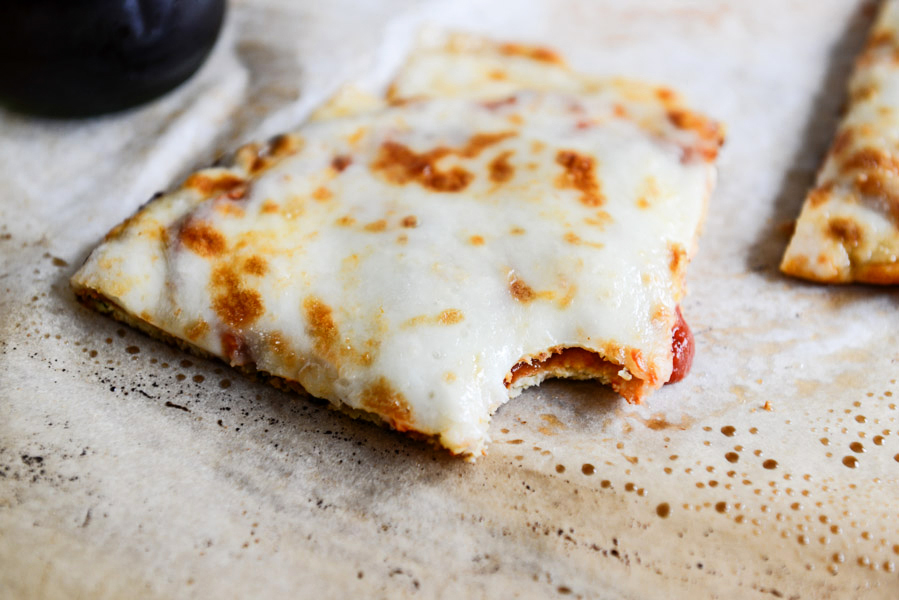
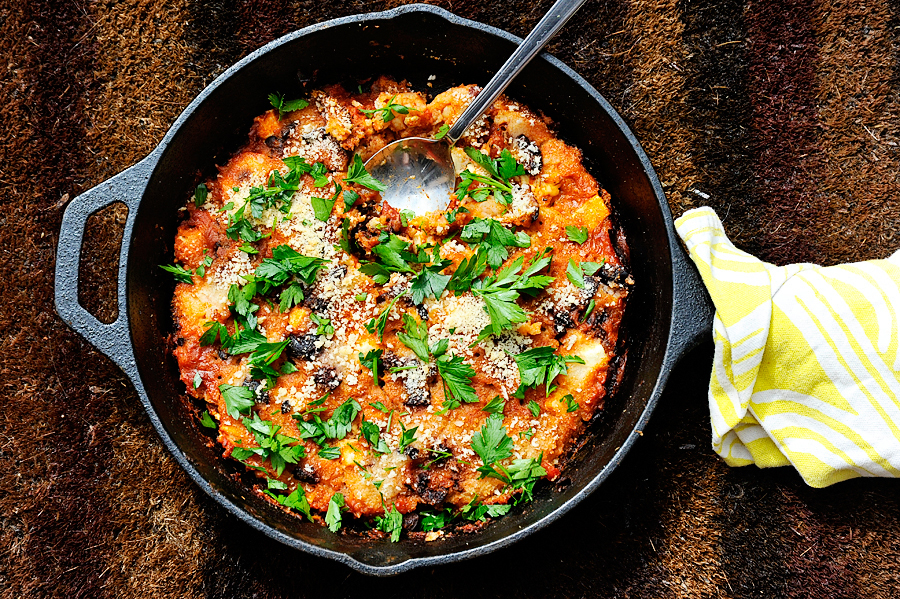
Serve it up. Savor the cheese. So, so good.

I am so glad I took another shot at the cauliflower crust because my mind has changed. It’s totally a winner in my book. Thanks so much to Michelle for the fabulous recipe. Be sure to check out her blog, The Lucky Penny, for more delicious recipes.


Printable Recipe

The Best Cauliflower Crust Pizza

See post on The Lucky Penny Blog’s site!
5.00 Mitt(s) 8 Rating(s)8 votes, average: 5.00 out of 58 votes, average: 5.00 out of 58 votes, average: 5.00 out of 58 votes, average: 5.00 out of 58 votes, average: 5.00 out of 5

Prep Time:

Cook Time:

Difficulty: Easy

Servings: 2

2
x

Print Options

Page size Letter 3x5 4x6
Text Size Small Medium Large
Content Include description
Include prep time, etc.
Show image

Description

This cauliflower crust pizza is so good it’s hard to believe it is gluten and grain-free! You can even pick it up like a regular slice of pizza.

Ingredients

  • 1 head (Small Head) Cauliflower
  • ¼ cups Parmesan Cheese
  • ¼ cups Mozzarella Cheese
  • ¼ teaspoons Kosher Salt
  • ½ teaspoons Dried Basil
  • ½ teaspoons Dried Oregano
  • ½ teaspoons Garlic Powder
  • Red Pepper Flakes (optional)
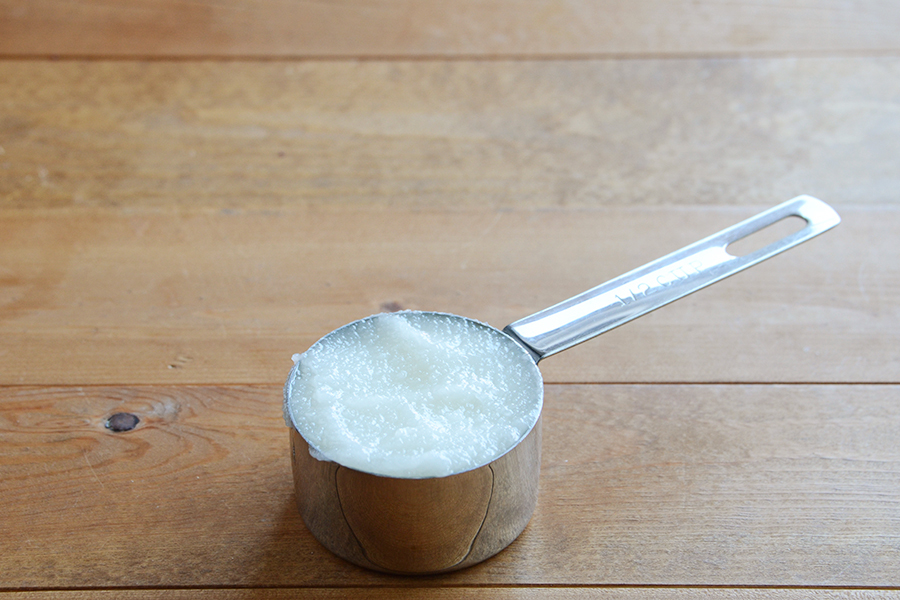
  • 1 Tablespoon Almond Meal (optional)
  • 1 whole Egg

Preparation Instructions

Place a pizza stone in the oven, or baking sheet if you don’t have a pizza stone. Preheat oven to 450ºF. On a cutting board, place a large piece of parchment paper and spray it with nonstick cooking oil.

Wash and throughly dry a small head of cauliflower. Don’t get one the size of your head unless you are planning on making 2 pizzas. Cut off the florets—you don’t need much stem, just stick with the florets. Pulse in your food processor for about 30 seconds, until you get powdery snow like cauliflower. You should end up with 2 to 3 cups cauliflower “snow”. Place the cauliflower in a microwave safe bowl and cover. Cook for 4 minutes. Dump cooked cauliflower onto a clean tea towel and allow to cool for a bit before attempting the next step.

Once cauliflower is cool enough to handle, wrap it up in the dish towel and wring the heck out of it. You want to squeeze out as much water as possible. This will ensure you get a chewy pizza like crust instead of a crumbly mess.

Dumped squeezed cauliflower into a bowl. Now add Parmesan cheese, mozzarella cheese, kosher salt, dried basil (crush up the leaves even more between your fingers before adding), dried oregano (crush up the leaves even more between your fingers before adding), garlic powder (not garlic salt), and a dash of red pepper if you want. I also added 1 tablespoon almond meal because my cauliflower yielded closer to 2 cups of cauli snow; this is optional and I would not add the almond meal if you have closer to 3 cups of cauli snow. Now add the egg and mix away. Hands tend to work best.

Once mixed together, use your hands to form the dough into a crust on your oiled parchment paper. Pat it down throughly, you want it nice and tightly formed together. Don’t make it too thick or thin either.

Using a cutting board, slide the parchment paper onto your hot pizza stone or baking sheet in the oven. Bake for 8-11 minutes, until it starts to turn golden brown. Remove from oven.

Add however much sauce, cheese, and toppings you want. I’m not gonna give you measurements for this. You know how you like your pizza—so go for it! Slide parchment with topped pizza back in the hot oven and cook for another 5 to 7 minutes until the cheese is melted, bubbly, and slightly golden.

Test your patience and allow it to cool for a minute or two. Probably closer to two. Then using a pizza cutter and a spatula, serve up your delicious grain-free cauliflower crust pizza!


_______________________________________

Jessica Merchant is a personal trainer turned food writer and blogger. Her blog, How Sweet Eats, is where she proclaims her love for all things sweet, all things bacon, and everything else in between. She works her magic in her Pittsburgh kitchen, which she shares with her husband of 2 years.


Profile photo of georgiapellegrini

Greek Roasted Shrimp with Olives and Feta

Posted by in Step-by-Step Recipes

Tasty Kitchen Blog: Greek Roasted Shrimp with Olives and Feta. Guest post by Georgia Pellegrini, recipe submitted by TK member Marie of Little Kitchie.

 
I love a good one dish meal—so many fewer dishes to clean! Plus there is something lovely about making something in a skillet and casserole and serving is tableside. This Greek Roasted Shrimp with Olives and Feta from TK member Marie was to die for. The tomatoes became richer and sweeter as they cooked slowly and the saltiness from the feta and olives was the perfect balance. It was even delicious room temperature the next day.


Tasty Kitchen Blog: Greek Roasted Shrimp with Olives and Feta. Guest post by Georgia Pellegrini, recipe submitted by TK member Marie of Little Kitchie.

To make it you will need: olive oil, shallots, garlic, white wine, canned diced tomatoes, tomato paste, dried oregano, lemon zest, salt, pepper, peeled and deveined shrimp, Kalamata olives, feta cheese, bread crumbs, and Italian parsley.


Tasty Kitchen Blog: Greek Roasted Shrimp with Olives and Feta. Guest post by Georgia Pellegrini, recipe submitted by TK member Marie of Little Kitchie.

Finely dice the shallots and garlic.


Tasty Kitchen Blog: Greek Roasted Shrimp with Olives and Feta. Guest post by Georgia Pellegrini, recipe submitted by TK member Marie of Little Kitchie.

Heat two tablespoons of olive oil in a cast iron skillet and sweat them until soft and translucent.


Tasty Kitchen Blog: Greek Roasted Shrimp with Olives and Feta. Guest post by Georgia Pellegrini, recipe submitted by TK member Marie of Little Kitchie.

Deglaze the pan with white wine and let it reduce to about half.


Tasty Kitchen Blog: Greek Roasted Shrimp with Olives and Feta. Guest post by Georgia Pellegrini, recipe submitted by TK member Marie of Little Kitchie.

Add the crushed tomatoes …


Tasty Kitchen Blog: Greek Roasted Shrimp with Olives and Feta. Guest post by Georgia Pellegrini, recipe submitted by TK member Marie of Little Kitchie.

And the tomato paste and give it a stir.


Tasty Kitchen Blog: Greek Roasted Shrimp with Olives and Feta. Guest post by Georgia Pellegrini, recipe submitted by TK member Marie of Little Kitchie.

Let it reduce and sprinkle in the oregano …


Tasty Kitchen Blog: Greek Roasted Shrimp with Olives and Feta. Guest post by Georgia Pellegrini, recipe submitted by TK member Marie of Little Kitchie.

And the lemon zest. Simmer for 10 minutes over medium-low heat and then remove the skillet from the burner.


Tasty Kitchen Blog: Greek Roasted Shrimp with Olives and Feta. Guest post by Georgia Pellegrini, recipe submitted by TK member Marie of Little Kitchie.

Place the shrimp in one layer in the tomato sauce.


Tasty Kitchen Blog: Greek Roasted Shrimp with Olives and Feta. Guest post by Georgia Pellegrini, recipe submitted by TK member Marie of Little Kitchie.

Sprinkle in the feta …


Tasty Kitchen Blog: Greek Roasted Shrimp with Olives and Feta. Guest post by Georgia Pellegrini, recipe submitted by TK member Marie of Little Kitchie.

The olives …


Tasty Kitchen Blog: Greek Roasted Shrimp with Olives and Feta. Guest post by Georgia Pellegrini, recipe submitted by TK member Marie of Little Kitchie.

And the breadcrumbs.


Tasty Kitchen Blog: Greek Roasted Shrimp with Olives and Feta. Guest post by Georgia Pellegrini, recipe submitted by TK member Marie of Little Kitchie.

Transfer the skillet to the oven and bake for 15 minutes until it is bubbling and much more dense.


Tasty Kitchen Blog: Greek Roasted Shrimp with Olives and Feta. Guest post by Georgia Pellegrini, recipe submitted by TK member Marie of Little Kitchie.

Remove from the oven and squeeze the lemon juice from the zested lemon over the top.


Tasty Kitchen Blog: Greek Roasted Shrimp with Olives and Feta. Guest post by Georgia Pellegrini, recipe submitted by TK member Marie of Little Kitchie.

Then sprinkle with a good dose of chopped parsley.

You’ll want to scoop this right out of the skillet and eat it. Or get some crusty bread and use that as your spoon, it is absolutely delightful. Visit Marie’s lovely website Little Kitchie for other wonderful recipes!


Printable Recipe

Greek Roasted Shrimp with Olives and Feta

See post on Marie @ Little Kitchie’s site!
0.00 Mitt(s) 0 Rating(s)0 votes, average: 0.00 out of 50 votes, average: 0.00 out of 50 votes, average: 0.00 out of 50 votes, average: 0.00 out of 50 votes, average: 0.00 out of 5

Prep Time:

Cook Time:

Difficulty: Easy

Servings: 3

3
x

Print Options

Page size Letter 3x5 4x6
Text Size Small Medium Large
Content Include description
Include prep time, etc.
Show image

Description

Tomatoes, olives, oregano and feta provide a zesty sauce for gorgeous roasted shrimp!

Ingredients

  • 4 Tablespoons Olive Oil, Divided
  • 2 whole Shallots, Diced
  • 4 cloves Garlic, Minced
  • ⅓ cups White Wine
  • 14-½ ounces, weight Canned Diced Tomatoes
  • 2 teaspoons Tomato Paste
  • 1 teaspoon Oregano, Minced
  • 1 whole Lemon, Zest And Juice
  • 1 teaspoon Kosher Salt
  • 1 teaspoon Freshly Ground Black Pepper
  • ¾ pounds Shrimp, Peeled And Deveined
  • ⅓ cups Kalamata Olives, Halved
  • 5 ounces, weight Feta Cheese, Crumbled
  • ¾ cups Panko Bread Crumbs
  • 3 Tablespoons Italian Parsley (minced)

Preparation Instructions

Preheat the oven to 400ºF.

Heat 2 tablespoons olive oil in a cast iron skillet over medium heat. Add the shallots and cook until soft, about 5 minutes. Add the garlic and cook for 1 more minute. Add the wine and bring to a boil, scraping the pan. Cook for about 3 minutes, until the wine has reduced about halfway. Add diced tomatoes, tomato paste, oregano, lemon zest, salt, and pepper to the skillet. Reduce heat to medium-low and simmer for 10 minutes.

Remove skillet from the heat and place the shrimp in one layer over the mixture in the skillet. Sprinkle the olives and feta over the entire thing. In a small bowl, mix the bread crumbs with the remaining 2 tablespoons of olive oil, then sprinkle over shrimp-feta-tomato mixture.

Transfer skillet to oven and bake for 15 minutes. Remove from oven, squeeze the lemon juice over the top, and sprinkle with parsley. Enjoy over quinoa, rice, or pasta, or simply serve from the skillet with a good hearty bread.


_______________________________________

There’s so much to say about Georgia, we don’t know where to start. Leaving Wall Street for the French Culinary Institute, followed by a stint at the Gramercy Tavern and La Chassagnette in France, her passion for food and food traditions are evident and inspiring. Visit her site at Georgia Pellegrini, where you’ll find more recipes, photos, learn all about her wonderful books Girl Hunter and Food Heroes, and enjoy her latest adventures.


Profile photo of Erica Lea

Frozen Thai Iced Coffee

Posted by in Step-by-Step Recipes

Tasty Kitchen Blog: Frozen Thai Iced Coffee. Guest post by Erica Kastner of Cooking for Seven, recipe submitted by TK member Stephanie of Girl Versus Dough.

 
Let’s all take a moment of silence and respect for whoever first invented iced coffee. It’s about the best summertime treat (root beer floats are a close second). In fact, it’s one of my favorite drinks any time of the year.

Today’s recipe—Frozen Thai Iced Coffee—-is brought to us by Stephanie, adapted from King Arthur Flour. It’s an indulgent treat, complete with sweetened condensed milk, toasted coconut, and heavy cream. Oh yes.

Now, before you get all up on your high horse and complain, “That isn’t REAL Thai Iced Coffee,” let me make a concession. This is more of a Thai-inspired or, perhaps more accurately, Vietnamese-inspired iced coffee. Erika informed me that authentic Thai iced coffee is typically made with cardamom-infused coffee and evaporated milk instead of sweetened condensed. 

That sounds lovely, and I may have to try it sometime. But if you’re looking for a straight-up frozen coffee, this is an excellent recipe to try. Let me show you how to make it!


Tasty Kitchen Blog: Frozen Thai Iced Coffee. Guest post by Erica Kastner of Cooking for Seven, recipe submitted by TK member Stephanie of Girl Versus Dough.

Here’s what you’ll need: strong coffee (I cold-brewed mine), sweetened condensed milk (I made mine from scratch), milk, vanilla, heavy cream, sugar (I used demerara), and coconut flakes.


Tasty Kitchen Blog: Frozen Thai Iced Coffee. Guest post by Erica Kastner of Cooking for Seven, recipe submitted by TK member Stephanie of Girl Versus Dough.

Scoop the sweetened condensed milk into a large bowl.


Tasty Kitchen Blog: Frozen Thai Iced Coffee. Guest post by Erica Kastner of Cooking for Seven, recipe submitted by TK member Stephanie of Girl Versus Dough.

Pour in the coffee …


Tasty Kitchen Blog: Frozen Thai Iced Coffee. Guest post by Erica Kastner of Cooking for Seven, recipe submitted by TK member Stephanie of Girl Versus Dough.

The milk …


Tasty Kitchen Blog: Frozen Thai Iced Coffee. Guest post by Erica Kastner of Cooking for Seven, recipe submitted by TK member Stephanie of Girl Versus Dough.

And the vanilla extract.


Tasty Kitchen Blog: Frozen Thai Iced Coffee. Guest post by Erica Kastner of Cooking for Seven, recipe submitted by TK member Stephanie of Girl Versus Dough.

Whisk it all together until it’s nice and smooth. If you used hot coffee, you’ll need to chill this mixture in the refrigerator for 8 hours.


Tasty Kitchen Blog: Frozen Thai Iced Coffee. Guest post by Erica Kastner of Cooking for Seven, recipe submitted by TK member Stephanie of Girl Versus Dough.

Pour into a shallow pan (I used a 13×9-inch glass dish) and place in the freezer until solid, about 4 hours.


Tasty Kitchen Blog: Frozen Thai Iced Coffee. Guest post by Erica Kastner of Cooking for Seven, recipe submitted by TK member Stephanie of Girl Versus Dough.

Meanwhile, get your coconut nice and toasted. You can do this in the oven as well. I just prefer not having to preheat the oven.


Tasty Kitchen Blog: Frozen Thai Iced Coffee. Guest post by Erica Kastner of Cooking for Seven, recipe submitted by TK member Stephanie of Girl Versus Dough.

Whip the cream with the sugar. 


Tasty Kitchen Blog: Frozen Thai Iced Coffee. Guest post by Erica Kastner of Cooking for Seven, recipe submitted by TK member Stephanie of Girl Versus Dough.

Once the coffee mixture is solid, it’s ready to serve!


Tasty Kitchen Blog: Frozen Thai Iced Coffee. Guest post by Erica Kastner of Cooking for Seven, recipe submitted by TK member Stephanie of Girl Versus Dough.

Scoop some into a cup.


Tasty Kitchen Blog: Frozen Thai Iced Coffee. Guest post by Erica Kastner of Cooking for Seven, recipe submitted by TK member Stephanie of Girl Versus Dough.

Top with whipped cream.


Tasty Kitchen Blog: Frozen Thai Iced Coffee. Guest post by Erica Kastner of Cooking for Seven, recipe submitted by TK member Stephanie of Girl Versus Dough.

Finish off with a sprinkle of toasted coconut.


Tasty Kitchen Blog: Frozen Thai Iced Coffee. Guest post by Erica Kastner of Cooking for Seven, recipe submitted by TK member Stephanie of Girl Versus Dough.

Now go and enjoy!


Tasty Kitchen Blog: Frozen Thai Iced Coffee. Guest post by Erica Kastner of Cooking for Seven, recipe submitted by TK member Stephanie of Girl Versus Dough.

Thank you so much, Stephanie, for sharing this amazing drink with us! Make sure you check out her blog, Girl Versus Dough. Her recipes have me salivating, especially this Thai Shrimp Fried Rice.


Printable Recipe

Frozen Thai Iced Coffee

See post on Stephanie | Girl Versus Dough’s site!
0.00 Mitt(s) 0 Rating(s)0 votes, average: 0.00 out of 50 votes, average: 0.00 out of 50 votes, average: 0.00 out of 50 votes, average: 0.00 out of 50 votes, average: 0.00 out of 5

Prep Time:

Cook Time:

Difficulty: Easy

Servings: 4

4
x

Print Options

Page size Letter 3x5 4x6
Text Size Small Medium Large
Content Include description
Include prep time, etc.
Show image

Description

Thai iced coffee turned into a frozen drink of wonderfulness.

Ingredients

  • 2 cups Strong Hot Coffee
  • 1 can (14 Oz. Size) Sweetened Condensed Milk
  • 1 cup Milk, 2-Percent Or Whole Milk
  • 1 teaspoon Vanilla
  • 1 cup Heavy Whipping Cream
  • 1 Tablespoon Granulated Sugar
  • ½ cups Sweetened Coconut Flakes

Preparation Instructions

In a large bowl or heatproof pitcher, stir hot coffee, condensed milk, milk and vanilla. Cover and chill at least 8 hours or overnight.

Pour chilled mixture into a shallow pan (I used a 13-by-9-inch baking pan). Freeze until solid, about 4 hours.

Meanwhile, make the whipped cream: Beat cream and sugar on high speed until stiff peaks form, about 2 to 3 minutes. Chill until ready to use.

Toast the coconut: Heat oven to 350ºF. Spread coconut flakes on a baking sheet; toast in oven, stirring occasionally, until golden brown, about 7 to 10 minutes.

Scoop frozen coffee mixture into serving glasses. Top with whipped cream and toasted coconut.

Adapted from King Arthur Flour.


_______________________________________

Newly-married Erica Kastner shares her wonderful recipes and amazing food photography on her blog, Buttered Side Up. She also writes about crafts and posts more of her beautiful photography in her personal blog, Simple Days. There really isn’t much that this amazing young lady can’t do, and we’re thrilled she does some of it here.


Profile photo of Faith (An Edible Mosaic)

(Coconut Flour) Cake Donuts

Posted by in Baking, Step-by-Step Recipes

Tasty Kitchen Blog: (Coconut Flour) Cake Donuts. Guest post by Faith Gorsky of An Edible Mosaic, recipe submitted by TK member Traci of LottaMadness.

 
I’ve been dabbling with paleo for about a year now, and one of my favorite things to do is re-make not-so-healthy desserts into healthier paleo versions. Any time I see a paleo treat, I can’t help but take a closer look. When I saw Tasty Kitchen member Traci’s recipe for (Coconut Flour) Cake Donuts, I was immediately interested.

Even if you’re just paleo-curious or getting your feet wet, it doesn’t hurt to try a paleo treat. Let’s start with donuts!


Tasty Kitchen Blog: (Coconut Flour) Cake Donuts. Guest post by Faith Gorsky of An Edible Mosaic, recipe submitted by TK member Traci of LottaMadness.

For these donuts you’ll need: coconut flour, honey, baking soda, coconut oil, chocolate chips, eggs, salt, and vanilla.


Tasty Kitchen Blog: (Coconut Flour) Cake Donuts. Guest post by Faith Gorsky of An Edible Mosaic, recipe submitted by TK member Traci of LottaMadness.

Here’s the coconut oil, pre-melt. (If you’re making these donuts on a hot day, yours might already be melted.)


Tasty Kitchen Blog: (Coconut Flour) Cake Donuts. Guest post by Faith Gorsky of An Edible Mosaic, recipe submitted by TK member Traci of LottaMadness.

And here it is after melting for a few seconds in the microwave.


Tasty Kitchen Blog: (Coconut Flour) Cake Donuts. Guest post by Faith Gorsky of An Edible Mosaic, recipe submitted by TK member Traci of LottaMadness.

My honey was already in liquid form; if yours isn’t, go ahead and melt it.


Tasty Kitchen Blog: (Coconut Flour) Cake Donuts. Guest post by Faith Gorsky of An Edible Mosaic, recipe submitted by TK member Traci of LottaMadness.

Add the honey and the eggs to a food processor (or blender like I used), and blend them together.


Tasty Kitchen Blog: (Coconut Flour) Cake Donuts. Guest post by Faith Gorsky of An Edible Mosaic, recipe submitted by TK member Traci of LottaMadness.

Then process in the melted coconut oil and vanilla. The mixture will be foamy!


Tasty Kitchen Blog: (Coconut Flour) Cake Donuts. Guest post by Faith Gorsky of An Edible Mosaic, recipe submitted by TK member Traci of LottaMadness.

Sift in the coconut flour, baking soda, and salt. I sifted the dry ingredients right into the food processor with the wet ingredients because unlike flours containing gluten, coconut flour can handle the extra mixing.


Tasty Kitchen Blog: (Coconut Flour) Cake Donuts. Guest post by Faith Gorsky of An Edible Mosaic, recipe submitted by TK member Traci of LottaMadness.

Whiz it all together in the blender or food processor until smooth.

Here’s where a little bit of finesse comes in because coconut flour can be a finicky thing. Coconut flour absorbs quite a bit more moisture than all-purpose flour, so you might be surprised by that if it’s your first time working with coconut flour. Also, coconut flour can vary quite a bit by brand, so depending on the brand you’re using, you might need to add a bit more liquid or flour. Don’t be afraid to play with the batter a little until you get a consistency that works. The batter should be fairly stiff, but still spoonable. And the batter should be able to spread out when you fill the donut tray and tap it on the counter a couple times.


Tasty Kitchen Blog: (Coconut Flour) Cake Donuts. Guest post by Faith Gorsky of An Edible Mosaic, recipe submitted by TK member Traci of LottaMadness.

Generously grease 2 donut pans.


Tasty Kitchen Blog: (Coconut Flour) Cake Donuts. Guest post by Faith Gorsky of An Edible Mosaic, recipe submitted by TK member Traci of LottaMadness.

Spoon the batter into the wells and tap the pans on the counter a couple times to even them out.


Tasty Kitchen Blog: (Coconut Flour) Cake Donuts. Guest post by Faith Gorsky of An Edible Mosaic, recipe submitted by TK member Traci of LottaMadness.

Bake until they’re golden and a toothpick inserted inside comes out clean, about 15 minutes. Let them cool completely in the pan before removing.


Tasty Kitchen Blog: (Coconut Flour) Cake Donuts. Guest post by Faith Gorsky of An Edible Mosaic, recipe submitted by TK member Traci of LottaMadness.

Melt the chocolate chips and 1 tablespoon coconut oil together in a microwave or double boiler. Dip each donut into the chocolate and place it on a wire rack or parchment-lined tray.


Tasty Kitchen Blog: (Coconut Flour) Cake Donuts. Guest post by Faith Gorsky of An Edible Mosaic, recipe submitted by TK member Traci of LottaMadness.

Refrigerate the donuts so the chocolate can harden, and serve!


Tasty Kitchen Blog: (Coconut Flour) Cake Donuts. Guest post by Faith Gorsky of An Edible Mosaic, recipe submitted by TK member Traci of LottaMadness.

These donuts were absolutely delicious, and of course perfect with a cup of coffee. Texture-wise, they aren’t the same as regular donuts, but given the fact that they’re much healthier, they’re completely worth it. One tip I have is to leave these in the fridge until you’re ready to eat them because the chocolate topping will start to condense and then melt on hot days. The good thing is, they lasted and were completely fine for me for 3 days in the fridge!

Thanks to Traci for her delicious recipe! Head over to her fun blog LottaMaddness for more recipe ideas, as well as life, DIY, travel, and culture tidbits!


Printable Recipe

(Coconut Flour) Cake Donuts

See post on LottaMadness’s site!
5.00 Mitt(s) 1 Rating(s)1 vote, average: 5.00 out of 51 vote, average: 5.00 out of 51 vote, average: 5.00 out of 51 vote, average: 5.00 out of 51 vote, average: 5.00 out of 5

Prep Time:

Cook Time:

Difficulty: Easy

Servings: 12

12
x

Print Options

Page size Letter 3x5 4x6
Text Size Small Medium Large
Content Include description
Include prep time, etc.
Show image

Description

Who says you can’t have your donut and eat it too when you’re on a Paleo diet?

Ingredients

  • ½ cups Coconut Oil
  • ½ cups Raw Honey
  • 6 whole Eggs
  • 1 teaspoon Vanilla Extract
  • ¾ cups Coconut Flour
  • ¾ teaspoons Baking Soda
  • 1 teaspoon Salt
  • FOR THE TOPPING:
  • ½ cups Chocolate Chips (I Used Enjoy)
  • 1 Tablespoon Coconut Oil

Preparation Instructions

Preheat the oven to 350ºF. Melt the coconut oil in the microwave for a few seconds until liquid form. Heat the honey in the microwave for 20 seconds until it’s in liquid form.

Blend the eggs and honey together in a blender. Add the melted coconut oil and vanilla extract.

Sift the coconut flour, baking soda and salt into the egg mixture and mix until well blended.

Using a dessert spoon, spoon the batter into the circles of a well-greased donut pan. (I used 2 6-circle donut pans.) Bake for 15 minutes or until a toothpick comes out clean. Once cooled, remove donuts from the donut pan.

For the topping, melt the chocolate chips and coconut oil together. Dip each donut into the chocolate and set onto a tray lined with parchment paper. Place donuts into the fridge for the chocolate to harden. Enjoy!


_______________________________________

Faith Gorsky is the writer, recipe developer, photographer, and food stylist behind the blog An Edible Mosaic. She lives in Upstate New York and loves to travel, especially to places steeped in rich culture and history. She also enjoys reading, vintage shopping, watching movies, and is enamored with ancient cultures. She just released her first cookbook, “An Edible Mosaic: Middle Eastern Fare with Extraordinary Flair” (Tuttle Publishing), a collection of authentic Middle Eastern recipes handed down to her from her husband’s family.


Profile photo of georgiapellegrini

Cheesy Baked Green Chile Rice

Posted by in Step-by-Step Recipes

  This recipe for Cheesy Baked Green Chile Rice from TK member Lindsay made my house smell so amazing that those passing by begged for a bite. It is a wonderful combination of cheesy, spicy, crunchy deliciousness. And you can make it in small or large skillets or a baking dish and serve it tableside. […]

Profile photo of Erika (TK)

Looks Delicious! Barbecue Sauces

Posted by in Looks Delicious!

  These recipes caught my eye because I love barbecued anything and I’m still dreaming of some amazing pulled pork I enjoyed last weekend. Plus I love chipotle, so Jackie’s spicy and tangy Chipotle Lime BBQ Sauce is right up my alley. I’ve also got some peaches to use up, and they add a nice […]

Profile photo of georgiapellegrini

Spicy Margarita Shrimp

Posted by in Step-by-Step Recipes

  In this hot, hot weather, I rarely want to turn the oven on, so this Spicy Margarita Shrimp from TK member Damelio called my name because most of the cooking happens in the marinade. Plus I love a good margarita and was intrigued by the idea of using some of those same ingredients to […]

Profile photo of Erika (TK)

Looks Delicious! Summer Weekend Burgers

Posted by in Looks Delicious!

  It’s Friday! Even better, that indescribably horrid heatwave has finally broken ’round these parts, which means it’s safe to venture outdoors again. We’ve been wanting to fire up the grill for days now but it’s just been too hot and humid that I swear the meat arrives almost half-cooked after walking all 15 steps […]