The Pioneer Woman Tasty Kitchen
Profile photo of ThreeManyCooks

Thai Coconut Mussels

Posted by in Step-by-Step Recipes

Tasty Kitchen Blog: Thai Coconut Mussels. Guest post by Maggy Keet of Three Many Cooks, recipe submitted by TK member Lisa of One Cook, Two Kitchens.

 
Years ago my husband and I started a tradition with our good friends called ‘Mussels Night.’ Every so often we’d get together at one house or the other and make two giant pots of mussels—one in a creamy white sauce, the other in a spicy marinara. We cherished those evenings not only for the company, but for the ease of preparation and speedy cook-time, which meant we could focus more on our friends than fussing in the kitchen. When the mussels were done we’d put the steaming pots in the middle of the table, pull out a few baguettes, open a couple bottles of wine, and settle in for a good night of boisterous conversation and uproarious laughter. We’d start with large bowlfuls. By the end of the night we’d be sitting in front of a giant pile of shells, washing down the last sauce-soaked piece of bread with a gulp of red wine.

We no longer live in England, near those good friends, but mussels still hold a special place in my heart. These beautiful Thai Coconut Mussels from One Cook Two Kitchens reminded me that it’s been far too long since our last ‘Mussels Night.’


Tasty Kitchen Blog: Thai Coconut Mussels. Guest post by Maggy Keet of Three Many Cooks, recipe submitted by TK member Lisa of One Cook, Two Kitchens.

This recipe requires just six ingredients: chicken broth, green curry paste, fish sauce, mussels, coconut milk, and cilantro.


Tasty Kitchen Blog: Thai Coconut Mussels. Guest post by Maggy Keet of Three Many Cooks, recipe submitted by TK member Lisa of One Cook, Two Kitchens.

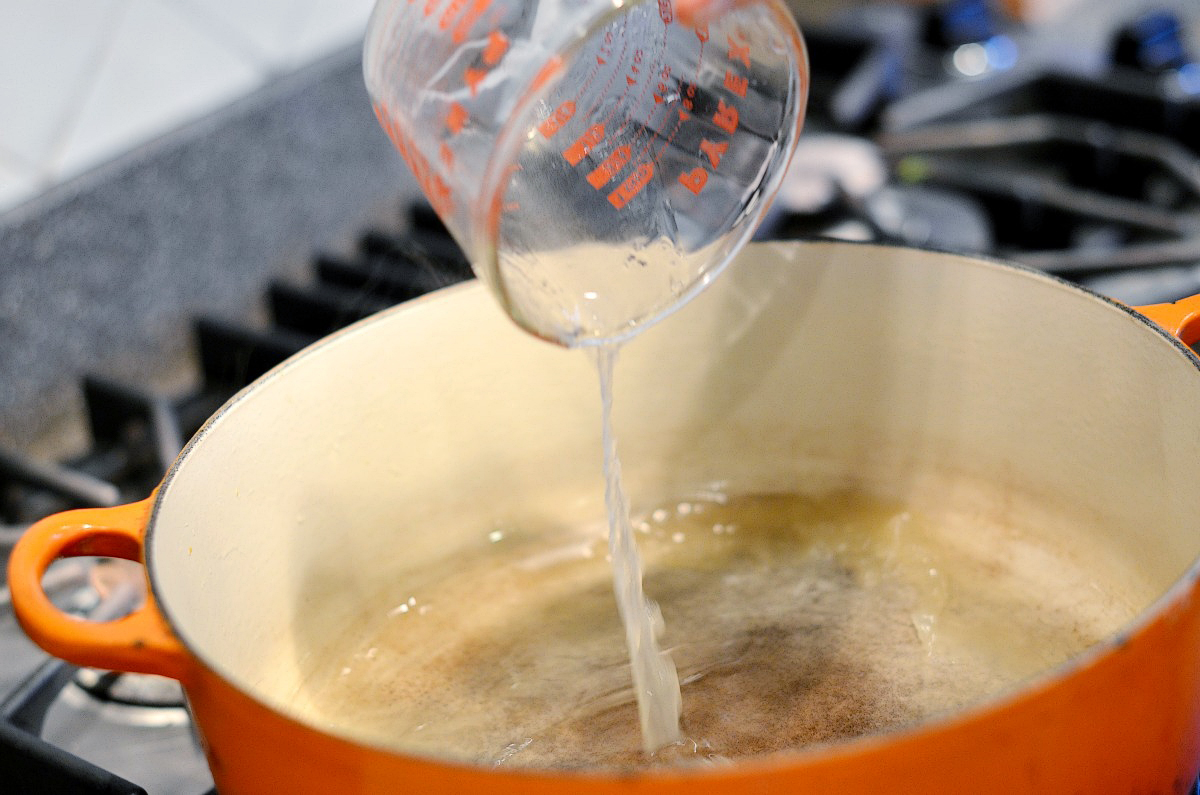
In a large pot or Dutch oven, bring the chicken broth to the boil.


Tasty Kitchen Blog: Thai Coconut Mussels. Guest post by Maggy Keet of Three Many Cooks, recipe submitted by TK member Lisa of One Cook, Two Kitchens.

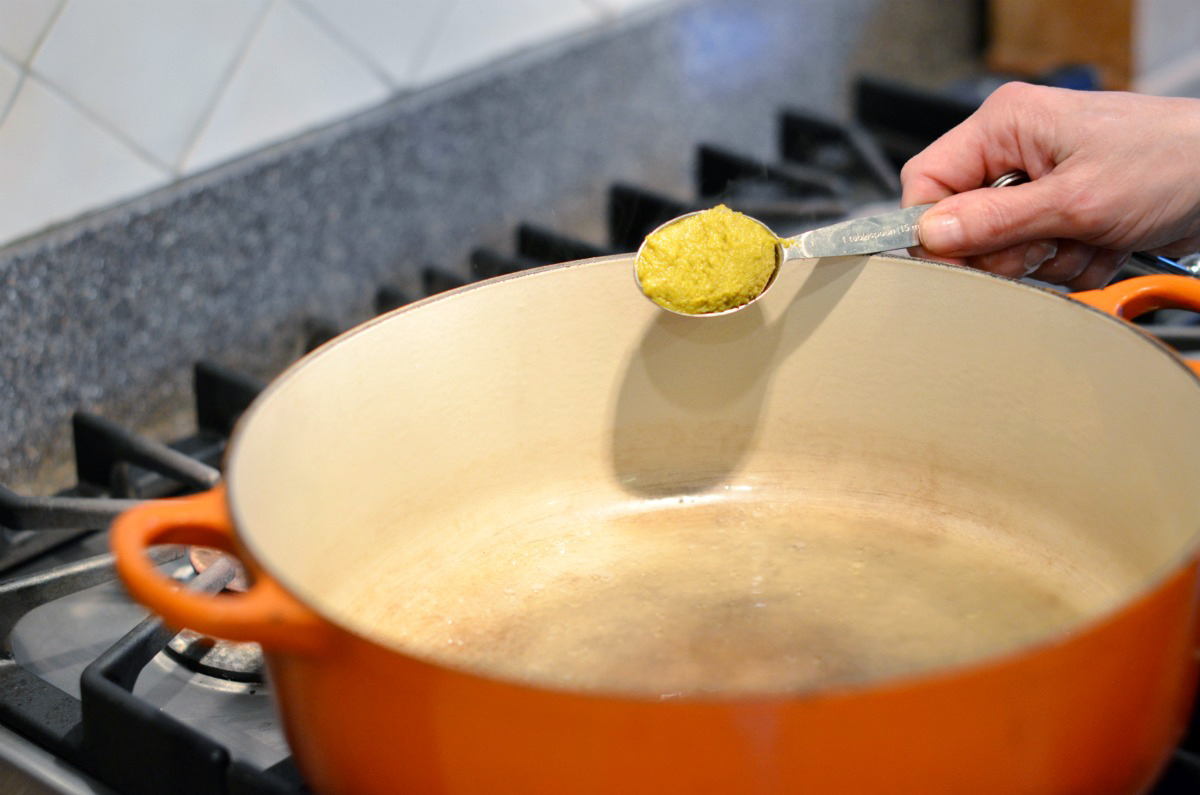
Then add the green curry paste. If you’re enthusiastic about curry (as I am!), you could add a bit more curry paste to increase the flavor and heat.


Tasty Kitchen Blog: Thai Coconut Mussels. Guest post by Maggy Keet of Three Many Cooks, recipe submitted by TK member Lisa of One Cook, Two Kitchens.

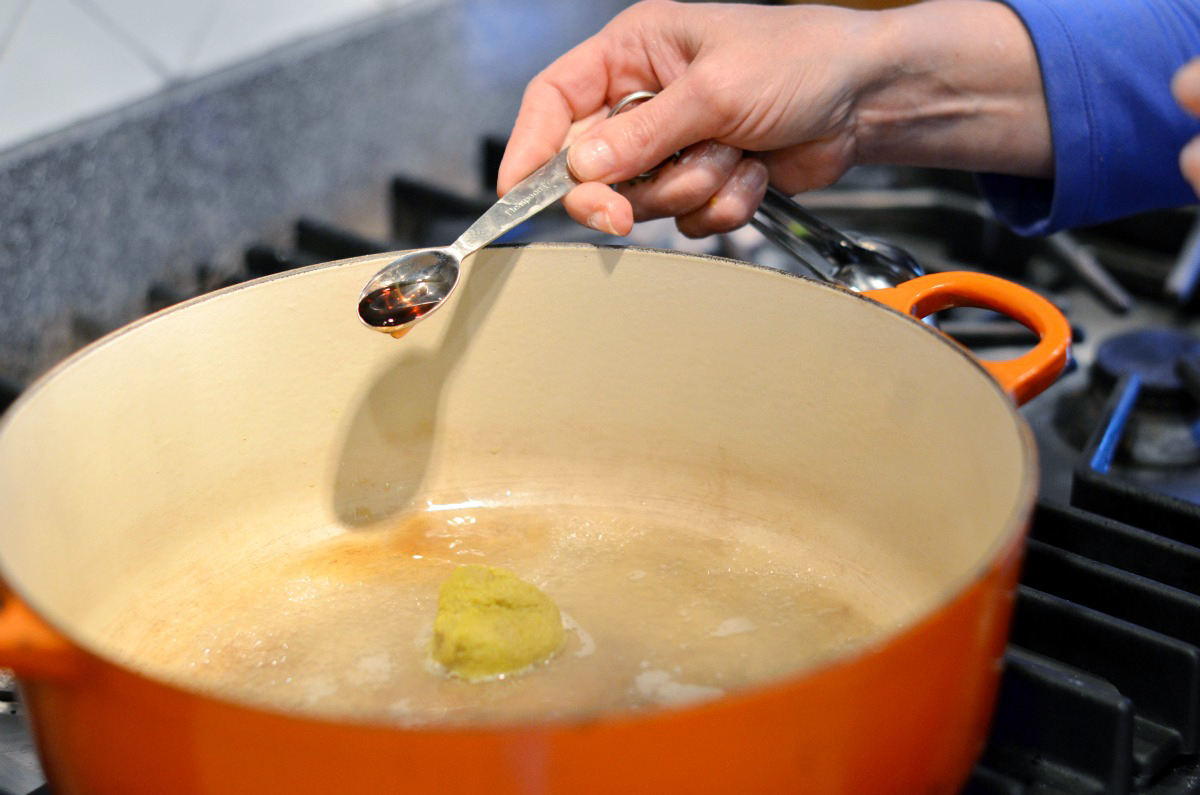
Then add the fish sauce to the mix and give the pot a stir.


Tasty Kitchen Blog: Thai Coconut Mussels. Guest post by Maggy Keet of Three Many Cooks, recipe submitted by TK member Lisa of One Cook, Two Kitchens.

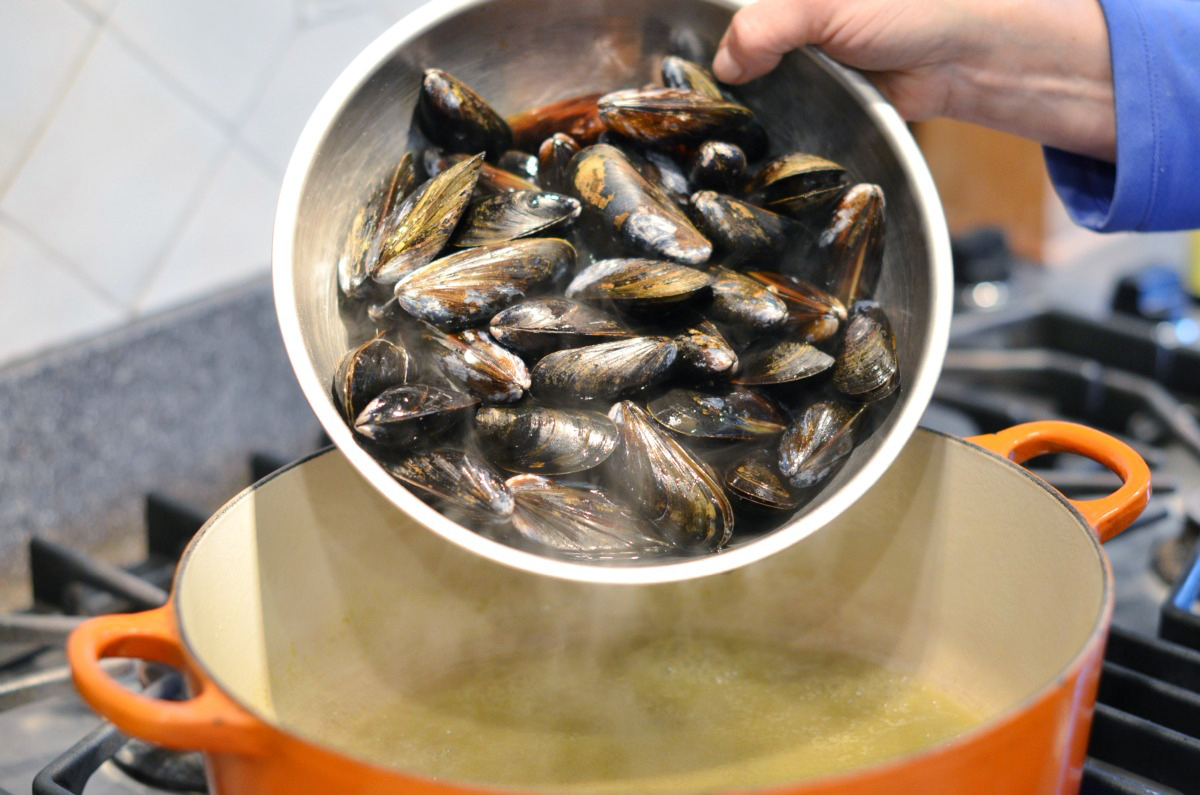
Once mixed, pour in those mussels.


Tasty Kitchen Blog: Thai Coconut Mussels. Guest post by Maggy Keet of Three Many Cooks, recipe submitted by TK member Lisa of One Cook, Two Kitchens.

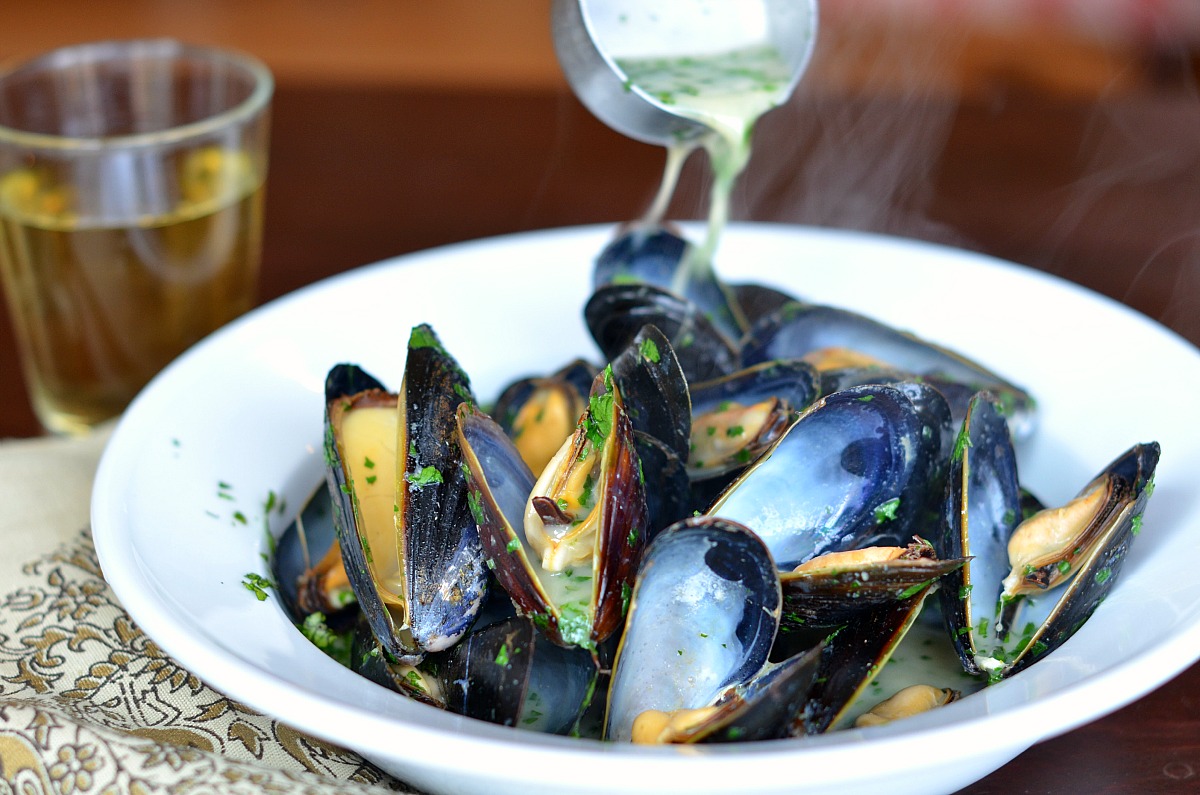
Then add the creamy coconut milk. I am giving you permission to splurge and use full fat coconut milk. It’s just better.


Tasty Kitchen Blog: Thai Coconut Mussels. Guest post by Maggy Keet of Three Many Cooks, recipe submitted by TK member Lisa of One Cook, Two Kitchens.

Stir in the coconut milk.


Tasty Kitchen Blog: Thai Coconut Mussels. Guest post by Maggy Keet of Three Many Cooks, recipe submitted by TK member Lisa of One Cook, Two Kitchens.

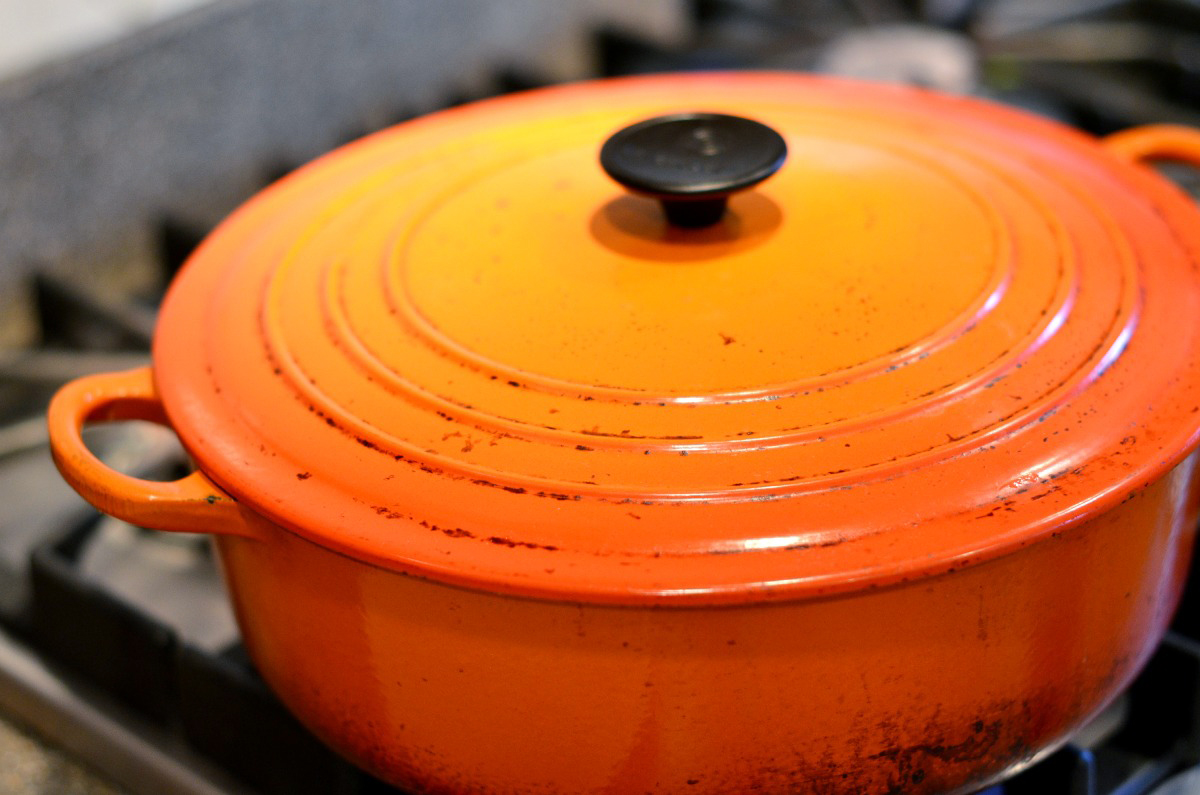
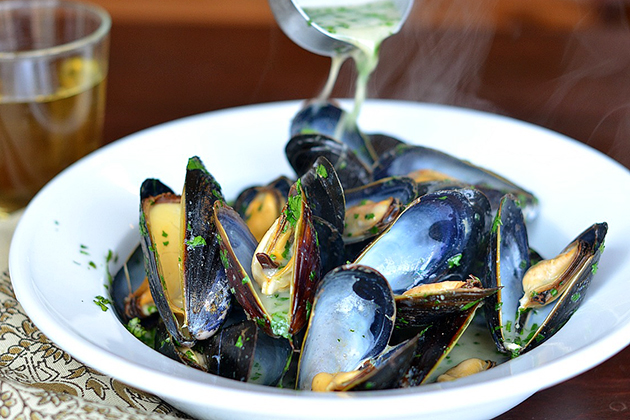
Put a lid on the Dutch oven. Five to seven minutes later, this dish is done. You know the mussels are fully cooked when they’ve all popped open! If they don’t pop open, don’t eat ‘em.


Tasty Kitchen Blog: Thai Coconut Mussels. Guest post by Maggy Keet of Three Many Cooks, recipe submitted by TK member Lisa of One Cook, Two Kitchens.

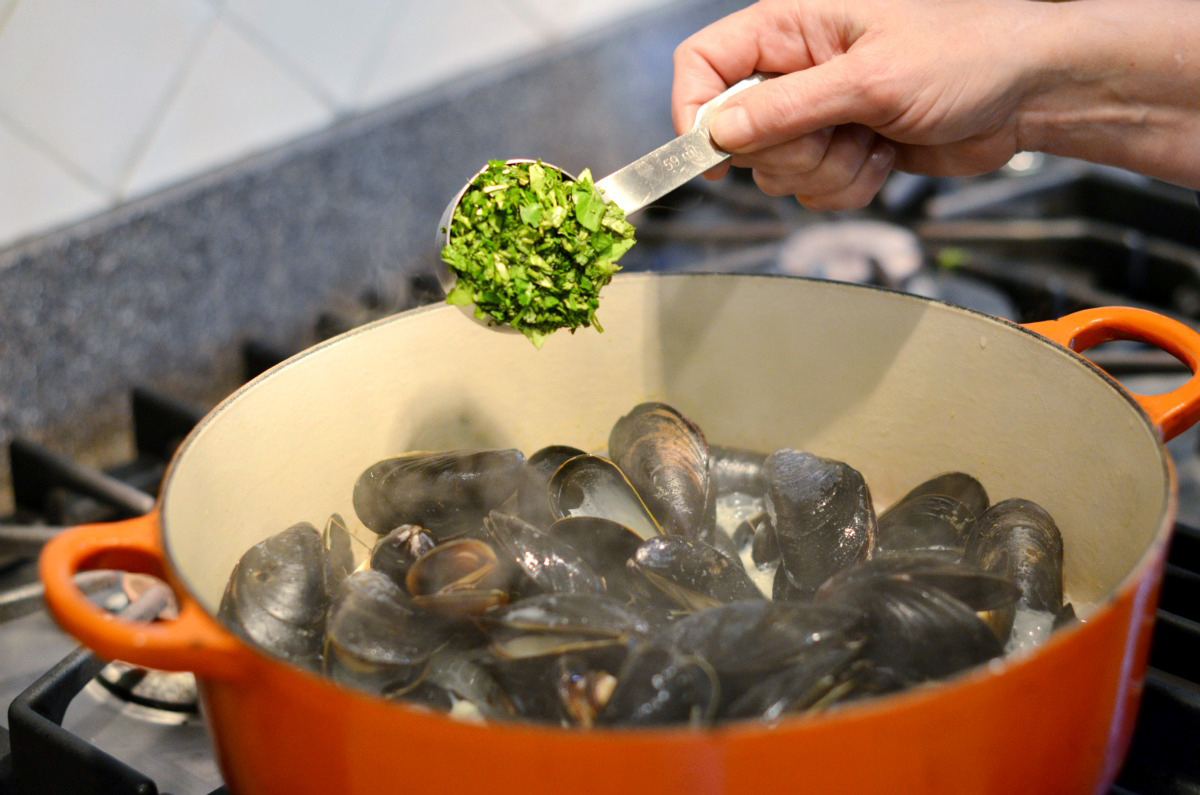
Stir in plenty of chopped cilantro (in my opinion, the greatest fresh herb on the planet).


Tasty Kitchen Blog: Thai Coconut Mussels. Guest post by Maggy Keet of Three Many Cooks, recipe submitted by TK member Lisa of One Cook, Two Kitchens.

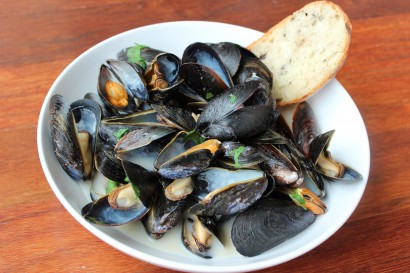
Now this is the most important step: Make sure you enjoy these mussels with some good bread (or rice), a glass of white wine, and plenty of wonderful people!

Thanks to Lisa for this delicious recipe! Head over to her blog One Cook. Two Kitchens. for more recipes from her kitchens. (In case you were wondering, one is in a Toronto condo, and the other in a lake house. Both have gorgeous views.)


Printable Recipe

Thai Coconut Mussels

See post on One Cook Two Kitchens’s site!
5.00 Mitt(s) 1 Rating(s)1 vote, average: 5.00 out of 51 vote, average: 5.00 out of 51 vote, average: 5.00 out of 51 vote, average: 5.00 out of 51 vote, average: 5.00 out of 5

Prep Time:

Cook Time:

Difficulty: Easy

Servings: 2

2
x

Print Options

Page size Letter 3x5 4x6
Text Size Small Medium Large
Content Include description
Include prep time, etc.
Show image

Description

Mussels are one of the healthiest, easiest fast-food dishes going, and yet they are impressively elegant to serve. Try this exotic Thai green curry, coconut-based broth for a meal that you can have on the table in less than half an hour.

Ingredients

  • ½ cups Chicken Broth
  • 1 Tablespoon Thai Green Curry Paste
  • 2 teaspoons Fish Sauce
  • 2 pounds Mussels, Cleaned, With 'beards' Removed
  • 1 cup Coconut Milk (regular Or Light Works)
  • ¼ cups Fresh Cilantro Or Basil, Chopped
  • Basmati Rice, To Serve

Preparation Instructions

In a large pot that has a lid (Dutch oven works well), heat the chicken broth to boiling. Add in green curry paste and fish sauce. If you are heat-sensitive, start with 1 teaspoon of the green curry paste, and add more at the end, to taste, if desired.

Add in mussels, stir. Add in coconut milk. Cook until the shells open, 5 to 10 minutes.

Add in chopped cilantro, if desired. (Basil is good too.)

Serve in bowls with lots of broth for each person and pass a bowl of basmati rice on the side.


_______________________________________

Three Many Cooks is the always-entertaining food blog of Pam Anderson and her two daughters, Maggy and Sharon. Pam is a well-known and much-respected food writer and author, Maggy is a “hippy adventurer meets 1950s housewife,” and Sharon refers to herself as a recovering food snob learning to survive on a graduate student’s budget. Theirs is a strong relationship both inside and outside the kitchen, and it shows in the food they create and the stories they tell.


Profile photo of ThreeManyCooks

Baked Falafel Pita

Posted by in Step-by-Step Recipes

Tasty Kitchen Blog: Baked Falafel Pita. Guest post by Maggy Keet of Three Many Cooks, recipe submitted by TK member Jane (janecooks).

 
As I’m eating less meat these days, I’m always on the look-out for recipes that use beans and legumes. They’re healthy, filling, and full of protein and fiber. But when I think falafel, I think fried and weekend project, too.

But Tasty Kitchen member janecooks offers a baked version of the fried favorite that’s weeknight-easy. And with two cans of chickpeas as the bulk of the meal, it’s easy on the wallet, too. These Baked Falafel Pitas are colorful, flavorful, and oh-so delicious. They received rave reviews in my house and I’m sure they will in yours.


Tasty Kitchen Blog: Baked Falafel Pita. Guest post by Maggy Keet of Three Many Cooks, recipe submitted by TK member Jane (janecooks).

Bright, colorful, flavorful ingredients. That’s always a good start.

Preheat your oven to 400ºF.


Tasty Kitchen Blog: Baked Falafel Pita. Guest post by Maggy Keet of Three Many Cooks, recipe submitted by TK member Jane (janecooks).

Drain the chickpeas and pour them into your food processor.


Tasty Kitchen Blog: Baked Falafel Pita. Guest post by Maggy Keet of Three Many Cooks, recipe submitted by TK member Jane (janecooks).

Add the flour, parsley, garlic, cumin, coriander, chili powder, salt and pepper.


Tasty Kitchen Blog: Baked Falafel Pita. Guest post by Maggy Keet of Three Many Cooks, recipe submitted by TK member Jane (janecooks).

Blitz the ingredients until it looks like this. If you don’t have a food processor, you can use a fork or a potato masher instead.


Tasty Kitchen Blog: Baked Falafel Pita. Guest post by Maggy Keet of Three Many Cooks, recipe submitted by TK member Jane (janecooks).

Form chickpea patties about 1 ½ inches wide by 2 inches thick. Place formed patties on a lightly greased baking sheet and bake for 15-20 minutes.


Tasty Kitchen Blog: Baked Falafel Pita. Guest post by Maggy Keet of Three Many Cooks, recipe submitted by TK member Jane (janecooks).

While the chickpea patties are baking, make this tahini-lemon sauce. We added a little water to make it more … saucy.


Tasty Kitchen Blog: Baked Falafel Pita. Guest post by Maggy Keet of Three Many Cooks, recipe submitted by TK member Jane (janecooks).

Assemble by spreading a portion of the tahini-lemon sauce inside of each pita. Then add a couple of chickpea patties and a generous amount of lettuce, tomato, and crumbled feta. Enjoy!

Thanks to Jane for sharing these Baked Falafel Pitas, I’m definitely adding these to my weeknight repertoire!


Printable Recipe

Baked Falafel Pitas

5.00 Mitt(s) 7 Rating(s)7 votes, average: 5.00 out of 57 votes, average: 5.00 out of 57 votes, average: 5.00 out of 57 votes, average: 5.00 out of 57 votes, average: 5.00 out of 5

Prep Time:

Cook Time:

Difficulty: Easy

Servings: 4

4
x

Print Options

Page size Letter 3x5 4x6
Text Size Small Medium Large
Content Include description
Include prep time, etc.
Show image

Description

These healthy chickpea cakes have zesty Middle Eastern flavor and are a great, quick dinner-time treat when tucked into a pita! My meat-loving fiance doesn’t even miss the meat in this flavorful, filling meal!

Ingredients

  • 2 cans (15 Oz. Size) Chickpeas
  • 3 Tablespoons Flour
  • 3 Tablespoons Parsley (optional)
  • 4 cloves Garlic
  • 2 teaspoons Ground Cumin
  • 2 teaspoons Ground Coriander
  • 1 teaspoon Chili Powder
  • ½ teaspoons Salt
  • 1 dash Black Pepper
  • 4 Tablespoons Tahini
  • 3 Tablespoons Lemon Juice
  • 3 whole Tomatoes, Diced
  • 1 block (8 Oz. Size) Feta Cheese, Crumbled
  • 1 head Lettuce
  • 12 whole Small Pitas

Preparation Instructions

Throw the chickpeas, flour, parsley, and spices into a food processor and pulse until well blended—or mash up chickpeas with a fork or potato masher and mix in spices. Then form small patties out of the chickpea mixture, about 1 1/2 to 2 inches wide and 1 inch thick.

Preheat the oven to 400ºF and place chickpea patties on a lightly greased pan and pop into the oven for 15–20 minutes.

Meanwhile, mix together the tahini and lemon juice and set aside with your other toppings (tomatoes, feta, and lettuce). When the patties are done, put them in a pita with plenty of toppings, and enjoy!


_______________________________________

Three Many Cooks is the always-entertaining food blog of Pam Anderson and her two daughters, Maggy and Sharon. Pam is a well-known and much-respected food writer and author, Maggy is a “hippy adventurer meets 1950s housewife,” and Sharon refers to herself as a recovering food snob learning to survive on a graduate student’s budget. Theirs is a strong relationship both inside and outside the kitchen, and it shows in the food they create and the stories they tell.


Profile photo of ThreeManyCooks

Enfrijoladas

Posted by in Step-by-Step Recipes

Tasty Kitchen Blog: Enfrijoladas. Guest post by Maggy Keet of Three Many Cooks, recipe submitted by TK member Caroline of Pink Basil.


A simple alternative to fajitas and enchiladas, enfrijoladas make a fun weeknight pantry supper that also works for Meatless Monday. You can serve these enfrijoladas topped with sour cream, cilantro, and salsa. I’ve highlighted the simplest version, but there are other great recipes that include meat, vegetables, and even eggs! For fans of spicy food, add a little heat to the bean mixture or serve hot sauce with the other toppings.

Big tip: microwaving the corn tortillas before dipping them into the refried beans keeps them pliable enough to fold without breaking. Another bit of good news: there was enough sauce and room in the pan for eight tortillas, making it a perfect dinner for four.


Tasty Kitchen Blog: Enfrijoladas. Guest post by Maggy Keet of Three Many Cooks, recipe submitted by TK member Caroline of Pink Basil.

Start with these ingredients.


Tasty Kitchen Blog: Enfrijoladas. Guest post by Maggy Keet of Three Many Cooks, recipe submitted by TK member Caroline of Pink Basil.

Heat the refried beans, broth, and water in a large pot. Note: I measured and mixed the broth and water in the Pyrex measuring cup and poured it all in at one time.


Tasty Kitchen Blog: Enfrijoladas. Guest post by Maggy Keet of Three Many Cooks, recipe submitted by TK member Caroline of Pink Basil.

Then add the tomato paste.


Tasty Kitchen Blog: Enfrijoladas. Guest post by Maggy Keet of Three Many Cooks, recipe submitted by TK member Caroline of Pink Basil.

Whisk until thoroughly mixed. The texture should be pretty soupy! While the sauce is mixing and heating, microwave the corn tortillas until hot.


Tasty Kitchen Blog: Enfrijoladas. Guest post by Maggy Keet of Three Many Cooks, recipe submitted by TK member Caroline of Pink Basil.

Now get set up with your baking dish, grated cheese, tortillas, and the bean mixture. Using a pair of tongs, dip the tortilla into the bean mixture and allow it to soak for just a moment.


Tasty Kitchen Blog: Enfrijoladas. Guest post by Maggy Keet of Three Many Cooks, recipe submitted by TK member Caroline of Pink Basil.

Place the bean mixture-coated tortilla in the baking dish, add a portion of cheese to one half, and then fold over. Repeat with the remaining seven tortillas, then top the dish with the remaining bean mixture and cheese.


Tasty Kitchen Blog: Enfrijoladas. Guest post by Maggy Keet of Three Many Cooks, recipe submitted by TK member Caroline of Pink Basil.

Bake at 350ºF for 10-15 minutes or until the cheese has melted and it looks like this! It took everything inside me not to dig into that dish with a spoon.


Tasty Kitchen Blog: Enfrijoladas. Guest post by Maggy Keet of Three Many Cooks, recipe submitted by TK member Caroline of Pink Basil.

Serve with a dollop of sour cream, salsa, and chopped fresh cilantro!

Thank you, Caroline, for introducing me to this classic Mexican recipe. I will certainly be stocking refried beans in my pantry from now on so that I can make these again! Visit her blog, Pink Basil, for more recipes, thoughtful writing, and great photography.


Printable Recipe

Enfrijoladas

See post on Pink Basil’s site!
4.62 Mitt(s) 8 Rating(s)8 votes, average: 4.62 out of 58 votes, average: 4.62 out of 58 votes, average: 4.62 out of 58 votes, average: 4.62 out of 58 votes, average: 4.62 out of 5

Prep Time:

Cook Time:

Difficulty: Easy

Servings: 4

4
x

Print Options

Page size Letter 3x5 4x6
Text Size Small Medium Large
Content Include description
Include prep time, etc.
Show image

Description

Enfrijoladas: delicious Mexican comfort food!

Ingredients

  • 4 cups Refried Beans
  • 1 cup Vegetable Stock
  • 1 cup Water
  • 1 Tablespoon Tomato Paste
  • 6 whole Small Or Medium Size Tortillas
  • 3 cups Shredded Monterey Jack Cheese

Preparation Instructions

Heat up the refried beans in a large pan. Add in the vegetable stock, water and tomato paste and blend until smooth. You want the sauce to be very thin, so add more liquid if necessary. If the sauce is too thick it will weigh down the tortillas and tear them. Using tongs, take a tortilla and dip in the sauce. This is a bit of an art—you want them to soak through enough that they are pliable and won’t tear, but soak them for too long and they’ll come apart when you lift them out.

Lay the tortilla dipped in bean sauce flat in a small baking dish. Sprinkle some cheese on one side of the tortilla, and then fold it in half like a quesadilla. Repeat this with each tortilla until the baking dish is full. Pour the remainder of the bean sauce into the pan and sprinkle with remaining cheese.

Bake at 350ºF for about 10 to 15 minutes, or until the cheese has melted.


_______________________________________

Three Many Cooks is the always-entertaining food blog of Pam Anderson and her two daughters, Maggy and Sharon. Pam is a well-known and much-respected food writer and author, Maggy is a “hippy adventurer meets 1950s housewife,” and Sharon refers to herself as a recovering food snob learning to survive on a graduate student’s budget. Theirs is a strong relationship both inside and outside the kitchen, and it shows in the food they create and the stories they tell.


Profile photo of ThreeManyCooks

Sweet Potato Foil Packet Tacos

Posted by in Step-by-Step Recipes

Tasty Kitchen Blog: Sweet Potato Foil Packs. Guest post by Maggy Keet of Three Many Cooks, recipe submitted by TK member Natalie Perry of Perry's Plate.

 
I thought about simply writing “best weeknight dinner…ever” and leaving it at that, but I also wanted you to know just why I liked this dish so much. I was first drawn to Natalie’s recipe because of the solid reviews. Each person said how much their family loved it and how they’d made it again and again, so it was no surprise when I found the same true for me.

As I eat less meat these days, I’m always in search of recipes that move meat from focal point to flavoring, and I think this recipe perfectly exemplifies that. Sweet potatoes are a little unexpected in a dish with Mexican flavorings, but paired with a small amount of spicy meat it’s a winning combination. The spinach and beans make the dish even heartier and healthier.

I don’t have children (yet!), but I know that assembling foil packs is a fun way to involve kids in dinner preparation. Give this recipe a try, and I’ll bet you join the other reviewers and me in declaring Sweet Potato Foil Packs a weeknight favorite in your home.


Tasty Kitchen Blog: Sweet Potato Foil Packs. Guest post by Maggy Keet of Three Many Cooks, recipe submitted by TK member Natalie Perry of Perry's Plate.

Here’s what you need.


Tasty Kitchen Blog: Sweet Potato Foil Packs. Guest post by Maggy Keet of Three Many Cooks, recipe submitted by TK member Natalie Perry of Perry's Plate.

Start by browning the meat. I used ground turkey instead of beef because I prefer it, but any type of ground meat would work!


Tasty Kitchen Blog: Sweet Potato Foil Packs. Guest post by Maggy Keet of Three Many Cooks, recipe submitted by TK member Natalie Perry of Perry's Plate.

To the browned meat, add the taco seasoning…


Tasty Kitchen Blog: Sweet Potato Foil Packs. Guest post by Maggy Keet of Three Many Cooks, recipe submitted by TK member Natalie Perry of Perry's Plate.

The tomato sauce…


Tasty Kitchen Blog: Sweet Potato Foil Packs. Guest post by Maggy Keet of Three Many Cooks, recipe submitted by TK member Natalie Perry of Perry's Plate.

And the beans, stirring until evenly mixed.


Tasty Kitchen Blog: Sweet Potato Foil Packs. Guest post by Maggy Keet of Three Many Cooks, recipe submitted by TK member Natalie Perry of Perry's Plate.

Next, cut six large pieces of aluminum foil, making sure to give yourself enough room to fold in all four sides. (Think of it like wrapping a gift; you don’t want to get to the end only to realize you don’t have enough!) Spray each piece of foil with cooking spray before assembling packets. Start by adding the sweet potato…


Tasty Kitchen Blog: Sweet Potato Foil Packs. Guest post by Maggy Keet of Three Many Cooks, recipe submitted by TK member Natalie Perry of Perry's Plate.

Then top with a little pat of butter. Butter and sweet potatoes? Yum!


Tasty Kitchen Blog: Sweet Potato Foil Packs. Guest post by Maggy Keet of Three Many Cooks, recipe submitted by TK member Natalie Perry of Perry's Plate.

Then add a pinch of salt, followed by a portion of spinach, meat, beans, and plenty of cheese. Do you hear me? Plenty of cheese! Note: I used frozen spinach which I thawed, drained, and squeezed dry as that’s what I had on hand, though the recipe calls for fresh spinach.


Tasty Kitchen Blog: Sweet Potato Foil Packs. Guest post by Maggy Keet of Three Many Cooks, recipe submitted by TK member Natalie Perry of Perry's Plate.

Once you’ve assembled your foil pack, pull together the sides and fold down. But be sure to leave a little breathing room in there!


Tasty Kitchen Blog: Sweet Potato Foil Packs. Guest post by Maggy Keet of Three Many Cooks, recipe submitted by TK member Natalie Perry of Perry's Plate.

Then fold up the ends, just like wrapping a present.


Tasty Kitchen Blog: Sweet Potato Foil Packs. Guest post by Maggy Keet of Three Many Cooks, recipe submitted by TK member Natalie Perry of Perry's Plate.

After sealing all the foil packs, place them on a rimmed baking sheet and bake for 25-30 minutes.


Tasty Kitchen Blog: Sweet Potato Foil Packs. Guest post by Maggy Keet of Three Many Cooks, recipe submitted by TK member Natalie Perry of Perry's Plate.

Once baked, open (being careful of any steam) … and inhale. The smell is divine!


Tasty Kitchen Blog: Sweet Potato Foil Packs. Guest post by Maggy Keet of Three Many Cooks, recipe submitted by TK member Natalie Perry of Perry's Plate.

We served the foil packs on flour tortillas with a dollop of sour cream and a few sprigs of fresh cilantro.

Thanks to Natalie for this delicious weeknight recipe! I can’t wait to make it again and try new variations. Do visit her blog Perry’s Plate for more of her great recipes. She’s always cooking up something good!


Printable Recipe

Sweet Potato Foil Packet Tacos

See post on Natalie | Perry's Plate’s site!
4.94 Mitt(s) 17 Rating(s)17 votes, average: 4.94 out of 517 votes, average: 4.94 out of 517 votes, average: 4.94 out of 517 votes, average: 4.94 out of 517 votes, average: 4.94 out of 5

Prep Time:

Cook Time:

Difficulty: Easy

Servings: 6

6
x

Print Options

Page size Letter 3x5 4x6
Text Size Small Medium Large
Content Include description
Include prep time, etc.
Show image

Description

Taco – tortilla + sweet potato cubes = a gluten-free alternative to tacos that your kids will adore!

Ingredients

  • ½ pounds Ground Beef Or Turkey
  • 2 Tablespoons Taco Seasoning
  • ½ cups Tomato Sauce
  • 1 can (15 Oz. Can) Black, Kidney, Or Pinto Beans, Drained
  • 6 cups Sweet Potatoes, Peeled And Cut Into 1/2-inch Cubes
  • 2 Tablespoons Butter
  • ½ teaspoons Salt
  • 1-½ cup Chopped Fresh Spinach
  • 1-½ cup Shredded Cheddar Cheese
  • Sour Cream, Salsa, And/or Guacamole For Garnish

Preparation Instructions

Preheat oven to 425ºF.

Brown ground meat in a skillet over medium-high heat. Stir in taco seasoning, tomato sauce, and beans. Set aside.

To assemble packets, spray the foil with non-stick spray. Place 1 cup sweet potato cubes in the center of each piece. Top with a small piece of butter (about 1 teaspoon) and a pinch or two of salt. Sprinkle some chopped spinach over the sweet potatoes, followed by about 1/3 cup of taco meat and a sprinkle of cheese. Fold the sides in, then bring the top and bottom ends of the foil together in the center and fold, sealing the packet.

Repeat with remaining ingredients, placing the packets on a rimmed cookie sheet. Bake for 25–30 minutes, until the sweet potatoes are tender.

Serve with sour cream, salsa, and/or guacamole.

Makes 6 servings.

Note: For the taco meat, I used some leftover Hidden Veggie Chipotle Taco Meat I had in the fridge (recipe in my TK box).


_______________________________________

Three Many Cooks is the always-entertaining food blog of Pam Anderson and her two daughters, Maggy and Sharon. Pam is a well-known and much-respected food writer and author, Maggy is a “hippy adventurer meets 1950s housewife,” and Sharon refers to herself as a recovering food snob learning to survive on a graduate student’s budget. Theirs is a strong relationship both inside and outside the kitchen, and it shows in the food they create and the stories they tell.


Profile photo of ThreeManyCooks

Sander’s Hot Fudge Sauce

Posted by in Step-by-Step Recipes

  A bit of history in a recipe’s headnote always catches my eye. So when I stumbled upon Kathy Marie’s recipe for Sander’s Hot Fudge Sauce, a recipe passed down by her 82 year-old mother-in-law who grew up in Detroit, I figured it had t be great. Her mother-in-law recalled what a treat it was […]

Profile photo of ThreeManyCooks

Chocolate Hazelnut Milk

Posted by in Step-by-Step Recipes

  At the risk of sounding like Mugatu in the film Zoolander: nut milks are “so hot right now.” I’m seeing them everywhere. I think they’ve hit the mainstream, not only because they are non-dairy and vegan (and in most cases raw), but also because they are delicious. Nut milks have a wonderful depth of […]

Profile photo of ThreeManyCooks

Shamrock Blizzard

Posted by in Step-by-Step Recipes

  Since its debut in the 1970s, McDonald’s Shamrock Shake has garnered something of a cult following. I’m certain part of its popularity stems from very limited availability. You might be interested to know the Shamrock Shake has its own website pointing devoted fans to selected serving locations. I love a good milkshake, but this seems a […]

Profile photo of ThreeManyCooks

Homemade Tortillas

Posted by in Step-by-Step Recipes

  I know what you’re thinking, and I’m going to answer your question right up front. Yes, making flour tortillas from scratch is worth it. It was certainly my question before making them the first time. But here’s why it’s worth it: the ones at the store are uniform, bland, and blonde. The ones you […]