The Pioneer Woman Tasty Kitchen
Profile photo of steamykitchen

Greekin’ Up Spaghetti!

Posted by in Step-by-Step Recipes

Tasty Kitchen Blog: Greekin' Up Spaghetti! Guest post by Jaden Hair of Steamy Kitchen.

 
Italian spaghetti and meatballs is as classic as classic can get, and here I go changing it up! The truth is, I get bored and restless, and either I vent out my creativity by repainting my whole house or I head to the kitchen to Greek up a recipe.

I know for sure that my husband is dang happy that I chose the kitchen instead of the paint can!

The recipe for the Greek-fied meatballs comes from morphing a recipe from one of my favorite cookbooks that I acquired this year, How To Roast a Lamb: New Greek Classic Cooking by Michael Psilakis. The original recipe was for Greek-Style Hamburgers (you must make!) but it’s just as good rolled into meatballs.

Ground cumin and coriander are subbed for the normal Italian oregano. Feta cheese and fresh parsley stand in for parmesan.

The secret to this recipe is slowly sautéing the onions until soft ‘n sweet. Then mince!

Tasty Kitchen Blog: Greekin' Up Spaghetti! Guest post by Jaden Hair of Steamy Kitchen.


You’ve got to mince them finely as they’ll need to be blended into the meat. See the difference between the right (chopped) and left (minced)?

Tasty Kitchen Blog: Greekin' Up Spaghetti! Guest post by Jaden Hair of Steamy Kitchen.


To any type of meat that you want—ground chicken, turkey, beef, lamb or pork—add in the minced onion, salt, garlic, cumin, pepper, mustard, coriander and parsley. (Though if you only added the onion, garlic, salt and pepper, it’s just as good).

Tasty Kitchen Blog: Greekin' Up Spaghetti! Guest post by Jaden Hair of Steamy Kitchen.


Roll ‘em into 1 1/2-inch meatballs. Try to keep them all even in size.

Tasty Kitchen Blog: Greekin' Up Spaghetti! Guest post by Jaden Hair of Steamy Kitchen.


Brown them in a pan …

Tasty Kitchen Blog: Greekin' Up Spaghetti! Guest post by Jaden Hair of Steamy Kitchen.


On all sides …

Tasty Kitchen Blog: Greekin' Up Spaghetti! Guest post by Jaden Hair of Steamy Kitchen.


Then pour in your favorite tomato sauce. Your favorite marinara sauce from a jar will do just fine.

Tasty Kitchen Blog: Greekin' Up Spaghetti! Guest post by Jaden Hair of Steamy Kitchen.


I’d love to know: how would you change up the regular ol’ spaghetti dish? Would you make it Moroccan? Swedish? Tex-Mex? Or would ya keep it as is—a classic untouchable!


—–
Spaghetti ‘n Greek Meatballs
Recipe adapted from How To Roast a Lamb: New Greek Classic Cooking by Michael Psilakis
Serves 4

 
1 pound dried pasta
2 tablespoons olive oil, divided
1 sweet onion, sliced
1/2 teaspoon kosher salt
freshly ground black pepper
1 1/2 pound ground meat (choice of ground turkey, chicken, pork, beef or lamb)
1 tablespoon Dijon mustard
1/2 teaspoon ground coriander
3 tablespoons finely chopped fresh parsley
1 garlic clove, finely minced
1/2 teaspoon ground cumin
4 cups your favorite marinara sauce
1/2 cup crumbled feta cheese

 
1. Cook pasta according package instructions. Drain and set aside.

2. Heat a large saute pan over medium heat. When hot, swirl in just 1 tablespoon of the olive oil. Add the onions and cook until browned, soft and tender. The longer you cook, the sweeter the onion will taste. Remove from pan to a cutting board and finely mince the onions.

3. In a large bowl, combine the minced onions, salt, pepper, ground meat, Dijon mustard, coriander, garlic, cumin and 1 tablespoon of the parsley. Use your hands to mix thoroughly.

4. To form the meatballs, put a good handful of the meat onto the palm of your hand and shape into a tight ball. Try to keep all the meatballs 1 1/2 inches in diameter to make sure they cook evenly.

5. Heat a large saute pan over medium-high heat. When hot, swirl in the remaining olive oil. Add the meatballs (not touching) and cook for 2 minutes. Roll the meatballs and fry the other sides for 2 minutes each. When all sides are browned, pour the tomato sauce over the meatballs and bring to a simmer. Cook for an additional 5 minutes until the meatballs are cooked through.

6. Serve over pasta topped with feta cheese and the remaining chopped parsley.

 
Tasty Kitchen Blog: Greekin' Up Spaghetti! Guest post by Jaden Hair of Steamy Kitchen.


_______________________________________

Jaden Hair is a food writer, television personality, and food photographer based in Tampa Bay, Florida. Find more of her recipes in her blog, Steamy Kitchen, where you can also read more about Jaden’s new book, The Steamy Kitchen Cookbook, and the rave reviews it’s received!


Profile photo of Erika (TK)

A Pasta Salad Tour

Posted by in The Theme Is...

Tasty Kitchen Blog: A Pasta Salad Tour (Pasta Salad with Fresh Mozzarella, Sun-Dried Tomatoes & Olives, recipe submitted by TK member The Parsley Thief)

 
A pasta salad is one of the easiest, quickest meals or sides to make in the summer. Much of it can be prepped in advance and it’s a great way to get your daily dose of vegetables. It’s highly customizable too. Don’t like one of the ingredients? Leave it out and add something else that you like. Not a fan of the dressing? Replace it with your favorite!

It seems like pasta salads are universal, too. Different regions in the world have their own unique take on it. Let’s take a quick tour around the globe, shall we?

Let’s get started with a stop in the Mediterranean. Because it’s pretty there. Blue waters, cool ocean breezes, colorful markets, and great food. Fresh, simple dishes that are healthy but definitely not short on flavor. We’ve got some great choices there, like a Greek Pasta Salad from ThreeManyCooks and a wonderfully fresh Mediterranean Orzo Salad from mcmom.

 
Tasty Kitchen Blog: A Pasta Salad Tour (Mediterranean)


How about a stop in the far east for that wonderful pasta known as soba noodles? Soba noodles are made with buckwheat flour. They’re rich in thiamine and can also be served cold or warm. They have a delightful texture, a subtle nutty flavor, and provide an excellent twist to regular pasta salads.
 

Tasty Kitchen Blog: A Pasta Salad Tour (Soba)Clockwise from left: Soba Salad with Asparagus and Shiitake Mushrooms from wynk52, Spicy Ginger Soba Chicken Salad from Sally Wolff, and Spicy Peanut Soba Noodles from runningwithtweezers.

 
While we’re exploring Asia, you may also want to try Ree’s awesome Asian Noodle Salad below. It’s beyond amazing. It truly is. And I’m not just saying that because she’s listening.

 
Tasty Kitchen Blog: A Pasta Salad Tour (Asian Noodle Salad, from Ree Drummond of The Pioneer Woman)


We can’t take a tour without visiting Italy since, after all, pasta is more often associated with Italy. Here we have pattilouwho’s Ancini di Pepe Savory Pasta Salad (on the left) which just looks absolutely fresh and summery. If you’re looking for a bolder, richer kind of salad, a Pasta Salad with Fresh Mozzarella, Sun-Dried Tomatoes & Olives from theparsleythief is just the recipe you need.

 
Tasty Kitchen Blog: A Pasta Salad Tour (Italian)


Or perhaps you’d rather wing it and do your own thing. That’s fine too! Many great recipes here at Tasty Kitchen are the result of your creative winging. If that sounds like something you’d like to do (and hey, maybe Zee might want to help out too), you can use one of these basic recipes as a start and build from there. We have a delicious and Fabulously Adaptable Pasta Salad from nhsweetcherry (on the left), or you can try the Basic Pasta Salad from Tracy (sugarcrafter) on the right.

 
Tasty Kitchen Blog: A Pasta Salad Tour (Basic)


So if you’re looking for a quick and easy summer meal (or side), check out the Pasta Salads category! I have a good feeling you’ll find something that tickles your fancy.

 
Then please come back here and share some with me. I’m hungry.


Profile photo of savorysweetlife

Banana Split Ice Cream Cake

Posted by in Step-by-Step Recipes

Today is a special day because we’re welcoming the brand new PW design. Our little corner here is getting its very own spot in the front page of The Pioneer Woman and if you haven’t been there yet today, check it out! There are tons of new features to play with, and it’s new and familiar at the same time. We thought it’d be be fun to celebrate all this forward movement by going retro here at the Tasty Kitchen Blog, and we’re absolutely thrilled to have our dear friend Alice of Savory Sweet Life help us usher in this new age of Aquarius. Or something like that.

 
Tasty Kitchen Blog: Banana Split Ice Cream Cake. Guest post by Alice Currah of Savory Sweet Life, recipe submitted by TK member Annalise Ree (cuddelsandcomfortfoods) of Sweet Anna's.

 
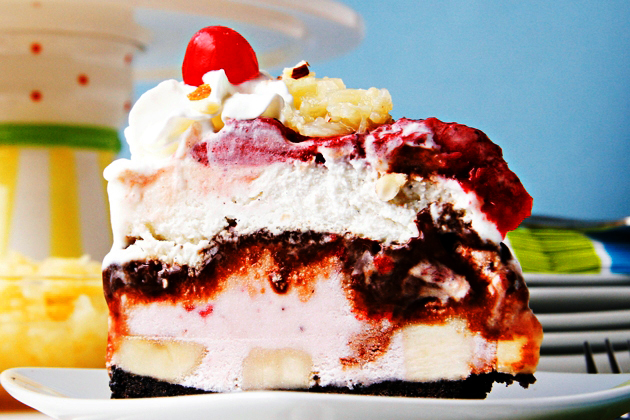
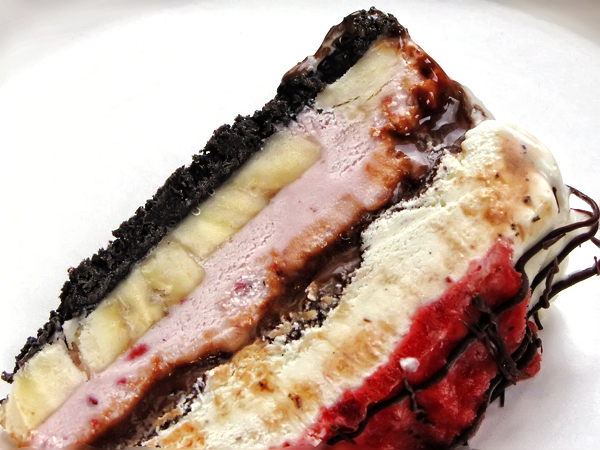
When it comes to ice cream sundaes, banana splits are the grand daddy of them all. This nostalgic ice cream dessert has been around since the early 1900s and its popularity over the years has never ceased. It is a timeless classic which I have adored since I was a small child and still do today. As the world quickly changes around us, banana splits remain the same today as they did over 100 years ago.

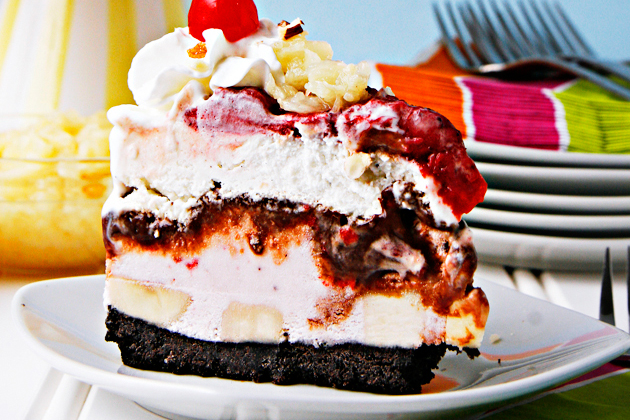
A traditional banana split is made of a banana vertically cut in half and lined on each side of a boat shaped serving bowl. A scoop of vanilla, strawberry, and chocolate ice cream is sandwiched between the two halves of the banana like three peas in a pod. Each scoop of ice cream is then topped off with its own sauce of hot fudge, strawberry, and crushed pineapple. Finally, the sundae is made complete with a crown of whipped cream, a sprinkling of chopped nuts, and a maraschino cherry on top. When I discovered Annalise’s recipe for a Banana Split Ice Cream Cake on Tasty Kitchen, I instantly knew I had to make it! It is the perfect marriage of all things banana split except in a ice cream cake version.

If you love ice cream sundaes, you are in for a fantastic treat. It’s a fun way to enjoy a classic banana split but served as an ice cream cake. This recipe is not difficult but does require time—but it’s so worth it! I’m convinced people who hate bananas (cough … Ree Drummond) will love this dessert. So let’s get started, shall we?


Tasty Kitchen Blog: Banana Split Ice Cream Cake. Guest post by Alice Currah of Savory Sweet Life, recipe submitted by TK member Annalise Ree (cuddelsandcomfortfoods) of Sweet Anna's.

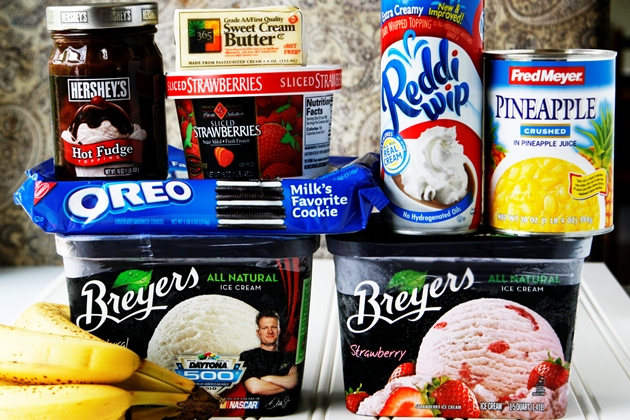
Here is a list of everything you’ll need to get started: Oreo cookies, butter, vanilla and strawberry ice creams, hot fudge sauce, frozen sweetened strawberries, crushed pineapple, and whipped cream. I also opted to add a few chopped almonds and maraschino cherries just for the heck of it. The recipe calls for a springform pan but doesn’t mention which size to use. I used an 8” and would suggest using a springform pan between 8”-10”. The smaller than pan, the taller the ice cream cake will be and vice versa.


Tasty Kitchen Blog: Banana Split Ice Cream Cake. Guest post by Alice Currah of Savory Sweet Life, recipe submitted by TK member Annalise Ree (cuddelsandcomfortfoods) of Sweet Anna's.

This recipe is all about layers and building on top of one another after the previous one has set. The first layer is the Oreo chocolate cookie crust.


Tasty Kitchen Blog: Banana Split Ice Cream Cake. Guest post by Alice Currah of Savory Sweet Life, recipe submitted by TK member Annalise Ree (cuddelsandcomfortfoods) of Sweet Anna's.

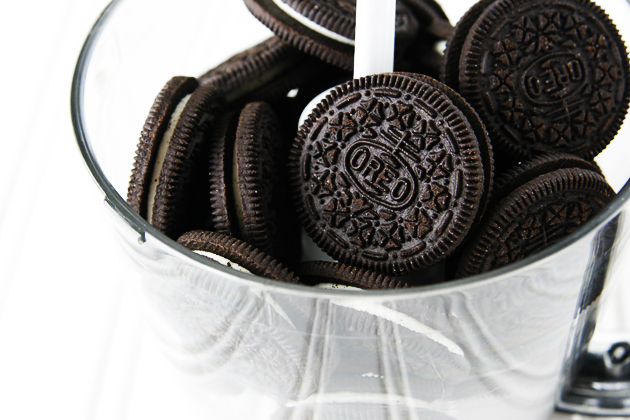
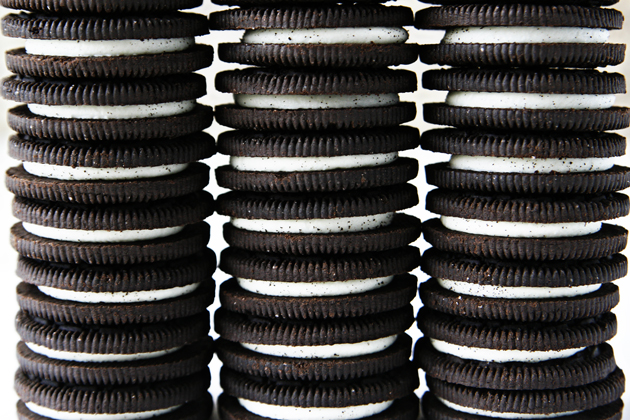
Place Oreo cookies in a food processor and pulse until they become fine crumbs resembling rich dark soil. If you don’t have a food processor, you can place the cookies in a Ziploc bag and achieve the same effect by using a rolling pin to crush the cookies.


Tasty Kitchen Blog: Banana Split Ice Cream Cake. Guest post by Alice Currah of Savory Sweet Life, recipe submitted by TK member Annalise Ree (cuddelsandcomfortfoods) of Sweet Anna's.

Add melted butter the food processor and pulse a few more times to make sure the butter is evenly distributed.


Tasty Kitchen Blog: Banana Split Ice Cream Cake. Guest post by Alice Currah of Savory Sweet Life, recipe submitted by TK member Annalise Ree (cuddelsandcomfortfoods) of Sweet Anna's.

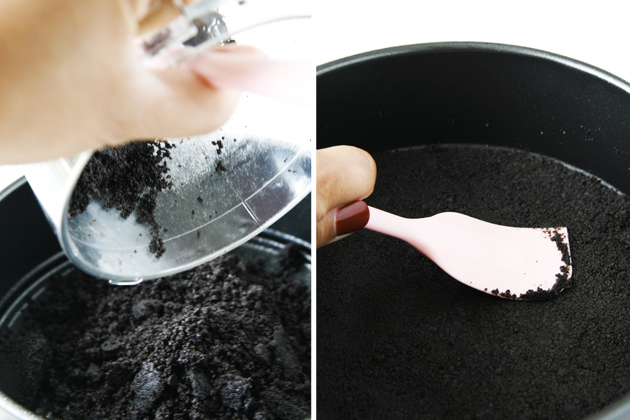
Dump mixture into the springform pan. Using the back of a spatula or by using your fingers, press cookie crumb mixture down and firmly to form a uniformed crust on the bottom of the pan.


Tasty Kitchen Blog: Banana Split Ice Cream Cake. Guest post by Alice Currah of Savory Sweet Life, recipe submitted by TK member Annalise Ree (cuddelsandcomfortfoods) of Sweet Anna's.

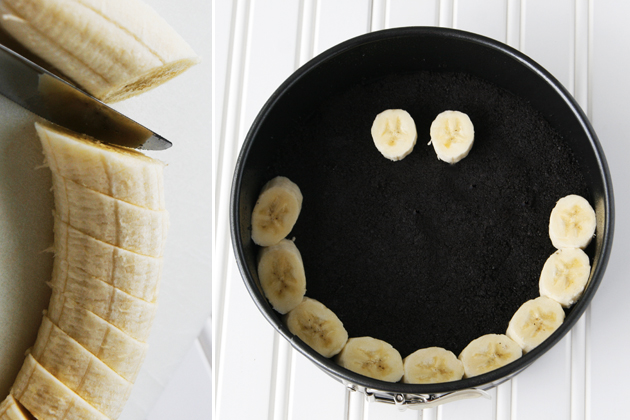
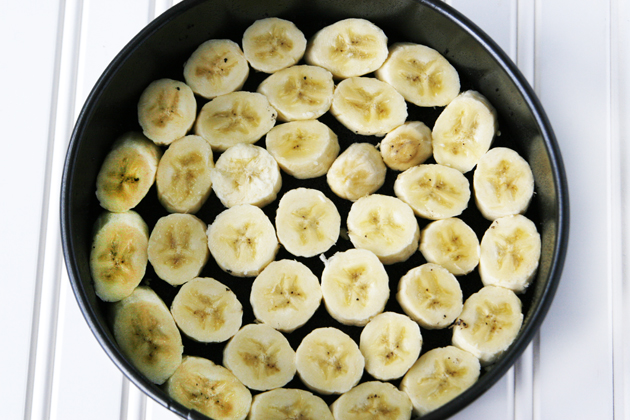
The recipe calls for cutting four bananas in ½” thick slices but I found I only needed 2.5 bananas. I point this out only to let you know you may or may not need to use as many bananas the recipe calls for. Cut enough banana slices to cover the bottom of the pan in a single layer and then put the springform pan in the freezer for at least 10 minutes.


Tasty Kitchen Blog: Banana Split Ice Cream Cake. Guest post by Alice Currah of Savory Sweet Life, recipe submitted by TK member Annalise Ree (cuddelsandcomfortfoods) of Sweet Anna's.

A note to banana haters (you know who you are): If you dislike bananas because of their texture, the banana slices in this recipe become frozen. This changes the texture from mushy to a frozen piece of fruit that’s more like hard banana ice cream. This may be the recipe which converts your disdain to love. Just saying.


Tasty Kitchen Blog: Banana Split Ice Cream Cake. Guest post by Alice Currah of Savory Sweet Life, recipe submitted by TK member Annalise Ree (cuddelsandcomfortfoods) of Sweet Anna's.

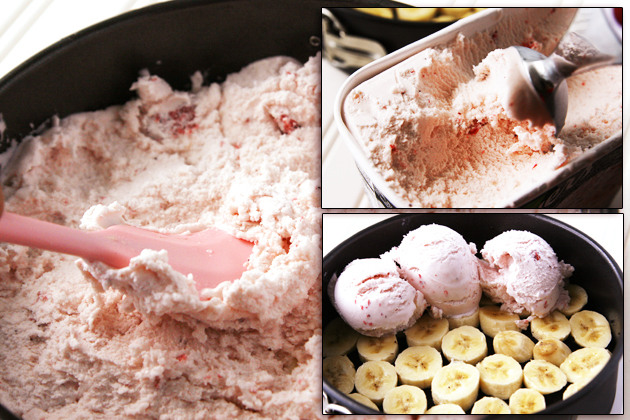
Scoop slightly softened ice cream on top of the banana layer until it is completely covered. Smooth and press down the ice cream layer by using a spatula dipped in hot water. Place cake pan in the freezer for 2 hours.


Tasty Kitchen Blog: Banana Split Ice Cream Cake. Guest post by Alice Currah of Savory Sweet Life, recipe submitted by TK member Annalise Ree (cuddelsandcomfortfoods) of Sweet Anna's.

Note: Although the photo above shows a 1.5 gallon of strawberry ice cream, the recipe actually calls for only a pint. I bought the bigger size because it was actually cheaper than the smaller container. In my opinion you could use either. But if you do go with the bigger size, you’ll want to use approximately 1/3-1/2 of the container.


Tasty Kitchen Blog: Banana Split Ice Cream Cake. Guest post by Alice Currah of Savory Sweet Life, recipe submitted by TK member Annalise Ree (cuddelsandcomfortfoods) of Sweet Anna's.

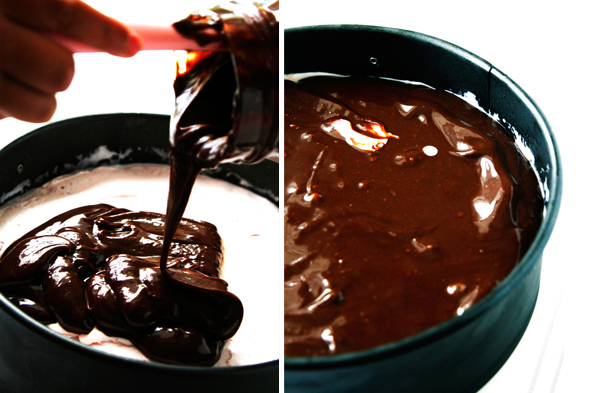
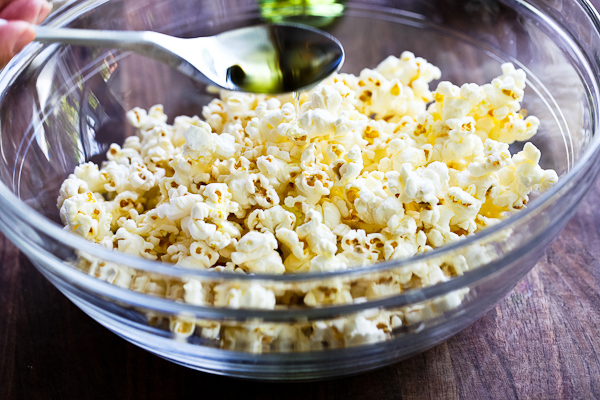
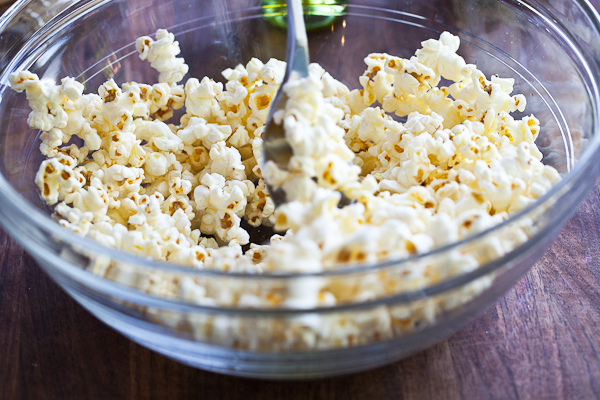
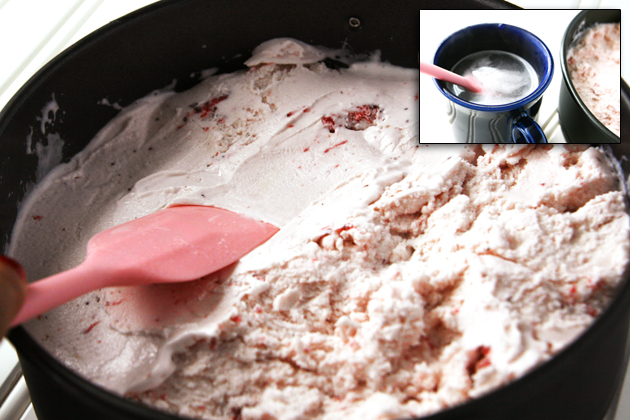
Warm the hot fudge in the microwave for 30 seconds with the lid removed. Stir the jar so the sauce has a nice spreadable consistency. Empty the entire hot jar of hot fudge sauce on top of the strawberry ice cream layer and smooth it out from edge to edge. Place the cake pan back in the freezer for 30 minutes or until the fudge layer has firmed up.


Tasty Kitchen Blog: Banana Split Ice Cream Cake. Guest post by Alice Currah of Savory Sweet Life, recipe submitted by TK member Annalise Ree (cuddelsandcomfortfoods) of Sweet Anna's.

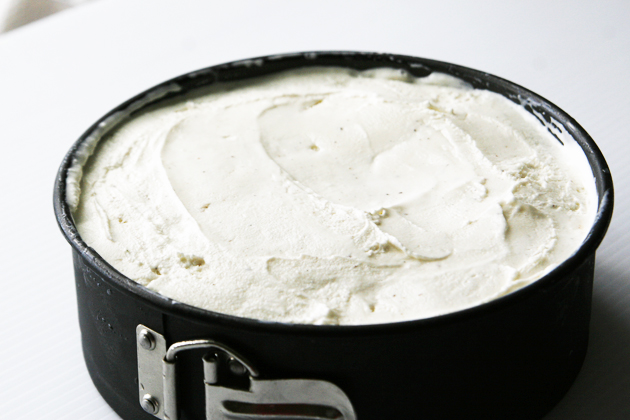
Grab the vanilla ice cream and repeat the exact same steps as the strawberry ice cream.


Tasty Kitchen Blog: Banana Split Ice Cream Cake. Guest post by Alice Currah of Savory Sweet Life, recipe submitted by TK member Annalise Ree (cuddelsandcomfortfoods) of Sweet Anna's.

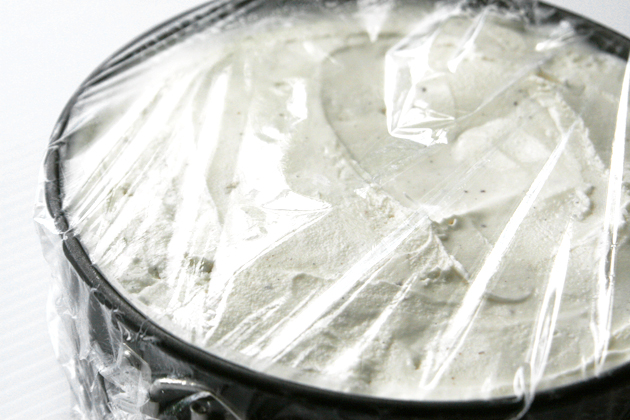
Cover the cake pan with plastic wrap and return the ice cream cake to the freezer for at least 6 hours or until very firm. What you’re looking for is for the cake to be completely rock solid frozen. Allowing the ice cream layers to set overnight works beautifully.


Tasty Kitchen Blog: Banana Split Ice Cream Cake. Guest post by Alice Currah of Savory Sweet Life, recipe submitted by TK member Annalise Ree (cuddelsandcomfortfoods) of Sweet Anna's.

Tasty Kitchen Blog: Banana Split Ice Cream Cake. Guest post by Alice Currah of Savory Sweet Life, recipe submitted by TK member Annalise Ree (cuddelsandcomfortfoods) of Sweet Anna's.

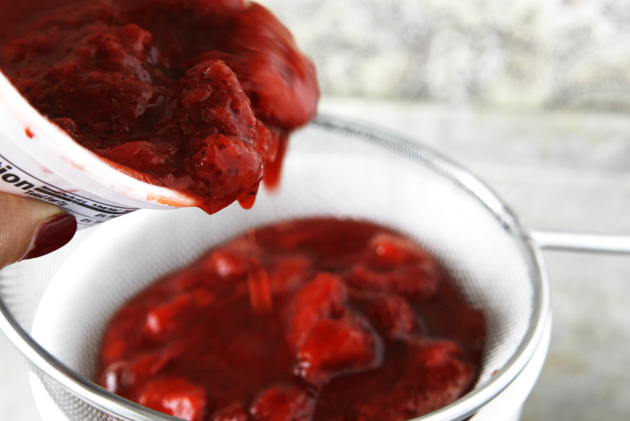
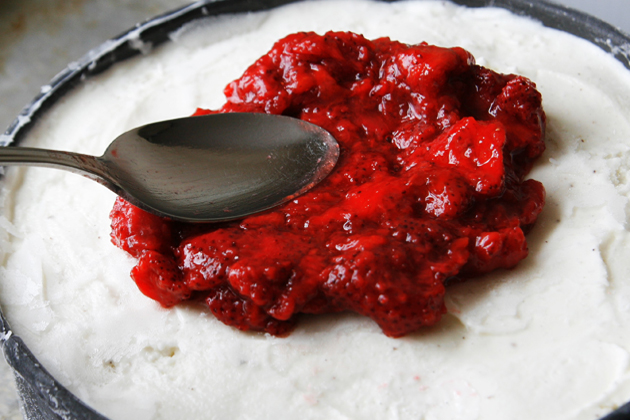
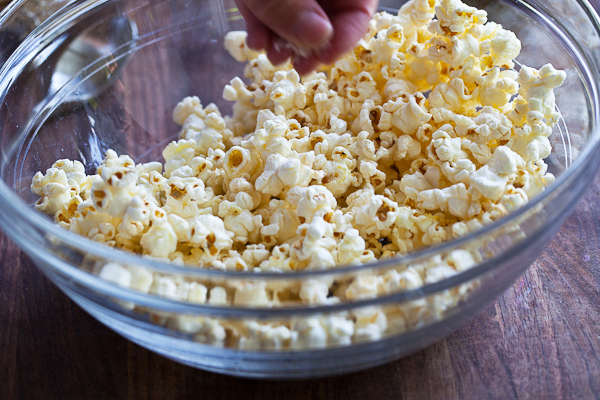
When you’re preparing the cake to serve, be sure to make sure the frozen strawberries have thawed. Drain the strawberries and then spread the mixture on top of the frozen ice cream cake. Make sure to leave about a 1” edge around the cake.


Tasty Kitchen Blog: Banana Split Ice Cream Cake. Guest post by Alice Currah of Savory Sweet Life, recipe submitted by TK member Annalise Ree (cuddelsandcomfortfoods) of Sweet Anna's.

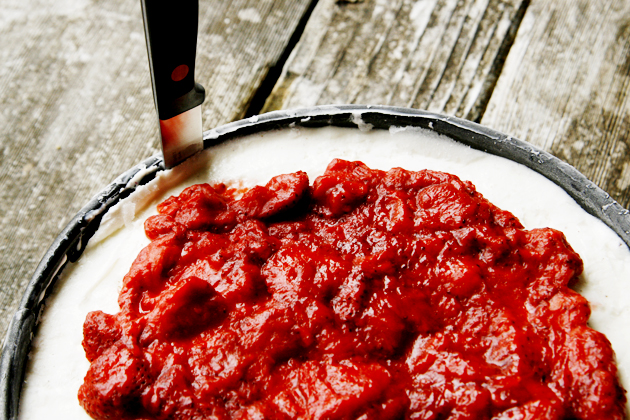
To loosen the cake from the pan, take a knife and run it around the inside of the pan.


Tasty Kitchen Blog: Banana Split Ice Cream Cake. Guest post by Alice Currah of Savory Sweet Life, recipe submitted by TK member Annalise Ree (cuddelsandcomfortfoods) of Sweet Anna's.

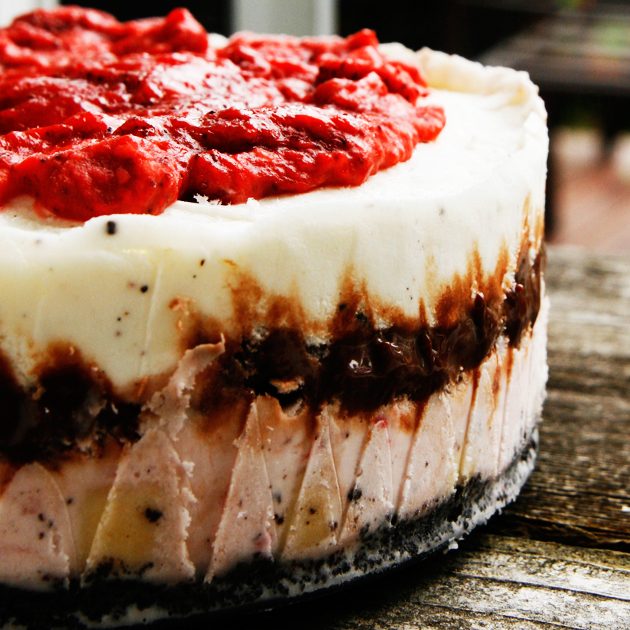
Unlatch the springform pan from its base.


Tasty Kitchen Blog: Banana Split Ice Cream Cake. Guest post by Alice Currah of Savory Sweet Life, recipe submitted by TK member Annalise Ree (cuddelsandcomfortfoods) of Sweet Anna's.

Tasty Kitchen Blog: Banana Split Ice Cream Cake. Guest post by Alice Currah of Savory Sweet Life, recipe submitted by TK member Annalise Ree (cuddelsandcomfortfoods) of Sweet Anna's.

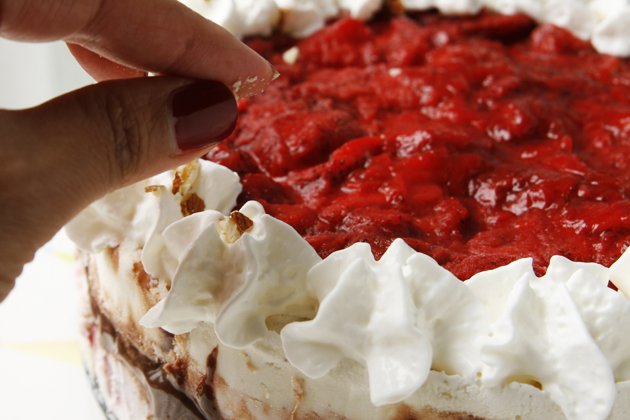
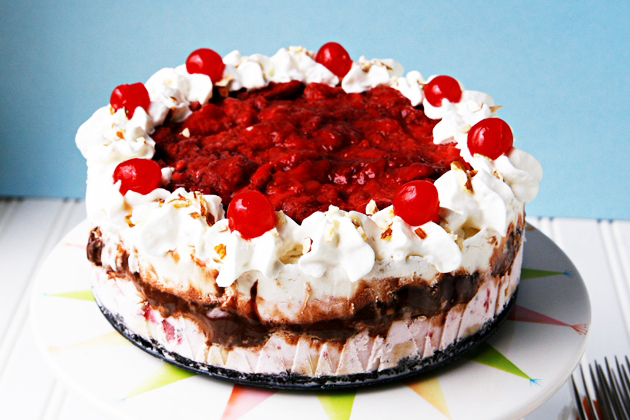
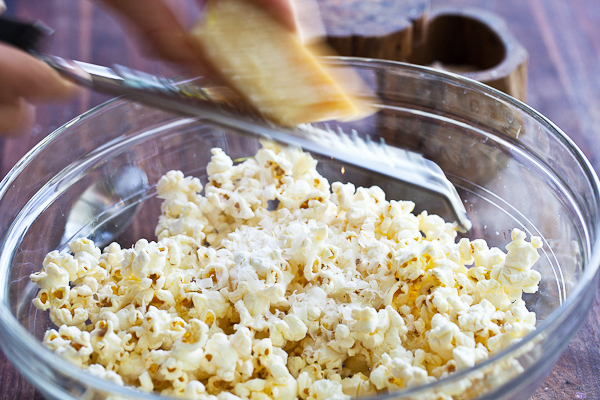
To finish the ice cream cake off, top the edges off with swirls of whipped cream. For an added touch, sprinkle chopped nuts on top of the cake and add maraschino cherries on top of the whipped cream crowns.


Tasty Kitchen Blog: Banana Split Ice Cream Cake. Guest post by Alice Currah of Savory Sweet Life, recipe submitted by TK member Annalise Ree (cuddelsandcomfortfoods) of Sweet Anna's.

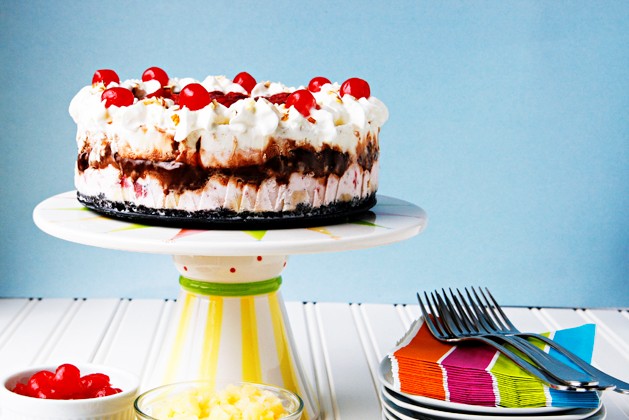
Serve with crushed pineapple on the side.


Tasty Kitchen Blog: Banana Split Ice Cream Cake. Guest post by Alice Currah of Savory Sweet Life, recipe submitted by TK member Annalise Ree (cuddelsandcomfortfoods) of Sweet Anna's.

Final thoughts: I will not lie. As I mentioned in the beginning of this post, this recipe requires time. It is best made at least 1 day ahead but can be stored in the freezer for a couple weeks. This makes a great alternative to serving a traditional cake on any special occasion and best of all … requires NO BAKING. It is nostalgic, whimsical, and fun to eat.

Thanks again to Tasty Kitchen member Annalise Ree of Sweet Anna’s for this creative way of preparing one of my favorite ice cream treats!


Printable Recipe

Banana Split Ice Cream Cake

See post on Sweet Anna's’s site!
4.89 Mitt(s) 9 Rating(s)9 votes, average: 4.89 out of 59 votes, average: 4.89 out of 59 votes, average: 4.89 out of 59 votes, average: 4.89 out of 59 votes, average: 4.89 out of 5

Prep Time:

Cook Time:

Difficulty: Easy

Servings: 12

12
x

Print Options

Page size Letter 3x5 4x6
Text Size Small Medium Large
Content Include description
Include prep time, etc.
Show image

Description

Soo good. Really. That’s all there is to it!

Oh, and don’t let the ‘cake’ part fool you … there’s no cake in this ‘cake’!

Ingredients

  • 20 whole Oreo Cookies
  • 4 Tablespoons Butter, Melted
  • 4 whole Bananas
  • 1 pint Strawberry Ice Cream
  • 1 pint Vanilla Ice Cream
  • 1 jar (about 16 Oz. Jar) Hot Fudge Sauce
  • 1 container (16 Oz. Container) Frozen Sliced Sweetened Strawberries, Thawed And Drained
  • Fresh Whipped Cream, For Serving
  • Crushed Pineapple, For Serving

Preparation Instructions

Take out the strawberry ice cream to thaw. Place the Oreos in a gallon Ziploc bag and crush well with a rolling pin or small frying pan. Pour the melted butter into the Ziploc bag and mix it up. Press this crumb mixture into the bottom of a springform pan.

Slice the bananas into 1/2″ rounds and arrange in a single layer on top of the crust. (Use as many banana slices as needed to fill the layer.) Place the pan into the freezer for about 10 minutes.

Scoop the softened strawberry ice cream in small scoops on top of the frozen banana layer, smoothing it together with a spoon dipped in warm water. Return to the freezer for 1-2 hours, until the ice cream is firm again.

Take the vanilla ice cream out of the freezer to thaw. Warm the hot fudge sauce slightly, just until it is easily spreadable. Pour the fudge over the strawberry ice cream layer, smoothing the top, and place back into the freezer for 15 minutes or so, until the fudge has firmed up again.

Scoop the softened vanilla ice cream in small scoops on top of the fudge layer, again smoothing it together with the back of a spoon dipped in warm water. Cover with plastic wrap and return to the freezer for at least another 4-6 hours until very firm. (At this point the cake could be frozen, well wrapped, for a week or longer!)

Pour the drained sliced sweetened strawberries into a bowl and crush with a pastry blender or a fork until the berries are all mashed up. Store in the fridge until almost ready to serve the cake.

Spread the crushed berries over the top of the cake, to within one-half inch of the edge. Serve with fresh whipped cream and crushed pineapple for those who want it!


_______________________________________

Alice Currah is the force behind Sweet Savory Life and Everyday Alice. She and her husband Rob are the proud parents of three children: Abbi, Mimi, and Elli. Alice is the winner of Saveur’s Cover Contest and is on the Forbes.com list of Eight of The Very Best Food Bloggers. She’s the best-est.


Profile photo of steamykitchen

Popcorn with Parmesan and Truffle Oil

Posted by in Step-by-Step Recipes

I have a new addiction but luckily this time, it’s not quite as unhealthy as my last (ahem … Kit Kats) or budget-breaking as the one before that (ahem … fresh oysters from the Pacific Northwest). It’s all my friend Jennifer’s fault. She gushed on about her new popcorn maker—the stand-alone, old-fashioned design complete with the crank to empty the popping bin.

It’s an absolutely impractical space-hogging small kitchen appliance that only people who have a popcorn fixation (moi) could justify. And so there it sits on my kitchen island, taking up 55% of the counter footprint, leaving no room for anything else.

Of course, my husband Scott just shakes his head and says, “We’ll see how long this popcorn thing lasts …” So what am I to do? Well, I make popcorn. Buckets of it. Every few hours.

Okay, so honestly, my addiction isn’t so much eating the popcorn but rather making it. And if I have to hang my head in shame, stand in the corner, and really, really dig down deep for the absolute truthful answer, the popcorn-making frenzy is all about warding off the “I told you it was a bad idea” thing from Scott!

C’mon, please tell me you do the same thing too?

 
Tasty Kitchen Blog: Popcorn with Parmesan and Truffle Oil. Guest post by Jaden Hair of Steamy Kitchen.

Of the gazillion popcorn combos that I’ve made (and have sourced from Twitter friends!), my favorite is the Popcorn with Parmesan and Truffle Oil. It’s a great way to glam up the humble popcorn! (Though I think popcorn stopped being humble the moment I bought that fancy $80 popcorn maker.)

The first step is to pop yer corn. If you’re doing the microwave thing, make sure you get plain popcorn. If you want to make popcorn on your stove (like your grandma use to do), here’s a recipe from Elise.

Once it’s popped, put the popcorn in a large bowl and drizzle just 1/4 to 1/2 teaspoon of the truffle oil (truffle oil is very strong!). If you have an oil mister, even better.

Tasty Kitchen Blog: Popcorn with Parmesan and Truffle Oil. Guest post by Jaden Hair of Steamy Kitchen.


Mix it all about. The oil goes first, so that it coats the popcorn and gives the salt and parmesan something to stick to.

Tasty Kitchen Blog: Popcorn with Parmesan and Truffle Oil. Guest post by Jaden Hair of Steamy Kitchen.


Now add the sea salt. It’s gotta be good sea salt, like my favorite flaky Maldon sea salt. Hey, if you’re gonna use truffle oil and good parmesan, you might as well use good salt!

Tasty Kitchen Blog: Popcorn with Parmesan and Truffle Oil. Guest post by Jaden Hair of Steamy Kitchen.


And then add a generous grating of good quality parmesan or pecorino.

Tasty Kitchen Blog: Popcorn with Parmesan and Truffle Oil. Guest post by Jaden Hair of Steamy Kitchen.


To finish, just because this is glam popcorn, I use a vegetable peeler to add some nice shavings of parmesan on top.

Tasty Kitchen Blog: Popcorn with Parmesan and Truffle Oil. Guest post by Jaden Hair of Steamy Kitchen.


What’s your favorite popcorn flavor? Got any creative ideas for me? I’ve got at least another 2 weeks of popcorn frenzy before I can safely retire the monster in my garage AND minimize the “I told you so’s.”

 
Hugs and kisses,
Jaden


_______________________________________

Jaden Hair is a food writer, television personality, and food photographer based in Tampa Bay, Florida. Find more of her recipes in her blog, Steamy Kitchen, where you can also read more about Jaden’s new book, The Steamy Kitchen Cookbook, and the rave reviews it’s received!


Profile photo of Erika (TK)

A Sweet Story

Posted by in The Theme Is...

  Once upon a time, there was a child named … Zee. Zee was a middle child in a family of busy adults, three pesky siblings, two hamsters and a lazy dog that thinks it’s a fat cat, so they call him Whiskers. One hot summer day, Zee walked into the kitchen, sat on a […]

Profile photo of Ree | The Pioneer Woman

Muffins That Taste Like Doughnuts

Posted by in Baking, Step-by-Step Recipes

I was immediately intrigued when I saw the title of this recipe. Muffins that taste like doughnuts? Count me in! About 3/4 of the way through the recipe, I realized that it’s very similar to an old recipe I picked up in my ninth grade French class: French Breakfast Puffs. In both recipes, you make […]

Profile photo of Erika (TK)

Meet Dara

Posted by in Meet the Member!

  She’s the Canadian behind all those wonderful dishes with flavor combinations that always hit the mark, and her food writing is both engaging and informative. I know many have been wanting to learn more about her, and today’s the day we get to do just that. Say hello to our lovely cookincanuck—Dara Michalski. Dara […]

Profile photo of steamykitchen

Fill ‘em Up!

Posted by in Looks Delicious!

  The best way to get my kids to eat something is to fill it in a dumpling or wrap ‘em in a tortilla. I could stuff wontons with pickled pigs feet and the boys would chomp it all up! Who can resist a cute little two-bite package? Especially if it looked like little fishies! […]