The Pioneer Woman Tasty Kitchen
Profile photo of georgiapellegrini

Garlic Wasabi and Sage Green Beans

Posted by in Step-by-Step Recipes

Tasty Kitchen Blog: Garlic Wasabi and Sage Green Beans. Guest post by Georgia Pellegrini, recipe submitted by TK member Nancy of The Coupon Clipping Cook.

 
Green bean salads are one of my favorite, especially in the warmer months for a picnic, served room temperature with a tangy vinaigrette. Tasty Kitchen member Nancy’s version caught me eye because of the wasabi spice and browned garlic. It was absolutely delicious! And a great dish to make ahead for the week.


Tasty Kitchen Blog: Garlic Wasabi and Sage Green Beans. Guest post by Georgia Pellegrini, recipe submitted by TK member Nancy of The Coupon Clipping Cook.

You will need: butter, dried sage, garlic powder, olive oil, salt, garlic, wasabi powder and green beans.


Tasty Kitchen Blog: Garlic Wasabi and Sage Green Beans. Guest post by Georgia Pellegrini, recipe submitted by TK member Nancy of The Coupon Clipping Cook.

Rinse the green beans and snap off the ends if need be. Then add them to a medium-sized bowl. Add the olive oil and toss, then set aside to marinate.


Tasty Kitchen Blog: Garlic Wasabi and Sage Green Beans. Guest post by Georgia Pellegrini, recipe submitted by TK member Nancy of The Coupon Clipping Cook.

Add the garlic powder …


Tasty Kitchen Blog: Garlic Wasabi and Sage Green Beans. Guest post by Georgia Pellegrini, recipe submitted by TK member Nancy of The Coupon Clipping Cook.

And the crushed sage …


Tasty Kitchen Blog: Garlic Wasabi and Sage Green Beans. Guest post by Georgia Pellegrini, recipe submitted by TK member Nancy of The Coupon Clipping Cook.

And the wasabi powder.


Tasty Kitchen Blog: Garlic Wasabi and Sage Green Beans. Guest post by Georgia Pellegrini, recipe submitted by TK member Nancy of The Coupon Clipping Cook.

Toss it about well until evenly incorporated.


Tasty Kitchen Blog: Garlic Wasabi and Sage Green Beans. Guest post by Georgia Pellegrini, recipe submitted by TK member Nancy of The Coupon Clipping Cook.

Cut the garlic into ¼-inch pieces and set aside.


Tasty Kitchen Blog: Garlic Wasabi and Sage Green Beans. Guest post by Georgia Pellegrini, recipe submitted by TK member Nancy of The Coupon Clipping Cook.

Heat a skillet over medium-high heat and add the green beans. Cook them for 5 minutes or so, tossing every so often.


Tasty Kitchen Blog: Garlic Wasabi and Sage Green Beans. Guest post by Georgia Pellegrini, recipe submitted by TK member Nancy of The Coupon Clipping Cook.

Add the butter and garlic and toss well to ensure the garlic doesn’t burn.


Tasty Kitchen Blog: Garlic Wasabi and Sage Green Beans. Guest post by Georgia Pellegrini, recipe submitted by TK member Nancy of The Coupon Clipping Cook.

Transfer to a plate and serve. This dish stored well for a week and was delicious when served cold or room temperature. It can be reinvented several times as well with the addition of cherry tomatoes, crumbled cheese or whatever other extras are in your refrigerator.

Thanks to Nancy for this delicious recipe. Visit her website Coupon Clipping Cook for other wonderful treats!


Printable Recipe

Garlic Wasabi and Sage Green Beans

See post on Nancy @ Coupon Clipping Cook’s site!
0.00 Mitt(s) 0 Rating(s)0 votes, average: 0.00 out of 50 votes, average: 0.00 out of 50 votes, average: 0.00 out of 50 votes, average: 0.00 out of 50 votes, average: 0.00 out of 5

Prep Time:

Cook Time:

Difficulty: Easy

Servings: 3

3
x

Print Options

Page size Letter 3x5 4x6
Text Size Small Medium Large
Content Include description
Include prep time, etc.
Show image

Description

A delicious side dish with an earthy flavor.

Ingredients

  • ½ pounds Fresh Fine French Green Beans (Or Regular Green Beans)
  • 2 Tablespoons Olive Oil, Divided
  • ½ teaspoons Garlic Powder
  • ½ teaspoons Ground Sage
  • ½ teaspoons Wasabi Powder
  • ¼ teaspoons Sea Salt
  • 4 cloves Garlic
  • 1 Tablespoon Butter

Preparation Instructions

Snap or cut the stem ends off the green beans, rinse them off and add to a medium size bowl. Add the olive oil (reserving about 2 teaspoons of olive oil for the skillet), garlic powder, sage, wasabi powder, and sea salt.

Toss the green beans until coated. Set aside. Slice the garlic into pieces about ¼-inch thick and set aside for a moment.

Heat a large skillet on medium heat. Add the green beans to the skillet and the reserved 2 teaspoons olive oil. Add the butter and garlic and stir (if using regular green beans, let them sauté in the pan for about 6 minutes before adding the butter and garlic). Continue stirring.

Keep stirring until the garlic starts to turn a light brown or golden color (about 6 minutes) which is about the time when the green beans should be done. If the garlic is cooking too fast and starting to turn a dark brown color, turn the heat down just a bit. Some of the thinner green beans should be a little soft while others should be a bit crisp. Try a quick sample and salt to taste.

Serve hot right out of the skillet as a side dish.


_______________________________________

There’s so much to say about Georgia, we don’t know where to start. Leaving Wall Street for the French Culinary Institute, followed by a stint at the Gramercy Tavern and La Chassagnette in France, her passion for food and food traditions are evident and inspiring. Visit her site at Georgia Pellegrini, where you’ll find more recipes, photos, learn all about her wonderful books Girl Hunter and Food Heroes, and enjoy her latest adventures.


Profile photo of missamy

Dark Chocolate Banana Bread (with Coconut)

Posted by in Baking, Step-by-Step Recipes

Tasty Kitchen Blog: Dark Chocolate Banana Bread (with Coconut). Guest post by Amy Johnson of She Wears Many Hats, recipe submitted by TK members Chrissy and Lauren of Little Yellow Kitchen.

 
Combinations of chocolate and coconut hardly go unnoticed around here, so when I saw this recipe for Dark Chocolate Banana Bread (with Coconut) from Tasty Kitchen members Chrissy and Lauren, I just had to try it. I had to. The line between “need” and “want” gets kind of blurred when chocolate is involved. And dark chocolate in moderation can be a healthy thing, don’t cha know?


Tasty Kitchen Blog: Dark Chocolate Banana Bread (with Coconut). Guest post by Amy Johnson of She Wears Many Hats, recipe submitted by TK members Chrissy and Lauren of Little Yellow Kitchen.

Overall this bread may look sinful, but considering the list of ingredients, it’s on the healthier side: dark chocolate, flour, cocoa powder, baking powder, baking soda, salt, cinnamon, eggs, brown sugar, Greek yogurt, coconut oil, overripe bananas, shredded coconut, and a little turbinado sugar.

(Just so you know, I made a couple of substitutions using what I had on hand: all-purpose white flour instead of whole wheat, and sweetened shredded coconut for the unsweetened coconut.)

Begin by preheating your oven to 350°F and preparing a 9x5x3″ (or thereabouts) baking pan.


Tasty Kitchen Blog: Dark Chocolate Banana Bread (with Coconut). Guest post by Amy Johnson of She Wears Many Hats, recipe submitted by TK members Chrissy and Lauren of Little Yellow Kitchen.

Chop the dark chocolate. Don’t eat any! The cake needs it.


Tasty Kitchen Blog: Dark Chocolate Banana Bread (with Coconut). Guest post by Amy Johnson of She Wears Many Hats, recipe submitted by TK members Chrissy and Lauren of Little Yellow Kitchen.

In a double boiler or in the microwave, melt the dark chocolate and set aside.


Tasty Kitchen Blog: Dark Chocolate Banana Bread (with Coconut). Guest post by Amy Johnson of She Wears Many Hats, recipe submitted by TK members Chrissy and Lauren of Little Yellow Kitchen.

Sift together the flour, cocoa powder, baking powder, baking soda, salt and cinnamon. Set aside. (Shhh … don’t tell anyone, but I just whisked mine altogether. My sifter is wonky and leaks all over the place. Whisking worked just lovely for me.)


Tasty Kitchen Blog: Dark Chocolate Banana Bread (with Coconut). Guest post by Amy Johnson of She Wears Many Hats, recipe submitted by TK members Chrissy and Lauren of Little Yellow Kitchen.

Add the eggs and brown sugar to a large mixing bowl, and beat them together on medium speed.


Tasty Kitchen Blog: Dark Chocolate Banana Bread (with Coconut). Guest post by Amy Johnson of She Wears Many Hats, recipe submitted by TK members Chrissy and Lauren of Little Yellow Kitchen.

Look, an action shot! Beat for about 30 seconds.


Tasty Kitchen Blog: Dark Chocolate Banana Bread (with Coconut). Guest post by Amy Johnson of She Wears Many Hats, recipe submitted by TK members Chrissy and Lauren of Little Yellow Kitchen.

The Greek yogurt, coconut oil, and mashed bananas go in next for a little mixing.


Tasty Kitchen Blog: Dark Chocolate Banana Bread (with Coconut). Guest post by Amy Johnson of She Wears Many Hats, recipe submitted by TK members Chrissy and Lauren of Little Yellow Kitchen.

More action! Mix until well combined.


Tasty Kitchen Blog: Dark Chocolate Banana Bread (with Coconut). Guest post by Amy Johnson of She Wears Many Hats, recipe submitted by TK members Chrissy and Lauren of Little Yellow Kitchen.

On a low setting, gradually add in the flour mixture.


Tasty Kitchen Blog: Dark Chocolate Banana Bread (with Coconut). Guest post by Amy Johnson of She Wears Many Hats, recipe submitted by TK members Chrissy and Lauren of Little Yellow Kitchen.

Mix until just incorporated. Nice.


Tasty Kitchen Blog: Dark Chocolate Banana Bread (with Coconut). Guest post by Amy Johnson of She Wears Many Hats, recipe submitted by TK members Chrissy and Lauren of Little Yellow Kitchen.

Fold in the shredded coconut.

(Again, I used sweetened shredded coconut instead of the unsweetened called for in the recipe. I liked it with the added sweetness and didn’t feel it was overly sweet.)


Tasty Kitchen Blog: Dark Chocolate Banana Bread (with Coconut). Guest post by Amy Johnson of She Wears Many Hats, recipe submitted by TK members Chrissy and Lauren of Little Yellow Kitchen.

Evenly spread the batter in the prepared baking pan.


Tasty Kitchen Blog: Dark Chocolate Banana Bread (with Coconut). Guest post by Amy Johnson of She Wears Many Hats, recipe submitted by TK members Chrissy and Lauren of Little Yellow Kitchen.

Now for the healthy melted dark chocolate. Pour the melted chocolate over the batter.


Tasty Kitchen Blog: Dark Chocolate Banana Bread (with Coconut). Guest post by Amy Johnson of She Wears Many Hats, recipe submitted by TK members Chrissy and Lauren of Little Yellow Kitchen.

To swirl in the melted chocolate, drag a knife back and forth several times through the batter. Can you say “yum?”


Tasty Kitchen Blog: Dark Chocolate Banana Bread (with Coconut). Guest post by Amy Johnson of She Wears Many Hats, recipe submitted by TK members Chrissy and Lauren of Little Yellow Kitchen.

Sprinkle the top with more shredded coconut and the turbinado sugar.


Tasty Kitchen Blog: Dark Chocolate Banana Bread (with Coconut). Guest post by Amy Johnson of She Wears Many Hats, recipe submitted by TK members Chrissy and Lauren of Little Yellow Kitchen.

Bake until done (see recipe below for bake times). Notice the toasted coconut? Toasted coconut is one of the most delectable things ever. I could eat it as a snack. It’s lovely on this bread, but be careful to avoid burning the coconut while baking. If needed, loosely cover the top with foil the slow the toasting.


Tasty Kitchen Blog: Dark Chocolate Banana Bread (with Coconut). Guest post by Amy Johnson of She Wears Many Hats, recipe submitted by TK members Chrissy and Lauren of Little Yellow Kitchen.

This bread turned out wonderfully. It was so gorgeous I hated to cut it. But I did anyway.

I’ll be making this one again soon. Maybe in muffin form next time.

Thank you so much to the Chrissy and Lauren for sharing this new favorite with me and my family. Check out other wonderfulness over at their site: From the Little Yellow Kitchen.


Printable Recipe

Dark Chocolate Banana Bread (with Coconut)

See post on LittleYellowKitchen’s site!
5.00 Mitt(s) 2 Rating(s)2 votes, average: 5.00 out of 52 votes, average: 5.00 out of 52 votes, average: 5.00 out of 52 votes, average: 5.00 out of 52 votes, average: 5.00 out of 5

Prep Time:

Cook Time:

Difficulty: Easy

Servings: 12

12
x

Print Options

Page size Letter 3x5 4x6
Text Size Small Medium Large
Content Include description
Include prep time, etc.
Show image

Description

The best version of banana bread out there! The dark chocolate swirls and yummy coconut flavor make for the perfect complements to a classic.

Ingredients

  • 3 ounces, weight Dark Chocolate
  • 1-¾ cup White Whole Wheat Flour
  • ½ cups Cocoa Powder, Unsweetened
  • 1 teaspoon Baking Powder
  • ¾ teaspoons Baking Soda
  • ¼ teaspoons Salt
  • ½ teaspoons Cinnamon
  • 2 whole Large Eggs
  • ½ cups Packed Brown Sugar
  • ⅓ cups Greek Yogurt
  • ⅓ cups Coconut Oil, Melted/liquid
  • 3 whole Medium Overripe Bananas, Peeled And Mashed (3 Should Yield About 1 1/2 Cups)
  • ¾ cups Shredded Coconut, Unsweetened, Plus 3 Tablespoons More For The Top
  • 1 Tablespoon Turbinado Sugar, For The Top

Preparation Instructions

Preheat oven to 350 F. Lightly grease a 9x5x3 pan.

Finely chop the chocolate and melt it in the top of a double-boiler or in the microwave in 30 second increments, stirring in between each increment and continuing until melted. Set the melted chocolate aside.

In a medium bowl, sift the flour, cocoa powder, baking powder, baking soda, salt, and cinnamon; set aside.

In the bowl of your stand mixer, beat the eggs and sugar on medium speed for about 30 seconds. Add the yogurt, coconut oil and mashed bananas and mix until well combined. While mixing on low, slowly add the flour mixture until it’s just incorporated. Fold in the coconut.

Pour the batter into the greased pan and spread evenly. Pour the melted dark chocolate over the top, dragging a knife back and forth several times, until the chocolate is swirled throughout the entire loaf. Sprinkle the top with some shredded coconut and turbinado sugar.

Bake for about 50-60 minutes or until a toothpick inserted into the center of the loaf comes out clean. If the coconut on top looks like it is browning quickly, loosely place a piece a foil over the top to slow the toasting.

Remove pan from oven when done, and set it on a cooling rack. Let bread cool for 10 minutes in the pan. Then carefully remove it from pan and transfer to a wire rack to finish cooling before cutting into the loaf.


_______________________________________

Amy Johnson is a blogger who writes about food, travel, the home (both inside and out), and various observations and random musings about anything and everything. Visit her blog She Wears Many Hats for a dose of deliciousness, practicality, hilarity, or just plain fun. She lives in South Carolina with her husband and two children.


Profile photo of georgiapellegrini

Strawberry Balsamic Vinaigrette

Posted by in Step-by-Step Recipes

Tasty Kitchen Blog: Strawberry Balsamic Vinaigrette. Guest post by Georgia Pellegrini, recipe submitted by TK member Chef Jamie Levine of Green Beans and Grapefruit.

 
Spring seems to finally be here, and with that comes strawberry season! This recipe for a Strawberry Balsamic Vinaigrette from Tasty Kitchen member Jamie Levine caught my eye for its beautiful color and creamy texture. It will brighten up even the simplest of salads.


Tasty Kitchen Blog: Strawberry Balsamic Vinaigrette. Guest post by Georgia Pellegrini, recipe submitted by TK member Chef Jamie Levine of Green Beans and Grapefruit.

To make her recipe, you will need: fresh strawberries, Dijon mustard, balsamic vinegar, salt and olive oil. That’s it!


Tasty Kitchen Blog: Strawberry Balsamic Vinaigrette. Guest post by Georgia Pellegrini, recipe submitted by TK member Chef Jamie Levine of Green Beans and Grapefruit.

Start by rinsing the strawberries and slicing the tops off.


Tasty Kitchen Blog: Strawberry Balsamic Vinaigrette. Guest post by Georgia Pellegrini, recipe submitted by TK member Chef Jamie Levine of Green Beans and Grapefruit.

Drop them in a blender along with the Dijon mustard and balsamic vinegar.


Tasty Kitchen Blog: Strawberry Balsamic Vinaigrette. Guest post by Georgia Pellegrini, recipe submitted by TK member Chef Jamie Levine of Green Beans and Grapefruit.

Turn the blender on and slowly drizzle in the olive oil, blending until fully incorporated. If the mixture doesn’t blend to a smooth consistency easily, simply add a few tablespoons of water until it does.


Tasty Kitchen Blog: Strawberry Balsamic Vinaigrette. Guest post by Georgia Pellegrini, recipe submitted by TK member Chef Jamie Levine of Green Beans and Grapefruit.

The mixture will be emulsified and creamy and the most beautiful color. You can then pass it through a strainer or leave it as it is. It was smooth enough for me so I skipped that step.


Tasty Kitchen Blog: Strawberry Balsamic Vinaigrette. Guest post by Georgia Pellegrini, recipe submitted by TK member Chef Jamie Levine of Green Beans and Grapefruit.

This is a wonderful dressing for spring when the strawberries are plump and ripe. It will brighten up the simplest looking salad and will also store well in the refrigerator.

Try it this spring—you will love it. And thank you to Jamie for this wonderful, silky smooth dressing. Visit her website Green Beans & Grapefruit for some other amazing recipes!


Printable Recipe

Strawberry Balsamic Vinaigrette

See post on Jamie Levine {green beans & grapefruit}’s site!
5.00 Mitt(s) 1 Rating(s)1 vote, average: 5.00 out of 51 vote, average: 5.00 out of 51 vote, average: 5.00 out of 51 vote, average: 5.00 out of 51 vote, average: 5.00 out of 5

Prep Time:

Cook Time:

Difficulty: Easy

Servings: 6

6
x

Print Options

Page size Letter 3x5 4x6
Text Size Small Medium Large
Content Include description
Include prep time, etc.
Show image

Description

Tasty and healthy strawberry vinaigrette—pretty and perfect for Spring!

Ingredients

  • 8 whole Fresh Strawberries (medium), Hulled
  • 1 Tablespoon Dijon Mustard
  • 2 Tablespoons White Balsamic Vinegar
  • 1 pinch Kosher Salt
  • 4 teaspoons Olive Oil

Preparation Instructions

In a small food processor or blender, blend strawberries, Dijon mustard, white balsamic vinegar and salt until smooth. Slowly drizzle in the olive oil as it’s still blending, until fully incorporated. Strain the mixture into a jar. Can be refrigerated for a few days and it freezes well.


_______________________________________

There’s so much to say about Georgia, we don’t know where to start. Leaving Wall Street for the French Culinary Institute, followed by a stint at the Gramercy Tavern and La Chassagnette in France, her passion for food and food traditions are evident and inspiring. Visit her site at Georgia Pellegrini, where you’ll find more recipes, photos, learn all about her wonderful books Girl Hunter and Food Heroes, and enjoy her latest adventures.


Profile photo of Faith (An Edible Mosaic)

Vietnamese Summer Roll Salad

Posted by in Step-by-Step Recipes

Tasty Kitchen Blog: Vietnamese Summer Roll Salad. Guest post by Faith Gorsky of An Edible Mosaic, recipe submitted by TK member Vicky of Avocado Pesto.

 
Even though I’m a winter-loving girl, I’m secretly longing for summer’s arrival. Which is pretty much blasphemy around these parts; I’m in snow-country, just about as north as a girl can go. Although spring has just arrived, I’m ready to welcome summer. In fact, I’ll take summer in any form I can get.

Even roll form.

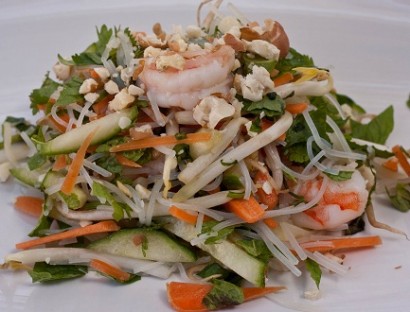
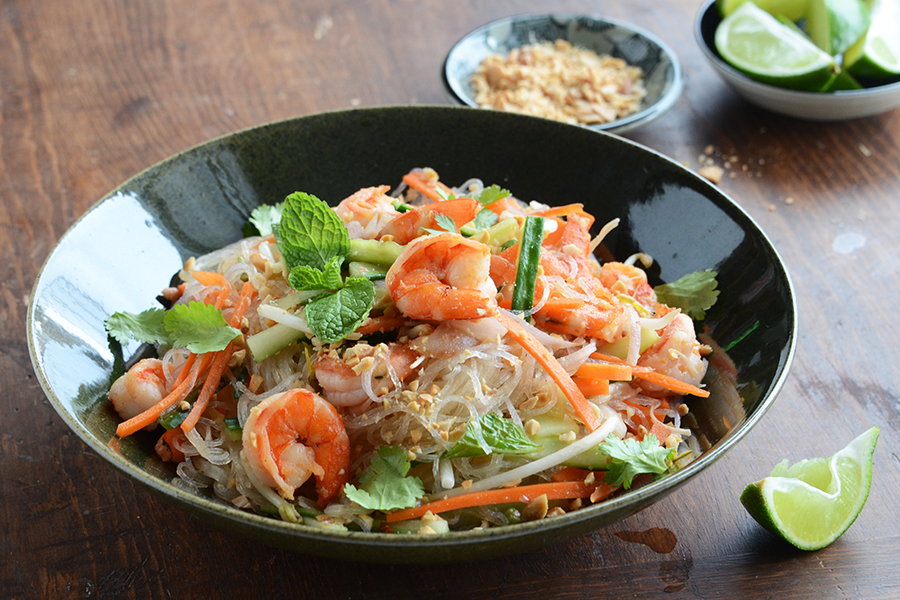
Summer rolls have always been a favorite of mine: Fresh, bright-flavored veggies, perfectly cooked shrimp, and chewy noodles, all wrapped up in a pretty little rice paper package. Add a great dipping sauce and what more could anyone want, right? (Because sauces not only make food more flavorful, but they also make eating more fun…that’s what my niece says and I’m inclined to agree!) When I first saw Vicky’s recipe for Vietnamese Summer Roll Salad, I couldn’t wait to make it.

Summer rolls are great, but this salad is fantastic. Why not turn a starter into a complete meal?

Start by getting out all your ingredients.


Tasty Kitchen Blog: Vietnamese Summer Roll Salad. Guest post by Faith Gorsky of An Edible Mosaic, recipe submitted by TK member Vicky of Avocado Pesto.

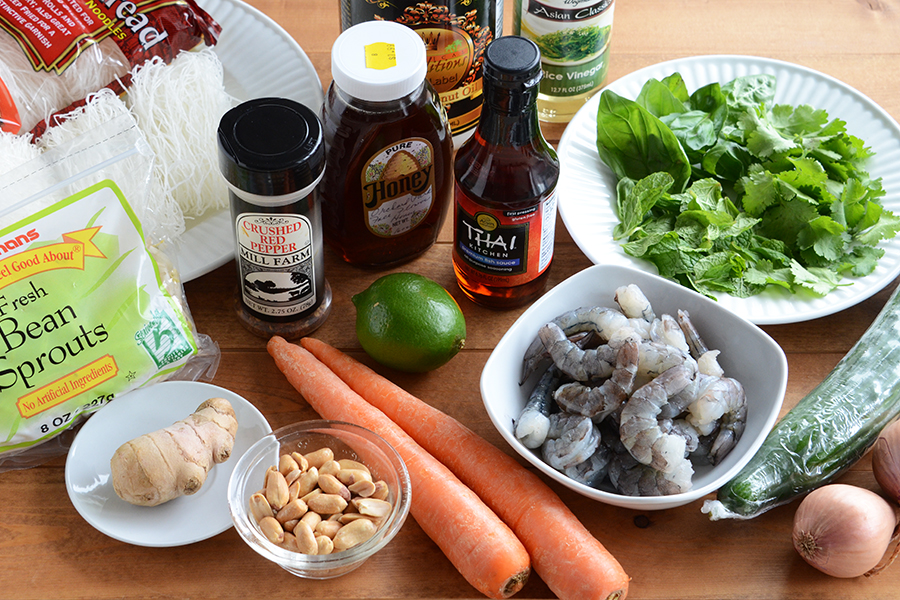
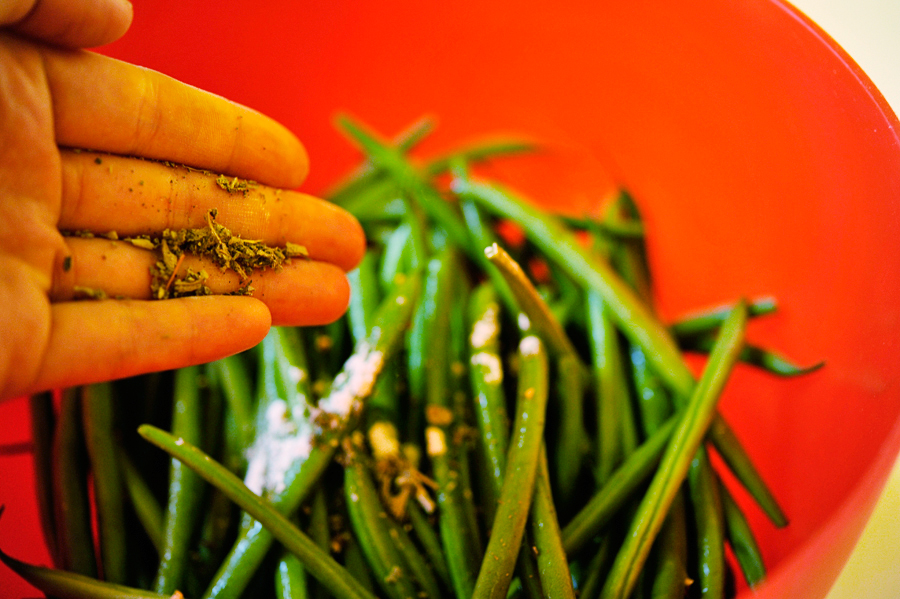
You’ll need bean thread noodles, honey, coconut oil, rice vinegar, fish sauce, fresh herbs (basil, mint, and cilantro), shrimp, cucumber, shallot, carrot, lime, ginger, bean sprouts, peanuts, and red chilies. For the life of me, I couldn’t find red chilies and I didn’t have time to make the 30-minute drive to the closest Asian grocery in my area (strangely enough, I don’t live in the middle of nowhere—we just need better grocery stores nearby!), so I used crushed red pepper flakes.


Tasty Kitchen Blog: Vietnamese Summer Roll Salad. Guest post by Faith Gorsky of An Edible Mosaic, recipe submitted by TK member Vicky of Avocado Pesto.

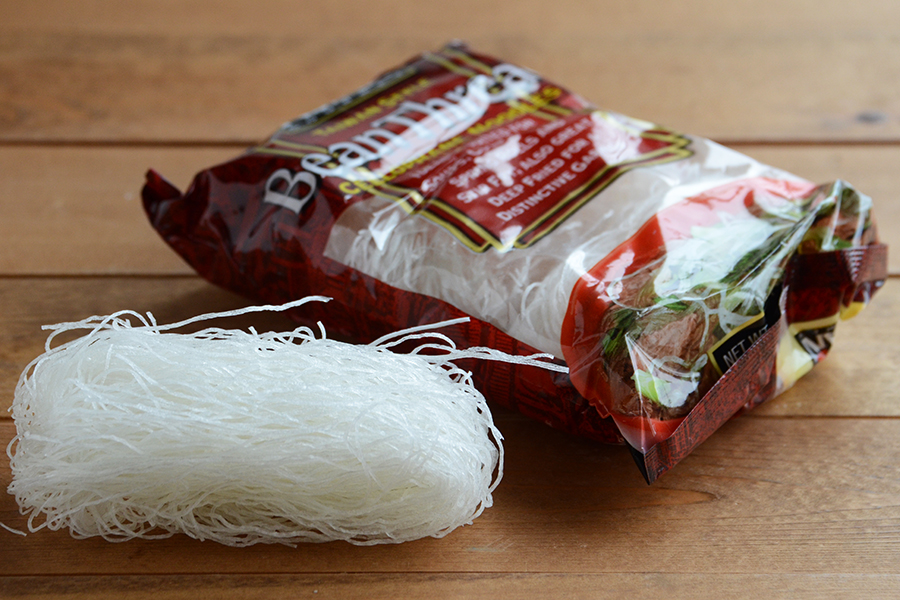
Because they’re so purty, here’s a close-up of the bean thread noodles. You might also find them called cellophane noodles or glass noodles. I found these in the international aisle of my regular grocery store.

Now for a little prep work.


Tasty Kitchen Blog: Vietnamese Summer Roll Salad. Guest post by Faith Gorsky of An Edible Mosaic, recipe submitted by TK member Vicky of Avocado Pesto.

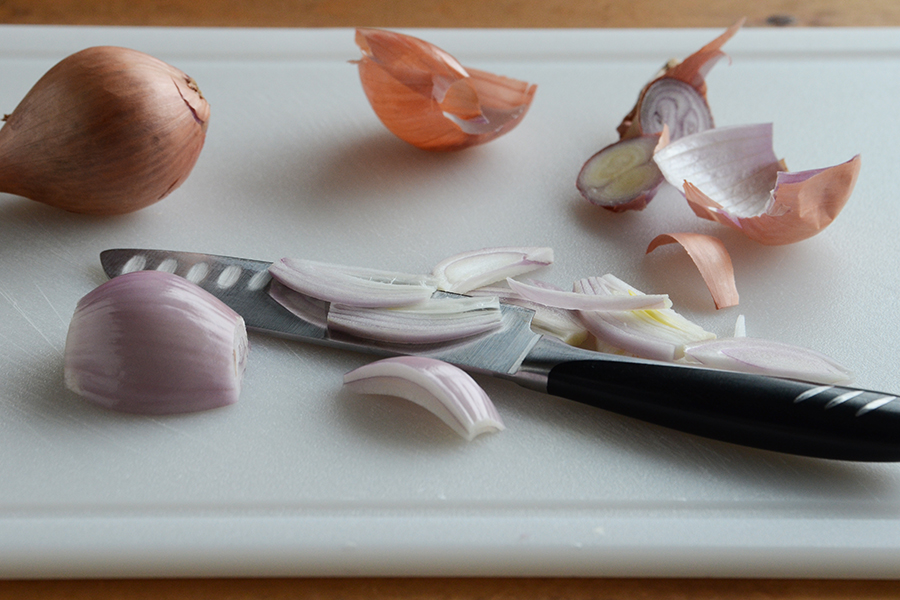
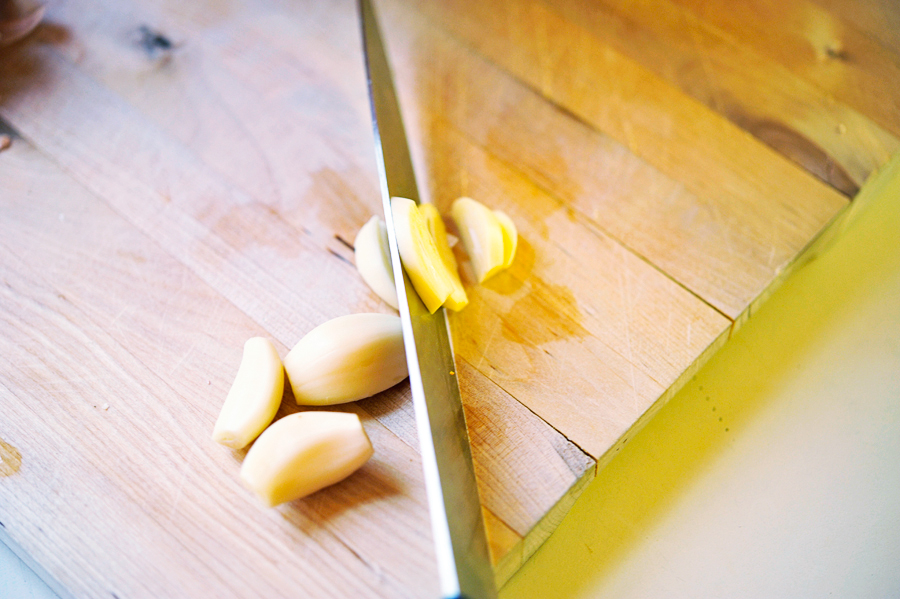
Thinly slice the shallots.


Tasty Kitchen Blog: Vietnamese Summer Roll Salad. Guest post by Faith Gorsky of An Edible Mosaic, recipe submitted by TK member Vicky of Avocado Pesto.

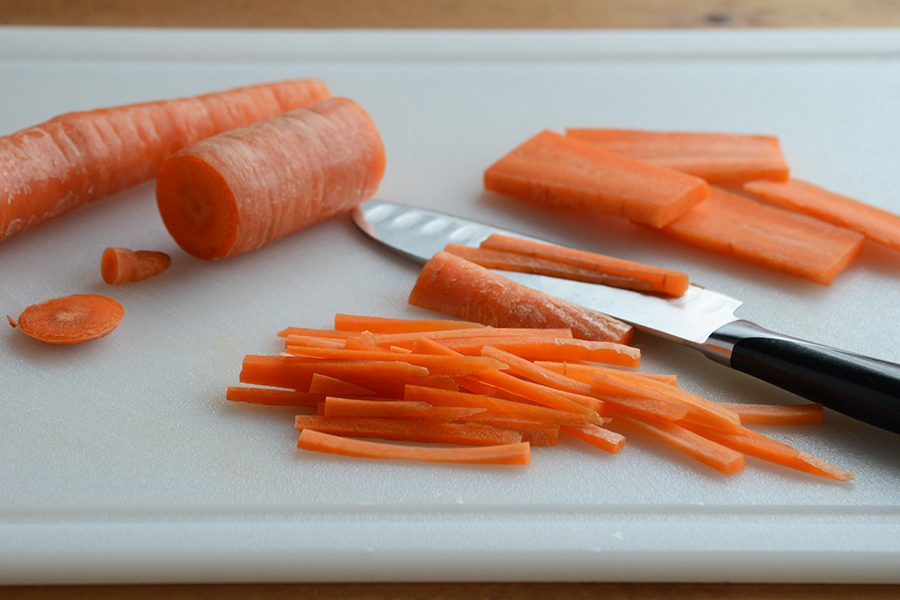
Julienne the carrots by trimming off the ends and cutting them each into 2 to 3-inch pieces; cut each piece lengthwise into planks, then cut each plank lengthwise again into thin sticks. It sounds complicated but it’s not, and once you get into it, it goes pretty fast. (If you want, you can peel your carrot before you start cutting it; I always give my carrots a good scrub but leave the peel on.)


Tasty Kitchen Blog: Vietnamese Summer Roll Salad. Guest post by Faith Gorsky of An Edible Mosaic, recipe submitted by TK member Vicky of Avocado Pesto.

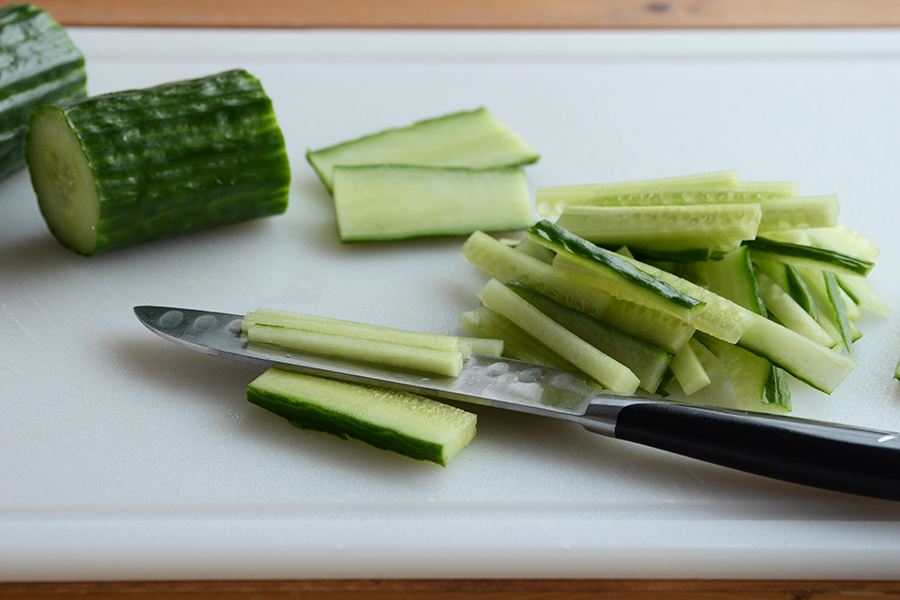
Julienne the cucumber the same way.


Tasty Kitchen Blog: Vietnamese Summer Roll Salad. Guest post by Faith Gorsky of An Edible Mosaic, recipe submitted by TK member Vicky of Avocado Pesto.

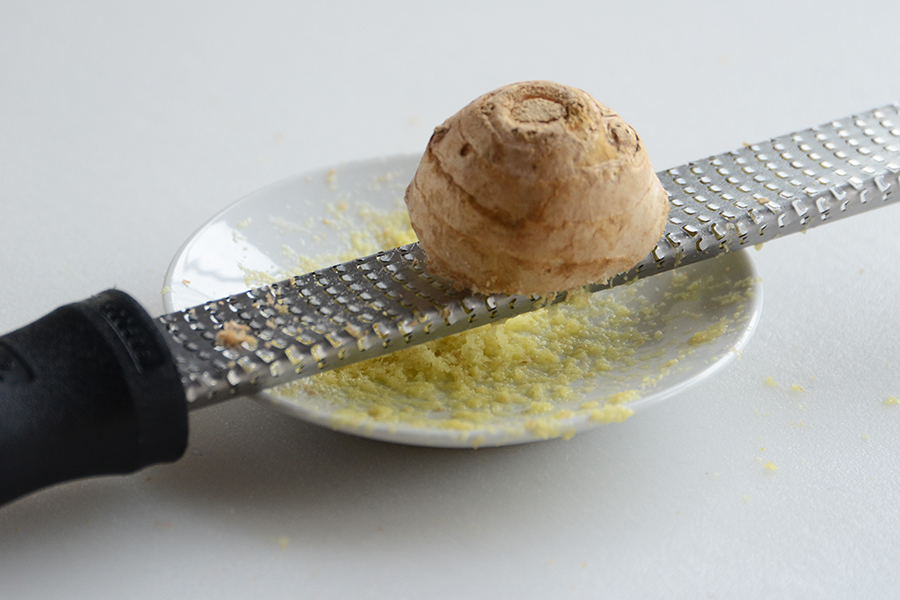
Grate the ginger. I like to use a microplane for this, and I keep my ginger in the freezer so it grates up easily.


Tasty Kitchen Blog: Vietnamese Summer Roll Salad. Guest post by Faith Gorsky of An Edible Mosaic, recipe submitted by TK member Vicky of Avocado Pesto.

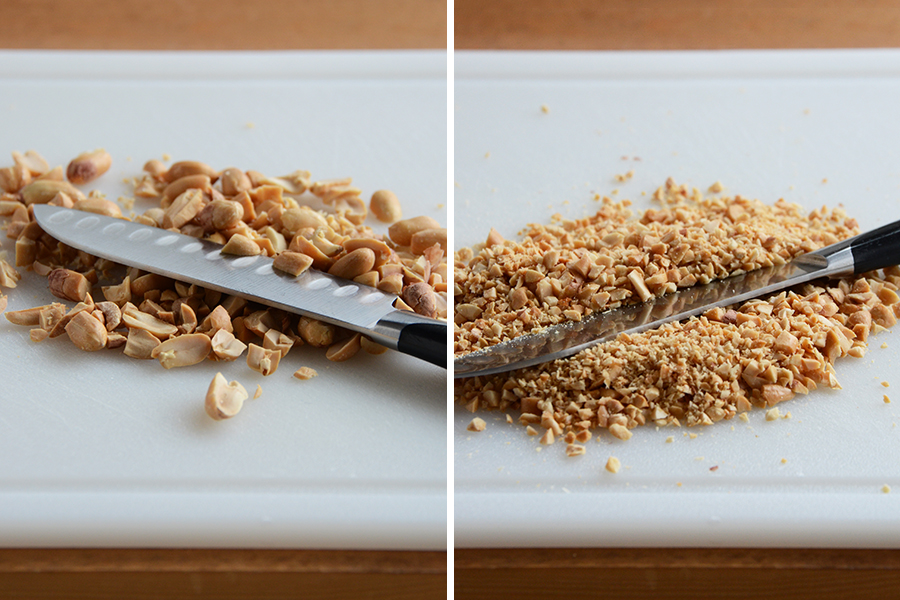
Smash the peanuts. You can keep chop them by hand until they’re as finely chopped as you like, or use a food processor (but be careful you don’t end up with peanut flour or nut butter if you use your processor). If you’re like me and cleaning your food processor is the bane of your existence, know that this is really easy to do by hand. And heads up, I chopped up extra peanuts (around 3 tablespoons) to serve alongside the salad so people could add more on top if they wanted.


Tasty Kitchen Blog: Vietnamese Summer Roll Salad. Guest post by Faith Gorsky of An Edible Mosaic, recipe submitted by TK member Vicky of Avocado Pesto.

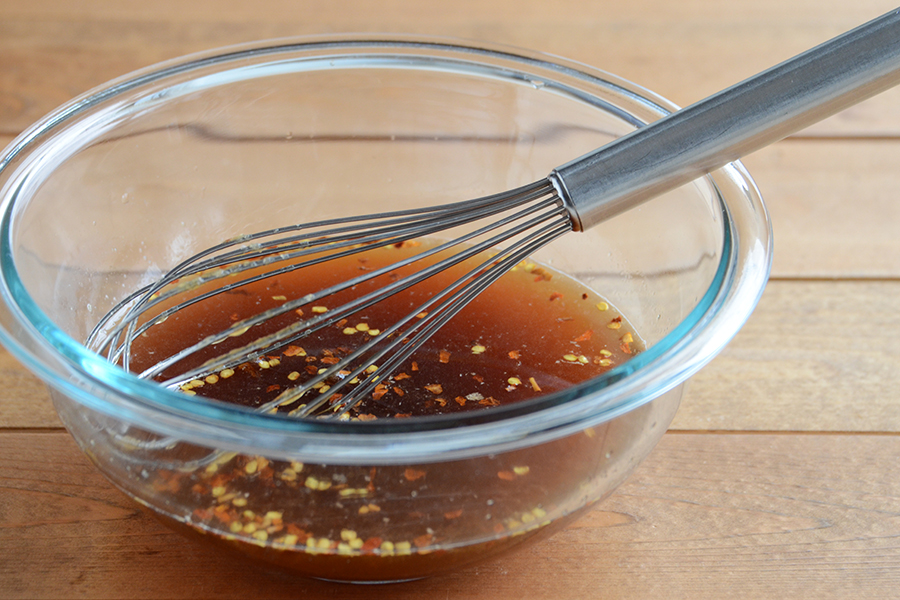
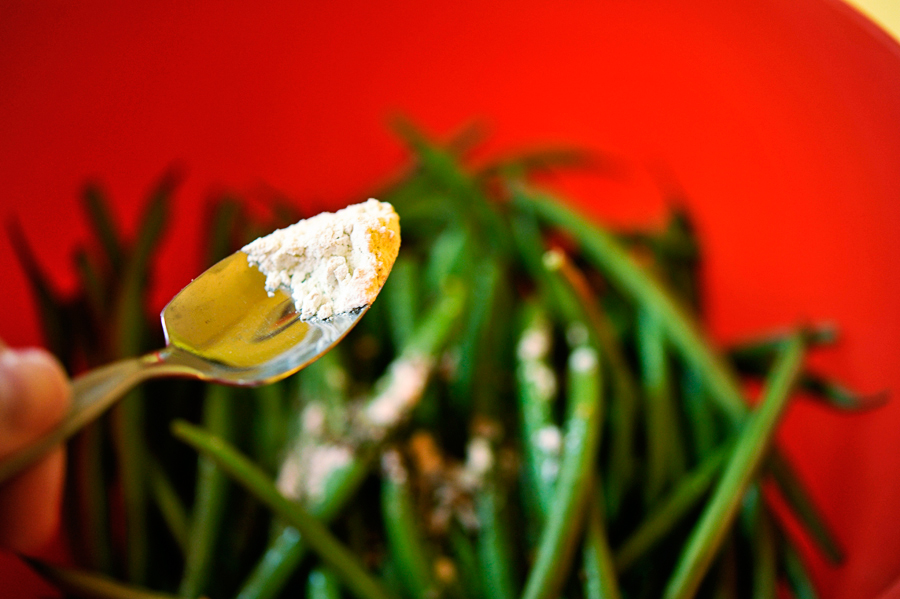
Whisk up the dressing: fish sauce, rice vinegar, ginger, red chilies (I used about 2 teaspoons crushed red pepper flakes instead; you can use more or less to taste), and honey. There was quite a bit of extra dressing pooled in the bottom so next time I’ll make a little less; I’m planning to decrease both the rice vinegar and fish sauce to 1/2 cup, and also add 2 tablespoons of soy sauce for even more depth of flavor.


Tasty Kitchen Blog: Vietnamese Summer Roll Salad. Guest post by Faith Gorsky of An Edible Mosaic, recipe submitted by TK member Vicky of Avocado Pesto.

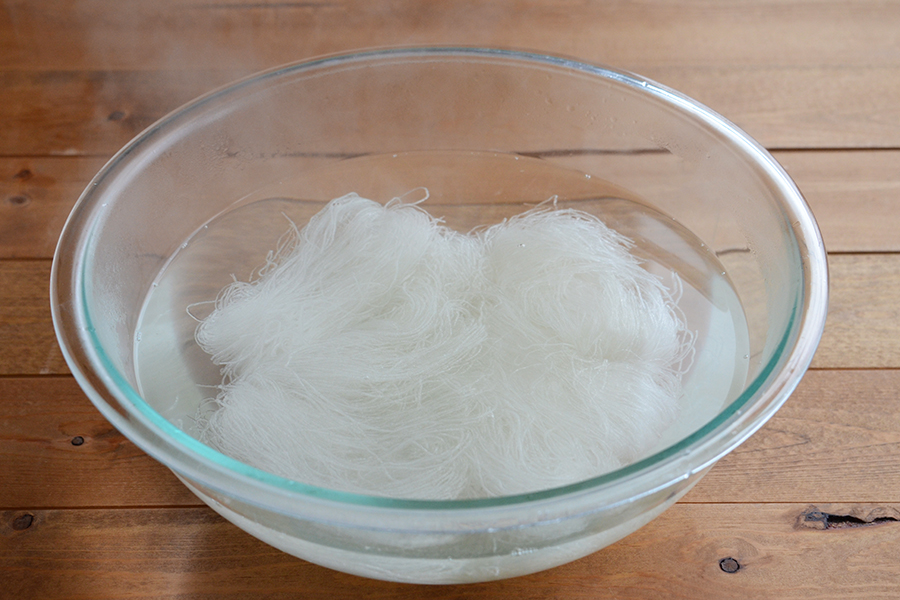
Cook the noodles following what it says to on the package directions—but be careful not to overcook them! I soaked my noodles in warm water for about 10 to 15 minutes, then drained them in a colander and rinsed them under cold running water.


Tasty Kitchen Blog: Vietnamese Summer Roll Salad. Guest post by Faith Gorsky of An Edible Mosaic, recipe submitted by TK member Vicky of Avocado Pesto.

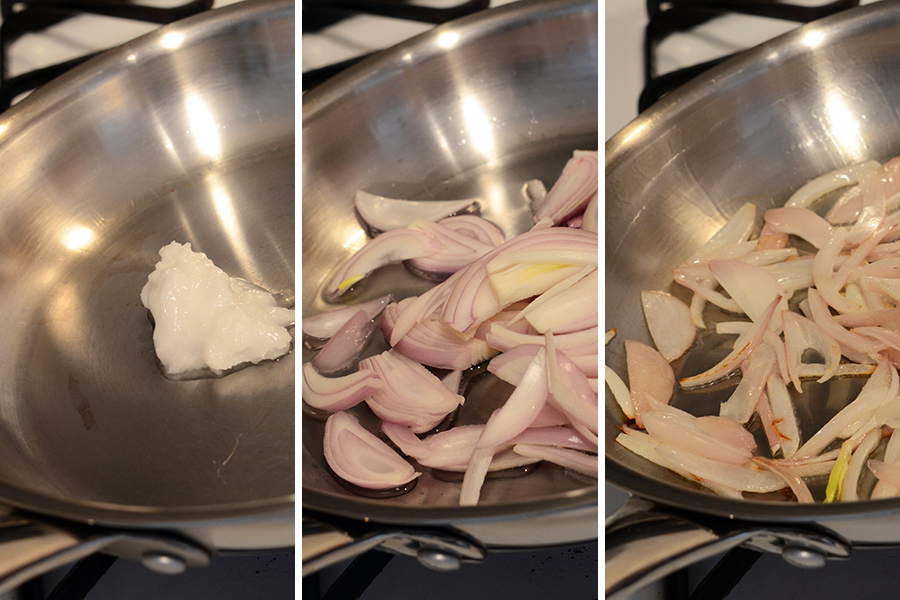
Add the coconut oil to a medium pan over medium-high heat. Once melted, add the shallot and cook until it starts to brown in spots. Use a slotted spoon to transfer the browned shallot to a paper towel-lined plate. (Thank you, Vicky, for reminding us of that trick! I don’t always remember to do that, but shhhh, don’t tell.)


Tasty Kitchen Blog: Vietnamese Summer Roll Salad. Guest post by Faith Gorsky of An Edible Mosaic, recipe submitted by TK member Vicky of Avocado Pesto.

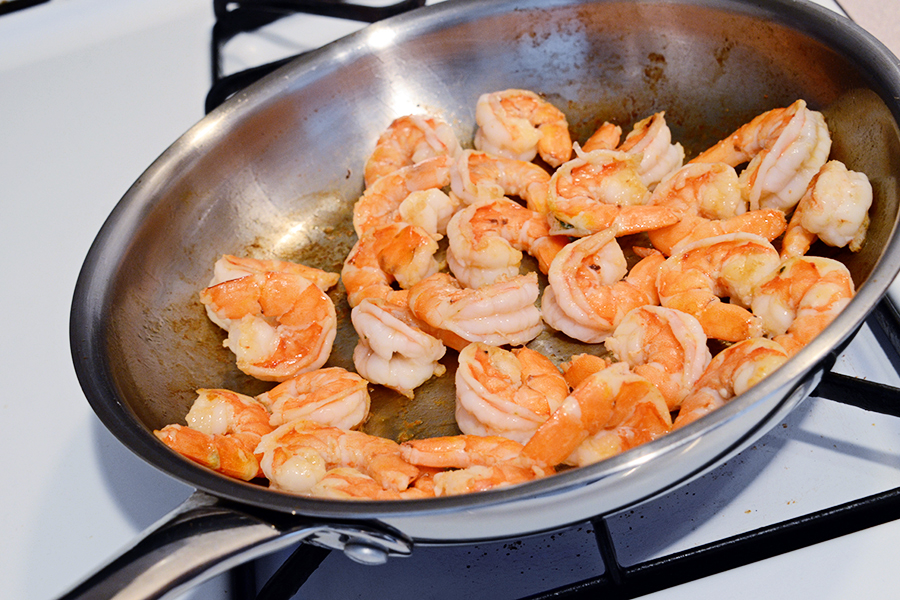
Add the shrimp to the pan and cook until it turns completely pink, about 3 to 4 minutes.

The recipe calls for 1/2 pound of shrimp, but if you’re getting it without the shell/vein/tail removed I recommend getting about 2/3 to 3/4 of a pound to account for the lost weight when you clean your shrimp. Heck, I love shrimp so much in here I think next time I’ll increase it to a full 1 pound either way.


Tasty Kitchen Blog: Vietnamese Summer Roll Salad. Guest post by Faith Gorsky of An Edible Mosaic, recipe submitted by TK member Vicky of Avocado Pesto.

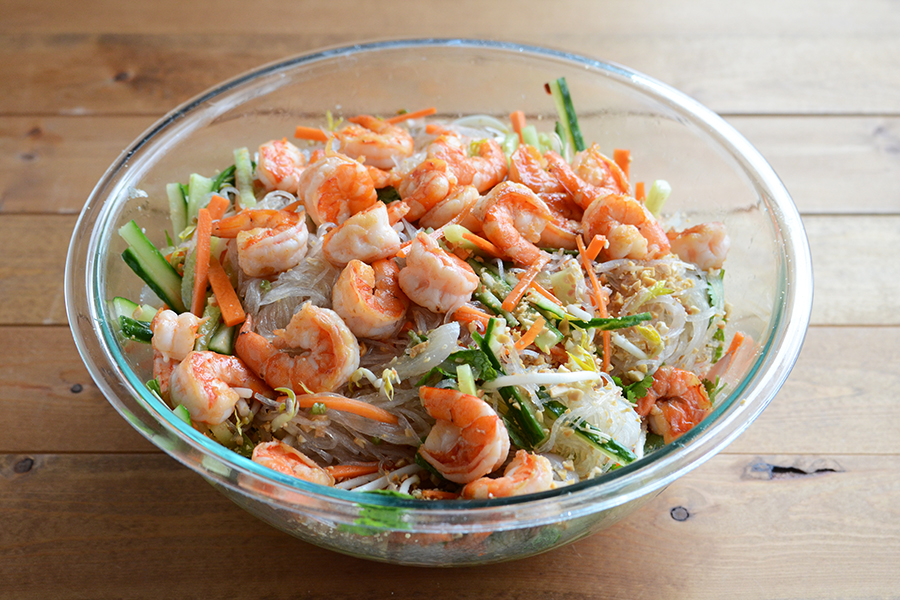
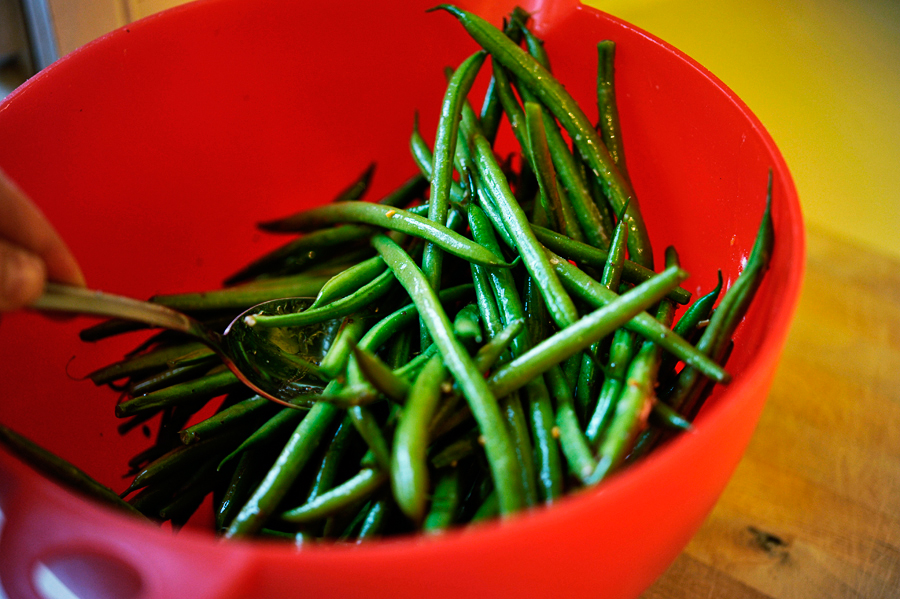
Now for the fun part: Add everything to a large bowl (be sure you don’t forget the fresh herbs—I almost did!) and give it all a good toss. This makes a lot of salad. That’s a 4-quart bowl in the photo!


Tasty Kitchen Blog: Vietnamese Summer Roll Salad. Guest post by Faith Gorsky of An Edible Mosaic, recipe submitted by TK member Vicky of Avocado Pesto.

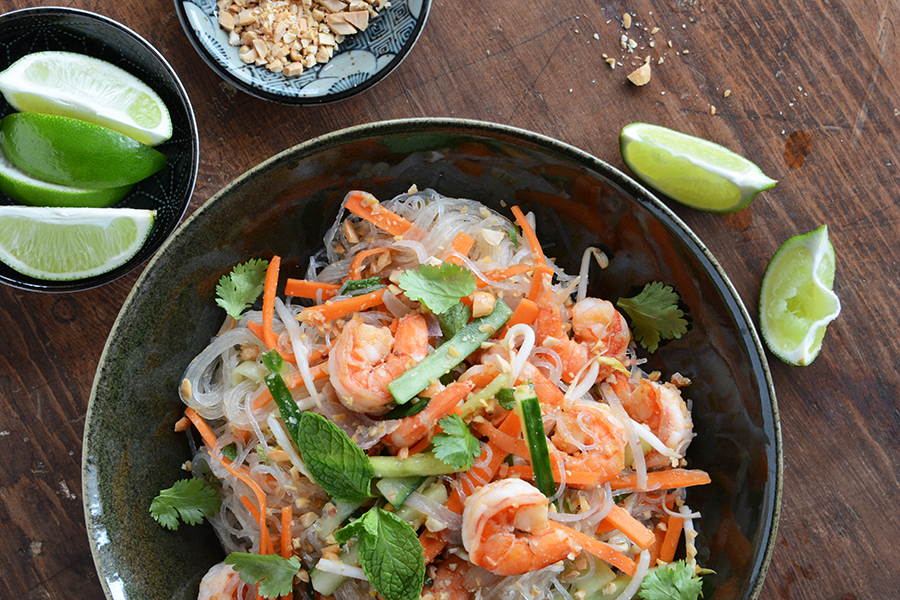
Put the salad into pretty individual bowls to serve it up. Don’t forget the fresh lime wedges to squeeze on top, and remember, I chopped up extra peanuts to serve alongside so people can add more as they want. Gorgeous, isn’t it?

Thank you to Vicky for sharing a fantastic recipe with us! Be sure to check out Vicky’s beautiful blog Avocado Pesto for what she calls a “smorgasbord of ethnic cuisines” (I love that description!). Also, a big thank you to Running with Tweezers for the original inspiration for this recipe!


Printable Recipe

Vietnamese Summer Roll Salad

See post on Vicky @AvocadoPesto’s site!
3.00 Mitt(s) 3 Rating(s)3 votes, average: 3.00 out of 53 votes, average: 3.00 out of 53 votes, average: 3.00 out of 53 votes, average: 3.00 out of 53 votes, average: 3.00 out of 5

Prep Time:

Cook Time:

Difficulty: Easy

Servings: 6

6
x

Print Options

Page size Letter 3x5 4x6
Text Size Small Medium Large
Content Include description
Include prep time, etc.
Show image

Description

A deconstructed summer roll salad. Less time consuming than making the rolls but full of all the same flavors.

Ingredients

  • 8 ounces, weight Bean Thread Noodles
  • 1 Tablespoon Coconut Oil
  • 2 whole Shallots, Thinly Sliced
  • ½ pounds Shrimp, Shells, Veins And Tails Removed
  • ¾ cups Fish Sauce
  • ¾ cups Rice Vinegar
  • 2 Tablespoons Ginger, grated
  • 2 whole Small Red Chilies, Diced
  • 2 Tablespoons Honey
  • 1 whole Medium Cucumber, Julienned
  • 2 whole Carrots, Peeled And Julienned
  • 1 cup Bean Sprouts
  • ⅓ cups Fresh Basil, Chopped
  • ⅓ cups Fresh Cilantro, Chopped
  • ⅓ cups Fresh Mint, Chopped
  • ⅓ cups Roasted Peanuts, Smashed
  • 3 whole Lime Wedges

Preparation Instructions

1. Bring a pot of water to a boil and add noodles. Cook 3-5 minutes making sure not to overcook (refer to the package instructions for the specific timing for your noodles). Put the noodles into a colander to drain and rinse with cold water to stop the cooking process.

2. In a pan heat coconut oil over medium-high heat and add shallots. Cook until shallots are starting to get golden brown. Remove them from the pan and drain on a paper towel. Add shrimp to the pan and cook until cooked through, roughly 3-4 minutes. Then remove the shrimp from the pan.

3. To make the dressing: In a small bowl whisk together the fish sauce, rice vinegar, ginger, red chili pepper and honey.

4. To assemble the salad: In a large bowl add cucumber, carrot, bean sprouts and noodles, toss to combine. Add all of the herbs, shallots and peanuts, and top with shrimp. Squeeze lime wedges over the salad. Pour the dressing over the salad when ready to eat, otherwise noodles will get soggy. Serve with additional lime wedges.

Recipe adapted from Running With Tweezers.


_______________________________________

Faith Gorsky is the writer, recipe developer, photographer, and food stylist behind the blog An Edible Mosaic. She lives in Upstate New York and loves to travel, especially to places steeped in rich culture and history. She also enjoys reading, vintage shopping, watching movies, and is enamored with ancient cultures. She just released her first cookbook, “An Edible Mosaic: Middle Eastern Fare with Extraordinary Flair” (Tuttle Publishing), a collection of authentic Middle Eastern recipes handed down to her from her husband’s family.


Profile photo of georgiapellegrini

Spinach, Scallion and Feta Frittata

Posted by in Step-by-Step Recipes

  I love a good frittata; it reminds me of my grandmother who always made them full of fresh herbs, and had them sitting on the counter as a snack. She added a dollop of plain yogurt to hers for an extra fluffy version. So of course, when Kristi posted this recipe for this Spinach, […]

Profile photo of missamy

Healthy Black Bean Tostadas with Cilantro Sauce

Posted by in Step-by-Step Recipes

A healthy go-to meal option (or game day grub!) that's high on flavor and low in calories. The cilantro sauce kicks this into crazy good territory.

Profile photo of Erika (TK)

Looks Delicious! Salted Caramel Cashew Blondies

Posted by in Baking, Looks Delicious!

  Okay, I just spotted this on TK and felt compelled to share it with you. Compelled, I say. As in, I was powerless to resist it. These Salted Caramel Cashew Blondies from TK member Sommer have it all. Plus they have yogurt, which cancels out the caramel and sugar calories, yes? Go make some […]

Profile photo of georgiapellegrini

Hot Matcha Lemonade

Posted by in Step-by-Step Recipes

  Matcha is a finely powdered Japanese green tea that is full of nutrition. I loved Tasty Kitchen member Lindsay’s recipe for this healthy hot drink because it was a morning pick-me-up alternative to coffee and had a soothing lemon honey flavor for the throat.       You don’t need much to make this […]