
No Reviews
You must be logged in to post a review.
Pulled pork is delicious, but in my humble opinion, you haven’t had true pulled pork until you’ve eaten it in North Carolina. My fiance has become a master at smoking meat in his smoker and duplicating true NC-style pulled pork. This recipe will explain how it’s all done—from the pork rub right down to the smoking process!
You will also need a vertical-style water charcoal smoker, a bag of charcoal, 5 pounds of your preferred wood chunks (soaked for 30 minutes in advance), a chimney starter, a roll of aluminum foil and a pastry brush. Check out my blog post for photos to guide you along!
First things first, get that smoker ready and started. That way you can prep your pork rub and pork mop while you wait for the smoker to reach an ideal temperature.
Create a ring of black charcoal in the charcoal pan leaving the middle open/empty. This leaves room for the hot charcoals in the centre, which will speed up the rising in temperature. The unlit charcoal will eventually be ignited by the coals in the centre, which gives you a long and steady burn and prevents you from having to add more charcoal later.
To heat up the other charcoal, for the center, use a chimney starter. Roll up some newspaper and press it into the bottom of the starter, in ring-form, following the shape of the starter. Don’t over-stuff the bottom with newspapers.
Flip the starter back to its proper position and fill it to the brim with coals. Light the paper through one of the slits at the bottom of the starter. Let the coals burn up. Once they are white, dump them into the middle of the charcoal pan. Make sure you wear protection (on your hands) and avoid flying ashes. Things get pretty heated!
After dumping the hot coals into the centre of the charcoal pan, place the soaked wood chunks around the coals. Close up the smoker and fill the water basin to approximately 3/4 full. Place the grate down, cover, and let the smoker get to the ideal temperature (approximately 275 F).
While you wait for the smoker to heat up, prep the meat, the rub, and the mop. Once the smoker has reached the ideal temp, place your prepared meat on the grate, cover, and smoke away. The first two mops are done approximately every hour and a half. After that, it’s good to mop it every hour or so. There really are no hard set rules, but this is how we roll.
Prepare the rub by mixing all of the ingredients listed above under ‘Pork Rub’ in a bowl. Then distribute it evenly over the pork, pressing down to secure the spices.
Now, make that mop! Just mix all of the ingredients listed under ‘Pork Mop’ in another bowl. Then smell it. Trust me. It’s wonderful. Set it aside.
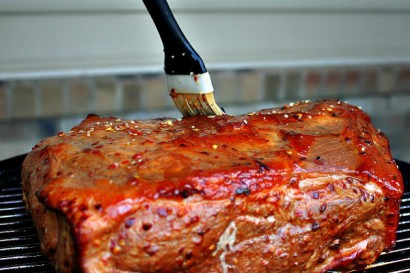
Place the pork on the grill and get excited. And again, don’t forget to mop! This will keep the meat moist and juicy. You don’t want it to dry out.
Once you start getting a nice bark on the outside, wrap the pork in aluminum foil, and put it back on the grate. This helps to maintain moisture. Additionally, it will help get your internal temperature to the desired 190 F. There is a point where the internal temp may remain the same for a while (this is called ‘the stall’), and wrapping the pork in aluminum foil will help you get past that point. This method is sometimes referred to as the ‘Texas Crutch’.
Once the meat is done (190 F), remove it from the smoker, and put it in a large roasting pan. Let it rest for an hour. After it’s all nice and rested, shred away! Keep it in the roasting pan as you shred to keep the juices from dripping away. Once the shred is complete, sprinkle some kosher salt over the meat and mix it all up. This mixes in the salt, and all of that rendered fat and delicious flavour.
You can serve pulled pork on a nice fresh bun, or on a plate all on it’s own because it’s just that delicious.
Hopefully this entry has been useful to any aspiring meat smokers out there. It’s definitely an art, and something worth perfecting if you enjoy it like we do.
Prep: Cook:
Serves: 4 Level: Easy
Prep: Cook:
Serves: 4 Level: Easy

Prep: Cook:
Serves: 4 Level: Easy

Prep: Cook:
Serves: 12 Level: Easy
Prep: Cook:
Serves: 8 Level: Easy


One Comment
Leave a Comment
You must be logged in to post a comment.
C. L. ( Cheryl ) "Cheffie Cooks" Wiser on 7.24.2014
Hey Dana, I will agree North Carolina’s smoke pork is very good. I have a college friend living in Charlotte and she took us to the best place in the “Queen City” for pulled pork. It would give any Texan pork a run for its money! Nice job! Cheryl