


Confession time: I’ve never mastered the pizza dough. Nope. It’s always turned out mushy, doughy, and, well, just wrong. I’ll keep working on it, but in the meantime, I found with this recipe for Cracker Pizza, submitted by Tasty Kitchen member, Mrs. Schwartz, I don’t really have to worry about it right now. Plus, I’ve grown quite fond of a crispy, crunchy pizza. It’s good eating if you ask me. And this recipe is as simple as it gets. I’m guessing a quick 15 minutes from start to that first crunchy bite.
This Cracker Pizza recipe would be great to use for a pizza party, especially with teenagers. Prepare a pizza bar with a bunch of toppings and let everyone fix their own favorite combo. Fun!
Let me show you how easy it is.
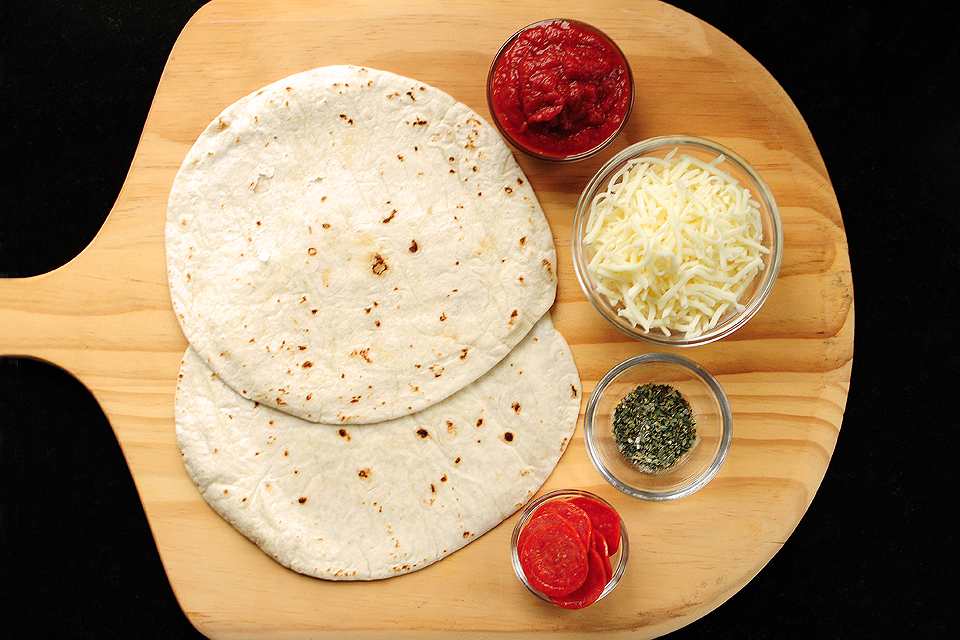
To get started you’ll need: tortillas, pizza sauce, mozzarella cheese, pepperoni or your favorite toppings, and pizza seasoning (or create your own; I used basil, oregano, garlic powder, and black pepper).
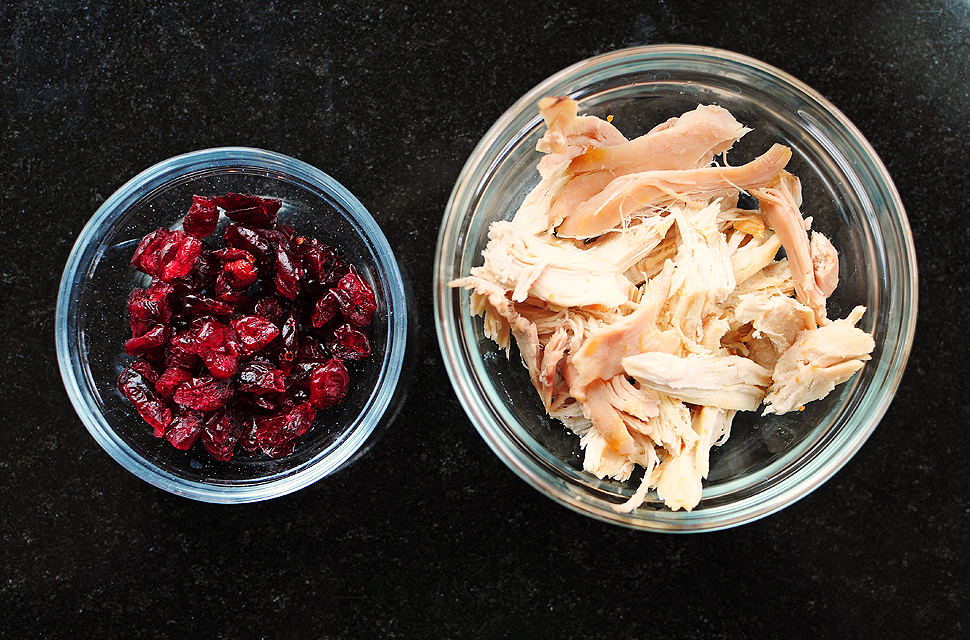
In addition to the pepperoni, I used some leftover chicken with dried cranberries for a holiday-inspired pizza. That leftover turkey would be veddy, veddy good here too.
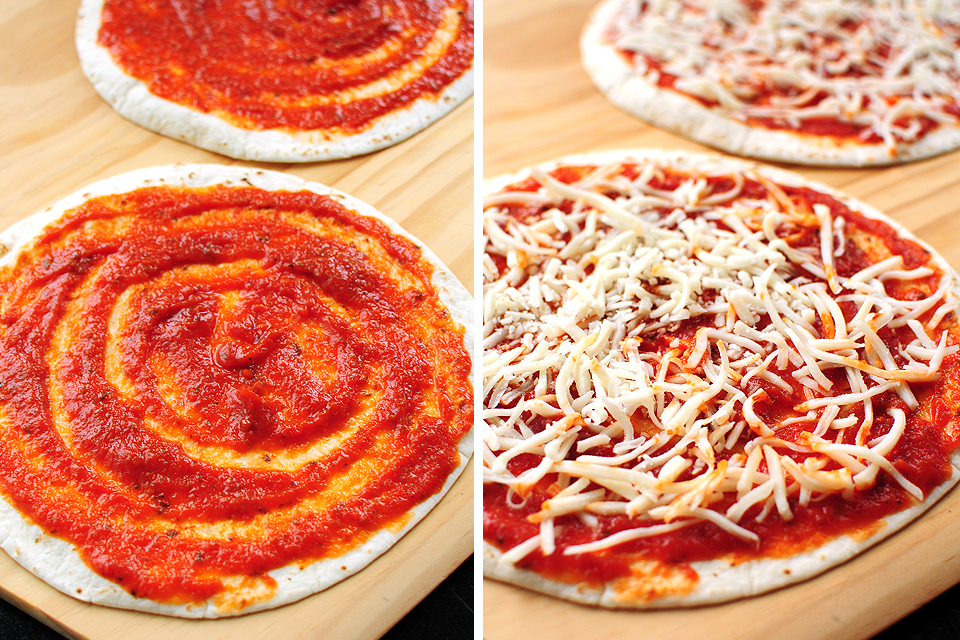
Evenly spread the pizza sauce over the tortilla, and then the cheese, please.
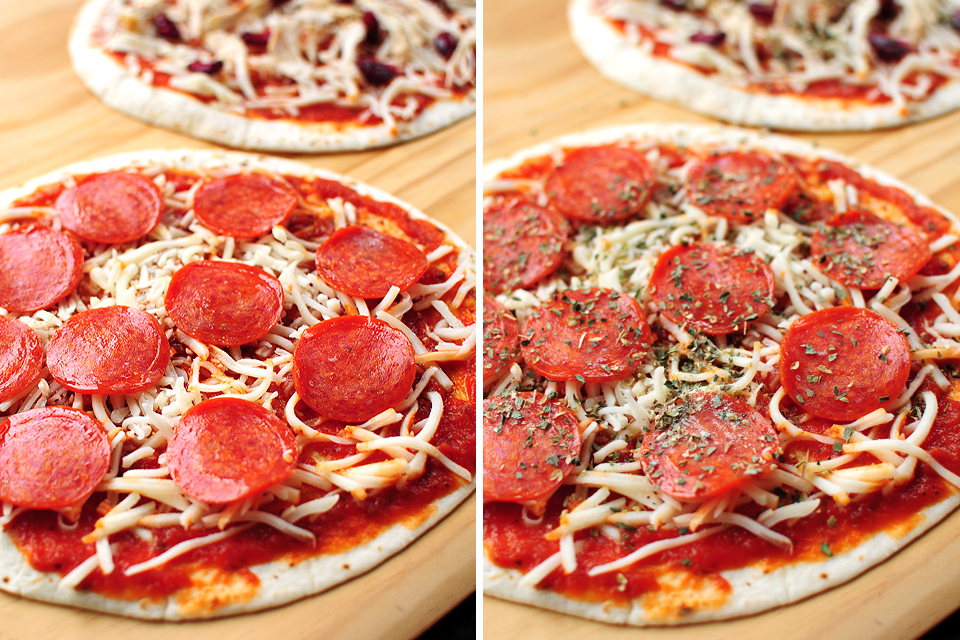
Add your favorite toppings, and evenly sprinkle the pizza with seasonings.
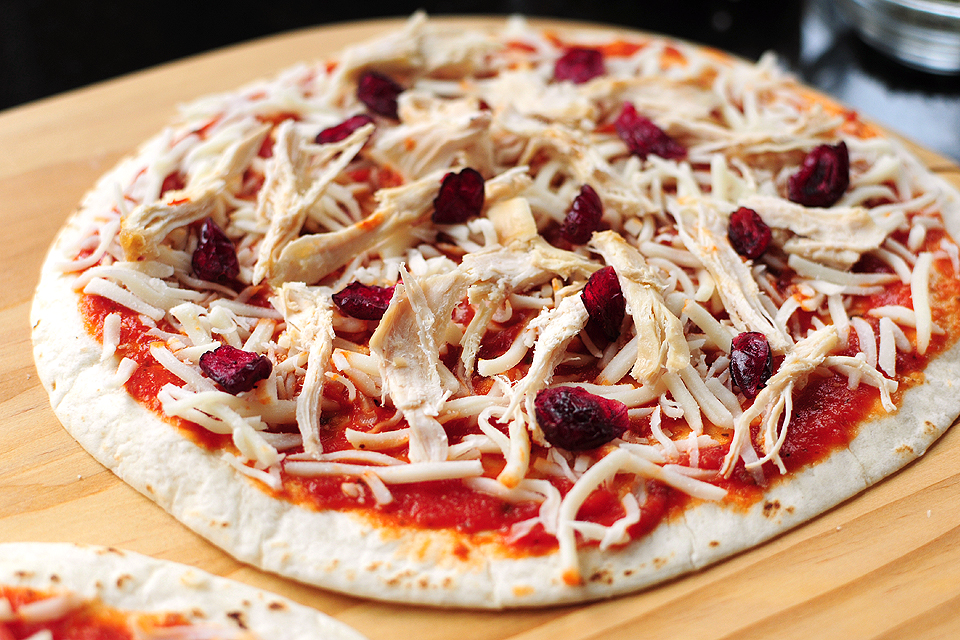
The chicken and cranberry pizza is looking good.
Now it’s time to bake, for about 10 minutes. Be sure to watch carefully to avoid burning the crust.
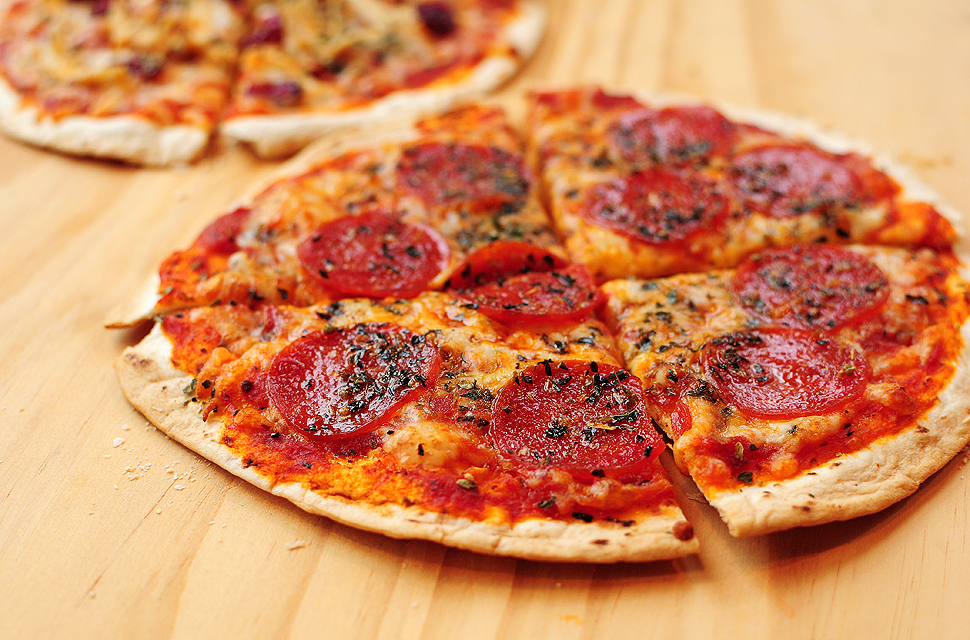
Yum! Melty cheese on top of a crunchy cracker-style crust.
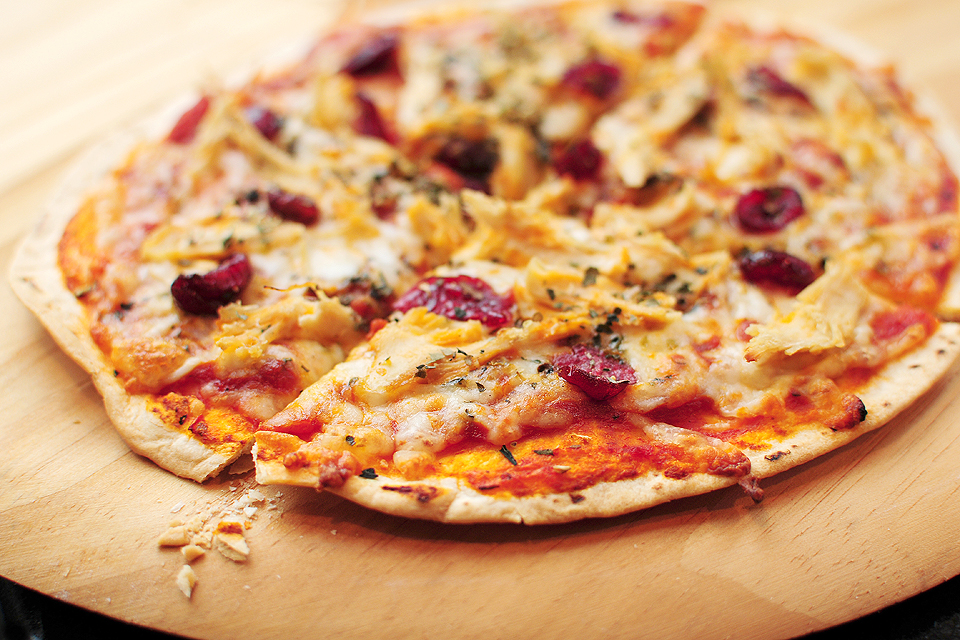
And the chicken cranberry combo turned out very nice. The crust is so crispy! It’s hard to believe it only takes 10 minutes for a plain, boring flour tortilla to turn into such deliciousness.
I’m thinking I may serve a few different combinations of these for appetizers at our next gathering. So simple, and the ingredients are basic enough to keep on hand for snacks, or last-minute appetizers.
Dear Mrs. Schwartz,
The recipe for Cracker Pizza is most certainly a keeper. And now I can make pizza any time I want even though I’m stinking up the pizza dough.
Thanks for sharing it with all of us!
Sincerely,
Pizza Dough Challenged Mrs. Johnson
Printable Recipe

Print Options
Description
Quick, easy and healthy(er) fix to that pizza craving!
Ingredients
- 1 whole Large Tortilla
- 3 Tablespoons Pizza Sauce (or Additional Depending On Your Preference)
- ¼ cups Mozzarella Cheese
- 10 slices Pepperoni
- 3 dashes Pizza Seasoning
Preparation Instructions
Preheat your oven to 415ºF. You want it very hot so the “crust” (tortilla) gets nice and crispy.
Spoon the pizza sauce onto the tortilla, spread it out almost to the edges, evenly.
Top with cheese and pepperoni. Sprinkle with pizza seasoning.
Bake for about 10 minutes. This will brown fast so pay close attention while it is in the oven.
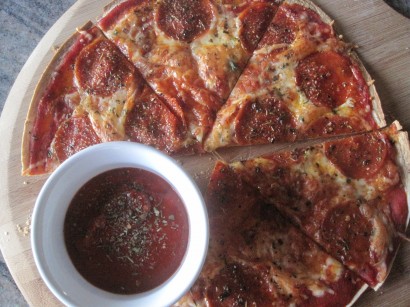
You can modify this with any type of pizza toppings you prefer!
Enjoy!
_______________________________________
Amy Johnson is a blogger who writes about food, travel, the home (both inside and out), and various observations and random musings about anything and everything. Visit her blog She Wears Many Hats for a dose of deliciousness, practicality, hilarity, or just plain fun. She lives in South Carolina with her husband and two children.

37 Comments
Comments are closed for this recipe.
Christy on 2.10.2012
I baked this on a pizza stone and it was not quite right…the top and the edges looked perfect! However, the rest was not crisp and was basically soggy, a real let down….I believe baking it directly on the oven rack would be perfect. I will try it that way and post the results.
Michael Knife on 12.23.2011
I’ve been making a variation of this pizza for years. The kids love it as a snack and it’s quick and easy to make. I make mine in the toaster over and they come out nice and crispy every time.
3jsmom on 12.22.2011
oh my gawsh! We call this a “Pizza-Dilla” have been making it for years! Super duper tasty…
bgoodny on 12.21.2011
These are great. We like to make pizzas on pita bread also. Just split them apart and put toppings on split side.
Green on 12.21.2011
To avoid soggy crust, place a cooling rack on a cookie sheet, then place the prepared pizza on the rack. Bake as instructed. No muss, no fuss, and a crispy crust!
marilyn on 12.21.2011
My family loves my pizza dough – I use the breadmaker with the recipe that came with it for pizza dough. Simple, easy, and I don’t even leave it the full amount of time; when it beeps to tell me it is going to rest for a little while, I take it out and put it into an oiled bowl and start another one. I usually make 3 when cooking for my family. By the time I take the 3rd one out the first one is ready to go onto the pizza pan.
Mary on 12.21.2011
Made this for dinner last night! Was I living under a rock that I didn’t know about tortilla pizza? I love making homemade pizza and I have a fabulous dough recipe, but this was so quick and so easy I will definitely do it again!
Val on 12.20.2011
For those getting a soggy crust~ I’ve been doing this for several years and you should prebake the crust (with a little olive oil brushed on) at 425 for about 8 min. This gets it really crispy. Then add toppings and go from there. Usually about 10-12 more minutes to get the cheese good and melted. I’ve got a version with veggies and goat cheese I make regularly and this thin crust is great for it! Great blog and great ideas here!!!!! Following….
hermitgrrl on 12.20.2011
I’ve made 3 of these since I read this yesterday, but my Mom ate one so I feel a little less guilty about this new found pleasure! Awesome recipe! I made mine in a toaster oven. 375 degrees (they cooked a little too fast at 415 but it’s a powerful lil’ toaster) directly on the rack, and I now have a new regular meal. It’s great for single servings! Thanks for sharing this!
Heather :) :) :) on 12.20.2011
Oh, this looks so good. I used to make these as a young teenager, when we didn’t have a lot of money to buy food. I called them “Depression Pizzas”…as in Depression Era
 I used tortillas and would baked them in my toaster oven. i’m so going to try this and make it gluten-free
 Love and hugs from the ocean shores of California, Heather
Laurie - Simply Scratch on 12.20.2011
I love it! This recipe is great for those nights you don’t feel like making pizza crust!
mimster on 12.20.2011
I used to make these all the time for my kids in the 90s as an interactive lunch. They made their own pizza and watched the cheese melt in the toaster oven. Now I want one.
Wenderly on 12.20.2011
Love this! Sounds divine!!!
Deb Graham on 12.20.2011
Amy – thanks for the suggestion – I did bake right on the oven rack – I think I’ll give it another try today. I was so disappointed because the pictures look so good. I think I may hit it with a shot of cooking spray before hand too to see if that will help. Thanks again.
Miss Amy on 12.20.2011
Deb:
Hey! Other than the low carb tortilla I can’t imagine what could be wrong. Unless…did you bake it on a baking sheet? I baked mine directly on the oven rack. Or maybe your oven temperature isn’t accurate? I know I should check mine soon.
Maybe try baking a plain low carb tortilla and keep checking to see how long one takes to crisp up to see how to adjust the cook time before making one up with all the fixings?
Hope that helps. It really is such a simple and tasty recipe. Almost too simple to call it a recipe.
~ Amy
Zee @ The Recipe Code on 12.20.2011
Perfect! I love shortcut pizzas
Stephanie Hobson on 12.19.2011
I bet you could use this method to make Mexican Pizza like Taco Bell has! I have to try that with my grandkids.
Deb Graham on 12.19.2011
I was so excited to try this – and really disappointed. I followed directions absolutely to the letter and my pizza did not come out crispy. Do you suppose it had anything to do with the fact that I used a low carb tortilla instead of a “full-fat” one?
Katrina on 12.19.2011
This is so fun!
Regina Fischer on 12.19.2011
I made this and they were great. Quick and very easy. I will be using this for my breakfast pizzas also.
JulieD on 12.19.2011
My pizza dough doesn’t come out every time too! This looks amazing! Will definitely try it for a quick lunch. Thank you!!
Mrs. Schwartz on 12.19.2011
Hi All!
Thank you for your comments, I’m so excited that this recipe was featured on the blog today! For cooking directions, I do place the pizzas on a pizza stone. They are really inexpensive and I keep mine in our oven at all times. It ensures an absolutely crispy, paper thin crust. I do think you can place the tortilla right on the oven wrack as well. Laurie, great improvising with the rumpled foil as well!
Enjoy!!
Laurie on 12.19.2011
For those wondering about whether they need to be on a stone or what…..I have placed them directly on the rack and they get really crispy, but the cheese is not melted all the way through. I then tried them on a cookie sheet and the center of the tortilla was a bit soggy. Now, since I don’t have a pizza stone anymore (was dropped and broken) I put them on a sheet of rumpled foil. I have found the rumpled foil keeps there from being any soggy spots.
Laurie on 12.19.2011
This is how we do it at our house for a quick lunch. I have never attempted to make pizza dough, but it is on my list of things I want to master in the kitchen.
NorthwoodsCatie on 12.19.2011
415 degrees? really? can you do that on your oven? I can do 425…? And do you bake directly on the rack? On a stone? Or….? More info please! Looks delish!
Cyn Mackley on 12.19.2011
I love tortillas as a pizza crust. I’m a big fan of thin crust and I found a recipe for a cracker-style crust for St. Louis style pizze (which is delicious) and one day I thought, why not try a flour torilla, it’s basically the same thing. That’s been my pizza crust ever since.
ClovenHoofedHeifer on 12.19.2011
Great recipe! I’ll give it a try tonight.
Caitlin on 12.19.2011
I also really like them on pita bread, for just a little extra oomf in the crust. Thanks for this recipe though, the chicken and cranberry pizza sounds excellent!
Miss Amy on 12.19.2011
Hey Lisa D!
I baked directly on the oven rack, and it wasn’t messy at all. Really. I slid the pizzas right onto the rack, and off, with no trouble.
Amy
Emily Jean on 12.19.2011
I thought this was a staple meal of every student enrolled in college. We always made these when we were low on money or too busy with exams to make a proper meal.
Debbie on 12.19.2011
I, too, use to have a lot of trouble with my pizza dough being the consistency I wanted after it was baked. We ate the outer edges of my homemade pizza and I would usually have to throw the middle away because it was too gooey. I now pre-baked my crust for 5 – 8 minutes (up to10 mins.for deep dish), depending on whether it’s a thin or thick crust. This helps to make sure the crust in the middle is at least partially baked before adding anything else, especially your sauce. Prick the crust lightly with a fork before baking and also keep in mind that your crust will shrink some when it’s baked with no ingredients on it. As soon as the pre-bake is finished, add your sauce and the rest of your pizza toppings and return the pizza to the oven for an additional 5 – 10 minutes. Adjust your second baking time to how done you ultimately want your crust on the bottom and how “melty” you want your cheese. I like to really load our pizza with a little meat and lots of peppers, onions, black olives and other vegetables, as well as a couple kinds of cheese. In the past, all these toppings (and any liquid in the veggies and sauce) kept my pizza crust from properly cooking in the middle. I am a bit lazy when it comes to making pizza and usually use a pizza crust mix, like Jiffy or whatever is available at the grocery store. I think this would work with a homemade crust just as well. So far, this method has never failed me and every bit of my pizza gets eaten now. IF you have any leftover pizza, this crust will stand up to being warmed in the microwave, although I prefer the toaster oven. Hope this works for you, too!
lauren in arkansas on 12.19.2011
What an idea! I’ll try a variety and even use the tomato and spinach tortillas. Mmmm
Lisa D. on 12.19.2011
Did you bake them on a pizza stone, a cookie sheet, or on the oven rack (that would be a mess!)?
Heather (Heather's Dish) on 12.19.2011
i normally love the doughy, yeasty goodness that is a traditional crust but i also love anything that means i get more pizza in me faster!
Jessica @ How Sweet on 12.19.2011
love love love pizza on tortillas. so easy and delish.
The Mrs @ Success Along the Weigh on 12.19.2011
We’re thick crust kind of peeps but this is perfect for appetizer pizza so I’m definitely keeping this one available!
Meme on 12.19.2011
This look delish and easy.