The Pioneer Woman Tasty Kitchen
Profile photo of Megan {Country Cleaver}

Buttermilk-Vanilla Glazed Cronuts

Posted by in Baking

Tasty Kitchen Blog: Vanilla Buttermilk Glazed Croissant Donuts. Guest post by Megan Keno of Wanna Be a Country Cleaver, recipe submitted by TK member Chris Castro of Salt and Smoke.

I love a good food fad. I remember the first time I heard the word “cronut” and I was utterly confused! But I was also equally intrigued. How could a mash up of croissant and doughnut possibly be a bad thing? When I saw Chris Castro’s recipe for Buttermilk-Vanilla Glazed Croissant Donuts, I knew that the “cronut” bandwagon was one I had to hop on!


Tasty Kitchen Blog: Vanilla Buttermilk Glazed Croissant Donuts. Guest post by Megan Keno of Wanna Be a Country Cleaver, recipe submitted by TK member Chris Castro of Salt and Smoke.

Breads, and especially croissants, can be a little time-consuming. But these were worth it in every single way. So if you haven’t tried your hand at bread-making, dive into it with these!


Tasty Kitchen Blog: Vanilla Buttermilk Glazed Croissant Donuts. Guest post by Megan Keno of Wanna Be a Country Cleaver, recipe submitted by TK member Chris Castro of Salt and Smoke.

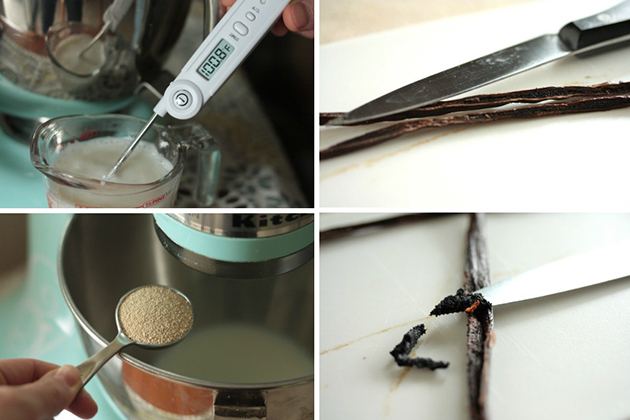
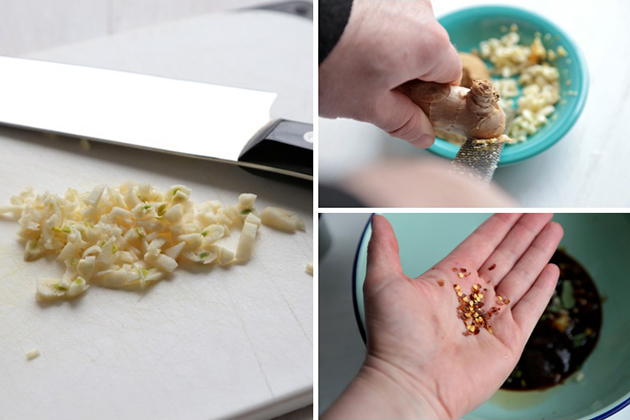
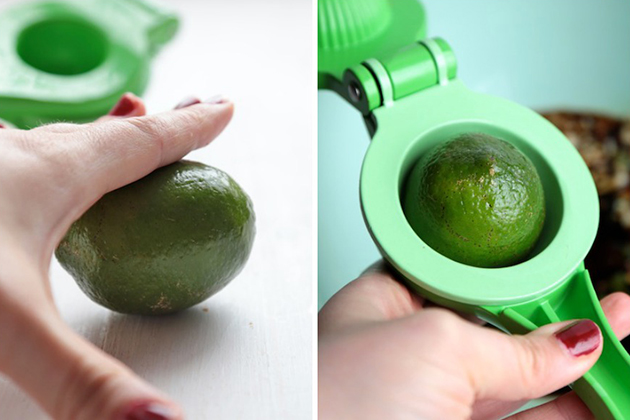
Sprinkle the milk with yeast and let it bloom. While it’s working its magic, scrape the seeds inside a vanilla bean.


Tasty Kitchen Blog: Vanilla Buttermilk Glazed Croissant Donuts. Guest post by Megan Keno of Wanna Be a Country Cleaver, recipe submitted by TK member Chris Castro of Salt and Smoke.

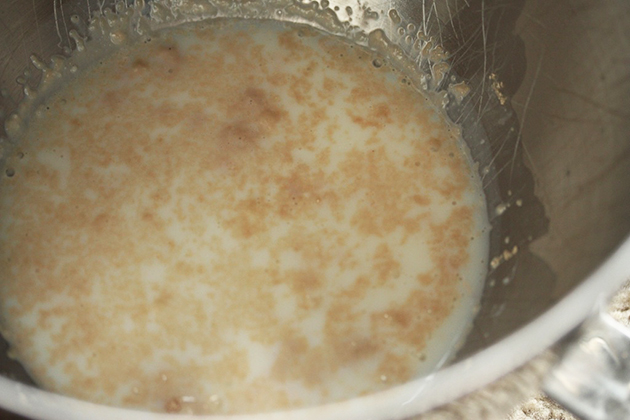
One your yeast has bloomed and is a little foamy, it’s time for the next step.


Tasty Kitchen Blog: Vanilla Buttermilk Glazed Croissant Donuts. Guest post by Megan Keno of Wanna Be a Country Cleaver, recipe submitted by TK member Chris Castro of Salt and Smoke.

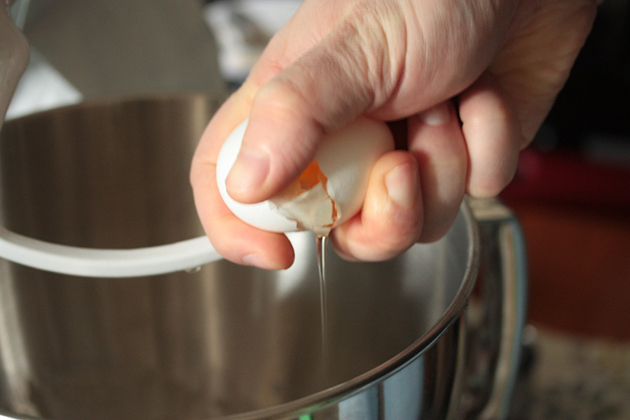
Crack an egg right on into the yeast and mix it in.


Tasty Kitchen Blog: Vanilla Buttermilk Glazed Croissant Donuts. Guest post by Megan Keno of Wanna Be a Country Cleaver, recipe submitted by TK member Chris Castro of Salt and Smoke.

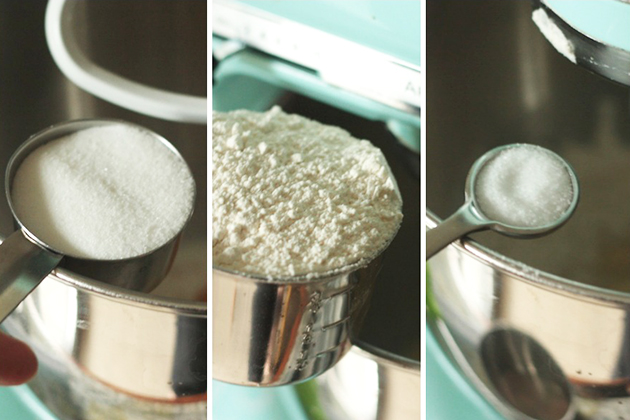
Next, with the mixer on low, add in the sugar, flour (reserve 1/4 cup for the vanilla butter later) and sugar until combined.


Tasty Kitchen Blog: Vanilla Buttermilk Glazed Croissant Donuts. Guest post by Megan Keno of Wanna Be a Country Cleaver, recipe submitted by TK member Chris Castro of Salt and Smoke.

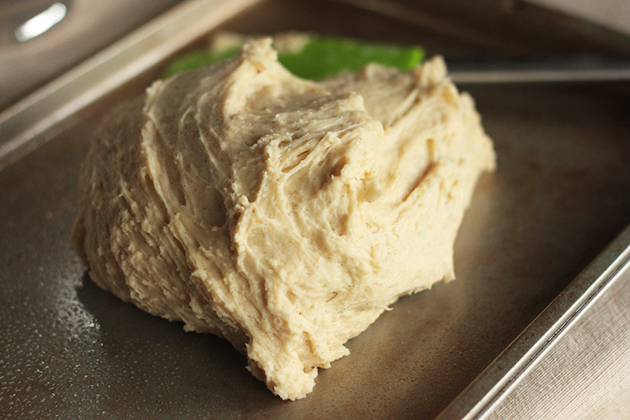
Knead the dough in the mixer until it’s all combined and nearly smooth. Don’t leave any dry bits at the bottom! Once it’s all done, cover the dough and place it in a warm, dark place to rise until doubled in size. My favorite place to let my dough proof is on my dryer when I’m doing laundry—it’s nice and toasty, perfect for proofing!


Tasty Kitchen Blog: Vanilla Buttermilk Glazed Croissant Donuts. Guest post by Megan Keno of Wanna Be a Country Cleaver, recipe submitted by TK member Chris Castro of Salt and Smoke.

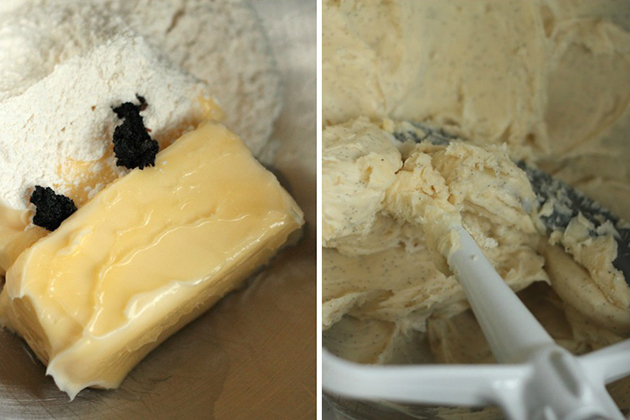
In a clean bowl or in your stand mixer, combine the butter, vanilla bean seeds, and the remaining flour.


Tasty Kitchen Blog: Vanilla Buttermilk Glazed Croissant Donuts. Guest post by Megan Keno of Wanna Be a Country Cleaver, recipe submitted by TK member Chris Castro of Salt and Smoke.

Roll out the proofed dough into a rectangle and smear the vanilla bean butter over the dough. Fold the dough into thirds, cover and place in the fridge to rise and chill the butter. Keeping your butter cold is important in these steps.

After an hour, roll out your dough again. This time, turn the dough 90 degrees, and roll it again. Fold into thirds again, cover and place in the fridge. This is how the layers of croissants get created.


Tasty Kitchen Blog: Vanilla Buttermilk Glazed Croissant Donuts. Guest post by Megan Keno of Wanna Be a Country Cleaver, recipe submitted by TK member Chris Castro of Salt and Smoke.

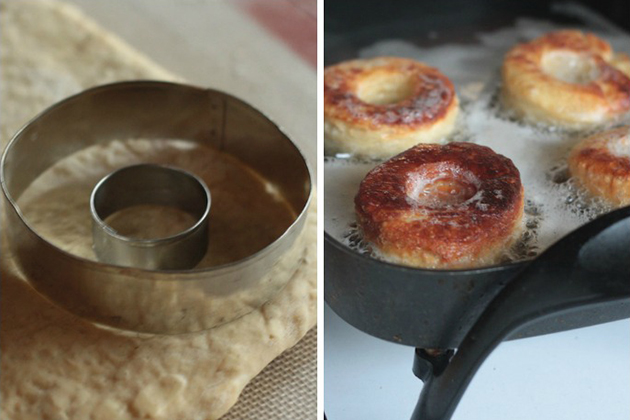
Finally, you’re ready to do your final roll. Roll out the dough and using a doughnut cutter, cut out your cronuts! Heat the vegetable oil in an electric skillet or a Dutch oven. When heated to 350ºF, fry your cronuts until deep golden brown on each side. Remove from oil, place on a paper towel to drain, and voila!


Tasty Kitchen Blog: Vanilla Buttermilk Glazed Croissant Donuts. Guest post by Megan Keno of Wanna Be a Country Cleaver, recipe submitted by TK member Chris Castro of Salt and Smoke.

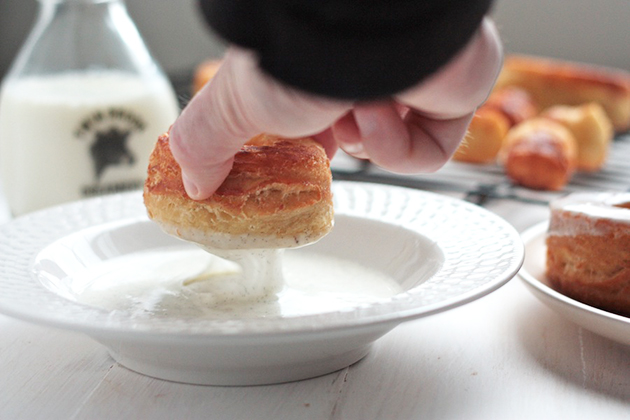
When they’re cool, don’t forget to dip them in glaze! That’s what seals the deal. Wouldn’t you agree?


Tasty Kitchen Blog: Vanilla Buttermilk Glazed Croissant Donuts. Guest post by Megan Keno of Wanna Be a Country Cleaver, recipe submitted by TK member Chris Castro of Salt and Smoke.

Thanks for getting me on the cronut bandwagon, Chris! It’s one I don’t want to hop off anytime soon. Check out his blog, Salt and Smoke, for more of this cool dad’s recipes.


Printable Recipe

Vanilla Buttermilk Glazed Croissant Donuts

See post on Salt & Smoke’s site!
5.00 Mitt(s) 2 Rating(s)2 votes, average: 5.00 out of 52 votes, average: 5.00 out of 52 votes, average: 5.00 out of 52 votes, average: 5.00 out of 52 votes, average: 5.00 out of 5

Prep Time:

Cook Time:

Difficulty: Intermediate

Servings: 12

12
x

Print Options

Page size Letter 3x5 4x6
Text Size Small Medium Large
Content Include description
Include prep time, etc.
Show image

Description

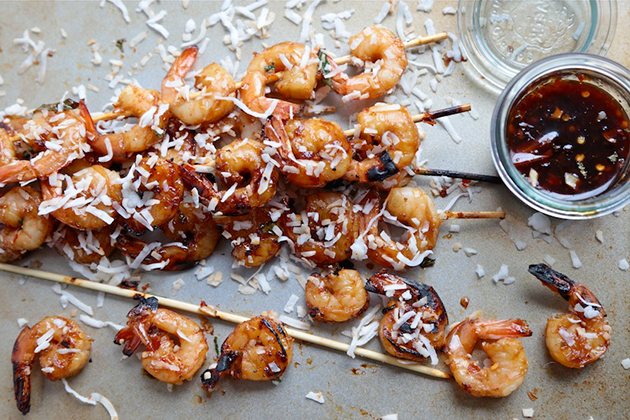
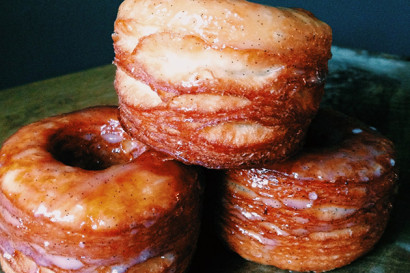
Golden brown flaky layers of crisp and light dough with flecks of vanilla beans throughout, drizzled in buttermilk glaze. Yum!
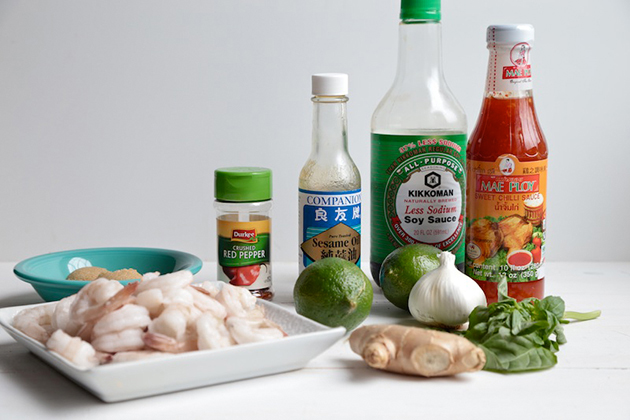
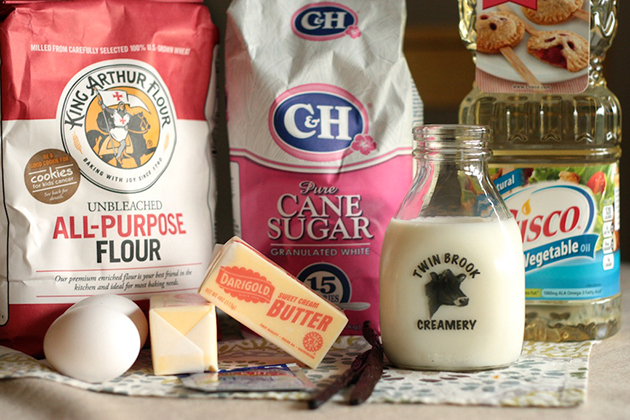
Ingredients

  • FOR THE CRONUTS:
  • ¾ cups Milk, Warmed
  • 1 Tablespoon Active Dry Yeast
  • 2  Large Eggs
  • ⅓ cups Sugar
  • 2 teaspoons Vanilla Paste Or 2 Beans, Split In Half Lengthwise With Seeds Scraped Out, Divided
  • 3-½ cups All-purpose Flour, Divided
  • 1 teaspoon Salt
  • 2 sticks Butter, At Room Temperature
  • Oil, For Frying
  • FOR THE VANILLA BUTTERMILK GLAZE:
  • 1 cup Powdered Sugar
  • 2 Tablespoons Buttermilk
  • 1 teaspoon Vanilla Paste Or 1 Bean Split In Half Lengthwise With Seeds Scraped Out

Preparation Instructions

Stir together milk and yeast in a large bowl and let it sit for about 5 minutes. Stir in eggs, sugar and 1 teaspoon of vanilla paste (or 1 bean scraped), then mix well. Add a cup of flour and salt and mix, then gradually add another 2 1/4 cups of flour.

Stir and knead for several minutes until smooth and elastic, and still somewhat tacky.

Transfer dough to a baking sheet and cover with plastic wrap. Chill in the refrigerator for about 30 minutes.

Meanwhile, beat butter, 1 vanilla bean (scraped) or another teaspoon of vanilla paste and remaining 1/4 cup flour in the bowl of an electric mixer for a couple of minutes until smooth, scraping down sides of bowl as needed.

After dough has chilled, turn it out onto a lightly floured surface then roll it into a rectangle that is around 12″ x 18″, and about 1/4″ thick. Spread the butter mixture evenly over the dough. Fold the dough as you would fold a letter before inserting it into an envelope (in thirds). Cover dough in plastic wrap and put it back in the refrigerator for another 45 minutes to an hour.

Pull dough out from the refrigerator, remove plastic and put dough on the counter top, with open sides to the left and right. Roll it out and readjust shape into a rectangle. Fold the left third towards the middle, followed by the right third. After folding, cover with plastic wrap and put it back in refrigerator for another 45 minutes to an hour.

Remove it from the refrigerator again. Roll and fold again as specified above and refrigerate dough. Do this two more times—until you’ve done it a total of four times. Then cover dough and refrigerate for another hour, or overnight (I prefer overnight, it doesn’t seem as labor intensive).

Roll out dough to about 1 1/2″ inch thickness, then using a donut cutter, cut out 12 donuts reserving holes (re-roll the dough scraps if necessary). Place cut donuts on a baking sheet and put it in the fridge until ready to fry, removing only the ones you are going to fry to keep the butter cold.

In a heavy pot, heat a couple inches of oil to around 350°F, or until hot but not smoking. Drop in a small scrap of dough to test the temp, it should sizzle. Then cook doughnuts in batches being careful not to crowd the pot (this affects the temperature of oil causing it to cool). Flip as necessary until both sides are deep golden, then transfer them to a baking sheet lined with a paper towel. Repeat until you’ve fried all of them.

Meanwhile, whisk together powdered sugar, buttermilk and vanilla to make glaze. Drizzle over doughnuts while still warm.

Makes 1 dozen donuts and holes.


_______________________________________

Megan Keno is the writer and photographer of Country Cleaver, a food blog fueled by Nutella and images of June Cleaver—if June wore cowboy boots and flannel, that is. A self-proclaimed country bum, Megan creates from-scratch recipes that range from simple to sublime and how-to’s to build your cooking repertoire. But she couldn’t do it without the help of her trusty—and furry—sous chef, Huckleberry. He’s a world class floor cleaner.


Profile photo of Megan {Country Cleaver}

Thai Chili Coconut Shrimp Skewers

Posted by in Step-by-Step Recipes

Tasty Kitchen Blog: Thai Chili Coconut Shrimp Skewers. Guest post by Megan Keno of Wanna Be a Country Cleaver, recipe submitted by TK member John Dawson of Patio Daddio BBQ.

There isn’t anything better than the smell of good BBQ. It’s a summer time staple. And no recipe has had me longing for summer as much as John’s recipe for Thai Chili Coconut Shrimp Skewers. John is a BBQ competitor, and after making these skewers, I can tell you that this is a man who knows what he’s doing behind a grill! You have to try these ASAP.


Tasty Kitchen Blog: Thai Chili Coconut Shrimp Skewers. Guest post by Megan Keno of Wanna Be a Country Cleaver, recipe submitted by TK member John Dawson of Patio Daddio BBQ.

The marinade for these shrimp skewers is full of fresh Thai food flavors, like sweet chili sauce, basil, ginger, garlic, and sesame oil. It’s fresh, fun and jam-packed with flavors that you are going to swoon over.


Tasty Kitchen Blog: Thai Chili Coconut Shrimp Skewers. Guest post by Megan Keno of Wanna Be a Country Cleaver, recipe submitted by TK member John Dawson of Patio Daddio BBQ.

To start, finely mince the garlic and ginger for the marinade.


Tasty Kitchen Blog: Thai Chili Coconut Shrimp Skewers. Guest post by Megan Keno of Wanna Be a Country Cleaver, recipe submitted by TK member John Dawson of Patio Daddio BBQ.

Roll the limes under your palm to extract as much juice from them as possible and squeeze the juice into the bowl of marinade fixins.


Tasty Kitchen Blog: Thai Chili Coconut Shrimp Skewers. Guest post by Megan Keno of Wanna Be a Country Cleaver, recipe submitted by TK member John Dawson of Patio Daddio BBQ.

Next, pour in the sweet chili sauce. If you haven’t tried sweet chili sauce yet, get ready to see the light!


Tasty Kitchen Blog: Thai Chili Coconut Shrimp Skewers. Guest post by Megan Keno of Wanna Be a Country Cleaver, recipe submitted by TK member John Dawson of Patio Daddio BBQ.

Whisk the marinade together until it’s all combined.


Tasty Kitchen Blog: Thai Chili Coconut Shrimp Skewers. Guest post by Megan Keno of Wanna Be a Country Cleaver, recipe submitted by TK member John Dawson of Patio Daddio BBQ.

Pour the shrimp into the marinade and coat them completely. Cover the bowl and let them marinate in the fridge for an hour. While the shrimp are doing their business, add several bamboo skewers to a large bowl of water and let them soak. This will prevent them from burning while they are on the grill. Preheat the grill to about 350ºF.


Tasty Kitchen Blog: Thai Chili Coconut Shrimp Skewers. Guest post by Megan Keno of Wanna Be a Country Cleaver, recipe submitted by TK member John Dawson of Patio Daddio BBQ.

Skewer the shrimp onto the soaked bamboo skewers. John suggests using two skewers per shrimp so they don’t spin on the skewers while on the grill. Drain the marinade into a sauce pan and bring the marinade to a boil and reduce it by half to form a glaze for the shrimp.

Place your shrimp skewers onto the preheated grill. Baste the shrimp on each side with the glaze.


Tasty Kitchen Blog: Thai Chili Coconut Shrimp Skewers. Guest post by Megan Keno of Wanna Be a Country Cleaver, recipe submitted by TK member John Dawson of Patio Daddio BBQ.

Flip the shrimp and baste them again with the glaze. Turn every couple of minutes until they are cooked through. Remove from the grill and sprinkle them with shredded coconut. Serve them immediately and prepare to swoon.

Thank you to John for this fantastic recipe. My husband is so ready for grilling season after these!! Be sure to check out John’s Recipe Box for other inspired food and see his site for other great stuff, like these Fire Roasted Pork Tenderloin with Corn Cakes. Have mercy!


Printable Recipe

Thai Chili Coconut Shrimp Skewers

See post on patiodaddio’s site!
5.00 Mitt(s) 3 Rating(s)3 votes, average: 5.00 out of 53 votes, average: 5.00 out of 53 votes, average: 5.00 out of 53 votes, average: 5.00 out of 53 votes, average: 5.00 out of 5

Prep Time:

Cook Time:

Difficulty: Easy

Servings: 6

6
x

Print Options

Page size Letter 3x5 4x6
Text Size Small Medium Large
Content Include description
Include prep time, etc.
Show image

Description

I made these skewers as part of a surf-n-turf meal for our daughter’s recent sleepover. They combine sweet and a bit of heat with classic Thai flavors. The final touch is a dusting of coconut to add an interesting textural component.

Ingredients

  • 1-½ pound Raw Medium Shrimp (26-30 Count), Deveined And Peeled
  • ¾ cups Sweetened Coconut Flakes
  • FOR THE MARINADE:
  • ½ cups Sweet Chili Sauce (I Used Mai Ploy Brand)
  • ⅓ cups Soy Sauce (I Used Aloha Brand Because It's Mellow And Less Salty)
  • ¼ cups Water
  • ¼ cups Thai Basil, Chopped Fine
  • 2 Tablespoons Brown Sugar
  • 1 Tablespoon Chile Oil (or 1/2 Tsp Red Chile Flakes And 1 Tsp Oil)
  • 1 teaspoon Ginger, Grated Or Minced Fresh
  • 1 teaspoon Garlic, Grated Or Minced Fresh
  • 1 teaspoon Sesame Oil
  • 2 whole Limes, Juiced

Preparation Instructions

Combine all of the marinade ingredients in a small bowl, whisk very well, and let sit for at least an hour to allow the flavors to marry.

Note: If you’re using wooden skewers, soak them in water for at least an hour. I like to use two skewers side-by-side to keep the shrimp from rotating when you flip them on the grill.

Put the shrimp in a gallon zip-top bag, add the marinade, shake to distribute well, then seal and refrigerate for 30 minutes.

Start your grill and prepare for direct grilling at medium-high heat (350-375ºF).

Drain the marinade into a small sauce pan, bring to a gentle boil over medium heat, reduce by half to make a glaze and set aside.

Skewer the shrimp so that they barely touch each other. You don’t want them crammed together.

Grill each skewer for about two minutes per side, basting periodically with the glaze.

Remove the skewers from the grill, brush with the glaze, and sprinkle both sides of each with the coconut flakes.

Serve with the remaining sauce for dipping.

Enjoy!


_______________________________________

Megan Keno is the writer and photographer of Country Cleaver, a food blog fueled by Nutella and images of June Cleaver—if June wore cowboy boots and flannel, that is. A self-proclaimed country bum, Megan creates from-scratch recipes that range from simple to sublime and how-to’s to build your cooking repertoire. But she couldn’t do it without the help of her trusty—and furry—sous chef, Huckleberry. He’s a world class floor cleaner.


Profile photo of Megan {Country Cleaver}

Spicy Pulled Chicken Sliders with Bacon Queso Guacamole

Posted by in Step-by-Step Recipes

Tasty Kitchen Blog: Spicy Pulled Chicken Sliders with Bacon Queso Guacamole. Guest post by Megan Keno of Wanna Be a Country Cleaver, recipe submitted by TK member Serena of Domesticate Me.

Mexican food and I have a special bond. I love it, it understands me and I can’t ever turn it down. It’s my food kryptonite. So when I saw Serena’s recipe for Spicy Pulled Chicken Sliders with Bacon Queso Guacamole, I just swooned.


Tasty Kitchen Blog: Spicy Pulled Chicken Sliders with Bacon Queso Guacamole. Guest post by Megan Keno of Wanna Be a Country Cleaver, recipe submitted by TK member Serena of Domesticate Me.

The list of ingredients wasn’t overly complicated, and it helped me use up a lot of the veggies that I already had on hand.


Tasty Kitchen Blog: Spicy Pulled Chicken Sliders with Bacon Queso Guacamole. Guest post by Megan Keno of Wanna Be a Country Cleaver, recipe submitted by TK member Serena of Domesticate Me.

To start, dice an onion and simmer in dash of olive oil until translucent. Add in the ketchup and reduce until the onions are soft.


Tasty Kitchen Blog: Spicy Pulled Chicken Sliders with Bacon Queso Guacamole. Guest post by Megan Keno of Wanna Be a Country Cleaver, recipe submitted by TK member Serena of Domesticate Me.

Once the onions and ketchup have reduced, pour in a bottle of beer for the braise. Serena recommends not using an IPA, because it will turn bitter after simmering, and I agree. For this I chose a lager that I had on hand and it was perfect. Add in the chicken breasts, cover and braise until cooked through.


Tasty Kitchen Blog: Spicy Pulled Chicken Sliders with Bacon Queso Guacamole. Guest post by Megan Keno of Wanna Be a Country Cleaver, recipe submitted by TK member Serena of Domesticate Me.

While the chicken is braising, get started on your guacamole. In a medium bowl, mix your avocado, cilantro, red onion, and all the other fixin’s.


Tasty Kitchen Blog: Spicy Pulled Chicken Sliders with Bacon Queso Guacamole. Guest post by Megan Keno of Wanna Be a Country Cleaver, recipe submitted by TK member Serena of Domesticate Me.

And don’t forget your bacon! Priorities friends, priorities.


Tasty Kitchen Blog: Spicy Pulled Chicken Sliders with Bacon Queso Guacamole. Guest post by Megan Keno of Wanna Be a Country Cleaver, recipe submitted by TK member Serena of Domesticate Me.

When the chicken is cooked through, shred it with a couple of forks until pulled apart. Once shredded, add the pulled chicken back into the braising sauce and stir to coat it completely. Cover and keep warm until you’re ready to put your sliders together.


Tasty Kitchen Blog: Spicy Pulled Chicken Sliders with Bacon Queso Guacamole. Guest post by Megan Keno of Wanna Be a Country Cleaver, recipe submitted by TK member Serena of Domesticate Me.

When you’re ready to put your sliders together, slice the slider buns and toast them until golden brown. Top with some pulled chicken and then a hefty dollop of bacon-loaded guacamole. Finish it off with the toasted golden brown top of your slider and devour it immediately.

Thank you to Serena for her fantastic recipe. Be sure to check out Serena’s Recipe Box for other inspired food, and see her site, Domesticate Me, for other great stuff—-like this Grilled Pita Pizza with Prosciutto and Chanterelles. Wowzer!


Printable Recipe

Spicy Pulled Chicken Sliders with Bacon-Queso Guacamole

See post on Serena Wolf @ Domesticate ME!’s site!
5.00 Mitt(s) 1 Rating(s)1 vote, average: 5.00 out of 51 vote, average: 5.00 out of 51 vote, average: 5.00 out of 51 vote, average: 5.00 out of 51 vote, average: 5.00 out of 5

Prep Time:

Cook Time:

Difficulty: Easy

Servings: 8

8
x

Print Options

Page size Letter 3x5 4x6
Text Size Small Medium Large
Content Include description
Include prep time, etc.
Show image

Description

These chicken sliders topped with the world’s most epic guacamole are guaranteed to spice up your life and your game-day festivities.

Ingredients

  • FOR THE SLIDERS:
  • 2 Tablespoons Olive Oil
  • 1 whole Medium Yellow Onion, Minced
  • 2 cloves Garlic, Minced
  • 2 whole Chipotle Pepper Canned In Adobo, Finely Chopped (only Use 1 Pepper If You're Not Into Spicy)
  • ½ cups Ketchup
  • 1 whole Lime, Juiced
  • 2 Tablespoons Honey
  • 18 ounces, fluid Beer Of Your Choice (Do Not Use An IPA, As It Gets Very Bitter When Reduced)
  • 4 whole Boneless, Skinless Chicken Breasts
  • 36 whole Slider Buns (I Love Martin's Party Potato Rolls)
  • FOR THE BACON-QUESO GUACAMOLE
  • 3 whole Avocados
  • 1-½ whole Limes, Juiced
  • 1 clove Garlic, Minced
  • ¼ cups Red Onion, Minced
  • 4 slices Cooked Thick-cut Bacon, Crumbled
  • ½ cups Crumbled Queso Fresco
  • 3 Tablespoons Chopped Cilantro

Preparation Instructions

For the sliders:
Heat the olive oil in a Dutch oven (or whatever large saucepan you have with a lid) over medium heat. When hot, add the minced onions and garlic and sauté for 3-4 minutes until the onions become translucent. Add the chipotles, ketchup, lime juice, honey and beer. Bring the mixture to a boil and then add the chicken breasts. Lower the heat to a simmer, cover and cook for 20 minutes.

Then remove the chicken breasts from the cooking liquid, place them on a cutting board and allow them to cool slightly. When cool enough to handle, shred the chicken using two forks (or your hands, whatever).

Bring the cooking liquid to a boil and cook until it has reduced by about half and thickened slightly. This should take about 15 minutes. While your sauce is reducing, make your guacamole.

For the Bacon-Queso Guacamole:
Slice your avocados in half and remove the pits. Score the flesh of each avocado half with a knife and spoon the flesh out of its skin into a mixing bowl. Squeeze lime juice over the avocado and mash it with a fork. Mix in the minced garlic, red onion, crumbled bacon, queso fresco and cilantro. Boom. Cover tightly with plastic wrap until ready to use. If you leave your guac hanging around uncovered, it will oxidize and turn brown. Party foul.

When your sauce has reduced, mix in the shredded chicken and cook for 3-5 minutes until heated through. Remove from heat.

Spoon your spicy pulled chicken onto slider rolls and top with bacon-queso guacamole and serve immediately. Game day just got a whole lot fancier, people.


_______________________________________

Megan Keno is the writer and photographer of Country Cleaver, a food blog fueled by Nutella and images of June Cleaver—if June wore cowboy boots and flannel, that is. A self-proclaimed country bum, Megan creates from-scratch recipes that range from simple to sublime and how-to’s to build your cooking repertoire. But she couldn’t do it without the help of her trusty—and furry—sous chef, Huckleberry. He’s a world class floor cleaner.


Profile photo of Megan {Country Cleaver}

Creamy Chicken and Sun-dried Tomato Fettucine

Posted by in Step-by-Step Recipes

Tasty Kitchen Blog: Creamy Chicken and Sun-dried Tomato Fettucine. Guest post by Megan Keno of Wanna Be a Country Cleaver, recipe submitted by TK member Natalie of Perry’s Plate.

I love finding new inspiration on Tasty Kitchen. There is always new stuff to find and try. When I joined TK, I kept filling my Recipe Box with so many great community recipes that I just “had to try” but it dawned on me that I hadn’t actually made any of them! Tragedy! The first recipe I ever made from Tasty Kitchen was Creamy Chicken and Sun-dried Tomato Fettucine from Natalie Perry. The flavors all combined so beautifully and the sauce was addicting! I would eat it for days on end.


Tasty Kitchen Blog: Creamy Chicken and Sun-dried Tomato Fettucine. Guest post by Megan Keno of Wanna Be a Country Cleaver, recipe submitted by TK member Natalie of Perry’s Plate.

The ingredients in this dish are really simple and include fettuccine, jarred sun-dried tomato pesto (Natalie also has a recipe here in TK for a homemade version), goat cheese crumbles, spinach, marinated artichoke hearts, green onions, and salt and pepper. Shredding leftover roasted chicken into this pasta adds something nice to the dish, or keep it vegetarian for a Meatless Monday meal!


Tasty Kitchen Blog: Creamy Chicken and Sun-dried Tomato Fettucine. Guest post by Megan Keno of Wanna Be a Country Cleaver, recipe submitted by TK member Natalie of Perry’s Plate.

To start, bring a large saucepan of salted water to a boil. Prepare fettuccine noodles according to package directions. Before draining, reserve about 1 cup of the pasta water for making the sauce. Pour the drained pasta into a large bowl.


Tasty Kitchen Blog: Creamy Chicken and Sun-dried Tomato Fettucine. Guest post by Megan Keno of Wanna Be a Country Cleaver, recipe submitted by TK member Natalie of Perry’s Plate.

Grab the pesto and chop the artichoke hearts. Now you’re ready to put this all together.


Tasty Kitchen Blog: Creamy Chicken and Sun-dried Tomato Fettucine. Guest post by Megan Keno of Wanna Be a Country Cleaver, recipe submitted by TK member Natalie of Perry’s Plate.

Stir the jarred sun dried tomato pesto, goat cheese, green onions, and artichoke hearts into the pasta and coat the noodles evenly. Add in some of the reserved pasta water if the sauce is too thick. Add in spinach and combine. The heat from the pasta will help the spinach wilt slightly. If you think it needs a little extra seasoning, add in a little salt and pepper to taste.


Tasty Kitchen Blog: Creamy Chicken and Sun-dried Tomato Fettucine. Guest post by Megan Keno of Wanna Be a Country Cleaver, recipe submitted by TK member Natalie of Perry’s Plate.

If you do add chicken, stir it in at this step and toss to coat the chicken in the creamy sauce.


Tasty Kitchen Blog: Creamy Chicken and Sun-dried Tomato Fettucine. Guest post by Megan Keno of Wanna Be a Country Cleaver, recipe submitted by TK member Natalie of Perry’s Plate.

Then serve! I always add a little more goat cheese to the top. The creamy tang is just too irresistible for words!

A big thank you to Natalie for this wonderful dish. Be sure to check out Natalie’s blog, Perry’s Plate, for more amazing recipes, including loads of paleo-inspired dishes. She’s just brimming with creativity and healthy eats!


Printable Recipe

Creamy Chicken & Sun-dried Tomato Fettucine

See post on Natalie | Perry's Plate’s site!
4.33 Mitt(s) 9 Rating(s)9 votes, average: 4.33 out of 59 votes, average: 4.33 out of 59 votes, average: 4.33 out of 59 votes, average: 4.33 out of 59 votes, average: 4.33 out of 5

Prep Time:

Cook Time:

Difficulty: Easy

Servings: 4

4
x

Print Options

Page size Letter 3x5 4x6
Text Size Small Medium Large
Content Include description
Include prep time, etc.
Show image

Description

Made with a homemade sun-dried tomato pesto and comes together in under 30 minutes!

Ingredients

  • 8 ounces, weight Whole Wheat Fettucine (spaghetti Or Linguine Would Also Work)
  • 1-½ cup Cooked Diced Or Shredded Chicken
  • 1 cup Jarred Marinated Artichoke Hearts, Chopped
  • 2 cups Chopped Fresh Baby Spinach (about 3 Big Handfuls)
  • ⅓ cups Sun-dried Tomato Pesto (also In My Recipe Box)
  • 1 whole Green Onion, Sliced Thinly
  • 2 ounces, weight Goat Cheese, Plus More For Garnish
  • ⅛ teaspoons Salt And Black Pepper (or To Taste)

Preparation Instructions

Bring a large pot of water to boil. Add 2 tablespoons salt to the water, then add pasta. Cook according to package directions, until al dente. Meanwhile, prepare other ingredients.

When pasta is finished cooking, remove a cup of the pasta water from the pot and set aside. Drain remaining water and place cooked pasta in a large bowl. Add remaining ingredients and stir until the pesto and goat cheese have coated everything and the spinach has wilted. If it gets too thick and cumbersome, add reserved pasta water a few tablespoonfuls at a time to loosen things up. The pasta should be lightly coated with a sauce, but not watery.

Makes about 4 servings.


_______________________________________

Megan Keno is the writer and photographer of Country Cleaver, a food blog fueled by Nutella and images of June Cleaver—if June wore cowboy boots and flannel, that is. A self-proclaimed country bum, Megan creates from-scratch recipes that range from simple to sublime and how-to’s to build your cooking repertoire. But she couldn’t do it without the help of her trusty—and furry—sous chef, Huckleberry. He’s a world class floor cleaner.


Profile photo of Megan {Country Cleaver}

Baked Blueberry Pecan French Toast

Posted by in Baking

Baked French toast, or bread pudding, always reminds me of my mom. She loves it. And so do I! It’s comforting, warm, and best of all, full of carbs. When I found Mel’s recipe for Baked…

Profile photo of Megan {Country Cleaver}

Bourbon and Biscoff Milkshakes

Posted by in Step-by-Step Recipes

We’re so thrilled to welcome Megan, also known as Country Cleaver—the mastermind behind many scrumptious recipes seen on Tasty Kitchen. She’s as talented as she is sweet and charming. Megan starts our week off with this simple yet deadly treat from Tasty Kitchen member Erika of Southern Souffle. Welcome, Megan and thank you for the […]