The Pioneer Woman Tasty Kitchen
Profile photo of cookincanuck

Roasted Tomato and Goat Cheese Sandwiches

Posted by in Step-by-Step Recipes

Tasty Kitchen Blog: Open-Faced Roasted Tomato & Goat Cheese Sandwiches. Guest post by Dara Michalski of Cookin' Canuck, recipe submitted by TK member Courtney of Bake. Eat. Repeat.

 
Every year, the tomatoes catch me by surprise. One day I’ll head out to peruse the garden for gorgeous produce to pluck from the vine and … nothing. A couple of days later, I swear that the vines are practically drooping with ruby red tomatoes. If I want my share, I have to move fast. My 8-year old son makes a beeline for the garden beds each morning and, if I’m not fast enough, his cheeks will be filled to the brim chipmunk-style before I even step out the door.

With a bounty crop each year, I’m always looking for new ways to use our tomatoes. This Open-Faced Roasted Tomato and Goat Cheese Sandwich recipe from Tasty Kitchen member Courtney came at the perfect time. The tomatoes are drizzled with a garlicky olive oil mixture and roasted until tender. The sweet tomatoes are layered with goat cheese, fresh herbs and golden brown Parmesan bits on top of grilled, crunchy bread. To finish the dish, a simple balsamic glaze is drizzled on top.

Enough chit-chat. Let’s make (and eat!) this amazing sandwich. We’ll also make a balsamic reduction to drizzle on top.


Tasty Kitchen Blog: Open-Faced Roasted Tomato & Goat Cheese Sandwiches. Guest post by Dara Michalski of Cookin' Canuck, recipe submitted by TK member Courtney of Bake. Eat. Repeat.

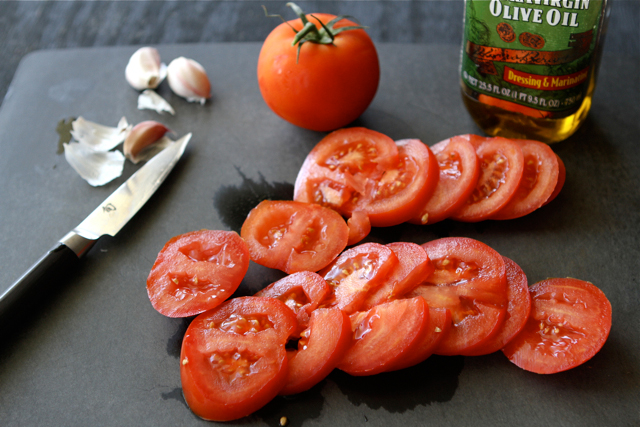
Preheat the oven to 450ºF. Line a baking sheet with aluminum foil. Cut the tomatoes in ¼-inch thick slices and spread them out on the lined baking sheet.


Tasty Kitchen Blog: Open-Faced Roasted Tomato & Goat Cheese Sandwiches. Guest post by Dara Michalski of Cookin' Canuck, recipe submitted by TK member Courtney of Bake. Eat. Repeat.

In a small bowl, whisk together olive oil, garlic, salt, pepper and sugar. The first time I made this, I found the tomatoes to be too salty (and this is coming from a confessed salt lover), so I used half the amount of salt the next time.


Tasty Kitchen Blog: Open-Faced Roasted Tomato & Goat Cheese Sandwiches. Guest post by Dara Michalski of Cookin' Canuck, recipe submitted by TK member Courtney of Bake. Eat. Repeat.

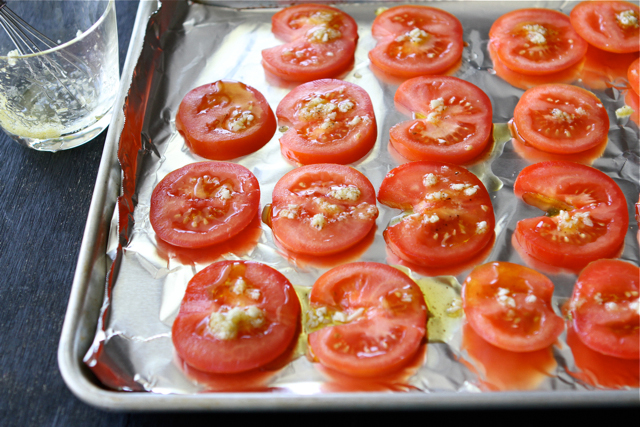
Pour the mixture evenly over tomatoes.


Tasty Kitchen Blog: Open-Faced Roasted Tomato & Goat Cheese Sandwiches. Guest post by Dara Michalski of Cookin' Canuck, recipe submitted by TK member Courtney of Bake. Eat. Repeat.

Bake until the tomatoes shrink slightly and are soft, 20 to 25 minutes.


Tasty Kitchen Blog: Open-Faced Roasted Tomato & Goat Cheese Sandwiches. Guest post by Dara Michalski of Cookin' Canuck, recipe submitted by TK member Courtney of Bake. Eat. Repeat.

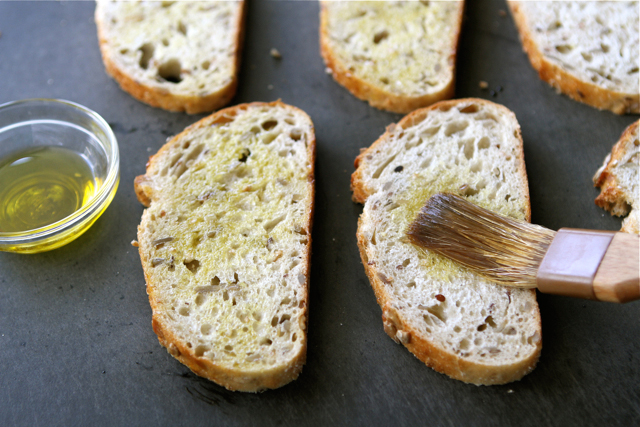
Meanwhile, set a large skillet over medium-high heat. Use a pastry brush to brush melted butter (or olive oil) on both sides of the bread slices.


Tasty Kitchen Blog: Open-Faced Roasted Tomato & Goat Cheese Sandwiches. Guest post by Dara Michalski of Cookin' Canuck, recipe submitted by TK member Courtney of Bake. Eat. Repeat.

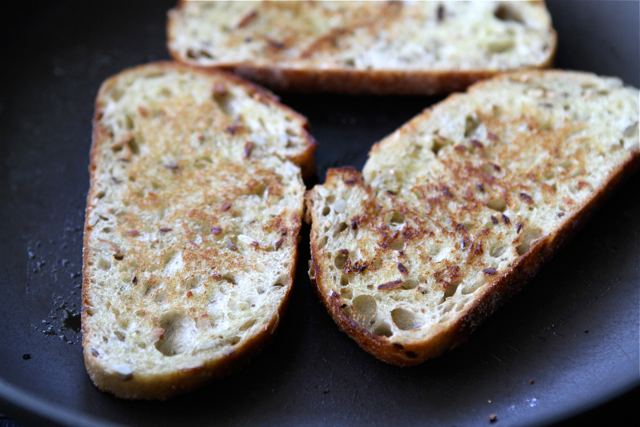
Place the bread slices in the skillet and cook until they are evenly browned, turning halfway through. Transfer the bread slices to a plate.


Tasty Kitchen Blog: Open-Faced Roasted Tomato & Goat Cheese Sandwiches. Guest post by Dara Michalski of Cookin' Canuck, recipe submitted by TK member Courtney of Bake. Eat. Repeat.

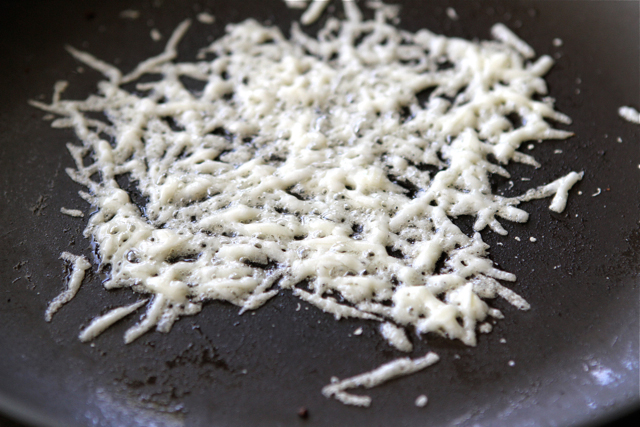
This is where you get to make crispy, browned cheese. If you can resist eating at least half of it before it even makes it to the sandwiches, you are a better woman/man than me.

Add Parmesan cheese to the hot skillet. Grill until cheese is crispy and browned. When the cheese set, I flipped it over with a small metal spatula to brown it on both sides. Transfer the browned cheese to a plate and break into pieces.


Tasty Kitchen Blog: Open-Faced Roasted Tomato & Goat Cheese Sandwiches. Guest post by Dara Michalski of Cookin' Canuck, recipe submitted by TK member Courtney of Bake. Eat. Repeat.

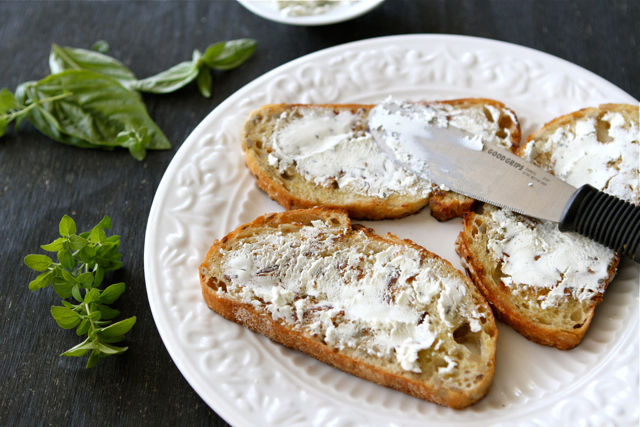
To assemble, divide the bread slices between two plates. Divide the goat cheese between the bread slices and spread evenly.


Tasty Kitchen Blog: Open-Faced Roasted Tomato & Goat Cheese Sandwiches. Guest post by Dara Michalski of Cookin' Canuck, recipe submitted by TK member Courtney of Bake. Eat. Repeat.

Top each sandwich with 2-3 slices of roasted tomatoes. Sprinkle with chopped fresh herbs. Drizzle evenly with balsamic vinegar reduction (see note below). Top with Parmesan crisps. Serve immediately.

Note: This recipe calls for 3 tablespoons of balsamic reduction to drizzle over the finished sandwiches. That sounds really fancy and intimidating, doesn’t it? Have no fear, the process involves no more than some boiling, stirring and no more than 5 minutes of your time.

To make the balsamic reduction, pour 6 tablespoons of balsamic vinegar in a saucepan set over medium heat. Bring to a boil, stirring frequently. When the vinegar reaches a boil, stir constantly until the vinegar reduces by half. It will have a syrupy consistency and a slightly sweet, decadent flavor.


Tasty Kitchen Blog: Open-Faced Roasted Tomato & Goat Cheese Sandwiches. Guest post by Dara Michalski of Cookin' Canuck, recipe submitted by TK member Courtney of Bake. Eat. Repeat.

Thanks so much to Courtney for this recipe. Be sure to check out Courtney’s blog, Bake. Eat. Repeat. It is full of recipes that feature seasonal ingredients, photos that will leave you licking your lips, and fun stories about daily life.


Printable Recipe

Open-Faced Roasted Tomato and Goat Cheese Sandwiches

See post on Courtney’s site!
5.00 Mitt(s) 1 Rating(s)1 vote, average: 5.00 out of 51 vote, average: 5.00 out of 51 vote, average: 5.00 out of 51 vote, average: 5.00 out of 51 vote, average: 5.00 out of 5

Prep Time:

Cook Time:

Difficulty: Easy

Servings: 2

2
x

Print Options

Page size Letter 3x5 4x6
Text Size Small Medium Large
Content Include description
Include prep time, etc.
Show image

Description

Creamy tangy goat cheese and sweet roasted tomatoes make the perfect summer sandwich. And don’t forget the Parmesan crisps! Fried cheese is always a good idea.
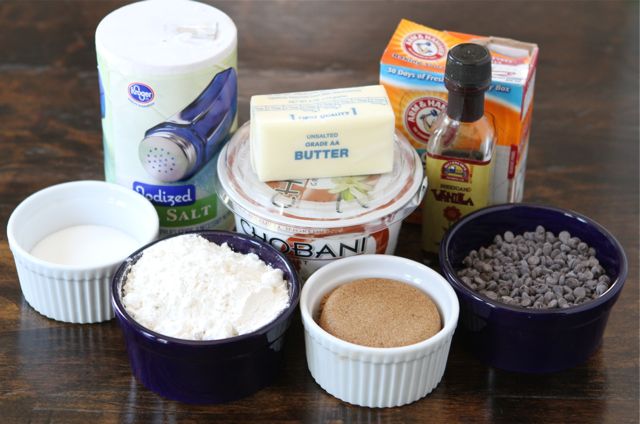
Ingredients

  • 3  Slicer Tomatoes
  • 2 Tablespoons Olive Oil
  • 2 teaspoons Minced Garlic
  • 1 teaspoon Kosher Salt
  • ½ teaspoons Black Pepper
  • 2 pinches Sugar
  • 6  Small Slices Crusty Bread (we Used Our Favorite Cheesy Semolina)
  • 3 Tablespoons Butter, Melted
  • ¼ cups Parmesan Cheese
  • 2 ounces, weight Goat Cheese
  • 2 Tablespoons Chopped Fresh Herbs (we Used Basil, Parsley, And Rosemary)
  • 3 Tablespoons Balsamic Vinegar Reduction Or Balsamic Glaze

Preparation Instructions

1. Preheat the oven to 450 F. Line a baking sheet with aluminum foil. Slice the tomatoes about 1/4 inch thick and spread them out on the baking sheet. In a small bowl, whisk together olive oil, garlic, salt, pepper and sugar. Pour mixture evenly over tomatoes. Bake in the preheated oven for 20-25 minutes or until tomatoes are slightly shrunk and softened.

2. Meanwhile, heat a skillet over medium high heat. Use a pastry brush to brush melted butter on both sides of the bread slices. Place slices in the skillet and grill until evenly browned. Flip bread and continue to grill until both sides are browned. Remove bread to a plate.

3. Add 1/4 cup Parmesan cheese to the hot skillet. Grill until cheese is crispy and browned. Remove to a plate and break into pieces.

3. To assemble, divide bread slices among two plates. Smear one side of the bread with goat cheese. Top with 2-3 slices of roasted tomatoes. Sprinkle with assorted herbs. Drizzle evenly with balsamic vinegar reduction. Top with Parmesan crisps. Serve immediately.


_______________________________________

Dara Michalski is a doll and a sweetheart who clearly knows her way around the kitchen. She blogs at Cookin’ Canuck, where she shares her flavor-packed recipes and fun, engaging writing. The photography’s pretty incredible, too.


Profile photo of Amber {Sprinkled With Flour}

Grilled Peaches with Honey-Ginger Cream Cheese Fluff

Posted by in Step-by-Step Recipes

Tasty Kitchen Blog: Grilled Peaches with Honey Ginger Cream Cheese Fluff. Guest post by Amber Potter of Sprinkled with Flour, recipe submitted by Jessica of A Kitchen Addiction.

 
Living in a house with a 5-year-old, most of our desserts are of the kid-friendly variety. “Grown up” desserts are saved for special occasions, when I feel the need to step away from kiddie land and enjoy something a bit more, well, grown up. 

Don’t get me wrong! I love a good ol’ chocolate chip cookie sundae, but every now and then a girl needs to pamper her palate. When I found Jessica’s recipe for Grilled Peaches with Honey Ginger Cream Cheese Fluff, I knew this recipe would hit the mark.

Besides, who doesn’t love a dessert that has fluff in it? Fluff is very grown up, right?


Tasty Kitchen Blog: Grilled Peaches with Honey Ginger Cream Cheese Fluff. Guest post by Amber Potter of Sprinkled with Flour, recipe submitted by Jessica of A Kitchen Addiction.

This recipe is super simple. You’ll need: peaches, neufchatel cheese, honey, ginger, nutmeg, and Cool Whip. 


Tasty Kitchen Blog: Grilled Peaches with Honey Ginger Cream Cheese Fluff. Guest post by Amber Potter of Sprinkled with Flour, recipe submitted by Jessica of A Kitchen Addiction.

In a bowl, mix together the neufchatel cheese and honey.


Tasty Kitchen Blog: Grilled Peaches with Honey Ginger Cream Cheese Fluff. Guest post by Amber Potter of Sprinkled with Flour, recipe submitted by Jessica of A Kitchen Addiction.

Beat with a mixer until creamy, about 2 minutes.


Tasty Kitchen Blog: Grilled Peaches with Honey Ginger Cream Cheese Fluff. Guest post by Amber Potter of Sprinkled with Flour, recipe submitted by Jessica of A Kitchen Addiction.

Add the ginger and nutmeg. 


Tasty Kitchen Blog: Grilled Peaches with Honey Ginger Cream Cheese Fluff. Guest post by Amber Potter of Sprinkled with Flour, recipe submitted by Jessica of A Kitchen Addiction.

Beat for another 2 minutes, until well combined.


Tasty Kitchen Blog: Grilled Peaches with Honey Ginger Cream Cheese Fluff. Guest post by Amber Potter of Sprinkled with Flour, recipe submitted by Jessica of A Kitchen Addiction.

Gently fold in the Cool Whip with a spoon, just until combined. Refrigerate while you grill the peaches.


Tasty Kitchen Blog: Grilled Peaches with Honey Ginger Cream Cheese Fluff. Guest post by Amber Potter of Sprinkled with Flour, recipe submitted by Jessica of A Kitchen Addiction.

Cover the grate of your grill with foil. Place the peaches, cut side down, on the grill. Grill for 3-6 minutes, or until soft.


Tasty Kitchen Blog: Grilled Peaches with Honey Ginger Cream Cheese Fluff. Guest post by Amber Potter of Sprinkled with Flour, recipe submitted by Jessica of A Kitchen Addiction.

Remove peaches to a platter. Top with the cream cheese fluff, drizzle with honey, and sprinkle with nutmeg.


Tasty Kitchen Blog: Grilled Peaches with Honey Ginger Cream Cheese Fluff. Guest post by Amber Potter of Sprinkled with Flour, recipe submitted by Jessica of A Kitchen Addiction.

I absolutely LOVED these grilled peaches. Even my son loved them, so they’re not just for grown ups! The spiced cream cheese topping went so well with the sweet, juicy peaches. A perfect ending to a summer meal. Thank you Jessica for sharing you’re recipe with us! You can visit Jessica’s blog, A Kitchen Addiction, to find more of her yummy recipes.


Printable Recipe

See post on Jessica@A Kitchen Addiction’s site!
4.50 Mitt(s) 2 Rating(s)2 votes, average: 4.50 out of 52 votes, average: 4.50 out of 52 votes, average: 4.50 out of 52 votes, average: 4.50 out of 52 votes, average: 4.50 out of 5

Prep Time:

Cook Time:

Difficulty: Easy

Servings: 6

6
x

Print Options

Page size Letter 3x5 4x6
Text Size Small Medium Large
Content Include description
Include prep time, etc.
Show image

Description

The cream cheese fluff offers a slight tang to offset the sweetness of the peaches, and the ginger and honey blend beautifully with this delicious treat!

Ingredients

  • 4 ounces, weight 1/3 Of The Fat Neufchatel Cheese, Softened
  • 1-½ Tablespoon Honey
  • ½ teaspoons Ginger
  • ⅛ teaspoons Nutmeg
  • 4 ounces, weight Fat Free Cool Whip, Thawed
  • 1 pound Peaches, Washed And Halved
  • Honey And Nutmeg For Garnish

Preparation Instructions

1. In a small bowl, add neufchatel cheese and honey. Beat with a hand mixer until creamy, about 2 minutes. Add in the ginger and nutmeg. Beat again for another 2 minutes.
2. Gently fold in the Cool Whip with a spoon just until combined. Refrigerate while you grill the peaches.
3. Cover grate of grill with aluminum foil. Place peaches, cut side down, on grill. Grill on low heat for 3-6 minutes, or until soft.
4. Remove peaches to a plate. Top with cream cheese fluff. Drizzle with honey and sprinkle with nutmeg.


_______________________________________

Amber is a stay at home mom who lives in the heart of the Missouri Ozarks. It’s a long way from where she grew up, in Wales (yes, way over in the U.K.). The recipes in her blog Sprinkled with Flour include her original creations as well as her family recipes. Go check them out!


Profile photo of Erica Lea

Spring Greens with Pears, Sugared Walnuts & Gorgonzola

Posted by in Step-by-Step Recipes

Tasty Kitchen Blog: Spring Greens with Pears, Sugared Walnuts & Gorgonzola. Guest post by Erica Kastner, recipe submitted by TK member Jennifer of Jennifer Cooks.

 
I don’t know about you guys, but to me an iceberg + ranch dressing salad is so blasé. I prefer my salad with a bit of pizzazz.

Thus, when I saw Jennifer’s recipe for a mix of spring greens, pears, sugared walnuts and gorgonzola, I was very much excited to give it a go. The list of ingredients was just different enough to make it interesting but familiar enough to make it appetizing.

Let me show you how to throw (or toss) it together!


Tasty Kitchen Blog: Spring Greens with Pears, Sugared Walnuts & Gorgonzola. Guest post by Erica Kastner, recipe submitted by TK member Jennifer of Jennifer Cooks.

First off, these are the things you’ll need: spring salad greens (or any type of lettuce you prefer), red pear, fresh herbs of choice (I left these out), gorgonzola, walnut halves, white sugar, brown sugar, extra virgin olive oil, red wine vinegar (I used pomegranate-infused), ground mustard, salt and garlic powder.


Tasty Kitchen Blog: Spring Greens with Pears, Sugared Walnuts & Gorgonzola. Guest post by Erica Kastner, recipe submitted by TK member Jennifer of Jennifer Cooks.

Begin by sugaring the walnuts: Over medium heat, sauté the walnuts with white and brown sugars. Stir often.


Tasty Kitchen Blog: Spring Greens with Pears, Sugared Walnuts & Gorgonzola. Guest post by Erica Kastner, recipe submitted by TK member Jennifer of Jennifer Cooks.

The sugars will begin to melt after a few minutes. When the walnuts are toasty, light brown and covered with the melted sugar, they’re done.


Tasty Kitchen Blog: Spring Greens with Pears, Sugared Walnuts & Gorgonzola. Guest post by Erica Kastner, recipe submitted by TK member Jennifer of Jennifer Cooks.

Remove to wax paper (I used parchment) and allow to cool.


Tasty Kitchen Blog: Spring Greens with Pears, Sugared Walnuts & Gorgonzola. Guest post by Erica Kastner, recipe submitted by TK member Jennifer of Jennifer Cooks.

Now make the salad dressing: In a small jar place the olive oil, red wine vinegar, sugar, salt …


Tasty Kitchen Blog: Spring Greens with Pears, Sugared Walnuts & Gorgonzola. Guest post by Erica Kastner, recipe submitted by TK member Jennifer of Jennifer Cooks.

And garlic powder.


Tasty Kitchen Blog: Spring Greens with Pears, Sugared Walnuts & Gorgonzola. Guest post by Erica Kastner, recipe submitted by TK member Jennifer of Jennifer Cooks.

Screw on the lid and shake like mad until well combined.


Tasty Kitchen Blog: Spring Greens with Pears, Sugared Walnuts & Gorgonzola. Guest post by Erica Kastner, recipe submitted by TK member Jennifer of Jennifer Cooks.

Thinly slice your pear.


Tasty Kitchen Blog: Spring Greens with Pears, Sugared Walnuts & Gorgonzola. Guest post by Erica Kastner, recipe submitted by TK member Jennifer of Jennifer Cooks.

Now it’s time to assemble your salad. Put your greens in a bowl.


Tasty Kitchen Blog: Spring Greens with Pears, Sugared Walnuts & Gorgonzola. Guest post by Erica Kastner, recipe submitted by TK member Jennifer of Jennifer Cooks.

Add the sliced pears …


Tasty Kitchen Blog: Spring Greens with Pears, Sugared Walnuts & Gorgonzola. Guest post by Erica Kastner, recipe submitted by TK member Jennifer of Jennifer Cooks.

Sugared walnuts …


Tasty Kitchen Blog: Spring Greens with Pears, Sugared Walnuts & Gorgonzola. Guest post by Erica Kastner, recipe submitted by TK member Jennifer of Jennifer Cooks.

Homemade salad dressing …


Tasty Kitchen Blog: Spring Greens with Pears, Sugared Walnuts & Gorgonzola. Guest post by Erica Kastner, recipe submitted by TK member Jennifer of Jennifer Cooks.

And gorgonzola cheese.


Tasty Kitchen Blog: Spring Greens with Pears, Sugared Walnuts & Gorgonzola. Guest post by Erica Kastner, recipe submitted by TK member Jennifer of Jennifer Cooks.

Isn’t that prettiest thing you ever did see?


Tasty Kitchen Blog: Spring Greens with Pears, Sugared Walnuts & Gorgonzola. Guest post by Erica Kastner, recipe submitted by TK member Jennifer of Jennifer Cooks.

Recipe Notes:

1. Because I wasn’t taking this salad to a large gathering, I only fixed myself a small bowl. If you want to mix up a big bowl, I would suggest not adding the toppings until just before serving.
2. I thought the vinaigrette was lovely, but Reuben thought it was a bit sour. You could decrease the amount of vinegar if you prefer a milder dressing. 

 
Thanks so much to Jennifer for sharing this lovely recipe with us. Make sure to check out her blog, Jennifer Cooks, for many more recipes. Her Greek Tostados have my mouth watering.


Printable Recipe

See post on Jennifer | JenniferCooks.com’s site!
5.00 Mitt(s) 8 Rating(s)8 votes, average: 5.00 out of 58 votes, average: 5.00 out of 58 votes, average: 5.00 out of 58 votes, average: 5.00 out of 58 votes, average: 5.00 out of 5

Prep Time:

Cook Time:

Difficulty: Easy

Servings: 4

4
x

Print Options

Page size Letter 3x5 4x6
Text Size Small Medium Large
Content Include description
Include prep time, etc.
Show image

Description

I love all kinds of salad and this one is no exception! I also love gorgonzola and bleu cheese.

Ingredients

  • 6 cups Spring Mix Salad Greens
  • 2 whole Red Pears, Cored And Thinly Sliced
  • Your Choice Of Fresh Herbs, To Taste (optional)
  • 8 ounces, weight Gorgonzola Cheese, Coarsely Crumbled
  • 1 cup Walnut Halves
  • 2 Tablespoons White Sugar
  • 2 Tablespoons Brown Sugar
  • _____
  • FOR THE DRESSING:
  • ½ cups Oil
  • ⅓ cups Red Wine Vinegar
  • 2 Tablespoons Sugar
  • ½ teaspoons Ground Mustard
  • ½ teaspoons Salt
  • ¼ teaspoons Garlic Powder

Preparation Instructions

Salad: Combine spring greens, pears and herbs (if desired) in a large salad bowl. Top with cooled sugared walnuts.

Right before serving, toss salad with desired amount of dressing. Add gorgonzola crumbles at the very last, tossing lightly to incorporate into the salad.

Sugared walnuts: In a small pan, saute walnuts and white and brown sugar over medium heat until walnuts are caramelized, stirring often (they will be light brown and coated with melted sugar), approximately 4-6 minutes. Spread the walnuts on foil or waxed paper. After they cool, break apart.

For the dressing: Combine oil, vinegar, sugar, mustard, salt and garlic powder in a jar or container with a lid and shake well. Pour the dressing over the salad and toss.


_______________________________________

Newly-married Erica Kastner shares her wonderful recipes and amazing food photography on her blog, Cooking for Seven. She also writes about crafts and posts more of her beautiful photography in her personal blog, EricaLea.com. There really isn’t much that this amazing young lady can’t do, and we’re thrilled she does some of it here.


Profile photo of twopeasandtheirpod

Chocolate Chunk Cookie Dough Frozen Yogurt

Posted by in Step-by-Step Recipes

Tasty Kitchen Blog: Chocolate Chunk Cookie Dough Frozen Yogurt. Guest post by Maria Lichty of Two Peas and Their Pod, recipe submitted by TK member Anna of Crunchy Creamy Sweet.

 
Cookies are my all time favorite dessert, that is no secret. Well, my second favorite dessert is frozen yogurt. So when I saw Anna’s recipe for Chocolate Chunk Cookie Dough Frozen Yogurt my eyes almost popped out of my head. My two favorite treats combined in one recipe—a dream come true! And the best part? You don’t even need an ice cream maker to make this dreamy frozen yogurt. It is so easy to make! The hardest part is letting it chill in the freezer. I am not patient, especially when desserts are involved. But I promise this Chocolate Chunk Cookie Dough Frozen Yogurt is well worth the wait! 


Tasty Kitchen Blog: Chocolate Chunk Cookie Dough Frozen Yogurt. Guest post by Maria Lichty of Two Peas and Their Pod, recipe submitted by TK member Anna of Crunchy Creamy Sweet.

Let’s get started! To make it, you will need: butter, dark brown sugar, granulated sugar, vanilla extract, flour, baking soda, salt, chocolate chips or chunks, and vanilla yogurt. 


Tasty Kitchen Blog: Chocolate Chunk Cookie Dough Frozen Yogurt. Guest post by Maria Lichty of Two Peas and Their Pod, recipe submitted by TK member Anna of Crunchy Creamy Sweet.

In the bowl of a stand mixer, combine the butter and sugars. 


Tasty Kitchen Blog: Chocolate Chunk Cookie Dough Frozen Yogurt. Guest post by Maria Lichty of Two Peas and Their Pod, recipe submitted by TK member Anna of Crunchy Creamy Sweet.

Beat until light and fluffy. 


Tasty Kitchen Blog: Chocolate Chunk Cookie Dough Frozen Yogurt. Guest post by Maria Lichty of Two Peas and Their Pod, recipe submitted by TK member Anna of Crunchy Creamy Sweet.

Add the vanilla extract and mix until smooth.


Tasty Kitchen Blog: Chocolate Chunk Cookie Dough Frozen Yogurt. Guest post by Maria Lichty of Two Peas and Their Pod, recipe submitted by TK member Anna of Crunchy Creamy Sweet.

In a small mixing bowl, combine flour and baking soda.


Tasty Kitchen Blog: Chocolate Chunk Cookie Dough Frozen Yogurt. Guest post by Maria Lichty of Two Peas and Their Pod, recipe submitted by TK member Anna of Crunchy Creamy Sweet.

Add in the salt. 


Tasty Kitchen Blog: Chocolate Chunk Cookie Dough Frozen Yogurt. Guest post by Maria Lichty of Two Peas and Their Pod, recipe submitted by TK member Anna of Crunchy Creamy Sweet.

Whisk all of the dry ingredients together. 


Tasty Kitchen Blog: Chocolate Chunk Cookie Dough Frozen Yogurt. Guest post by Maria Lichty of Two Peas and Their Pod, recipe submitted by TK member Anna of Crunchy Creamy Sweet.

Add the chocolate chips and stir. 


Tasty Kitchen Blog: Chocolate Chunk Cookie Dough Frozen Yogurt. Guest post by Maria Lichty of Two Peas and Their Pod, recipe submitted by TK member Anna of Crunchy Creamy Sweet.

Add the flour and chocolate chip mixture to the butter mixture and fold gently. 


Tasty Kitchen Blog: Chocolate Chunk Cookie Dough Frozen Yogurt. Guest post by Maria Lichty of Two Peas and Their Pod, recipe submitted by TK member Anna of Crunchy Creamy Sweet.

Stir until combined. 


Tasty Kitchen Blog: Chocolate Chunk Cookie Dough Frozen Yogurt. Guest post by Maria Lichty of Two Peas and Their Pod, recipe submitted by TK member Anna of Crunchy Creamy Sweet.

Add the yogurt. 


Tasty Kitchen Blog: Chocolate Chunk Cookie Dough Frozen Yogurt. Guest post by Maria Lichty of Two Peas and Their Pod, recipe submitted by TK member Anna of Crunchy Creamy Sweet.

Stir until smooth. 


Tasty Kitchen Blog: Chocolate Chunk Cookie Dough Frozen Yogurt. Guest post by Maria Lichty of Two Peas and Their Pod, recipe submitted by TK member Anna of Crunchy Creamy Sweet.

Place in a container and cover with a lid. Freeze until set, preferably overnight. 


Tasty Kitchen Blog: Chocolate Chunk Cookie Dough Frozen Yogurt. Guest post by Maria Lichty of Two Peas and Their Pod, recipe submitted by TK member Anna of Crunchy Creamy Sweet.

Remove from the freezer and serve. 


Tasty Kitchen Blog: Chocolate Chunk Cookie Dough Frozen Yogurt. Guest post by Maria Lichty of Two Peas and Their Pod, recipe submitted by TK member Anna of Crunchy Creamy Sweet.

Enjoy! 


Tasty Kitchen Blog: Chocolate Chunk Cookie Dough Frozen Yogurt. Guest post by Maria Lichty of Two Peas and Their Pod, recipe submitted by TK member Anna of Crunchy Creamy Sweet.

The frozen yogurt is rich, creamy, and oh so sweet. It tastes just like cookie dough but in frozen form. I love how simple it is to make. I am going to have to keep our freezer stocked with this frozen yogurt! It is the perfect cool-down treat for a hot summer day. 

Thanks Anna for sharing your Chocolate Chunk Cookie Dough Frozen Yogurt. I am off to eat another scoop now! Make sure you visit Anna’s blog Crunchy Creamy Sweet for other fun and delicious recipes!


Printable Recipe

Chocolate Chunk Cookie Dough Frozen Yogurt

See post on Anna’s site!
5.00 Mitt(s) 8 Rating(s)8 votes, average: 5.00 out of 58 votes, average: 5.00 out of 58 votes, average: 5.00 out of 58 votes, average: 5.00 out of 58 votes, average: 5.00 out of 5

Prep Time:

Cook Time:

Difficulty: Easy

Servings: 4

4
x

Print Options

Page size Letter 3x5 4x6
Text Size Small Medium Large
Content Include description
Include prep time, etc.
Show image

Description

Your favorite cookie dough meets frozen yogurt for a perfect treat on a hot day!

Ingredients

  • ½ cups Unsalted Butter, Softened
  • ½ cups Packed Dark Brown Sugar
  • ¼ cups Granulated Sugar
  • 2 teaspoons Vanilla Extract
  • 1 cup All-purpose Flour
  • ¼ teaspoons Baking Soda
  • ¼ teaspoons Salt
  • ¾ cups Mini Chocolate Chips Or Chunks
  • 1 cup Vanilla Yogurt

Preparation Instructions

In a mixing bowl of a stand mixer, beat the butter and both sugars together until light and fluffy. Add vanilla and beat until combined.

In a small mixing bowl, whisk together the flour, soda and salt. Add the chocolate chips or chunks and stir.

Add the flour and chocolate mixture to butter mixture and fold in gently. Add yogurt and stir again.

Place in a container and cover with lid. Freeze until set, preferably overnight.

Cookie dough recipe adapted from Better Homes and Gardens Bridal Edition Cookbook.

Makes about 2 cups.


_______________________________________

Maria and her husband Josh (who she affectionately refers to as her “dough boy”) blog at Two Peas and Their Pod. They’ve been featured on Saveur, Eatocracy, Gourmet Live, Glamour, and the Los Angeles Times, to name just a few. They’d also just recently added a little pea to their pod. We’re so glad to have them here!


Profile photo of missamy

Lime Olive Oil Muffins

Posted by in Baking, Step-by-Step Recipes

  When I saw the recipe for these Lime Olive Oil Muffins from Tasty Kitchen member Rachel, I thought it sounded interesting. Having never baked with olive oil before, I wasn’t quite sure what to expect. But I was pleasantly surprised that there was no hint of olive oil in the taste, and as a […]