
No Reviews
You must be logged in to post a review.
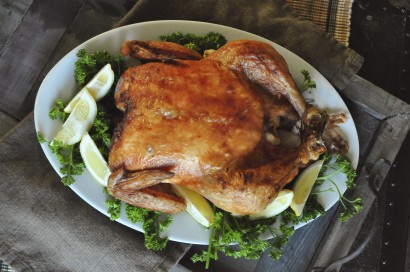
Juicy, moist and with crispy skin this bird is perfect!
1. Preheat the oven to 400˚F.
2. Remove the chicken from the packaging and pull out the yucky stuff (neck, liver etc.). I usually just toss it but if you like chicken livers, save them, by all means. I know they are very good for you, but I can’t stand the taste of them so you won’t find any recipes for them here. The neck of course comes in handy for soup, so you CAN pop that into a freezer bag and save it.
3. Rinse chicken and pat dry.
4. Sprinkle the cavity with kosher salt and pepper. Then, this is the part that makes it taste like a brined bird, you are going to run your hands under the skin on the breast side and separate it from the meat, all the way down. Once the skin is separated, but still attached to the bird, get a small handful of kosher salt, about two teaspoons per breast and smear it all over the meat, under the skin.
5. Next stuff the cavity of the bird with lemon wedges, onion wedges and garlic. Just cram as much in there as you can and then truss the legs with kitchen twine, just so you keep all the stuff in the cavity. I don’t get fancy with the trussing for this, I pretty much just cross the legs and tie them. No big deal.
6. For the pan, just about anything with a rim will work, so long as you can put a wire rack in to keep the bird out of the juices. Lately I have been too lazy to get my big roasting pan down from the top of the cupboard so I have just been using a rimmed baking sheet with a wire rack in it and it works great. Place the bird in the pan on the rack, legs up.
7. Using a pastry brush, baste the bird with a good layer of soft butter.
8. Place it in the preheated oven, basting about every 20-25 minutes with more of the soft butter, until a meat thermometer inserted in the thickest part of the breast registers about 178˚ degrees F. Martha Stewart recommends 180˚, but I feel like the breast is just a touch dry at 180˚ so I remove it from the oven once it is comfortably past 175˚. Mine usually takes close to two hours to get up to temperature. If you are not at high altitude you can likely count on a little less time. I would guess maybe an hour and a half.
9. If you want to make a simple gravy from the pan juices, move the chicken to a cutting board or serving platter and allow to rest while you make the gravy. Pour the drippings from the roasting pan into a saucepan or fry pan over medium heat.
10. Toss in the flour and stir until it turns to a thick paste.
11. To have a nice smooth gravy you must add the liquid slowly, stirring the whole time. So start with about a 1/4 cup chicken stock and pour that into the pan with the flour mixture, stirring as you go. Once it is smooth add another 1/4 cup and again, stir until smooth, repeat until all the stock has been added or you get the consistency you desire. If you need more than 2 cups stock, by all means, add more, likewise, if you get the consistency you want before all the stock has been added, then stop. Add a little salt and pepper and you’re good to go.
12. To serve you can carve the chicken ahead of time and place it on a platter or just put the whole thing on the table and let everyone dig in.
Enjoy!
Prep: Cook:
Serves: 4 Level: Easy
Prep: Cook:
Serves: 4 Level: Easy

Prep: Cook:
Serves: 4 Level: Easy

Prep: Cook:
Serves: 12 Level: Easy
Prep: Cook:
Serves: 8 Level: Easy


No Comments
Leave a Comment!
You must be logged in to post a comment.