The Pioneer Woman Tasty Kitchen
Profile photo of cookincanuck

Lemon and Garlic Drenched Brussels Sprouts

Posted by in Step-by-Step Recipes

Tasty Kitchen Blog: Lemon and Garlic Drenched Brussels Sprouts Guest post by Dara Michalski of Cookin' Canuck, recipe submitted by TK member Gaby of What's Gaby Cooking.

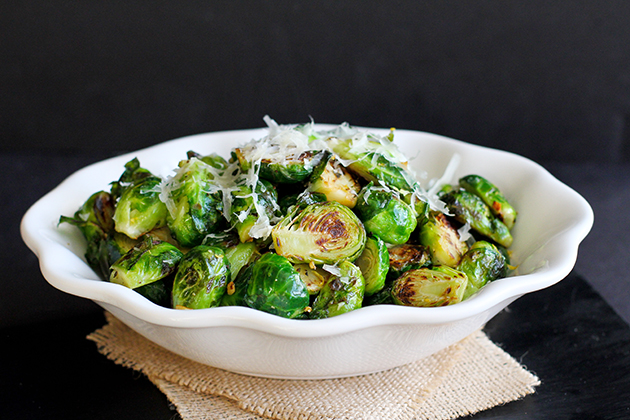
Looking for a side dish that you can make throughout the fall and winter? These Lemon and Garlic Drenched Brussels Sprouts by Tasty Kitchen member Gaby will fit the bill. Honestly, it’s hard to resist anything that’s drenched in lemon and garlic.

If you have never been a fan of Brussels sprouts (and I get it, because I used to feel the same way), I beg you to try this recipe. When the sprouts cook in the olive oil and begin to caramelize, they turn from those unfortunate Brussels sprouts of your childhood into something magically delicious. Trust me on this one.

Let’s get started.

For this recipe, you will Brussels sprouts, olive oil, lemon zest and juice, garlic, salt and pepper. It doesn’t get much easier than that!


Tasty Kitchen Blog: Lemon and Garlic Drenched Brussels Sprouts Guest post by Dara Michalski of Cookin' Canuck, recipe submitted by TK member Gaby of What's Gaby Cooking.

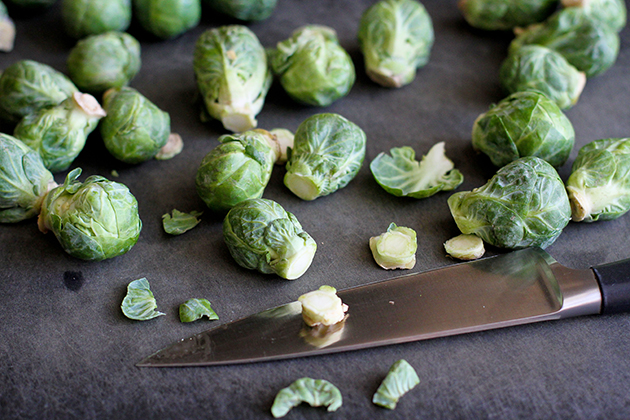
Trim the ends off the Brussels sprouts and remove the outer layer of each sprout. Often, those outer leaves are a little tough or even slightly shriveled, so you want to ditch those.


Tasty Kitchen Blog: Lemon and Garlic Drenched Brussels Sprouts Guest post by Dara Michalski of Cookin' Canuck, recipe submitted by TK member Gaby of What's Gaby Cooking.

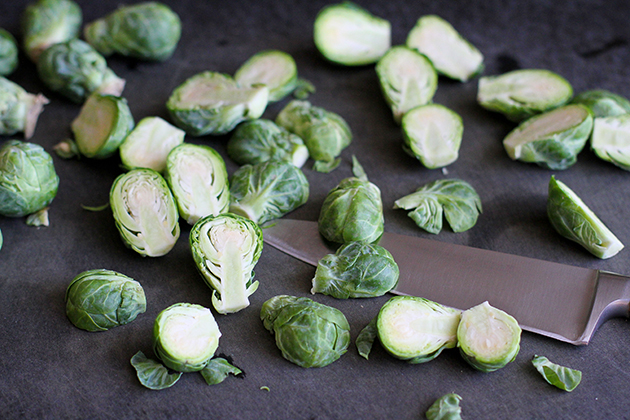
Cut each Brussels sprout in half lengthwise. This will help them cook faster and makes for a really pretty presentation.


Tasty Kitchen Blog: Lemon and Garlic Drenched Brussels Sprouts Guest post by Dara Michalski of Cookin' Canuck, recipe submitted by TK member Gaby of What's Gaby Cooking.

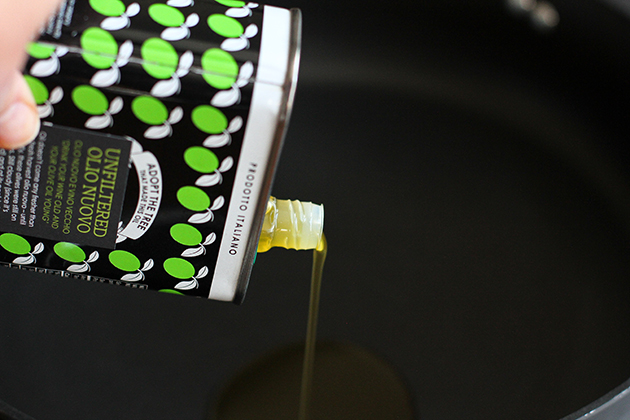
Pour the olive oil in a large skillet set over medium heat and let the oil get hot.


Tasty Kitchen Blog: Lemon and Garlic Drenched Brussels Sprouts Guest post by Dara Michalski of Cookin' Canuck, recipe submitted by TK member Gaby of What's Gaby Cooking.

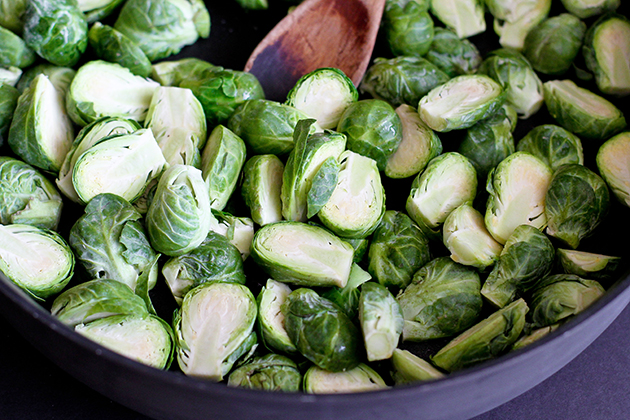
Add the Brussels sprouts and cook, stirring occasionally, until the sprouts start to caramelize and turn that gorgeous golden brown color. The insides of the Brussels sprouts should be tender when pierced with a fork.


Tasty Kitchen Blog: Lemon and Garlic Drenched Brussels Sprouts Guest post by Dara Michalski of Cookin' Canuck, recipe submitted by TK member Gaby of What's Gaby Cooking.

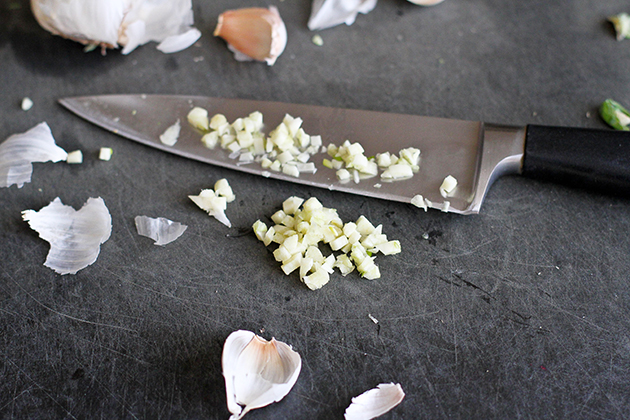
While the Brussels sprouts are cooking, mince some garlic.


Tasty Kitchen Blog: Lemon and Garlic Drenched Brussels Sprouts Guest post by Dara Michalski of Cookin' Canuck, recipe submitted by TK member Gaby of What's Gaby Cooking.

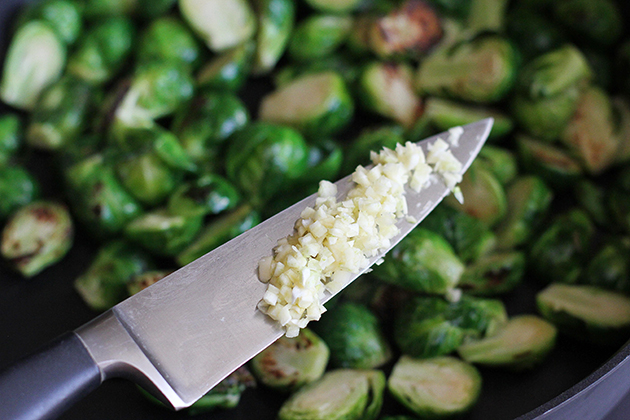
Add all of that fragrant garlic to the sprouts about halfway through cooking. Now it’s time to do some more frequent stirring so that the garlic doesn’t burn.


Tasty Kitchen Blog: Lemon and Garlic Drenched Brussels Sprouts Guest post by Dara Michalski of Cookin' Canuck, recipe submitted by TK member Gaby of What's Gaby Cooking.

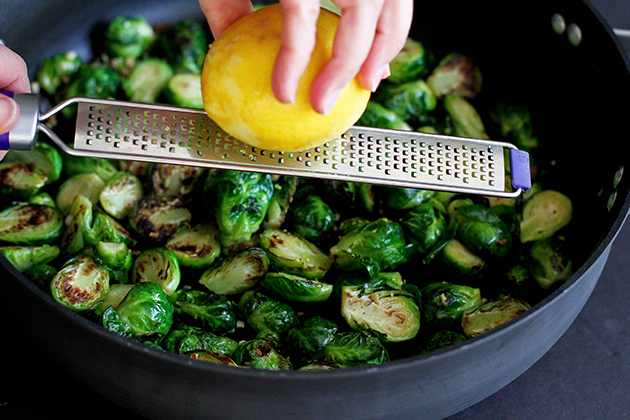
Once the Brussels sprouts are cooked, turn the heat to low and grate in the lemon zest. This adds an amazing bright flavor!


Tasty Kitchen Blog: Lemon and Garlic Drenched Brussels Sprouts Guest post by Dara Michalski of Cookin' Canuck, recipe submitted by TK member Gaby of What's Gaby Cooking.

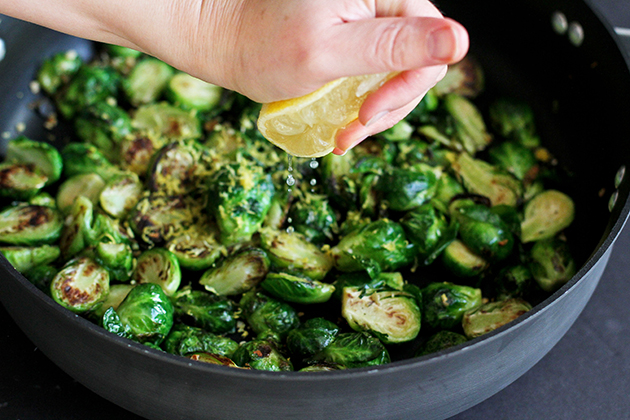
Squeeze the lemon juice into the pan and stir well to coat the sprouts.


Tasty Kitchen Blog: Lemon and Garlic Drenched Brussels Sprouts Guest post by Dara Michalski of Cookin' Canuck, recipe submitted by TK member Gaby of What's Gaby Cooking.

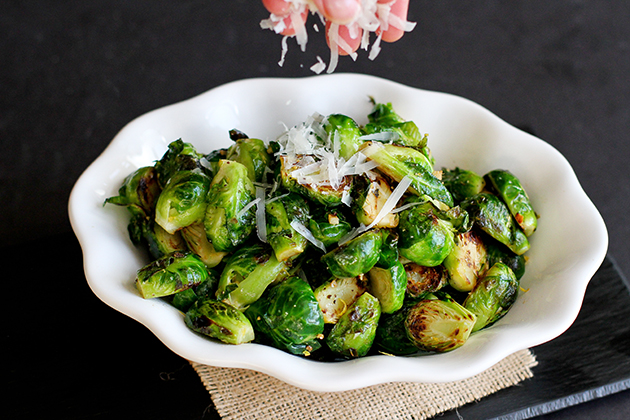
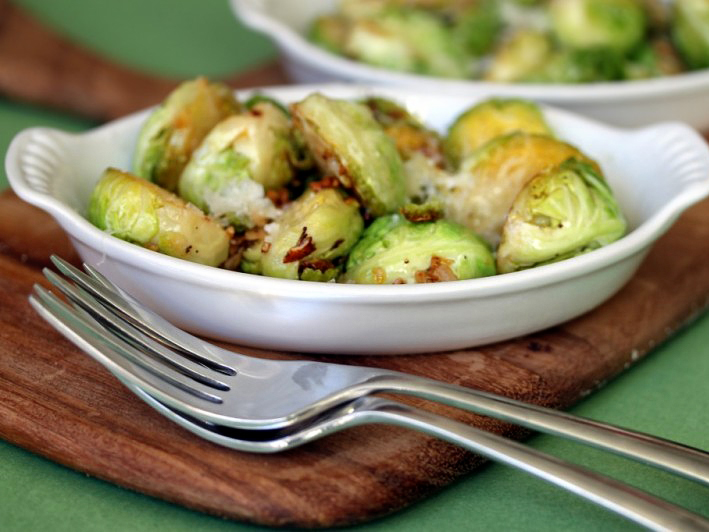
Transfer the Brussels sprouts to a serving dish and sprinkle that nutty grated Gruyere cheese over top. Heavenly!


Tasty Kitchen Blog: Lemon and Garlic Drenched Brussels Sprouts Guest post by Dara Michalski of Cookin' Canuck, recipe submitted by TK member Gaby of What's Gaby Cooking.

Thanks so much to Gaby for this wonderful recipe. Be sure to check out her site, What’s Gaby Cooking. It is filled with recipes that will make you ravenously hungry. Her Caramel Brownies and Avocado Mushroom Toast are making my mouth water!


Printable Recipe

Lemon and Garlic Drenched Brussels Sprouts

See post on whatsgabycooking’s site!
5.00 Mitt(s) 4 Rating(s)4 votes, average: 5.00 out of 54 votes, average: 5.00 out of 54 votes, average: 5.00 out of 54 votes, average: 5.00 out of 54 votes, average: 5.00 out of 5

Prep Time:

Cook Time:

Difficulty: Easy

Servings: 2

2
x

Print Options

Page size Letter 3x5 4x6
Text Size Small Medium Large
Content Include description
Include prep time, etc.
Show image

Description

These lemon-and-garlic-coated Brussels sprouts are healthy, delicious and the perfect side dish for starting off the new year!

Ingredients

  • 2 pounds Brussels Sprouts
  • 4 Tablespoons Olive Oil
  • 5 cloves Garlic
  • 1 whole Lemon, Zest And Juice
  • 3 Tablespoons Gruyere
  • Salt And Pepper, to taste

Preparation Instructions

Clean the Brussels sprouts by trimming off the ends and peeling the outer layer of the sprout off. Cut each one in half. Heat the oil in a large skillet over medium high heat. Once heated, add the halved Brussels sprouts to the pan and saute for about 7-8 minutes on each side until the outer part is a caramelized brown and the inside is soft and fully cooked. Add the garlic halfway through the cooking. Reduce the heat to low and add the lemon zest, juice, salt and pepper. Stir to combine and taste. Adjust seasoning if needed. Add the cheese on top and serve.


_______________________________________

Dara Michalski is a doll and a sweetheart who clearly knows her way around the kitchen. She blogs at Cookin’ Canuck, where she shares her flavor-packed recipes and fun, engaging writing. The photography’s pretty incredible, too.


Profile photo of cookincanuck

Sweet Potato Tuna Patties

Posted by in Step-by-Step Recipes

Tasty Kitchen Blog: Sweet Potato Tuna Patties. Guest post by Dara Michalski of Cookin' Canuck, recipe submitted by TK member Olivia of Primavera Kitchen.

As soon as autumn hits, my craving for sweet potatoes sets in. I will eat them any way them come, whether mashed, baked, twice-baked or roasted. So, when I saw “sweet potato” in the title of these Sweet Potato Tuna Patties by Tasty Kitchen member Olivia, my curiosity was piqued. In fact, I ran straight out to the store to buy the ingredients.

If you’ve ever had tuna or salmon patties, be prepared for the tuna patty that will spoil you forever. From the natural sweetness of the potatoes to the zing of the chili powder, this is a recipe that you will want to make over and over again.

If you have leftovers, store them in an airtight container in the refrigerator, then reheat in a 350ºF oven when ready to eat.

Let’s get started.


Tasty Kitchen Blog: Sweet Potato Tuna Patties. Guest post by Dara Michalski of Cookin' Canuck, recipe submitted by TK member Olivia of Primavera Kitchen.

For this recipe, you will need sweet potatoes, canned tuna, green onions, breadcrumbs (gluten-free, if you prefer), eggs, red onion, yellow pepper, garlic powder, chili powder, salt and pepper.


Tasty Kitchen Blog: Sweet Potato Tuna Patties. Guest post by Dara Michalski of Cookin' Canuck, recipe submitted by TK member Olivia of Primavera Kitchen.

Chop the sweet potatoes and boil them until tender when pierced with a fork, about 10 to 15 minutes. Drain and run them under cold water. This will stop them from cooking further and will cool the mixture down so that the eggs don’t cook when added. That wouldn’t be pretty!


Tasty Kitchen Blog: Sweet Potato Tuna Patties. Guest post by Dara Michalski of Cookin' Canuck, recipe submitted by TK member Olivia of Primavera Kitchen.

Transfer the sweet potatoes to a large bowl and mash with the back of a fork.


Tasty Kitchen Blog: Sweet Potato Tuna Patties. Guest post by Dara Michalski of Cookin' Canuck, recipe submitted by TK member Olivia of Primavera Kitchen.

Add the tuna …


Tasty Kitchen Blog: Sweet Potato Tuna Patties. Guest post by Dara Michalski of Cookin' Canuck, recipe submitted by TK member Olivia of Primavera Kitchen.

Green onions …


Tasty Kitchen Blog: Sweet Potato Tuna Patties. Guest post by Dara Michalski of Cookin' Canuck, recipe submitted by TK member Olivia of Primavera Kitchen.

Breadcrumbs (use gluten-free breadcrumbs if you prefer) …


Tasty Kitchen Blog: Sweet Potato Tuna Patties. Guest post by Dara Michalski of Cookin' Canuck, recipe submitted by TK member Olivia of Primavera Kitchen.

Eggs, chopped red onions …


Tasty Kitchen Blog: Sweet Potato Tuna Patties. Guest post by Dara Michalski of Cookin' Canuck, recipe submitted by TK member Olivia of Primavera Kitchen.

Garlic powder, chili powder, salt and pepper. What a fabulous punch of flavor!


Tasty Kitchen Blog: Sweet Potato Tuna Patties. Guest post by Dara Michalski of Cookin' Canuck, recipe submitted by TK member Olivia of Primavera Kitchen.

Using your hands, shape the mixture into patties. You could make mini ones for appetizer-sized patties, or larger ones for a dinner portion. I made my patties about 1/2 inch thick each and a few inches wide. Perfect for dinnertime!


Tasty Kitchen Blog: Sweet Potato Tuna Patties. Guest post by Dara Michalski of Cookin' Canuck, recipe submitted by TK member Olivia of Primavera Kitchen.

Heat a large nonstick skillet over medium-high heat and lightly coat with cooking spray. Cook the patties until perfectly golden brown, about 3 minutes per side. Serve.


Tasty Kitchen Blog: Sweet Potato Tuna Patties. Guest post by Dara Michalski of Cookin' Canuck, recipe submitted by TK member Olivia of Primavera Kitchen.

Thanks so much to Olivia for this wonderful recipe. Be sure to check out her site, Primavera Kitchen. It is filled with healthy recipes that are packed with flavor. Her Kale Sneak In Meatballs and Baked Potato with Lemon Shrimp are on my must-make list for this month.


Printable Recipe

Sweet Potato Tuna Patties

See post on Olivia @Primavera Kitchen’s site!
5.00 Mitt(s) 1 Rating(s)1 vote, average: 5.00 out of 51 vote, average: 5.00 out of 51 vote, average: 5.00 out of 51 vote, average: 5.00 out of 51 vote, average: 5.00 out of 5

Prep Time:

Cook Time:

Difficulty: Easy

Servings: 8

8
x

Print Options

Page size Letter 3x5 4x6
Text Size Small Medium Large
Content Include description
Include prep time, etc.
Show image

Description

These Sweet Potato Tuna Patties are very soft inside and crisp on the outside. It is a delicious, easy, quick and healthy appetizer recipe!

Ingredients

  • 2  Medium-sized Sweet Potatoes, Peeled And Sliced Into Chunks
  • 2 cans (180 Gram Size) Chunked Tuna In Water, Drained And Flaked
  • ½ cups Chopped Green Onions
  • ½ cups Gluten-free Breadcrumbs
  • 2 whole Eggs
  • ½ cups Diced Red Onions
  • 1-½ cup Diced Yellow Pepper
  • ½ teaspoons Garlic Powder
  • ¼ teaspoons Chili Pepper
  • Salt And Pepper For Taste
  • Olive Oil Cooking Spray

Preparation Instructions

Fill a medium pan halfway full of water. Bring water to a boil and add sweet potatoes. Cook them for about 10-15 minutes or until tender. Drain and run them under cold running water. Transfer to a large bowl and mash with a fork.

Add the tuna, green onions, breadcrumbs, eggs, red onions, yellow pepper, garlic powder, chili pepper, salt and pepper. Mix well until the all ingredients are combined. Use your hands to shape mixture into your preferred size patties.

Heat a non-stick frying pan over medium-high heat and add cooking spray. Cook patties for 3 minutes per side or until golden brown.


_______________________________________

Dara Michalski is a doll and a sweetheart who clearly knows her way around the kitchen. She blogs at Cookin’ Canuck, where she shares her flavor-packed recipes and fun, engaging writing. The photography’s pretty incredible, too.


Profile photo of cookincanuck

Grilled Buffalo Chicken Quesadillas

Posted by in Step-by-Step Recipes

Tasty Kitchen Blog: Grilled Buffalo Chicken Quesadillas. Guest post by Dara Michalski of Cookin' Canuck, recipe submitted by TK member Phoebe of Feed Me Phoebe.

Whether you are tail-gating, hosting a party, or planning an easy weeknight dinner, you can never go wrong with Buffalo chicken. As much as I love a basket of crispy Buffalo wings, sometimes I’m looking for something a little lighter to satisfy my craving. This recipe for Grilled Buffalo Chicken Quesadillas by Tasty Kitchen member Phoebe caught my eye right away. All of the flavors of Buffalo chicken in a cheesy, crispy package? Count me in!

If you don’t have an outdoor grill—or if grilling season is already over where you are—no need to worry. These quesadillas can also be made in a grill pan on your stovetop.

Let’s get started.


Tasty Kitchen Blog: Grilled Buffalo Chicken Quesadillas. Guest post by Dara Michalski of Cookin' Canuck, recipe submitted by TK member Phoebe of Feed Me Phoebe.

For this recipe, you will need chicken breasts, olive oil, celery, coconut oil, hot sauce, nonfat Greek yogurt, garlic, lemon juice, taco-sized tortillas, red onion, cheddar cheese, salt and pepper.


Tasty Kitchen Blog: Grilled Buffalo Chicken Quesadillas. Guest post by Dara Michalski of Cookin' Canuck, recipe submitted by TK member Phoebe of Feed Me Phoebe.

Heat a grill pan or outdoor grill to medium-high heat. Drizzle the chicken with olive oil, and season with salt and pepper. Grill until just cooked through, about 4 minutes per side. Try not to overcook the chicken so you can avoid dry chicken breasts. Nobody likes dry meat.


Tasty Kitchen Blog: Grilled Buffalo Chicken Quesadillas. Guest post by Dara Michalski of Cookin' Canuck, recipe submitted by TK member Phoebe of Feed Me Phoebe.

Once the chicken is cool enough to touch, chop it up.


Tasty Kitchen Blog: Grilled Buffalo Chicken Quesadillas. Guest post by Dara Michalski of Cookin' Canuck, recipe submitted by TK member Phoebe of Feed Me Phoebe.

Add it to a large bowl, along with the celery and coconut oil. If you’re not a huge fan of the coconut flavor, go easy on the coconut oil or substitute olive oil instead.


Tasty Kitchen Blog: Grilled Buffalo Chicken Quesadillas. Guest post by Dara Michalski of Cookin' Canuck, recipe submitted by TK member Phoebe of Feed Me Phoebe.

Add your favorite hot sauce. This is where things get interesting! Stir to coat the chicken. Taste and add more hot sauce if you like things fiery.


Tasty Kitchen Blog: Grilled Buffalo Chicken Quesadillas. Guest post by Dara Michalski of Cookin' Canuck, recipe submitted by TK member Phoebe of Feed Me Phoebe.

In a medium bowl, make the sauce by whisking together the yogurt, garlic, lemon juice and a bit of salt.


Tasty Kitchen Blog: Grilled Buffalo Chicken Quesadillas. Guest post by Dara Michalski of Cookin' Canuck, recipe submitted by TK member Phoebe of Feed Me Phoebe.

It’s time to put it all together. Arrange the tortillas on a work surface. Slather one side of each tortilla with a scant tablespoon of that awesome yogurt sauce. Cover the sauce with a thin layer of the chicken mixture.


Tasty Kitchen Blog: Grilled Buffalo Chicken Quesadillas. Guest post by Dara Michalski of Cookin' Canuck, recipe submitted by TK member Phoebe of Feed Me Phoebe.

Top the chicken with red onions and cheddar cheese. You can never have enough cheese!


Tasty Kitchen Blog: Grilled Buffalo Chicken Quesadillas. Guest post by Dara Michalski of Cookin' Canuck, recipe submitted by TK member Phoebe of Feed Me Phoebe.

Fold the tortillas in half. Grill them until crispy and browned, about 2 minutes per side. Rotate 90 degrees halfway through cooking each side to get those fancy crosshatch marks.


Tasty Kitchen Blog: Grilled Buffalo Chicken Quesadillas. Guest post by Dara Michalski of Cookin' Canuck, recipe submitted by TK member Phoebe of Feed Me Phoebe.

Cut each quesadilla in half and serve with the remaining yogurt sauce.

Thanks so much to Phoebe for this amazing recipe. Be sure to check out her site, Feed Me Phoebe. It is filled with healthy recipes that will leave you satisfied and craving more. Her Vegan Cauliflower Soup with Red Curry and Healthy Raw Oatmeal Chocolate Chip Cookie Bites are recipes that I will be trying very soon.


Printable Recipe

Grilled Buffalo Chicken Quesadillas

See post on Phoebe Lapine’s site!
5.00 Mitt(s) 1 Rating(s)1 vote, average: 5.00 out of 51 vote, average: 5.00 out of 51 vote, average: 5.00 out of 51 vote, average: 5.00 out of 51 vote, average: 5.00 out of 5

Prep Time:

Cook Time:

Difficulty: Easy

Servings: 4

4
x

Print Options

Page size Letter 3x5 4x6
Text Size Small Medium Large
Content Include description
Include prep time, etc.
Show image

Description

These easy grilled Buffalo chicken quesadillas are a healthy, gluten-free take on the classic bar snack. They make for the perfect summer appetizer recipe.

Ingredients

  • 2  Boneless, Skinless Chicken Breasts
  • Olive Oil
  • Sea Salt And Pepper
  • ¼ cups Thinly Sliced Celery
  • 2 Tablespoons Melted, Extra Virgin Coconut Oil
  • ¼ cups Hot Sauce
  • 6 ounces, weight Nonfat Greek Yogurt
  • 1 clove Garlic, Minced
  • 2 Tablespoons Lemon Juice
  • 6  Taco-sized Corn, Brown Rice, Or Whole Wheat Tortillas
  • ½  Small Red Onion, Thinly Sliced
  • 1 cup Mild Shredded Cheddar Cheese

Preparation Instructions

1. Fire up an indoor grill pan or charcoal grill.
2. Place the chicken breasts on a work surface. Drizzle with olive oil and season with salt and pepper. Grill over medium-high heat, for 4 minutes on each side, rotating 90 degrees halfway through cooking to get a nice crosshatch. Allow the chicken to rest until cool enough to touch. Finely chop the chicken and add to a mixing bowl along with the celery, coconut oil and hot sauce. Toss to combine and taste for seasoning.
3. Meanwhile, in a medium bowl, combine the yogurt, garlic, lemon juice and ½ teaspoon sea salt. Whisk until smooth.
4. To assemble the quesadillas, arrange the tortillas on a clean work surface. Slather one side of each with a scant tablespoon of the yogurt sauce. Arrange a thin layer of the chicken mixture on one half of the tortillas. Top with the onions and cheese. Fold the tortillas in half.
5. Grill the tortillas until crispy and charred, about 2 minutes per side, rotating 90 degrees halfway through to get a nice crosshatch. Cut in half and serve alongside the remaining yogurt sauce.


_______________________________________

Dara Michalski is a doll and a sweetheart who clearly knows her way around the kitchen. She blogs at Cookin’ Canuck, where she shares her flavor-packed recipes and fun, engaging writing. The photography’s pretty incredible, too.


Profile photo of cookincanuck

Chocolate-Dipped Tahini Cookies

Posted by in Step-by-Step Recipes

Tasty Kitchen Blog: Chocolate-Dipped Tahini Cookies. Guest post by Dara Michalski of Cookin' Canuck, recipe submitted by TK member Norma of Allspice and Nutmeg.

When autumn hits and school starts, I start scrambling for cookie and snack ideas to surprise my kids with when they come home from school. These cookies taste like indulgent treats, but are actually packed with goodness. The kids will never suspect a thing!

These easy Chocolate-Dipped Tahini Cookies by Tasty Kitchen member Norma caught my eye and I happened to have everything in my fridge and pantry to make them. If you haven’t used tahini before, think of it as peanut butter-like. Made from sesame seeds, it’s a thick spread that is used in Middle Eastern and Mediterranean cooking. Tahini can be found in most grocery stores, usually near the peanut butter.

The tahini is just one part of these cookies. There’s crunch from chopped almonds, chewiness from oats and sweetness from a heavenly dip of chocolate.

Let’s get started.


Tasty Kitchen Blog: Chocolate-Dipped Tahini Cookies. Guest post by Dara Michalski of Cookin' Canuck, recipe submitted by TK member Norma of Allspice and Nutmeg.

For this recipe, you will need oats, cinnamon, dark chocolate, almonds, pitted dates, tahini (sesame paste), honey, maple syrup, brewed coffee and chocolate chips.

Preheat the oven to 350ºF. Line a rimmed baking sheet with a Silpat or parchment paper.


Tasty Kitchen Blog: Chocolate-Dipped Tahini Cookies. Guest post by Dara Michalski of Cookin' Canuck, recipe submitted by TK member Norma of Allspice and Nutmeg.

In a large bowl, stir together the oats and cinnamon.


Tasty Kitchen Blog: Chocolate-Dipped Tahini Cookies. Guest post by Dara Michalski of Cookin' Canuck, recipe submitted by TK member Norma of Allspice and Nutmeg.

Chop the dark chocolate and add it to the bowl. The pieces don’t have to be perfectly even, so just chop away!


Tasty Kitchen Blog: Chocolate-Dipped Tahini Cookies. Guest post by Dara Michalski of Cookin' Canuck, recipe submitted by TK member Norma of Allspice and Nutmeg.

Add the chopped almonds to the bowl and stir to combine. The almonds add the perfect bit of crunch to the cookies.


Tasty Kitchen Blog: Chocolate-Dipped Tahini Cookies. Guest post by Dara Michalski of Cookin' Canuck, recipe submitted by TK member Norma of Allspice and Nutmeg.

Place the pitted dates in a small bowl and microwave for 25 seconds until soft. Smash the dates with the back of a fork.


Tasty Kitchen Blog: Chocolate-Dipped Tahini Cookies. Guest post by Dara Michalski of Cookin' Canuck, recipe submitted by TK member Norma of Allspice and Nutmeg.

Stir in the tahini, honey, maple syrup and coffee.


Tasty Kitchen Blog: Chocolate-Dipped Tahini Cookies. Guest post by Dara Michalski of Cookin' Canuck, recipe submitted by TK member Norma of Allspice and Nutmeg.

Transfer the tahini mixture to the bowl with the oats.


Tasty Kitchen Blog: Chocolate-Dipped Tahini Cookies. Guest post by Dara Michalski of Cookin' Canuck, recipe submitted by TK member Norma of Allspice and Nutmeg.

Stir well until combined. If you can’t stir properly with a wooden spoon or spatula, get your hands in there and mix it up. A little trick I’ve learned is lightly coating your hands with cooking spray to stop the cookie dough from sticking to your fingers.


Tasty Kitchen Blog: Chocolate-Dipped Tahini Cookies. Guest post by Dara Michalski of Cookin' Canuck, recipe submitted by TK member Norma of Allspice and Nutmeg.

Use a cookie scoop to form 1-inch balls and place them on the prepared baking sheet.


Tasty Kitchen Blog: Chocolate-Dipped Tahini Cookies. Guest post by Dara Michalski of Cookin' Canuck, recipe submitted by TK member Norma of Allspice and Nutmeg.

Use the bottom of a glass or measuring cup to flatten the cookies slightly.


Tasty Kitchen Blog: Chocolate-Dipped Tahini Cookies. Guest post by Dara Michalski of Cookin' Canuck, recipe submitted by TK member Norma of Allspice and Nutmeg.

Bake the cookies until they are golden brown. That should take 15 to 20 minutes. Remove them from the oven and let them cool.


Tasty Kitchen Blog: Chocolate-Dipped Tahini Cookies. Guest post by Dara Michalski of Cookin' Canuck, recipe submitted by TK member Norma of Allspice and Nutmeg.

If you want to dip the cookies in chocolate (and, really, why wouldn’t you?), melt the chocolate chips in a medium bowl. Be sure to do this on 50% heat, stirring every 15 to 20 seconds, so that the chocolate doesn’t separate or burn.

Dip half of each cookie in the melted chocolate. Serve or store in an airtight container, preferably in the fridge.

Thanks so much to Norma for this wonderful recipe! Be sure to check out her site, Allspice and Nutmeg. Her Summer Squash Tacos with Haloumi and Zaatar-Spiced Oven Fries look absolutely amazing.


Printable Recipe

Chocolate Dipped Tahini Cookies

See post on AllspiceAndNutmeg’s site!
0.00 Mitt(s) 0 Rating(s)0 votes, average: 0.00 out of 50 votes, average: 0.00 out of 50 votes, average: 0.00 out of 50 votes, average: 0.00 out of 50 votes, average: 0.00 out of 5

Prep Time:

Cook Time:

Difficulty: Easy

Servings: 12

12
x

Print Options

Page size Letter 3x5 4x6
Text Size Small Medium Large
Content Include description
Include prep time, etc.
Show image

Description

These tahini cookies are brimming with wholesome ingredients like tahini, almonds, dates and oats, then dipped in dark chocolate.

Ingredients

  • 1 cup Old Fashions Oats
  • 1 teaspoon Cinnamon
  • 3 ounces, weight Dark Chocolate, Chopped
  • ¼ cups Chopped Almonds
  • ¼ cups Pitted Dates
  • 1 cup Tahini (sesame Paste)
  • 2 Tablespoons Honey
  • 2 Tablespoons Maple Syrup
  • 1 Tablespoon Brewed Coffee, Cold
  • 1 cup Chocolate Chips, Melted, For Dipping (optional)

Preparation Instructions

Preheat oven to 350ºF. Line a rimmed baking pan with parchment paper or a silpat.

In a large bowl combine the oats, cinnamon, chopped dark chocolate, and chopped almonds.

In a smal bowl microwave the dates for 25 seconds until soft. Smash the dates with a fork then combine with the tahini, honey, maple syrup, and coffee. Pour the tahini mixture into the bowl with the oats. Stir thoroughly to combine. Try to get your hands in there to stir. You’ll be able to more combine everything more thoroughly.

Using a small cookie scoop or a spoon, scoop out enough to form a 1-inch ball. Line the balls up in the pan. Press on each one to flatten. Make them as thick or thin as you like.

Bake at 350ºF for 15 to 20 minutes until golden. Remove from oven and let cool.

If desired, melt chocolate chips according to package directions and dip cookies in melted chocolate. Enjoy!


_______________________________________

Dara Michalski is a doll and a sweetheart who clearly knows her way around the kitchen. She blogs at Cookin’ Canuck, where she shares her flavor-packed recipes and fun, engaging writing. The photography’s pretty incredible, too.


Profile photo of cookincanuck

Coconut Curried Sweet Potato Soup

Posted by in Step-by-Step Recipes

This is the perfect remedy for those cold weather blues. The curry flavors add a depth to this soup, balancing the sweetness of the sweet potato perfectly. It's made with coconut milk rather than cream, so it's vegan to boot.

Profile photo of cookincanuck

Pumpkin Enchiladas

Posted by in Step-by-Step Recipes

  Nothing says “comfort food” quite like pumpkin. While you just can’t beat a creamy pumpkin pie or a batch of pumpkin scones, this tasty squash works just as well in savory dishes. Chicken enchiladas are always a cause for excitement in my house and this healthy Pumpkin Enchiladas version by Tasty Kitchen member Ann, […]

Profile photo of cookincanuck

Farro, Cranberry and Goat Cheese Salad

Posted by in Step-by-Step Recipes

  If you’re like me, you may be skeptical about the “grain of the minute” that comes on the scene and seems to take over every recipe site. While it may seem new to many of us, Italians have been cooking with farro for generations. And you know what? It’s really good! It’s a whole […]

Profile photo of cookincanuck

Raw Cauliflower Couscous

Posted by in Step-by-Step Recipes

  This Raw Cauliflower Couscous recipe shocked the heck out of me. When I first looked at the list of ingredients, I thought, “Okay, I like all of these things. But raw? Shouldn’t I roast them or something?” It turns out that Tasty Kitchen member Spontaneous Hausfrau knew what she was doing when she grated […]