No Reviews
You must be logged in to post a review.

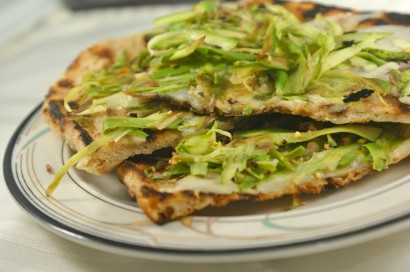
A grilled pizza, charred and blistered to perfection, and topped with garlic oil, Parmesan and Iberico cheeses, and a heavenly shaved asparagus salad. It tastes complicated, but it comes together fast, and it’ll make you dance.
Note: The prep times listed above don’t reflect making the pizza dough. I wanted to include the dough recipe because it’s awesome, but you can still make this delicious pizza with store-bought dough. I won’t tell!
To make the pizza:
1. Preheat your grill to medium heat.
2. In a small saucepan over the lowest heat you can manage on your stove, combine the olive oil and garlic cloves. Let this mixture stew for a good 20 minutes so the flavors can marry. Check on it every few minutes, giving the pan a good swirl, to ensure that the garlic doesn’t brown. We want the flavors to cook out, but not sauté. When it is done to your liking, remove the pan from the heat and set aside to cool.
3. Once the oil is cooled, fish out the garlic cloves (you’ve made garlic confit!). Either chop them into small pieces, or leave them whole. Those babies are going on the pizza. I opted for chopped for more garlic coverage.
4. Using a vegetable peeler, shave the asparagus stalks into beautiful ribbons (or hack into ribbon-like bits, if you’re me). You can use the woody ends as a handle and discard them once you’ve shaved the stalk down to the nub. In a medium bowl, combine the asparagus ribbons, lemon juice, salt, pepper, and red pepper flakes. Toss to combine.
5. On a pizza peel or large cutting board, stretch your pizza dough to your desired shape and thickness. I did most of my dough stretching on my fists, letting gravity do the work. The gluten in the dough was so relaxed, that it pretty much melted over my hands. I also opted for a very thin dough, since the crispy texture you get from the grill goes best with a thin crust.
From here on out, things happen fast, so make sure you have everything prepped and ready to go – tongs, plates, brushes, etc. at the ready.
6. Brush the shaped dough with the garlic oil. Carefully (it’s going to stretch, it’s ok, it doesn’t have to be pretty) lay the pizza dough with the oiled side down on the grill. While that side cooks, brush the top of the dough with more garlic oil. Using tongs, peak under the dough after about 2 minutes to check doneness. You want some nice char marks, but you don’t want it to burn. When it’s ready, flip the dough over. Working quickly because this is going to cook fast, sprinkle the garlic over the dough. Then sprinkle the parmesan and Iberico cheeses. Then top with as much of the asparagus as you think fits nicely without too much heaping (I heaped quite a bit because I’m like that). Close the lid on the grill and let it cook for 2 minutes. Check the pizza to see if the cheese has melted. If it hasn’t, keep cooking it covered until it melts. Once it’s melted and the underside of the dough is nicely charred, remove it from the grill.
7. Slice and enjoy!
To make the pizza dough:
Note: This dough makes six portions, and requires overnight rising, so plan accordingly!
1. In the bowl of a stand mixer fitted with the paddle attachment, stir together the flours, salt, and yeast on the slowest setting until mixed. Stream in the oil, and then 1 ¾ cups of the cold water. Switch to the dough hook and mix on medium speed. The dough should clear the sides of the bowl but stick to the bottom of the bowl. If it is too dry, add the remaining water, a tablespoon or so at a time until it sticks appropriately. Continue mixing for 5 to 7 minutes, or until the dough is smooth and sticky, and a small piece passes the window pane test (to tell if the gluten has fully developed). The finished dough will be springy, elastic, and sticky, but not just tacky.
2. Transfer the dough to a floured countertop, and portion into 6 equal pieces (I used a scale because I’m like that). Mold each into a ball, creating some nice surface tension (Peter Reinhart and I are all about surface tension). Rub each ball with olive oil and seal each into a Ziplock bag. Refrigerate overnight (or up to a few days). Alternatively, you can freeze the dough balls at this point – just thaw them in the refrigerator when you’re ready to use them.
3. The next day remove the desired number of dough balls from the refrigerator at least 1 hour before making the pizza (I’d suggest 2 hours unless it’s a hot day). Leave them in their plastic bags, so they don’t dry out. I like to turn my oven on for literally a minute, then turn it off and put the dough inside. It’s slightly warmer than room temperature, so they wake up nicely.
4. When you’re ready to shape the dough, on a floured surface, press it gently with your fingers into a round disk. Balance the disk on your fists and gently work the dough apart as evenly as possible. You can also use your hands to stretch it. If the dough is not cooperating, it means the gluten isn’t relaxed enough, and letting it rest for 15-20 minutes should help.
No Comments
Leave a Comment!
You must be logged in to post a comment.