The Pioneer Woman Tasty Kitchen
Profile photo of Natalie | Perry's Plate

Butternut and Black Bean Enchilada Skillet

Posted by in Step-by-Step Recipes

Tasty Kitchen Blog: Butternut and Black Bean Enchilada Skillet. Guest post by Natalie Perry of Perry's Plate, recipe submitted by TK member Monique of Ambitious Kitchen.

 
After having my third baby last summer, I’m beginning to understand the desperation I sometimes hear from moms who want fast, easy meals. Because I love to cook, spending 15 minutes chopping vegetables isn’t a big deal to me, but it is if I have a baby crying at my feet (or strapped to my chest), and two other small children begging for snacks and/or tormenting each other. 

I can’t imagine what that’s like for someone who dislikes being in the kitchen. What a frightening thought.

For that reason, finding meals like this easy and fairly quick Butternut and Black Bean Enchilada Skillet really make my day. (And days down the road when I’m ready to pick up the phone and order pizza.) Let’s all give TK member Monique a great, big virtual hug for adding to our weeknight repertoire!


Tasty Kitchen Blog: Butternut and Black Bean Enchilada Skillet. Guest post by Natalie Perry of Perry's Plate, recipe submitted by TK member Monique of Ambitious Kitchen.

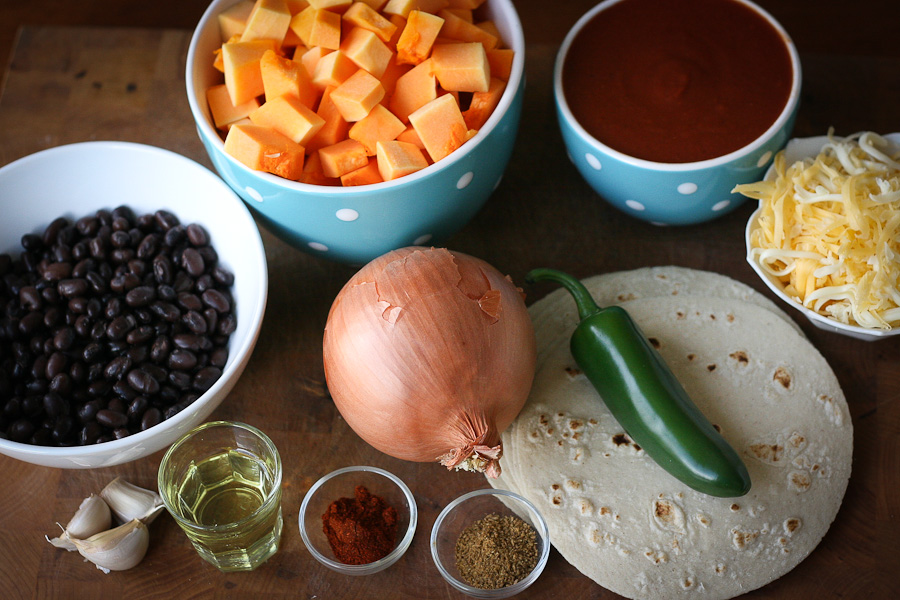
Here’s what you need: butternut squash, black beans, enchilada sauce, grated cheese, a jalapeno, some corn tortillas (I used a wheat-corn blend), an onion, cumin, chili powder, garlic cloves, and heat-safe oil (like coconut or grapeseed oil).


Tasty Kitchen Blog: Butternut and Black Bean Enchilada Skillet. Guest post by Natalie Perry of Perry's Plate, recipe submitted by TK member Monique of Ambitious Kitchen.

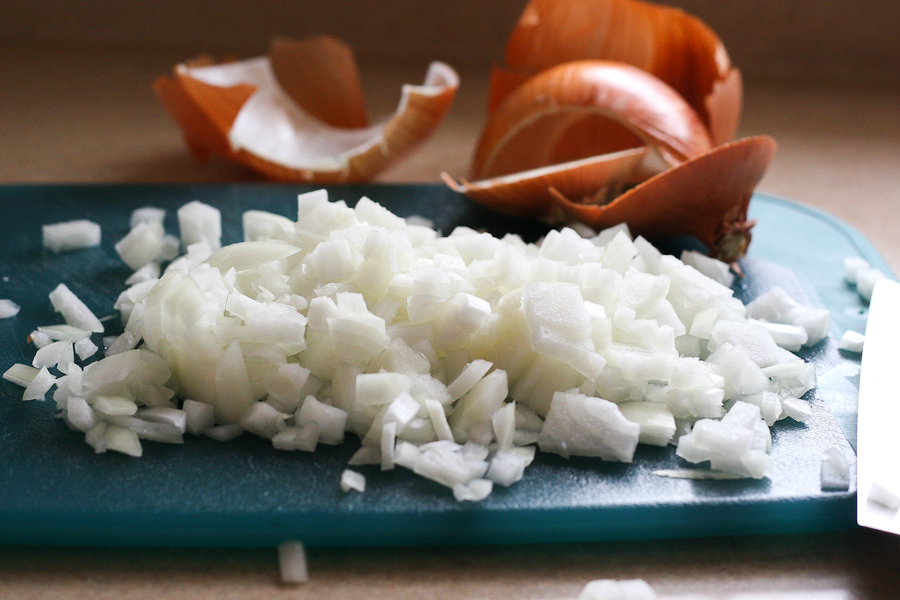
First, dice the onion.


Tasty Kitchen Blog: Butternut and Black Bean Enchilada Skillet. Guest post by Natalie Perry of Perry's Plate, recipe submitted by TK member Monique of Ambitious Kitchen.

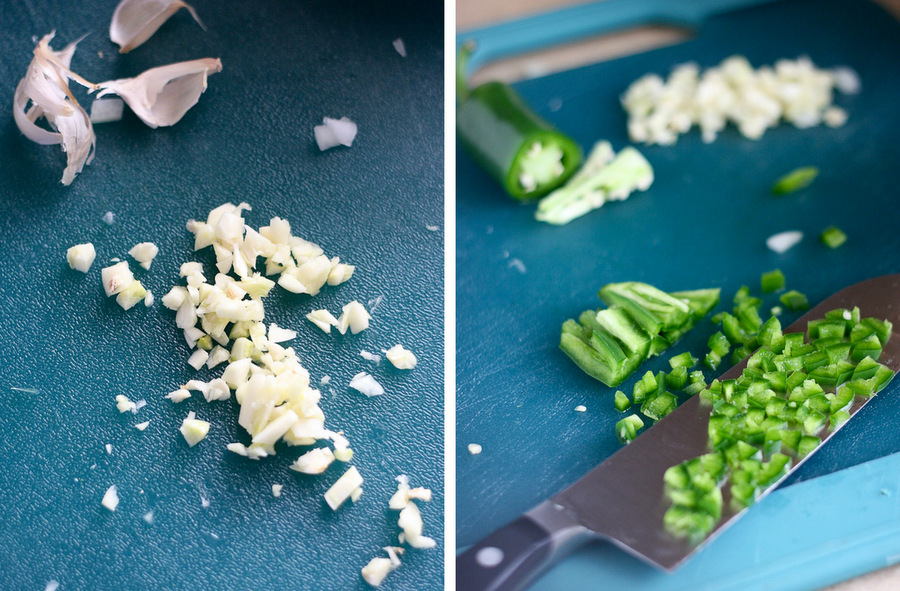
Chop the garlic and half the jalapeno. (Save the rest for later!)


Tasty Kitchen Blog: Butternut and Black Bean Enchilada Skillet. Guest post by Natalie Perry of Perry's Plate, recipe submitted by TK member Monique of Ambitious Kitchen.

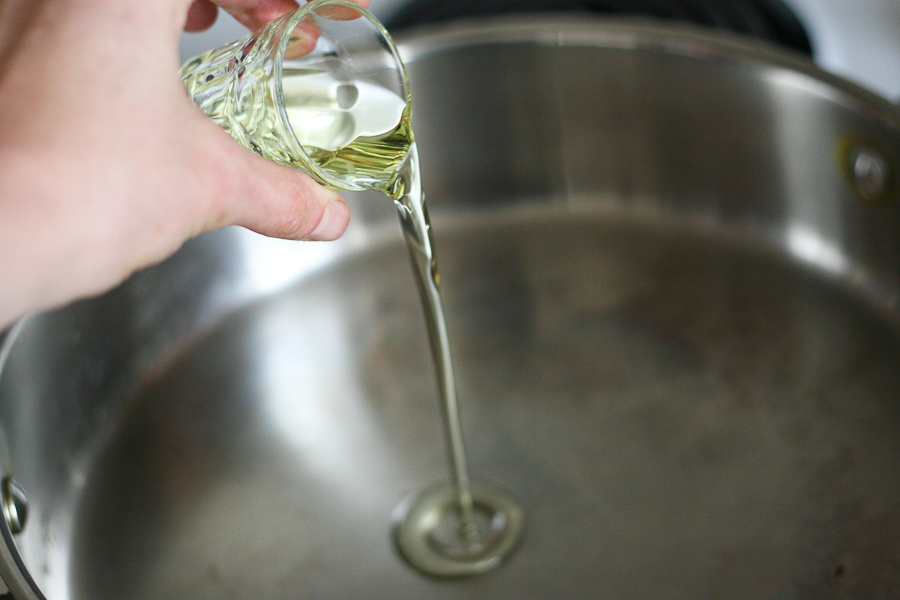
Pour the oil into a large, oven-proof skillet and bring to medium-high heat.


Tasty Kitchen Blog: Butternut and Black Bean Enchilada Skillet. Guest post by Natalie Perry of Perry's Plate, recipe submitted by TK member Monique of Ambitious Kitchen.

Throw in the chopped onion, garlic, and jalapeno.


Tasty Kitchen Blog: Butternut and Black Bean Enchilada Skillet. Guest post by Natalie Perry of Perry's Plate, recipe submitted by TK member Monique of Ambitious Kitchen.

Saute for 3-4 minutes until the onion becomes soft and translucent.


Tasty Kitchen Blog: Butternut and Black Bean Enchilada Skillet. Guest post by Natalie Perry of Perry's Plate, recipe submitted by TK member Monique of Ambitious Kitchen.

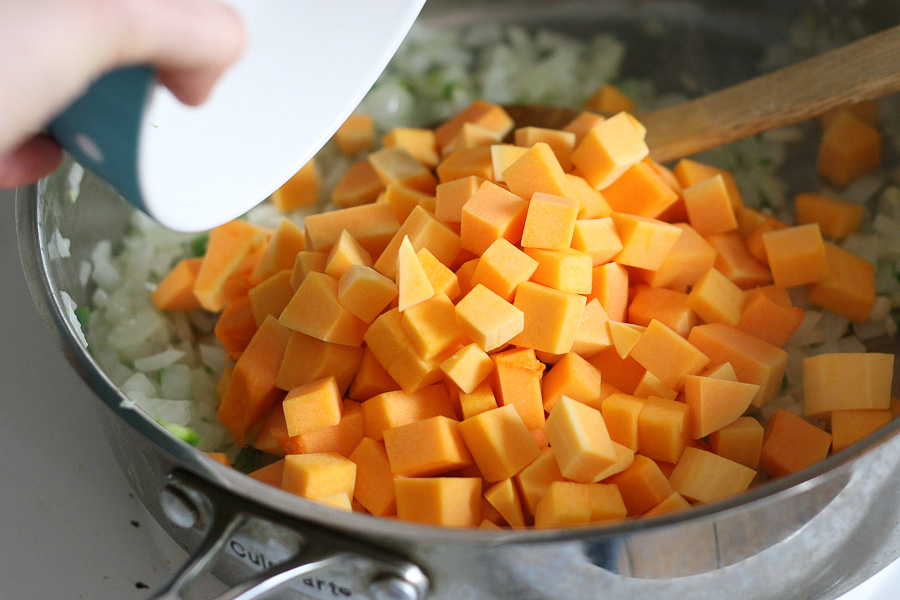
Add that gorgeous squash. You can find butternut squash pre-diced, which isn’t a bad idea, considering the manual labor it takes to peel and chop one. 


Tasty Kitchen Blog: Butternut and Black Bean Enchilada Skillet. Guest post by Natalie Perry of Perry's Plate, recipe submitted by TK member Monique of Ambitious Kitchen.

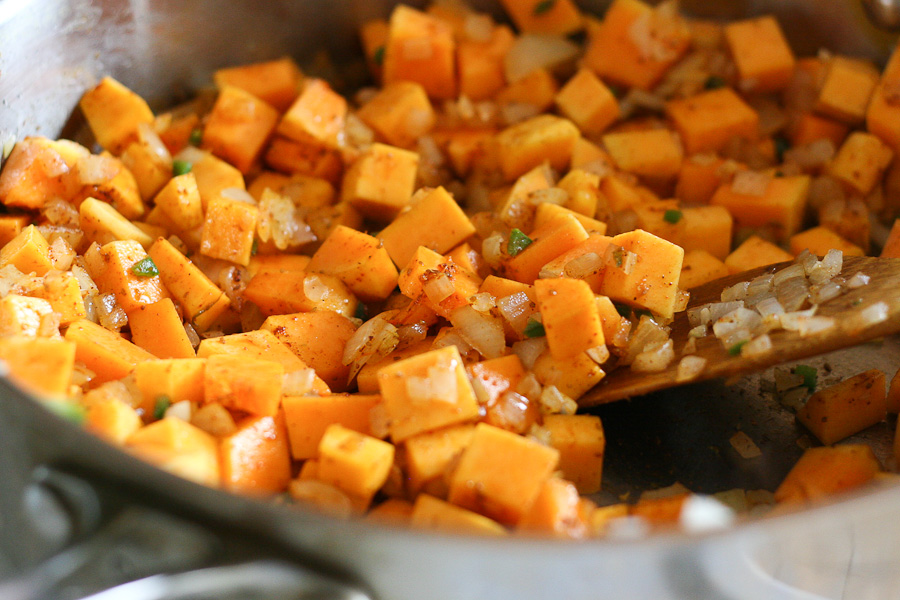
Add the chili powder and cumin, as well as a few generous pinches of salt and black pepper.


Tasty Kitchen Blog: Butternut and Black Bean Enchilada Skillet. Guest post by Natalie Perry of Perry's Plate, recipe submitted by TK member Monique of Ambitious Kitchen.

At this point, you’re supposed to cook it for 8-10 minutes until the squash is fork-tender. I may have diced my squash too large because after 4-5 minutes, it was still rock-hard. 


Tasty Kitchen Blog: Butternut and Black Bean Enchilada Skillet. Guest post by Natalie Perry of Perry's Plate, recipe submitted by TK member Monique of Ambitious Kitchen.

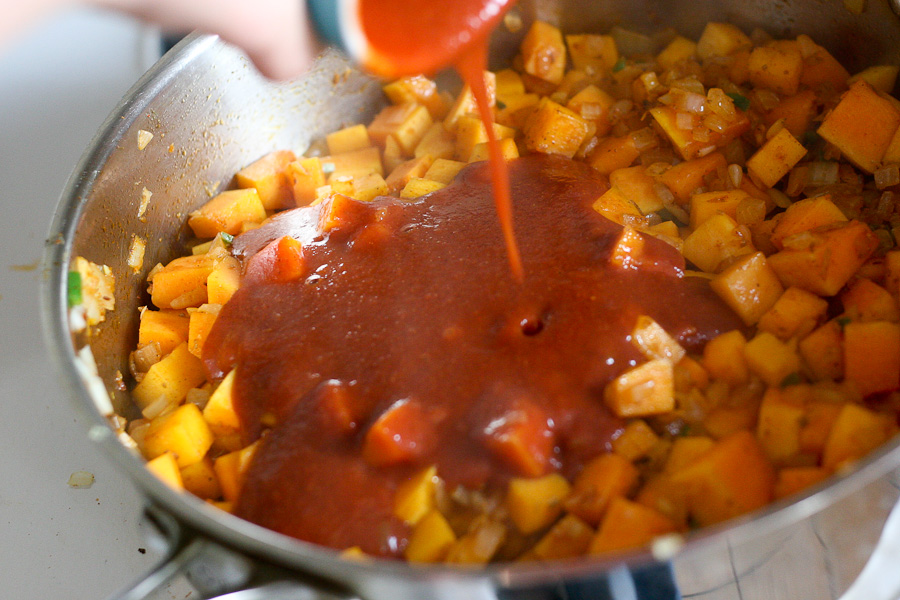
Here’s where some improvisation may be handy. If this also happens to you, add the enchilada sauce, cover the pan, and bring the temperature down to medium-low. Add a little water if too much evaporates. The squash will cook perfectly without sticking to the pan or burning before the center is cooked!


Tasty Kitchen Blog: Butternut and Black Bean Enchilada Skillet. Guest post by Natalie Perry of Perry's Plate, recipe submitted by TK member Monique of Ambitious Kitchen.

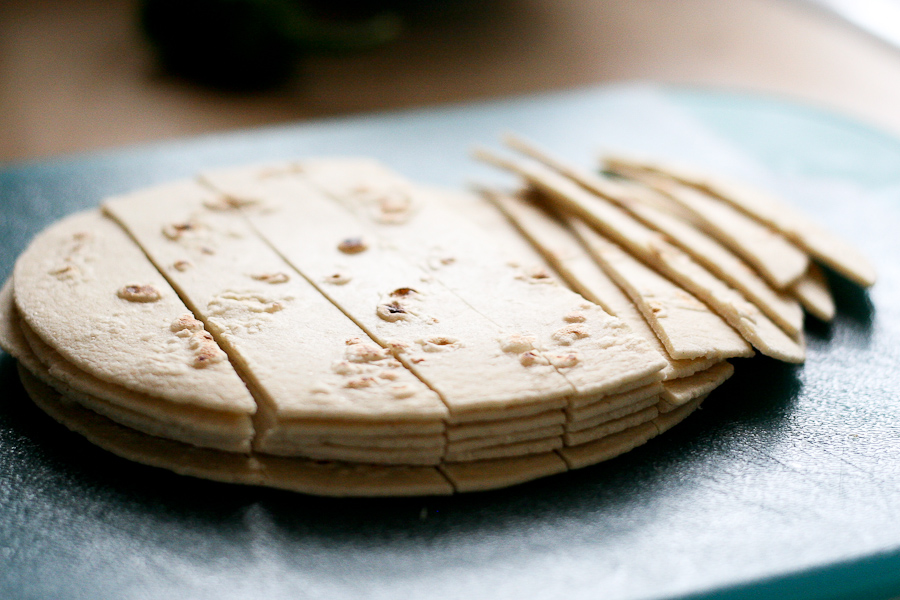
While the squash is simmering away, cut the tortillas into strips. I used a wheat-corn blend, which were slightly thicker than regular corn tortillas. I only used 6, but I will reduce the number even more when I make this again. 


Tasty Kitchen Blog: Butternut and Black Bean Enchilada Skillet. Guest post by Natalie Perry of Perry's Plate, recipe submitted by TK member Monique of Ambitious Kitchen.

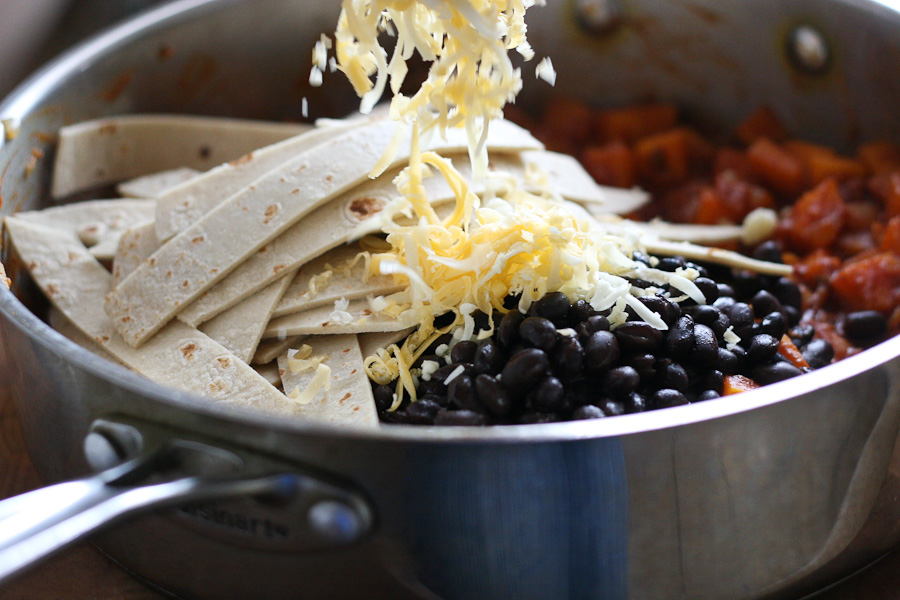
Add the tortillas and beans to the skillet. Oh, and most of the cheese!


Tasty Kitchen Blog: Butternut and Black Bean Enchilada Skillet. Guest post by Natalie Perry of Perry's Plate, recipe submitted by TK member Monique of Ambitious Kitchen.

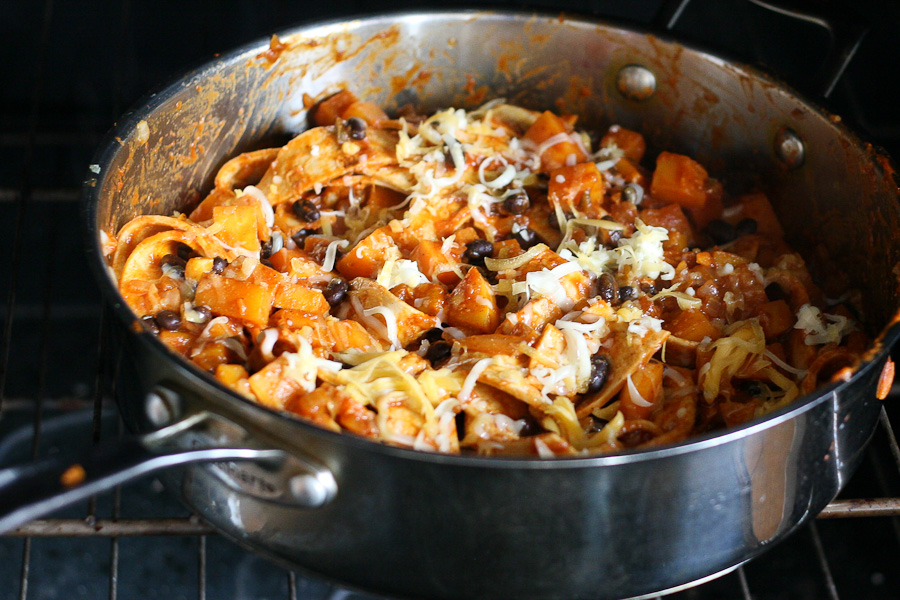
Stir it up, and cook it for a couple more minute until the tortillas get softer and everything is combined well. Taste, and season with salt and pepper if necessary. Sprinkle the remaining cheese over top, and stick it under the broiler for a few minutes.


Tasty Kitchen Blog: Butternut and Black Bean Enchilada Skillet. Guest post by Natalie Perry of Perry's Plate, recipe submitted by TK member Monique of Ambitious Kitchen.

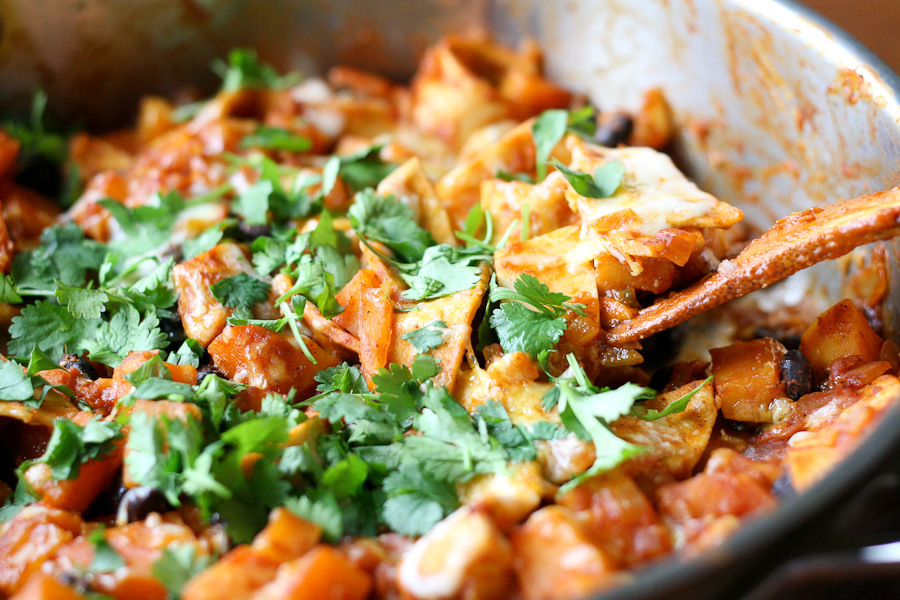
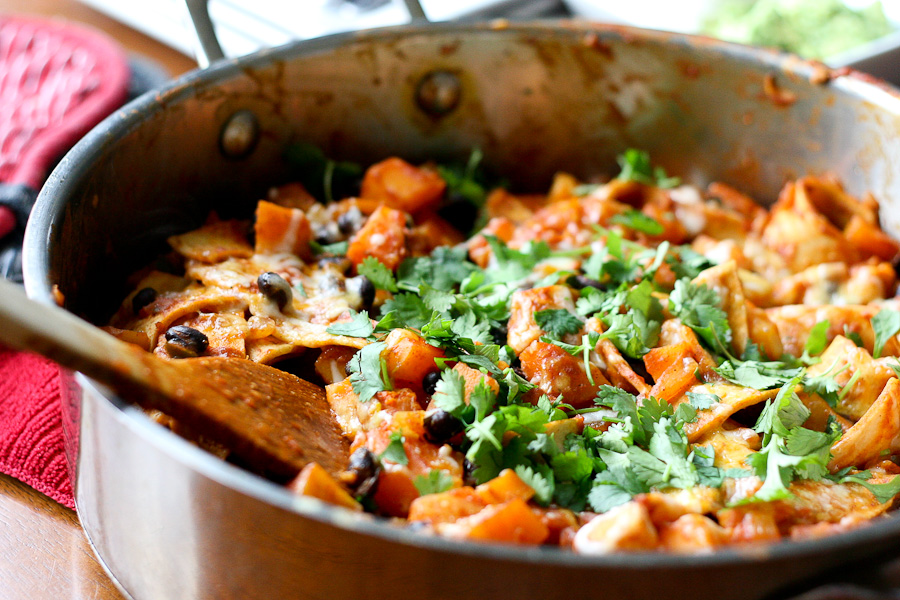
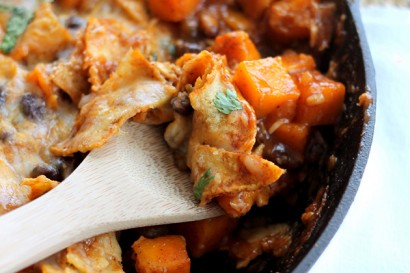
Sprinkle some freshly chopped cilantro on top, and dig in!

We loved this with homemade guacamole, sour cream, and some lime wedges. (Most things in my life can be improved with those three things…)


Tasty Kitchen Blog: Butternut and Black Bean Enchilada Skillet. Guest post by Natalie Perry of Perry's Plate, recipe submitted by TK member Monique of Ambitious Kitchen.

Thank you Monique! Please check out Monique’s quickly growing TK Recipe Box as well as her beautiful blog, Ambitious Kitchen. You’ll find the complete recipe and instructions below.


Printable Recipe

Butternut Squash and Black Bean Enchilada Skillet

See post on Monique of Ambitious Kitchen’s site!
4.96 Mitt(s) 24 Rating(s)24 votes, average: 4.96 out of 524 votes, average: 4.96 out of 524 votes, average: 4.96 out of 524 votes, average: 4.96 out of 524 votes, average: 4.96 out of 5

Prep Time:

Cook Time:

Difficulty: Easy

Servings: 6

6
x

Print Options

Page size Letter 3x5 4x6
Text Size Small Medium Large
Content Include description
Include prep time, etc.
Show image

Description

Put a spin on Mexican night with this healthy, vegetarian skillet dish. Ready in 30 minutes!

Ingredients

  • 2 teaspoons Olive Oil
  • 1  Medium Yellow Onion, Diced
  • 3 cloves Garlic, Minced
  • ½  Jalapeno, Seeded And Diced
  • 3 cups 1/2 Inch Diced, Peeled Butternut Squash
  • 1 teaspoon Cumin
  • 1 teaspoon Chili Powder
  • Salt And Pepper To Season
  • 1 can (15 Oz. Size) Black Beans, Rinsed And Drained
  • 8  Yellow Corn Tortillas (taco Size), Cut Into Thick Strips
  • 1 can (15 Oz. Size) Red Enchilada Sauce
  • 1 cup Reduced-fat Colby Jack Or Mexican Cheese, Divided
  • Cilantro And Low Fat Sour Cream, For Serving

Preparation Instructions

Heat olive oil over medium-high heat in a large oven-proof skillet. Add onions, garlic, and jalapeno and cook 2-3 minutes until onions become translucent and garlic is fragrant. Add cubed squash, cumin and chili powder and season with salt and pepper. Cook, stirring occasionally, until the squash is slightly tender, 8 to 10 minutes. You want the squash to be fork tender, but not so tender that it starts to fall apart and become mush.

Next add the black beans, corn tortilla pieces, and can of enchilada sauce and stir to combine. Reduce heat to medium-low and sprinkle in 1/2 cup of cheese. Stir again and simmer for a few minutes until everything is nice and melted.

Turn your oven broiler to high. Sprinkle an additional 1/2 cup of cheese over the top of the enchilada mixture and place in the oven under broiler for 3-5 minutes until cheese melts and tortilla edges become a bit golden brown. Remove from heat and serve immediately.

Serve with sour cream, cilantro, guacamole, or hot sauce!


_______________________________________

Be sure to check out Natalie’s own beautiful food blog, Perrys’ Plate, where you can see her growing collection of lovely recipes. There’s always something new to see there. Go visit now!


Profile photo of Natalie | Perry's Plate

Gingered Butternut Squash Soup with Beet Slaw

Posted by in Step-by-Step Recipes

Tasty Kitchen Blog: Gingered Butternut Squash Soup. Guest post by Natalie Perry of Perry's Plate, recipe submitted by TK member Julia of The Roasted Root.

 
Friends, this may be the most beautiful soup I’ve ever made. Or photographed. Or eaten. The lovely TK member Julia at The Roasted Root definitely has an eye for color and a wonderful sense for taste. This soup was one of those recipes that grabbed me and wouldn’t let go. 

Luckily, it’s fall. I’d have had a hard time finding a butternut squash in April.


Tasty Kitchen Blog: Gingered Butternut Squash Soup. Guest post by Natalie Perry of Perry's Plate, recipe submitted by TK member Julia of The Roasted Root.

Speaking of butternut squash, if you’ve got one, (carefully) chop it in half. You’ll need a very sharp knife for this. Butternuts don’t give in easily.


Tasty Kitchen Blog: Gingered Butternut Squash Soup. Guest post by Natalie Perry of Perry's Plate, recipe submitted by TK member Julia of The Roasted Root.

Scrape out all of the seeds and slimy stuff.


Tasty Kitchen Blog: Gingered Butternut Squash Soup. Guest post by Natalie Perry of Perry's Plate, recipe submitted by TK member Julia of The Roasted Root.

Drizzle some oil on the insides, and sprinkle it with salt.


Tasty Kitchen Blog: Gingered Butternut Squash Soup. Guest post by Natalie Perry of Perry's Plate, recipe submitted by TK member Julia of The Roasted Root.

Place them face-down in a baking dish and place them in the oven for 40-60 minutes, depending on the size of your squash.


Tasty Kitchen Blog: Gingered Butternut Squash Soup. Guest post by Natalie Perry of Perry's Plate, recipe submitted by TK member Julia of The Roasted Root.

Meanwhile, peel the beets and carrots, cut them into chunks and put them in your food processor.


Tasty Kitchen Blog: Gingered Butternut Squash Soup. Guest post by Natalie Perry of Perry's Plate, recipe submitted by TK member Julia of The Roasted Root.

Buzz them up until the pieces are small and slightly smaller than peas. Transfer to large mixing bowl.

Don’t wash the food processor. (I like how Julia thinks.)


Tasty Kitchen Blog: Gingered Butternut Squash Soup. Guest post by Natalie Perry of Perry's Plate, recipe submitted by TK member Julia of The Roasted Root.

Zest a whole orange.

If you don’t have a Microplane zester, stop what you’re doing and go get one. (Make sure someone is home to watch your roasting squash.) I love mine, and use it all the time!


Tasty Kitchen Blog: Gingered Butternut Squash Soup. Guest post by Natalie Perry of Perry's Plate, recipe submitted by TK member Julia of The Roasted Root.

Add the zest to the beet-carrot mixture.


Tasty Kitchen Blog: Gingered Butternut Squash Soup. Guest post by Natalie Perry of Perry's Plate, recipe submitted by TK member Julia of The Roasted Root.

Cut the apples into large chunks.


Tasty Kitchen Blog: Gingered Butternut Squash Soup. Guest post by Natalie Perry of Perry's Plate, recipe submitted by TK member Julia of The Roasted Root.

Add them to the dirty food processor. (Don’t worry, it’ll all work out in the end.) Also, juice the orange you just zested, right over the apples.

Good grief, I need a manicure. Maybe if I hold out long enough I’ll have pink French tips.


Tasty Kitchen Blog: Gingered Butternut Squash Soup. Guest post by Natalie Perry of Perry's Plate, recipe submitted by TK member Julia of The Roasted Root.

Buzz up the apples an orange juice, and dump it into the bowl with the beets and carrots.

Nope, not time to wash the food processor. Hang tight.


Tasty Kitchen Blog: Gingered Butternut Squash Soup. Guest post by Natalie Perry of Perry's Plate, recipe submitted by TK member Julia of The Roasted Root.

Peel and slice the ginger, and throw the ginger pieces into the food processor with the walnuts.

Process them until you have a chunky, finely chopped mixture.


Tasty Kitchen Blog: Gingered Butternut Squash Soup. Guest post by Natalie Perry of Perry's Plate, recipe submitted by TK member Julia of The Roasted Root.

And … you guessed it. Transfer the mixture into the other bowl, along with some unsweetened coconut.


Tasty Kitchen Blog: Gingered Butternut Squash Soup. Guest post by Natalie Perry of Perry's Plate, recipe submitted by TK member Julia of The Roasted Root.

Over that, add some extra-virgin olive oil, a few pinches of salt, and some toasted sesame seeds.


Tasty Kitchen Blog: Gingered Butternut Squash Soup. Guest post by Natalie Perry of Perry's Plate, recipe submitted by TK member Julia of The Roasted Root.

Mix it all together and you have this incredibly flavorful and vibrant garnish for the soup! I love all of the flavors in this salad.

I think my favorite color is beet, too.


Tasty Kitchen Blog: Gingered Butternut Squash Soup. Guest post by Natalie Perry of Perry's Plate, recipe submitted by TK member Julia of The Roasted Root.

Check on that squash now. You’ll know it’s done when you can easily stick a butter knife into it and the skin starts to turn golden brown.


Tasty Kitchen Blog: Gingered Butternut Squash Soup. Guest post by Natalie Perry of Perry's Plate, recipe submitted by TK member Julia of The Roasted Root.

Scrape out all of that soft, butternutty goodness …


Tasty Kitchen Blog: Gingered Butternut Squash Soup. Guest post by Natalie Perry of Perry's Plate, recipe submitted by TK member Julia of The Roasted Root.

And toss it into your blender. Add some of the chicken stock to help it blend.


Tasty Kitchen Blog: Gingered Butternut Squash Soup. Guest post by Natalie Perry of Perry's Plate, recipe submitted by TK member Julia of The Roasted Root.

Give it a whirl until it’s silky smooth.


Tasty Kitchen Blog: Gingered Butternut Squash Soup. Guest post by Natalie Perry of Perry's Plate, recipe submitted by TK member Julia of The Roasted Root.

Pour it into your favorite soup pot along with a can of coconut milk.


Tasty Kitchen Blog: Gingered Butternut Squash Soup. Guest post by Natalie Perry of Perry's Plate, recipe submitted by TK member Julia of The Roasted Root.

Grate some ginger into the pot. If you still don’t have a Microplane, it’s not too late to get one!


Tasty Kitchen Blog: Gingered Butternut Squash Soup. Guest post by Natalie Perry of Perry's Plate, recipe submitted by TK member Julia of The Roasted Root.

Add the cinnamon and salt. (I think next time I’d halve the cinnamon and double the ginger, but that’s just my taste.)


Tasty Kitchen Blog: Gingered Butternut Squash Soup. Guest post by Natalie Perry of Perry's Plate, recipe submitted by TK member Julia of The Roasted Root.

Add more chicken stock until the soup reaches your desired consistency.


Tasty Kitchen Blog: Gingered Butternut Squash Soup. Guest post by Natalie Perry of Perry's Plate, recipe submitted by TK member Julia of The Roasted Root.

Stir it well and heat it to a low boil.


Tasty Kitchen Blog: Gingered Butternut Squash Soup. Guest post by Natalie Perry of Perry's Plate, recipe submitted by TK member Julia of The Roasted Root.

Ladle this gorgeous soup into some bowls, top with a couple spoonfuls of the salad and a drizzle of coconut milk. (Don’t be like me and photo bomb yourself. Unless you really want to.)


Tasty Kitchen Blog: Gingered Butternut Squash Soup. Guest post by Natalie Perry of Perry's Plate, recipe submitted by TK member Julia of The Roasted Root.

I LOVED this soup. It has such a unique flavor, combined with the salad. Please don’t make this without the salad! I think it really takes the soup to a whole new level. (The recipe for the Beet Slaw can be found in Julia’s site. She credits her friend Jason for finding it on a paleo website.)


Tasty Kitchen Blog: Gingered Butternut Squash Soup. Guest post by Natalie Perry of Perry's Plate, recipe submitted by TK member Julia of The Roasted Root.

Thanks again, Julia (and Jason), for a great cleansing-between-rich-meals recipe for the holidays!

Be sure to check out Julia’s Tasty Kitchen Recipe Box as well as her blog, The Roasted Root, for more tasty, nourishing recipes!


Printable Recipe

Gingered Butternut Squash Soup

See post on Julia {The Roasted Root}’s site!
0.00 Mitt(s) 0 Rating(s)0 votes, average: 0.00 out of 50 votes, average: 0.00 out of 50 votes, average: 0.00 out of 50 votes, average: 0.00 out of 50 votes, average: 0.00 out of 5

Prep Time:

Cook Time:

Difficulty: Easy

Servings: 6

6
x

Print Options

Page size Letter 3x5 4x6
Text Size Small Medium Large
Content Include description
Include prep time, etc.
Show image

Description

Simple roasted butternut squash soup with coconut milk, chicken stock ginger, and cinnamon. Easy, nutritious and dairy-free!

Ingredients

  • 1 whole Butternut Squash, Medium-sized
  • Olive Oil, To Drizzle On Seeds
  • ½ teaspoons Salt, Or To Taste
  • 3 teaspoons Fresh Ginger, Grated
  • ½ teaspoons Ground Cinnamon
  • 2 cups Chicken Or Vegetable Broth
  • 1-½ cup Coconut Milk (full-fat Recommended) Or Almond Milk

Preparation Instructions

Preheat the oven to 375ºF. Cut butternut squash in half lengthwise, scoop out the seeds and lightly drizzle the flesh with olive oil and salt. Place squash in a casserole dish cut-side down and bake for 50 to 60 minutes until flesh is very soft and juices are seeping out.

Allow squash to cool and once cool enough to handle, scoop the flesh out and place it in a blender (discard the skin). Add the remaining ingredients to the blender and blend until completely smooth.

Pour the soup into a pot and heat to a low boil.


_______________________________________

Be sure to check out Natalie’s own beautiful food blog, Perrys’ Plate, where you can see her growing collection of lovely recipes. There’s always something new to see there. Go visit now!


Profile photo of Natalie | Perry's Plate

Slow Cooker Korean Short Rib Tacos

Posted by in Step-by-Step Recipes

Tasty Kitchen Blog: Slow Cooker Korean Short Rib Tacos. Guest post by Natalie Perry of Perry's Plate, recipe submitted by TK member Shelbi Keith of Look Who's Cookin' Now.

 
We recently bought half of an organic, grass-fed cow. That’s, like, a whole freezer full of meat, and my mind is reeling at all of the unfamiliar cuts. (My meat selection growing up was limited to ground beef, steak, roasts, and boneless, skinless chicken breasts. I’ve come a long way!) Beef short ribs is one of those cuts, so I wandered around Tasty Kitchen looking for recipes. When I saw TK member Shelbi Keith’s recipe for Crockpot Korean Short Rib Tacos, I knew it was going to be a winner.

Why?

1. Unfamiliar cuts of meat + slow cooker = deliciousness
2. Tacos make my world go round. I love them almost as much as my children.

Let’s start!


Tasty Kitchen Blog: Slow Cooker Korean Short Rib Tacos. Guest post by Natalie Perry of Perry's Plate, recipe submitted by TK member Shelbi Keith of Look Who's Cookin' Now.

Gather up the ingredients for the sauce that goes in the slow cooker with the short ribs: soy sauce (I used tamari), rice vinegar, sesame oil, crushed red pepper flakes, garlic, ginger, and brown sugar (I reduced it to 1/3 cup).


Tasty Kitchen Blog: Slow Cooker Korean Short Rib Tacos. Guest post by Natalie Perry of Perry's Plate, recipe submitted by TK member Shelbi Keith of Look Who's Cookin' Now.

Peel the garlic and ginger and roughly chop them both. For the ginger, I just cut the skin off with a sharp knife. Yes, you may lose some ginger in the process, but the thought of scraping it off with the back of a spoon makes me crazy. So, I slice it off.


Tasty Kitchen Blog: Slow Cooker Korean Short Rib Tacos. Guest post by Natalie Perry of Perry's Plate, recipe submitted by TK member Shelbi Keith of Look Who's Cookin' Now.

Put the garlic and ginger in a food processor and give it a few pulses until it’s nice and minced. You could also mince it really well with a knife. Or use a Microplane grater.


Tasty Kitchen Blog: Slow Cooker Korean Short Rib Tacos. Guest post by Natalie Perry of Perry's Plate, recipe submitted by TK member Shelbi Keith of Look Who's Cookin' Now.

Transfer to a medium-ish bowl. Preferably one with polka dots.


Tasty Kitchen Blog: Slow Cooker Korean Short Rib Tacos. Guest post by Natalie Perry of Perry's Plate, recipe submitted by TK member Shelbi Keith of Look Who's Cookin' Now.

Add the soy sauce …


Tasty Kitchen Blog: Slow Cooker Korean Short Rib Tacos. Guest post by Natalie Perry of Perry's Plate, recipe submitted by TK member Shelbi Keith of Look Who's Cookin' Now.

And the rest of the ingredients: brown sugar, rice vinegar, sesame oil, and crushed red pepper.


Tasty Kitchen Blog: Slow Cooker Korean Short Rib Tacos. Guest post by Natalie Perry of Perry's Plate, recipe submitted by TK member Shelbi Keith of Look Who's Cookin' Now.

Give it a stir. You can make this sauce ahead and keep it in the fridge for several days.


Tasty Kitchen Blog: Slow Cooker Korean Short Rib Tacos. Guest post by Natalie Perry of Perry's Plate, recipe submitted by TK member Shelbi Keith of Look Who's Cookin' Now.

Unwrap your beef short ribs.


Tasty Kitchen Blog: Slow Cooker Korean Short Rib Tacos. Guest post by Natalie Perry of Perry's Plate, recipe submitted by TK member Shelbi Keith of Look Who's Cookin' Now.

Grab the slow cooker your mom used when you were a kid. (Those are the best kind! The newer ones cook way too hot.) Place the ribs inside. I used a 4-quart slow cooker, and it did wonderfully.


Tasty Kitchen Blog: Slow Cooker Korean Short Rib Tacos. Guest post by Natalie Perry of Perry's Plate, recipe submitted by TK member Shelbi Keith of Look Who's Cookin' Now.

Pour that sauce over the ribs, put the lid on, and walk away.

For about 10-12 hours. It took my ribs 11 hours to loosen up and start falling off the bones. It was a lot longer than I anticipated.


Tasty Kitchen Blog: Slow Cooker Korean Short Rib Tacos. Guest post by Natalie Perry of Perry's Plate, recipe submitted by TK member Shelbi Keith of Look Who's Cookin' Now.

So, instead of having these for dinner, I took the meat off the bones, poured the sauce into a container, and went to bed. That’s why the fat is so hard in the photo above. It was nice, though, to be able to remove so much of it. And it made for a nice, quick Saturday lunch the next day!


Tasty Kitchen Blog: Slow Cooker Korean Short Rib Tacos. Guest post by Natalie Perry of Perry's Plate, recipe submitted by TK member Shelbi Keith of Look Who's Cookin' Now.

I had to show you this. This is what the sauce looked like when I removed the fat, after it had sat in the fridge all night. Sort of like a beef broth-soy sauce gelatin. *shudder*


Tasty Kitchen Blog: Slow Cooker Korean Short Rib Tacos. Guest post by Natalie Perry of Perry's Plate, recipe submitted by TK member Shelbi Keith of Look Who's Cookin' Now.

No need to fear, though. I threw the meat into a skillet with about half of the gelatin-ized sauce and after a few minutes it got all juicy-like. Meat’s ready!


Tasty Kitchen Blog: Slow Cooker Korean Short Rib Tacos. Guest post by Natalie Perry of Perry's Plate, recipe submitted by TK member Shelbi Keith of Look Who's Cookin' Now.

Now let’s make the carrot-cucumber slaw to go on top. Don’t slack on this. This taco needs this slaw.

Peel a carrot and a cucumber. (I made more slaw than the recipe suggested and used every bit.)


Tasty Kitchen Blog: Slow Cooker Korean Short Rib Tacos. Guest post by Natalie Perry of Perry's Plate, recipe submitted by TK member Shelbi Keith of Look Who's Cookin' Now.

Julienne them both and place them in a bowl. You can do it by hand or use a julienne blade on a mandoline slicer. I really, really love my mandoline. It’s a dangerous thing for me to have, given my track record with sharp objects, but it makes thin, beautiful, uniform cuts. Totally worth the risk.


Tasty Kitchen Blog: Slow Cooker Korean Short Rib Tacos. Guest post by Natalie Perry of Perry's Plate, recipe submitted by TK member Shelbi Keith of Look Who's Cookin' Now.

The dressing for the slaw is simple: just rice vinegar, sugar, salt, and some crushed red pepper flakes. Combine them in a bowl …


Tasty Kitchen Blog: Slow Cooker Korean Short Rib Tacos. Guest post by Natalie Perry of Perry's Plate, recipe submitted by TK member Shelbi Keith of Look Who's Cookin' Now.

And pour it over the carrots and cucumber. You can do this a couple of hours ahead of time, but if you do it earlier, the cucumbers might get soggy. Toss it around, and it’s ready!


Tasty Kitchen Blog: Slow Cooker Korean Short Rib Tacos. Guest post by Natalie Perry of Perry's Plate, recipe submitted by TK member Shelbi Keith of Look Who's Cookin' Now.

Grab some tortillas and assemble the tacos, placing some slaw over the shredded meat. Top it with some chopped fresh cilantro and you are in business, my friends.


Tasty Kitchen Blog: Slow Cooker Korean Short Rib Tacos. Guest post by Natalie Perry of Perry's Plate, recipe submitted by TK member Shelbi Keith of Look Who's Cookin' Now.

Thank you, thank you, Shelbi for making these tacos a part of my life! They were fantastic and every solid-food-eating member of my family loved them!

Be sure to check out Shelbi’s Tasty Kitchen Recipe Box and her blog, Look Who’s Cookin’ Now for more great recipes! (Her Lime Grilled Steak with Smoky Cilantro Butter is calling my name.)


Printable Recipe

Crockpot Korean Short Rib Tacos

See post on Shelbi Keith’s site!
5.00 Mitt(s) 15 Rating(s)15 votes, average: 5.00 out of 515 votes, average: 5.00 out of 515 votes, average: 5.00 out of 515 votes, average: 5.00 out of 515 votes, average: 5.00 out of 5

Prep Time:

Cook Time:

Difficulty: Easy

Servings: 3

3
x

Print Options

Page size Letter 3x5 4x6
Text Size Small Medium Large
Content Include description
Include prep time, etc.
Show image

Description

After taking one bite, my husband proclaimed this his new favorite meal!

Ingredients

  • FOR THE KOREAN SHORT RIBS:
  • 5 cloves Garlic
  • 1-½ whole Inches Of Ginger, Peeled
  • ¾ cups Soy Sauce
  • ½ cups Plus 3 Tablespoons Brown Sugar
  • 6 Tablespoons Rice Vinegar
  • 2 Tablespoons Sesame Oil
  • 1 teaspoon Red Pepper Flakes
  • 3 pounds Beef Short Ribs
  • FOR THE CUCUMBER SLAW:
  • ½ whole Hot House Cucumber
  • ½ whole Carrot
  • 4 teaspoons Rice Vinegar
  • 1 teaspoon Sugar
  • 2 pinches Salt
  • 1 pinch Red Pepper Flakes
  • FOR SERVING:
  • 4 whole Tortillas
  • 2 Tablespoons Cilantro For Garnish

Preparation Instructions

For the Korean short ribs:

In a mini food processor, blend garlic and ginger until minced. Mix with soy sauce, brown sugar, rice vinegar, sesame oil, and red pepper flakes.

Place short ribs in crockpot and pour sauce over ribs. Turn crock pot on low heat. Cover with a lid and cook for 6-8 hours.
Remove meat from pot, discard bones. Place in the fridge to chill to touch.

Meanwhile, skim fat off the top of the sauce. Place in a sauce pan and simmer until thickened.

Once meat is cool to touch, pull apart with your fingers. Pour about 1/2 cup of the sauce back into the meat. You may serve the extra sauce on the side or discard it.

For the cucumber slaw:

Peel cucumber and chop into matchsticks. Peel carrot and shred.

Mix carrot and cucumber with rice vinegar, sugar, salt and red pepper flakes.

Serve meat on a warm tortilla topped with slaw and cilantro.


_______________________________________

Be sure to check out Natalie’s own beautiful food blog, Perrys’ Plate, where you can see her growing collection of lovely recipes. There’s always something new to see there. Go visit now!


Profile photo of Natalie | Perry's Plate

Peaches and Cream Crumble Bars

Posted by in Baking, Step-by-Step Recipes

Tasty Kitchen Blog: Peaches and Cream Crumble Bars. Guest post by Natalie Perry of Perry's Plate, recipe submitted by TK member Courtney of Bake, Eat, Repeat.

 
I think I should come clean before I start telling you about this recipe.

Confession: I really don’t like peaches. Like, despise them. I like peaches about as much as Ree likes bananas.

What business did I have making a dessert with peaches? Well, it was all about love, people. The rest of my family loves peaches, and I love my family. I had a few peaches from my last farmers’ market trip that needed to be used ASAP on a day when I needed to make a potluck dessert. It was destiny, I suppose.

This recipe is a combination of a cheesecake and a crumble, and I think you may even substitute a different kind of fruit for the peaches (pears, apples, berries, etc.). Thank you TK member Courtney (who blogs at Bake, Eat, Repeat) for posting these Peaches and Cream Crumble Bars!


Tasty Kitchen Blog: Peaches and Cream Crumble Bars. Guest post by Natalie Perry of Perry's Plate, recipe submitted by TK member Courtney of Bake, Eat, Repeat.

Let’s begin by making a few preparations. Oven at 350ºF? Check. Baking dish lined with foil and greased? Check.


Tasty Kitchen Blog: Peaches and Cream Crumble Bars. Guest post by Natalie Perry of Perry's Plate, recipe submitted by TK member Courtney of Bake, Eat, Repeat.

To make the crust you only need three things: flour, brown sugar, and butter. (If you use unsalted butter, you’ll need to add a bit of salt.)


Tasty Kitchen Blog: Peaches and Cream Crumble Bars. Guest post by Natalie Perry of Perry's Plate, recipe submitted by TK member Courtney of Bake, Eat, Repeat.

Add the butter to a medium-sized mixing bowl. (Or the work bowl of your best friend—er, I mean stand mixer. Please tell me you named yours, too?)


Tasty Kitchen Blog: Peaches and Cream Crumble Bars. Guest post by Natalie Perry of Perry's Plate, recipe submitted by TK member Courtney of Bake, Eat, Repeat.

Add the brown sugar, then beat it to soften the butter and incorporate the sugar.


Tasty Kitchen Blog: Peaches and Cream Crumble Bars. Guest post by Natalie Perry of Perry's Plate, recipe submitted by TK member Courtney of Bake, Eat, Repeat.

Add the flour.


Tasty Kitchen Blog: Peaches and Cream Crumble Bars. Guest post by Natalie Perry of Perry's Plate, recipe submitted by TK member Courtney of Bake, Eat, Repeat.

Mix well, scraping down the sides. At first it’ll look really crumbly. Then it will look like …


Tasty Kitchen Blog: Peaches and Cream Crumble Bars. Guest post by Natalie Perry of Perry's Plate, recipe submitted by TK member Courtney of Bake, Eat, Repeat.

This. A beautiful, somewhat-sticky mass about the consistency of cookie dough.


Tasty Kitchen Blog: Peaches and Cream Crumble Bars. Guest post by Natalie Perry of Perry's Plate, recipe submitted by TK member Courtney of Bake, Eat, Repeat.

Press the dough evenly into the prepared baking dish and bake it for about 20 minutes. It should begin to turn golden brown on the edges and the middle should be set.


Tasty Kitchen Blog: Peaches and Cream Crumble Bars. Guest post by Natalie Perry of Perry's Plate, recipe submitted by TK member Courtney of Bake, Eat, Repeat.

Meanwhile you can start on the other components. First, the filling. You’ll need three ripe peaches, eggs, peach jam (thanks Grandma!), cream cheese, sour cream, flour, and vanilla.

You’ll need some sugar, too. Just pretend it’s in the photo, snuggled in between the sour cream and cream cheese. Yep, right there.


Tasty Kitchen Blog: Peaches and Cream Crumble Bars. Guest post by Natalie Perry of Perry's Plate, recipe submitted by TK member Courtney of Bake, Eat, Repeat.

Put the cream cheese and sour cream into a mixing bowl.


Tasty Kitchen Blog: Peaches and Cream Crumble Bars. Guest post by Natalie Perry of Perry's Plate, recipe submitted by TK member Courtney of Bake, Eat, Repeat.

Beat the daylights out of it until you have a relatively lump-free mixture. Be sure to scrape down the sides a few times to get those tricky parts in the bottom.


Tasty Kitchen Blog: Peaches and Cream Crumble Bars. Guest post by Natalie Perry of Perry's Plate, recipe submitted by TK member Courtney of Bake, Eat, Repeat.

Add the sugar and the flour …


Tasty Kitchen Blog: Peaches and Cream Crumble Bars. Guest post by Natalie Perry of Perry's Plate, recipe submitted by TK member Courtney of Bake, Eat, Repeat.

And the eggs and vanilla.


Tasty Kitchen Blog: Peaches and Cream Crumble Bars. Guest post by Natalie Perry of Perry's Plate, recipe submitted by TK member Courtney of Bake, Eat, Repeat.

Like before, beat the daylights out of it until you have a silky-smooth batter. (Scrape down the sides again!)


Tasty Kitchen Blog: Peaches and Cream Crumble Bars. Guest post by Natalie Perry of Perry's Plate, recipe submitted by TK member Courtney of Bake, Eat, Repeat.

Next, let’s get the topping done. In a small bowl, add the flour, brown sugar, cinnamon, and ginger. (If you use unsalted butter, add 1/4 teaspoon of salt.)


Tasty Kitchen Blog: Peaches and Cream Crumble Bars. Guest post by Natalie Perry of Perry's Plate, recipe submitted by TK member Courtney of Bake, Eat, Repeat.

You’ll need to add a stick of melted butter to this mixture, but you might want to whisk it together first. I didn’t. My daughters (3 and 5) were glued to me asking, “CAN I HELP NOW?” “CAN I TASTE IT?” “CAN I STIR IT UP?” “WHEN ARE YOU GOING TO BE DONE?!” “CAN I HELP NOW?” And somehow I forgot to whisk it. It happens.

I think they have a built-in radar that tells them I’m making a dessert. They usually aren’t glued to me when I make dinner.


Tasty Kitchen Blog: Peaches and Cream Crumble Bars. Guest post by Natalie Perry of Perry's Plate, recipe submitted by TK member Courtney of Bake, Eat, Repeat.

But, see? It all turned out well in the end. The crumble was wetter than I anticipated, but it was easily broken apart with my fingers.


Tasty Kitchen Blog: Peaches and Cream Crumble Bars. Guest post by Natalie Perry of Perry's Plate, recipe submitted by TK member Courtney of Bake, Eat, Repeat.

One last thing: Slice up the peaches. Aren’t they pretty?


Tasty Kitchen Blog: Peaches and Cream Crumble Bars. Guest post by Natalie Perry of Perry's Plate, recipe submitted by TK member Courtney of Bake, Eat, Repeat.

Alright. Assembly time. Grab the baked crust and smear some peach jam over it.


Tasty Kitchen Blog: Peaches and Cream Crumble Bars. Guest post by Natalie Perry of Perry's Plate, recipe submitted by TK member Courtney of Bake, Eat, Repeat.

Grab some helpers (or your own two hands) and lay the peaches on top.


Tasty Kitchen Blog: Peaches and Cream Crumble Bars. Guest post by Natalie Perry of Perry's Plate, recipe submitted by TK member Courtney of Bake, Eat, Repeat.

My 5-year-old enjoys lining things up in nice, even rows. (Ahem. She gets that from her mother.) This is how ours turned out. We used two yellow peaches and one white one.


Tasty Kitchen Blog: Peaches and Cream Crumble Bars. Guest post by Natalie Perry of Perry's Plate, recipe submitted by TK member Courtney of Bake, Eat, Repeat.

You know that batter you’d like to put your face in? Pour that over the peaches. Then lick that bowl clean. I didn’t make it into the closet in time so I had to share with my minions.


Tasty Kitchen Blog: Peaches and Cream Crumble Bars. Guest post by Natalie Perry of Perry's Plate, recipe submitted by TK member Courtney of Bake, Eat, Repeat.

Speaking of minions, they’re awfully good at sprinkling the crumble mixture over the cheesecake batter.


Tasty Kitchen Blog: Peaches and Cream Crumble Bars. Guest post by Natalie Perry of Perry's Plate, recipe submitted by TK member Courtney of Bake, Eat, Repeat.

My younger one ate more than she sprinkled, but we had enough to cover the whole thing.

Time to bake! Throw it in the oven for 30-40 minutes or until the middle sets up.


Tasty Kitchen Blog: Peaches and Cream Crumble Bars. Guest post by Natalie Perry of Perry's Plate, recipe submitted by TK member Courtney of Bake, Eat, Repeat.

Let it cool for 15-20 minutes before you dig in. I was able to lift the foil and slide the whole thing onto a cutting board.


Tasty Kitchen Blog: Peaches and Cream Crumble Bars. Guest post by Natalie Perry of Perry's Plate, recipe submitted by TK member Courtney of Bake, Eat, Repeat.

I love how beautiful the layers are in these!


Tasty Kitchen Blog: Peaches and Cream Crumble Bars. Guest post by Natalie Perry of Perry's Plate, recipe submitted by TK member Courtney of Bake, Eat, Repeat.

And I even liked how they tasted. Yes, even the peach-hater liked them! Like cheesecake, they get even better when they sit in the fridge and cool for several hours.

Thanks again Courtney! Be sure to check out Courtney’s TK recipe box and her recipes over on her blog, Bake, Eat, Repeat.

Recipe alterations: I replaced all of the flour with whole wheat pastry flour, reduced all of the sugars by half, used salted butter and omitted the added salt, and omitted the step of brushing the crust with melted butter. (I didn’t think that last one was necessary.)


Printable Recipe

Peaches and Cream Crumble Bars

See post on Courtney’s site!
4.75 Mitt(s) 4 Rating(s)4 votes, average: 4.75 out of 54 votes, average: 4.75 out of 54 votes, average: 4.75 out of 54 votes, average: 4.75 out of 54 votes, average: 4.75 out of 5

Prep Time:

Cook Time:

Difficulty: Easy

Servings: 24

24
x

Print Options

Page size Letter 3x5 4x6
Text Size Small Medium Large
Content Include description
Include prep time, etc.
Show image

Description

Sweet juicy peaches paired with tender shortbread, rich custard and spiced crumble. It’s summer in a bar.

Ingredients

  • FOR THE SHORTBREAD:
  • 2 sticks Unsalted Butter, Cut Into Small Chunks
  • ¼ cups Brown Sugar
  • ½ teaspoons Kosher Salt
  • 2 cups Flour
  • FOR THE FILLING:
  • 1 Tablespoon Butter
  • ½ cups Peach Jam
  • 3  Large Peaches, Pitted And Thinly Sliced
  • 12 ounces, weight Cream Cheese, Softened
  • ¼ cups Sour Cream
  • ½ cups Sugar
  • 1 Tablespoon Flour
  • 2  Eggs
  • 1 teaspoon Vanilla
  • FOR THE CRUMB TOPPING:
  • 1 cup Flour
  • ¼ cups Sugar
  • ¼ cups Brown Sugar
  • ½ teaspoons Ginger
  • 1 teaspoon Cinnamon
  • ¼ teaspoons Salt
  • 1 stick Unsalted Butter, melted

Preparation Instructions

1. For the shortbread crust: Preheat the oven to 350 F. Line a 13 x 9 inch baking dish with foil, then grease the foil on all sides. Set the dish aside. In the bowl of an electric mixer, beat the butter until it begins to soften, about 30 seconds. Add sugar and salt and beat on low speed until just combined. Add the flour and beat on low speed until incorporated then increase to high speed and beat until a cohesive dough is formed. Using your fingers, press the dough into the baking dish and bake for 20 minutes or until puffy and golden brown. When it’s done remove it from the oven and start the next step.

2. For the filling: Brush shortbread crust with 1 tablespoon of melted butter. Spread peach jam evenly over the crust, then layer with sliced peaches. To make the cream layer, put the cream cheese and sour cream in a bowl and beat on high speed until smooth. Add sugar and 1 tablespoon flour and beat another 30 seconds. Add eggs and vanilla and beat until smooth and thoroughly combined. Pour cheesecake mixture over peach slices. Set aside.

3. For the topping: In a small bowl, combine flour, sugars, ginger, cinnamon, and salt. Pour melted butter over all of it and use your fingers to mix everything together until coarse crumbles form. Sprinkle over the top of the cheesecake layer. Bake again at 350 F for 30 minutes or until crumbles are golden brown and center is set.


_______________________________________

Be sure to check out Natalie’s own beautiful food blog, Perrys’ Plate, where you can see her growing collection of lovely recipes. There’s always something new to see there. Go visit now!


Profile photo of Natalie | Perry's Plate

Melon Salad

Posted by in Step-by-Step Recipes

  My heart goes out to everyone without air conditioning this summer. Being hot is right up there on my list of “most unpleasant sensations” between having a cavity drilled and discovering my husband finished off the Nutella without telling me. The only redeeming quality to hot summers is the abundance of fresh fruit—especially melons.…

Profile photo of Natalie | Perry's Plate

Customizable Bread Bowl Breakfast

Posted by in Step-by-Step Recipes

  If I ask my (almost) 5-year-old what cooking show she wants to watch with Mom, she always says, “Pioneer Woman!” She adores Ree’s show! After one recent episode where Ree made soup in bread bowls, my little girl was obsessed with the idea of eating her bowl when she finished her soup. (It IS […]

Profile photo of Natalie | Perry's Plate

Buffalo Chicken Wraps

Posted by in Step-by-Step Recipes

  Although I’m not a hot wing person, I like “Buffalo” flavored things. So, when I saw these Buffalo Chicken Wraps from the lovely and hilarious Bev Weidner, I about fell out of my chair. Not only are there Buffalo-flavored chicken tenders (much easier to eat than wings) in these wraps, but some of my […]

Profile photo of Natalie | Perry's Plate

Layered Mediterranean Dip

Posted by in Step-by-Step Recipes

  Pretty, isn’t it? Think: Mediterranean version of the classic (and sometimes overdone) Mexican 7-layer dip. On the bottom there’s a fantastic cilantro-pecan pesto, then a generous dose of hummus, and a sprinkling of diced vegetables, feta cheese, and toasted pine nuts. We recently became homeowners and threw a little housewarming party last…