The Pioneer Woman Tasty Kitchen
Profile photo of Natalie | Perry's Plate

Customizable Bread Bowl Breakfast

Posted by in Step-by-Step Recipes

Tasty Kitchen Blog Customizable Bread Bowl Breakfast. Guest post by Natalie Perry of Perry's Plate, recipe submitted by TK member Lindsay of Perfecting the Pairing.

 
If I ask my (almost) 5-year-old what cooking show she wants to watch with Mom, she always says, “Pioneer Woman!” She adores Ree’s show! After one recent episode where Ree made soup in bread bowls, my little girl was obsessed with the idea of eating her bowl when she finished her soup. (It IS pretty cool if you ask me.) She’s been hounding me to make them for several weeks now.

Since bread bowls are pretty substantial (especially for a 5-year-old) I was so excited when I saw a miniature version made from crusty rolls! The Customizable Bread Bowl Breakfast idea comes from TK member Lindsay.

I love recipes like this that are more conceptual than a strict-measurement recipe. You can literally go any direction with these bowls and simply use what you have on hand! They’d also be great to serve a crowd at brunch (perhaps an Easter brunch if you’re planning one?). If you have enough fillings, then there’s bound to be something that everyone will like!


Tasty Kitchen Blog Customizable Bread Bowl Breakfast. Guest post by Natalie Perry of Perry's Plate, recipe submitted by TK member Lindsay of Perfecting the Pairing.

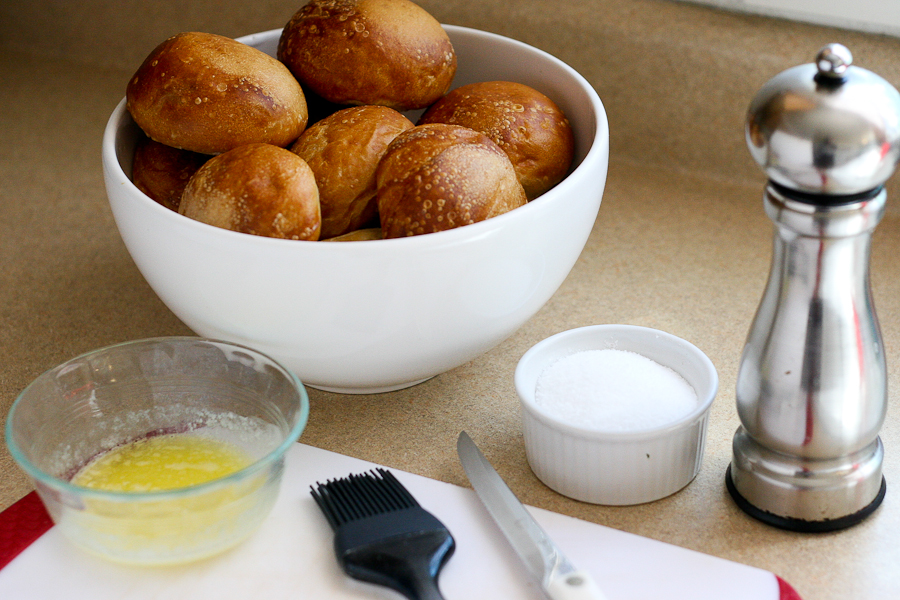
To get started you’ll need some crusty dinner rolls, some melted butter, a sharp serrated knife, a pastry brush, salt, and pepper.


Tasty Kitchen Blog Customizable Bread Bowl Breakfast. Guest post by Natalie Perry of Perry's Plate, recipe submitted by TK member Lindsay of Perfecting the Pairing.

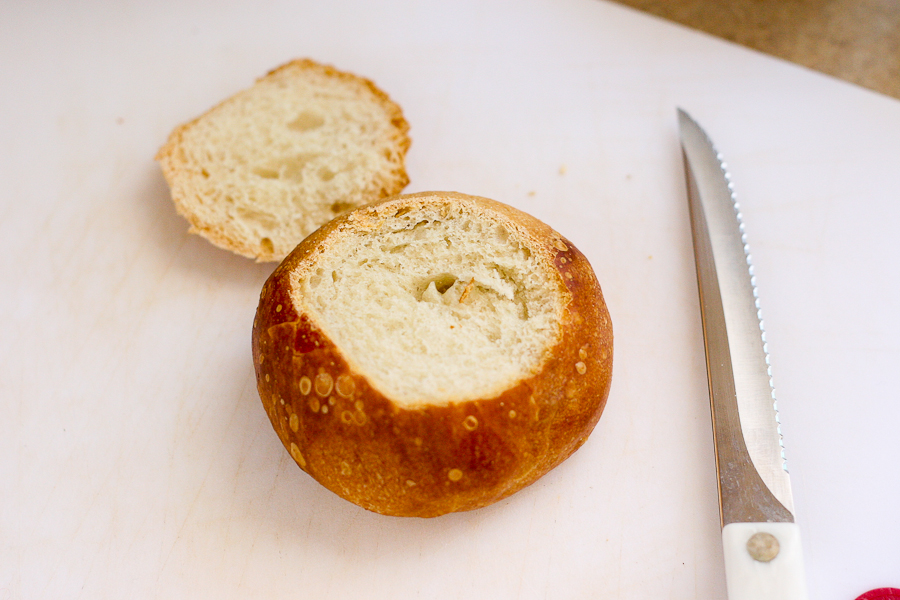
Slice off the very top of the roll.

(These are so easy. It kills me.)


Tasty Kitchen Blog Customizable Bread Bowl Breakfast. Guest post by Natalie Perry of Perry's Plate, recipe submitted by TK member Lindsay of Perfecting the Pairing.

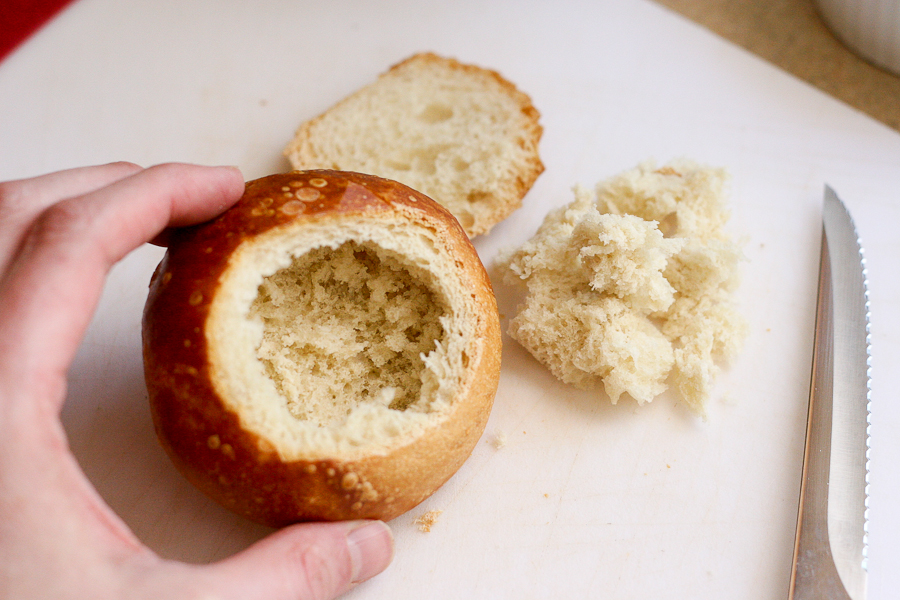
Pull out as much of the inside of the roll as you can without breaking through the crust. My rolls had a pretty thick, crusty outside, so that’s about as far as I could go.


Tasty Kitchen Blog Customizable Bread Bowl Breakfast. Guest post by Natalie Perry of Perry's Plate, recipe submitted by TK member Lindsay of Perfecting the Pairing.

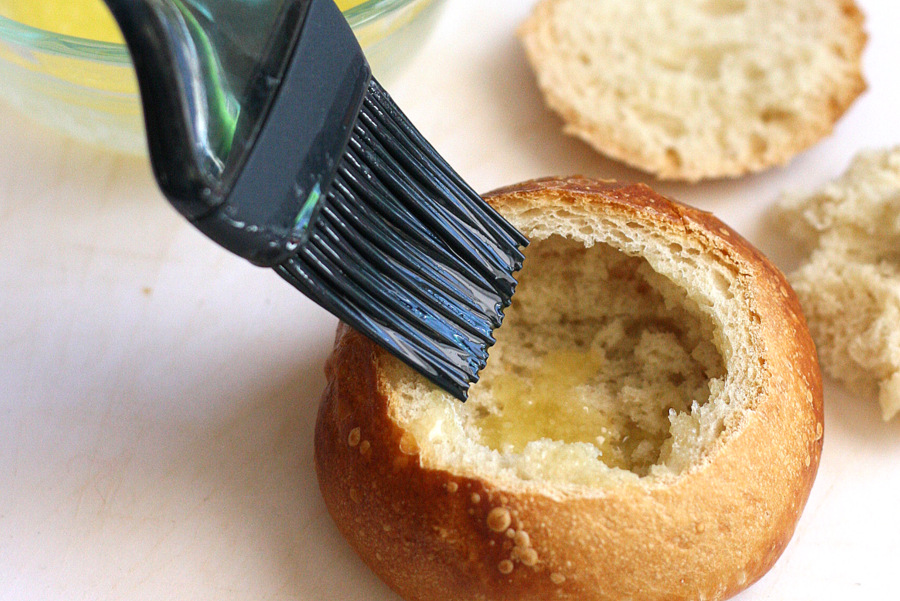
Brush the inside with butter.


Tasty Kitchen Blog Customizable Bread Bowl Breakfast. Guest post by Natalie Perry of Perry's Plate, recipe submitted by TK member Lindsay of Perfecting the Pairing.

Then sprinkle some salt and pepper inside.


Tasty Kitchen Blog Customizable Bread Bowl Breakfast. Guest post by Natalie Perry of Perry's Plate, recipe submitted by TK member Lindsay of Perfecting the Pairing.

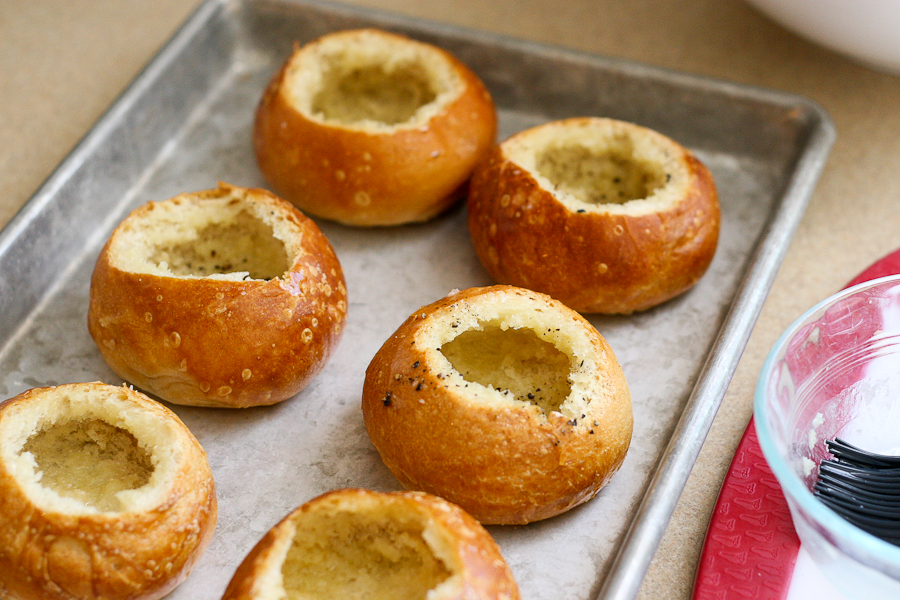
Put them on a sheet pan or a platter for your hungry ones to grab and fill.


Tasty Kitchen Blog Customizable Bread Bowl Breakfast. Guest post by Natalie Perry of Perry's Plate, recipe submitted by TK member Lindsay of Perfecting the Pairing.

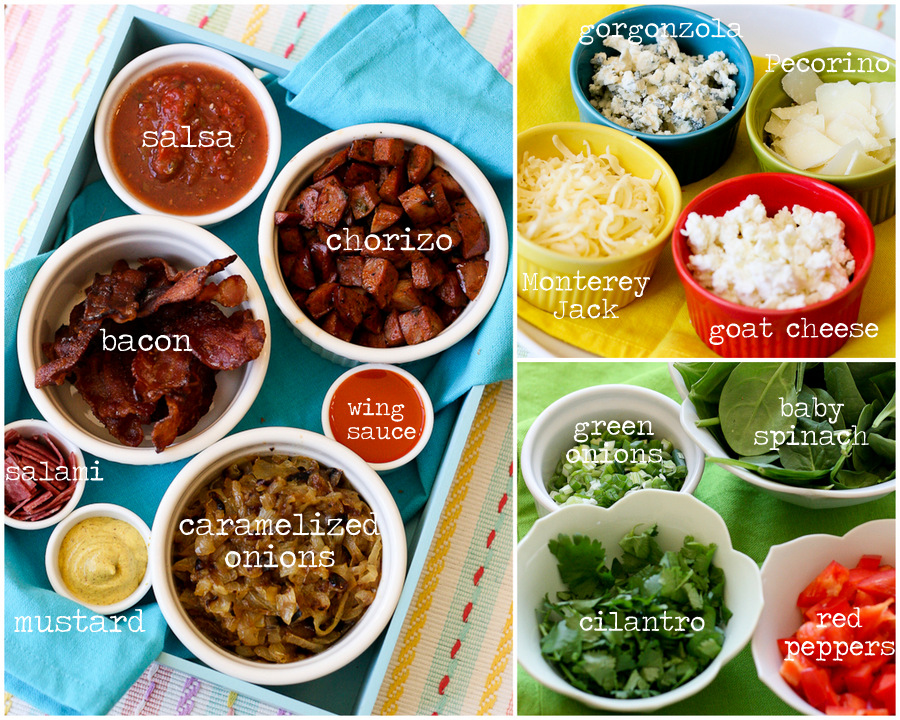
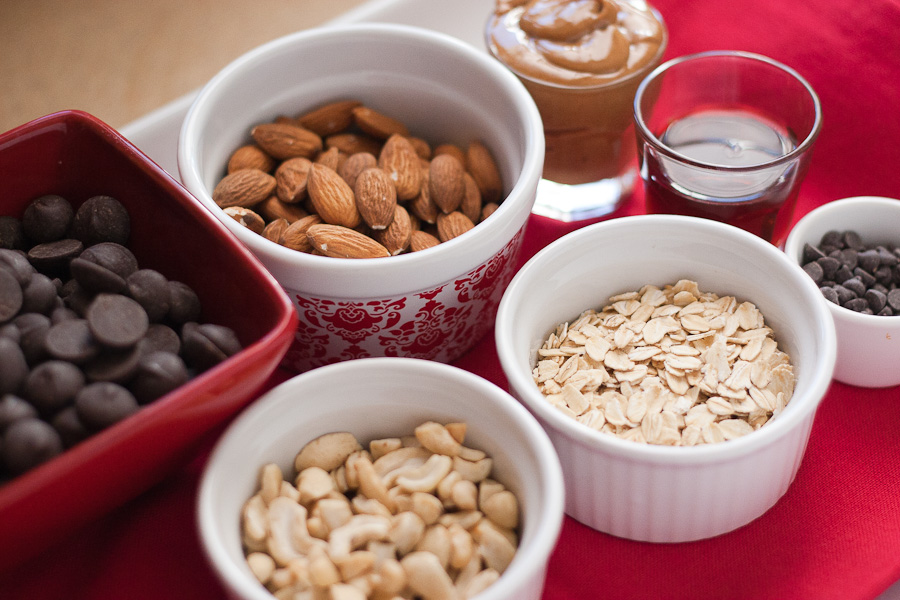
Here comes the fun part: gathering the fillings! I actually did this before I prepped my rolls, and you can even do it the night before breakfast. They don’t have to be hot because everything gets baked in the oven anyway. I began to “clean out” my fridge, so to speak, and ended up with WAY more fillings than we needed. Things got a bit heady with flavor combinations.

(By the way, if you don’t use all of the fillings, you have everything conveniently prepped for omelets later!)


Tasty Kitchen Blog Customizable Bread Bowl Breakfast. Guest post by Natalie Perry of Perry's Plate, recipe submitted by TK member Lindsay of Perfecting the Pairing.

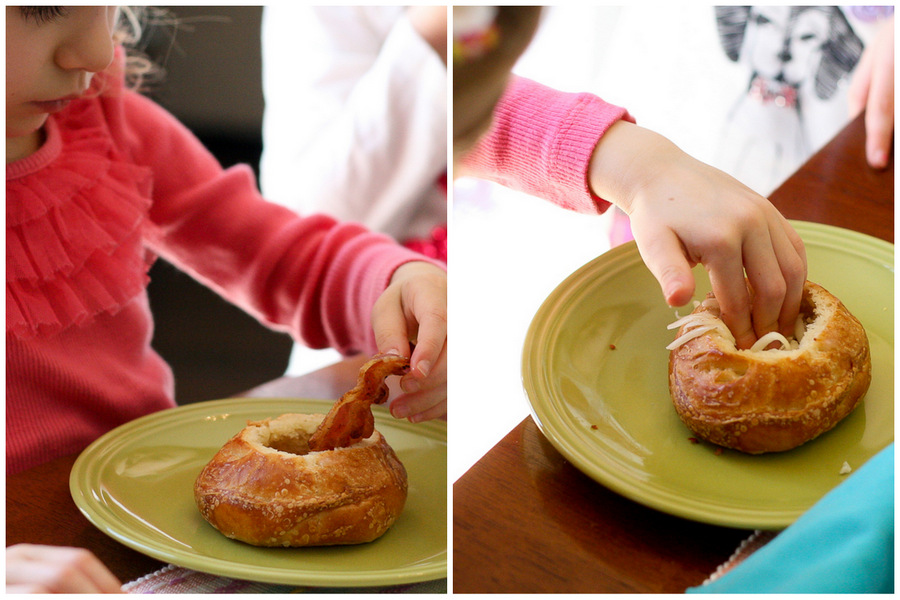
I let my kids go at it, curious to see what they would put in their rolls. My 3-year-old went straight for the bacon. And the cheese. (She’s a momma’s girl.) One thing we learned through this is to fill the rolls sparingly and really push the fillings down and into the sides. You’ll see why in a second.


Tasty Kitchen Blog Customizable Bread Bowl Breakfast. Guest post by Natalie Perry of Perry's Plate, recipe submitted by TK member Lindsay of Perfecting the Pairing.

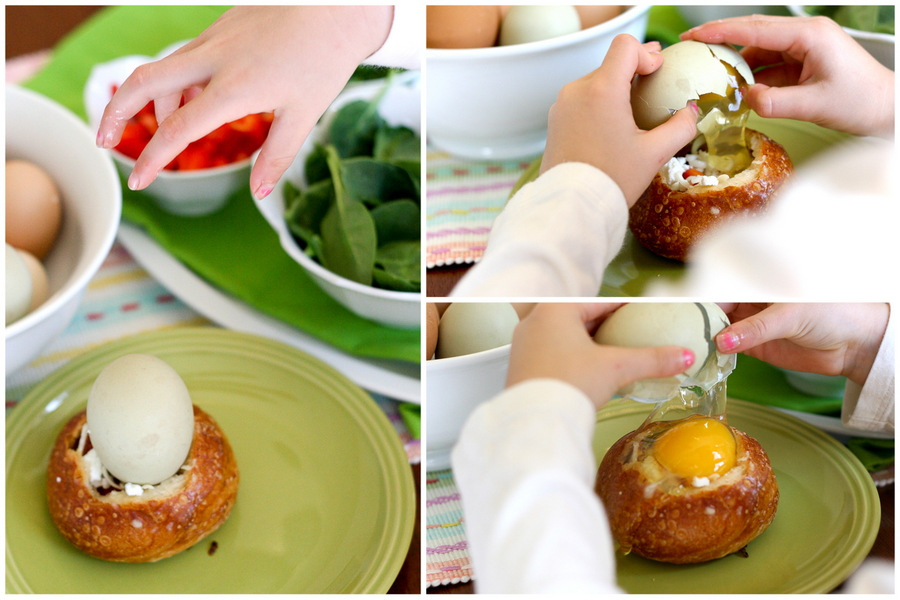
I told the 5-year-old to put an egg in hers. I should have been more specific. She figured out soon enough that meant cracking the egg. Silly girl.

I’m not sure if my rolls were on the small side or if my eggs were on the large side (yolks from pastured eggs tend to be larger), but we lost a good bit of the white down the side of the roll. No biggie.

You could also use the whites only or whisk together the eggs (for those who like things mixed up) and only pour as much as you need into each roll.


Tasty Kitchen Blog Customizable Bread Bowl Breakfast. Guest post by Natalie Perry of Perry's Plate, recipe submitted by TK member Lindsay of Perfecting the Pairing.

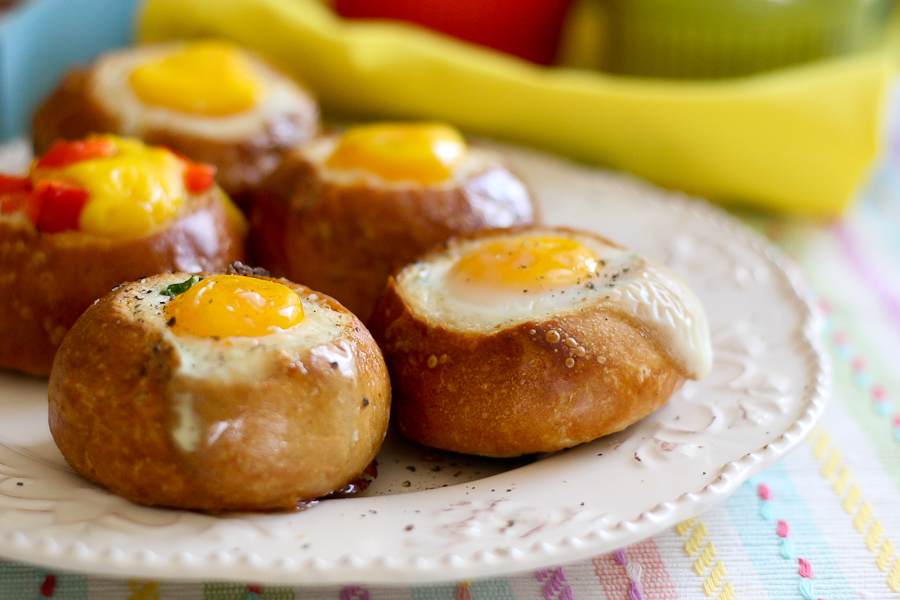
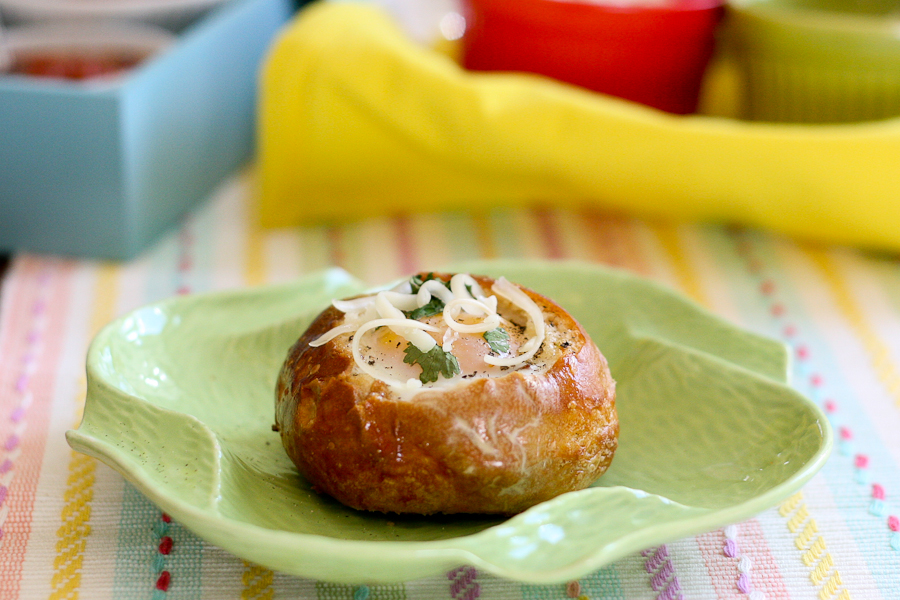
After you have your rolls filled and baked, you’re ready to eat! If you like your yolks runny, keep an eye on them closely so they don’t firm up in the oven.


Tasty Kitchen Blog Customizable Bread Bowl Breakfast. Guest post by Natalie Perry of Perry's Plate, recipe submitted by TK member Lindsay of Perfecting the Pairing.

Thanks to Lindsay for a fabulous brunch idea! Be sure to visit her TK recipe box as well as her own blog, Perfecting the Pairing, for more delicious recipes.


Printable Recipe

Customizable Bread Bowl Breakfast

See post on Lindsay’s site!
4.83 Mitt(s) 6 Rating(s)6 votes, average: 4.83 out of 56 votes, average: 4.83 out of 56 votes, average: 4.83 out of 56 votes, average: 4.83 out of 56 votes, average: 4.83 out of 5

Prep Time:

Cook Time:

Difficulty: Easy

Servings: 8

8
x

Print Options

Page size Letter 3x5 4x6
Text Size Small Medium Large
Content Include description
Include prep time, etc.
Show image

Description

Egg in a bread bowl is the perfect breakfast for a crowd because it is completely customizable!

Ingredients

  • 8 whole Crusty Bread Rolls
  • 2 Tablespoons Butter, Melted
  • Salt And Pepper
  • Assorted Fillings (See Suggestions In Instructions)
  • 8 whole Eggs

Preparation Instructions

Preheat your oven to 350ºF. Slice off the top of each roll and scoop out the soft bread inside, leaving the sides of the roll intact. Brush the inside of each roll with the melted butter and season with salt and pepper.

Let your guests fill the roll with their favorite toppings (see suggestions below). Crack an egg or egg white on top, season with salt and pepper, and place on a cookie sheet. Bake for 10-12 minutes and then cover the pan loosely with foil. Bake an additional 20-25 minutes, or until the egg is just set.

Suggested fillings: grape tomatoes, cilantro, parsley, thyme, shredded cheese, herbed goat cheese, caramelized onions, pre-cooked breakfast potatoes, spinach artichoke dip, deli ham, cooked sausage, crumbled bacon, onions, mushrooms, spinach, feta cheese.


_______________________________________

Be sure to check out Natalie’s own beautiful food blog, Perrys’ Plate, where you can see her growing collection of lovely recipes. There’s always something new to see there. Go visit now!


Profile photo of Natalie | Perry's Plate

Dark Chocolate Cookie Dough Cups

Posted by in Holidays, Step-by-Step Recipes

Tasty Kitchen Blog: Dark Chocolate Cookie Dough Cups. Guest post by Natalie Perry of Perry's Plate, recipe submitted by TK member Adrienne Jacobs of This Country Girl Cooks.

 
With all of the chocolates flying around this month, I thought I would throw something out there that would satisfy your sweet tooth or chocolate craving, but won’t leave you feeling like you’ve overindulged. 

These adorable Dark Chocolate Cookie Dough Cups by TK member Adrienne Jacobs (who blogs at This Country Girl Cooks) are a perfect balance of indulgent chocolate and a naturally-sweetened, nutty filling. 

Let’s get started! 


Tasty Kitchen Blog: Dark Chocolate Cookie Dough Cups. Guest post by Natalie Perry of Perry's Plate, recipe submitted by TK member Adrienne Jacobs of This Country Girl Cooks.

You’ll need dark chocolate (I used Ghirardelli 60% chips), almonds, cashews, rolled oats, peanut butter, and real maple syrup. Oh, and a little more chocolate—in the form of mini chips. 


Tasty Kitchen Blog: Dark Chocolate Cookie Dough Cups. Guest post by Natalie Perry of Perry's Plate, recipe submitted by TK member Adrienne Jacobs of This Country Girl Cooks.

First, chop the nuts roughly. Don’t work yourself too hard — we’re going to throw them in the food processor. Chopping them up a bit helps the mixture to be more uniform.

Pull a couple tablespoonfuls aside and reserve them. 


Tasty Kitchen Blog: Dark Chocolate Cookie Dough Cups. Guest post by Natalie Perry of Perry's Plate, recipe submitted by TK member Adrienne Jacobs of This Country Girl Cooks.

Throw the rest of the chopped nuts in the processor with the cashews and oats. If you happen to have a 4-year-old around, they’re great at things like that.


Tasty Kitchen Blog: Dark Chocolate Cookie Dough Cups. Guest post by Natalie Perry of Perry's Plate, recipe submitted by TK member Adrienne Jacobs of This Country Girl Cooks.

Pulse until you get a mealy mixture free of large almond pieces. 


Tasty Kitchen Blog: Dark Chocolate Cookie Dough Cups. Guest post by Natalie Perry of Perry's Plate, recipe submitted by TK member Adrienne Jacobs of This Country Girl Cooks.

Add the peanut butter, maple syrup, and mini chocolate chips to the bowl.


Tasty Kitchen Blog: Dark Chocolate Cookie Dough Cups. Guest post by Natalie Perry of Perry's Plate, recipe submitted by TK member Adrienne Jacobs of This Country Girl Cooks.

Pulse until the mixture comes together in large clumps. If it seems dry, add more peanut butter by spoonfuls until you reach the right consistency. It should hold together in a ball, but not be overly sticky.


Tasty Kitchen Blog: Dark Chocolate Cookie Dough Cups. Guest post by Natalie Perry of Perry's Plate, recipe submitted by TK member Adrienne Jacobs of This Country Girl Cooks.

Now that our filling is done, let’s get the chocolate prepped. Melt the chocolate either in a double-broiler set up or in 30 second intervals in the microwave. Stir after each interval until the chocolate is smooth.


Tasty Kitchen Blog: Dark Chocolate Cookie Dough Cups. Guest post by Natalie Perry of Perry's Plate, recipe submitted by TK member Adrienne Jacobs of This Country Girl Cooks.

Line a 24-cup mini muffin pan with mini cups then put a teaspoon or so of chocolate into each cup. Four-year-olds also like to do this. But you may end up with just as much chocolate on the pan as in the cups.


Tasty Kitchen Blog: Dark Chocolate Cookie Dough Cups. Guest post by Natalie Perry of Perry's Plate, recipe submitted by TK member Adrienne Jacobs of This Country Girl Cooks.

Roll the dough into 1-inch balls and flatten slightly.


Tasty Kitchen Blog: Dark Chocolate Cookie Dough Cups. Guest post by Natalie Perry of Perry's Plate, recipe submitted by TK member Adrienne Jacobs of This Country Girl Cooks.

Press each ball into a muffin cup until the chocolate sort of oozes up the sides.


Tasty Kitchen Blog: Dark Chocolate Cookie Dough Cups. Guest post by Natalie Perry of Perry's Plate, recipe submitted by TK member Adrienne Jacobs of This Country Girl Cooks.

Spoon the remaining chocolate over top. It doesn’t have to cover the nut mixture completely.


Tasty Kitchen Blog: Dark Chocolate Cookie Dough Cups. Guest post by Natalie Perry of Perry's Plate, recipe submitted by TK member Adrienne Jacobs of This Country Girl Cooks.

Sprinkle with reserved chopped almonds. 

Stick them in the freezer (if you have space) for a few minutes to harden. 


Tasty Kitchen Blog: Dark Chocolate Cookie Dough Cups. Guest post by Natalie Perry of Perry's Plate, recipe submitted by TK member Adrienne Jacobs of This Country Girl Cooks.

And there you have it! Cute little “cookie dough” morsels. I must say, though, that I didn’t think these tasted like cookie dough at all, but a more sophisticated version of those peanut butter cups in the orange wrappers. You know which ones I’m talking about, right? 

Of course you do.

Give a few of these to someone you love this week.


Tasty Kitchen Blog: Dark Chocolate Cookie Dough Cups. Guest post by Natalie Perry of Perry's Plate, recipe submitted by TK member Adrienne Jacobs of This Country Girl Cooks.

Then pop one into your mouth. Or six. (But not all at once, tempting as it might be.)

You’ll find the complete recipe and instructions below. Be sure to head over to Adrienne’s TK recipe box and blog This Country Girl Cooks for more delicious recipes!


Printable Recipe

Dark Chocolate Cookie Dough Cups

See post on Adrienne Jacobs’s site!
0.00 Mitt(s) 0 Rating(s)0 votes, average: 0.00 out of 50 votes, average: 0.00 out of 50 votes, average: 0.00 out of 50 votes, average: 0.00 out of 50 votes, average: 0.00 out of 5

Prep Time:

Cook Time:

Difficulty: Easy

Servings: 10

10
x

Print Options

Page size Letter 3x5 4x6
Text Size Small Medium Large
Content Include description
Include prep time, etc.
Show image

Description

Who knew three kinds of nuts, oats, and a little maple syrup mixed together would taste just like cookie dough. Covered with dark chocolate, this treat is actually something to feel good about.

Ingredients

  • 8 ounces, fluid Dark Chocolate
  • ¼ cups Rolled Oats
  • ¼ cups Cashews
  • ½ cups Roughly Chopped Almonds, Plus 1 Tablespoon, Divided
  • 3 Tablespoons Peanut Butter
  • 2 Tablespoons Maple Syrup
  • 1 Tablespoon Chocolate Chips

Preparation Instructions

Line a mini muffin tin with paper liners.

Over a double boiler or in the microwave, melt dark chocolate. Once chocolate is melted, line bottom of muffin tin liners with a heaping teaspoon of melted chocolate.

In a food processor blend oats, cashews, and 1/2 cup almonds together until mixture has a flour consistency. Add in peanut butter and syrup. Blend until “dough” comes together. More peanut butter may need to be added to get mixture to form together better.

Add in chocolate chips and pulse a few more seconds. Cover with remaining chocolate.

Sprinkle on remaining 1 tablespoon almonds over the top of chocolates. Freeze for 20 minutes or until hardened. Store them in the freezer.

Enjoy.


_______________________________________

Be sure to check out Natalie’s own beautiful food blog, Perrys’ Plate, where you can see her growing collection of lovely recipes. There’s always something new to see there. Go visit now!


Profile photo of Natalie | Perry's Plate

Fruit Christmas Tree

Posted by in Holidays, Step-by-Step Recipes

Tasty Kitchen Blog: Fruit Christmas Tree. Guest post by Natalie Perry of Perry's Plate, recipe submitted by TK member Vegan Momma of Live. Learn. Love. Eat.

 
If you’re looking for a healthy alternative to sugary gingerbread houses or just want something fun to do with your kids on a snowy afternoon, you have to try this. I had two five-year-olds and an 18-month-old entertained for at least an hour. They were also completely filled with fruit when it was over.

My kids can probably eat MY weight in fruit, so I knew they would love this Fruit Christmas Tree submitted by TK member Vegan Momma. As much fun as my girls have baking sweets, I was happy to find a healthy food-related activity that they would get just as excited about.

It’s super easy, too. Watch.


Tasty Kitchen Blog: Fruit Christmas Tree. Guest post by Natalie Perry of Perry's Plate, recipe submitted by TK member Vegan Momma of Live. Learn. Love. Eat.

You’ll definitely need a pineapple and a pear. The rest is up to you. There isn’t a lot of winter fruit that will work for this, so pick up what you can find. I had my doubts about those berries, but they were surprisingly good!

You’ll also need a bunch of toothpicks, a small wooden skewer, and a star-shaped cookie cutter.


Tasty Kitchen Blog: Fruit Christmas Tree. Guest post by Natalie Perry of Perry's Plate, recipe submitted by TK member Vegan Momma of Live. Learn. Love. Eat.

First prep the pineapple by cutting the ends off.


Tasty Kitchen Blog: Fruit Christmas Tree. Guest post by Natalie Perry of Perry's Plate, recipe submitted by TK member Vegan Momma of Live. Learn. Love. Eat.

Slice the skin off, too. But turn it upright when you slice off the skin. I’m not sure why I decided to lay the pineapple down like it was sleeping. Maybe because I had a baby next to me the entire time trying to steal fruit off my table.


Tasty Kitchen Blog: Fruit Christmas Tree. Guest post by Natalie Perry of Perry's Plate, recipe submitted by TK member Vegan Momma of Live. Learn. Love. Eat.

She’s a sneaky one.


Tasty Kitchen Blog: Fruit Christmas Tree. Guest post by Natalie Perry of Perry's Plate, recipe submitted by TK member Vegan Momma of Live. Learn. Love. Eat.

Anyway …

Cut off about 1/2 inch off the fat end of the pineapple and cut out a star. When I said “star-shaped cookie cutter” up there, I should have specified a metal cutter. My plastic one was pretty weak, and I ended up having to finish it off with my knife. We survived, though.


Tasty Kitchen Blog: Fruit Christmas Tree. Guest post by Natalie Perry of Perry's Plate, recipe submitted by TK member Vegan Momma of Live. Learn. Love. Eat.

Put the pineapple on the cutting board fat-side down and trim off some of the top to make it more tapered. Reserve those bits and pieces to attach to the tree later.


Tasty Kitchen Blog: Fruit Christmas Tree. Guest post by Natalie Perry of Perry's Plate, recipe submitted by TK member Vegan Momma of Live. Learn. Love. Eat.

Trim off the bottom the pear and pull the stem out.


Tasty Kitchen Blog: Fruit Christmas Tree. Guest post by Natalie Perry of Perry's Plate, recipe submitted by TK member Vegan Momma of Live. Learn. Love. Eat.

Attach the pear to the pineapple by driving the wooden skewer through the top of the pear. If you need a little help getting it all the way in, place the flat side of a wide knife over the skewer and tap it gently with your fist.


Tasty Kitchen Blog: Fruit Christmas Tree. Guest post by Natalie Perry of Perry's Plate, recipe submitted by TK member Vegan Momma of Live. Learn. Love. Eat.

Attach the star to the top of the pear by inserting two toothpicks into the sides, pressing downward.

Also, cover the whole thing in toothpicks. Make sure more than half of the toothpick is in the pineapple/pear so you don’t have a bunch of pointy ends sticking out of the “ornaments” later.


Tasty Kitchen Blog: Fruit Christmas Tree. Guest post by Natalie Perry of Perry's Plate, recipe submitted by TK member Vegan Momma of Live. Learn. Love. Eat.

Wash the fruit and peel/dice any fruit that need it. You’ll want them cut into 1-inch pieces for good coverage.


Tasty Kitchen Blog: Fruit Christmas Tree. Guest post by Natalie Perry of Perry's Plate, recipe submitted by TK member Vegan Momma of Live. Learn. Love. Eat.

Here’s the fun part! Set out the fruit and let your kids loose!


Tasty Kitchen Blog: Fruit Christmas Tree. Guest post by Natalie Perry of Perry's Plate, recipe submitted by TK member Vegan Momma of Live. Learn. Love. Eat.

Depending on the age of your kids, they may eat more than what they stick on the tree, so plan to have a little extra.

If you find you have a lot of space between the fruit, just add more toothpicks!


Tasty Kitchen Blog: Fruit Christmas Tree. Guest post by Natalie Perry of Perry's Plate, recipe submitted by TK member Vegan Momma of Live. Learn. Love. Eat.

It turned out incredibly cute, thanks to my little helpers! And it disappeared a few hours later just as fast as it appeared. (Kind of like the ornaments on the bottom half of our Christmas tree. Toddlers are the best, aren’t they?)

Such a fun morning we had! Thank you, Vegan Momma, for a creative activity, beautiful centerpiece, and wholesome snack all rolled into one!

Take a look at Vegan Momma’s TK Recipe Box when you can, as well as her blog, Live.Learn.Love.Eat. for more family-friendly vegan ideas!


Printable Recipe

Fruit Christmas Tree

See post on Vegan Momma’s site!
0.00 Mitt(s) 0 Rating(s)0 votes, average: 0.00 out of 50 votes, average: 0.00 out of 50 votes, average: 0.00 out of 50 votes, average: 0.00 out of 50 votes, average: 0.00 out of 5

Prep Time:

Cook Time:

Difficulty: Easy

Servings: 5

5
x

Print Options

Page size Letter 3x5 4x6
Text Size Small Medium Large
Content Include description
Include prep time, etc.
Show image

Description

A delicious, colorful and healthy alternative to candy gingerbread houses. A great edible craft for kids or to take to any Christmas party!

Ingredients

  • 1 whole Ripe Pineapple
  • 1 whole Ripe Pear
  • 2 cups Ripe Strawberries, Stems Removed
  • 6 ounces, weight Fresh Raspberries
  • 6 ounces, weight Fresh Blackberries
  • 2 whole Kiwi, Peeled And Chopped
  • 2 whole Mandarin Oranges, Peeled And Sectioned
  • 1 cup Red Seedless Grapes
  • ½ cups Chopped Watermelon

Preparation Instructions

For this recipe, you will also need 1 large star-shaped cookie cutter.

1. Begin by cutting the top and bottom off of your pineapple. Save a 1-inch-thick slice of your pineapple as well for the star. Cut all of the skin off of the outside of the pineapple so that only the edible portion remains. Slice the top of your pineapple as well to give it a slightly pointed shape at the top. Save the edible pineapple scraps to decorate the tree with later.
2. Cut the bottom off of your pear and remove the stem. Use a toothpick to place the pear on top of the prepared pineapple. This is your tree.
3. Use a large star-shaped cookie cutter to cut out a star for the top of the tree from the reserved slice of pineapple. Place the star on top of the Christmas tree with a wooden toothpick.
4. Insert many wooden toothpicks all over the pineapple and pear, fairly deep in so that they won’t show through the fruit once you have placed it on.
5. Decorate! Stick the prepared fruit onto the toothpicks all over the tree.
6. Eat!


_______________________________________

Be sure to check out Natalie’s own beautiful food blog, Perrys’ Plate, where you can see her growing collection of lovely recipes. There’s always something new to see there. Go visit now!


Profile photo of Natalie | Perry's Plate

Gingered Butternut Squash Soup with Beet Slaw

Posted by in Step-by-Step Recipes

Tasty Kitchen Blog: Gingered Butternut Squash Soup. Guest post by Natalie Perry of Perry's Plate, recipe submitted by TK member Julia of The Roasted Root.

 
Friends, this may be the most beautiful soup I’ve ever made. Or photographed. Or eaten. The lovely TK member Julia at The Roasted Root definitely has an eye for color and a wonderful sense for taste. This soup was one of those recipes that grabbed me and wouldn’t let go. 

Luckily, it’s fall. I’d have had a hard time finding a butternut squash in April.


Tasty Kitchen Blog: Gingered Butternut Squash Soup. Guest post by Natalie Perry of Perry's Plate, recipe submitted by TK member Julia of The Roasted Root.

Speaking of butternut squash, if you’ve got one, (carefully) chop it in half. You’ll need a very sharp knife for this. Butternuts don’t give in easily.


Tasty Kitchen Blog: Gingered Butternut Squash Soup. Guest post by Natalie Perry of Perry's Plate, recipe submitted by TK member Julia of The Roasted Root.

Scrape out all of the seeds and slimy stuff.


Tasty Kitchen Blog: Gingered Butternut Squash Soup. Guest post by Natalie Perry of Perry's Plate, recipe submitted by TK member Julia of The Roasted Root.

Drizzle some oil on the insides, and sprinkle it with salt.


Tasty Kitchen Blog: Gingered Butternut Squash Soup. Guest post by Natalie Perry of Perry's Plate, recipe submitted by TK member Julia of The Roasted Root.

Place them face-down in a baking dish and place them in the oven for 40-60 minutes, depending on the size of your squash.


Tasty Kitchen Blog: Gingered Butternut Squash Soup. Guest post by Natalie Perry of Perry's Plate, recipe submitted by TK member Julia of The Roasted Root.

Meanwhile, peel the beets and carrots, cut them into chunks and put them in your food processor.


Tasty Kitchen Blog: Gingered Butternut Squash Soup. Guest post by Natalie Perry of Perry's Plate, recipe submitted by TK member Julia of The Roasted Root.

Buzz them up until the pieces are small and slightly smaller than peas. Transfer to large mixing bowl.

Don’t wash the food processor. (I like how Julia thinks.)


Tasty Kitchen Blog: Gingered Butternut Squash Soup. Guest post by Natalie Perry of Perry's Plate, recipe submitted by TK member Julia of The Roasted Root.

Zest a whole orange.

If you don’t have a Microplane zester, stop what you’re doing and go get one. (Make sure someone is home to watch your roasting squash.) I love mine, and use it all the time!


Tasty Kitchen Blog: Gingered Butternut Squash Soup. Guest post by Natalie Perry of Perry's Plate, recipe submitted by TK member Julia of The Roasted Root.

Add the zest to the beet-carrot mixture.


Tasty Kitchen Blog: Gingered Butternut Squash Soup. Guest post by Natalie Perry of Perry's Plate, recipe submitted by TK member Julia of The Roasted Root.

Cut the apples into large chunks.


Tasty Kitchen Blog: Gingered Butternut Squash Soup. Guest post by Natalie Perry of Perry's Plate, recipe submitted by TK member Julia of The Roasted Root.

Add them to the dirty food processor. (Don’t worry, it’ll all work out in the end.) Also, juice the orange you just zested, right over the apples.

Good grief, I need a manicure. Maybe if I hold out long enough I’ll have pink French tips.


Tasty Kitchen Blog: Gingered Butternut Squash Soup. Guest post by Natalie Perry of Perry's Plate, recipe submitted by TK member Julia of The Roasted Root.

Buzz up the apples an orange juice, and dump it into the bowl with the beets and carrots.

Nope, not time to wash the food processor. Hang tight.


Tasty Kitchen Blog: Gingered Butternut Squash Soup. Guest post by Natalie Perry of Perry's Plate, recipe submitted by TK member Julia of The Roasted Root.

Peel and slice the ginger, and throw the ginger pieces into the food processor with the walnuts.

Process them until you have a chunky, finely chopped mixture.


Tasty Kitchen Blog: Gingered Butternut Squash Soup. Guest post by Natalie Perry of Perry's Plate, recipe submitted by TK member Julia of The Roasted Root.

And … you guessed it. Transfer the mixture into the other bowl, along with some unsweetened coconut.


Tasty Kitchen Blog: Gingered Butternut Squash Soup. Guest post by Natalie Perry of Perry's Plate, recipe submitted by TK member Julia of The Roasted Root.

Over that, add some extra-virgin olive oil, a few pinches of salt, and some toasted sesame seeds.


Tasty Kitchen Blog: Gingered Butternut Squash Soup. Guest post by Natalie Perry of Perry's Plate, recipe submitted by TK member Julia of The Roasted Root.

Mix it all together and you have this incredibly flavorful and vibrant garnish for the soup! I love all of the flavors in this salad.

I think my favorite color is beet, too.


Tasty Kitchen Blog: Gingered Butternut Squash Soup. Guest post by Natalie Perry of Perry's Plate, recipe submitted by TK member Julia of The Roasted Root.

Check on that squash now. You’ll know it’s done when you can easily stick a butter knife into it and the skin starts to turn golden brown.


Tasty Kitchen Blog: Gingered Butternut Squash Soup. Guest post by Natalie Perry of Perry's Plate, recipe submitted by TK member Julia of The Roasted Root.

Scrape out all of that soft, butternutty goodness …


Tasty Kitchen Blog: Gingered Butternut Squash Soup. Guest post by Natalie Perry of Perry's Plate, recipe submitted by TK member Julia of The Roasted Root.

And toss it into your blender. Add some of the chicken stock to help it blend.


Tasty Kitchen Blog: Gingered Butternut Squash Soup. Guest post by Natalie Perry of Perry's Plate, recipe submitted by TK member Julia of The Roasted Root.

Give it a whirl until it’s silky smooth.


Tasty Kitchen Blog: Gingered Butternut Squash Soup. Guest post by Natalie Perry of Perry's Plate, recipe submitted by TK member Julia of The Roasted Root.

Pour it into your favorite soup pot along with a can of coconut milk.


Tasty Kitchen Blog: Gingered Butternut Squash Soup. Guest post by Natalie Perry of Perry's Plate, recipe submitted by TK member Julia of The Roasted Root.

Grate some ginger into the pot. If you still don’t have a Microplane, it’s not too late to get one!


Tasty Kitchen Blog: Gingered Butternut Squash Soup. Guest post by Natalie Perry of Perry's Plate, recipe submitted by TK member Julia of The Roasted Root.

Add the cinnamon and salt. (I think next time I’d halve the cinnamon and double the ginger, but that’s just my taste.)


Tasty Kitchen Blog: Gingered Butternut Squash Soup. Guest post by Natalie Perry of Perry's Plate, recipe submitted by TK member Julia of The Roasted Root.

Add more chicken stock until the soup reaches your desired consistency.


Tasty Kitchen Blog: Gingered Butternut Squash Soup. Guest post by Natalie Perry of Perry's Plate, recipe submitted by TK member Julia of The Roasted Root.

Stir it well and heat it to a low boil.


Tasty Kitchen Blog: Gingered Butternut Squash Soup. Guest post by Natalie Perry of Perry's Plate, recipe submitted by TK member Julia of The Roasted Root.

Ladle this gorgeous soup into some bowls, top with a couple spoonfuls of the salad and a drizzle of coconut milk. (Don’t be like me and photo bomb yourself. Unless you really want to.)


Tasty Kitchen Blog: Gingered Butternut Squash Soup. Guest post by Natalie Perry of Perry's Plate, recipe submitted by TK member Julia of The Roasted Root.

I LOVED this soup. It has such a unique flavor, combined with the salad. Please don’t make this without the salad! I think it really takes the soup to a whole new level. (The recipe for the Beet Slaw can be found in Julia’s site. She credits her friend Jason for finding it on a paleo website.)


Tasty Kitchen Blog: Gingered Butternut Squash Soup. Guest post by Natalie Perry of Perry's Plate, recipe submitted by TK member Julia of The Roasted Root.

Thanks again, Julia (and Jason), for a great cleansing-between-rich-meals recipe for the holidays!

Be sure to check out Julia’s Tasty Kitchen Recipe Box as well as her blog, The Roasted Root, for more tasty, nourishing recipes!


Printable Recipe

Gingered Butternut Squash Soup

See post on Julia {The Roasted Root}’s site!
0.00 Mitt(s) 0 Rating(s)0 votes, average: 0.00 out of 50 votes, average: 0.00 out of 50 votes, average: 0.00 out of 50 votes, average: 0.00 out of 50 votes, average: 0.00 out of 5

Prep Time:

Cook Time:

Difficulty: Easy

Servings: 6

6
x

Print Options

Page size Letter 3x5 4x6
Text Size Small Medium Large
Content Include description
Include prep time, etc.
Show image

Description

Simple roasted butternut squash soup with coconut milk, chicken stock ginger, and cinnamon. Easy, nutritious and dairy-free!

Ingredients

  • 1 whole Butternut Squash, Medium-sized
  • Olive Oil, To Drizzle On Seeds
  • ½ teaspoons Salt, Or To Taste
  • 3 teaspoons Fresh Ginger, Grated
  • ½ teaspoons Ground Cinnamon
  • 2 cups Chicken Or Vegetable Broth
  • 1-½ cup Coconut Milk (full-fat Recommended) Or Almond Milk

Preparation Instructions

Preheat the oven to 375ºF. Cut butternut squash in half lengthwise, scoop out the seeds and lightly drizzle the flesh with olive oil and salt. Place squash in a casserole dish cut-side down and bake for 50 to 60 minutes until flesh is very soft and juices are seeping out.

Allow squash to cool and once cool enough to handle, scoop the flesh out and place it in a blender (discard the skin). Add the remaining ingredients to the blender and blend until completely smooth.

Pour the soup into a pot and heat to a low boil.


_______________________________________

Be sure to check out Natalie’s own beautiful food blog, Perrys’ Plate, where you can see her growing collection of lovely recipes. There’s always something new to see there. Go visit now!


Profile photo of Natalie | Perry's Plate

Gluten-Free Apple, Ginger and Spice Scones

Posted by in Baking, Step-by-Step Recipes

  As far as gluten-free baked goods go, these are seriously the bomb. We’re not an entirely gluten-free household, but occasionally I like to play with almond meal in baked goods. I love the rich, nutty (but not too nutty) flavor it imparts. And you can’t beat the nutritional benefits of almonds. These Gluten-Free Apple, […]

Profile photo of Natalie | Perry's Plate

Grandma Inez’s Pineapple Pie

Posted by in Baking, Step-by-Step Recipes

  I’m excited to share a recipe from my own box today because it’s one that’s close to my heart. I have a southern grandmother who cooks the best desserts. (I’m guessing many of you are nodding your heads and smiling. You know what I’m talking about, right?) Grandma Inez’s Pineapple Pie is my most […]

Profile photo of Natalie | Perry's Plate

Grilled Brie with Grilled Corn and Mango Salsa

Posted by in Step-by-Step Recipes

It never occurred to me to grill brie. Or pair it with a salsa. Or put bacon in mango salsa. The whole thing almost made my head explode---in the best way possible. It's brilliant. And it was like summertime on a platter. Luckily it's not hard, either. Here, I'll show you!

Profile photo of Natalie | Perry's Plate

Grilled Macadamia-Crusted Pineapple with Coconut Cream

Posted by in Step-by-Step Recipes

I big puffy heart love grilled pineapple. To me, it’s right up there with corn on the cob, watermelon, and drippy popsicles on my favorite summer food list. Cover it in crushed macadamia nuts and coconut cream, though? It’ll seem like you’re indulging, but it’s actually a pretty healthy treat! I’ve been eyeing Taylor Kiser’s…