The Pioneer Woman Tasty Kitchen
Profile photo of Megan {Country Cleaver}

Oven Fried Guinness Onion Rings

Posted by in Step-by-Step Recipes

Tasty Kitchen Blog: Oven Fried Guinness Onion Rings with Stout Gravy. Guest post by Megan Keno of Wanna Be a Country Cleaver, recipe submitted by TK member Lauren of Climbing Grier Mountain.

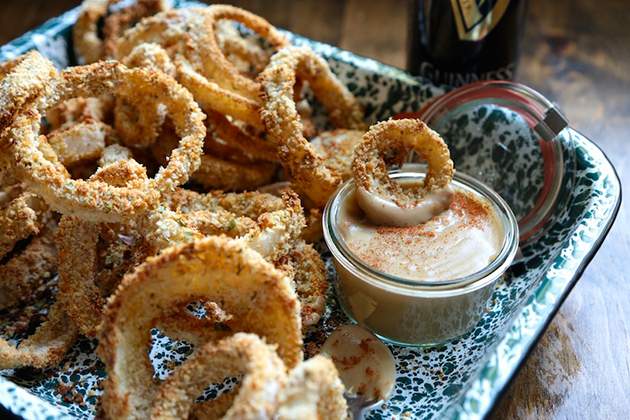
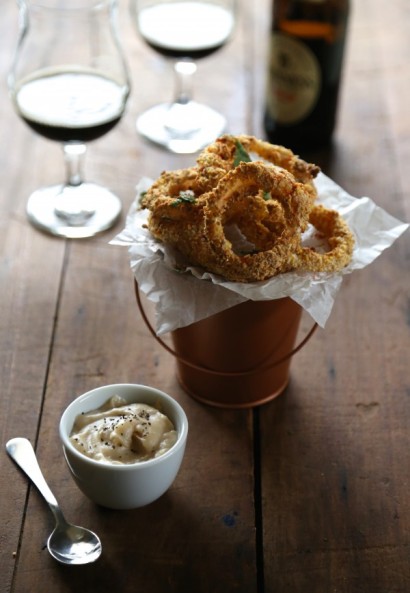
They always say the way to a man’s heart is through his stomach, and Lauren definitely helped me win the love of my husband all over again with these Oven Fried Guinness Onion Rings! If your hunny-bunny loves a good stout beer, like mine does, he will love this recipe too.


Tasty Kitchen Blog: Oven Fried Guinness Onion Rings with Stout Gravy. Guest post by Megan Keno of Wanna Be a Country Cleaver, recipe submitted by TK member Lauren of Climbing Grier Mountain.

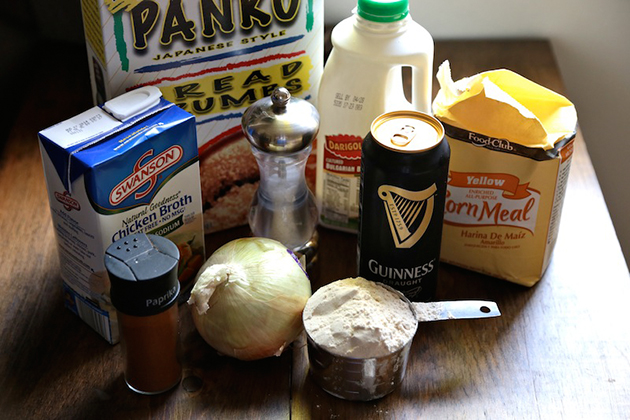
The ingredients are super simple and make perfectly crunchy onion rings. I definitely like these way better than the fried version.


Tasty Kitchen Blog: Oven Fried Guinness Onion Rings with Stout Gravy. Guest post by Megan Keno of Wanna Be a Country Cleaver, recipe submitted by TK member Lauren of Climbing Grier Mountain.

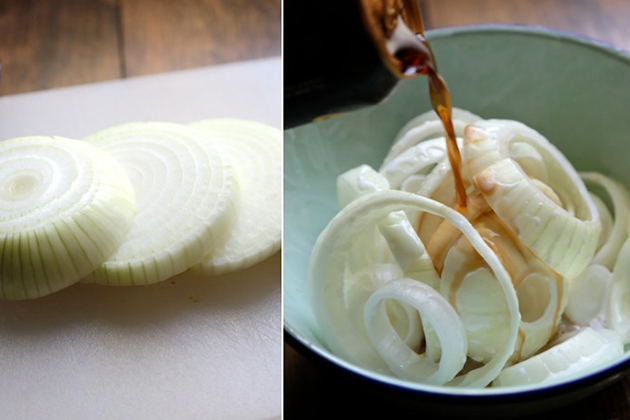
Using a sharp knife, peel and slice your onion into 1/2-inch rings. Place them in a large bowl and pour the buttermilk and part of the Guinness over the top. Lauren recommends letting them rest, covered, in the fridge for at least five hours. And she says they’re even better if left overnight.


Tasty Kitchen Blog: Oven Fried Guinness Onion Rings with Stout Gravy. Guest post by Megan Keno of Wanna Be a Country Cleaver, recipe submitted by TK member Lauren of Climbing Grier Mountain.

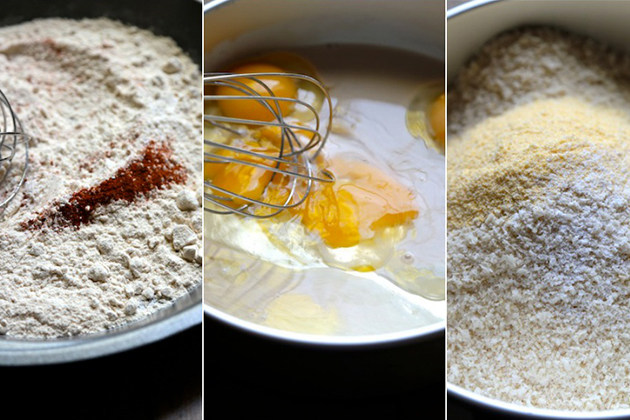
When you’re ready to prep your onion rings, I go with the “trip-dip” approach, preparing one bowl of seasoned flour for dredging, one bowl (or pie pan, in my case) of eggs and buttermilk as a wash, and one final pie pan of the panko and cornmeal to give the onion rings that uber-crunchy coating.


Tasty Kitchen Blog: Oven Fried Guinness Onion Rings with Stout Gravy. Guest post by Megan Keno of Wanna Be a Country Cleaver, recipe submitted by TK member Lauren of Climbing Grier Mountain.

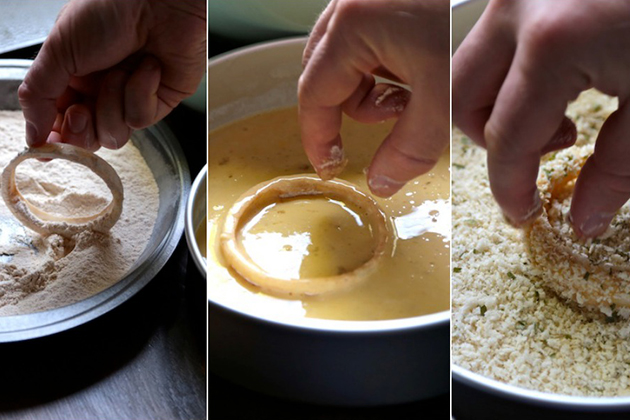
Next, gingerly gather your sliced onions from the buttermilk bath and dredge them in the flour, then the egg wash, and finally into the panko, coating them completely.


Tasty Kitchen Blog: Oven Fried Guinness Onion Rings with Stout Gravy. Guest post by Megan Keno of Wanna Be a Country Cleaver, recipe submitted by TK member Lauren of Climbing Grier Mountain.

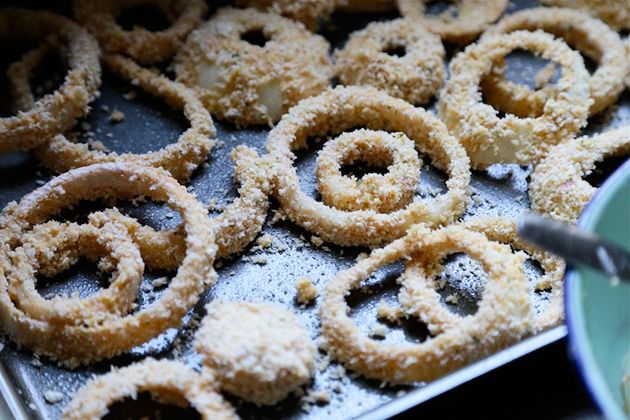
Place them onto a nonstick baking sheet that has been sprayed with additional nonstick spray, and bake!


Tasty Kitchen Blog: Oven Fried Guinness Onion Rings with Stout Gravy. Guest post by Megan Keno of Wanna Be a Country Cleaver, recipe submitted by TK member Lauren of Climbing Grier Mountain.

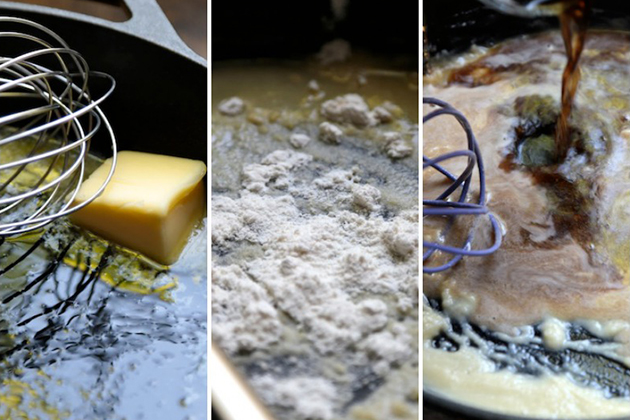
But don’t forget the Guiness gravy! While the onion rings are in the oven, melt your butter in a skillet or saucepan. Whisk in the flour to form a roux. When the roux turns golden brown, whisk in the Guinness and chicken stock until smooth.


Tasty Kitchen Blog: Oven Fried Guinness Onion Rings with Stout Gravy. Guest post by Megan Keno of Wanna Be a Country Cleaver, recipe submitted by TK member Lauren of Climbing Grier Mountain.

Be prepared to chow down and fight off your honey for these onion rings! Go visit Lauren at Climbing Grier Mountain for this and so many other inspired recipes, like her Spicy Reuben Chowder and other recipes in her TK recipe box. Jaw-droppers, all of them.


Printable Recipe

Oven Fried Guinness Onion Rings with Stout Gravy

See post on Climbing Grier Mountain’s site!
0.00 Mitt(s) 0 Rating(s)0 votes, average: 0.00 out of 50 votes, average: 0.00 out of 50 votes, average: 0.00 out of 50 votes, average: 0.00 out of 50 votes, average: 0.00 out of 5

Prep Time:

Cook Time:

Difficulty: Easy

Servings: 4

4
x

Print Options

Page size Letter 3x5 4x6
Text Size Small Medium Large
Content Include description
Include prep time, etc.
Show image

Description

A fun appetizer to celebrate St. Patrick’s Day!

Ingredients

  • FOR THE ONION RINGS:
  • 2 whole Yellow Or Sweet Onions, Cut Into 1/2 Inch Rings
  • 3 cups Buttermilk
  • ½ cups Guinness
  • 2 cups All-purpose Flour
  • 2 teaspoons Paprika
  • 2 teaspoons Kosher Salt, Divided
  • 3 whole Eggs
  • 2-½ cups Panko
  • ¼ cups Fine Cornmeal
  • Parsley, Garnish
  • FOR THE STOUT GRAVY:
  • 3 Tablespoons Unsalted Butter
  • 3 Tablespoons All-purpose Flour
  • ¾ cups Chicken Stock
  • ¼ cups Guinness Beer

Preparation Instructions

For the onion rings:
In a casserole dish, place sliced onions and cover with 2 cups buttermilk and beer. Cover dish with foil and put in fridge for at least 5 hours or for better results overnight.

Preheat oven to 450ºF. Remove onions from fridge and set aside. In a large bowl, combine flour, paprika, and half the salt. In another bowl, mix together remaining buttermilk and eggs. Take half of the flour mixture and add it to the buttermilk and give it a good whisk. In another large bowl, combine panko, cornmeal, and remaining salt.

Spray two baking sheets with nonstick cooking spray. Take an onion slice, dip into the flour, then the buttermilk, and then the panko. Place on baking sheet. Repeat with remaining onion slices. Bake onions for about 15 to 20 minutes, flipping midway. Bake until crispy. Garnish with parsley and serve gravy alongside.

For the stout gravy:
Preheat a sauce pan to medium heat. Melt butter. Add the flour and begin to whisk creating a roux. Let the flour cook out for a minute. Add the chicken stock and stout. Continue to whisk until thickened, about 5 minutes. Remove from heat.


_______________________________________

Megan Keno is the writer and photographer of Country Cleaver, a food blog fueled by Nutella and images of June Cleaver—if June wore cowboy boots and flannel, that is. A self-proclaimed country bum, Megan creates from-scratch recipes that range from simple to sublime and how-to’s to build your cooking repertoire. But she couldn’t do it without the help of her trusty—and furry—sous chef, Huckleberry. He’s a world class floor cleaner.


Profile photo of Erika (TK)

Looks Delicious! Bourbon Honey Ice Cream

Posted by in Looks Delicious!

Tasty Kitchen Blog: Looks Delicious! (Bourbon Honey Ice Cream with Brown Butter Crumble & Fresh Peaches, submitted by Lauren of Climbing Grier Mountain)

I’m sorry. I just had to share this. The recipe title says it all: Bourbon Honey Ice Cream with Brown Butter Crumble & Fresh Peaches. When I saw this beauty from Lauren, it just about stopped me in my tracks.

Believe it or not, this is Lauren’s first attempt at ice cream making. The gal sure knows how to make an entrance, right? Rather than start with a simple vanilla or even chocolate ice cream, she goes all out and puts together this bourbon ice cream from Saveur and a brown butter crumble from Food and Wine Magazine. Garnished with fresh peaches, it’s perfect for summer.

Thanks for sharing this, Lauren!


Profile photo of Erika (TK)

Let’s Talk Burgers

Posted by in Kitchen Talk

Tasty Kitchen Blog: Kitchen Talk (Let's Talk Burgers!)

Our family consumes more ground meat (beef, chicken, turkey, you name it) in the summer months than any other time of the year, mostly in the form of burgers. I suspect it’s the same for many others, because those family packs of ground meat are flying off the shelves at my local supermarket.

Given the amount of burgers we all seem to be enjoying this summer, it’s always nice to change things up a bit and do something a little different to spice things up. So tell us:

Do you have any killer burger tips to share?

Maybe it’s different condiments or toppings, or a special spread. Some like to pack cheese inside the patty, and some like to add bacon bits for a new take on a bacon burger. Me, I’ve been wanting to experiment with grinding my own beef at home and creating a burger blend, and I think I’m finally taking that plunge soon. (And yes, I will be trying a version with bacon mixed in. Because, why not?)

So come share your burger tips and tricks! It doesn’t matter if your signature burger is a straight-up beef burger, or one made with chicken, salmon, black beans, mushrooms—or even if it’s an awesome burger you had at some joint somewhere that you just can’t get out of your head. Let’s mix things up at the grill and have our guests talking about our burgers well past summer!


Profile photo of Natalie | Perry's Plate

Paleo Brownies

Posted by in Baking

Tasty Kitchen Blog: Paleo Brownies. Guest post by Natalie Perry of Perry's Plate, recipe submitted by TK member Elana of Elana's Pantry.

Some days I really want a brownie. Okay, most days I really want a brownie, but making brownies all the time would be a dangerous thing for me. I have very little self-control when there are baked goods sitting on my counter, and I end up eating them for breakfast.

No bueno.

Enter: Paleo Brownies by TK member elanaspantry. Elana is known for her almond flour recipes and paleo-focused blog and cookbooks. I’ve been reading her blog for several years and have had a lot of luck with her recipes. I think she has magical powers.

These chocolatey bites were just the thing to curb my brownie cravings without completely falling off the healthy wagon. They’re naturally sweetened, grain-free, and dairy-free. Can’t get much better than that.

Plus, they have a rich, dark, chocolate flavor. I like my chocolate (and my brownies) dark.

Let’s get started!


Tasty Kitchen Blog: Paleo Brownies. Guest post by Natalie Perry of Perry's Plate, recipe submitted by TK member Elana of Elana's Pantry.

You’ll need eggs, baking soda, vanilla stevia, coconut oil, blanched almond flour, dates, 100% cacao baking chocolate, and salt.


Tasty Kitchen Blog: Paleo Brownies. Guest post by Natalie Perry of Perry's Plate, recipe submitted by TK member Elana of Elana's Pantry.

First, put the almond flour, salt, and baking soda in the work bowl of a food processor. My food processor has a 9-cup bowl. You may be able to get away with a 7-cup bowl but I wouldn’t go smaller than that.

Did I mention all of this is done in a food processor? No other dishes or pots and pans needed! If you don’t have a food processor, go buy one.

Joking. (Kinda.)

You can make it without a food processor, but you’ll have to tweak the instructions a bit. I’ll help you out when we get to that point.


Tasty Kitchen Blog: Paleo Brownies. Guest post by Natalie Perry of Perry's Plate, recipe submitted by TK member Elana of Elana's Pantry.

Chop the chocolate into smaller pieces and add them to the food processor.

If you don’t have a food processor, melt the chocolate over low heat and stir it into the almond flour mixture.


Tasty Kitchen Blog: Paleo Brownies. Guest post by Natalie Perry of Perry's Plate, recipe submitted by TK member Elana of Elana's Pantry.

Pulse the mixture until it resembles wet sand and all of the large chocolate chunks have been broken down.


Tasty Kitchen Blog: Paleo Brownies. Guest post by Natalie Perry of Perry's Plate, recipe submitted by TK member Elana of Elana's Pantry.

Now for the dates. If your dates aren’t pitted, you’ll need to remove the pits. It’s super easy. Just rip them in half and pull the pits out.


Tasty Kitchen Blog: Paleo Brownies. Guest post by Natalie Perry of Perry's Plate, recipe submitted by TK member Elana of Elana's Pantry.

Add the date halves to the food processor.

If you (still) don’t have a food processor, jump in your car and grab one. I’ll wait.


Tasty Kitchen Blog: Paleo Brownies. Guest post by Natalie Perry of Perry's Plate, recipe submitted by TK member Elana of Elana's Pantry.

Pulse the mixture until (again) it looks like wet sand and the dates are broken up well.

No processor, still? You’ll need to chop those babies up really small. As in, mince. Then stir them into the mixture.


Tasty Kitchen Blog: Paleo Brownies. Guest post by Natalie Perry of Perry's Plate, recipe submitted by TK member Elana of Elana's Pantry.

Time for eggs! The recipe suggested three eggs, but my eggs were on the small side, so I used four. Blend the mixture again!


Tasty Kitchen Blog: Paleo Brownies. Guest post by Natalie Perry of Perry's Plate, recipe submitted by TK member Elana of Elana's Pantry.

Add the vanilla stevia.


Tasty Kitchen Blog: Paleo Brownies. Guest post by Natalie Perry of Perry's Plate, recipe submitted by TK member Elana of Elana's Pantry.

And coconut oil. I’ve made this with coconut oil in both liquid and solid form. It didn’t make a difference in the end.


Tasty Kitchen Blog: Paleo Brownies. Guest post by Natalie Perry of Perry's Plate, recipe submitted by TK member Elana of Elana's Pantry.

After the last blend, it should be thick and look something like this.


Tasty Kitchen Blog: Paleo Brownies. Guest post by Natalie Perry of Perry's Plate, recipe submitted by TK member Elana of Elana's Pantry.

Transfer the mixture into a greased 8 or 9-inch square baking pan. I used coconut oil spray to grease my pan.

Bake as directed in the recipe until an inserted toothpick comes out clean.


Tasty Kitchen Blog: Paleo Brownies. Guest post by Natalie Perry of Perry's Plate, recipe submitted by TK member Elana of Elana's Pantry.

Here they are after baking! I was ready to dive into these when I read, “Allow brownies to cool for 2 hours, then serve.”

DEVASTATION.

After making these a few times, I trust Elana. They taste much better after they’ve been sitting around a while. I thought the flavor was even better the next day. So wait, if you can. If you can’t, I won’t judge.


Tasty Kitchen Blog: Paleo Brownies. Guest post by Natalie Perry of Perry's Plate, recipe submitted by TK member Elana of Elana's Pantry.

They come out of the pan and slice so well, too!


Tasty Kitchen Blog: Paleo Brownies. Guest post by Natalie Perry of Perry's Plate, recipe submitted by TK member Elana of Elana's Pantry.

Thanks so much, Elana, for a healthier alternative to one of my favorite treats!

Go check out Elana’s TK Recipe Box as well as her blog, Elana’s Pantry for more paleo recipes and naturally-sweetened grain-free treats!

Notes:
These were slightly more cakey than I like my brownies to be, so I decided three eggs was better, even if said eggs were small. Also, if you reduce the baking time by a few minutes the texture is even more fudgy—which is my favorite.


Printable Recipe

Paleo Brownies

See post on elanaspantry’s site!
5.00 Mitt(s) 1 Rating(s)1 vote, average: 5.00 out of 51 vote, average: 5.00 out of 51 vote, average: 5.00 out of 51 vote, average: 5.00 out of 51 vote, average: 5.00 out of 5

Prep Time:

Cook Time:

Difficulty: Easy

Servings: 16

16
x

Print Options

Page size Letter 3x5 4x6
Text Size Small Medium Large
Content Include description
Include prep time, etc.
Show image

Description

These dark chocolate brownies are lightly-sweetened with dates and packed with other Paleo perks such as coconut oil.

Ingredients

  • 1 cup Blanched Almond Flour
  • ¼ teaspoons Celtic Sea Salt
  • ¼ teaspoons Baking Soda
  • 4 ounces, weight Baking Chocolate, 100% Cacao
  • 7  Medjool Dates
  • 3  Eggs
  • ½ cups Coconut Oil
  • ½ teaspoons Vanilla Stevia

Preparation Instructions

Preheat oven to 350°.

In a food processor, pulse together almond flour, salt and baking soda. Add the squares of dark chocolate and pulse until you reach the texture of coarse sand. Add the dates and pulse until you reach the texture of coarse sand. Add eggs and pulse to combine. Add coconut oil and stevia and pulse until mixture is smooth.

Transfer mixture to a greased 8 x 8 inch baking dish. Mixture will be very thick so you’ll need to smooth it with a spatula.

Bake at 350°F for 18-22 minutes. Remove from oven and set dish on a rack. Allow brownies to cool for 2 hours, then serve.


_______________________________________

Be sure to check out Natalie’s own beautiful food blog, Perrys’ Plate, where you can see her growing collection of lovely recipes. There’s always something new to see there. Go visit now!


Profile photo of Erika (TK)

Looks Delicious! Ice Cream Cake for Grads

Posted by in Looks Delicious!

Hooray for ice cream! If you're looking for a special yet simple and fun cake for a grad in your life---or just to celebrate the last day of school---look no further than this Ice Cream Cake with Circus Animal Crust from TK member

Profile photo of Erika (TK)

Kids in the Kitchen

Posted by in Kitchen Talk

It's almost officially summer! 'Tis the season for pool parties, backyard barbecues, camp, and having kids at home with hours of free time at their disposal. What to do with all that time! Or maybe their reading list is 2 pages long, and they'll need a break now and then from all that summer homework. Whichever the case may be, getting them into the kitchen at a…

Profile photo of Erica Lea

Roasted Garlic and Olive Focaccia

Posted by in Baking

Is it weird that I get excited at the thought of this focaccia (please say it isn't)? This Roasted Garlic and Olive Focaccia, brought to us by Sommer, is one that I'll definitely be making…

Profile photo of Erika (TK)

Let’s Talk Smoothies

Posted by in Kitchen Talk

For those of us who regularly enjoy smoothies, it's easy to get into a rut and make the same smoothies over and over again. Not that there's anything wrong with that, but if you're like me, you're ready for new ideas. So tell us:

What are your favorite smoothie tips or recipes?