


Activity around the kitchen always seems to ramp up as the end of the year approaches. First there’s the big Thanksgiving spread, and almost immediately after that, you have cookie trays, dinner parties, potlucks, and meals cooked and delivered with love to friends, family, and even strangers.
I love spending time in the kitchen and I’ve had my share of mistakes and mishaps in there. I like to think I’ve come a long way from the first time I ever gripped a spatula, and I attribute that to two main things: learning from my mistakes (and wounds and scars), and learning from others.
It’s been a rough weather week for many of us in the US so I thought it would be a great time to pour a cup of coffee—or tea, or hot chocolate—and sit and chat a bit. Our topic for today is:
What’s your favorite problem-solving trick in the kitchen? And what gives you the most trouble?
It would be lovely to share what we’ve learned over the years, and who knows, we might be able to help someone else struggling with a problem we’ve finally been able to nip!
I’ll start us off. I have two weaknesses when it comes to flavor: salty and sour, preferably at the same time. I really enjoy it when there’s a balance of both salt and acid in one dish. But it’s a delicate balance to achieve because it’s easy to overdo it in either direction. The tricks I’ve learned to fix either too much salt or too much acid are courtesy of my husband, who happens to be great in the kitchen (yay for me!).
Too salty: If a dish happens to be too salty, throw in a potato or two to soak up excess salt. The size of the potato pieces will depend on you; make them larger if you want to fish them out before serving, or make them the appropriate size if you intend to just leave them in the dish. You can also use a tomato in place of the potato, whichever suits the dish best. This also works when you add too much spice to a dish, which is my husband’s more-often problem.
Too sour: If too much acid is the problem, stir in the tiniest—and I mean tiniest—pinch of baking soda. Let it foam a bit, then taste. Add baking soda in very small amounts until the acid is neutralized.
Of course, the best tip is to always season carefully and incrementally so you don’t have to fix anything later. But sometimes I’m impatient or distracted and can’t help it, so those are my favorite troubleshooting tricks for when I end up heavy-handed with the salt or acid.
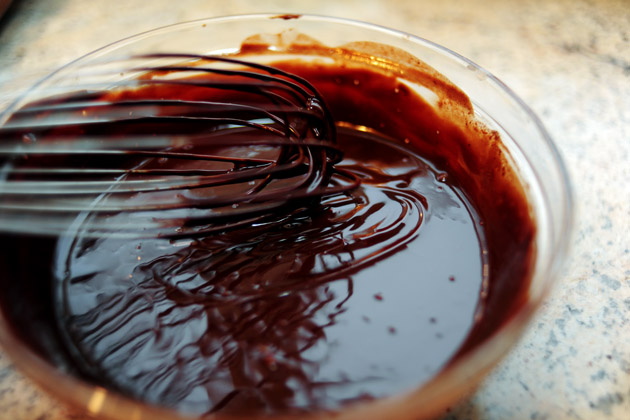
The one thing I have yet to master? Tempering chocolate. The chocolate still manages to seize up on me now and then. Any tips for me?
How about you? What nuggets of wisdom can you impart? What favorite problem-solving tip has saved you in the past? Or maybe it’s a favorite quick substitute for an ingredient you don’t have. And what would you like help with? Come share!

51 Comments
Comments are closed for this recipe.
jeanne on 12.29.2013
I second the microwave method for cooking rice. I was sort of a rice-snob, totally resisted my niece’s suggestion to try microwaving it. But I also hated dealing with that sticky residue at the bottom of the pot.
Now I microwave it and the rice is perfect every single time. I use Jasmine rice…just follow the microwave instructions on the back of the bag. And no sticky pot to clean!
TIP: When I make whipped cream I use a straight-sided bowl to minimize the “splatter”. But sometimes it’s being used and I have to resort to a shallower bowl. Then I avoid the splatter by cutting a hole in the middle of a paper plate and placing the plate over my mixer blades. When I start whipping, the plate falls down and covers the bowl, keeping all splatters IN the bowl.
Nan De Vries on 12.28.2013
Dry, fresh coffee grounds both absorb unpleasant odors *and* leave their own fragrant aroma behind. Once when I was away for several weeks on vacation the freezer part of my fridge stopped working – ugh – with fish in it. The coffee grounds worked much better and faster than baking soda did to help me take care of the horrible smell.
I thought of that again last night: my car, which has junked up during the Christmas season because I’ve been too busy to keep it neat and clean, and had gotten musty smelling. But a couple days ago a wonderful friend of mine had dropped off at my work place a French press coffee pot and some magnificent coffee from one of Lincoln, Nebraska’s fun and funky Haymarket coffee houses. I put it unopened (didn’t know what was in the package) in the car trunk. Within half a day the whole car, inside too, smelled like I had a freshly brewed cup of very aromatic coffee in there… It’s like the gift that gave twice!
billiev on 12.27.2013
I do my rice in the microwave oven. Got the recipe off a package of rice years ago and it still works like a charm. It is important to have a bowl or dish that has a heavy fitted lid. Place 1 cup of white rice and 2-1/4 cups water into a microwave safe dish. Place lid on dish and microwave on high for 5 minutes. Remove from oven and stir. Replace lid and return to microwave and microwave on 50% power for 15 minutes. Let stand 10 minutes before removing lid. Fluff with a fork and serve. Perfect every time. I usually add a couple of chicken bouillon cubes along with the water and sometimes other seasonings. A tablespoon on cooking oil/butter can also be added (this was an option in the original recipe) but as often as not, I skip the oil. The rice is not quite as fluffy with the oil added. Sometimes I add dried onion flakes, parsley, garlic powder. Whatever floats your boat.
Alice E on 12.25.2013
My latest victory involves bread making. For those who are nervous about yeast and bread making I recommend an instant read thermometer. Judging how warm water is can be tricky for some of us, but the thermometer always knows! I proof my yeast in water between 100 and 110 degrees Fahrenheit, but recipes where you mix the yeast in the flour usually call for temps around 120 degrees. I it is a cool day, it takes longer for the dough to rise, but I just expect that and work around it.
Alice E on 12.25.2013
My favorite way to cook rice is to add a little bit of oil to the empty pan, then heat the rice for a couple minutes in the oil, stirring constantly. Add the water, or other liquid, and watch closely till it comes to a boil, then reduce the heat and put the lid on and set your timer. You want a slow simmer. It doesn’t need to boil with the lid on, just a very few bubbles at the edge. You do have to check to be sure the heat is right after the lid has been on for a few minutes. The little bit of fat helps keep it from foaming when it comes to a boil. But I don’t put the lid on until the boil subsides. Hope this helps. Because the pot is hot from heating the rice in the oil (butter would probably work as well) the water doesn’t take long to boil. This is basically the way you start pilaf, but it works to cook just plain rice as well.
Alice E on 12.25.2013
I use one of those little pottery stone bears in my brown sugar and it stays soft. They are fairly cheap in the kitchen gadgets area of some stores. You wash them, then soak them briefly in water, dry them off and put them in the canister with the sugar. To soften the sugar, you can add half an apple, skin side down for a day of two, then take it out. The moisture in the apple, or the bread slice, softens the sugar, but it does take time.
jackie d on 12.25.2013
My husband tells me I take better care of my iron skillet then I do him!
Starting with a crappy skillet: scour it with kosher salt and a bit of vegtable oil, scrub it good, wipe with paper towel. Cook in it a lot using oily stuff, fried chicken, etc…once you cook something in it, just run it under hot hot hot water, do not use soap!! I know you think you should but don’t!! People have been eating out of unsoaped cast iron for years!! After you rinse the pan, you can scrub and clean with a clean sponge (no soap sponge). Once it is clean, put on stove on low heat until almost dry, wipe with paper towel to finish up the drying, turn off heat, only takes a minute or two…no get a paper towel lightly damp with a tablespoon of veggie oil and wipe the whole skillet, you should have a nice clean shine to it. Follow this procedure everytime you use the skillet!! Do not let it sit around with food, clean right after cooking using this method!! once you get going eventually it will be a beautiful dark black well seasoned skillet! Cook, rinse hot, wipe down. There you go, my skillet is over 25 years old, it is pretty much a non stick pan, and has silky smooth finish to it! But I am dilligent about caring for it and no one is allowed to cook in it but me!!
ReniLyn on 12.23.2013
After taking a candy class in high school (ahem …just a few years back…ahem), j finally found the two ingredient secrets to perfect chocolate. But first let me mention that you mustn’t buy expensive chocolate, ever, when using it as a coating. Ok, first add in is a small amount of Crisco. Not store brand, not another brand…just Crisco. Say you were using a bag of chocolate chips – add one Tbls to your melting bowl. Also, to the same bowl, add one Tbls of paraffin. I know, I know. Sounded odd to me too, until i started reading labels of my favorite chocolates! They all had SOME form of wax! Go figure! Use these tips over a VERY small amount of heat and you’ll never have temper issues! !
Joanna Reeves on 12.21.2013
When my brown sugar gets too hard to use, I use white sugar and mix in some molasses. That gets the color, moisture and flavor of brown sugar.
Sophie on 12.21.2013
Lloyd’s precooked baby back ribs for dinner last night Gluten free and delicious ! Popped them in the oven and heated them up .
CateS on 12.21.2013
My best hint is to buy quality… I still have a lot of kitchen items from over 30 years because they were quality! But I will say, don’t spend a lot of money on mandolines.. if you use them frequently, because you need the sharpness of the blades. But do invest in a cutting glove to save your fingers!
Sandy Manning on 12.21.2013
A heating pad can be used to set a bowl on to speed along yeast rising if your room is cold. It can also be used as a plate warmer. I hate putting a nice dinner on a cold plate!
Tina on 12.21.2013
How do you clean and maintain a cast iron pan. Ree’s pans always look so glossy and black. Mine recently started peeling. Now its an ugly mess. I’ve always struggled to get it clean, especially after egg dishes like Ree’s Migas!
Mandy on 12.19.2013
I found the easiest way to seed a bell pepper on Food Network a while ago.. I think it was Giada, but she turned the pepper upside down, made a large slit across the bottom of the pepper, and just pulled the sides apart. The seeds and stem always go with one side of the pepper, while the other side comes out clean. All you have to do is pull the stem off, it’s super easy!
Patricia @ ButterYum on 12.19.2013
Cara – two suggestsions. 1) use a larger saucepan, or 2) get yourself a Kuhn Rikon Spill Stopper. It’s a thingy you put on top of your saucepan and it prevents boil overs. It really works.
Tara W on 12.19.2013
Patty- a flower nail is used for making frosting roses. You find it in the cake decorating section, near the icing tips.
Cara on 12.19.2013
Does anyone have advice for keeping rice cooked on the stove from boiling over? I live at altitude (8200 ft) and every time I make rice I get ricy-water all over the stove because it invariably boils over. The handy wooden spoon over a pot trick doesn’t work since rice has to be kept covered. Thanks!
Patty White on 12.19.2013
Hi everyone, great tips! I don’t understand #19 though. What is a “flower nail”?
Thanks!
Aparna B. (Not A Leaf) on 12.19.2013
I have a coffee grinder that I use specifically for grinding spices for garam masala. Often times the dried mixture will stay inside the grinder leaving that smell in there. Tear a few pieces of bread and throw that into the grinder and grind away! It will clean out the grinder ridding it of the smell and stain so you can use it for something else.
Wendylee on 12.19.2013
To keep brown sugar soft, use a container that can be tightly sealed and toss in a whole slice of fresh bread. Check every couple of weeks and when the bread is hard/dry, simply replace with another slice of fresh bread. Any type of bread will work, as long as it’s soft and fresh. I have done this for years, and my sugar is always soft and ready to use! If you already have a rock hard box of sugar that you need in a hurry, use the tip above about microwaving with a damp paper towel, but check every few seconds. Know that you will have to use the sugar quickly after using this method, because when the sugar cools, it will revert back to rock solid!
Aparna B. (Not A Leaf) on 12.19.2013
I use a spoon for peeling things or hulling out centers of vegetables. Using a spoon is a great way to scrape the peel off of ginger. I also use a spoon after cutting jalapenos or other hot peppers in half. It’s a great way to scoop out the centers without having to cut with a paring knife, or using your fingers and having the pepper spice left on your finger tips!
CatCat on 12.19.2013
Put one tablespoon of white vinegar on the water when making hard boiled eggs to bright yellow yolks.
Piggerts on 12.19.2013
To prevent brown sugar from becoming hard, put a few marshmallows (small or large) in the bag with the sugar.
Carol on 12.19.2013
When making cookies with a Hershey Kiss in the center, freeze the candy before using. I always store the candy in the freezer so I know it’s frozen rock solid when I use it. Unwrap the amount of frozen candy needed, place them on a plate and return the candy to the freezer while the cookies are baking.
When the cookies come out of the oven, pop a frozen kiss in the center of each one while they’re on the cookie sheets. The bottoms will melt enough to adhere to the cookie and the rest of the candy retains its shape and doesn’t melt into a puddle.
Freezing the candy allows you to use the caramel and cherry cordial kisses without them splitting open when they hit the hot cookie.
Michele H. on 12.19.2013
I buy a large bag of baking soda & keep in cabinet under kitchen sink. I pour some into a glass shaker with large holes (like for sprinkling powdered sugar). Shake this and your liquid detergent into a pot or pan after dinner, and let sit….any sticky cooking residues will come off easily when you clean the pots. I also use baking soda to clean, polish and deodorize my stainless steel sink. You can get a second shaker and put in fridge to neutralize odors. I got mine at the dollar store.
Michele H. on 12.19.2013
I heard recently that putting the large size marshmallows in a container of brown sugar keeps the sugar moist. I am going to try this, and if it doesn’t work, I’ll go back to doing it like TK-Erika mentioned. This has always worked for me as well.
Ala on 12.19.2013
One thing that rocks for too-dry cakes is turning them into cake balls–the frosting rehydrates the cake and saves it from going to waste! I also love dipping anything that has turned disastrous (i.e. bar cookies, underbaked goods) into chocolate to make truffle balls, since the flavor is all there and it’s just the texture that needs tweaking. Thanks for the great thread!
Patricia @ ButterYum on 12.19.2013
Okay, last contribution for night. To peel hazelnuts easily, bring 2 cups of water and 3 tablespoons of baking soda to a boil. Add the hazelnuts and boil for 3 minutes. Drain and rinse – the skins will slip right off.
To open a coconut, drill holes in the eyes to drain liquid, then place it on a sheet pan and roast in a 400F oven for 10-15 minutes until the coconut cracks open. Easy.
Patricia @ ButterYum on 12.19.2013
When bringing butter to room temperature for baking, it should retain it’s chilled appearance, but should be soft enough to squish easily when pressed (65-75F). If the butter starts to look oily or separated, it’s been left out too long.
Patricia @ ButterYum on 12.19.2013
The older eggs are, the easier they are to peel when boiled so plan ahead. When I make eggs salad or deviled eggs, I use eggs that are several weeks old.
Patricia @ ButterYum on 12.19.2013
Use insulated baking strips around cake pans to prevent the cakes from forming humps when they bake. Works like magic. If you have the opposite problem and your cakes alway fall in the middle, place an upside down flower nail in the center of a cake pan full of batter before baking. The flower nail will heat the batter in the center of the pan so it won’t be underbaked.
Patricia @ ButterYum on 12.19.2013
If you soak a burned saucepan overnight in water with healthy dose of baking soda sprinkled in, the pan will be very easy to clean the next day.
Kaity on 12.18.2013
When you temper chocolate, there can be absolutely no moisture. This will cause your chocolate to seize, making it grainy and it will not set correctly. Use a thermometer! Temperature control is very important. You will need to temper couverture or high quality chocolate. Any chocolate that has other oils and fats in it do not need to be tempered like couverture.
White, milk and dark will vary slightly in the temperatures, but each follow the same process. As Heather mentioned, chocolate comes tempered. If you can heat it without taking it out of temper, then you do not need to worry. For white, 30 C, milk 31 C and dark 32 C is the MAXIMUM temperature it can be taken to without taking it out of temper. (This temperature will vary depending on the brand, but it is a good starting point.)
Otherwise, melt the chocolate until it reaches at least 46C, and no more than 50C. This melts out all the crystals in the cocoa butter. Then, drop the temperature to 26-27 degrees, either by working 1/2 on a clean and dry marble bench until it looks pasty, and then add back into the melted chocolate, and bring back to the working temperature as noted above. Dropping to this temperature sets the cocoa butter into it’s most stable form, so when it sets, it will glossy and snap. Or, reserve 1/3 of the total weight of chocolate, and add in, stirring until they are mostly melted. Then bring the temperature back up to the temperatures above.
You can work over a double boiler, but you run the risk of moisture being introduced. There is nothing wrong with using a microwave! It’s much easier. Only ever do short bursts of time, not going above 50% power.
If your chocolate seizes, you won’t be able to use it for coating or lining moulds. But it can still be used for cooking, or ganache, since you will be introducing more moisture.
Ellie on 12.18.2013
A bread crust in your container of “hard” brown sugar will soften it up overnight .
Heather on 12.18.2013
The best tip for tempering chocolate is ….well, never get it out of temper to begin with. I know that sounds like non-advice, but if you can get your chocolate to melt with as little heat possible, it will spread beautifully and then harden to a gorgeous finish without having to add shortening or butter. Small batches, short bursts in the microwave, lost of stirring, and you’ve got yourself some perfect, still in-temper chocolate to play with.
Also, if you’re making fudge with sweetened condensed milk, it is flawless if you add the chocolate and the milk to the sauce pan at the same time, and heat both together, just till the chocolate starts to smear into the milk, then remove from heat and stir till smooth.
Helena Mouta on 12.18.2013
I actually temper my chocolate using a method I saw Ina Garten doing in one of her shows: chop your chocolate very finely; melt about 75% of your chocolate until completely melted (I usually do this over a pan of simmering water and it always works out fine, but you can use the microwave); take it off the heat and stir in the remaining chopped chocolate until it’s all melted. However, I do think the quality of the chocolate has a lot to do with how well it melts. I have purchased a cheap bar of white chocolate to melt and it simply would never melt, no matter what I did. It just remained hard and grainy, even after adding some butter and even some milk. Will definitely NEVER buy that chocolate again!
Andres on 12.18.2013
This video has my favorite food disaster recovery tip: http://foodwishes.blogspot.com/2009/08/how-to-fix-broken-hollandaise.html
It may not be the most useful (not like I make hollandaise daily), but it does win in the “wow that’s magic” department.
NancyW on 12.18.2013
If you ever burn a pot of rice…Run cold water over the outside of the bottom of the pot… Keep the pot covered, and don’t add water to the rice in the pot. Running cold water on the bottom of the pot from the outside will help keep the burnt layer at the bottom from permeating the rest of the rice. Then, salvage as much unburned rice as you can….
Tempering chocolate is tricky…when I was a child our neighbor was a fantastic cook..I learned a lot from her…she told me cocoa beans from different regions vary..and has a lot to do with the temperature the chocolate needs to reach for optimum tempering…As I watched her…. it also takes patience..
Carol Bee on 12.18.2013
The one thing I did learn from Ree’s site (Pioneer Women) is that when you are cooking a pot roast, do not depend on the cooking instructions, no matter how big/small the roast, cook until it starts falling apart in the oven, then it’s done. Take it out too soon (according to direction) and it will be tough. I have never cooked a good pot roast until I tried this.
Cheryl A. on 12.18.2013
Hi All,
I went to bake some chocolate chip cookies for a bake sale at work and my light brown sugar which was opened but placed in a sealed large plastic bag was hard as a ROCK! I’ve heard that you can soften it but wasn’t sure how and ended up calling my Mom in a panic to use hers.
Anyone know how to soften hard (I’m talking rock hard) brown sugar?
Thanks!!
Cheryl
Erika (TK) on 12.18.2013
Hi Cheryl! That’s happened to me before. If you put it in a container with a wet paper towel (wet but not dripping wet) and microwave it in short bursts, about 10- or 15-second increments, the sugar will soften enough to use. To keep my brown sugar from hardening during normal storage, I always squeeze all the air I can out of the plastic bag, then seal it tightly and keep it in another sealed container. Hope that helps!
pattycake on 12.18.2013
I hate sticky, gluey mashed potatoes! Here’s how I avoid them: After draining, I put cooked potatoes back in the pan over very low heat and mash with my trusty hand masher. Then I add in WARMED milk and melted butter, stirring in while still over low heat. Works like a charm–nothing gluey about my taters!
Yanica on 12.18.2013
Any tips for making fudge? Half the time my seizes up when adding the Sw. Cond. milk to the melted chocolate, and then turns greasy and separates.
Kim on 12.18.2013
The best one I’ve found was for Swiss Meringue Buttercream’s. If it stays curdled looking despite how long you’ve been beating it, take out about 1/3 of the mixture and microwave it until it’s liquidy, then pour it back in and let it go for five minutes or so. You’ll come back and it will be beautiful!
The Suzzzz on 12.18.2013
Fats are good for helping with the temper of your chocolate. My favorite is adding cocoa butter into the chocolate, but you can use regular old vegetable oil or coconut oil as well.
Jessica H on 12.18.2013
The thing that I learned that improved my baking tremendously is to always cream the butter and sugar together long enough. It is not enough to just mix them. You really have to whip them so that enough air gets in the mix. It takes 3 minutes with a stand mixer, a little longer with a hand mixer to really get the job done.
The Suzzzz on 12.18.2013
For some reason I can’t get dough to rise in my kitchen. My house is cold and VERY dry. So I cheat. I grab my laundry squirt bottle and spritz a bath towel, then run the towel in the dryer on high for about 20 minutes. When the twenty minutes are up I put the bowl of dough in the dryer on the towel, covered with a dish cloth, and it proofs like a dream.
As for candy making, if your house is too dry your centers will be overly firm and chewy. So having a touch of humidity in your home while making and forming centers isn’t a bad idea, you just want it dry when you are actually tempering and dipping.
Jessica H. on 12.18.2013
a tablespoon or so of shortening: I found this trick myself a year or so ago when my chocolate that would not temper siezed up like a brick. Drop it in and stir, and you’ll have glossy, smooth chocolate.
Kym on 12.18.2013
I once heard that the key to tempering chocolate is to make sure it stays absolutely dry….moisture is the enemy. Oddly enough, though, if your chocolate seizes you can add water, 1tsp at a time, stirring well each time. It will return the chocolate to a nice glossy state. And it works!!!!
leah g on 12.18.2013
Never do laundry when making candy. At least for us. We found this seems to somehow increase the humidity in the house just enough to make everything not quite right.
Erika (TK) on 12.18.2013
Wow, I never would have even thought of that. Great tip, Leah! I have plans of venturing into candy-making next year and I’ll make sure I remember that.