The Pioneer Woman Tasty Kitchen
Profile Photo

Chiles Rellenos

0.00 Mitt(s) 0 Rating(s)0 votes, average: 0.00 out of 50 votes, average: 0.00 out of 50 votes, average: 0.00 out of 50 votes, average: 0.00 out of 50 votes, average: 0.00 out of 5

Prep:

Cook:

Level: Intermediate

System:

6
x

Print Options

Page size Letter 3x5 4x6
Text Size Small Medium Large
Content Include description
Include prep time, etc.
Show image

Description

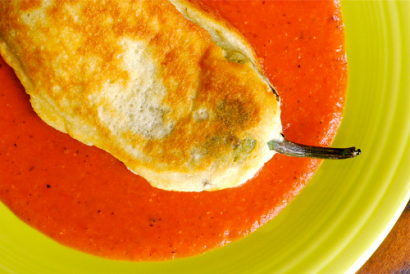
Perfectly delicious Chiles Rellenos. Crunchy, yet fluffy. Delicate, cheesy and tender chile interior. Plus a recipe for an awesome sauce!

Ingredients

  • FOR THE RELLENOS:
  • 6 whole Medium-to-large Anaheim Chile Peppers, Unpeeled, Stems Attached
  • 1 cup Cheddar Cheese, Grated
  • 1 cup Monterey Jack Cheese, Grated
  • 2 whole Eggs, Separated
  • ½ cups Milk
  • ½ cups All-purpose Flour Plus 1/4 Cup For Coating
  • ½ teaspoons Baking Powder
  • ½ teaspoons Baking Soda
  • ½ teaspoons Kosher Salt
  • ¼ teaspoons Ground Black Pepper
  • ½ teaspoons Olive Oil Plus Enough To Coat A Deep Skillet To Approximately 1/4-inch
  • 1 container Vegetable/canola Oil, Enough To Coat A Deep Skillet To Approximately 1/4-inch
  • _____
  • FOR THE SAUCE:
  • 1 Tablespoon Olive Oil
  • ⅔ whole Medium Onion, Chopped
  • 2 teaspoons Kosher Salt
  • ¼ teaspoons Ground Black Pepper
  • 3 cloves Garlic, Smashed
  • ⅓ cups All-purpose Flour
  • 1 can 28 Oz Crushed Tomatoes
  • 1-½ teaspoon Dried Oregano
  • 2 cups Chicken Stock (preferably Homemade)
  • 1 whole Bay Leaf

Preparation

There are several ways to peel a chile pepper: (1) place it about six inches beneath the broiler on a baking sheet, (2) place on an outdoor grill or (3) place on top of a gas stove (my method — though be sure to have ventilation ‘cuz it can get a bit smoky). Any way you choose, use tongs to turn the chile peppers as they darken. The idea is to burn as much of the peel/skin as possible. Keep a close eye on the chiles as they may go from blistered to burnt very quickly.

Once the skin is fully charred, place the hot chiles into a Ziploc bag and seal. Set aside for several minutes. The steam within the bag will help with removal of the skin.

Once the chiles are cool enough to touch, carefully make one slit up the side of each chile, keeping the stem intact. Gently remove the skin, seeds and membranes from the peppers. Gently stuff each chile with a combination of grated cheddar and Monterrey jack cheese until you’re just able to close at the slit comfortably. If the chile is refusing to stay together, you can try using a toothpick, but I found it unnecessary.

Whip the egg whites by hand or with an electric mixer until stiff. Set aside.

Combine milk, 1/2 cup flour, egg yolks, baking powder, baking soda, kosher salt, pepper and 1/2 teaspoon of olive oil in a deep large bowl. Gently fold in the egg whites until just mixed.

Pour equal amounts olive oil and vegetable/canola oil to reach 1/4-inch depth in a large, deep skillet. Heat oil over medium-high heat.

In a shallow bowl, spread out 1/4 cup flour. Roll each stuffed chile in the flour and gently shake off all excess flour. Dip chile into batter, holding the chile by its stem. Cover the chile as much as possible with the batter up to the stem, but leave the stem uncovered. The stem will be your holding/flipping device. Quickly transfer to hot skillet. Cook each chile until lightly browned on both sides. Transfer to a plate lined with paper towels until ready to serve. Serve quickly if possible, and with some chile relleno sauce (see below for recipe instructions).

For the sauce:

Heat oil in medium-large sauce pan over medium heat. Add onion and cook until sweating, about 5-8 minutes. Add kosher salt, pepper and garlic and cook for an additional 2 minutes, stirring occasionally.

Add flour, tomatoes and oregano and cook until thickened, about 5-8 minutes.

Add stock and bay leaf and bring to a boil, cooking for about 10 minutes. Remove bay leaf and discard.

Using a stick blender, blender or food processor, puree the sauce until smooth. Serve with chiles rellenos.

Enjoy!

One Comment

You must be logged in to post a comment.

Profile photo of Dez

Dez on 5.15.2011

Not sure why this is labeled vegetarian with the chicken stock in the recipe. Can this be done with vegetable stock and still taste the same?

No Reviews

You must be logged in to post a review.
Related Recipes

Cauliflower Tabbouleh (Keto, Gluten-Free)
Profile Photo by Kendall Smith in Special Dietary Needs
You say tabouli, I say tabbouleh! This Cauliflower Tabbouleh is based...
0.00 Mitt(s) 0 Rating(s)0 votes, average: 0.00 out of 50 votes, average: 0.00 out of 50 votes, average: 0.00 out of 50 votes, average: 0.00 out of 50 votes, average: 0.00 out of 5

Prep: Cook:

Serves: 6 Level: Easy


Keto Broccoli Bacon Salad
Profile Photo by Blondelish.com in Special Dietary Needs
Creamy lemon dressing, crunchy broccoli, and crispy bacon make this Keto Broccoli...
0.00 Mitt(s) 0 Rating(s)0 votes, average: 0.00 out of 50 votes, average: 0.00 out of 50 votes, average: 0.00 out of 50 votes, average: 0.00 out of 50 votes, average: 0.00 out of 5

Prep: Cook:

Serves: 6 Level: Easy


0.00 Mitt(s) 0 Rating(s)0 votes, average: 0.00 out of 50 votes, average: 0.00 out of 50 votes, average: 0.00 out of 50 votes, average: 0.00 out of 50 votes, average: 0.00 out of 5

Prep: Cook:

Serves: 9 Level: Easy


Vegan Lentil Burger
Profile Photo by AD Kitchen in Special Dietary Needs
Today's recipe is amazing Vegan Lentil Burgers that tastes like regular...
0.00 Mitt(s) 0 Rating(s)0 votes, average: 0.00 out of 50 votes, average: 0.00 out of 50 votes, average: 0.00 out of 50 votes, average: 0.00 out of 50 votes, average: 0.00 out of 5

Prep: Cook:

Serves: 7 Level: Easy


Aunt Rocky’s Easy Sweetbreads (Low Carb, Gluten Free)
Profile Photo by Roxana Lopez in Special Dietary Needs
A simplified method, with delicious results! Sweetbreads are a nutrient...
0.00 Mitt(s) 0 Rating(s)0 votes, average: 0.00 out of 50 votes, average: 0.00 out of 50 votes, average: 0.00 out of 50 votes, average: 0.00 out of 50 votes, average: 0.00 out of 5

Prep: Cook:

Serves: 3 Level: Easy