1. Combine warm water, yeast and sugar in a glass bowl. Stir and let sit 5 minutes. This allows the yeast to proof and shortens the rising time.
2. In a large bowl or plastic bag, combine dry ingredients. Mix well and set aside.
3. In a separate bowl, using a heavy-duty mixer with a paddle attachment or dough hook, combine remaining ingredients until well blended. Add water/yeast mixture and combine.
4. With the mixer on lowest speed, slowly add dry ingredients until combined. Scrape the bottom and sides of the bowl with a rubber spatula. With the mixer on medium speed, beat for 4 minutes.
5. Spoon into a prepared bread pan or mini-loaf pans. Let rise, uncovered, in a warm, draft-free place for 30-40 minutes, or until dough has risen to the top of the pan.
6. Meanwhile, preheat oven to 350 degrees F. Bake for 35 to 45 minutes or until loaf sounds hollow when tapped on the bottom of a single loaf.
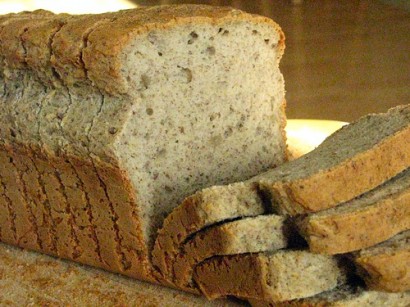
7. Slice and wrap while still warm in airtight individual sandwich bags, then place these in a larger freezer bag. Freeze up to 6 weeks.
Note: I love the new electric knife we got as a gift, it makes such wonderful, even slices. Perfect!
Nutritional value per serving based on 16 slices per loaf : 131 calories, 4g fat, 19g carbs, 3g protein and 1.5g fiber.


9 Comments
Leave a Comment
You must be logged in to post a comment.
bakingbeauties on 10.27.2010
Sometimes, looks just don’t matter, huh? Even if it’s not the prettiest, it still makes a fantastic panzanella!
I don’t do anything to prep my silicone pan that I use. After baking, wait for 5 minutes, then start to pull the pan away from the bread, and it has always released. So nice, when the other pans were sticking, even though I was doing everything to make them not stick.
whatlifedishesout on 10.27.2010
I had already planned to pick up an 8 x 4 pan for this recipe, since I baked it in a 9 x 5 and it was more rectangle than square, so I’ll have to get it in silicone when I do. Do you have to grease or prep the silicone at all? My normal everyday bread recipe does well in the larger pan shape-wise, but there is a greater volume of flours in mine – I noticed that when I was mixing your recipe. Anyway, the flavor of this was fantastic…I’m just going to have to follow your tips to get the looks improved!
bakingbeauties on 10.26.2010
Oh, and I can rarely wait for it to cool too, I’m always slicing it while warm. So glad that you’ve enjoyed it! woohoo!
bakingbeauties on 10.26.2010
Yep, the cinnamon raisin bread is on my blog already: http://www.thebakingbeauties.com/2010/04/gluten-free-oatmeal-cinnamon-raisin.html
As far as sticking goes, I ended up buying myself silicone pans to bake bread in. I found that it started sticking in my non-stick pans as well, even with the parchment paper under there and up 2 sides. Not sure why though, but I’ve had a horrible time with bread sticking. The silicone releases pretty easily though. After I remove it, I let it sit about 5 minutes before turning it out on a towel covered cooling rack. I also cool my breads on the side, then wait a while, and flip it to the other side. That way it may get a little lop sided, but it won’t get too short.
whatlifedishesout on 10.26.2010
I just oiled my non-stick loaf pan and lined it with parchment but the bread stuck like crazy to it (I wasn’t sure what you meant by “prepared pan”), so my loaf isn’t so pretty because I needed to use a knife to dislodge it. Should I have buttered the pan instead? Floured? I can tell this is going to be a nice light fluffy loaf but for next time, just wondering what I should do different to make it even better looking. Also, do you let it cool in the pan for a few minutes or just remove right to wire rack to cool?